DOM
DOM and SAX
W3C has developed a set of standard interface specifications for writing XML analyzers - DOM.
In addition, XML_ According to the requirements of the application, the members of dev mailing list also spontaneously defined a set of interface specification for operating XML documents - SAX.
These two kinds of interface specifications have their own emphases, strengths and weaknesses, and are widely used.
In the process of application development, the application does not directly operate the XML document, but first analyzes the XML document by the XML analyzer.
Then, the application operates the analysis results through the DOM interface or SAX interface provided by the XML analyzer, so as to indirectly access the XML document.
DOM introduction and analysis of advantages and disadvantages
DOM: Document Object Model.
The XML object-to-object operation of the application is usually realized by transforming the document model into an XML object-to-object collection in the DOM analyzer.
Through the DOM interface, applications can access any part of the data in XML documents at any time. Therefore, this mechanism using the DOM interface is also called random access mechanism.
The random access method provided by DOM tree brings great flexibility to the development of applications. It can arbitrarily control the content of the whole XML document.
However, because the DOM analyzer converts the whole XML document into a DOM tree and puts it in memory, when the document is large or the structure is complex, the demand for memory is relatively high.
Moreover, traversing the tree with complex structure is also a time-consuming operation.
Therefore, DOM analyzer has high requirements for machine performance, and the implementation efficiency is not very ideal.
Because the idea of tree structure adopted by Dom analyzer is consistent with the structure of XML document, and in view of the convenience brought by random access, DOM analyzer still has a wide range of application value.
Composition of DOM
For XML application development, DOM is an Object-Oriented XML data interface, a language independent and platform independent standard interface specification.
DOM defines the logical structure of HTML document and XML document, and gives a method to access and process these two documents.
Documents represent data, and DOM represents how to deal with it.
As the standard interface specification of W3C, DOM consists of three parts, including core, HTML interface and XML interface.
The core part is the collection of the underlying objects of structured documents. The objects defined in this part can express the data in any HTML and XML documents.
HTML interface and XML interface are high-level interfaces specially provided for operating specific HTML documents and XML documents
- DOM is a modeling process that organizes HTML/XML documents into object models;
- DOM modeling focuses on how to parse HTML/XML documents and open the node operation API interface that conforms to the DOM interface specification.
A DOM structure tree composed of xml is as follows
<?xml version="1.0" encoding="utf-8"?>

<bookstore>
    <book category="children">
          <title lang="en">Harry Potter</title>
          <author>J K. Rowling</author>
          <year>2005</year>
          <price>29.99</price>
    </book>

    <book category="cooking">
          <title lang="en">Everyday Italian</title>
          <author>Giada De Laurentiis</author>
          <year>2005</year>
          <price>30.00</price>
    </book>

    <book category="web">
          <title lang="en">Learning XML</title>
          <author>Erik T. Ray</author>
          <year>2003</year>
          <price>39.95</price>
    </book>

    <book category="web">
          <title lang="en">XQuery Kick Start</title>
          <author>James McGovern</author>
          <author>Per Bothner</author>
          <author>Kurt Cagle</author>
          <author>James Linn</author>
         <author>Vaidyanathan Nagarajan</author>
          <year>2003</year>
          <price>49.99</price>
    </book>

</bookstore>

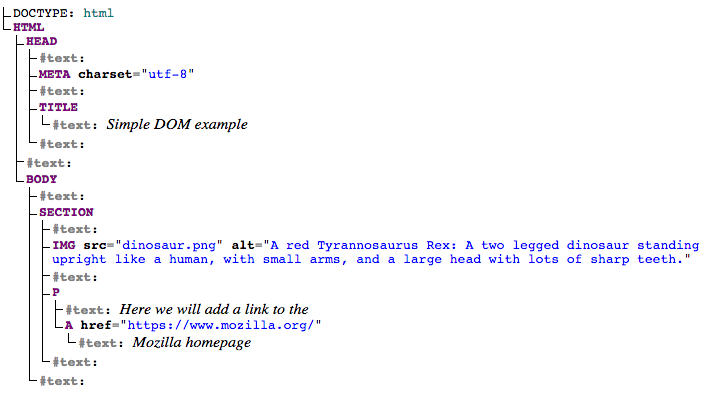
<!DOCTYPE html>
<html>
  <head>
    <meta charset="utf-8">
    <title>Simple DOM example</title>
  </head>
  <body>
      <section>
        <img src="dinosaur.png" alt="A red Tyrannosaurus Rex: A two legged dinosaur standing upright like a human, with small arms, and a large head with lots of sharp teeth.">
        <p>Here we will add a link to the <a href="https://www.mozilla.org/">Mozilla homepage</a></p>
      </section>
  </body>
</html>
Generate the following DOM structure tree
Four basic interfaces of DOM
In the DOM interface specification, there are four basic interfaces: document, node, NodeList and NamedNodeMap.
Document
The Document interface is the entry to operate on documents, which is inherited from the Node interface.
Node
The Node interface is the parent of most other interfaces.
In the DOM tree, the Node interface represents a Node in the tree.
NodeList
The NodeList interface is a collection of nodes, which contains all the child nodes in a node.
It provides an abstract definition of the node set, and does not include the definition of how to implement the node set.
NodeList is used to represent a group of nodes with sequential relationship, such as the sequence of child nodes of a node.
In DOM, the NodeList object is live. Changes to the document will be directly reflected in the relevant NodeList object.
NamedNodeMap
NamedNodeMap interface is also a collection of nodes. Through this interface, one-to-one mapping relationship between node names and nodes can be established, so that specific nodes can be accessed directly by using node names. This interface is mainly used for the representation of attribute nodes.
Although the nodes contained in NamedNodeMap can be accessed by index, it only provides an enumeration method. The nodes in the node set contained in NamedNodeMap are unordered.
Like NodeList, in DOM, the NamedNodeMap object is also live.
lightDOM & shadowDOM
Encapsulation is a basic feature of object-oriented programming. It enables programmers to restrict unauthorized access to some object components.
Under this definition, objects provide interfaces in the form of public access methods as a way to interact with their data. In this way, the internal representation of the object cannot be directly accessed by the external representation of the object.
Shadow DOM introduces this concept into HTML. It allows you to link hidden, separate DOM to elements, which means you can use the local scope of HTML and CSS. You can now use more generic CSS selectors without worrying about naming conflicts, and styles are no longer leaked or applied to inappropriate elements.
In fact, the Shadow DOM API is exactly what library and widget developers need to separate HTML structure, style, and behavior from the rest of the code.
Shadow root is the topmost node in the shadow tree. It is the content attached to the regular DOM node when creating the shadow DOM. The node with the shadow root associated with it is called shadow host.
You can attach elements to the shadow root as you would with normal DOM. Nodes linked to shadow root form a shadow tree. It should be able to express more clearly through charts:

The term light DOM is often used to distinguish between normal Dom and shadow dom. Shadow Dom and light DOM are called logical dom. The point where light DOM is separated from shadow DOM is called shadow boundary. DOM queries and CSS rules cannot reach the other side of the shadow boundary, creating encapsulation.
Create a shadow DOM
To create a shadow DOM, you need to use element The attachshadow() method attaches the shadow root to the element:
var shadowroot = element.attachShadow(shadowRootInit);
Let's take a simple example:
<div id="host"><p>Default text</p></div>

<script>
  const elem = document.querySelector('#host');

  // attach a shadow root to #host
  const shadowRoot = elem.attachShadow({mode: 'open'});

  // create a <p> element
  const p = document.createElement('p');

  // add <p> to the shadow DOM
  shadowRoot.appendChild(p);

  // add text to <p>
  p.textContent = 'Hello!';
</script>
This code attaches a shadow DOM tree to the div element, whose id is host. This tree is separate from the actual child elements of the div, and anything added to it will be a local element of the managed element.
Shadow root in Chrome DevTools.
Notice how the existing elements in #host are replaced by shadow root. Browsers that do not support shadow DOM will use the default content.
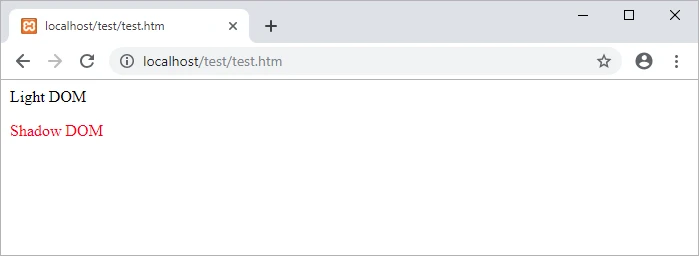
Now, when adding CSS to the main document, the style rules will not affect the shadow DOM:
<div><p>Light DOM</p></div>
<div id="host"></div>

<script>
  const elem = document.querySelector('#host');

  // attach a shadow root to #host
  const shadowRoot = elem.attachShadow({mode: 'open'});

  // set the HTML contained within the shadow root
  shadowRoot.innerHTML = '<p>Shadow DOM</p>';
</script>

<style>
  p {color: red}
</style>
Styles defined in the light DOM cannot cross the shadow boundary. Therefore, only paragraphs in the light DOM turn red.

On the contrary, the CSS you add to the shadow DOM is local to the hosting element and will not affect other elements in the DOM:
<div><p>Light DOM</p></div>
<div id="host"></div>

<script>
  const elem = document.querySelector('#host');
  const shadowRoot = elem.attachShadow({mode: 'open'});
  shadowRoot.innerHTML = `
    <p>Shadow DOM</p>
    <style>p {color: red}</style>`;

</script>
You can also put style rules in an external style sheet, as follows:
shadowRoot.innerHTML = `
  <p>Shadow DOM</p>
  <link rel="stylesheet" href="style.css">`;
To get a reference to the element to which the shadowRoot is attached, use the host attribute:
<div id="host"></div>

<script>
  const elem = document.querySelector('#host');
  const shadowRoot = elem.attachShadow({mode: 'open'});

  console.log(shadowRoot.host);    // => <div id="host"></div>
</script>
To do the opposite and get a reference to the shadow root managed by the element, you can use the shadowRoot attribute of the element:
<div id="host"></div>

<script>
  const elem = document.querySelector('#host');
  const shadowRoot = elem.attachShadow({mode: 'open'});

  console.log(elem.shadowRoot);    // => #shadow-root (open)
</script>
shadowRoot mode
When calling element When attaching the shadow root with attachshadow() method, you must specify the encapsulation mode of the shadow DOM tree by passing an object as a parameter, otherwise a TypeError will be thrown. The object must have a mode attribute with a value of open or closed.
The opened shadow root allows you to use the shadowRoot attribute of the host element to access the shadow root element from outside the root, as shown in the following example:
<div><p>Light DOM</p></div>
<div id="host"></div>

<script>
  const elem = document.querySelector('#host');

  // attach an open shadow root to #host
  const shadowRoot = elem.attachShadow({mode: 'open'});

  shadowRoot.innerHTML = `<p>Shadow DOM</p>`;
  // Nodes of an open shadow DOM are accessible
  // from outside the shadow root
  elem.shadowRoot.querySelector('p').innerText = 'Changed from outside the shadow root';
  elem.shadowRoot.querySelector('p').style.color = 'red';
</script>

However, if the value of the mode attribute is "closed", a TypeError will be thrown when trying to access the element of shadow root with JavaScript from outside root:
<div><p>Light DOM</p></div>
<div id="host"></div>

<script>
  const elem = document.querySelector('#host');

  // attach a closed shadow root to #host
  const shadowRoot = elem.attachShadow({mode: 'closed'});

  shadowRoot.innerHTML = `<p>Shadow DOM</p>`;

  elem.shadowRoot.querySelector('p').innerText = 'Now nodes cannot be accessed from outside';
  // => TypeError: Cannot read property 'querySelector' of null
</script>
When mode is set to closed, the shadowRoot property returns null. Because a null value does not have any properties or methods, calling querySelector() on it will result in TypeError. Browsers usually use closed shadow roo to make the implementation of some elements inaccessible internally and cannot be changed from JavaScript.
To determine whether the shadow DOM is in open or closed mode, you can refer to the mode attribute of shadow root:
<div id="host"></div>

<script>
  const elem = document.querySelector('#host');
  const shadowRoot = elem.attachShadow({mode: 'closed'});

  console.log(shadowRoot.mode);    // => closed
</script>
On the surface, for Web component authors who do not want to expose the shadow root of their components, the closed shadow DOM looks very convenient. However, in practice, it is not difficult to bypass the closed shadow dom. In general, the amount of work required to completely hide the shadow DOM exceeds its value.
Not all HTML elements can host shadow DOM
Only a limited set of elements can host the shadow DOM. The following table lists the supported elements:
+----------------+----------------+----------------+
|    article     |      aside     |   blockquote   |
+----------------+----------------+----------------+
|     body       |       div      |     footer     |
+----------------+----------------+----------------+
|      h1        |       h2       |       h3       |
+----------------+----------------+----------------+
|      h4        |       h5       |       h6       |
+----------------+----------------+----------------+
|    header      |      main      |      nav       |
+----------------+----------------+----------------+
|      p         |     section    |      span      |
+----------------+----------------+----------------+
Attempting to attach a shadow DOM tree to another element will result in a "DOMException" error. For example:
document.createElement('img').attachShadow({mode: 'open'});
// => DOMException
Using element as shadow host is unreasonable, so it's not surprising that this code throws an error. Another reason you may receive a DOMException error is that the browser has hosted the shadow DOM with this element.
The browser automatically attaches the shadow DOM to some elements
Shadow DOM has existed for a long time, and browsers have been using it to hide the internal structure of elements, such as and.
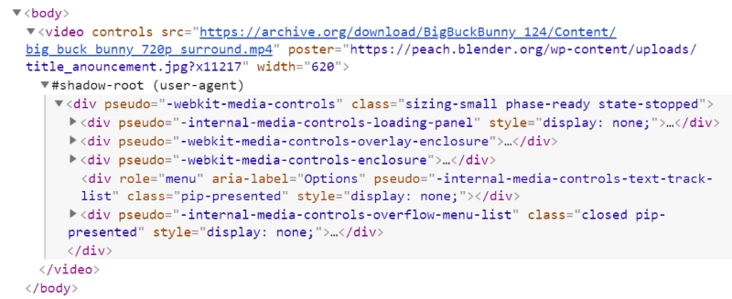
When you use elements in HTML, the browser will automatically attach the shadow DOM to the element containing the default browser control. But the only thing visible in the DOM is the element itself:

To display the shadow root of such elements in Chrome, open the Chrome DevTools setting (press F1), and then select "Show user agent shadow DOM" under the "elements" section:

When the "Show user agent shadow DOM" option is selected, the shadow root node and its child nodes will become visible. The following is how the same code is displayed when this option is enabled:
Hosting shadow DOM on custom elements
Custom elements created by the Custom Elements API can host the shadow DOM like other elements. See the following example:
<my-element></my-element>
<script>
  class MyElement extends HTMLElement {
    constructor() {

      // must be called before the this keyword
      super();

      // attach a shadow root to <my-element>
      const shadowRoot = this.attachShadow({mode: 'open'});

      shadowRoot.innerHTML = `
        <style>p {color: red}</style>
        <p>Hello</p>`;
    }
  }

  // register a custom element on the page
  customElements.define('my-element', MyElement);
</script>
This code creates a custom element that hosts the shadow DOM. It calls customelements Define () method, with element name as the first parameter and class object as the second parameter. This class extends HTMLElement and defines the behavior of the element.
In the constructor, super() is used to establish the prototype chain and attach Shadow root to the custom element. When you use it on a page, it will create its own shadow DOM:

Remember that a valid custom element cannot be a single word, and the name must contain a hyphen (-). For example, myelement cannot be used as the name of a custom element and will throw a DOMException error.
Stylize the host element
Usually, to set the style of the host element, you need to add CSS to the light DOM, because this is where the host element is located. But what if you need to set the style of the host element in the shadow DOM?
This is where the host() pseudo class function comes in. This selector allows you to access the shadow host from anywhere in the shadow root. Here is an example:
<div id="host"></div>

<script>
  const elem = document.querySelector('#host');
  const shadowRoot = elem.attachShadow({mode: 'open'});

  shadowRoot.innerHTML = `
    <p>Shadow DOM</p>
    <style>
      :host {
        display: inline-block;
        border: solid 3px #ccc;
        padding: 0 15px;
      }
    </style>`;
</script>
It is worth noting that host is only valid in shadow root. Also remember that the style rules defined outside shadow root are more specific than those defined in: host.
For example, #host {font size: 16px;} The priority of is higher than that of shadow DOM: host {font size: 20px;}. It's actually useful for the user to define the style for your component and allow it to override the default style. The only exception is! important rule, which is special in shadow dom.
You can also pass the selector as a parameter to: host(), which allows you to locate the host only if it matches the specified selector. In other words, it allows you to locate different states of the same host:
<style>
  :host(:focus) {
    /* style host only if it has received focus */
  }

  :host(.blue) {
    /* style host only if has a blue class */
  }

  :host([disabled]) {
    /* style host only if it's disabled */
  }
</style>
Context based styles
To select the shadow root host inside a specific ancestor, you can use the pseudo class function: host context(). For example:
:host-context(.main) {
  font-weight: bold;
}
Only if it is This CSS code will select shadow host only when the descendant of main:
<body class="main">
  <div id="host">
  </div>
</body>
: host context () is particularly useful for topics because it allows authors to style components according to the context in which they are used.
Style hook
An interesting thing about shadow DOM is its ability to create "style placeholders" and allow users to populate them. This can be done by using CSS custom properties. Let's take a simple example:
<div id="host"></div>

<style>
  #host {--size: 20px;}
</style>

<script>
  const elem = document.querySelector('#host');
  const shadowRoot = elem.attachShadow({mode: 'open'});

  shadowRoot.innerHTML = `
    <p>Shadow DOM</p>
    <style>p {font-size: var(--size, 16px);}</style>`;

</script>
This shadow DOM allows users to override the font size of their paragraphs. The value is set using the custom attribute notation (- size: 20px), and the shadow DOM retrieves the value with the var() function (font size: VAR ( size, 16px)). Conceptually, this is similar to how elements work.
Inheritable styles
shadow DOM allows you to create independent DOM elements without seeing selector visibility from the outside, but this does not mean that inherited attributes will not pass through shadow boundaries.
Some attributes, such as color, background, and font family, pass the shadow boundary and apply it to the shadow tree. Therefore, compared with iframe, shadow DOM is not a very powerful obstacle.
<style>
  div {
    font-size: 25px;
    text-transform: uppercase;
    color: red;
  }
</style>

<div><p>Light DOM</p></div>
<div id="host"></div>

<script>
  const elem = document.querySelector('#host');
  const shadowRoot = elem.attachShadow({mode: 'open'});

  shadowRoot.innerHTML = `<p>Shadow DOM</p>`;
</script>
The solution is simple: reset the inheritable style to its initial value by declaring all: initial, as follows:
<style>
  div {
    font-size: 25px;
    text-transform: uppercase;
    color: red;
  }
</style>

<div><p>Light DOM</p></div>
<div id="host"></div>

<script>
  const elem = document.querySelector('#host');
  const shadowRoot = elem.attachShadow({mode: 'open'});

  shadowRoot.innerHTML = `
    <p>Shadow DOM</p>
    <style>
      :host p {
        all: initial;
      }
    </style>`;
</script>
In this case, the element is forced back to its original state, so the style across the shadow boundary does not work.
Relocation event
Events triggered in the shadow DOM can cross the shadow boundary and bubble to the light DOM; However, event The value of target changes automatically, so it looks as if the event originated from the shadow tree it contains rather than the host element of the actual element.
This change is called event redirection, and the reason behind it is to preserve the shadow DOM encapsulation. Please refer to the following examples:
<div id="host"></div>

<script>
  const elem = document.querySelector('#host');
  const shadowRoot = elem.attachShadow({mode: 'open'});

  shadowRoot.innerHTML = `
    <ul>
      <li>One</li>
      <li>Two</li>
      <li>Three</li>
    <ul>
    `;

  document.addEventListener('click', (event) => {
    console.log(event.target);
  }, false);
</script>
When you click anywhere in the shadow DOM, this code will
However, retargeting does not occur in the shadow DOM. You can easily find the actual elements associated with the event:
<div id="host"></div>

<script>
  const elem = document.querySelector('#host');
  const shadowRoot = elem.attachShadow({mode: 'open'});

  shadowRoot.innerHTML = `
    <ul>
      <li>One</li>
      <li>Two</li>
      <li>Three</li>
    </ul>`;

  shadowRoot.querySelector('ul').addEventListener('click', (event) => {
    console.log(event.target);
  }, false);
</script>
Note that not all events are propagated from the shadow DOM. What those do is reposition, but others are just ignored. If you use custom events, you need to use the composed:true flag, otherwise the events will not emerge from the shadow boundary.
Shadow DOM v0 and v1
The original version of the shadow DOM specification was implemented in Chrome 25 and was called Shadow DOM v0 at that time. The new version of the specification improves many aspects of the Shadow DOM API.
For example, an element cannot host more than one shadow DOM, and some elements cannot host shadow DOM at all. Violation of these rules can lead to errors.
In addition, Shadow DOM v1 provides a set of new functions, such as turning on shadow mode, backup content, etc. You can find a comprehensive comparison between v0 and v1 written by one of the specification authors( https://hayato.io/2016/shadow …). A complete description of Shadow DOM v1 can be found in W3C.
Browser support for Shadow DOM v1
At the time of writing, Firefox and Chrome already fully support Shadow DOM v1. Unfortunately, Edge has not yet implemented V1, and Safari is only partially supported. The latest list of supported browsers is available on Can I use.
To implement shadow DOM on browsers that do not support Shadow DOM v1, you can use shadydom and shadycss polyfills.
summary
Lack of encapsulation in DOM development has always been a problem. The Shadow DOM API provides us with the ability to divide the scope of DOM, thus providing an elegant solution to this problem.
Now, style conflicts are no longer a concern, and selectors won't get out of control. shadow DOM changes the rules of the game for widget development. It can create widgets encapsulated from the rest of the page without being affected by other style sheets and scripts, which is a huge advantage.
As mentioned earlier, Web components are composed of three main technologies, and shadow DOM is the key part. Hopefully, after reading this article, it will be easier for you to understand how these three technologies work together to build Web components.
Reference link
What is DOM?
Analysis of mysterious shadow DOM
Deep understanding of Shadow DOM v1
Basic concepts of XML DOM parsing
MDN Shadow DOM