In the process of iOS development, one of the commonly used technologies is APP to upload pictures. Although this knowledge point is not difficult, the needs of uploading pictures are different. For example, sometimes you need to select a specified number of photos at the same time in the album at one time, and the number of selected pictures is uncertain, sometimes you need to call the system camera to take pictures. For this different needs of uploading photos, as long as you master the core principles of uploading photos, the rest of the content is much the same, regardless of the need for re-metamorphosis you will be able to control the edge.
This paper first introduces the principle of uploading pictures through the system album camera through the introduction of uploading a user's avatar through APP, and then the function of uploading pictures goes on naturally.
First, we should open the right of album camera in the project project project first.
In the new project, the default is not to add the open album camera privilege prompt, so developers need to add it manually, as shown in the following figure:
No previous cases were added: 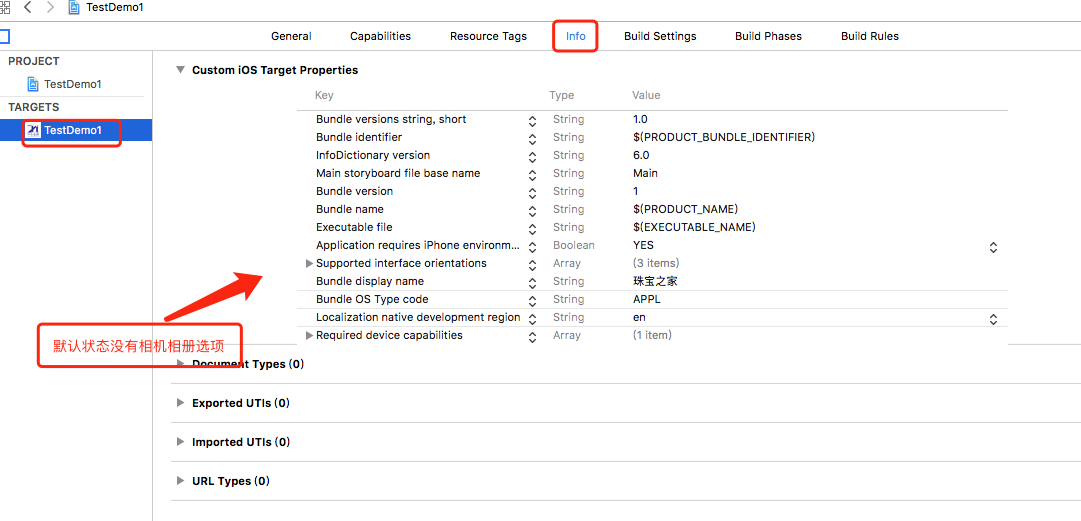
After adding: 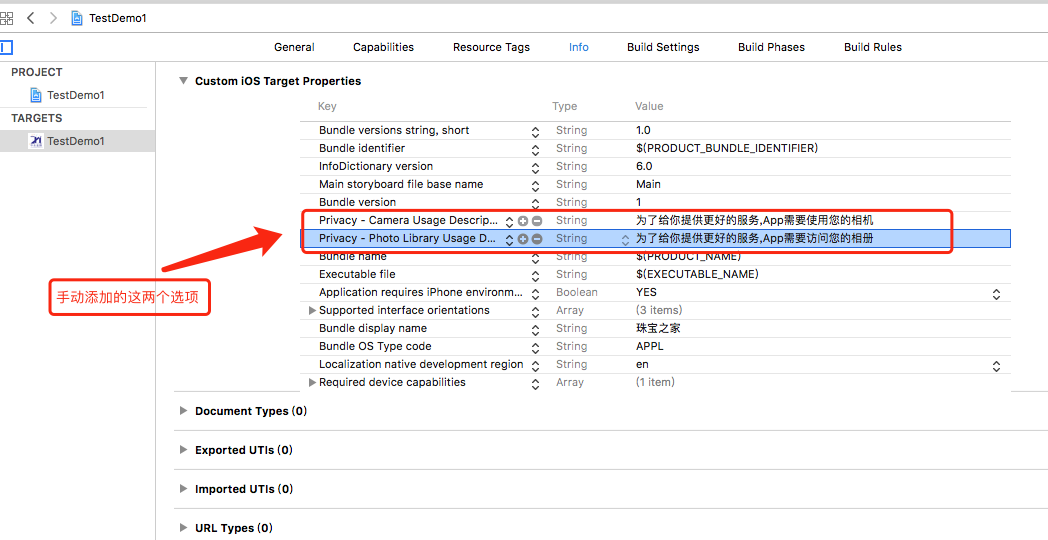
Second, create controls and set basic settings
1. Create a UIimageView control, and then set up the basic settings and initialize it.
2. Create a global UIImagePickerController object, then specify the source source source type of UIImagePickerController, the camera is UIImagePickerController SourceTypeCamera, the album is UIImagePickerController sourceType PhotoLibrary, and then follow the protocol;
3. Show the UIImagePickerController, then implement the proxy method and related invocation operations.
The protocol is declared in. m. The specific code steps are as follows:
#import "MineViewController.h"

@interface MineViewController ()<UIActionSheetDelegate,UIImagePickerControllerDelegate,UINavigationControllerDelegate> //We must declare that none of the three agreements is indispensable.

@property(nonatomic,strong) UIImagePickerController *imagePicker; //Declare global UIImagePickerController

@end
4. Initialize UIimageView settings and click event settings
Here I use the UIimageView control created by XIB. The use of pure code is not introduced here.
- (void)viewDidLoad {
    [super viewDidLoad];

    [self setImgUI];
}
- (void)setImgUI {
    //Basic settings for UIimageView
    _headerV.layer.cornerRadius = 100/2;
    _headerV.clipsToBounds = YES;
    _headerV.layer.borderWidth = 1;
    _headerV.layer.borderColor = [UIColor lightGrayColor].CGColor;
    _headerV.userInteractionEnabled = YES;
    [_headerV addGestureRecognizer:[[UITapGestureRecognizer alloc] initWithTarget:self action:@selector(headClick)]];
}
#pragma mark - click event for UI Image view of avatar-
- (void)headClick {
    //Custom message box
    UIActionSheet *sheet = [[UIActionSheet alloc] initWithTitle:@"Choice" delegate:self cancelButtonTitle:nil destructiveButtonTitle:@"cancel" otherButtonTitles:@"Photograph",@"Select from the album", nil];
    sheet.tag = 2550;
    //Display message box
    [sheet showInView:self.view];
}
#pragma mark-message box proxy implementation-
- (void)actionSheet:(UIActionSheet *)actionSheet clickedButtonAtIndex:(NSInteger)buttonIndex {
if (actionSheet.tag == 2550) {
NSUInteger sourceType = 0;
// Determine whether the system supports the camera
UIImagePickerController *imagePickerController = [[UIImagePickerController alloc] init];
if([UIImagePickerController isSourceTypeAvailable:UIImagePickerControllerSourceTypeCamera]) {
imagePickerController.delegate = self; //Setting up agents
imagePickerController.allowsEditing = YES;
imagePickerController.sourceType = sourceType; //picture source
if (buttonIndex == 0) {
return;
}else if (buttonIndex == 1) {
//Photograph
sourceType = UIImagePickerControllerSourceTypeCamera;
imagePickerController.sourceType = sourceType;
[self presentViewController:imagePickerController animated:YES completion:nil];
}else if (buttonIndex == 2){
//Album
sourceType = UIImagePickerControllerSourceTypePhotoLibrary;
imagePickerController.sourceType = sourceType;
[self presentViewController:imagePickerController animated:YES completion:nil];
}
}else {
sourceType = UIImagePickerControllerSourceTypePhotoLibrary;
imagePickerController.sourceType = sourceType;
[self presentViewController:imagePickerController animated:YES completion:nil];
}
}
}#Pagma mark - Implementing Picture Selector Agent - (The network request for uploading pictures is also done in this method, here I will not describe how to upload pictures in detail)
- (void)imagePickerController:(UIImagePickerController *)picker didFinishPickingMediaWithInfo:(NSDictionary *)info {
[picker dismissViewControllerAnimated:YES completion:^{}];
UIImage *image = [info objectForKey:UIImagePickerControllerOriginalImage]; //Get the picture through the key value
_headerV.image = image; //Apply UIimageView to selected photos
//Upload Pictures to Server - Network Request for Picture Upload here, not here
......
}//Call this method when the user cancels the selection
- (void)imagePickerControllerDidCancel:(UIImagePickerController *)picker {
[picker dismissViewControllerAnimated:YES completion:^{}];
}Above is the function of selecting pictures by calling the camera and accessing the album. The method of customizing the selection of pictures is not detailed here. I will use a single blog to introduce the method of customizing the upload of multiple pictures. Please look forward to it.