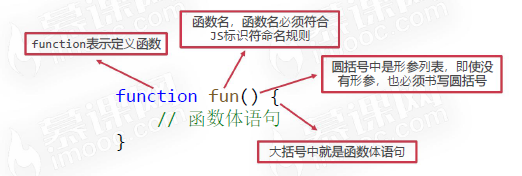
function
What is a function
- Functions are the encapsulation of statements, which can make these codes easily reused
- Function has the advantage of "one definition, multiple calls"
- Using functions can simplify the problem and make the code more readable
Function definition and call
Definition of function
- Like variables, functions must be defined before they can be used
- Use the function keyword to define a function. Function means "function"
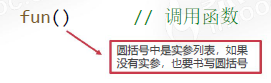
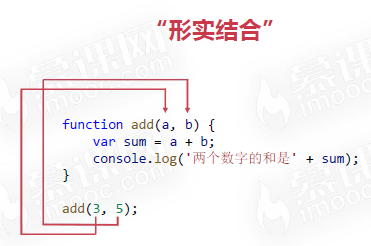
Function call
- Executing all statements in the function body is called "calling function"
- Calling a function is very simple. Just write a pair of parentheses after the function name
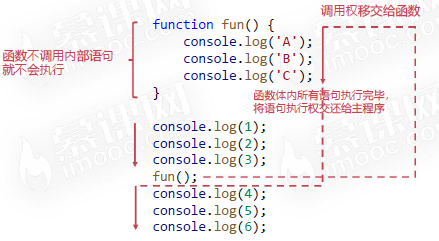
Statement execution order
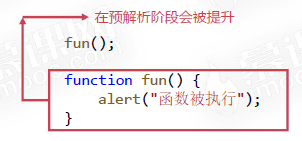
Promotion of function declaration
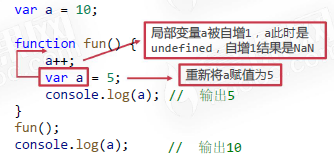
- Like variable declaration promotion, function declarations can also be promoted
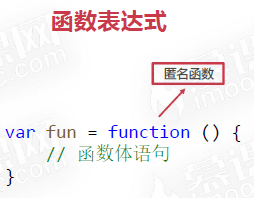
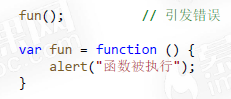
Function expression cannot be promoted
- If the function is defined in the way the function expression is written, there is no promotion feature
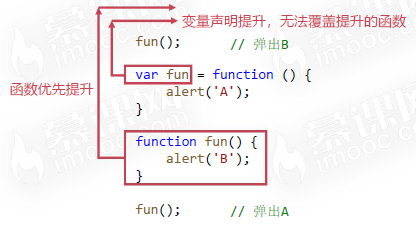
Function priority promotion
- Functions and variables are promoted at the same time
- Function promotion promotes the function declaration along with the definition
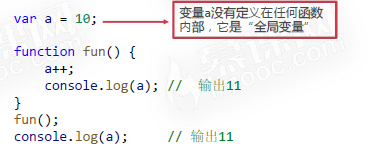
a();
function a(){
    b++;
    console.log(b)
}
var b =1;
//Output:2
fun();
var fun = function () {
    alert('A');
};
function fun() {
    alert('B');
}
fun();
// Output B A
// Due to the priority promotion of the function, the function in the form of variable expression is promoted first, and only the definition rather than the value is promoted first, resulting in the first output of B, which is overwritten after being executed to fun, so output A
Parameters and return values of the function
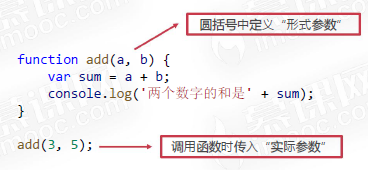
Parameters of function
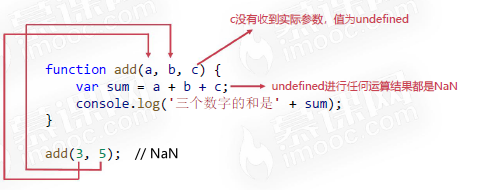
- Parameters are some undetermined values in the function. When calling the function, you must pass in the specific values of these parameters
- The parameters of the function can be more or less. The function can have no parameters or multiple parameters. Multiple parameters need to be separated by commas
The number of formal and actual parameters is different

arguments
- Arguments in the function represents the list of arguments it receives, which is a class array object.
- Class array object: all attributes are natural number sequences starting from 0 and have a length attribute. Similar to arrays, subscripts can be written in square brackets to access an attribute value of the object, but array methods cannot be called.
// No matter how many actual parameters the user passes in, their sum can always be calculated
function fun() {
    var sum = 0;
    for (var i = 0; i < arguments.length; i++) {
        sum += arguments[i];
    }
    console.log('The sum of all parameters is' + sum);
}

fun(33, 44, 23, 34);
fun(44);
fun(-3, 4);
Return value of function
- In the function body, you can use the return keyword to represent the "return value of the function"
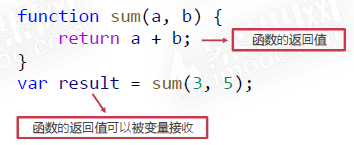
- Calling a function with a return value can be regarded as a normal value, so it can appear anywhere where the value can be written.
function sum(a, b) {
	return a + b;
}
var result = sum(3, 4) * sum(2, 6);
- Calling a function with a return value can be treated as a normal value and can appear anywhere a value can be written
function sum(a, b) {
	return a + b;
}
var result = sum(3, sum(4, 5));
Exit the function when you encounter return
- When calling a function, once a return statement is encountered, the function will exit immediately and the execution right will be returned to the caller
- When combining if statements, it is often unnecessary to write else branches
- For example, Title: please write a function to judge whether a number is even
function fun() {
    console.log('A');
    return 'B';
    console.log('C');
}
console.log(1);
var char = fun();
console.log(1+char);
console.log(2);
//Outpus:1 A 1B 2
Review shallow cloning
- Using statements like var arr2 = arr1 cannot clone arrays
- Shallow cloning: prepare an empty result array, and then use the for loop to traverse the original array, pushing the traversed items into the result array
- Shallow cloning only clones one layer of the array. If the array is a multi-dimensional array, the cloned items will be "broken".
// Prepare original array
var arr1 = [33, 44, 11, 22, [77, 88]];
// Prepare a result array
var result = [];
// Traverse the original array and push the traversed items into the result array
for(var i = 0; i < arr1.length; i++){
    result.push(arr1[i]);
}
// Output result array
console.log(result);
// Test whether cloning is implemented, that is, it is essentially a different array in memory
console.log(arr1 == result);
// Testing such clones is a shallow clone, "broken lotus roots"
arr1[4].push(99);
console.log(result);
//Output:[33, 44, 11, 22, [77, 88,99]]
Implement deep cloning
- Using the recursive idea, the overall idea is similar to that of shallow cloning, but some changes are made: if the traversed item is a basic type value, it is directly pushed into the result array; If the traversed item is an array, repeat the shallow clone operation.
 // Original array
var arr1 = [33, 44, 11, 22, [77, 88, [33, 44]]];

// Function, this function will be recursive
function deepClone(arr) {
    // Result array, "each layer" has a result array
    var result = [];
    // Traverse each item of the array
    for (var i = 0; i < arr.length; i++) {
        // Type judgment, if the traversed item is an array
        if (Array.isArray(arr[i])) {
            // recursion
            result.push(deepClone(arr[i]));
        } else {
            // If the traversed item is not an array but a basic type value, it is directly pushed into the result array,
            // Equivalent to recursive exit
            result.push(arr[i]);
        }
    }
    // Return result array
    return result;
}

// Test it
var arr2 = deepClone(arr1);
console.log(arr2);

// Is it broken
console.log(arr1[4][2] == arr2[4][2]);
arr1[4][2].push(99);
console.log(arr1);
console.log(arr2);
Global and local variables
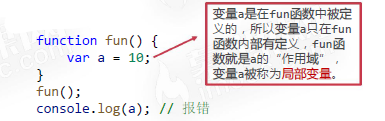
Variable scope
- JavaScript is a function level scoped programming language: variables are meaningful only within the function in which they are defined.
global variable
- If the variable is not defined inside any function, the variable is a global variable, which can be accessed and changed in any function.
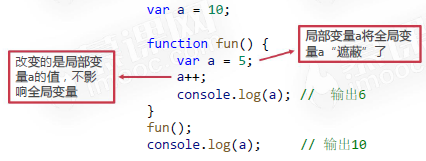
Masking effect
- If a variable with the same name as the global variable is also defined in the function, the variable in the function will "Mask" the global variable.
Variable declaration promotion
- What is the result of this program?
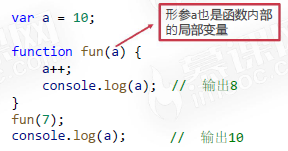
Formal parameters are also local variables
- What is the result of this program?
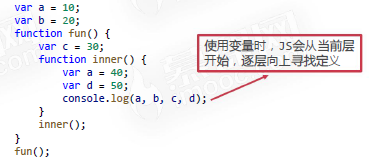
Scope chain
- Let's first understand the nesting of functions: a function can also be defined inside a function. Similar to local variables, functions defined inside a function are local functions.

- In function nesting, a variable will look for its definition layer by layer from the inside to the outside.
Global variables will be defined without var
- When assigning a value to a variable for the first time, if var is not added, the global variable will be defined.
function fun() {
	a = 3;
}
fun();
console.log(a); // 3
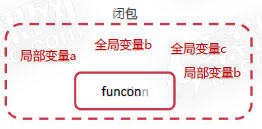
closure
What is a closure
-
Functions in JavaScript produce closure s. Closures are a combination of the function itself and the environment state in which the function is declared.
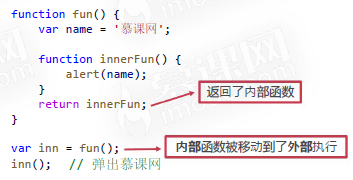
-
A function can "remember" the environment in which it is defined. Even if the function is not called in its defined environment, it can access the variables of the environment in which it is defined.
Observe closure phenomenon
- In JavaScript, closures are created every time a function is created.
- However, the closure feature often needs to execute the function "in another place" in order to be observed.
- Closures are useful because they allow us to associate data with functions that manipulate it. This is a little similar to "Object-Oriented Programming".
- Functions of closures: memory, simulation of private variables.
Closure purpose 1 - memory
- When a closure is generated, the state of the environment in which the function is located will always be kept in memory and will not be automatically cleared after the outer function is called. This is the memory of closures.
- Create a body temperature detection function checkTemp(n) to check whether the body temperature n is normal, and the function will return a Boolean value.
- However, different cells have different temperature detection standards. For example, the qualified temperature line in cell A is 37.1 ℃, while the qualified temperature line in cell B is 37.3 ℃. How should we program it?
function createCheckTemp(standardTemp) {
    function checkTemp(n) {
        if (n <= standardTemp) {
            alert('Your temperature is normal');
        } else {
            alert('Your temperature is on the high side');
        }
    }
    return checkTemp;
}

// Create a checkTemp function that takes 37.1 degrees as the standard line
var checkTemp_A = createCheckTemp(37.1);
// Then create a checkTemp function, which takes 37.3 degrees as the standard line
var checkTemp_B = createCheckTemp(37.3);

checkTemp_A(37.2);
checkTemp_A(37.0);
checkTemp_B(37.2);
checkTemp_B(37.0);
Closure purpose 2 - simulate private variables
- Title: please define a variable a. the requirement is to ensure that this a can only be used for specified operations (such as adding 1 and multiplying 2), but not other operations. How should I program it?
- In Java, C + + and other languages, there is the concept of private attributes, but JavaScript can only be simulated with closed packages.
// Encapsulate a function whose function is to privatize variables
function fun() {
    // Define a local variable a
    var a = 0;

    return {
        getA: function () {
            return a;
        },
        add: function () {
            a++;
        },
        pow: function () {
            a *= 2;
        }
    };
}

var obj = fun();
// If you want to use variable a outside the fun function, the only way is to call the getA() method
console.log(obj.getA());
// Want variable a to add 1
obj.add();
obj.add();
obj.add();
console.log(obj.getA());
obj.pow();
console.log(obj.getA());
Considerations for using closures
- Do not abuse closures, otherwise it will cause performance problems of web pages, which may lead to memory leakage in serious cases.
- The so-called memory leak means that the dynamically allocated memory in the program is not released or cannot be released for some reason.
An interview question with closure
function addCount() {
    var count = 0;
    return function () {
        count = count + 1;
        console.log(count);
    };
}
var fun1 = addCount();
var fun2 = addCount();
fun1();
fun2();
fun2();
fun1();
Execute function IIFE now
What is IIFE
- IIFE (Immediately Invoked Function Expression) is a special way to write JavaScript functions. Once defined, it will be called immediately.
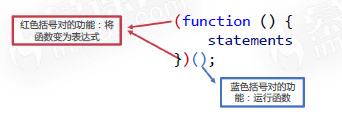
Method of forming IIFE
- Functions cannot be called directly with parentheses.
- A function must be converted to a function expression to be called.

Role of IIFE 1 - assign values to variables
- Assigning values to variables: when assigning values to variables requires some complex calculations (such as if statements), using IIFE makes the syntax more compact.
var age = 12;
var sex = 'male';
var title = (function () {
    if (age < 18) {
        return 'children'
        } else {
            if (sex == 'male') {
            	return 'sir';
            } else {
            	return 'ma'am';
        }
	}
})();
Role of IIFE - change global variables to local variables
- IIFE can change global variables into local variables on some occasions (such as in a for loop), which makes the syntax compact.
var arr = [];
for (var i = 0; i < 5; i++) {
    arr.push(function () {
        alert(i);  //Variable i is a global variable. All functions share the same variable i in memory
    });			  //Since the function is not executed, it is only called and assigned when it is called and executed, and the i at this time is already 5
}
arr[2](); // Pop up 5

var arr = [];
for (let i = 0; i < 5; i++) {
    arr.push(function () {
        alert(i);
    });
}
arr[2](); // Pop up 2

var arr = [];
for (var i = 0; i < 5; i++) {
    (function (i) {
        arr.push(function () {
        	alert(i);
        });
    })(i);
}
arr[2](); // Pop up 2
DOM
Dom basic concepts
DOM is a bridge for JS to manipulate HTML and CSS
DOM makes JS manipulation HTML more elegant
- For example, in the following HTML structure, now I want to insert a p tag pair after "milk" with JavaScript, and the content is "coke".
- Use string thinking: insert after the character with subscript 22“
cola
" (×) - Using node thinking: div is a node with three P child nodes. Now all we have to do is create a new p node and insert it after the original node 0 (√)
- Use string thinking: insert after the character with subscript 22“
<div id="box">
    <p>milk</p>
    <p>Coffee</p>
    <p>fruit juice</p>
</div>
Introduction to DOM
- DOM (Document Object Model) is an interface for JavaScript to operate HTML documents, which makes document operation very elegant and simple
- The biggest specific of DOM is to represent the document as a node tree
<!DOCTYPE html>
<html>
    <head>
        <meta charset="UTF-8">
        <title>Document</title>
    </head>
    <body>
        <h1>Muke network</h1>
        <div>
            <h2>Programmer's dream factory</h2>
            <img src="logo.png">
        	<div class="box">
        		Muke column
        	</div>
        </div>
    </body>
</html>
DOM node tree
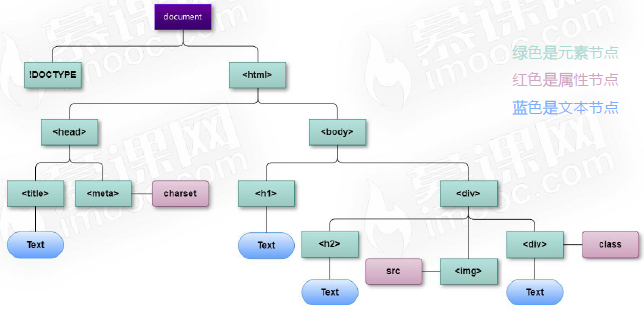
nodeType common attribute values
- The nodeType attribute of a node can display the specific type of the node
| nodeType value | Node Stereotypes |
|---|---|
| 1 | Element nodes, such as < p > and < div > |
| 3 | Text node |
| 8 | Comment Nodes |
| 9 | document node |
| 10 | DTD node |
Access element node
- The so-called "access" element node refers to the element node on the "get" and "get" pages
- The first step in operating a node is to get it
- Access to element nodes mainly depends on document objects
Understanding document objects
- Document object is the most important thing in DOM. Almost all DOM functions are encapsulated in document object
- The document object also represents the entire HTML document, which is the root of the DOM node tree
- The nodeType property value of the document object is 9
| method | function | compatibility |
|---|---|---|
| document.getElementById() | Get element array by ID | IE6 |
| document.getElementsByTagName() | Get element array by tag name | IE6 |
| document.getElementsByClassName() | Get element array by class name | IE9 |
| document.querySelector() | Get elements through selectors | IE8 partially compatible, IE9 fully compatible |
| document.querySelectorAll() | Get the element array through the selector | IE8 partially compatible, IE9 fully compatible |
getElementById()
- document. The getelementbyid () function obtains the element node by id
<div id="box">I am a box</div>
<p id="para">I am a paragraph</p>
<script>
    var box = document.getElementById('box'); //There is no need to write # numbers here
	var para = document.getElementById('para');
</script>
matters needing attention:
- If there are elements with the same id on the page, you can only get the first one
- No matter how deep an element is hidden, it can be found by id
Delayed operation
- When testing DOM code, usually JS code must be written after the HTML node, otherwise JS cannot find the corresponding HTML node
- You can use window Onload = function() {} event, so that the specified code can be executed after the page is loaded
<head>
    <meta charset="UTF-8">
    <meta http-equiv="X-UA-Compatible" content="IE=edge">
    <meta name="viewport" content="width=device-width, initial-scale=1.0">
    <title>Document</title>
    <script>
        window.onload = function(){
            var id1 = document.getElementById("id1");
            var id2 = document.getElementById("id2");
            console.log(id1);
            console.log(id2);
        }
    </script>
</head>
<body>
    <div id="id1"></div>
    <div id="id2"></div>
</body>
getElementsByTagName()
- The function of the getElementsByTagName() method is to get the node array through the tag name
<p>I'm a paragraph</p>
<p>I'm a paragraph</p>
<p>I'm a paragraph</p>
<p>I'm a paragraph</p>

<script>
    // Notice that ps here is an array
    var ps = document.getElementsByTagName('p');
</script>
matters needing attention
- The array is easy to traverse, so you can batch manipulate element nodes
- Even if there is only one node with the specified tag name on the page, you will get an array with a length of 1
- Any node element can also call the getElementsByTagName() method to get some kind of element node inside it
get ElementsByClassName()
- The function of the getElementsByClassName() method is to get the node array through the class name
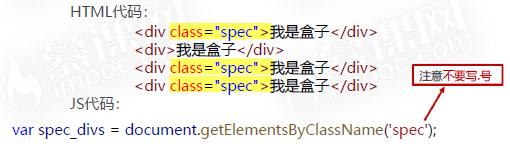
matters needing attention
- The getElementsByClassName() method is compatible from IE9
- A node element can also call the getElementsByClassName() method to get the element node of a class name inside it
querySelector()
- The function of the querySelector() method is to get the element through the selector
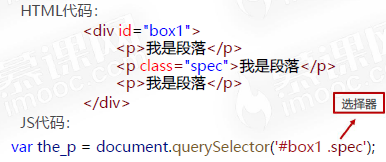
matters needing attention
- The querySelector() method can only get one element on the page. If more than one element meets the conditions, it can only get the first element
- The querySelector() method is compatible from IE8, but CSS3 selectors are supported from IE9, such as nth child(),: [src ^ = 'dog'] and other CSS3 selectors
<div id="box">
    <p>I'm a paragraph</p>
    <p class="spec para">I'm a paragraph</p>
    <p>I'm a paragraph</p>
</div>
<script>
    var the_p = document.querySelector('#box p:nth-child(1)');
    console.log(the_p);

</script>
querySelectorAll()
- The function of the querySelectorAll() method is to get the element array through the selector
- Even if there is only one node on the page that matches the selector, you will get an array of length 1
<ul id="list1">
    <li>I am li</li>
    <li>I am li</li>
    <li>I am li</li>
    <li>I am li</li>
    <li>I am li</li>
</ul>
<ul id="list2">
    <li>I am li</li>
    <li>I am li</li>
    <li>I am li</li>
    <li>I am li</li>
    <li>I am li</li>
</ul>
<script>
    var lis_inlist1 = document.querySelectorAll('#list1 li');
    console.log(lis_inlist1);
</script>
Relationship between nodes
| relationship | Consider all nodes |
|---|---|
| Child node | childNodes |
| Parent node | parentNode |
| First child node | firstChild |
| Last child node | lastChild |
| Previous sibling node | previousSibling |
| The last sibling node | nextSibling |
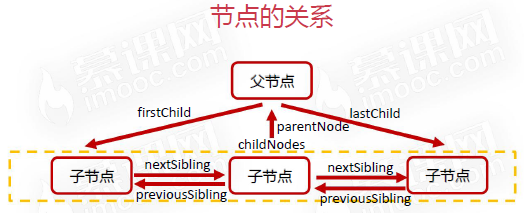
Note: text nodes are also nodes
- In DOM, text nodes also belong to nodes. You must pay attention to the relationship between nodes
- In the standard W3C specification, blank text nodes should also be counted as nodes, but there will be some compatibility problems in IE8 and previous browsers, which do not regard empty text nodes as nodes
- childNodes contains all nodes, including text nodes. The spaces between each label belong to text nodes, such as
<!DOCTYPE html>
<html lang="en">
<head>
    <meta charset="UTF-8">
    <meta http-equiv="X-UA-Compatible" content="IE=edge">
    <meta name="viewport" content="width=device-width, initial-scale=1.0">
    <title>Document</title>
</head>
<body>
    <div id="box">
        0<p>I'm a paragraph A</p>
        2
        <!-- This is a comment -->4
        <p id="para">I'm a paragraph B</p>
        6<p>I'm a paragraph C</p>8
		<p>I'm a paragraph D</p>
    </div>
    <script>
        var box = document.getElementById("box");
        console.log(box.childNodes);   //NodeList(11) [text, p, text, comment, text, p#para, text, p, text, p, text]
        console.log(box.childNodes[0]); // " 0"
        console.log(box.childNodes[2]); // " 2 "
        console.log(box.childNodes[4]); // "4 "
        console.log(box.childNodes[6]); // " 6"
		console.log(box.childNodes[8]); // "8 "
		console.log(box.childNodes[10]); // #text
    </script>
</body>
</html>
Eliminate the interference of text nodes
- Starting from IE9, some attributes of "only consider element nodes" are supported
| relationship | Consider all nodes | Only element nodes are considered |
|---|---|---|
| Child node | childNodes | children |
| Parent node | parentNode | with |
| First child node | firstChild | firstElementChild |
| Last child node | lastChild | lastElementChild |
| Previous sibling node | previousSibling | previousElementSibling |
| The last sibling node | nextSibling | nextElementSibling |
<!DOCTYPE html>
<html lang="en">
<head>
    <meta charset="UTF-8">
    <meta name="viewport" content="width=device-width, initial-scale=1.0">
    <title>Document</title>
</head>
<body>
    <div id="box">
        <p>I'm a paragraph A</p>
        <p id="para">I'm a paragraph B</p>
        <p>I'm a paragraph C</p>
    </div>

    <script>
        var box = document.getElementById('box');
        var para = document.getElementById('para');

        // All child nodes
        console.log(box.childNodes);
        // All element child nodes (IE9 compatible)
        console.log(box.children);

        // First child node
        console.log(box.firstChild);
        console.log(box.firstChild.nodeType);
        // First element child node (IE9 compatible)
        console.log(box.firstElementChild);

        // Last child node
        console.log(box.lastChild);
        console.log(box.lastChild.nodeType);
        // Last element child node (IE9 compatible)
        console.log(box.lastElementChild);

        // Parent node
        console.log(para.parentNode);

        // Previous sibling node
        console.log(para.previousSibling);
        // Previous element sibling node (IE9 compatible)
        console.log(para.previousElementSibling);

        // The last sibling node
        console.log(para.nextSibling);
        // Sibling node of the latter element (IE9 starts to be compatible)
        console.log(para.nextElementSibling);
    </script>
</body>
</html>
Write common node relationship functions
- Write IE6 compatible "find all element child nodes" function
- Write IE6 compatible "find previous element sibling node" function
- How to write a function to get all the sibling nodes of an element?
<!DOCTYPE html>
<html lang="en">

<head>
    <meta charset="UTF-8">
    <meta name="viewport" content="width=device-width, initial-scale=1.0">
    <title>Document</title>
</head>

<body>
    <div id="box">
        <p>I'm a paragraph</p>
        <p>I'm a paragraph</p>
        <p>I'm a paragraph</p>
        <p id="fpara">I'm a paragraph fpara</p>
        I'm text
        <!-- I'm a comment -->
        <p id="para">
            I'm a paragraph para
            <span>1</span>
            <span>2</span>
            <span>3</span>
        </p>
        <p>I'm a paragraph</p>
        <p>I'm a paragraph</p>
        <p>I'm a paragraph</p>
    </div>

    <script>
        var box = document.getElementById('box');
        var para = document.getElementById('para');
        var fpara = document.getElementById('fpara');

        // Encapsulates a function that can return all child element nodes of an element (compatible with IE6), similar to the function of children
        function getChildren(node) {
            // Result array
            var children = [];
            // Traverse all the child nodes of node and judge whether the nodeType attribute of each child node is 1
            // If it is 1, push the result array
            for (var i = 0; i < node.childNodes.length; i++) {
                if (node.childNodes[i].nodeType == 1) {
                    children.push(node.childNodes[i]);
                }
            }
            return children;
        }

        console.log(getChildren(box));
        console.log(getChildren(para));

        // Encapsulates a function that can return the sibling node of the previous element (compatible with IE6), similar to the function of previousElementSibling
        function getElementPrevSibling(node) {
            var o = node;
            // Using the while statement
            while (o.previousSibling != null) {
                if (o.previousSibling.nodeType == 1) {
                    // End loop, found
                    return o.previousSibling;
                }

                // Let o be its previous node, it feels a little "recursive"
                o = o.previousSibling;
            }
            return null;
        }

        console.log(getElementPrevSibling(para));
        console.log(getElementPrevSibling(fpara));

        // Encapsulates the third function, which can return all the element sibling nodes of the element
        function getAllElementSibling(node) {
            // Previous element sibling node
            var prevs = [];
            // Subsequent element sibling node
            var nexts = [];

            var o = node;
            // Traverse the nodes in front of the node
            while(o.previousSibling != null) {
                if(o.previousSibling.nodeType == 1){
                    prevs.unshift(o.previousSibling);
                }
                o = o.previousSibling;
            }

            o = node;

            // Traverse the nodes behind the node
            while(o.nextSibling != null) {
                if(o.nextSibling.nodeType == 1){
                    nexts.push(o.nextSibling);
                }
                o = o.nextSibling;
            }

            // Merge the two arrays and return
            return prevs.concat(nexts);
        }

        console.log(getAllElementSibling(para));
    </script>
</body>

</html>
How to change the content in an element node
- Two related attributes can be used to change the content in the element node:
- ① innerHTML ② innerText
- The innerHTML attribute can set the content in the node in HTML syntax
- The innerText property can only set the content in a node in plain text
<body>
    <div id="box"></div>

    <script>
        var oBox = document.getElementById('box');

        oBox.innerHTML = 'Muke network';
        oBox.innerHTML = '<ul><li>milk</li><li>Coffee</li></ul>';

        // oBox.innerText = 'muke.com';
        // oBox. InnerText = '< UL > < li > milk < / Li > < li > coffee < / Li > < / UL >';
    </script>
</body>
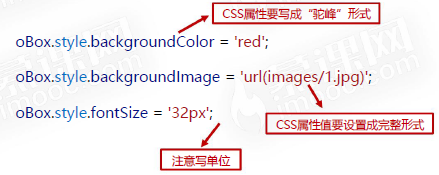
How to change the CSS style of element nodes
- To change the CSS style of an element node, you need to use the following statement:
<!DOCTYPE html>
<html lang="en">
<head>
    <meta charset="UTF-8">
    <meta name="viewport" content="width=device-width, initial-scale=1.0">
    <title>Document</title>
    <style>
        .box{
            width: 200px;
            height: 200px;
            border: 1px solid #000;
        }
    </style>
</head>
<body>
    <div class="box" id="box">
        Hello
    </div>

    <script>
        var oBox = document.getElementById('box');

        // oBox.style.backgroundColor = 'rgb(100, 200, 123)';
        // oBox.style.backgroundColor = '#f80';

        // oBox.style.backgroundImage = 'url(https://www.imooc.com/static/img/index/logo-recommended.png)';
        // oBox.style.backgroundSize = 'contain';

        oBox.style.fontSize = '50px';
    </script>
</body>
</html>
How to change the HTML attributes of element nodes
- Standard W3C attributes, such as src, href, etc., only need to be changed directly
<img src="images/1.jpg" id="pic">
    <a href="http://www.baidu.com" id="link">
        Go to Baidu
    </a>

    <script>
        var oPic = document.getElementById('pic');
        var oLink = document.getElementById('link');

        oPic.src = 'images/2.jpg';

        oLink.href = 'http://www.imooc.com';
        oLink.innerText = 'Go to muke.com';
    </script>
- Attributes that do not conform to W3C standards should be set and read using setAttribute() and getAttribute()
<div id="box"></div>

<script>
    var box = document.getElementById('box');
    box.setAttribute('data-n', 10);

    var n = box.getAttribute('data-n');
    alert(n);
</script>
Creation, removal and cloning of nodes
Node creation
- document. The createElement () method is used to create an HTML element that specifies tagName
var oDiv = document.createElement('div');
- The newly created node is an "orphan node", which means that it is not mounted on the DOM tree and we can't see it
- You must continue to use the appendChild() or insertBefore() methods to insert orphan nodes into the DOM tree
- Any node already on the DOM tree can call the appendChild() method, which can mount the orphan node inside it and become its last child node
- Parent node AppendChild (orphan node);
- Any node already on the DOM tree can call the insertBefore() method, which can mount the orphan node inside it and become the node before its "benchmark child node"
- Parent node InsertBefore (orphan node, benchmark node);
- Any node already on the DOM tree can call the appendChild() method, which can mount the orphan node inside it and become its last child node
<div id="box">
    <p>I am the original paragraph 0</p>
    <p>I am the original paragraph 1</p>
    <p>I am the original paragraph 2</p>
</div>
<script>
    var oBox = document.getElementById('box');
    var oPs = oBox.getElementsByTagName('p');

    // Create orphan node
    var oP = document.createElement('p');
    // Set internal text
    oP.innerText = 'I'm new here';

    // Go up the tree
    // oBox.appendChild(oP);
    oBox.insertBefore(oP, oPs[0]);
</script>
Small case
- Please dynamically create a table with 20 rows and 12 columns
<!DOCTYPE html>
<html lang="en">

<head>
    <meta charset="UTF-8">
    <meta name="viewport" content="width=device-width, initial-scale=1.0">
    <title>Document</title>
    <style>
        td {
            width: 20px;
            height: 20px;
            border: 1px solid #000;
        }
    </style>
</head>

<body>
    <table id="mytable"></table>

    <script>
        // Please dynamically create a table with 20 rows and 12 columns
        var mytable = document.getElementById('mytable');

        for (var i = 0; i < 20; i++) {
            // A new tr tag was created
            var tr = document.createElement('tr');
            for (var j = 0; j < 12; j++) {
                // A new td tag was created
                var td = document.createElement('td');
                // Let tr append td tag
                tr.appendChild(td);
            }
            // Let mytable append tr tag
            mytable.appendChild(tr);
        }
    </script>
</body>

</html>
- Make 99 multiplication table
<!DOCTYPE html>
<html lang="en">

<head>
    <meta charset="UTF-8">
    <meta name="viewport" content="width=device-width, initial-scale=1.0">
    <title>Document</title>
    <style>
        td {
            width: 120px;
            height: 30px;
            border: 1px solid #000;
        }
    </style>
</head>

<body>
    <table id="mytable"></table>

    <script>
        // Please create a 99 multiplication table
        var mytable = document.getElementById('mytable');

        for (var i = 1; i <= 9; i++) {
            // A new tr tag was created
            var tr = document.createElement('tr');
            for (var j = 1; j <= i; j++) {
                // A new td tag was created
                var td = document.createElement('td');
                // Set td internal text
                td.innerText = i + 'ride' + j + 'be equal to' + (i * j);
                // Let tr append td tag
                tr.appendChild(td);
            }
            // Let mytable append tr tag
            mytable.appendChild(tr);
        }
    </script>
</body>

</html>
Mobile node
- If you make a node that has been mounted on the DOM tree a parameter of appendChild() or insertBefore(), the node will be moved
- New parent node AppendChild (node that already has a parent);
- New parent node InsertBefore (nodes that already have a parent and benchmark child nodes);
- This means that a node cannot be in two places in the DOM tree at the same time
<div id="box1">
    <p id="para">I'm a paragraph</p>
</div>

<div id="box2">
    <p>I am box2 Original p label</p>
    <p>I am box2 Original p label</p>
    <p>I am box2 Original p label</p>
    <p>I am box2 Original p label</p>
</div>

<script>
    var box1 = document.getElementById('box1');
    var box2 = document.getElementById('box2');
    var para = document.getElementById('para');
    var ps_inbox2 = box2.getElementsByTagName('p');

    // box2.appendChild(para);
    box2.insertBefore(para, ps_inbox2[0]);
</script>
Delete node
- The removeChild() method deletes a child node from the DOM
- Parent node Removechild (to delete child nodes);
- A node cannot delete itself actively. It must be deleted by the parent node
<div id="box">
    <p>I am p Node 0</p>
    <p>I am p Node 1</p>
    <p>I am p Node 2</p>
</div>

<script>
    var box = document.getElementById('box');
    var the_first_p = box.getElementsByTagName('p')[0];

    box.removeChild(the_first_p);
</script>
Clone node
- cloneNode() method can clone nodes, and the cloned nodes are "orphan nodes"
- var orphan node = old node cloneNode();
- var orphan node = old node cloneNode(true);
- Parameter is a Boolean value indicating whether to adopt deep cloning: if it is true, all descendant nodes of the node will also be cloned; if it is false, only the node itself will be cloned
<div id="box1">
    <ul>
        <li>milk</li>
        <li>Coffee</li>
        <li>cola</li>
    </ul>
</div>

<div id="box2"></div>

<script>
    var box1 = document.getElementById('box1');
    var box2 = document.getElementById('box2');
    var theul = box1.getElementsByTagName('ul')[0];

    // Clone node
    var new_ul = theul.cloneNode(true);
    box2.appendChild(new_ul);
</script>
event listeners
What is "event monitoring"“
- DOM allows us to write JavaScript code to make HTML elements react to events
- What is "event": user interaction with web pages:
- When the user clicks on an element
- When the mouse moves over an element
- When the content of the text box is changed
- When the keyboard is pressed in the text box
- When the web page has been loaded
- "Listening", as the name suggests, is to enable the computer to find this event at any time, so as to execute some programs written in advance by the programmer
- There are mainly two methods for setting event listening: onxxx and addEventListener(). The former only involves the bubbling stage of the event, and the latter can select the bubbling and capture stages
The simplest way to set up event listening
-
The simplest way to set event listening for elements is to set their onxxx attribute, like this:
-
oBox.onclick = function(){ // When you click on the box, the statement here will be executed } -
oBox.addEventListener('click',function(){
    //code here
},true) //true indicates the listening and capturing stage, and false indicates the listening and bubbling stage
-
Common mouse event monitoring
| Event name | Event description |
|---|---|
| onclick | When the mouse clicks an object |
| ondbclick | When the mouse double clicks an object |
| onmousedown | When a mouse button is pressed on an object |
| onmouseup | When a mouse button is released on an object |
| onmousemove | When a mouse button is moved on an object |
| onmouseenter | When the mouse enters an object (similar event onmouseover) |
| onmouseleave | When the mouse leaves an object (similar event onmouseout) |
<!DOCTYPE html>
<html lang="en">
<head>
    <meta charset="UTF-8">
    <meta name="viewport" content="width=device-width, initial-scale=1.0">
    <title>Document</title>
    <style>
        div{
            width: 200px;
            height: 200px;
            background-color: #333;
        }
    </style>
</head>
<body>
    <div id="box"></div>

    <script>
        var oBox = document.getElementById('box');

        oBox.onclick = function() {
            console.log('I am onclick');
        };

        oBox.ondblclick = function() {  //Double click the mouse
            console.log('I am ondblclick');
        };

        oBox.onmousedown = function() {
            console.log('I am onmousedown');
        };

        oBox.onmouseup = function() {
            console.log('I am onmouseup');
        };

        oBox.onmouseenter = function() {
            console.log('I am onmouseenter');
        };

        oBox.onmouseleave = function() {
            console.log('I am onmouseleave');
        };

        oBox.onmousemove = function() {
            console.log('I am onmousemove');
        };
    </script>
</body>
</html>
Common keyboard event monitoring
| Event name | Event description |
|---|---|
| onkeypress | When a keyboard key is pressed (system buttons such as arrow keys and function keys cannot be recognized) |
| onkeydown | When a keyboard key is pressed (the system button can be recognized and occurs before onkeypress) |
| onkeyup | When a keyboard key is released |
Keyboard event monitoring
<!DOCTYPE html>
<html lang="en">
<head>
    <meta charset="UTF-8">
    <meta name="viewport" content="width=device-width, initial-scale=1.0">
    <title>Document</title>
</head>
<body>
    full name:
    <input type="text" id="nameField">

    <script>
        var nameField = document.getElementById('nameField');

        nameField.onkeydown = function () {
            console.log('I am onkeydown');  //It can monitor functional keys, such as F1-F12, Backspace, etc
        };

        nameField.onkeypress = function() { //It is not allowed to monitor functional keys, such as F1-F12, Backspace, etc
            console.log('I am onkeypress');
        }

        nameField.onkeyup = function() {
            console.log('I am onkeyup');
        }
    </script>
</body>
</html>
Form event listening
| Event name | Event description |
|---|---|
| onchange | When the user changes the content of the domain |
| onfocus | When an element gets focus (such as tab or mouse click) |
| onblur | When an element loses focus |
| onsubmit | When the form is submitted |
| onreset | When the form is reset |
<!DOCTYPE html>
<html lang="en">

<head>
    <meta charset="UTF-8">
    <meta name="viewport" content="width=device-width, initial-scale=1.0">
    <title>Document</title>
</head>

<body>
    <form id="myform">
        <p>
            full name:
            <input type="text" name="nameField">
        </p>
        <p>
            Age:
            <input type="text" name="ageField">
        </p>
        <p>
            <input type="submit">
        </p>
    </form>

    <script>
        var myform = document.getElementById('myform');
        var nameField = myform.nameField;
        var ageField = myform.ageField;

        nameField.onchange = function () {
            console.log('You have changed your name');
        };

        nameField.oninput = function () {
            console.log('You are changing your name');
        };

        nameField.onfocus = function() {
            console.log('The name box has gained focus');
        }

        nameField.onblur = function() {
             console.log('The name box has lost focus');
        }

        myform.onsubmit = function() {
            alert('You are trying to submit a form');
        }
    </script>
</body>

</html>
Common page event listening
| Event name | Event description |
|---|---|
| onload | When the page or image is finished loading |
| onunload | When the user exits the page |
Event propagation
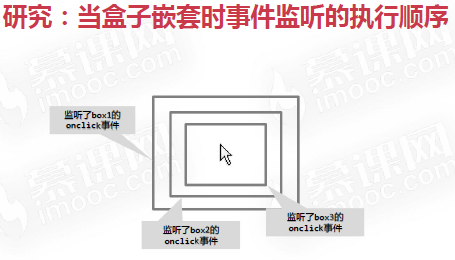
Propagation of events
- In fact, the spread of events is: first from the outside to the inside, and then from the inside to the outside

onxxx can only listen for bubbling phase
- onxxx can only monitor the bubbling stage
- DOM0 level event listening
<!DOCTYPE html>
<html lang="en">
<head>
    <meta charset="UTF-8">
    <meta name="viewport" content="width=device-width, initial-scale=1.0">
    <title>Document</title>
    <style>
        #box1{
            width: 202px;
            height: 202px;
            border: 1px solid #000;
            padding: 50px;
        }
        #box2{
            width: 100px;
            height: 100px;
            border: 1px solid #000;
            padding: 50px;
        }
        #box3{
            width: 100px;
            height: 100px;
            border: 1px solid #000;
        }
    </style>
</head>
<body>
    <div id="box1">
        <div id="box2">
            <div id="box3"></div>
        </div>
    </div>
    <script>
        var oBox1 = document.getElementById('box1');
        var oBox2 = document.getElementById('box2');
        var oBox3 = document.getElementById('box3');

        oBox2.onclick = function () {
            console.log('I am box2 of onclick');
        };

        oBox3.onclick = function () {
            console.log('I am box3 of onclick');
        };

        oBox1.onclick = function () {
            console.log('I am box1 of onclick');
        };
    </script>
</body>
</html>
addEventListener() method
-
DOM0 level event listening: only the bubbling stage can be listened to
-
oBox.onclick = function () {

};
-
-
DOM2 level event listening:
-
oBox.addEventListener('click', function () { //Event name without on
    // This is the event handler
}, true);   //true monitors the capture phase and false monitors the bubbling phase
-
matters needing attention
- The innermost element no longer distinguishes between capture and bubbling phases. It will first execute the listening written in front, and then execute the listening written after
- If the same two or more events with the same name are set for the element, the events written after the DOM 0 level writing method will overwrite the events written first; The DOM 2 level executes sequentially
DOM Level 2 event listening
<!DOCTYPE html>
<html lang="en">
<head>
    <meta charset="UTF-8">
    <meta name="viewport" content="width=device-width, initial-scale=1.0">
    <title>Document</title>
    <style>
        #box1{
            width: 202px;
            height: 202px;
            border: 1px solid #000;
            padding: 50px;
        }
        #box2{
            width: 100px;
            height: 100px;
            border: 1px solid #000;
            padding: 50px;
        }
        #box3{
            width: 100px;
            height: 100px;
            border: 1px solid #000;
        }
    </style>
</head>
<body>
    <div id="box1">
        <div id="box2">
            <div id="box3"></div>
        </div>
    </div>
    <script>
        var oBox1 = document.getElementById('box1');
        var oBox2 = document.getElementById('box2');
        var oBox3 = document.getElementById('box3');


        oBox2.addEventListener('click', function() {
            console.log('I am box2 Bubbling stage');
        }, false);


        oBox3.addEventListener('click', function() {
            console.log('I am box3 Capture phase of');
        }, true);  //The innermost element does not distinguish between capture and bubbling stages, and its writing order will affect the execution order

        oBox3.addEventListener('click', function() {
            console.log('I am box3 Bubbling stage');
        }, false);

        oBox3.onclick = function () {
            console.log('I am box3 of onclick');
        };

        oBox1.addEventListener('click', function() {
            console.log('I am box1 Bubbling stage');
        }, false);

        oBox2.addEventListener('click', function() {
            console.log('I am box2 Capture phase of');
        }, true);

        oBox1.addEventListener('click', function() {
            console.log('I am box1 Capture phase of');
        }, true);

        oBox1.onclick = function () {
            console.log('I am box1 of onclick');
        };

        oBox2.onclick = function () {
            console.log('I am box2 of onclick');
        };


    </script>
</body>
</html>
Coverage of events with the same name
<!DOCTYPE html>
<html lang="en">
<head>
    <meta charset="UTF-8">
    <meta name="viewport" content="width=device-width, initial-scale=1.0">
    <title>Document</title>
    <style>
        #box1{
            width: 202px;
            height: 202px;
            border: 1px solid #000;
            padding: 50px;
        }
        #box2{
            width: 100px;
            height: 100px;
            border: 1px solid #000;
            padding: 50px;
        }
        #box3{
            width: 100px;
            height: 100px;
            border: 1px solid #000;
        }
    </style>
</head>
<body>
    <div id="box1">
        <div id="box2">
            <div id="box3"></div>
        </div>
    </div>
    <script>
        var oBox1 = document.getElementById('box1');
        var oBox2 = document.getElementById('box2');
        var oBox3 = document.getElementById('box3');

        oBox2.onclick = function () {
            alert('A');
        };                  //DOM level 0 events will be overridden

        oBox2.onclick = function () {
            alert('B');
        };

        oBox2.addEventListener('click', function() {
            alert('C');
        }, false);

        oBox2.addEventListener('click', function() {
            alert('D');
        }, false);
    </script>
</body>
</html>
Event object
What is an event object
-
The event handler function provides a formal parameter, which is an object that encapsulates the details of this event
-
This parameter is usually represented by the word event or the letter e
-
oBox.onmousemove = function (e) {
	// Object e is the "event object" of this event
};
-
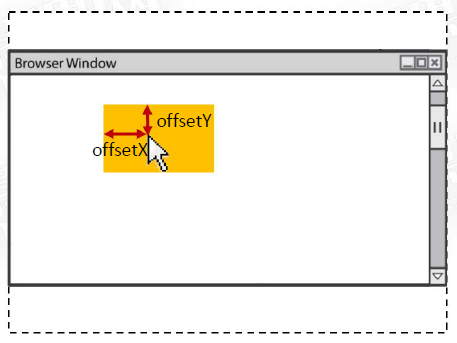
Mouse position
| attribute | Attribute description |
|---|---|
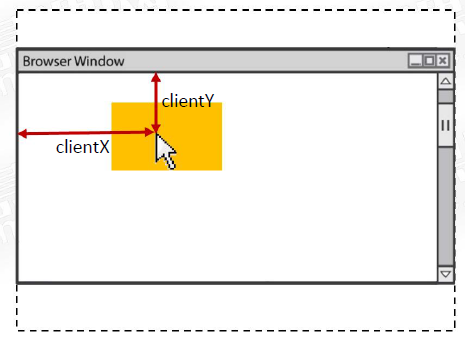
| clientX | Horizontal coordinates of the mouse pointer relative to the browser |
| clientY | The vertical coordinates of the mouse pointer relative to the browser |
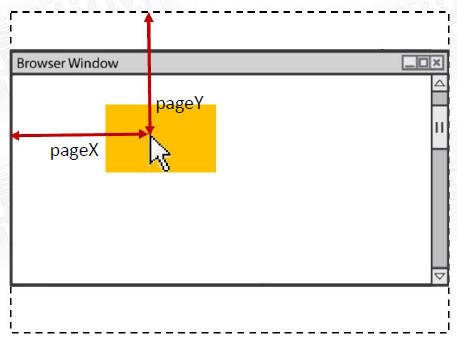
| pageX | The horizontal coordinate of the mouse pointer relative to the whole web page |
| pageY | The vertical coordinate of the mouse pointer relative to the whole web page |
| offsetX | The horizontal coordinate of the mouse pointer relative to the event source element |
| offsetY | The vertical coordinate of the mouse pointer relative to the event source element |
 <!DOCTYPE html>
<html lang="en">
<head>
    <meta charset="UTF-8">
    <meta name="viewport" content="width=device-width, initial-scale=1.0">
    <title>Document</title>
    <style>
        *{
            margin: 0;
            padding: 0;
        }
        #box{
            width: 200px;
            height: 200px;
            background-color: #333;
            margin: 100px;
        }
        body{
            height: 2000px;
        }
        #info{
            font-size: 30px;
        }

    </style>
</head>
<body>
    <div id="box">

    </div>
    <div id="info"></div>

    <script>
        var oBox = document.getElementById('box');
        var oInfo = document.getElementById('info');

        oBox.onmousemove = function (e) {
            //Note that the offsetX/Y calculation reference is the innermost child element, not the calling object
            oInfo.innerHTML = 'offsetX/Y: ' + e.offsetX + ',' + e.offsetY + '<br>'
                            + 'clientX/Y: ' + e.clientX + ',' + e.clientY + '<br>'
                            + 'pageX/Y: ' +  e.pageX + ',' + e.pageY;
        };
    </script>
</body>
</html>
e.charCode and e.keyCode attributes
- e.charCode attribute is usually used in onkeypress event to represent the "character code" of the character entered by the user
- e. The keycode attribute is usually used in onkeydown events and onkeyup, indicating the "key code" of the key pressed by the user
charCode character code
| character | Character code |
|---|---|
| Number 0-9 | 48-57 |
| Capital letters A-Z | 65-90 |
| Small letter a-z | 97-122 |
keyCode key code
| Key | Key code |
|---|---|
| Digit 0 ~ digit 9 | 48 ~ 57 (the same as charCode key code) |
| Letters regardless of size a ~ z | 65 ~ 90 (the same as the capital letters A ~ Z of charCode key code, and the keyCode is 65 ~ 90 regardless of case) |
| Four direction keys ←↑→↓ | 37,38,39,40 |
| enter key | 13 |
| Space bar | 32 |
<!DOCTYPE html>
<html lang="en">

<head>
    <meta charset="UTF-8">
    <meta name="viewport" content="width=device-width, initial-scale=1.0">
    <title>Document</title>
</head>

<body>
    <input type="text" id="field1">
    <h1 id="info1"></h1>
    <input type="text" id="field2">
    <h1 id="info2"></h1>

    <script>
        var oField1 = document.getElementById('field1');
        var oInfo1 = document.getElementById('info1');
        var oField2 = document.getElementById('field2');
        var oInfo2 = document.getElementById('info2');

        oField1.onkeypress = function (e) {
            oInfo1.innerText = 'The character code of the character you entered is' + e.charCode;
        };

        oField2.onkeydown = function (e) {
            oInfo2.innerText = 'The key code of the key you pressed is' + e.keyCode;
        };
    </script>
</body>

</html>
Small case 1: movement of small box
<!DOCTYPE html>
<html lang="en">

<head>
    <meta charset="UTF-8">
    <meta name="viewport" content="width=device-width, initial-scale=1.0">
    <title>Document</title>
    <style>
        #box {
            position: absolute;
            top: 200px;
            left: 200px;
            width: 100px;
            height: 100px;
            background-color: orange;
        }
    </style>
</head>

<body>
    <div id="box"></div>

    <script>
        var oBox = document.getElementById('box');

        // Global variables t and l represent the top attribute value and left attribute value of the box respectively
        var t = 200;
        var l = 200;

        // Listen to the keyboard pressing event of the document object, which means that when the user presses a key on the whole web page
        document.onkeydown = function (e) {
            switch (e.keyCode) {
                case 37:
                    l -= 3;
                    break;
                case 38:
                    t -= 3;
                    break;
                case 39:
                    l += 3;
                    break;
                case 40:
                    t += 3;
                    break;
            }

            // Change style
            oBox.style.left = l + 'px';
            oBox.style.top = t + 'px';
        };
    </script>
</body>

</html>
e.preventDefault() method
- e. The preventdefault () method is used to prevent the "default action" generated by the event
- Some special business requirements need to prevent the "default action" of events
Small case 2: making a text box can only let users input lowercase letters and numbers in it, and other characters have no effect
<!DOCTYPE html>
<html lang="en">

<head>
    <meta charset="UTF-8">
    <meta name="viewport" content="width=device-width, initial-scale=1.0">
    <title>Document</title>
</head>

<body>
    <p>
        Only lowercase letters and numbers can be entered:
        <input type="text" id="field">
    </p>
    <script>
        var oField = document.getElementById('field');

        oField.onkeypress = function (e) {
            console.log(e.charCode);

            // Character code (e.charCode) according to the character entered by the user
            // Numbers 0 ~ 9, character codes 48 ~ 57
            // Lowercase a~z, character codes 97 ~ 122
            if (!(e.charCode >= 48 && e.charCode <= 57 || e.charCode >= 97 && e.charCode <= 122)) {
                // Block browser default behavior
                e.preventDefault();
            }
        };
    </script>
</body>

</html>
Small case 3: preventDefault() method 2
- Create mouse wheel event: when the mouse scrolls down in the box, the number is increased by 1, otherwise it is reduced by 1
- The mouse wheel event is onmousewheel. Its event object e provides the delta attribute to indicate the mouse scrolling direction. It returns a positive value when scrolling down and a negative value when scrolling up
<!DOCTYPE html>
<html lang="en">

<head>
    <meta charset="UTF-8">
    <meta name="viewport" content="width=device-width, initial-scale=1.0">
    <title>Document</title>
    <style>
        #box {
            width: 200px;
            height: 200px;
            background-color: #333;
        }
        body{
            height: 2000px;
        }
    </style>
</head>

<body>
    <div id="box"></div>
    <h1 id="info">0</h1>

    <script>
        var oBox = document.getElementById('box');
        var oInfo = document.getElementById('info');

        // The global variable is the number displayed in info
        var a = 0;

        // Add mouse wheel event monitoring to box
        oBox.onmousewheel = function (e) {
            // Block default event: that is, when the user scrolls the mouse wheel in the box, the scrolling of the page scroll bar will not be triggered at this time
            e.preventDefault();

            if (e.deltaY > 0) {
                a++;
            } else {
                a--;
            }
            oInfo.innerText = a;
        }
    </script>
</body>

</html>
e. stopPropagation() method
- e. The stoppropagation () method is used to prevent the event from continuing to propagate
- On some occasions, it is very necessary to cut off the event to continue propagation, otherwise the page effect will show bug s
<!DOCTYPE html>
<html lang="en">

<head>
    <meta charset="UTF-8">
    <meta name="viewport" content="width=device-width, initial-scale=1.0">
    <title>Document</title>
    <style>
        div{
            width: 200px;
            height: 200px;
            background-color: #333;
        }
    </style>
</head>

<body>
    <div id="box">
        <button id="btn">Press me</button>
    </div>
    <script>
        var oBox = document.getElementById('box');
        var oBtn = document.getElementById('btn');

        // oBox.onclick = function () {
        //     console.log('I am a box ');
        // };

        // oBtn.onclick = function (e) {
        //     Prevent the event from spreading during the bubbling phase
        //     e.stopPropagation();
        //     console.log('I am the button ');
        // };

        oBox.addEventListener('click', function(e) {
            // Prevent events from continuing to propagate during the capture phase
            e.stopPropagation();
            console.log('I'm a box');
        }, true);

        oBtn.addEventListener('click', function() {
            console.log('I'm the button');
        }, true);
    </script>
</body>

</html>
Small case: make a pop-up layer: click the button to display the pop-up layer, click anywhere on the web page, and the pop-up layer will be closed
<!DOCTYPE html>
<html lang="en">

<head>
    <meta charset="UTF-8">
    <meta name="viewport" content="width=device-width, initial-scale=1.0">
    <title>Document</title>
    <style>
        .modal {
            width: 400px;
            height: 140px;
            background-color: #333;
            position: absolute;
            top: 50%;
            left: 50%;
            margin-top: -70px;
            margin-left: -200px;
            display: none;
        }
    </style>
</head>

<body>
    <button id="btn">Press me to pop up the layer</button>
    <div class="modal" id="modal"></div>

    <script>
        var oBtn = document.getElementById('btn');
        var oModal = document.getElementById('modal');

        // When you click the button, the layer display will pop up
        oBtn.onclick = function (e) {
            // Prevent the event from spreading to the document
            e.stopPropagation();
            oModal.style.display = 'block';
        };

        // When you click on any part of the page, the pop-up layer closes
        document.onclick = function () {
            oModal.style.display = 'none';
        };

        // When clicking inside the pop-up layer, you cannot close the pop-up layer, so you should prevent the event from spreading
        oModal.onclick = function (e) {
            // Prevent the event from spreading to the document
            e.stopPropagation();
        };
    </script>
</body>

</html>
Event delegation
Batch add event listening
- Title: there is an unordered list on the page
- , there are 20 in it
- Elements, please add click event monitoring to them in batch to achieve the effect: Click
- Element, which
- The element turns red
Performance problems of batch adding event listening
- Each event listening registration will consume a certain amount of system memory, and adding events in batch will lead to too many listeners and very large memory consumption
- In fact, every
- The event handling functions of are different functions, and these functions themselves will occupy memory
<!DOCTYPE html>
<html lang="en">

<head>
    <meta charset="UTF-8">
    <meta name="viewport" content="width=device-width, initial-scale=1.0">
    <title>Document</title>
</head>

<body>
    <ul id="list">
        <li>List item</li>
        <li>List item</li>
        <li>List item</li>
        <li>List item</li>
        <li>List item</li>
        <li>List item</li>
        <li>List item</li>
        <li>List item</li>
        <li>List item</li>
        <li>List item</li>
        <li>List item</li>
        <li>List item</li>
        <li>List item</li>
        <li>List item</li>
        <li>List item</li>
        <li>List item</li>
        <li>List item</li>
        <li>List item</li>
        <li>List item</li>
        <li>List item</li>
    </ul>

    <script>
        var oList = document.getElementById('list');
        var lis = oList.getElementsByTagName('li');

        // Write loop statements and add listeners to elements in batches
        for (var i = 0; i < lis.length; i++) {
            lis[i].onclick = function () {
                // In this function, this represents the element clicked
                this.style.color = 'red';
            };
        }
    </script>
</body>

</html>
New element dynamic binding event
- Title: there is an unordered list on the page
- No, it's not inside
- Element, please make a button. Click this button to add one
- Element. And require each additional
- The element should also have click event monitoring to realize the effect. Which click
- Element, which
- The element turns red
Problems with dynamically binding events
- Event listeners must be added separately for new elements. Event listeners cannot be obtained automatically
- A large number of event listening and event handling functions will consume a lot of memory
<!DOCTYPE html>
<html lang="en">

<head>
    <meta charset="UTF-8">
    <meta name="viewport" content="width=device-width, initial-scale=1.0">
    <title>Document</title>
</head>

<body>
    <button id="btn">Press me to add a new li List item</button>
    <ul id="list"></ul>
    <script>
        var oBtn = document.getElementById('btn');
        var oList = document.getElementById('list');
        var lis = oList.getElementsByTagName('li');

        // Button click event
        oBtn.onclick = function () {
            // Create a new li list item, orphan node
            var oLi = document.createElement('li');
            oLi.innerHTML = 'I'm a list item';
            // Go up the tree
            oList.appendChild(oLi);
            // Add onclick event listener to the newly created li node
            oLi.onclick = function () {
                this.style.color = 'red';
            };
        };
    </script>
</body>
</html>
Event delegation
- Event bubbling mechanism is used to delegate descendant element events to ancestor elements
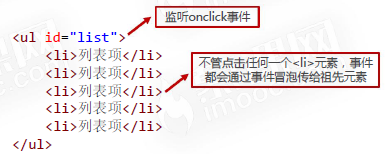
- Event delegates usually need to use the e.target attribute in combination
| attribute | Attribute description |
|---|---|
| target | The earliest element that triggered this event, i.e. "event source element" |
| currentTarget | The element to which the event handler is attached |
<!DOCTYPE html>
<html lang="en">

<head>
    <meta charset="UTF-8">
    <meta name="viewport" content="width=device-width, initial-scale=1.0">
    <title>Document</title>
</head>

<body>
    <button id="btn">Press me to create a new list item</button>
    <ul id="list">
        <li>List item</li>
        <li>List item</li>
        <li>List item</li>
    </ul>
    <script>
        var oList = document.getElementById('list');
        var oBtn = document.getElementById('btn');

        oList.onclick = function (e) {
            // e.target represents the element that the user actually clicked on
            e.target.style.color = 'red';
            //e.currentTarget represents the element to which the currently clicked event handler is attached, similar to this
             //e.currentTarget.style.backgroundColor = 'red';
        };

        oBtn.onclick = function () {
            // Create a new li element
            var oLi = document.createElement('li');
            // Write content
            oLi.innerText = 'I'm new here';
            // Go up the tree
            oList.appendChild(oLi);
        };
    </script>
</body>

</html>
Usage scenario of event delegation
- When a large number of similar elements need to add event listeners in batch, using event delegates can reduce memory overhead
- When there is a dynamic element node on the tree, the event delegate can be used to enable the new element on the tree to have event listening
Considerations when using event delegation
- Onmousenter and onmouseover both mean "mouse entry". What's the difference between them?
- A: onmousenter does not bubble, onmouseover bubbles.
- When using event delegation, you should note that you cannot delegate non bubbling events to ancestor elements
<!DOCTYPE html>
<html lang="en">

<head>
    <meta charset="UTF-8">
    <meta name="viewport" content="width=device-width, initial-scale=1.0">
    <title>Document</title>
</head>

<body>
    <button id="btn">Press me to create a new list item</button>
    <ul id="list">
        <li>List item</li>
        <li>List item</li>
        <li>List item</li>
    </ul>
    <script>
        var oList = document.getElementById('list');
        var oBtn = document.getElementById('btn');

        // The onmousenter attribute is naturally "non bubbling", which is equivalent to the DOM node to which your event handler function is attached
        // It is the event triggered by the DOM node itself. There is no bubbling process. At this time, the e.target represents oList
        // Note that the target element is the innermost element. Otherwise, the result may be abnormal
        oList.onmouseover = function (e) {    // onmouseover
            // e.target represents the element that the user actually clicked on
            e.target.style.color = 'red';
        };

        oBtn.onclick = function () {
            // Create a new li element
            var oLi = document.createElement('li');
            // Write content
            oLi.innerText = 'I'm new here';
            // Go up the tree
            oList.appendChild(oLi);
        };
    </script>
</body>

</html>
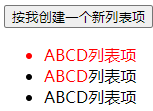
- The innermost element cannot have additional inner elements, such as:
<ul id="list">
    <li><span>I am span</span>List item</li>
    <li><span>I am span</span>List item</li>
    <li><span>I am span</span>List item</li>
</ul>
<!DOCTYPE html>
<html lang="en">

<head>
    <meta charset="UTF-8">
    <meta name="viewport" content="width=device-width, initial-scale=1.0">
    <title>Document</title>
</head>

<body>
    <button id="btn">Press me to create a new list item</button>
    <ul id="list">
        <li><span>ABCD</span>List item</li>
        <li><span>ABCD</span>List item</li>
        <li><span>ABCD</span>List item</li>
    </ul>
    <script>
        var oList = document.getElementById('list');
        var oBtn = document.getElementById('btn');

        oList.onclick = function (e) {
            // e.target represents the element that the user actually clicked on
            e.target.style.color = 'red';
        };

        oBtn.onclick = function () {
            // Create a new li element
            var oLi = document.createElement('li');
            // Write content
            oLi.innerText = 'I'm new here';
            // Go up the tree
            oList.appendChild(oLi);
        };
    </script>
</body>

</html>
Timer and delay
timer
- The setInterval() function can call a function repeatedly with a fixed time interval between each call
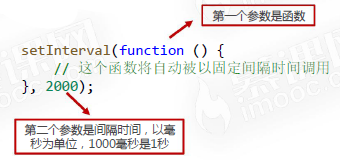
- The setInterval() function can receive the 3rd, 4th... Parameters, which will be passed into the function in order

- Named functions can also be passed in setInterval
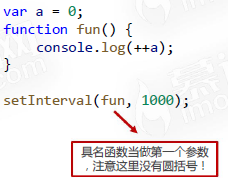
var a = 0;
setInterval(function () {
console.log(++a);
}, 1000);
var b = 0;
function fun(s,q){
console.log(++a);
}
setInterval(fun,1000,88,66); //Starting with the third parameter, it represents the parameters passed into the function
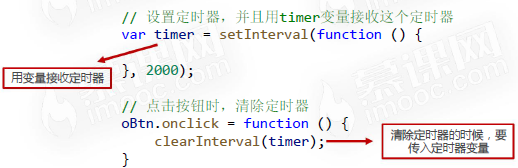
var timer = setInterval(function(){},2000);
oBtn.onclick = function(){ //Click the button to clear the timer
clearInterval(timer);
}
Clear timer
- The clearInterval() function clears a timer
Timer small case
 <!DOCTYPE html>
<html lang="en">

<head>
    <meta charset="UTF-8">
    <meta http-equiv="X-UA-Compatible" content="IE=edge">
    <meta name="viewport" content="width=device-width, initial-scale=1.0">
    <title>Document</title>
</head>

<body>
    <h1 id="info">0</h1>
    <button id="btn1">Start</button>
    <button id="btn2">Stop</button>
    <script>
        var oInfo = document.getElementById('info');
        var oBtn1 = document.getElementById('btn1');
        var oBtn2 = document.getElementById("btn2");
        var a = 0;
        var timer;
        oBtn1.onclick = function () {
            clearInterval(timer); //Note that here, in order to prevent the acceleration caused by timer superposition after multiple clicks on the timer
            timer = setInterval(function () {
                oInfo.innerText = ++a;
            }, 1000);
        };
        oBtn2.onclick = function(){
            clearInterval(timer);
        }
    </script>
</body>

</html>
Delay device
- The setTimeout() function can set a delayer. When the specified time expires, the function will be executed once and will not be repeated.
setTimeout(function () {
	// This function will execute once in 2 seconds
}, 2000);
Clear delay
- The clearTimeout() function can clear the delayer, which is very similar to clearInterval()
var timer = setTimeout(function(){
            console.log('A')
        },2000);
clearTimeout(timer);
Small case
<!DOCTYPE html>
<html lang="en">

<head>
    <meta charset="UTF-8">
    <meta name="viewport" content="width=device-width, initial-scale=1.0">
    <title>Document</title>
</head>

<body>
    <button id="btn1">2 Pop up in seconds hello</button>
    <button id="btn2">Cancel Popup</button>

    <script>
        var btn1 = document.getElementById('btn1');
        var btn2 = document.getElementById('btn2');
        var timer;

        btn1.onclick = function() {
            timer = setTimeout(function () {
                alert('Hello');
            }, 2000);
        }

        btn2.onclick = function() {
            clearTimeout(timer);
        }
    </script>
</body>

</html>
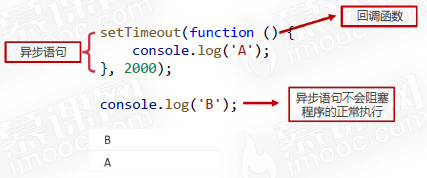
Asynchronous statement
- setInterval() and setTimeout() are asynchronous statements
- Asynchronous: the CPU will not be blocked from executing other statements. When the asynchronous is completed, the "callback function" will be executed
Animating with timers
Animating with timers
- The use of timers can achieve animation, using the principle of "visual persistence"
- It is inconvenient to use timer to realize Animation:
① It is not convenient to calculate the step size based on the total animation time
② The movement direction shall be set to positive and negative
③ It is difficult to stack multiple movements (for example, a square becomes a circle while moving)
<!DOCTYPE html>
<html lang="en">

<head>
    <meta charset="UTF-8">
    <meta name="viewport" content="width=device-width, initial-scale=1.0">
    <title>Document</title>
    <style>
        #box {
            position: absolute;
            top: 100px;
            left: 100px;
            width: 100px;
            height: 100px;
            background-color: orange;
        }
    </style>
</head>

<body>
    <button id="btn">Start moving</button>
    <div id="box"></div>

    <script>
        // Get element
        var btn = document.getElementById('btn');
        var box = document.getElementById('box');

        // The left value of the global variable box
        var left = 100;

        // Button monitor
        btn.onclick = function () {
            var timer = setInterval(function () {
                // Change global variables
                left += 10;
                if (left >= 1000) {
                    clearInterval(timer);
                }
                // Set the left property
                box.style.left = left + 'px';
            }, 20);
        };
    </script>
</body>

</html>
JS and CSS3 combine to realize animation
- We know that the transition attribute of CSS3 can realize animation
- JavaScript can easily implement elements using the transition attribute of CSS3
animation - JS and CSS3 combine to realize animation, which avoids the disadvantage of timer animation
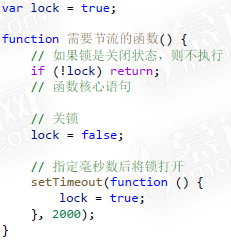
Function throttling
- Function throttling: after a function is executed once, the second execution is allowed only after it is greater than the set execution cycle
- Function throttling is very easy to implement with the help of setTimeout() delayer
<!DOCTYPE html>
<html lang="en">

<head>
    <meta charset="UTF-8">
    <meta name="viewport" content="width=device-width, initial-scale=1.0">
    <title>Document</title>
    <style>
        #box {
            width: 100px;
            height: 100px;
            background-color: orange;
            position: absolute;
            top: 100px;
            left: 100px;
        }
    </style>
</head>

<body>
    <button id="btn">Press me to exercise</button>
    <div id="box"></div>

    <script>
        // Get element
        var btn = document.getElementById('btn');
        var box = document.getElementById('box');

        // Identification quantity, indicating whether the current box is on the left or right
        var pos = 1;    // 1 left, 2 right

        // Function throttle lock
        var lock = true;

        // event listeners
        btn.onclick = function () {
            // First check whether the lock is closed
            if (!lock) return;

            // Add transition
            box.style.transition = 'all 2s linear 0s';
            if (pos == 1) {
                // Instantaneous movement, but due to the transition, it is animation
                box.style.left = '1100px';
                pos = 2;
            } else if (pos == 2) {
                // Instantaneous movement, but due to the transition, it is animation
                box.style.left = '100px';
                pos = 1;
            }

            // close and lock
            lock = false;
            // After the specified time, open the lock
            setTimeout(function() {
                lock = true;
            }, 2000);
        };
    </script>
</body>

</html>
Animation effect development
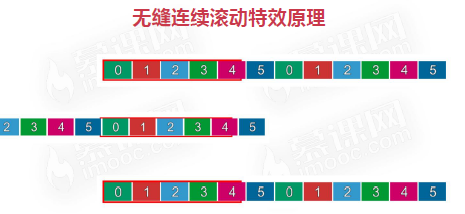
Animation effect development 1 - Seamless continuous rolling effect

<!DOCTYPE html>
<html lang="en">
<head>
    <meta charset="UTF-8">
    <meta http-equiv="X-UA-Compatible" content="IE=edge">
    <meta name="viewport" content="width=device-width, initial-scale=1.0">
    <title>Document</title>
    <style>
         * {
            margin: 0;
            padding: 0;
        }

        .box {
            width: 1000px;
            height: 130px;
            /* border: 1px solid #000; */
            margin: 50px auto;
            overflow: hidden;
        }

        .box ul {
            list-style: none;
            /* Set it larger so that li can float */
            width: 5000px;
            position: relative;
        }

        .box ul li {
            float: left;
            margin-right: 10px;
        }


    </style>
</head>
<body>
    <div id="box" class="box">
        <ul id="list">
            <li><img src="img/0.png" alt=""></li>
            <li><img src="img/1.png" alt=""></li>
            <li><img src="img/2.png" alt=""></li>
            <li><img src="img/3.png" alt=""></li>
            <li><img src="img/4.png" alt=""></li>
            <li><img src="img/5.png" alt=""></li>
        </ul>
    </div>
    <script>
        var box = document.getElementById("box");
        var list = document.getElementById('list');
        list.innerHTML += list.innerHTML;

        var left = 0;
        var timer;

        move();

        function move(){
            clearInterval(timer);
            timer = setInterval(function(){
                left -= 4;
                if(left<= -1260) left = 0;  //210*6=1260
                list.style.left=left+'px';
            },20);
        }
        box.onmouseenter =function(){
            clearInterval(timer);
        }
        box.onmouseleave = function(){
            move();
        }
    </script>
</body>
</html>
Case 2: horse racing car rotation map

<!DOCTYPE html>
<html lang="en">
<head>
    <meta charset="UTF-8">
    <meta name="viewport" content="width=device-width, initial-scale=1.0">
    <title>Document</title>
    <style>
        *{
            margin: 0;
            padding: 0;
        }
        .carousel {
            width: 650px;
            height: 360px;
            border: 1px solid #000;
            margin: 50px auto;
            position: relative;
            overflow: hidden;
        }
        .carousel ul {
            list-style: none;
            width: 6000px;
            position: relative;
            left: 0px;
            transition: left .5s ease 0s;
        }
        .carousel ul li {
            float: left;
        }
        .carousel .leftbtn {
            position: absolute;
            left: 20px;
            top: 50%;
            margin-top: -25px;
            width: 50px;
            height: 50px;
            background-color: rgb(28, 180, 226);
            border-radius: 50%;
        }
        .carousel .rightbtn {
            position: absolute;
            right: 20px;
            top: 50%;
            margin-top: -25px;
            width: 50px;
            height: 50px;
            background-color: rgb(28, 180, 226);
            border-radius: 50%;
        }
    </style>
</head>
<body>
    <div class="carousel">
        <ul id="list">
            <li><img src="images/beijing/0.jpg" alt=""></li>
            <li><img src="images/beijing/1.jpg" alt=""></li>
            <li><img src="images/beijing/2.jpg" alt=""></li>
            <li><img src="images/beijing/3.jpg" alt=""></li>
            <li><img src="images/beijing/4.jpg" alt=""></li>
        </ul>
        <a href="javascript:;" class="leftbtn" id="leftbtn"></a>
        <a href="javascript:;" class="rightbtn" id="rightbtn"></a>
    </div>
    <script>
        // Get the button and ul, ul move as a whole
        var leftbtn = document.getElementById('leftbtn');
        var rightbtn = document.getElementById('rightbtn');
        var list = document.getElementById('list');

        // Clone the first picture
        var cloneli = list.firstElementChild.cloneNode(true);
        list.appendChild(cloneli);

        // Which page is currently ul displayed, starting from 0
        var idx = 0;

        // Throttle lock
        var lock = true;

        // Right button monitoring
        rightbtn.onclick = function () {
            // Judge the state of the lock
            if (!lock) return;

            lock = false;

            // Add transition to the list, why add?? Isn't it already added in css?? This is because the last picture will remove the transition
            list.style.transition = 'left .5s ease 0s';
            idx ++;
            if (idx > 4) {
                // Set a delayer. The function of the delayer is to instantly pull ul back to the position of 0. The purpose of the delayer is to make the transition animation complete
                setTimeout(function() {
                    // Cancel the transition, because you want to move instantly, not "Gulu" back
                    list.style.transition = 'none';
                    list.style.left = 0;
                    idx = 0;
                }, 500);
            }
            list.style.left = -idx * 650 + 'px';

            // Function throttling
            setTimeout(function() {
                lock = true;
            }, 500);
        }

        // Left button monitoring
        leftbtn.onclick = function () {
            if (!lock) return;

            lock = false;

            // Judge whether it is the first 0. If it is, it is necessary to instantly replace the true with the false
            if (idx == 0) {
                // Cancel the transition, because you want to move instantly, not "grunt" the past
                list.style.transition = 'none';
                // Move directly and instantaneously to the last fake picture
                list.style.left = -5 * 650 + 'px';
                // Set a delay device. The delay time of this delay device can be 0 Ms. although it is 0 ms, it can allow us to cancel the transition immediately, and then add it
                setTimeout(function() {
                    // Plus transition
                    list.style.transition = 'left .5s ease 0s';
                    // Change idx to the real last one
                    idx = 4;
                    list.style.left = -idx * 650 + 'px';
                }, 0);
            } else {
                idx --;
                list.style.left = -idx * 650 + 'px';
            }

            // Function throttling
            setTimeout(function() {
                lock = true;
            }, 500);
        }
    </script>
</body>
</html>
Case 3: respiratory rotation chart

<!DOCTYPE html>
<html lang="en">

<head>
    <meta charset="UTF-8">
    <meta name="viewport" content="width=device-width, initial-scale=1.0">
    <title>Document</title>
    <style>
        * {
            margin: 0;
            padding: 0;
        }

        .carousel {
            width: 650px;
            height: 360px;
            border: 1px solid #000;
            margin: 50px auto;
            position: relative;

        }

        .carousel ul {
            list-style: none;
        }

        .carousel ul li {
            position: absolute;
            top: 0;
            left: 0;
            /* Transparency is 0 */
            opacity: 0;
            transition: opacity 1s ease 0s;
        }

        /* Only the first transparency is 1 */
        .carousel ul li:first-child {
            opacity: 1;
        }

        .carousel .leftbtn {
            position: absolute;
            left: 20px;
            top: 50%;
            margin-top: -25px;
            width: 50px;
            height: 50px;
            background-color: rgb(28, 180, 226);
            border-radius: 50%;
        }

        .carousel .rightbtn {
            position: absolute;
            right: 20px;
            top: 50%;
            margin-top: -25px;
            width: 50px;
            height: 50px;
            background-color: rgb(28, 180, 226);
            border-radius: 50%;
        }
    </style>
</head>

<body>
    <div class="carousel">
        <ul id="list">
            <li><img src="images/beijing/0.jpg" alt=""></li>
            <li><img src="images/beijing/1.jpg" alt=""></li>
            <li><img src="images/beijing/2.jpg" alt=""></li>
            <li><img src="images/beijing/3.jpg" alt=""></li>
            <li><img src="images/beijing/4.jpg" alt=""></li>
        </ul>
        <a href="javascript:;" class="leftbtn" id="leftbtn"></a>
        <a href="javascript:;" class="rightbtn" id="rightbtn"></a>
    </div>
    <script>
        // Get the button and ul, ul move as a whole
        var leftbtn = document.getElementById('leftbtn');
        var rightbtn = document.getElementById('rightbtn');
        var list = document.getElementById('list');
        var lis = list.getElementsByTagName('li');

        // Which image is currently displayed
        var idx = 0;

        // throttle
        var lock = true;

        // Right button
        rightbtn.onclick = function () {
            // Judgment throttling
            if (!lock) return;

            lock = false;

            // idx has not been changed. The idx image at this time is the old image, and the old image fades out
            lis[idx].style.opacity = 0;
            idx++;
            if (idx > 4) idx = 0;
            // idx is changed. The idx image at this time is a new image. The new image fades in
            lis[idx].style.opacity = 1;

            // After the animation, unlock
            setTimeout(function () {
                lock = true;
            }, 1000);
        }

        // Left button
        leftbtn.onclick = function () {
            // Judgment throttling
            if (!lock) return;

            lock = false;

            // idx has not been changed. The idx image at this time is the old image, and the old image fades out
            lis[idx].style.opacity = 0;
            idx--;
            if (idx < 0) idx = 4;
            // idx is changed. The idx image at this time is a new image. The new image fades in
            lis[idx].style.opacity = 1;

            // After the animation, unlock
            setTimeout(function () {
                lock = true;
            }, 1000);
        }
    </script>
</body>

</html>
BOM
windos object
What is BOM
- BOM (Browser Object Model) is the interface between JS and browser window
- Some special effects related to browser size change and scroll bar scrolling need the help of BOM technology
window object
- The window object is the window where the current JS script runs, and this window contains the DOM structure, window The document attribute is the document object
- In the browser with tab function, each tab has its own window object; That is, a window object will not be shared between tabs of the same window
Global variables are attributes of window
-
The global variable becomes a property of the window object
-
var a = 10;
console.log(window.a == a); // true
console.log(windows.hasOwnProperty('a')) //true
-
-
This means that multiple js files share the global scope, that is, js files have no scope isolation function
-
//1.js
var a = 1;
//2.js
console.log(++a); //2
-
Built in functions are generally window methods
- Built in functions such as setInterval() and alert() are generally window methods
console.log(window.alert == alert); // true
console.log(window.setInterval == setInterval); // true
console.log(window.hasOwnProperty('setInterval')); //true
window.setInterval(function(){
    window.console.log("Hello");
},1000);
- Window size related properties
| attribute | significance |
|---|---|
| innerHeight | The height of the content area of the browser window, including the horizontal scroll bar, if any |
| innerWidth | The width of the content area of the browser window, including the vertical scroll bar, if any. |
| outerHeight | The external height of the browser window |
| outerWidth | The outer width of the browser window |
To get the window width without scroll bars, use: document documentElement. clientWidth
<!DOCTYPE html>
<html lang="en">
<head>
    <meta charset="UTF-8">
    <meta name="viewport" content="width=device-width, initial-scale=1.0">
    <title>Document</title>
    <style>
        body {
            height: 5000px;
        }
    </style>
</head>
<body>
    <script>
        console.log('Inside window width (including scroll bar)', window.innerWidth);
        console.log('Window width', window.outerWidth);
        console.log('Inside window width (excluding scroll bar)', document.documentElement.clientWidth);
    </script>
</body>
</html>
resize event
- After the window size changes, the resize event will be triggered. You can use window Onresize or window Addeventlistener ('resize ') to bind the event handler
// Listen for window resizing events
window.onresize = function () {
    var root = document.documentElement;
    console.log('The window has changed size', root.clientWidth, root.clientHeight);
};
Rolled height
- window. The scrolly property indicates the pixel value that has been scrolled in the vertical direction
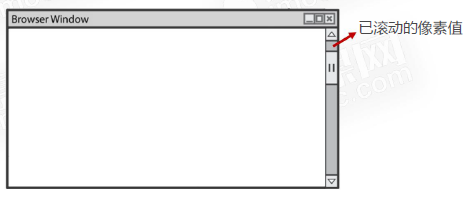
- document. documentElement. The scrolltop property also indicates the window scroll height
var scrollTop = window.scrollY || document.documentElement.scrollTop
- document.documentElement.scrollTop is not read-only, but window Scrolly is read-only
console.log(window.scrollY);
console.log(document.documentElement.scrollTop);
//You can manually modify the document documentElement. Scrolltop changes the browser's scroll bar
scroll event
- After the window is scrolled, the scroll event will be triggered. You can use window Onscroll or window Addeventlistener ('scroll ') to bind the event handler
window.onscroll = function () {
    console.log('The window scrolled', window.scrollY);
};
Navigator object
Navigator object
- window. The navigator property can retrieve the Navigator object, which contains the relevant properties and identification of the browser of the user's activity
| attribute | significance |
|---|---|
| appName | Browser official name |
| appVersion | Browser version |
| userAgent | User agent of browser (including kernel information and shell information) |
| platform | User operating system |
console.log('Browser brand',navigator.appName);
console.log('Browser version',navigator.appVersion);
console.log('user agent ',navigator.userAgent);
console.log('operating system',navigator.platform);
//Browser brand Netscape
//Browser version 5.0 (Windows NT 10.0; win64; x64) applewebkit / 537.36 (KHTML, like gecko) Chrome / 92.0 4515.131 Safari/537.36
//User agent Mozilla / 5.0 (Windows NT 10.0; win64; x64) applewebkit / 537.36 (KHTML, like gecko) Chrome / 92.0 4515.131 Safari/537.36
//VM375:4 operating system Win32
Identify user browser brand
- Navigator is usually used to identify the brand of the user's browser Useragent properties
var sUsrAg = navigator.userAgent;
if (sUsrAg.indexOf("Firefox") > -1) {

} else if (sUsrAg.indexOf("Opera") > -1) {

} else if (sUsrAg.indexOf("Edge") > -1) {

} else if (sUsrAg.indexOf("Chrome") > -1) {

} else if (sUsrAg.indexOf("Safari") > -1) {

} else {

}
History object
History object
- window. The history object provides an interface to manipulate the browser session history
- The common operation is to simulate the browser fallback button
history.back(); // Equivalent to clicking the browser's back button
history.go(-1); // Equivalent to history back();
<!--tmp.html-->
<!DOCTYPE html>
<html lang="en">
<head>
    <meta charset="UTF-8">
    <meta name="viewport" content="width=device-width, initial-scale=1.0">
    <title>Document</title>
</head>
<body>
    <h1>I am temp Webpage</h1>
    <a href="history method.html">Go see history Method page</a>
</body>
</html>
<!--history method.html-->
 <h1>I am history Method web page</h1>
    <button id="btn">Back off</button>
    <a href="javascript:history.back();">Back off</a>

    <script>
        var btn = document.getElementById('btn');

        btn.onclick = function() {
            // history.back();
            history.go(-1);
        };
    </script>
Location object
Location object
- window.location identifies the current web address. You can command the browser to jump to the page by assigning a value to this attribute
window.location = 'http://www.imooc.com';
window.location.href = 'http://www.imooc.com';
console.log(window.location);
//
<button id="btn1">I'll go to class at seven</button>
    <button id="btn2">Refresh</button>
    <script>
        var btn1 = document.getElementById('btn1');
        var btn2 = document.getElementById('btn2');

        btn1.onclick = function () {
            window.location = 'http://www.imooc.com';
        };

        btn2.onclick = function () {
            window.location.reload(true);
        };
    </script>
Reload current page
- You can call the reload method of location to reload the current page. The parameter true means to force the load from the server
window.location.reload(true);
GET request query parameters
- window. location. The search property is the GET request query parameter of the current browser
- Such as website https://www.imooc.com/?a=1&b=2
console.log(window.location.search); // "?a=1&b=2"
BOM special effects development
Back to top button making
- Return to the top principle: change document documentElement. Scrolltop property. If this value is changed step by step through the timer, it will be returned to the top in the form of animation.
<!DOCTYPE html>
<html lang="en">

<head>
    <meta charset="UTF-8">
    <meta name="viewport" content="width=device-width, initial-scale=1.0">
    <title>Document</title>
    <style>
        body {
            height: 5000px;
            background-image: linear-gradient(to bottom, blue, green, yellow);
        }

        .backtotop {
            width: 60px;
            height: 60px;
            background-color: rgba(255, 255, 255, .6);
            position: fixed;
            bottom: 100px;
            right: 100px;
            /* Small hand */
            cursor: pointer;
        }
    </style>
</head>

<body>
    <div class="backtotop" id="backtotopBtn">Back to top</div>

    <script>
        var backtotopBtn = document.getElementById('backtotopBtn');

        var timer;
        backtotopBtn.onclick = function () {
            // Set the meter to close first
            clearInterval(timer);

            // set timer
            timer = setInterval(function () {
                // Continuously reduce scrollTop
                document.documentElement.scrollTop -= 200;
                // The timer must stop
                if (document.documentElement.scrollTop <= 0) {
                    clearInterval(timer);
                }
            }, 20);
        };
    </script>
</body>

</html>
Floor navigation small effect
- DOM elements have an offsetTop attribute, which indicates the vertical distance from this element to the positioning ancestor element
- Locate ancestor element: in the ancestor, the element closest to itself and having the location attribute
<!DOCTYPE html>
<html lang="en">
<head>
    <meta charset="UTF-8">
    <meta name="viewport" content="width=device-width, initial-scale=1.0">
    <title>Document</title>
    <style>
        * {
            margin: 0;
            padding: 0;
        }
        #box {
            width: 400px;
            height: 400px;
            margin: 60px auto;
            border: 4px solid red;
        }
        ul {
            padding-top: 10px;
        }
        li {
            padding-top: 10px;
        }
        #para {
            width: 80px;
            height: 80px;
            background-color: orange;
        }
    </style>
</head>
<body>
    <div id="box">
        <ul>
            <li>
                <p id="para"></p>
            </li>
        </ul>
    </div>
    <script>
        var para = document.getElementById('para');
        // Net top value. When using this attribute, all ancestor elements should not have positioning. Positioning is not easy to use.
        console.log(para.offsetTop);
    </script>
</body>
</html>
Small case: floor navigation
<!DOCTYPE html>
<html lang="en">

<head>
    <meta charset="UTF-8">
    <meta name="viewport" content="width=device-width, initial-scale=1.0">
    <title>Document</title>
    <style>
        * {
            margin: 0;
            padding: 0;
        }

        .content-part {
            width: 1000px;
            margin: 0px auto;
            margin-bottom: 30px;
            background-color: #ccc;
            font-size: 50px;
        }

        .floornav {
            position: fixed;
            right: 40px;
            top: 50%;
            margin-top: -100px;
            width: 120px;
            height: 200px;
            background-color: orange;
        }

        .floornav ul {
            list-style: none;
        }

        .floornav ul li {
            width: 120px;
            height: 40px;
            line-height: 40px;
            text-align: center;
            font-size: 26px;
            /* Small hand pointer */
            cursor: pointer;
        }

        .floornav ul li.current {
            background: purple;
            color: white;
        }
    </style>
</head>

<body>
    <nav class="floornav">
        <ul id="list">
            <li data-n="science and technology" class="current">science and technology</li>
            <li data-n="Sports">Sports</li>
            <li data-n="Journalism">Journalism</li>
            <li data-n="entertainment">entertainment</li>
            <li data-n="video">video</li>
        </ul>
    </nav>

    <section class="content-part" style="height:674px;" data-n="science and technology">
        Science and technology column
    </section>

    <section class="content-part" style="height:567px;" data-n="Sports">
        Sports column
    </section>

    <section class="content-part" style="height:739px;" data-n="Journalism">
        News column
    </section>

    <section class="content-part" style="height:574px;" data-n="entertainment">
        Entertainment column
    </section>

    <section class="content-part" style="height:1294px;" data-n="video">
        Video column
    </section>

    <script>
        // Use event delegation to add listening to li
        var list = document.getElementById('list');
        var contentParts = document.querySelectorAll('.content-part');
        var lis = document.querySelectorAll('#list li');

        list.onclick = function (e) {
            if (e.target.tagName.toLowerCase() == 'li') {
                // getAttribute means to get an attribute value on the tag
                var n = e.target.getAttribute('data-n');

                // You can use the attribute selector (that is, the square bracket selector) to find content parts with the same data-n
                var contentPart = document.querySelector('.content-part[data-n=' + n + ']');

                // Let the scroll of the page automatically become the offsetTop value of the box
                document.documentElement.scrollTop = contentPart.offsetTop;
            }
        }


        // After the page is loaded, push the offsetTop values of all content part boxes into the array
        var offsetTopArr = [];

        // Traverse all contentparts and push their net positions into the array
        for (var i = 0; i < contentParts.length; i++) {
            offsetTopArr.push(contentParts[i].offsetTop);
        }
        // For the last term to facilitate comparison, we can push an infinity
        offsetTopArr.push(Infinity);

        console.log(offsetTopArr);

        // Current floor
        var nowfloor = -1;

        // Scrolling of windows
        window.onscroll = function () {
            // Get the current window scroll value
            var scrollTop = document.documentElement.scrollTop;

            // Traverse the offsetTopArr array to see which two floors the current scrollTop value is between
            for (var i = 0; i < offsetTopArr.length; i++) {
                if (scrollTop >= offsetTopArr[i] && scrollTop < offsetTopArr[i + 1]) {
                    break;
                }
            }
            // When exiting the cycle, i is the number, which indicates the current floor number
            // If the current floor is not i, it indicates that it is around the building
            if (nowfloor != i) {
                console.log(i);
                // Change the global variable to this floor number
                nowfloor = i;

                // Items with subscript i have cur
                for (var j = 0; j < lis.length; j++) {
                    if (j == i) {
                        lis[j].className = 'current';
                    } else {
                        lis[j].className = '';
                    }
                }
            }
        };
    </script>
</body>

</html>