Harbor introduction
Harbor is a cloud native product warehouse open source by VMware. The core function of harbor is to store and manage artifacts. Harbor allows users to push and pull container images and other artifacts with command-line tools, and provides a graphical management interface to help users view and manage these artifacts.
In Harbor version 2.0, in addition to container image, Harbor provides more support for Helm Chart, CNAB, OPA Bundle, etc. conforming to OCI specification.
Harbor overall architecture
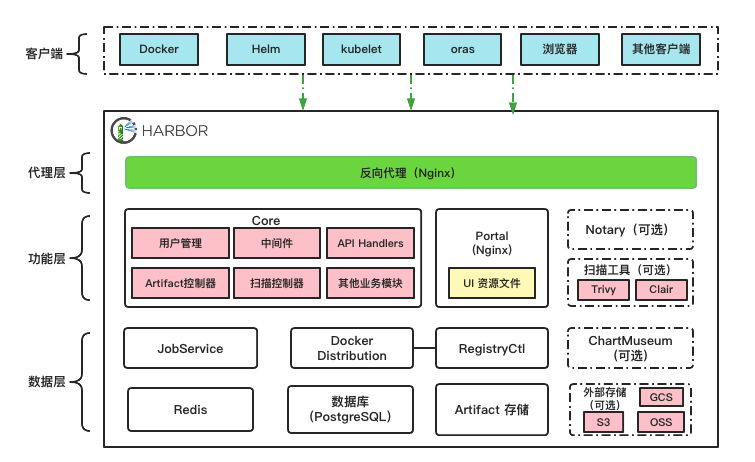
As shown in the figure above, the architecture of Harbor 2.0 can be divided into agent layer, function layer and data layer from top to bottom.
- Proxy layer: the proxy layer is essentially an Nginx reverse proxy, which is responsible for receiving different types of client requests, including browsers, user scripts, dockers, etc., and forwarding them to different back-end services for processing according to the request type and URI.
- Function layer:
- Portal: it is a front-end application based on angular and provides an interface for Harbor users to access.
- Core: it is the core component in Harbor and encapsulates most of Harbor's business logic.
- JobService: asynchronous task component, which is responsible for many time-consuming functions in Harbor, such as Artifact replication, scanning, garbage collection, etc.
- Docker Distribution: Harbor realizes the functions of reading, writing, accessing and other functions of Artifact through Distribution.
- RegistryCtl: the control component of Docker Distribution.
- Notary (optional): provides image signature management based on TUF.
- Scanning tool (optional): mirrored vulnerability detection tool.
- ChartMuseum (optional): provide API to manage helm charts of non OCI specifications. With the wider acceptance of helm charts compatible with OCI specifications in the community, helm charts can be stored and managed in Harbor in the form of Artifact and no longer rely on ChartMuseum. Therefore, Harbor may remove the support for ChartMuseum in subsequent versions.
- Data layer:
- Redis: it is mainly used as a cache service to store some data with a short life cycle. At the same time, it also provides a queue like function for JobService.
- PostgreSQL: stores Harbor application data, such as project information, relationship between users and projects, management policies, configuration information, metadata of Artifact, etc.
- Artifact storage: stores the contents of the artifact itself, that is, where the data is finally stored every time the image, Helm Chart or other artifact is pushed. By default, Harbor writes the artifact to the local file system. Users can also modify the configuration and store the artifact in external storage, such as Amazon's object storage S3, Google cloud storage GCS, Alibaba cloud's object storage OSS, etc.
Dock compose deploy Harbor
Prerequisite requirements
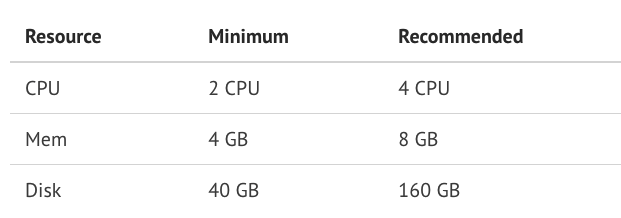
Hardware requirements:
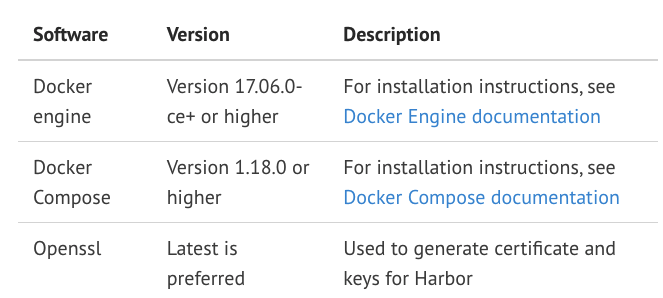
Software requirements:
Download installation package
wget https://github.com/goharbor/harbor/releases/download/v2.3.1/harbor-offline-installer-v2.3.1.tgz
tar -xzvf harbor-offline-installer-v2.3.1.tgz
cd harbor
Modify profile
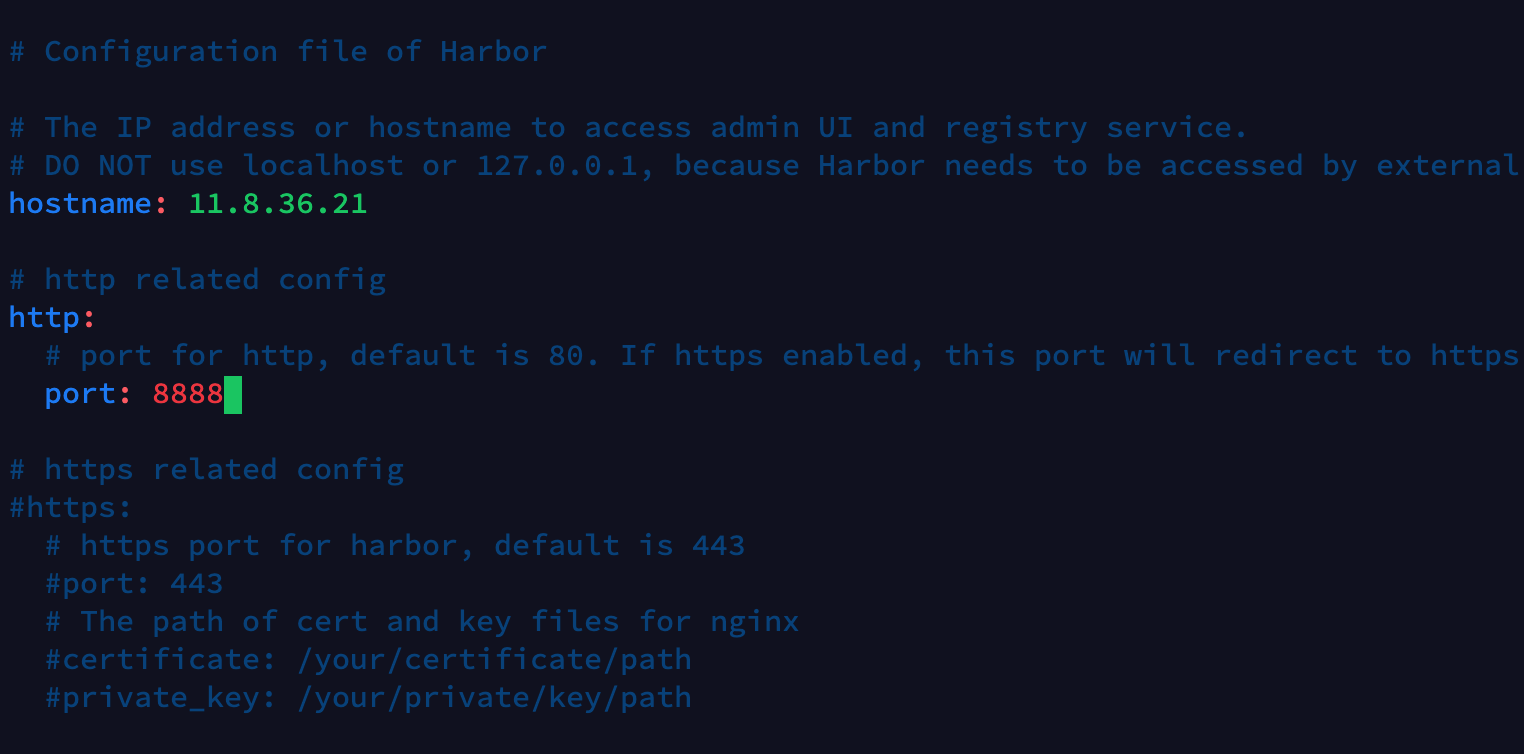
Copy the template file as harbor yml.
cp harbor.yml.tmpl harbor.yml
Edit harbor YML configuration file, hostname is the access address exposed by harbor, and HTTP service exposes port 8888. HTTPS will not be configured here for the time being, and HTTPS related contents will be annotated.
Deploy Harbor
After modifying the configuration file, you only need to execute install SH script to install Harbor.
./install.sh
To view Harbor component health:
> docker-compose ps
      Name                     Command                  State                        Ports
------------------------------------------------------------------------------------------------------------
harbor-core         /harbor/entrypoint.sh            Up (healthy)
harbor-db           /docker-entrypoint.sh 96 13      Up (healthy)
harbor-jobservice   /harbor/entrypoint.sh            Up (healthy)
harbor-log          /bin/sh -c /usr/local/bin/ ...   Up (healthy)   127.0.0.1:1514->10514/tcp
harbor-portal       nginx -g daemon off;             Up (healthy)
nginx               nginx -g daemon off;             Up (healthy)   0.0.0.0:8888->8080/tcp,:::8888->8080/tcp
redis               redis-server /etc/redis.conf     Up (healthy)
registry            /home/harbor/entrypoint.sh       Up (healthy)
registryctl         /home/harbor/start.sh            Up (healthy)
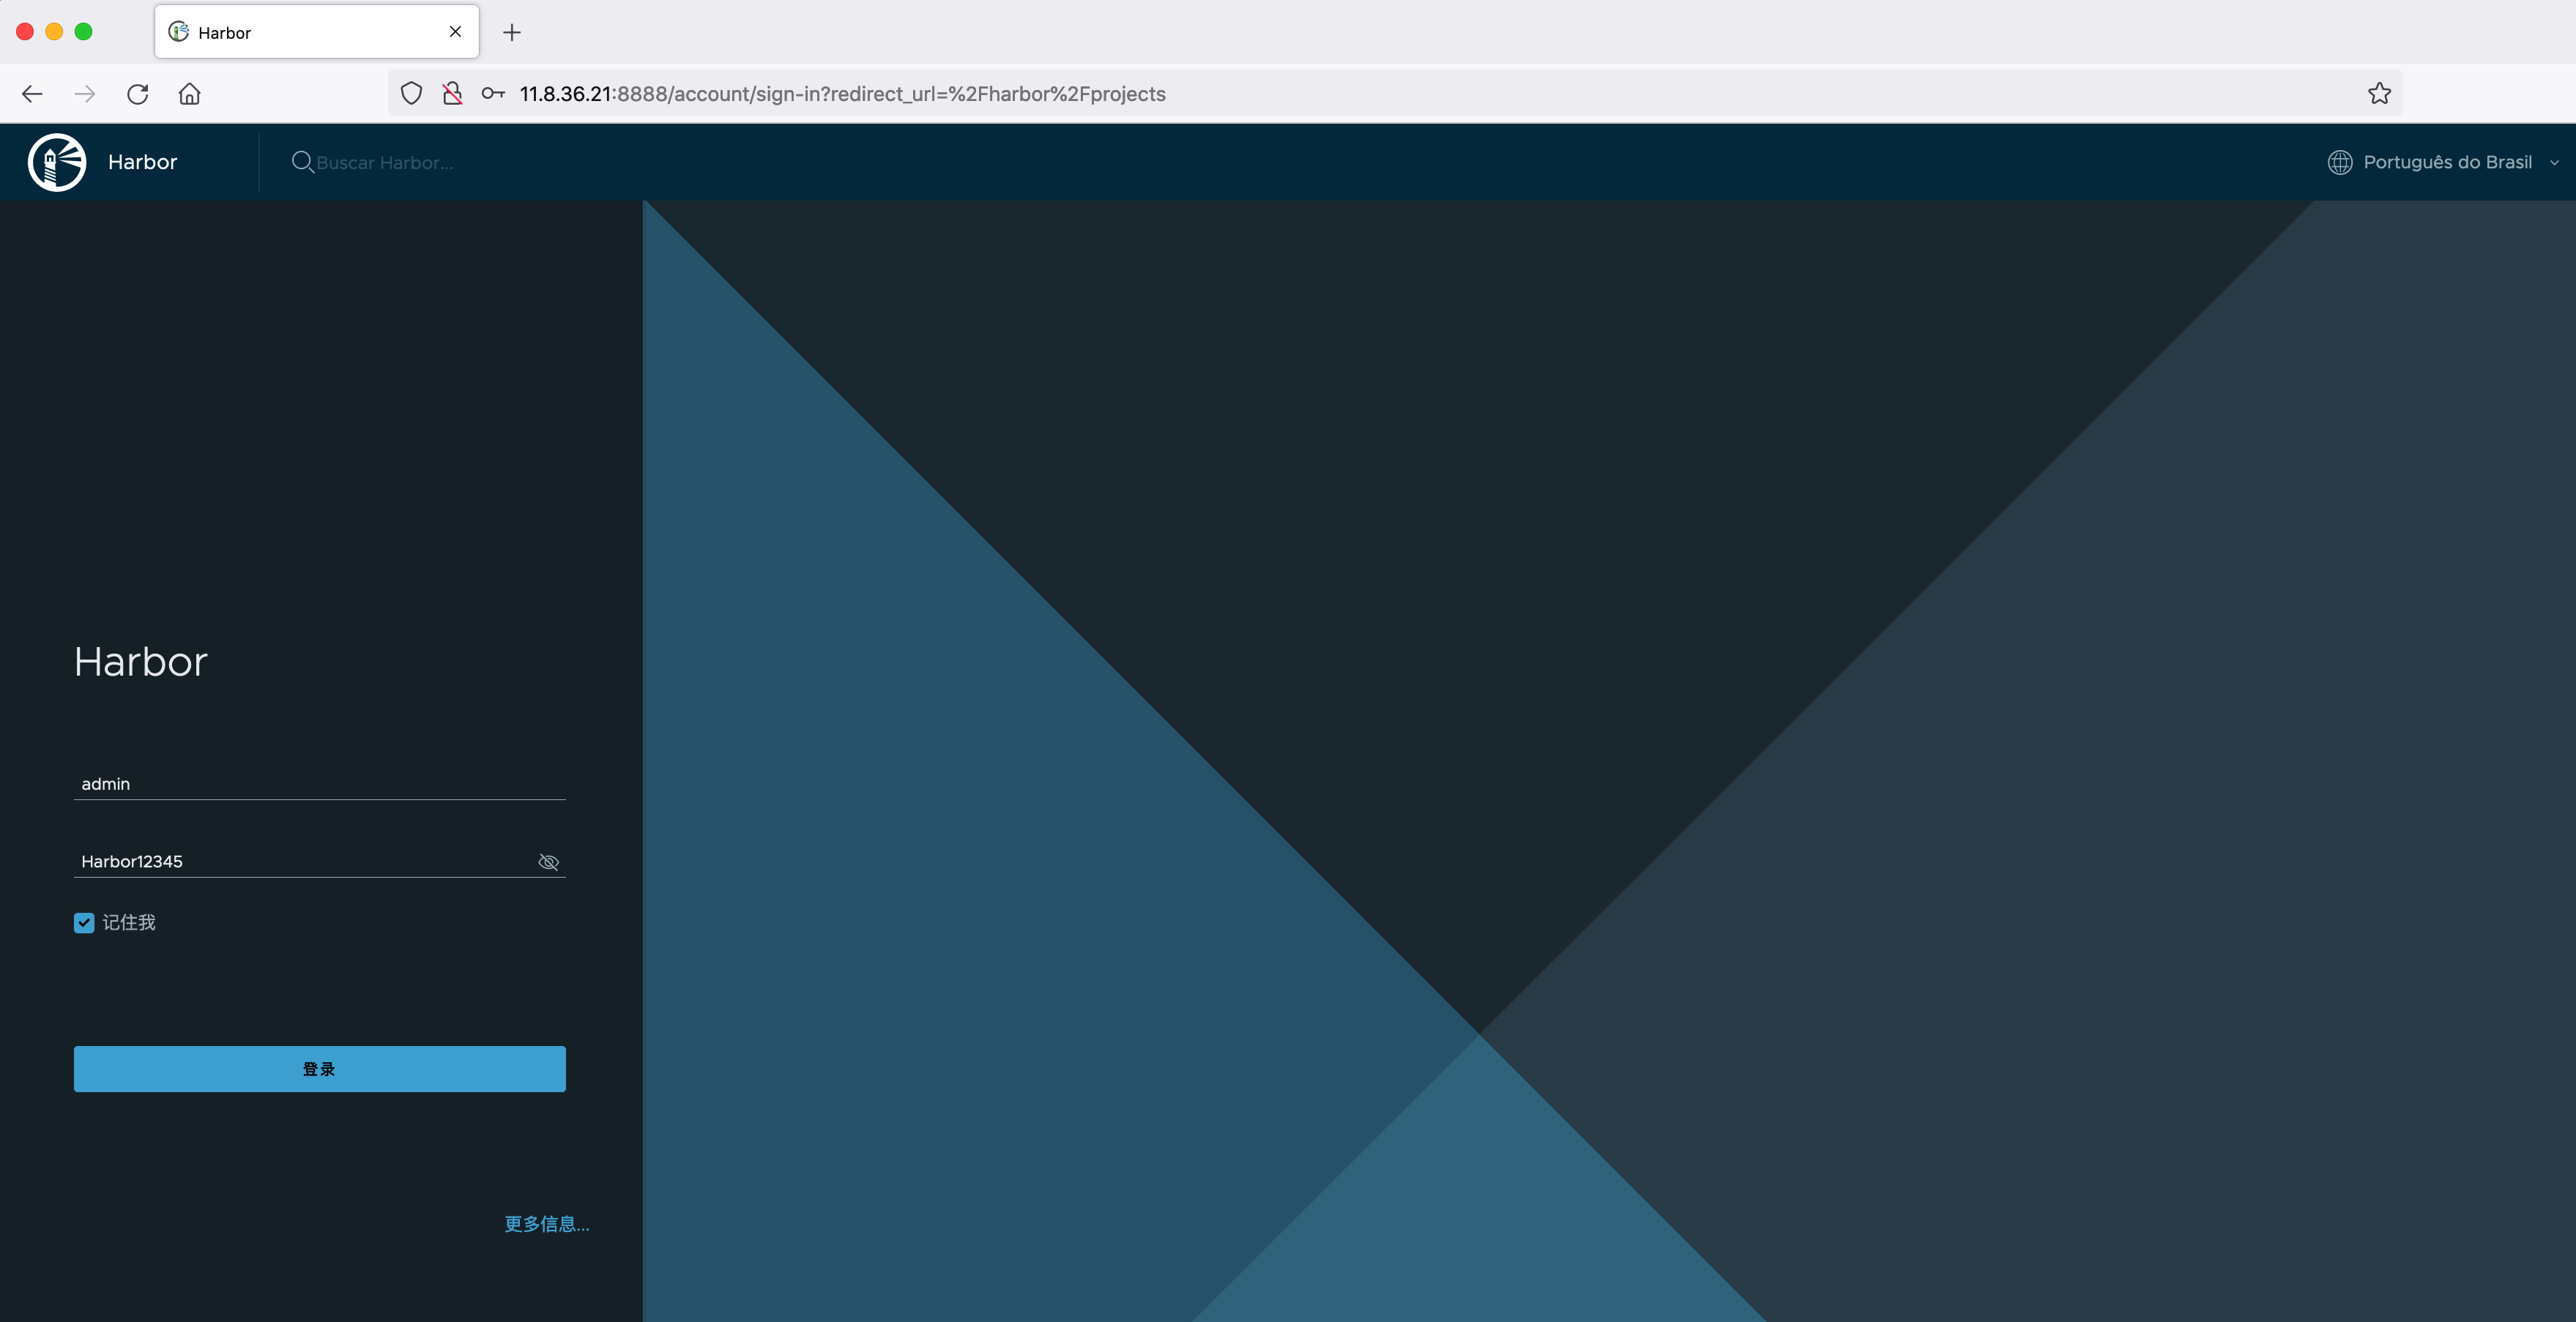
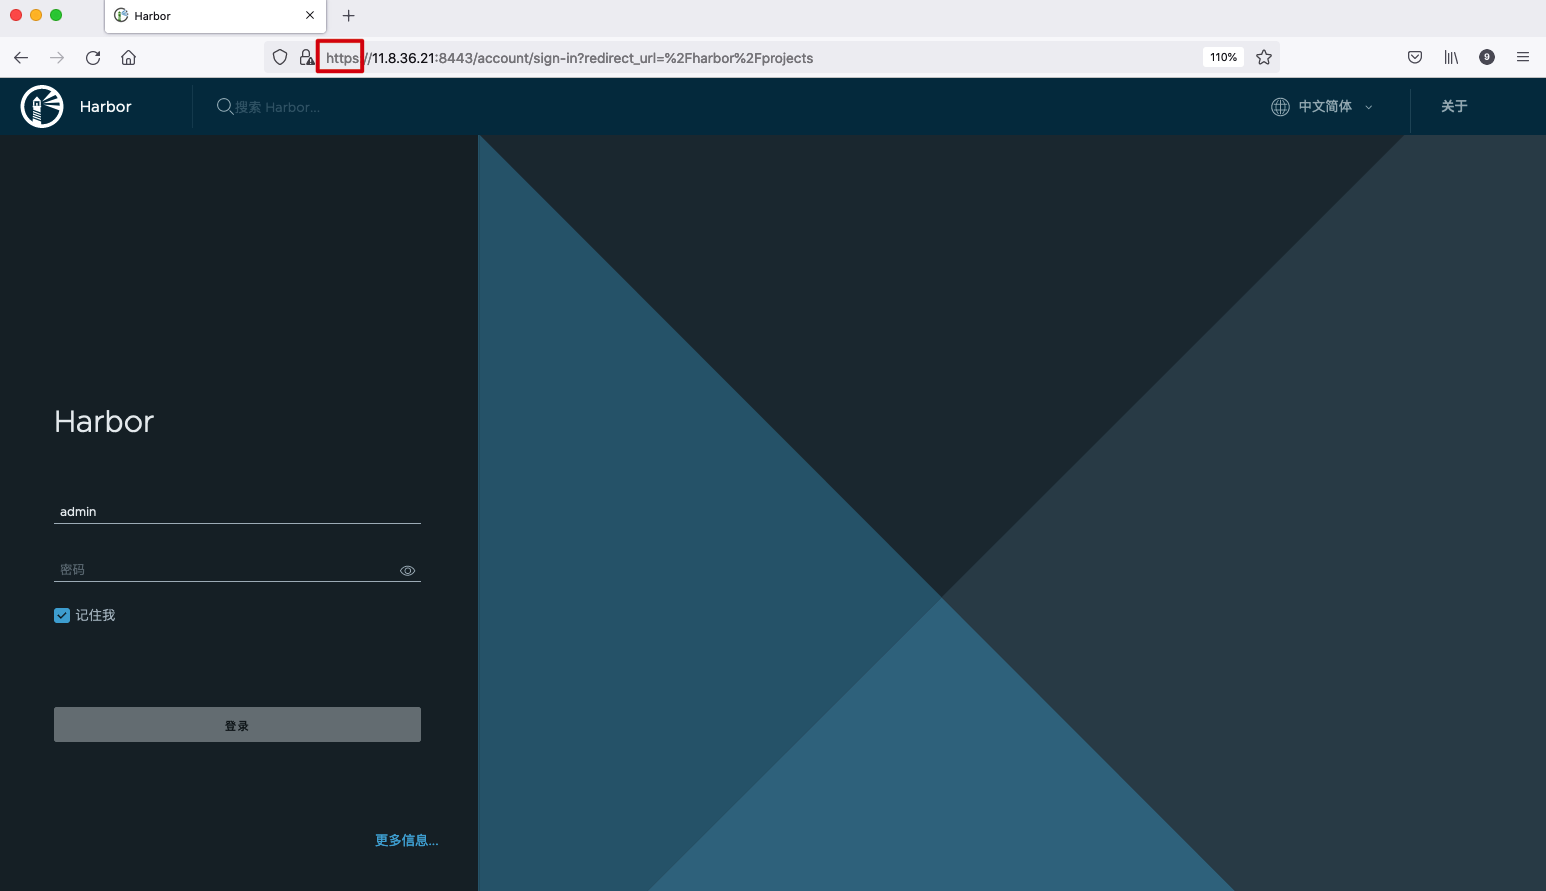
Login page
Browser input http://11.8.36.21:8888 Visit the Harbor page, and the user name and password are Harbor The default setting in the YML configuration file is admin, Harbor12345.
Push image
Pull an nginx:1.19 image from the public network:
> docker pull nginx:1.19
1.19: Pulling from library/nginx
69692152171a: Already exists
49f7d34d62c1: Pull complete
5f97dc5d71ab: Pull complete
cfcd0711b93a: Pull complete
be6172d7651b: Pull complete
de9813870342: Pull complete
Digest: sha256:df13abe416e37eb3db4722840dd479b00ba193ac6606e7902331dcea50f4f1f2
Status: Downloaded newer image for nginx:1.19
Edit / etc / docker / daemon JSON to set the HTTP warehouse address allowed to be accessed.
{
  "insecure-registries":["11.8.36.21:8888"]
}
Modify the mirror tag:
docker tag nginx:1.19 11.8.36.21:8888/library/nginx:1.19
Log in to Harbor:
> docker login 11.8.36.21:8888
Username: admin
Password:
Login Succeeded
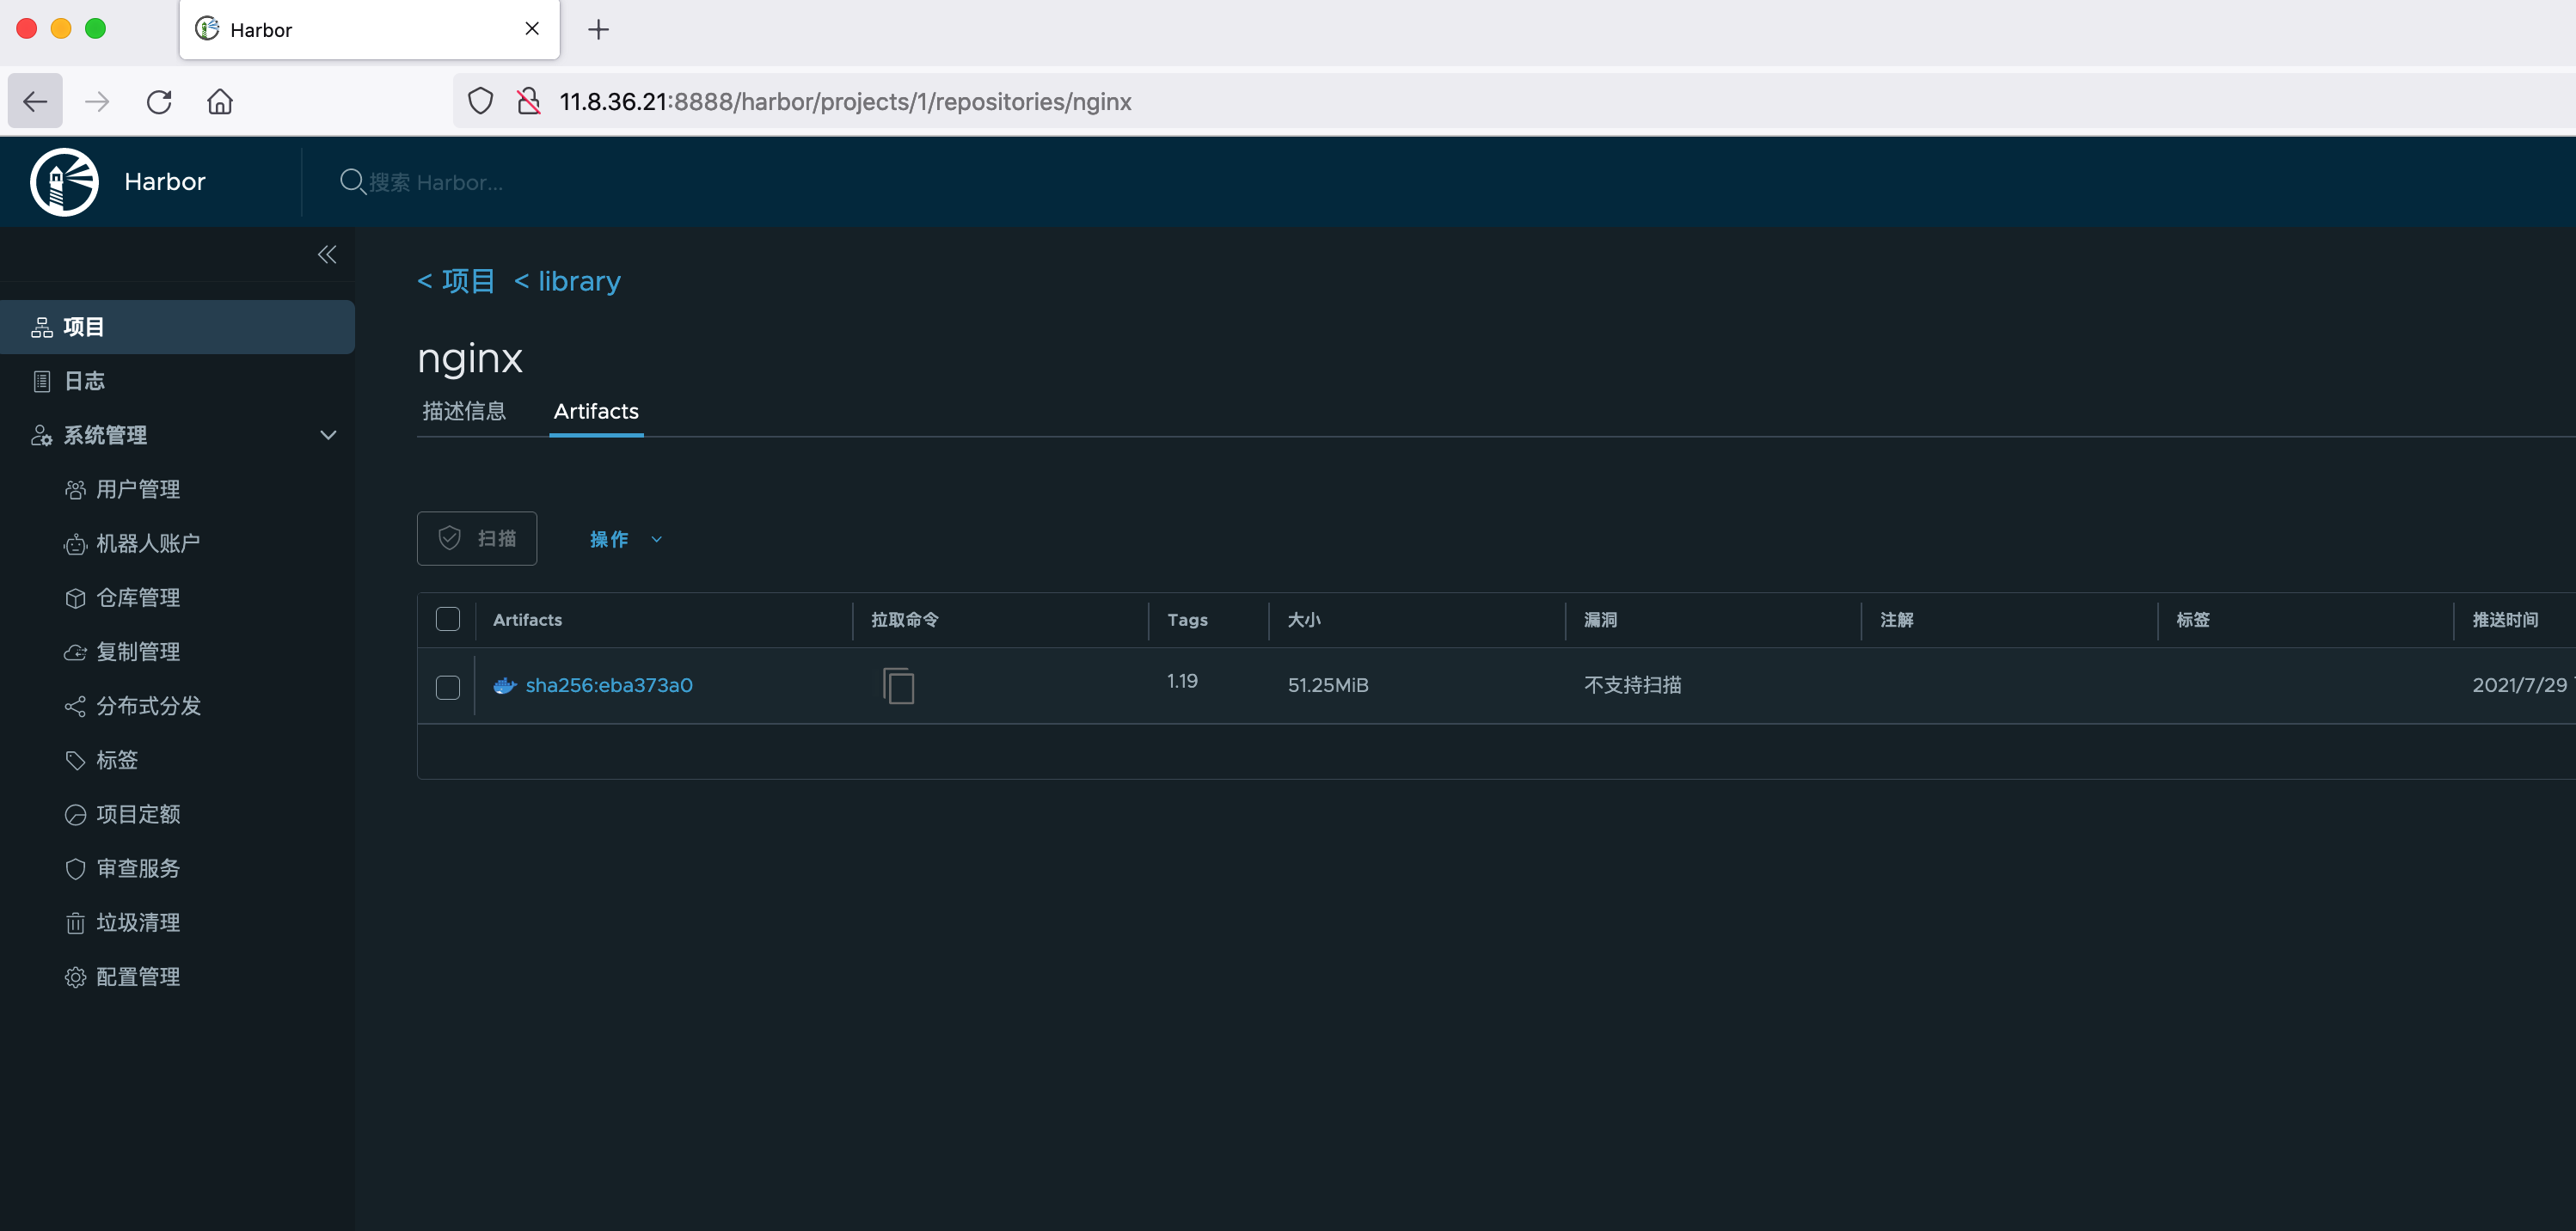
Push image to Harbor:
> docker push 11.8.36.21:8888/library/nginx:1.19
The push refers to a repository [11.8.36.21:8888/library/nginx]
f0f30197ccf9: Pushed
eeb14ff930d4: Pushed
c9732df61184: Pushed
4b8db2d7f35a: Pushed
431f409d4c5a: Pushed
02c055ef67f5: Pushed
1.19: digest: sha256:eba373a0620f68ffdc3f217041ad25ef084475b8feb35b992574cd83698e9e3c size: 1570
To view a pushed image:
HTTPS configuration (optional)
It is recommended to configure HTTPS in the production environment. You can use a certificate signed by a trusted third-party CA or a self signed certificate. If you want to enable Content Trust with Notary to properly sign all images, you must use HTTPS.
Create directory
First, create a directory to store the generated certificate.
mkdir /root/cert
cd /root/cert/
Generate CA certificate
In this experiment, we use self signed certificates. A certificate signed by a trusted third-party CA should be used in the production environment.
Generate CA certificate private key
openssl genrsa -out ca.key 4096
Generate CA certificate
-subj represents the organization of the certificate. Change the value after CN to the IP address or domain name of harbor.
openssl req -x509 -new -nodes -sha512 -days 3650 \
 -subj "/C=CN/ST=Beijing/L=Beijing/O=example/OU=Personal/CN=11.8.36.21" \
 -key ca.key \
 -out ca.crt
Generate Server certificate
Generate the certificate and private key used by Harbor.
Generate Server private key
openssl genrsa -out server.key 4096
Generate Server certificate signing request (CSR)
Generate a certificate signing request for Harbor, and use the CA certificate generated above to issue a certificate to the Server.
openssl req -sha512 -new \
    -subj "/C=CN/ST=Beijing/L=Beijing/O=example/OU=Personal/CN=11.8.36.21" \
    -key server.key \
    -out server.csr
Generate x509 v3 extension file
When pulling an HTTPS image through docker or ctr, the HTTPS certificate is required to include a SAN extension.
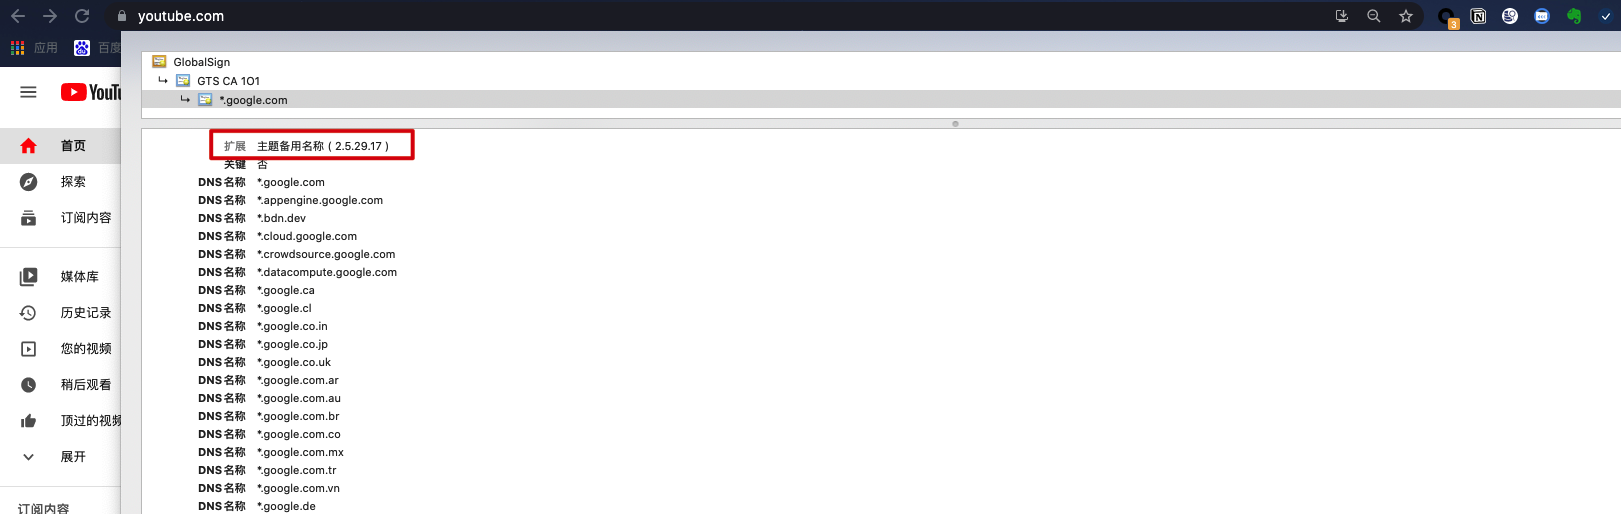
San (Subject Alternative Name) is an extension defined in the SSL standard x509. The SSL certificate using the San field can extend the domain name supported by this certificate, so that a certificate can support the resolution of multiple different domain names. For example, the Subject Alternative Name of Google's certificate in the figure below (SAN) lists a large list of domain names, so this certificate can be used by multiple domain names. For companies with a large number of domain names such as Google, using this type of certificate can greatly simplify the management of website certificates.
Generate an x509 v3 extension file using the following command:
cat > v3.ext <<-EOF
authorityKeyIdentifier=keyid,issuer
basicConstraints=CA:FALSE
keyUsage = digitalSignature, nonRepudiation, keyEncipherment, dataEncipherment
extendedKeyUsage = serverAuth
subjectAltName = IP:11.8.36.21
EOF
In case of domain name access, the x509 v3 extension file is generated in the following way:
cat > v3.ext <<-EOF
authorityKeyIdentifier=keyid,issuer
basicConstraints=CA:FALSE
keyUsage = digitalSignature, nonRepudiation, keyEncipherment, dataEncipherment
extendedKeyUsage = serverAuth
subjectAltName = @alt_names

[alt_names]
DNS.1=yourdomain.harbor.com
EO
Issue Server certificate using CA certificate
openssl x509 -req -sha512 -days 3650 \
    -extfile v3.ext \
    -CA ca.crt -CAkey ca.key -CAcreateserial \
    -in server.csr \
    -out server.crt
To view the files generated in the current directory:
root@ydt-net-portainer:/root/cert #ll
total 32
-rw-r--r-- 1 root root 2025 Aug  6 20:44 ca.crt
-rw-r--r-- 1 root root 3243 Aug  6 20:40 ca.key
-rw-r--r-- 1 root root   17 Aug  6 21:03 ca.srl
-rw-r--r-- 1 root root 2045 Aug  6 21:03 server.crt
-rw-r--r-- 1 root root 1704 Aug  6 20:47 server.csr
-rw-r--r-- 1 root root 3247 Aug  6 20:45 server.key
-rw-r--r-- 1 root root  202 Aug  6 21:00 v3.ext
Configure certificates for Harbor and Docker
Copy the server certificate and key to the / data/cert directory on the Harbor host
mkdir -p /data/cert
cp server.crt /data/cert/
cp server.key /data/cert/
Convert server CRT is server cert
The Docker daemon will think The crt file is a CA certificate, so you need to convert the server certificate to server CERT file. In fact, just change the suffix. The content in the certificate is the same.
openssl x509 -inform PEM -in server.crt -out server.cert
Copy the server certificate, key and CA certificate to the Docker certificate directory on the Harbor host
The Docker certificate directory needs to be created in advance. If port 443 is used to listen for HTTPS requests, the directory is IP / domain name. If a non 443 port is used, the directory is IP / Domain Name: port.
mkdir -p /etc/docker/certs.d/11.8.36.21:8443
cp server.cert /etc/docker/certs.d/11.8.36.21:8443
cp server.key /etc/docker/certs.d/11.8.36.21:8443
cp ca.crt /etc/docker/certs.d/11.8.36.21:8443
View Docker certificate directory file:
root@ydt-net-portainer:/root/cert #ll /etc/docker/certs.d/11.8.36.21:8443/
total 12
-rw-r--r-- 1 root root 2025 Aug  6 21:15 ca.crt
-rw-r--r-- 1 root root 2045 Aug  6 21:15 server.cert
-rw-r--r-- 1 root root 3247 Aug  6 21:15 server.key
Restart Docker Engine
systemctl restart docker
Redeploy Harbor
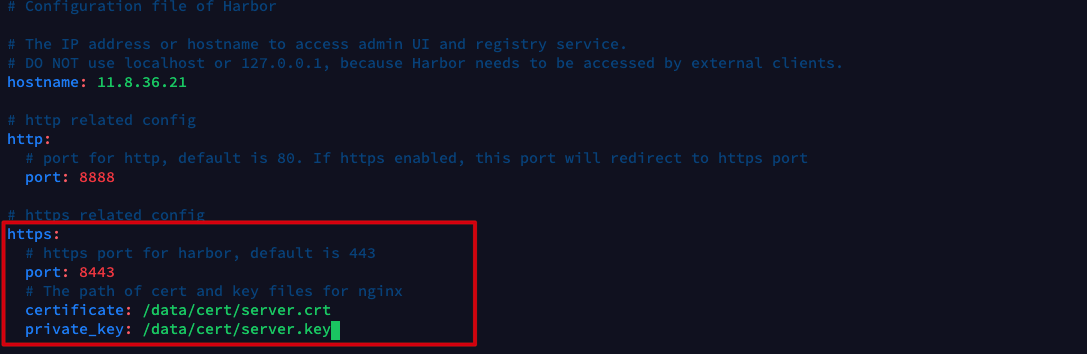
Modify harbor YML configuration file, add HTTPS related configuration, and specify HTTPS port number and certificate path:
Generate HTTPS configuration using prepare script
Use the prepare script to generate HTTPS configuration for the reverse proxy Nginx container.
./prepare
Delete the original Harbor container
The original Harbor data files are mounted in the / data directory of the host by default, so deleting the Harbor container will not lose data.
docker-compose down -v
Restart Harbor
docker-compose up -d
Login HTTPS page
Docker pulls and pushes images
If Docker wants to pull or push the image of the HTTPS image warehouse, it needs to configure the certificate in the Docker certificate directory. The Docker client here is another machine. First, create a directory on this machine.
mkdir /etc/docker/certs.d/11.8.36.21:8443
Then copy the certificate file from the Harbor host to the Docker client. The server certificate, key and CA certificate are required.
scp /root/cert/server.key  root@11.8.36.95:/etc/docker/certs.d/11.8.36.21:8443
scp /root/cert/server.cert  root@11.8.36.95:/etc/docker/certs.d/11.8.36.21:8443
scp /root/cert/ca.crt  root@11.8.36.95:/etc/docker/certs.d/11.8.36.21:8443
Pull image:
root@ydt-net-nginx-cisp:/root #docker pull 11.8.36.21:8443/library/nginx:1.19
Trying to pull repository 11.8.36.21:8443/library/nginx ...
1.19: Pulling from 11.8.36.21:8443/library/nginx
Digest: sha256:eba373a0620f68ffdc3f217041ad25ef084475b8feb35b992574cd83698e9e3c
Status: Downloaded newer image for 11.8.36.21:8443/library/nginx:1.19
Push image:
#Log in to Harbor image warehouse
root@ydt-net-nginx-cisp:/root #docker login https://11.8.36.21:8443
Username: admin
Password:
Login Succeeded

#tag the image and change its name
root@ydt-net-nginx-cisp:/root #docker tag 11.8.36.21:8443/library/nginx:1.19 11.8.36.21:8443/library/nginx-2:1.19

#Push image
root@ydt-net-nginx-cisp:/root #docker push 11.8.36.21:8443/library/nginx-2:1.19
The push refers to a repository [11.8.36.21:8443/library/nginx-2]
f0f30197ccf9: Pushed
eeb14ff930d4: Pushed
c9732df61184: Pushed
4b8db2d7f35a: Pushed
431f409d4c5a: Pushed
02c055ef67f5: Pushed
1.19: digest: sha256:eba373a0620f68ffdc3f217041ad25ef084475b8feb35b992574cd83698e9e3c size: 1570
Container configuration mirror warehouse
Kubernetes will abandon Docker as a container runtime in version 1.23 at the earliest, and emphasizes in its blog that CRI runtime such as container can be used to replace Docker.
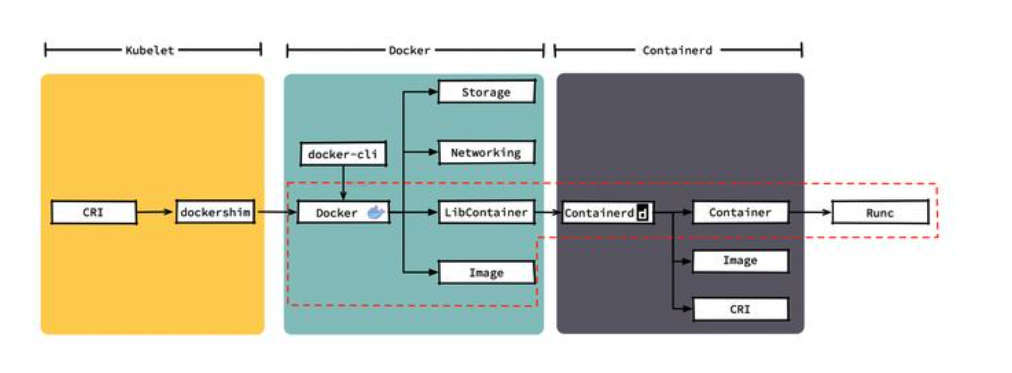
kubelet's direct call to container means shorter call chain, fewer components, more stable, and less node resources.
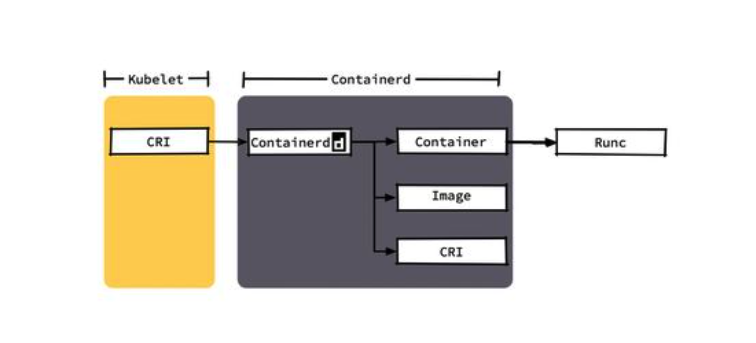
For container, you cannot log in to the image warehouse with docker login like Docker. You need to modify its configuration file for authentication.
Method 1: skip certificate verification
Edit / etc / containerd / config Toml file, add the following configuration. Note that there is a sinkhole: Registry Mirrors is followed by the address of the Harbor host, which must be written correctly. On the contrary, the content in the endpoint can be written freely.
  [plugins."io.containerd.grpc.v1.cri".registry]
      [plugins."io.containerd.grpc.v1.cri".registry.mirrors]
         [plugins."io.containerd.grpc.v1.cri".registry.mirrors."docker.io"]
            endpoint = ["https://registry-1.docker.io"]
         [plugins."io.containerd.grpc.v1.cri".registry.mirrors."11.8.75.154:11111"] #Be sure to write it right
             endpoint = ["https://11.8. 75.154:11111 "] # you can write whatever you like
      [plugins."io.containerd.grpc.v1.cri".registry.configs]
         [plugins."io.containerd.grpc.v1.cri".registry.configs."11.8.75.154:11111".tls]
             insecure_skip_verify = true #Skip certificate validation
         [plugins."io.containerd.grpc.v1.cri".registry.configs."11.8.75.154:11111".auth]
             username = "admin"
             password = "Harbor12345"
Method 2: configure certificate
If you want to be more secure, you can copy the CA certificate to the containerd machine, and then modify / etc / containerd / config Toml, specify the CA certificate.
  [plugins."io.containerd.grpc.v1.cri".registry]
      [plugins."io.containerd.grpc.v1.cri".registry.mirrors]
         [plugins."io.containerd.grpc.v1.cri".registry.mirrors."docker.io"]
            endpoint = ["https://registry-1.docker.io"]
         [plugins."io.containerd.grpc.v1.cri".registry.mirrors."11.8.75.154:11111"]
             endpoint = ["https://11.8.75.154:11111"]
      [plugins."io.containerd.grpc.v1.cri".registry.configs]
         [plugins."io.containerd.grpc.v1.cri".registry.configs."11.8.75.154:11111".tls]
             ca_file = "/etc/ssl/certs/ca.crt" #Specify CA certificate
         [plugins."io.containerd.grpc.v1.cri".registry.configs."11.8.75.154:11111".auth]
             username = "admin"
             password = "Harbor12345"
Restart the container after the configuration file:
systemctl restart containerd
When Kubernetes needs to pull the Harbor image, it will automatically authenticate the Harbor image warehouse according to the configuration of the container.
Kubernetes deploys Harbor
The above described method of deploying harbor through Docker Compose is usually only used in the stand-alone test environment. In the production environment, users may need to deploy harbor in the Kubernetes cluster. Harbor provides Helm Chart to help users quickly deploy harbor on Kubernetes.
Add Harbor Helm Chart warehouse and download Helm Chart locally.
helm repo add harbor https://helm.goharbor.io
helm pull  harbor/harbor --untar
Edit Harbar / values Yaml file:
- Modify the service type to nodePort so that machines outside the Kubernetes cluster can access Harbor through Node:IP.
- Set the domain name of the HTTPS certificate.
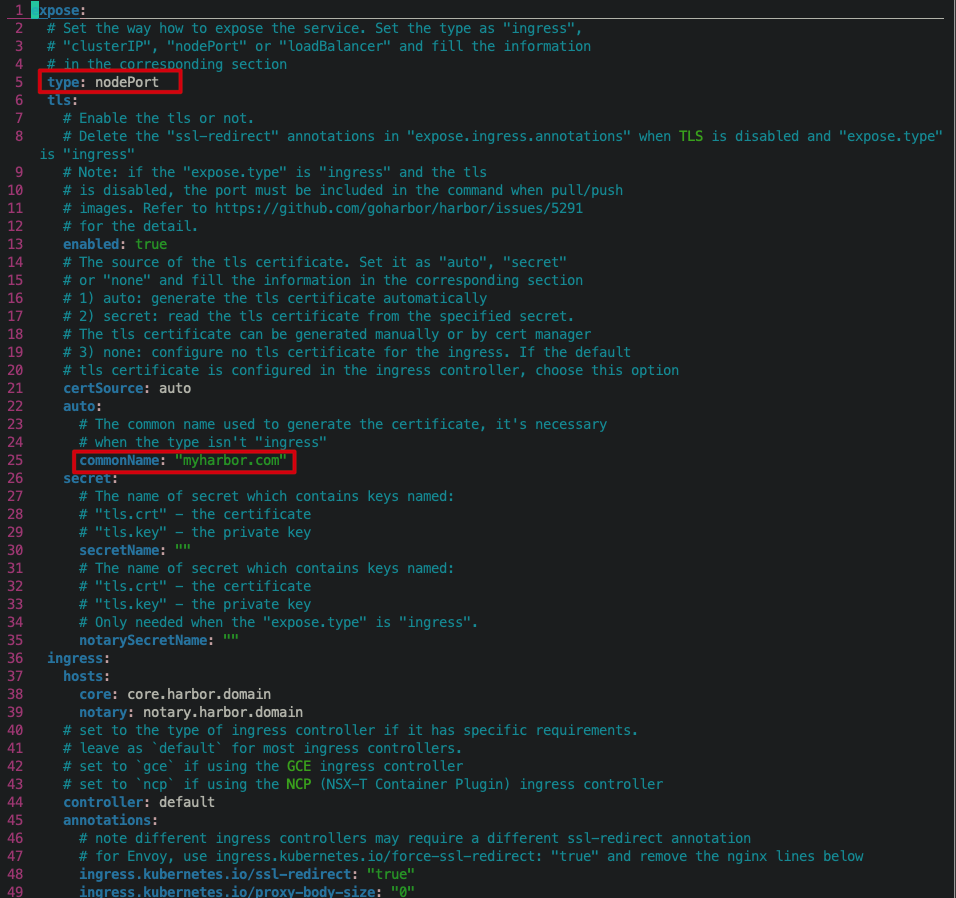
- Modify the externalURL to indicate the address where the external client accesses Harbor.

Execute the following command to deploy Harbor in the cloudnative lab namespace.
helm install harbor -n cloudnative-lab harbor --create-namespace
View the deployed Harbor container.
❯ kubectl get pod -n cloudnative-lab | grep harbor
harbor-chartmuseum-685fccc58d-n6bs7              1/1     Running   0          5m46s
harbor-core-58db6ff9b9-zfk2z                     1/1     Running   1          5m46s
harbor-database-0                                1/1     Running   0          5m46s
harbor-jobservice-6867cc6bfb-cpvrq               1/1     Running   0          5m46s
harbor-nginx-7949594686-f4cxz                    1/1     Running   0          5m46s
harbor-notary-server-6845f46559-975g4            1/1     Running   2          5m46s
harbor-notary-signer-6bcf747cc7-9k62c            1/1     Running   2          5m46s
harbor-portal-c55c48545-twnfn                    1/1     Running   0          5m46s
harbor-redis-0                                   1/1     Running   0          5m46s
harbor-registry-7df77757c4-k4kqz                 2/2     Running   0          5m46s
harbor-trivy-0                                   1/1     Running   1          5m46s
Check the Harbor related services. Note the service named Harbor, which is the service corresponding to the container of the Harbor reverse agent Nginx. It is exposed outside the cluster through NodePort. Next, outside the Kubernetes cluster, we all access Harbor through this service.
❯ kubectl get svc -n cloudnative-lab | grep harbor
harbor                          NodePort    24.3.218.77    <none>        80:30002/TCP,443:30003/TCP,4443:30004/TCP   6m7s
harbor-chartmuseum              ClusterIP   24.3.89.193    <none>        80/TCP                                      6m8s
harbor-core                     ClusterIP   24.3.166.42    <none>        80/TCP                                      6m8s
harbor-database                 ClusterIP   24.3.68.131    <none>        5432/TCP                                    6m8s
harbor-jobservice               ClusterIP   24.3.96.160    <none>        80/TCP                                      6m8s
harbor-notary-server            ClusterIP   24.3.15.36     <none>        4443/TCP                                    6m7s
harbor-notary-signer            ClusterIP   24.3.150.117   <none>        7899/TCP                                    6m7s
harbor-portal                   ClusterIP   24.3.183.66    <none>        80/TCP                                      6m7s
harbor-redis                    ClusterIP   24.3.254.28    <none>        6379/TCP                                    6m7s
harbor-registry                 ClusterIP   24.3.167.212   <none>        5000/TCP,8080/TCP                           6m7s
harbor-trivy                    ClusterIP   24.3.110.121   <none>        8080/TCP                                    6m7s
Add hosts record on the client and edit / etc/hosts, 11.8 38.43 is the IP address of one of the Kubernetes nodes, myharbor COM is the domain name specified when we deployed Harbor earlier.
11.8.38.43 myharbor.com
Deploying Harbor through Kubernetes will generate a self signed certificate and start HTTPS encryption by default. Browser input https://myharbor.com:30003 Access the Harbor user interface.
Harbor is used as Helm Chart product warehouse
Harbor can not only be used as a mirror warehouse, but also manage artifacts such as Helm Chart, CNAB, OPA Bundle, etc. that comply with OCI specifications.
Upload Helm Charts from WebUI
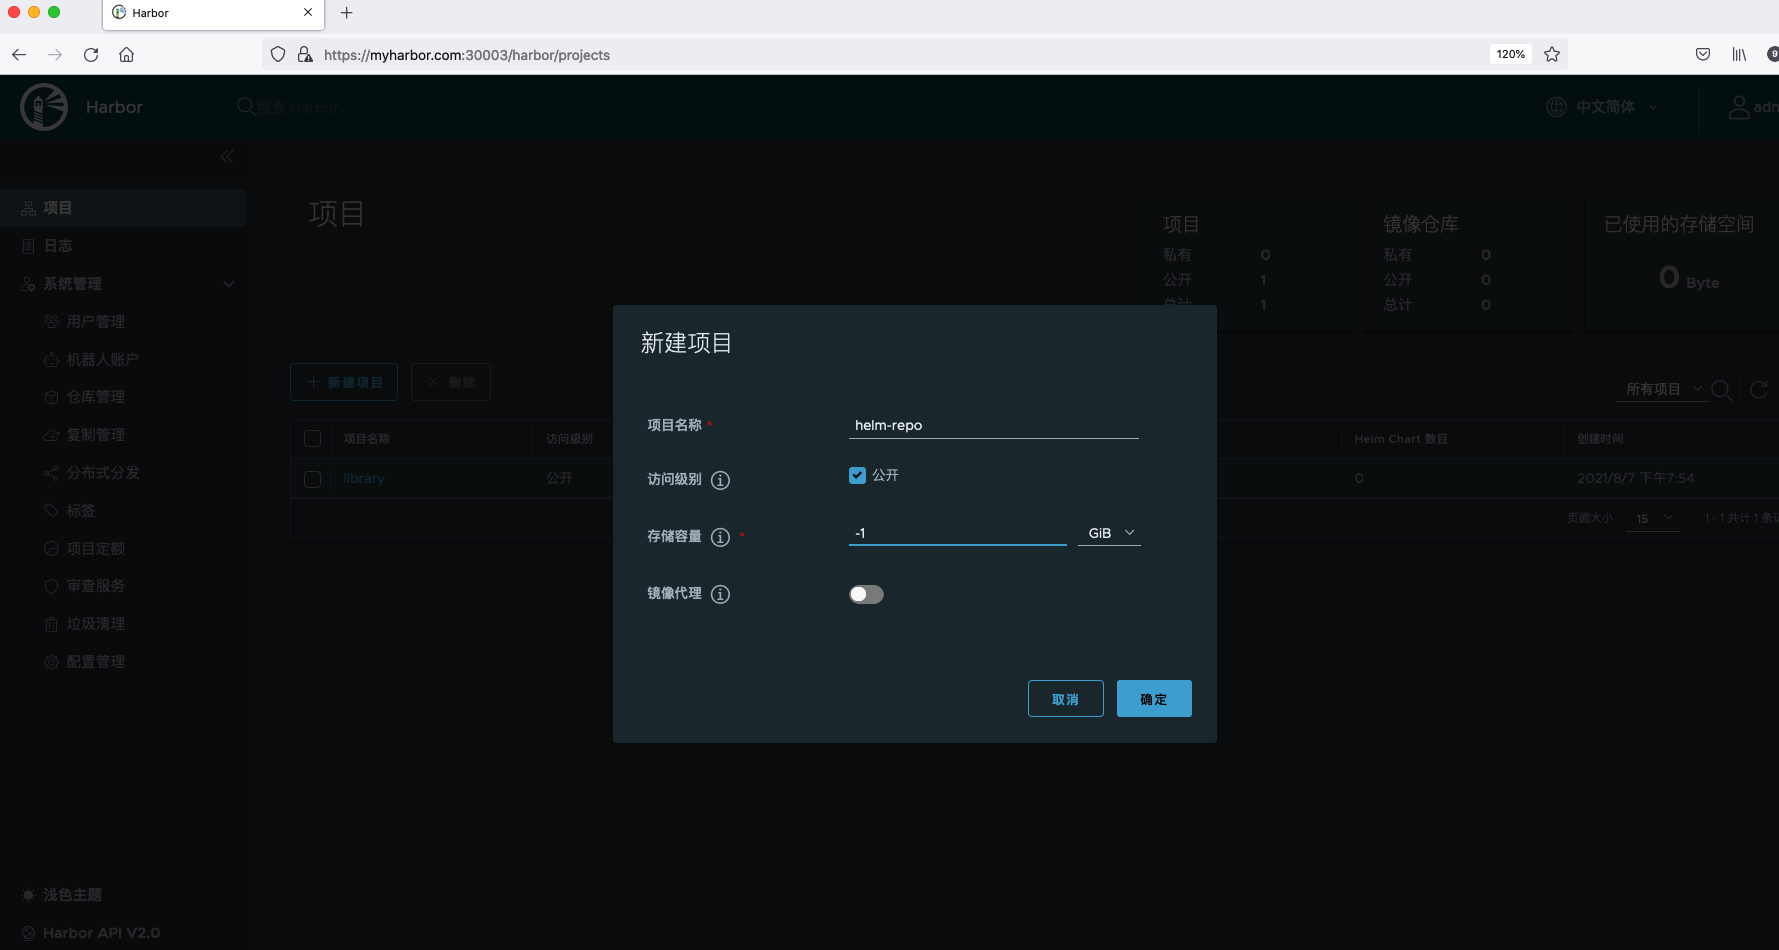
First, create a new project named helm repo.
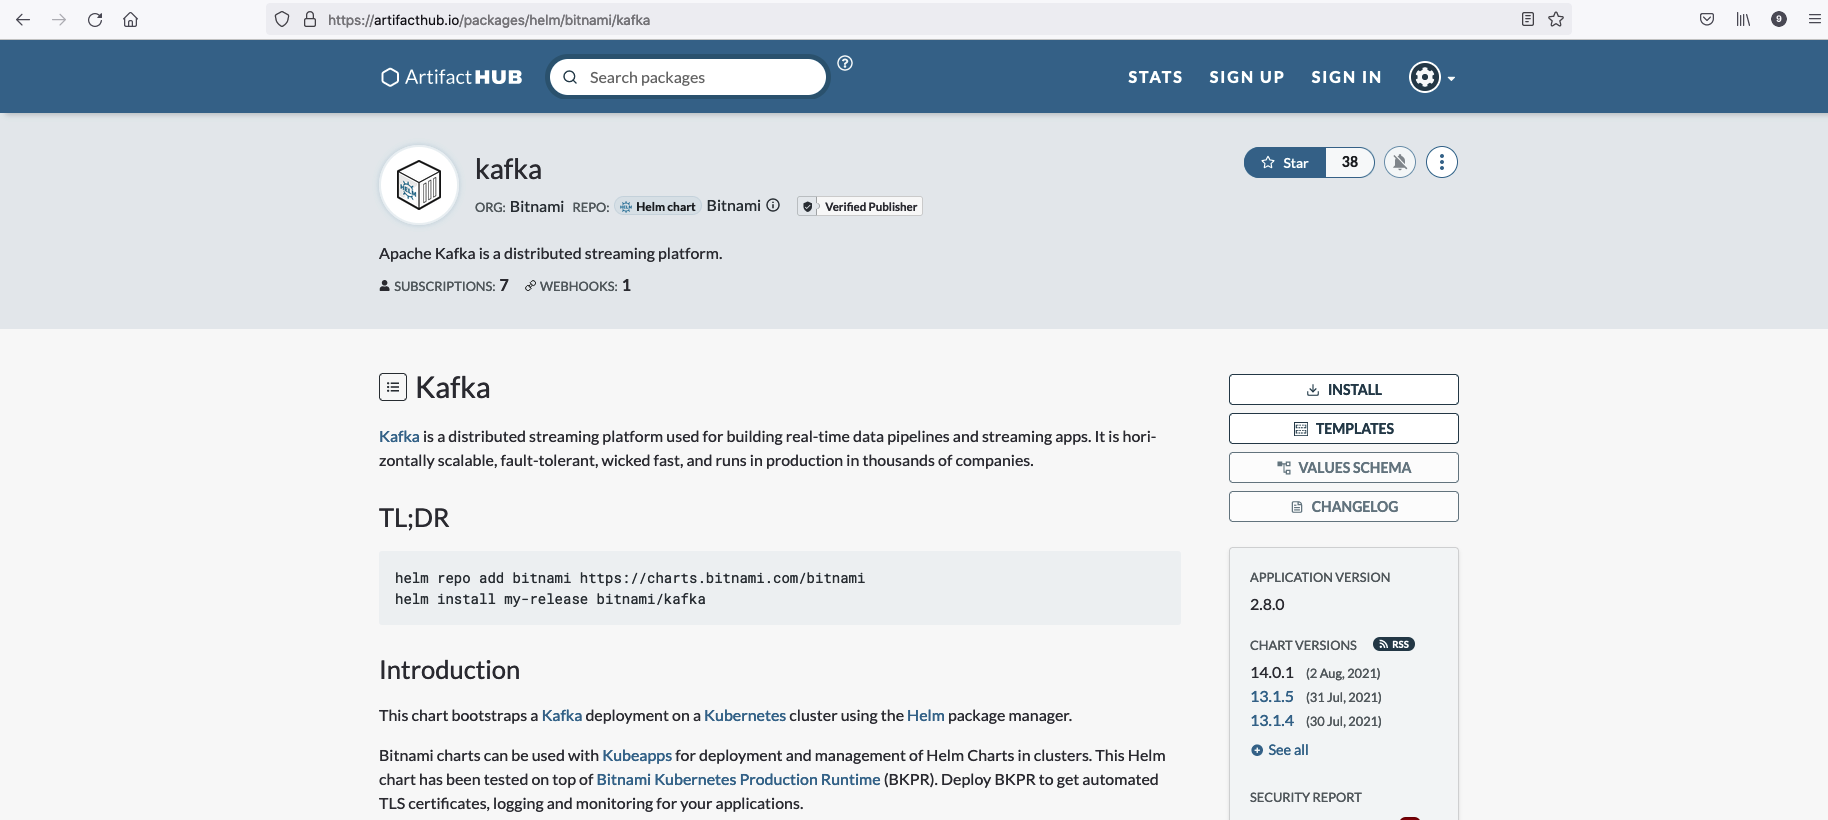
from Helm Chart warehouse Find a Helm Chart shared by others. Here I choose a Kafka Helm Chart.
Use the following command to pull Kafka Helm Chart.
helm repo add bitnami https://charts.bitnami.com/bitnami
helm pull bitnami/kafka
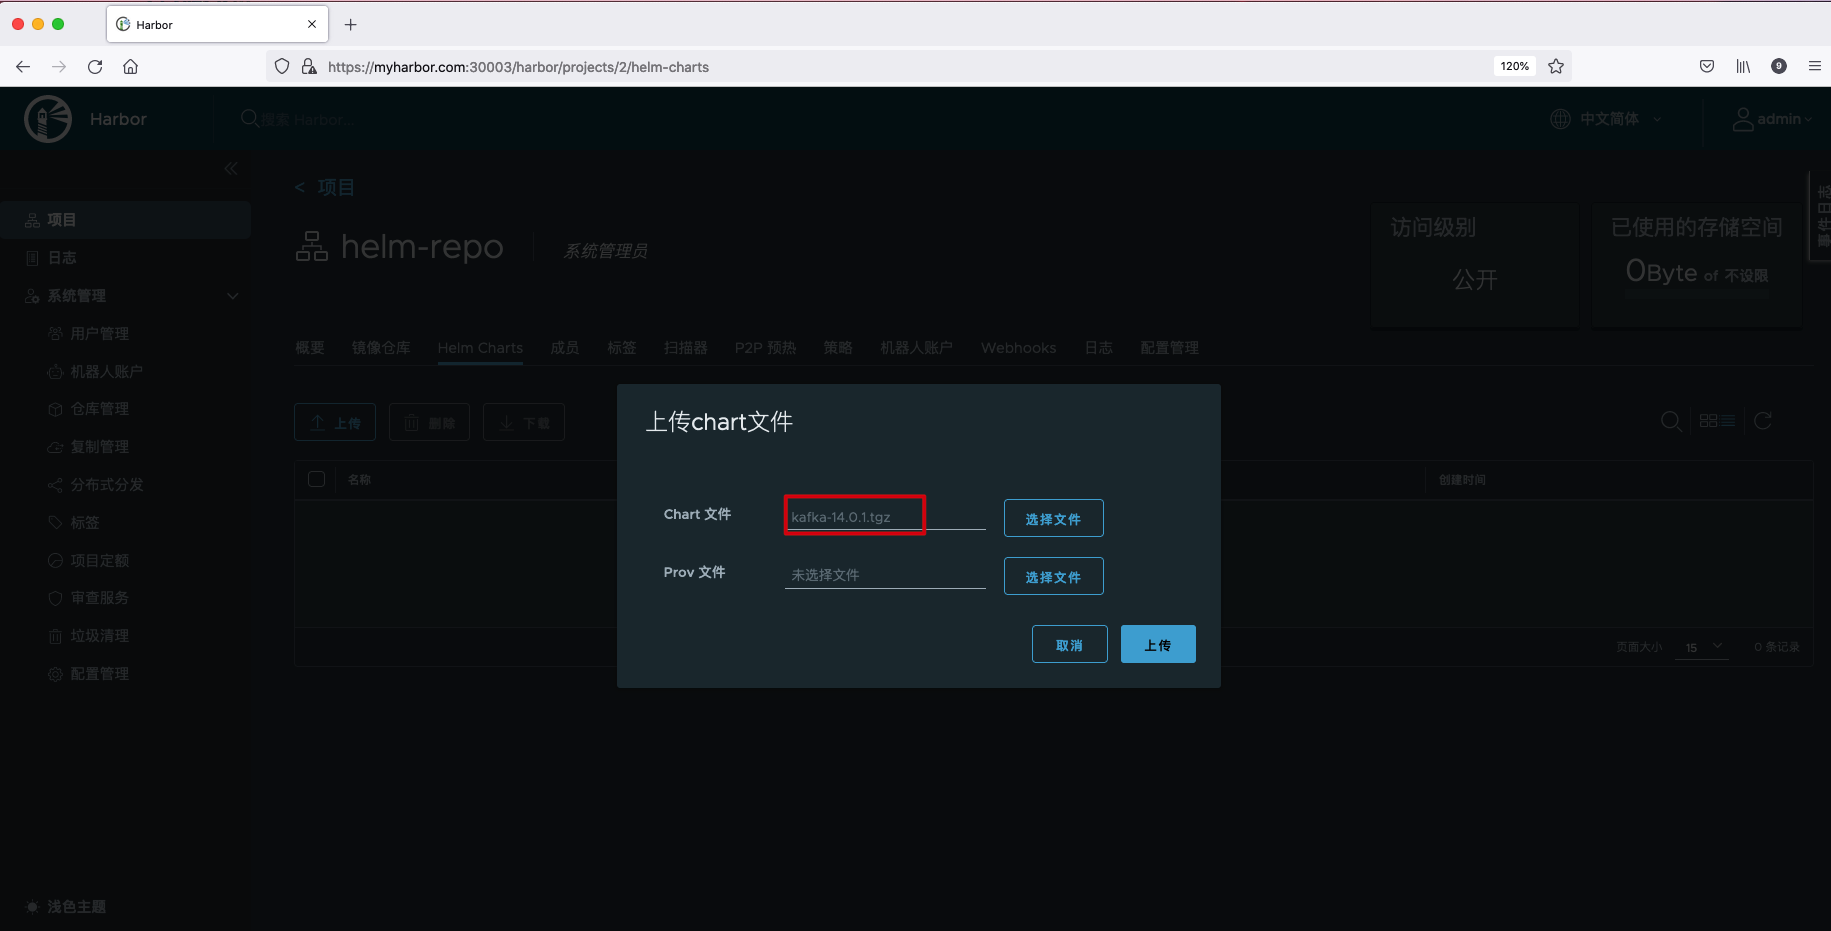
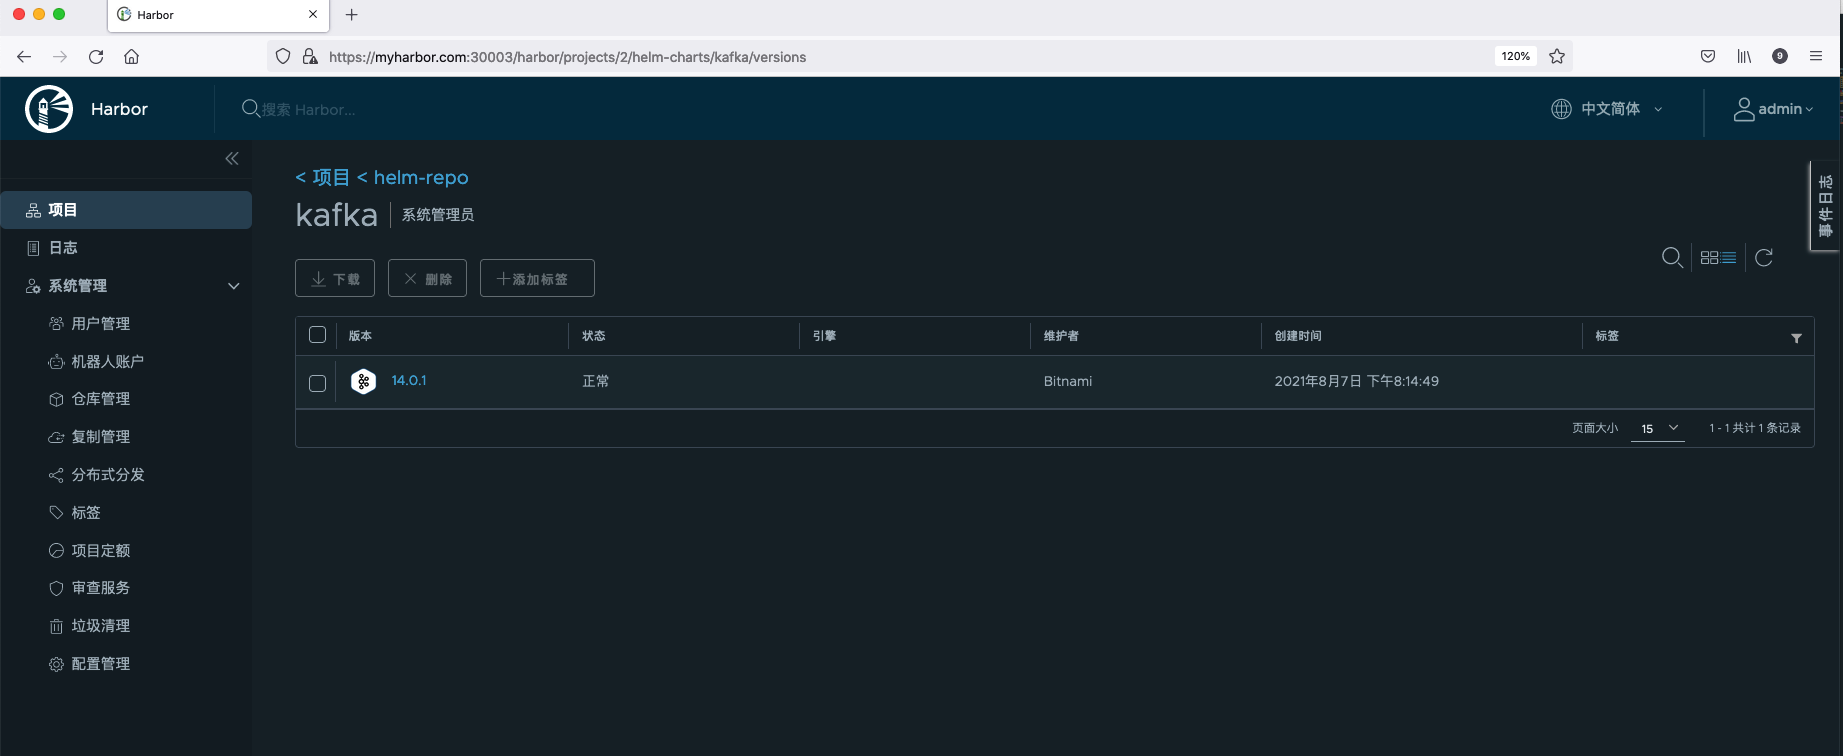
Select the compressed file of Kafka Helm Chart in the Harbor interface and click upload.
After Helm Charts is uploaded successfully, you can see relevant information, including Chart version number, status, author, template engine, creation time, etc.
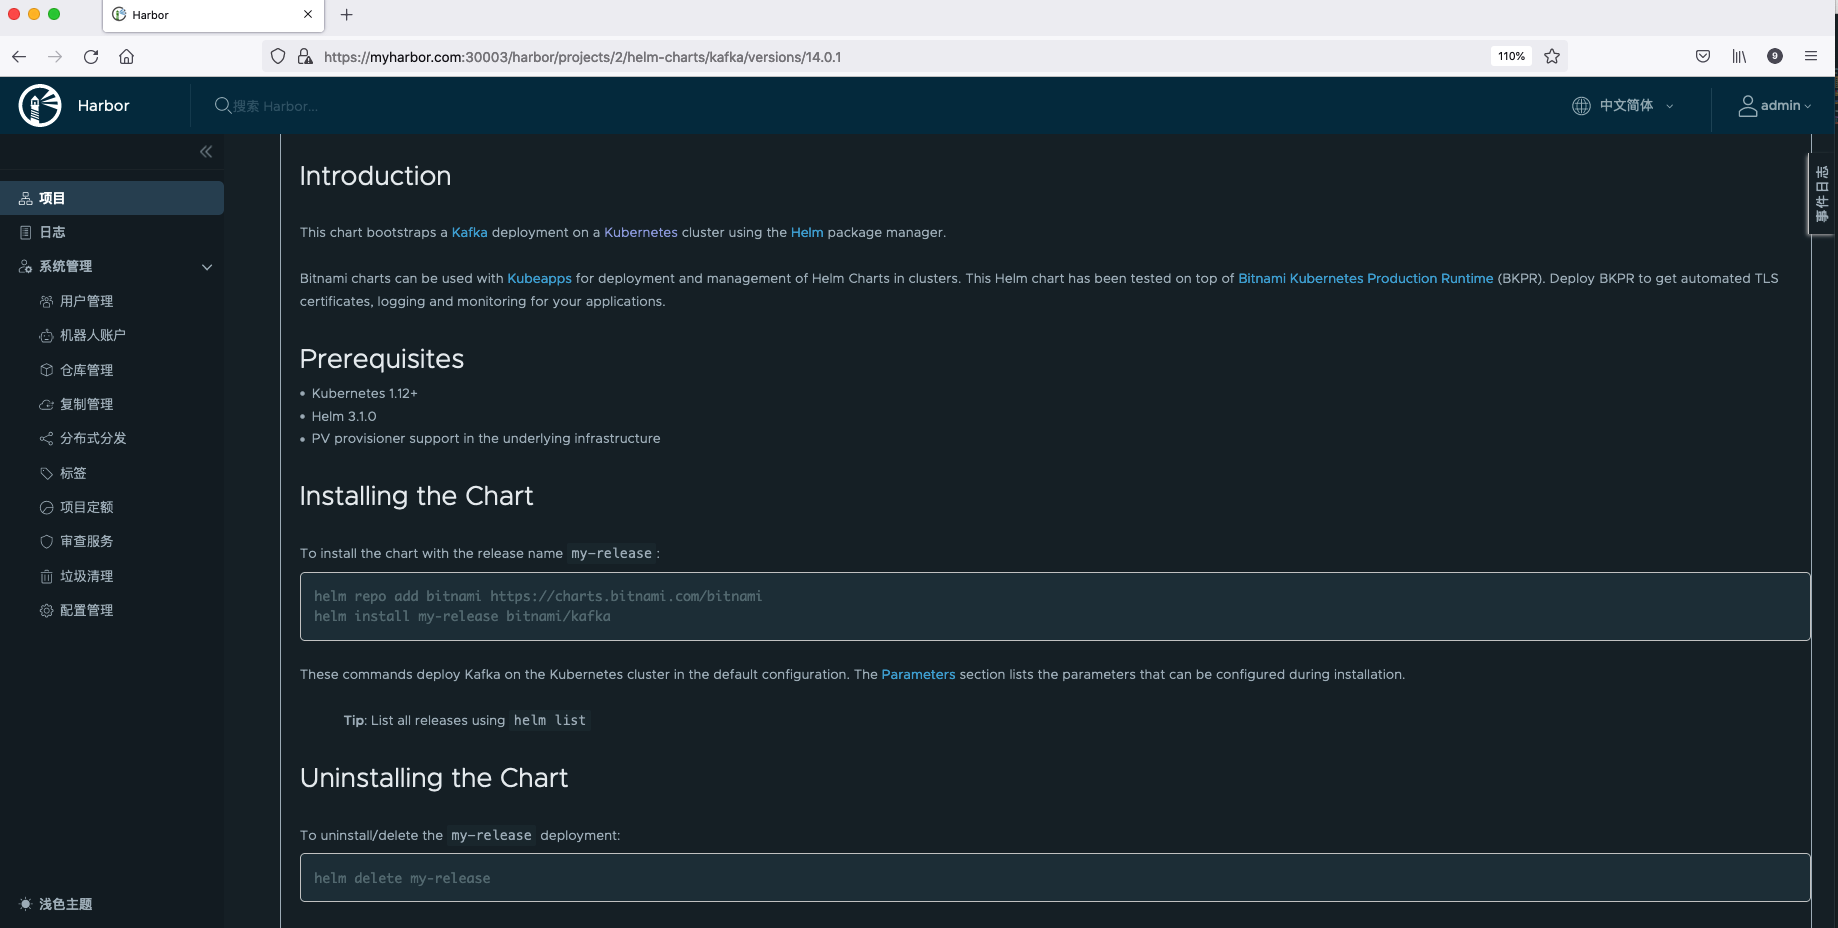
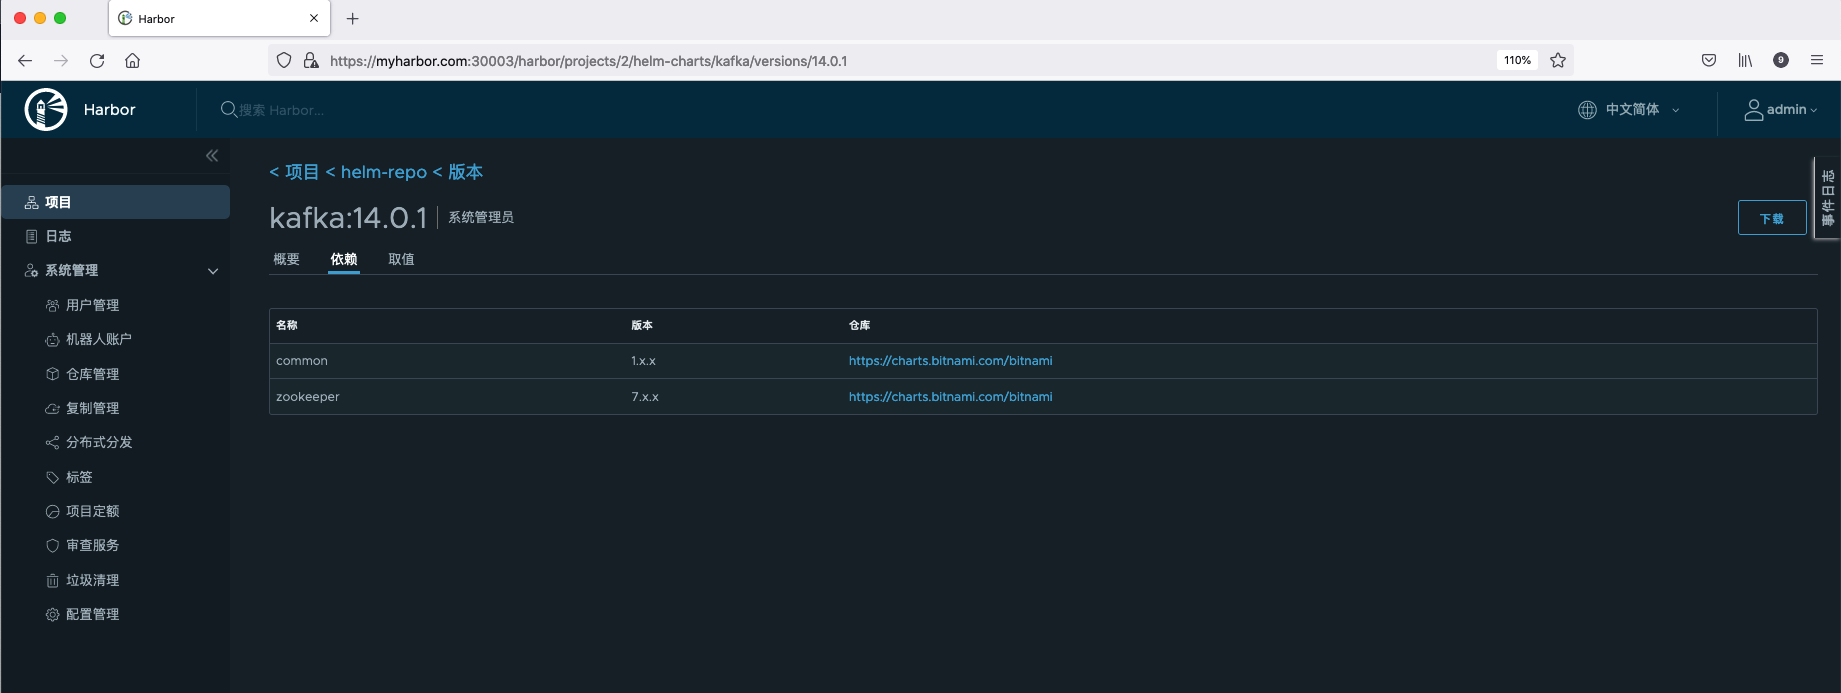
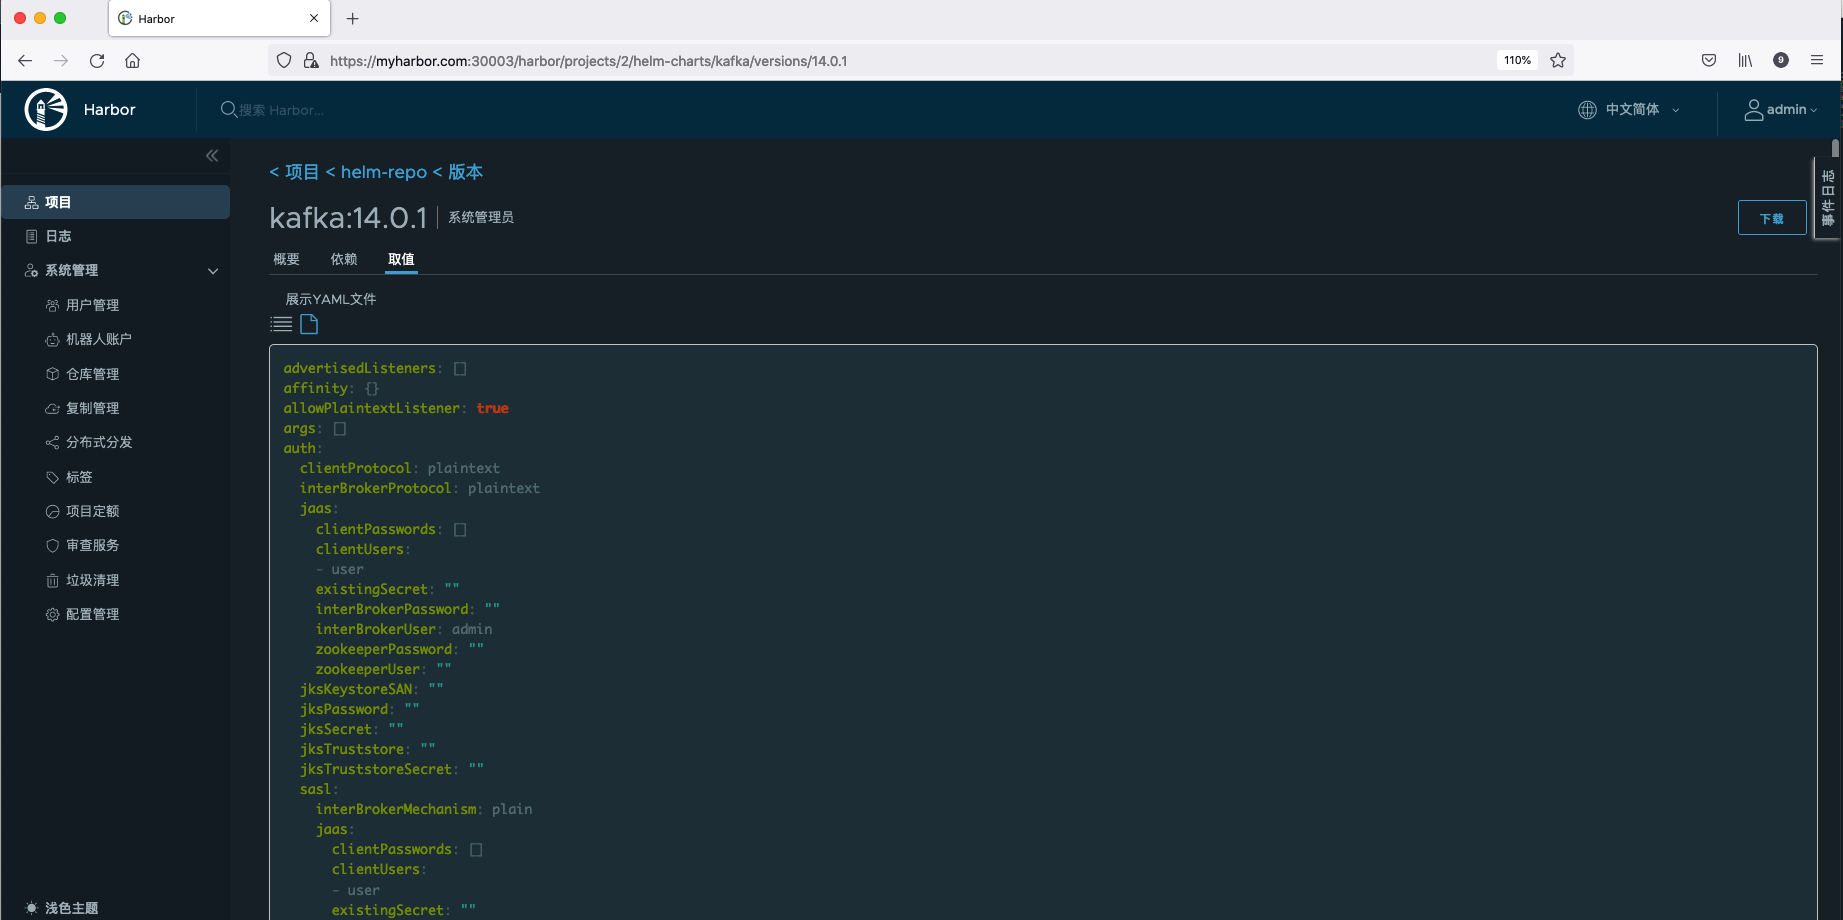
Click Chart version to view the detailed information of the Chart, mainly including Summary, Dependencies, Values and other related information.
- Summary: introduction to Helm Chart and installation commands.
- Dependencies: other repository information that Helm Chart depends on.
- Values: values of Helm Chart Yaml file content.
Add harbor helm warehouse
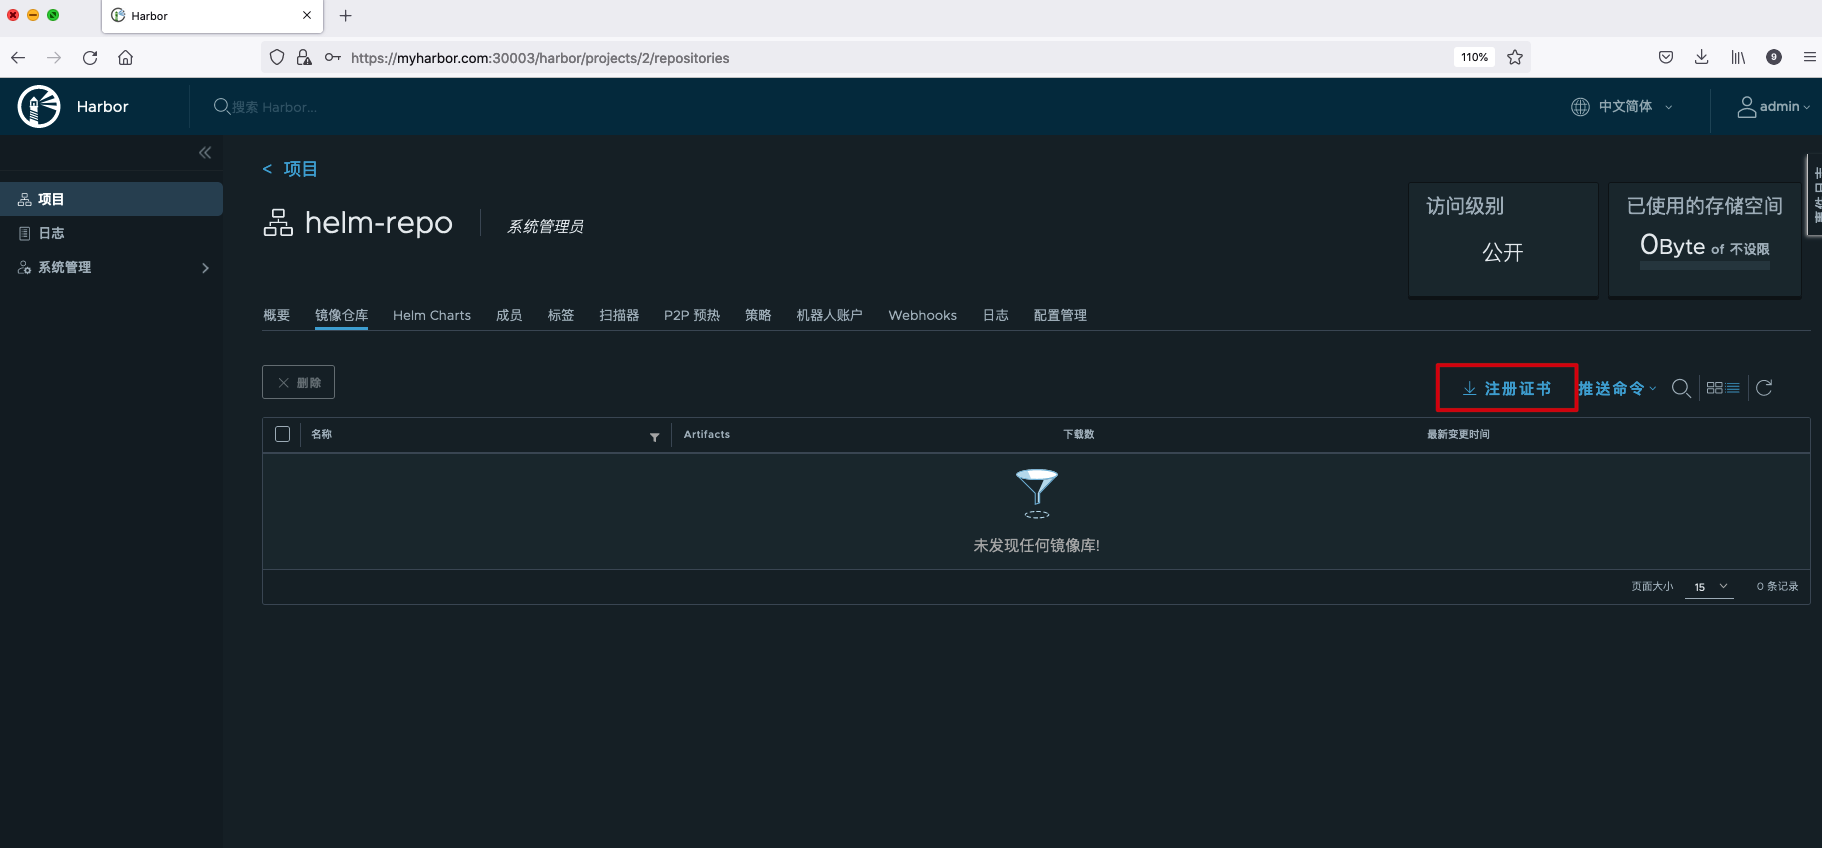
Because our HTTPS certificate is a self signed certificate, we need to bring ca.crt when adding the warehouse. If it is a certificate signed by a trusted third-party CA, this step is not necessary. Click the registration certificate to download the ca.crt file.
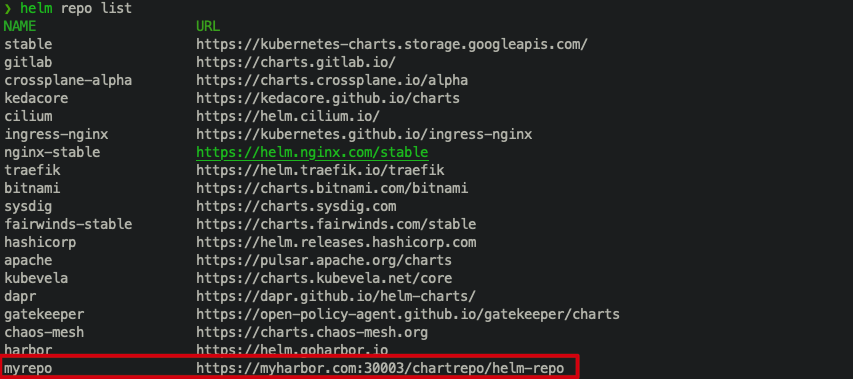
Specify the ca.crt file when using the helm repo add command.
helm repo add --ca-file ca.crt \
--username=admin --password=Harbor12345 \
myrepo https://myharbor.com:30003/chartrepo/helm-repo
View the warehouse named myrepo that you just added.
Deploy Helm Charts
helm install kafka --ca-file=ca.crt \
--username=admin --password=Harbor12345 myrepo/kafka
View the deployed Kafka Helm Chart.
❯ kubectl get pod -n cloudnative-lab | grep kafka
kafka-0                                          1/1     Running   1          36m
kafka-zookeeper-0                                1/1     Running   0          36m
CLI upload Helm Charts
If we want to upload Helm Charts to Harbor through CLI, we need to install helm plugin.
helm plugin install https://github.com/chartmuseum/helm-push
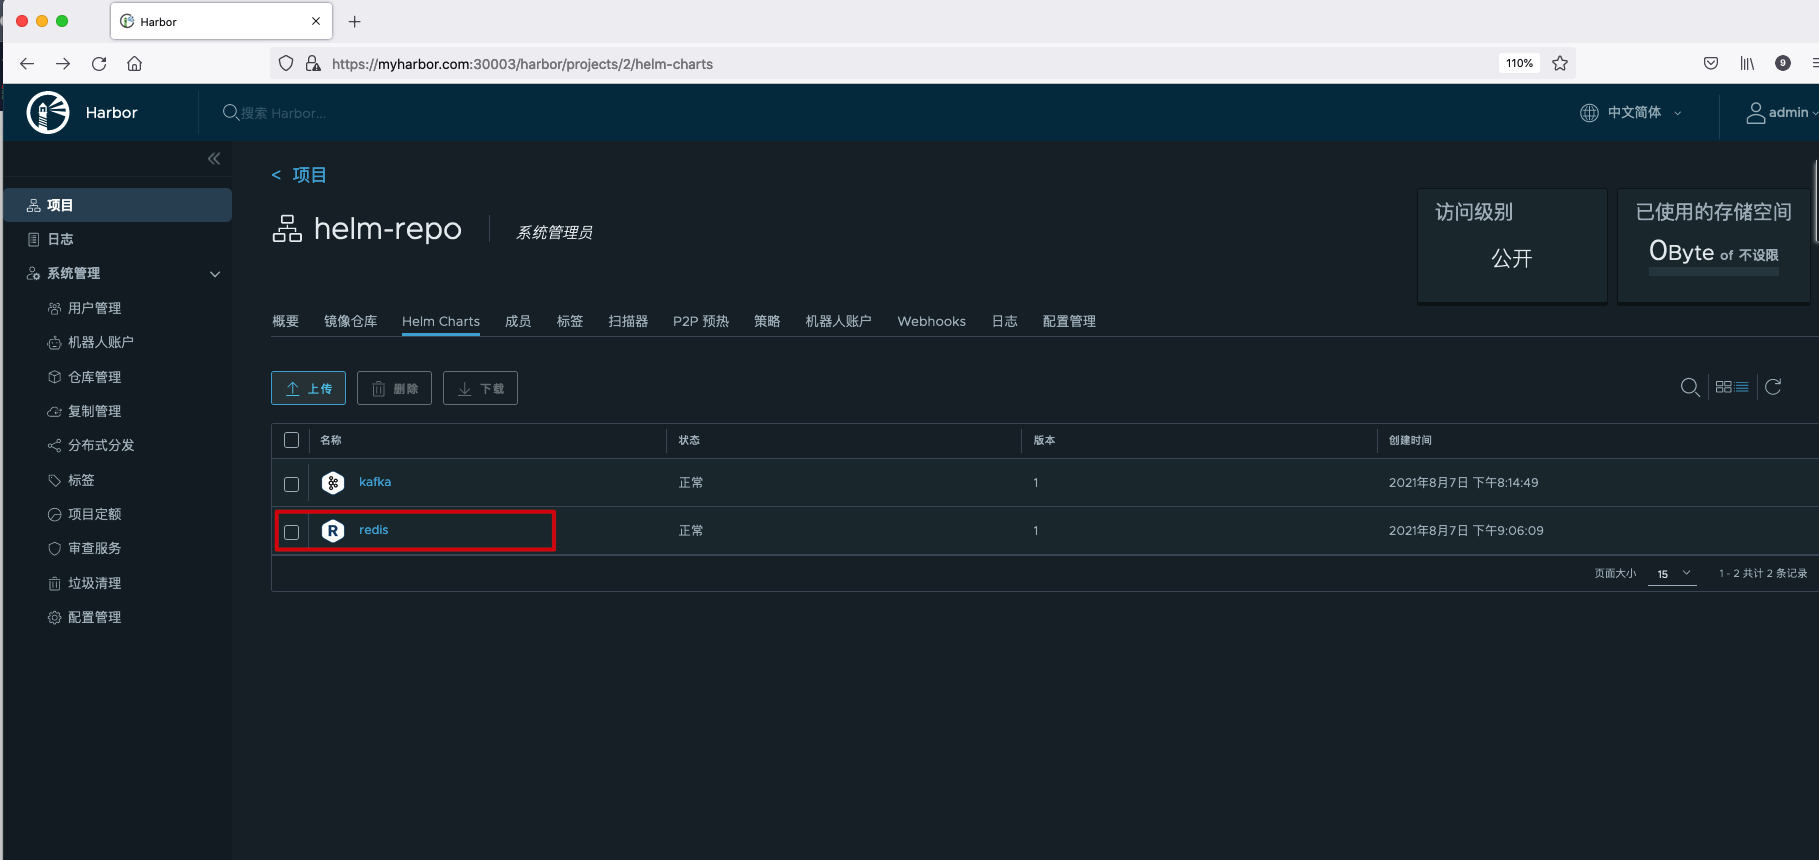
Upload the Redis Helm Charts prepared locally in advance to the Harbor warehouse.
helm push --ca-file=ca.crt --username=admin --password=Harbor12345  redis  myrepo
Pushing redis-12.7.7.tgz to myrepo...
Done.
View the newly uploaded Redis Helm Chart.
Remote replication
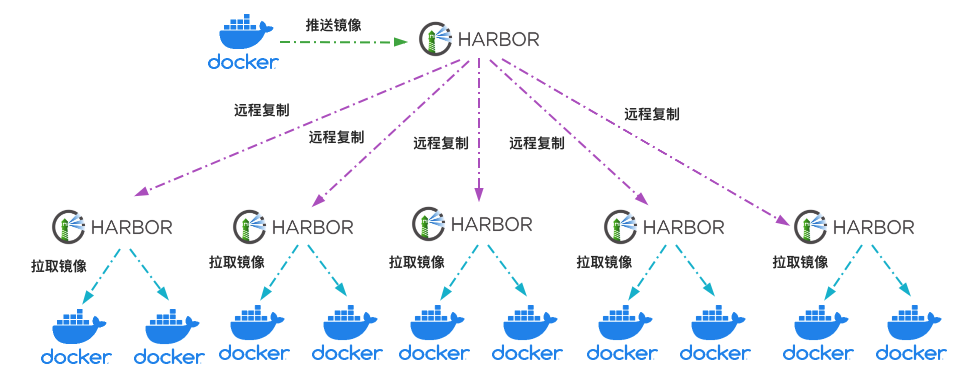
In a large-scale cluster environment, if all Docker hosts pull images from one image warehouse, the image warehouse is likely to become a bottleneck of image distribution and affect the speed of image distribution. This problem can be solved by building multiple image warehouses and using the remote replication function. As shown in the following figure, the image warehouse in the figure is divided into two levels: primary warehouse and sub warehouse. The remote replication policy is configured between the primary warehouse and the sub warehouse. When an application image is pushed to the main warehouse, the image can be distributed to other sub image warehouses immediately according to the configured replication policy. The Docker host in the cluster can pull the required image from any sub warehouse nearby to reduce the pressure on the main warehouse.
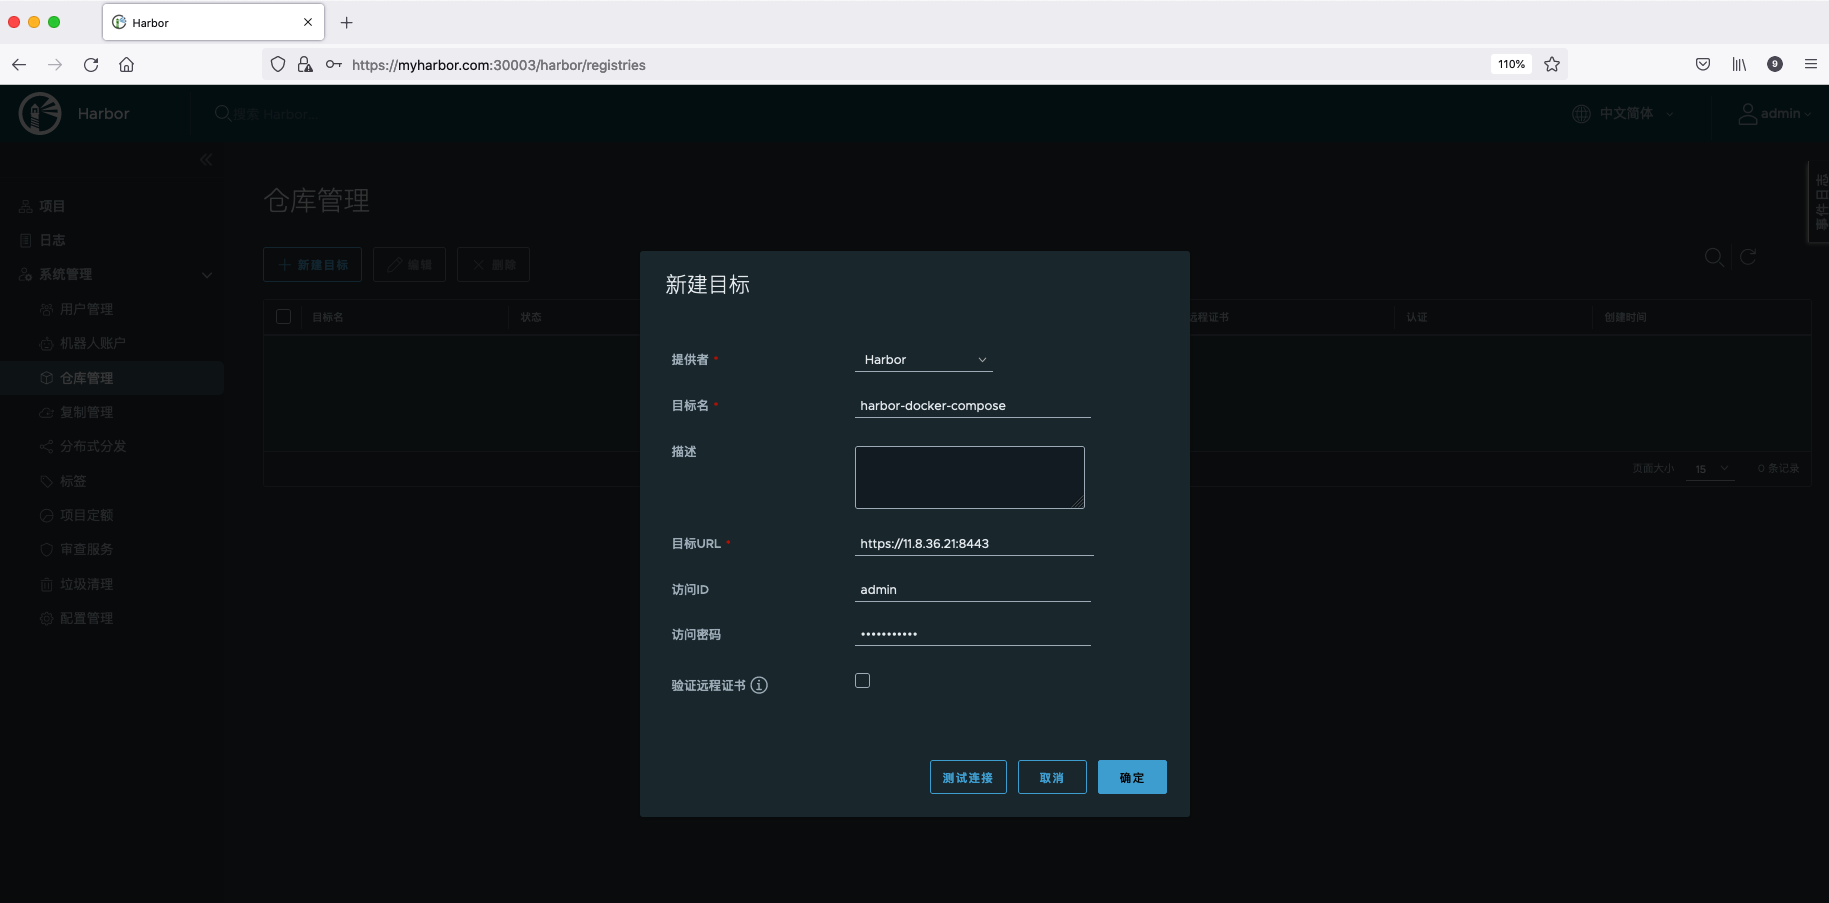
First, create a new target warehouse. The target warehouse here selects the Harbor previously deployed with Docker Compose.
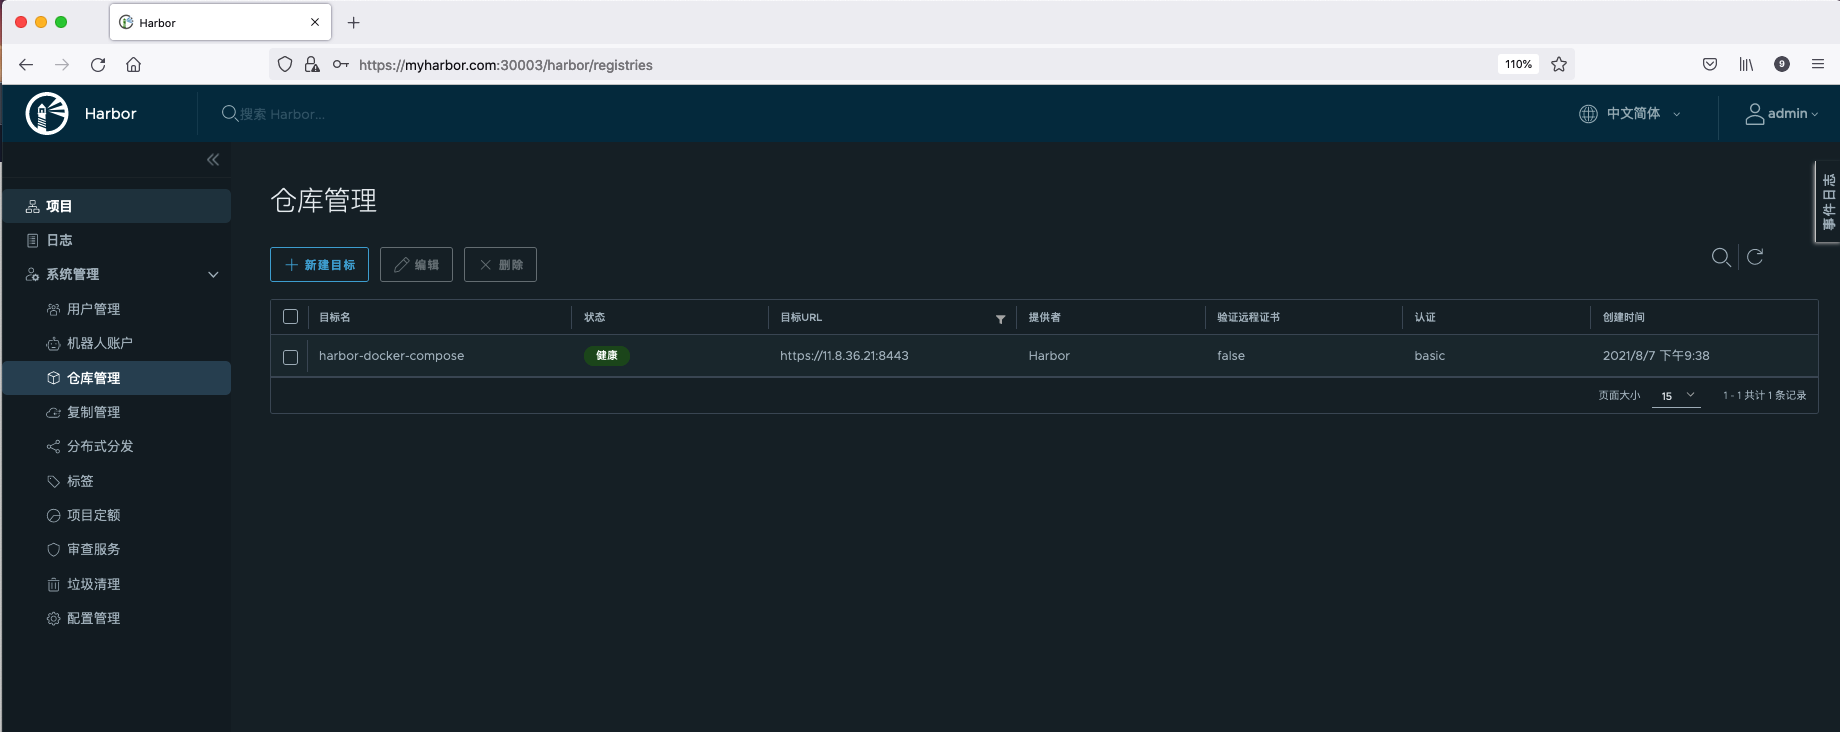
View the created target warehouse.
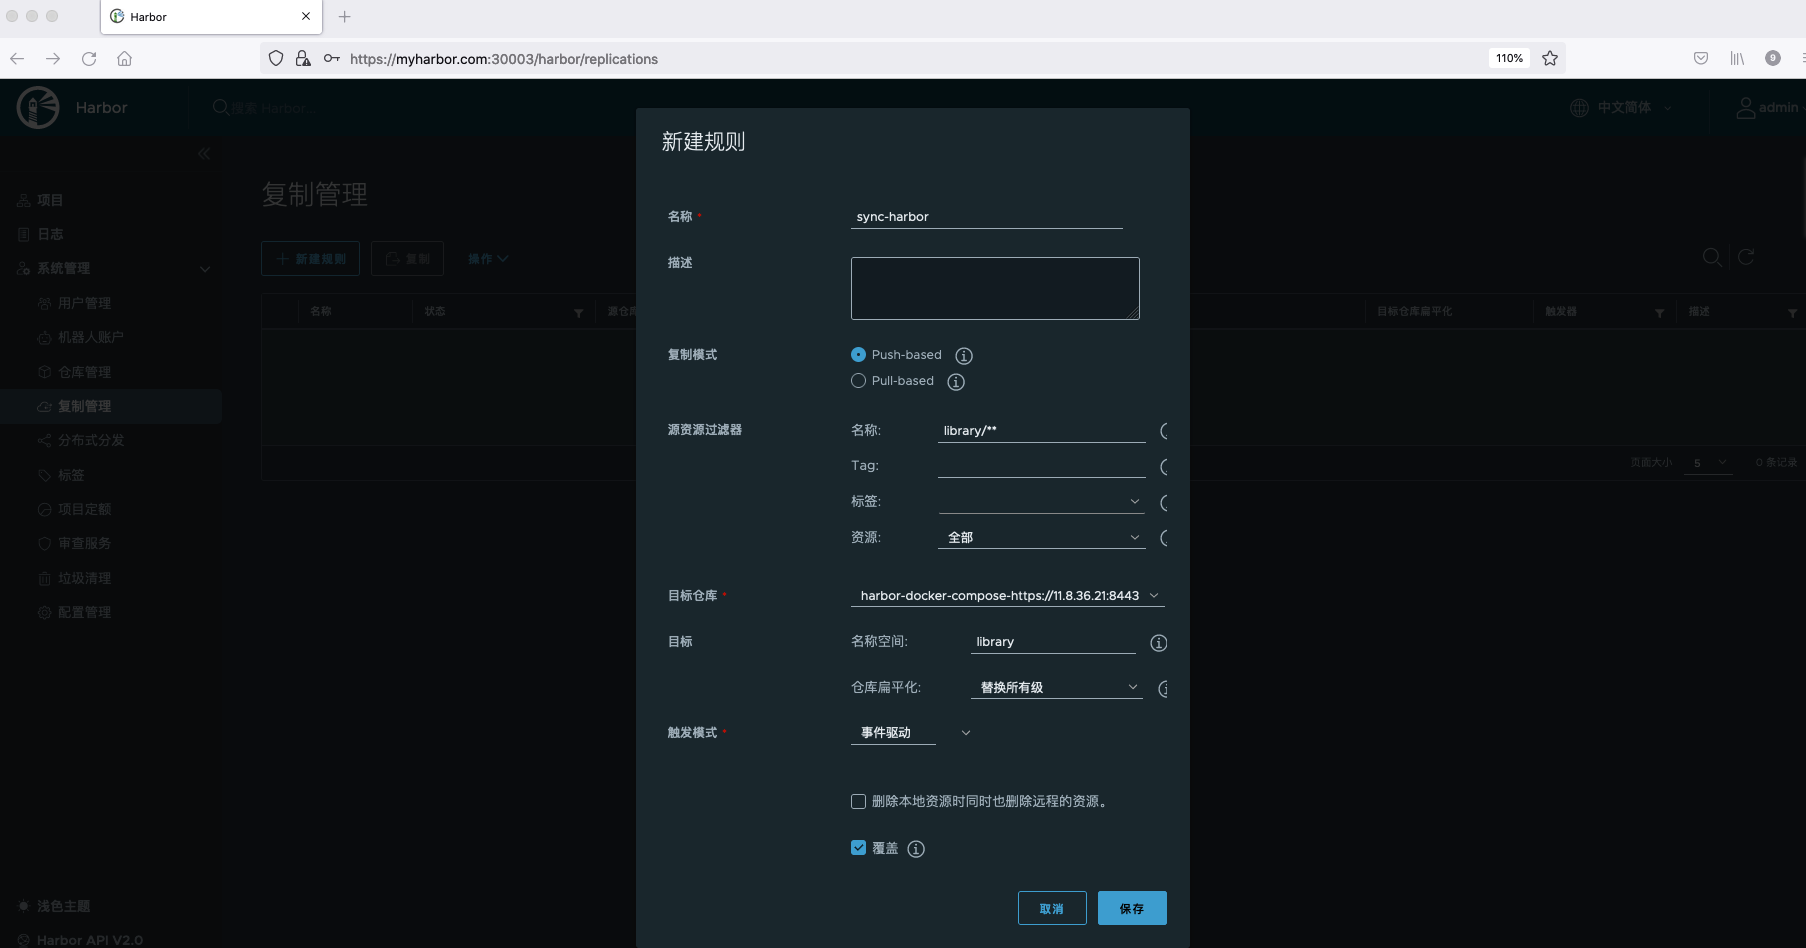
Create replication rules. Replication policies support push and pull. Push refers to copying the Artifact of the current Harbor instance to the remote Artifact warehouse service; Pull refers to copying artifacts from other Artifact warehouse services to the current Harbor instance.
Harbor supports four filters for different attributes of Artifact: name filter, Tag filter, Tag filter and resource filter.
Here, we choose to remotely copy all the images under the library project to the Harbor deployed by Docker Compose. The trigger mode is event driven. Once an image is pushed to Harbor, it will be copied to the remote warehouse immediately.
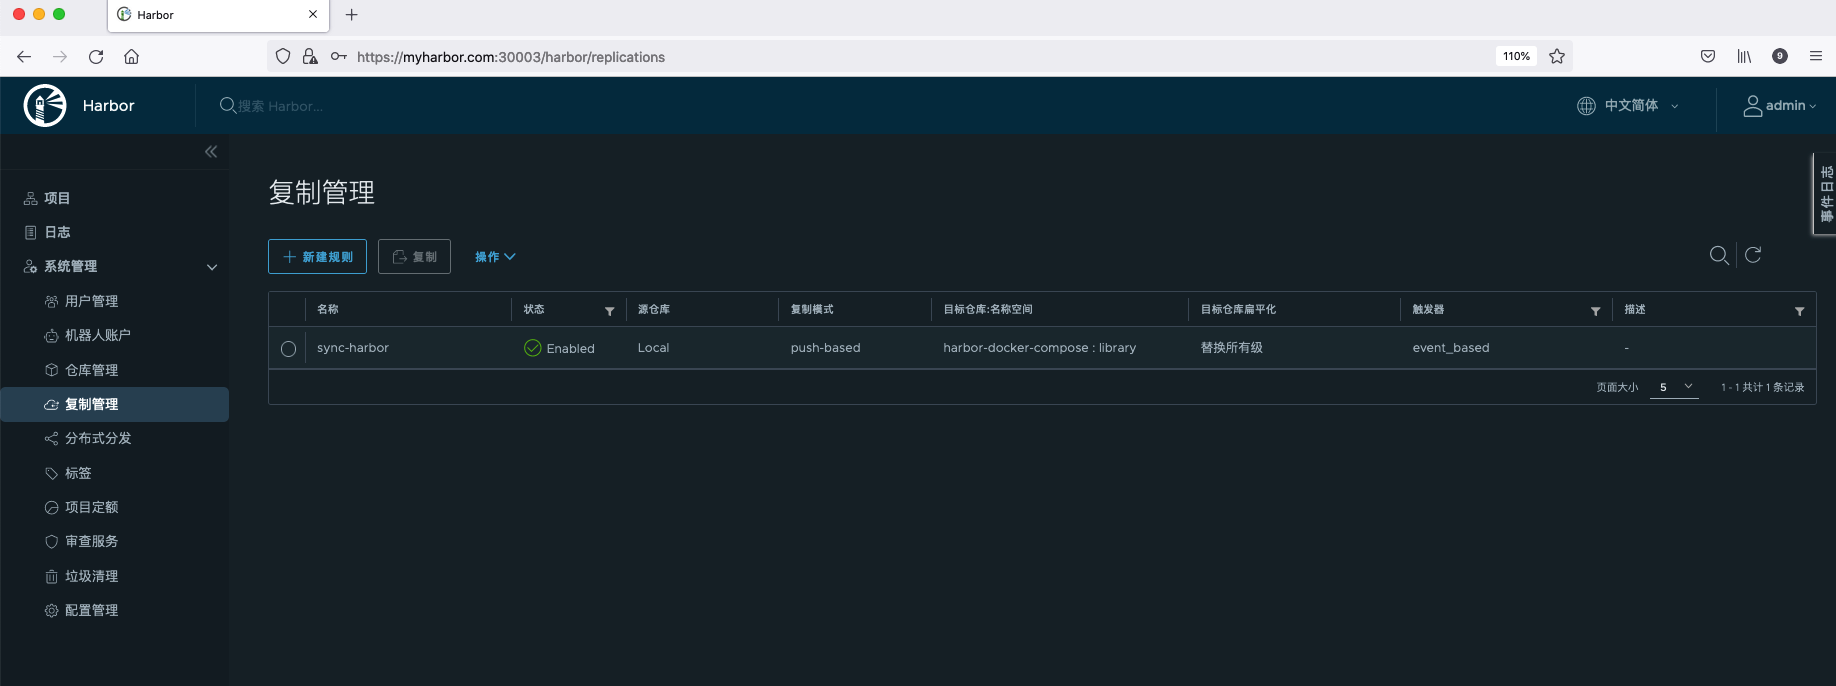
View replication policies.
Let's find a Docker client and upload the image to myharbor Com this harbor needs to be in / etc / Docker / certs D directory, create a directory of Harbor Address: port number, and put the harbor CA certificate in it.
#Create directory
mkdir /etc/docker/certs.d/myharbor.com:30003

#Harbor CA certificate is the same as that downloaded in the chapter using harbor as Helm Chart product warehouse
> ls /etc/docker/certs.d/myharbor.com:30003
ca.crt
tag the local Docker image with the Harbor warehouse.
docker tag 11.8.36.21:8888/library/nginx:1.19 myharbor.com:30003/library/nginx-new:1.19
Push the image to Harbor.
docker push myharbor.com:30003/library/nginx-new:1.19
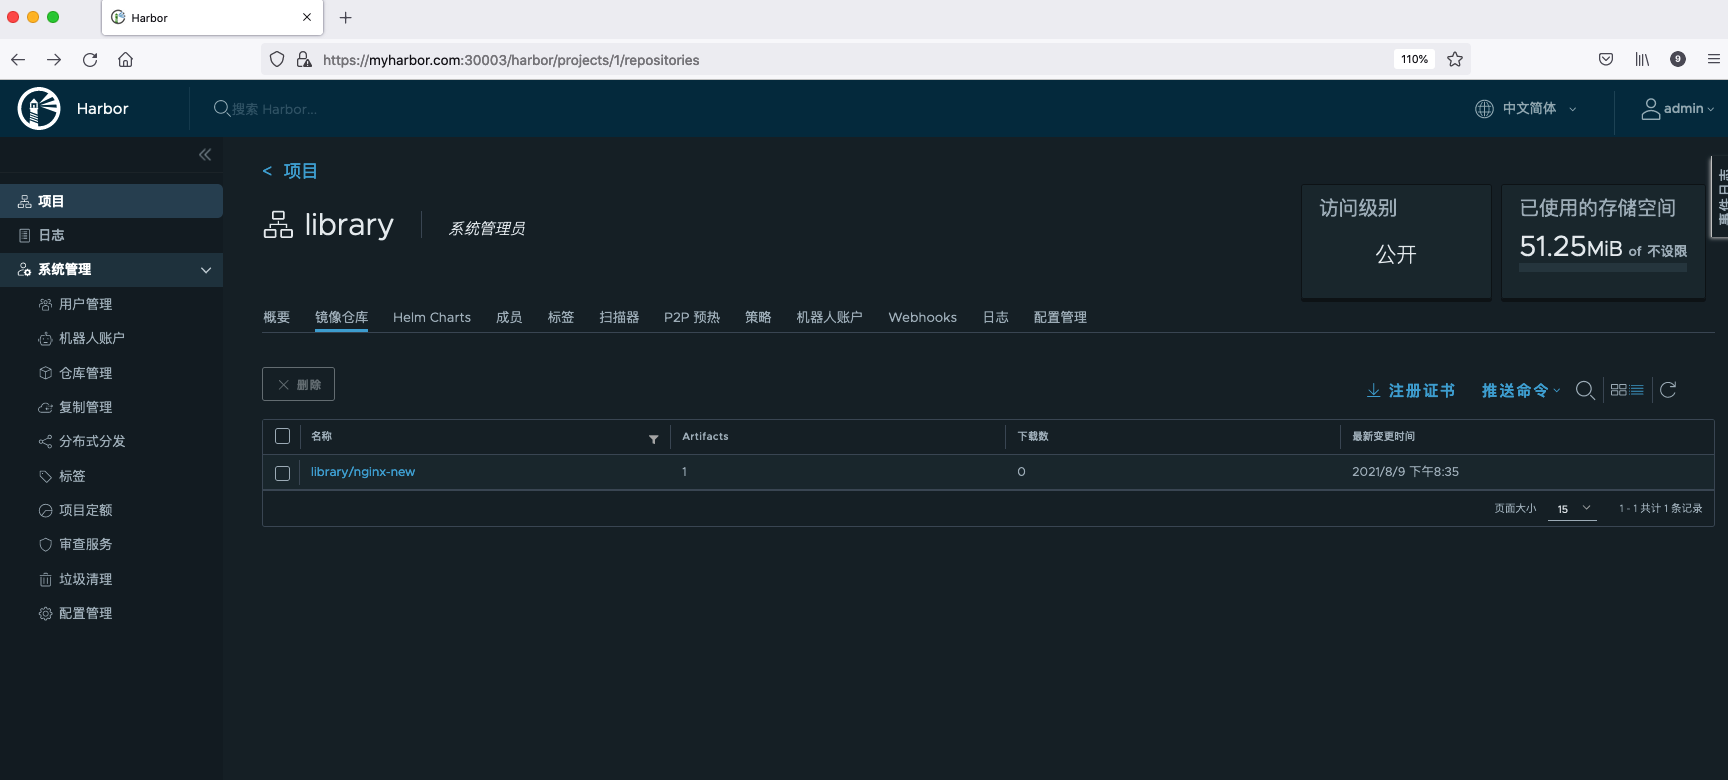
In myharbor View the image just pushed up in the Harbor warehouse of. Com.
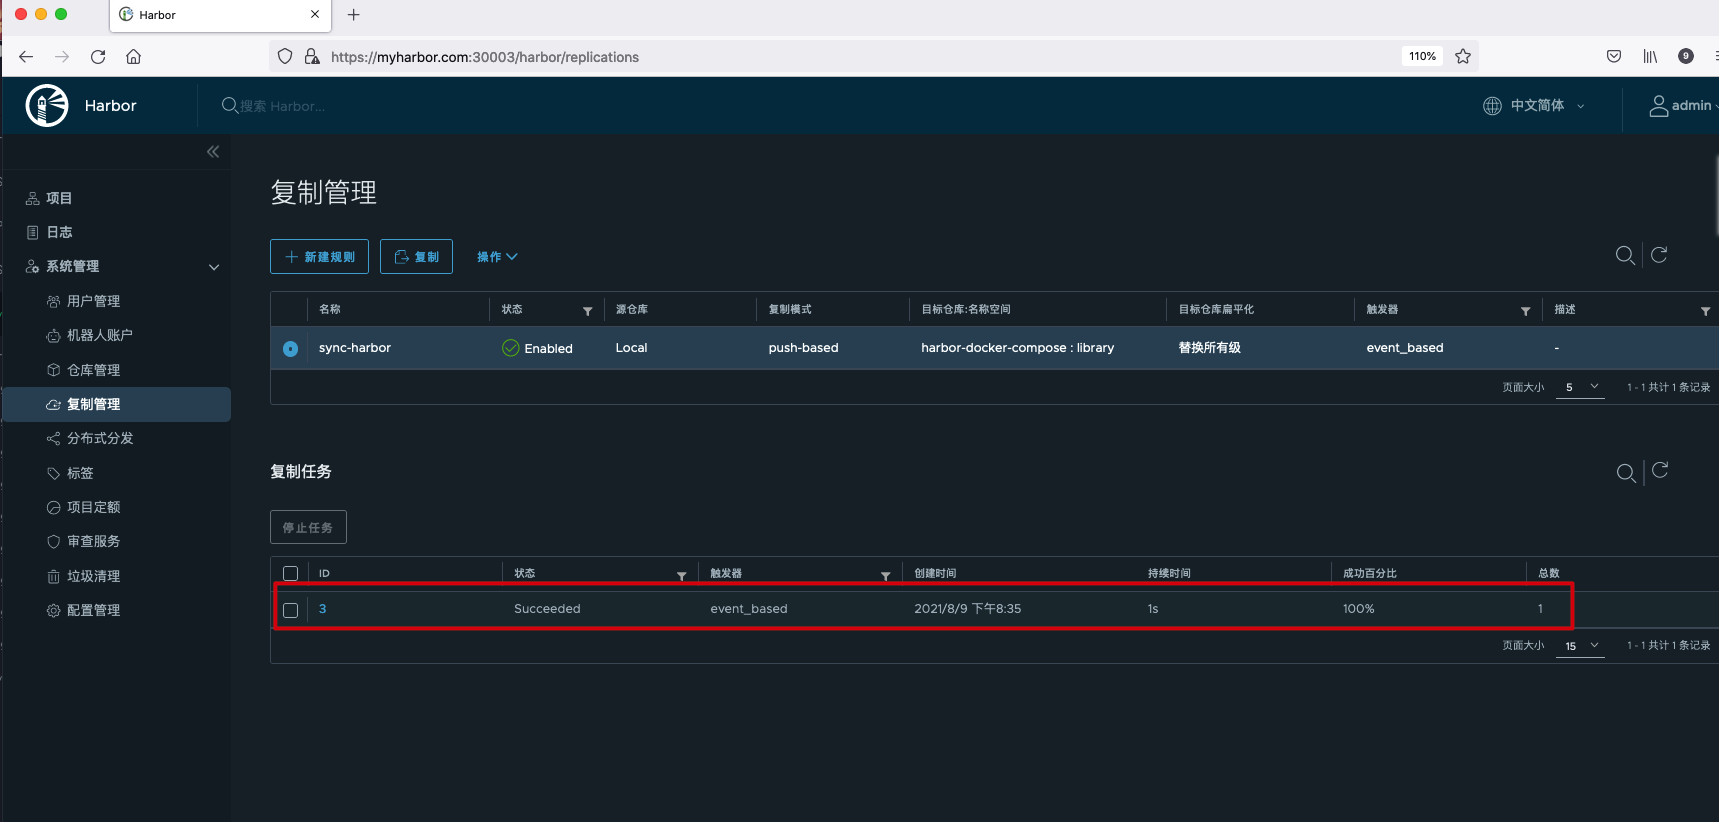
Viewing the replication progress, you can see that the replication has been completed.
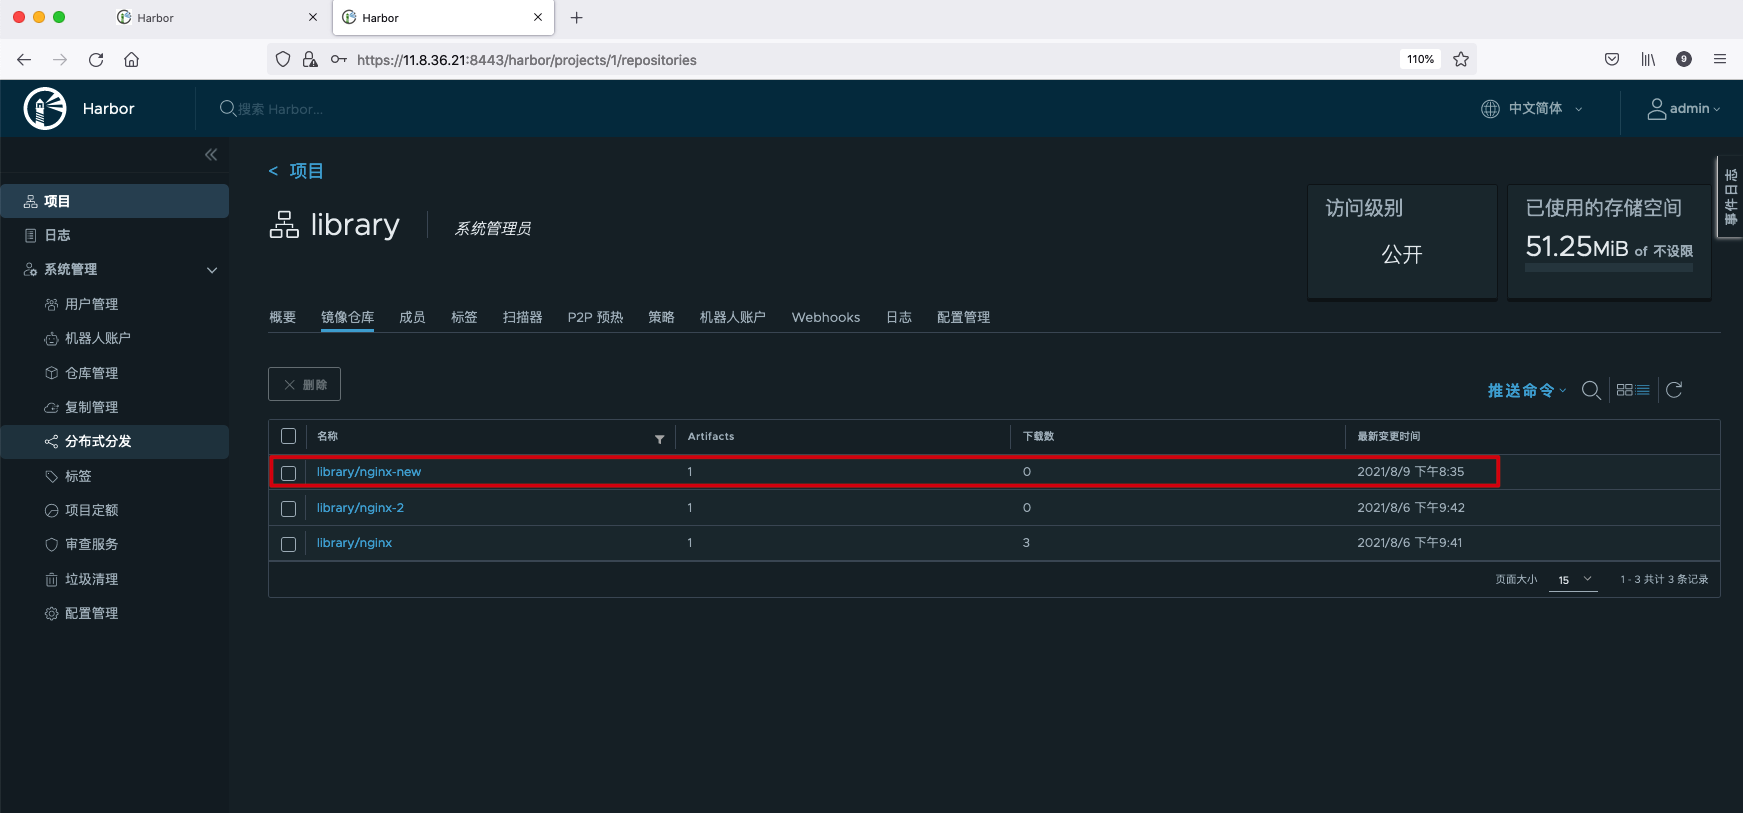
Check the remote warehouse and you can see that the image has been successfully copied.
Mirror scan
Code and software usually have defects. As the packaging form of application and its dependent software package and operating system, container image is no exception. Malicious attackers will use some of these defects to illegally invade the system, destroy the operation of the system or steal private information. These defects are well-known vulnerabilities. Once a defect is identified as a vulnerability, it can be registered as CVE (Common Vulnerabilities and Exposures, publicly disclosed list of computer security vulnerabilities) through MITRE company.
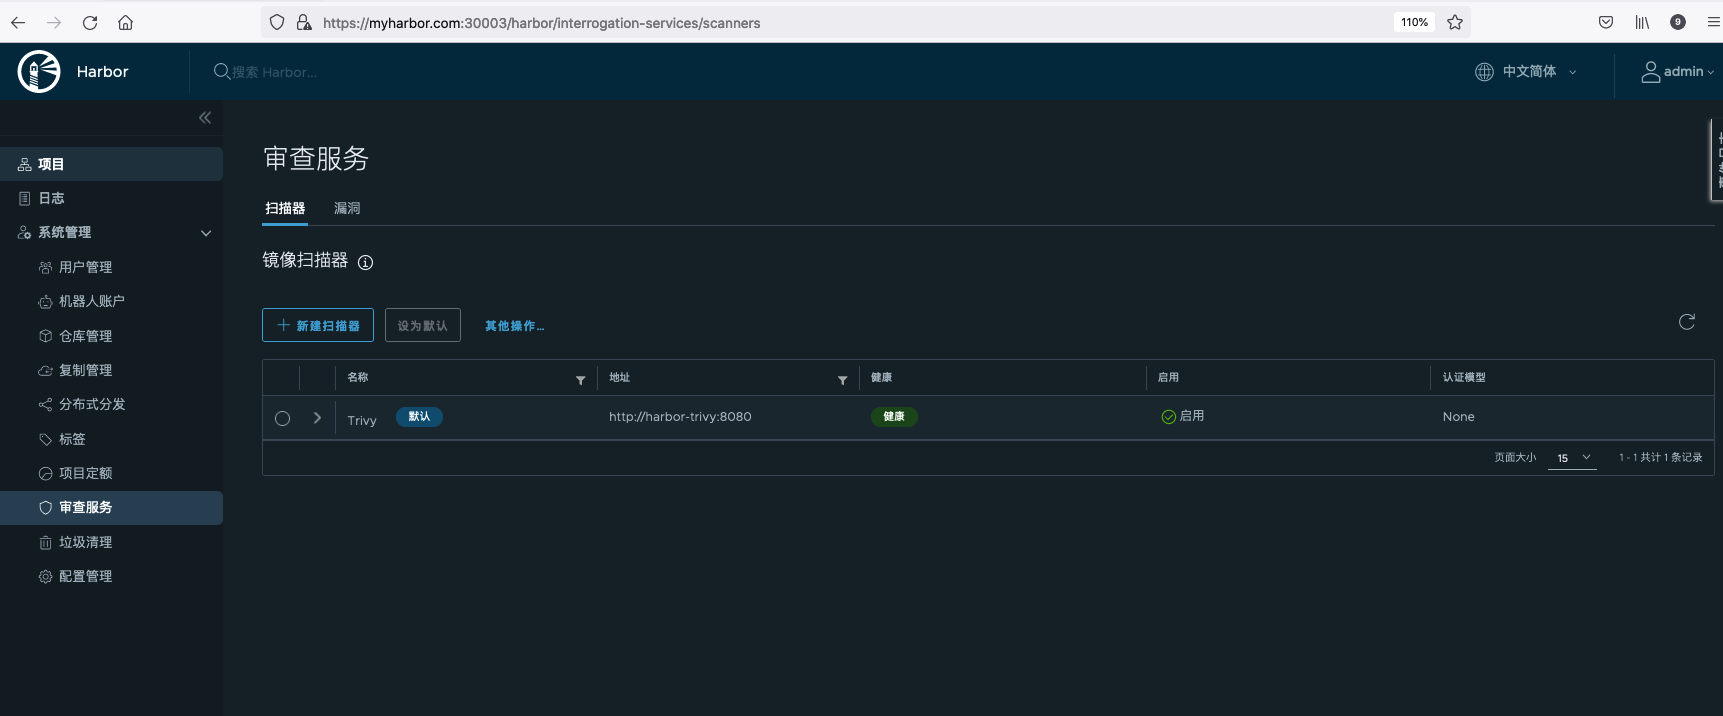
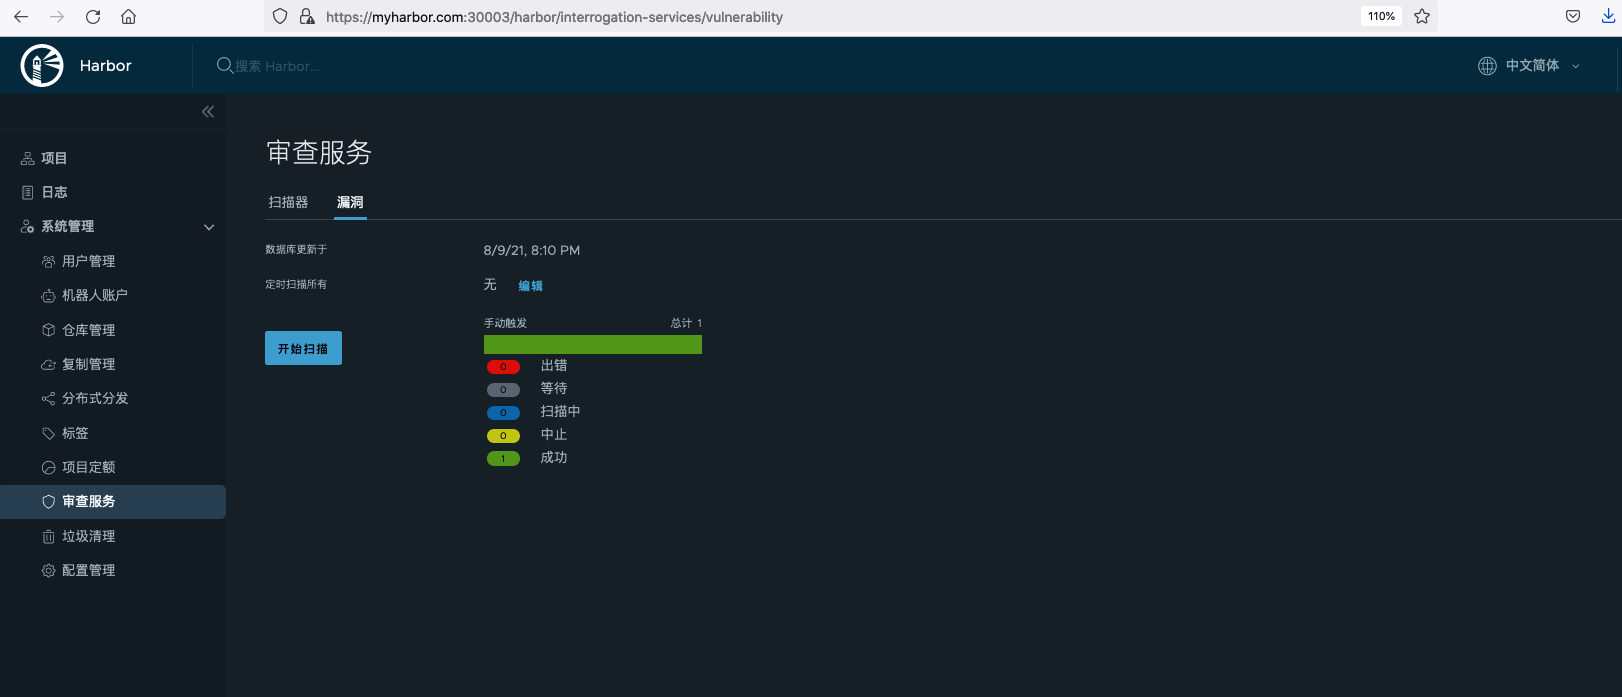
Harbor supports Trivy and Clair as image scanners. Harbor deployed in Helm mode has Trivy installed by default.
You can select the specified Artifact in the project to scan, or you can scan global vulnerabilities in the audit service.
Global vulnerability scan:
Select the specified Artifact scan:
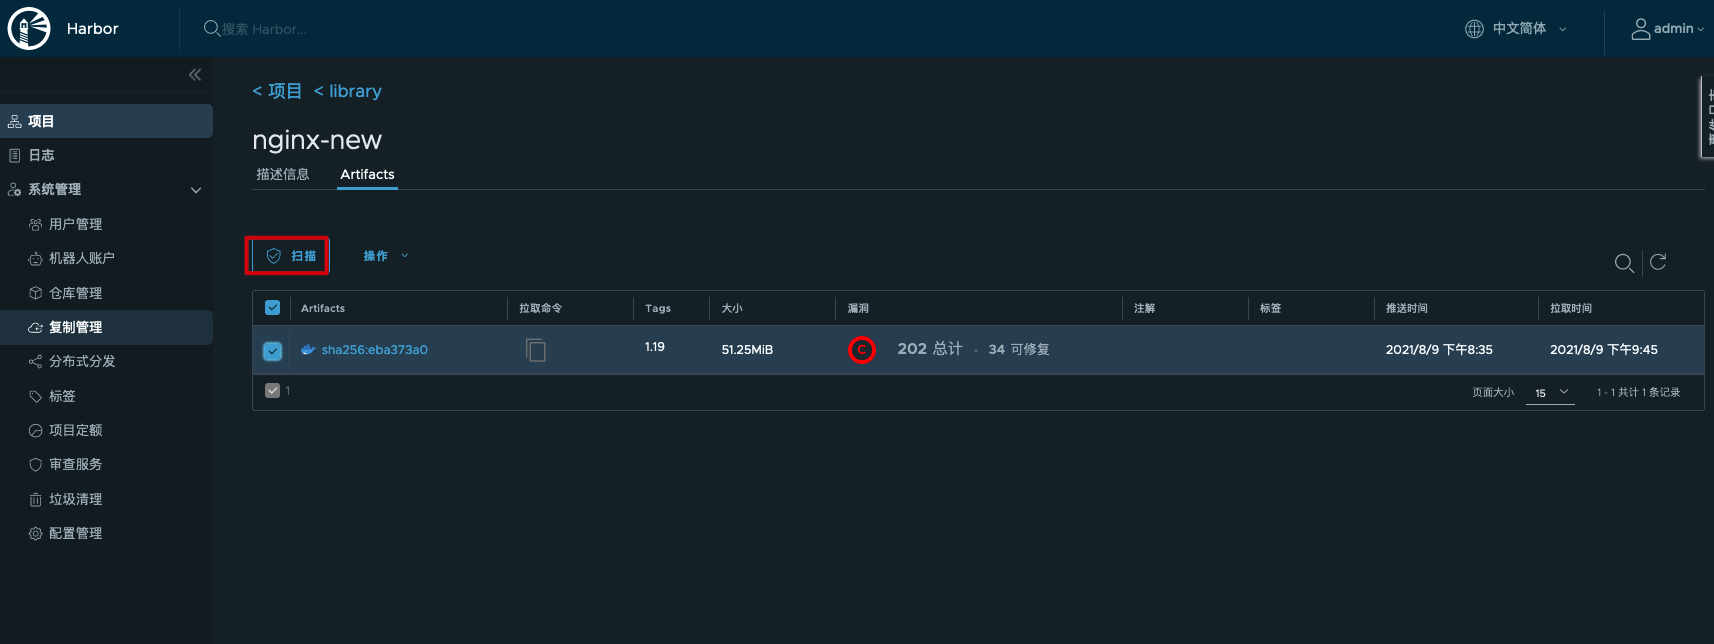
After scanning, you can see the number of vulnerabilities at different levels of critical, serious, medium, low, negligible and unknown.
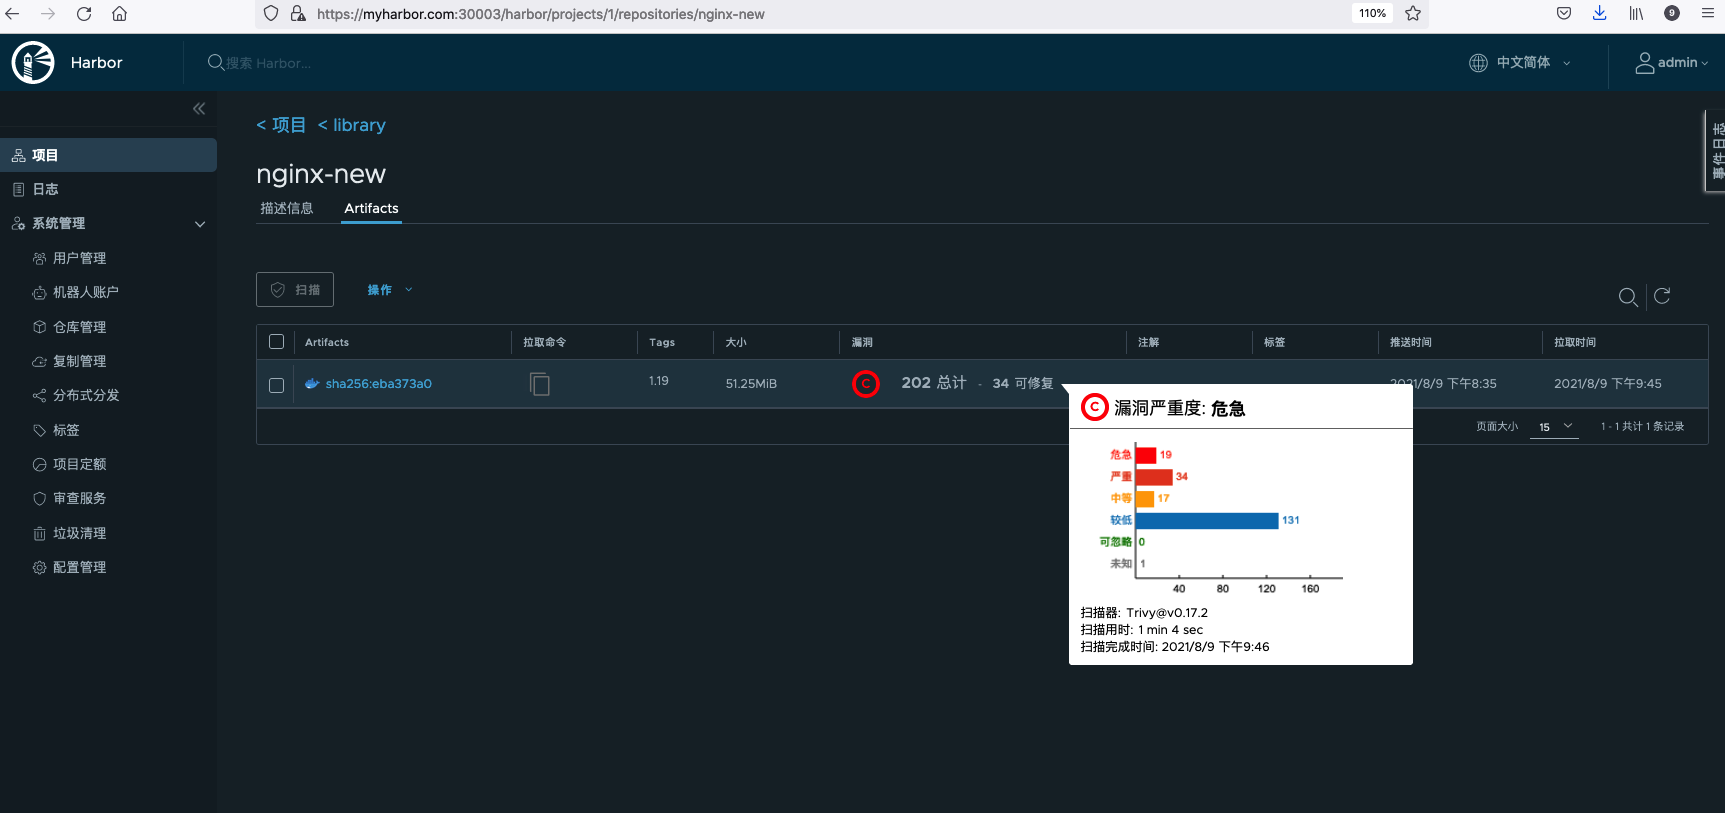
Click the image to view the details of the vulnerability.
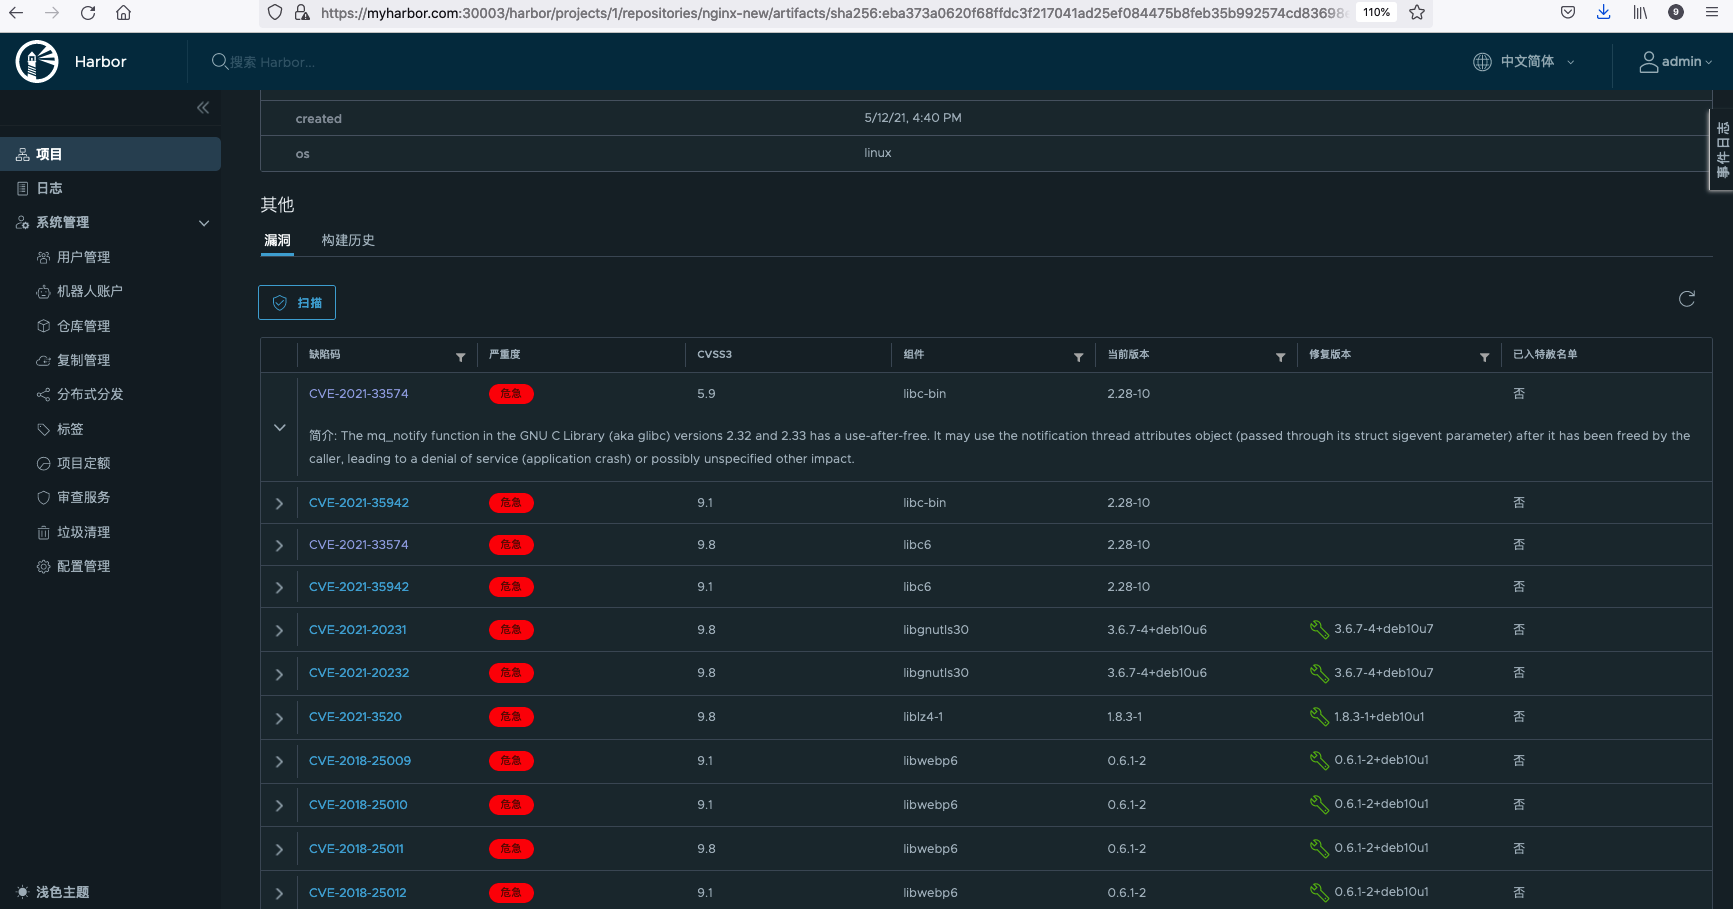
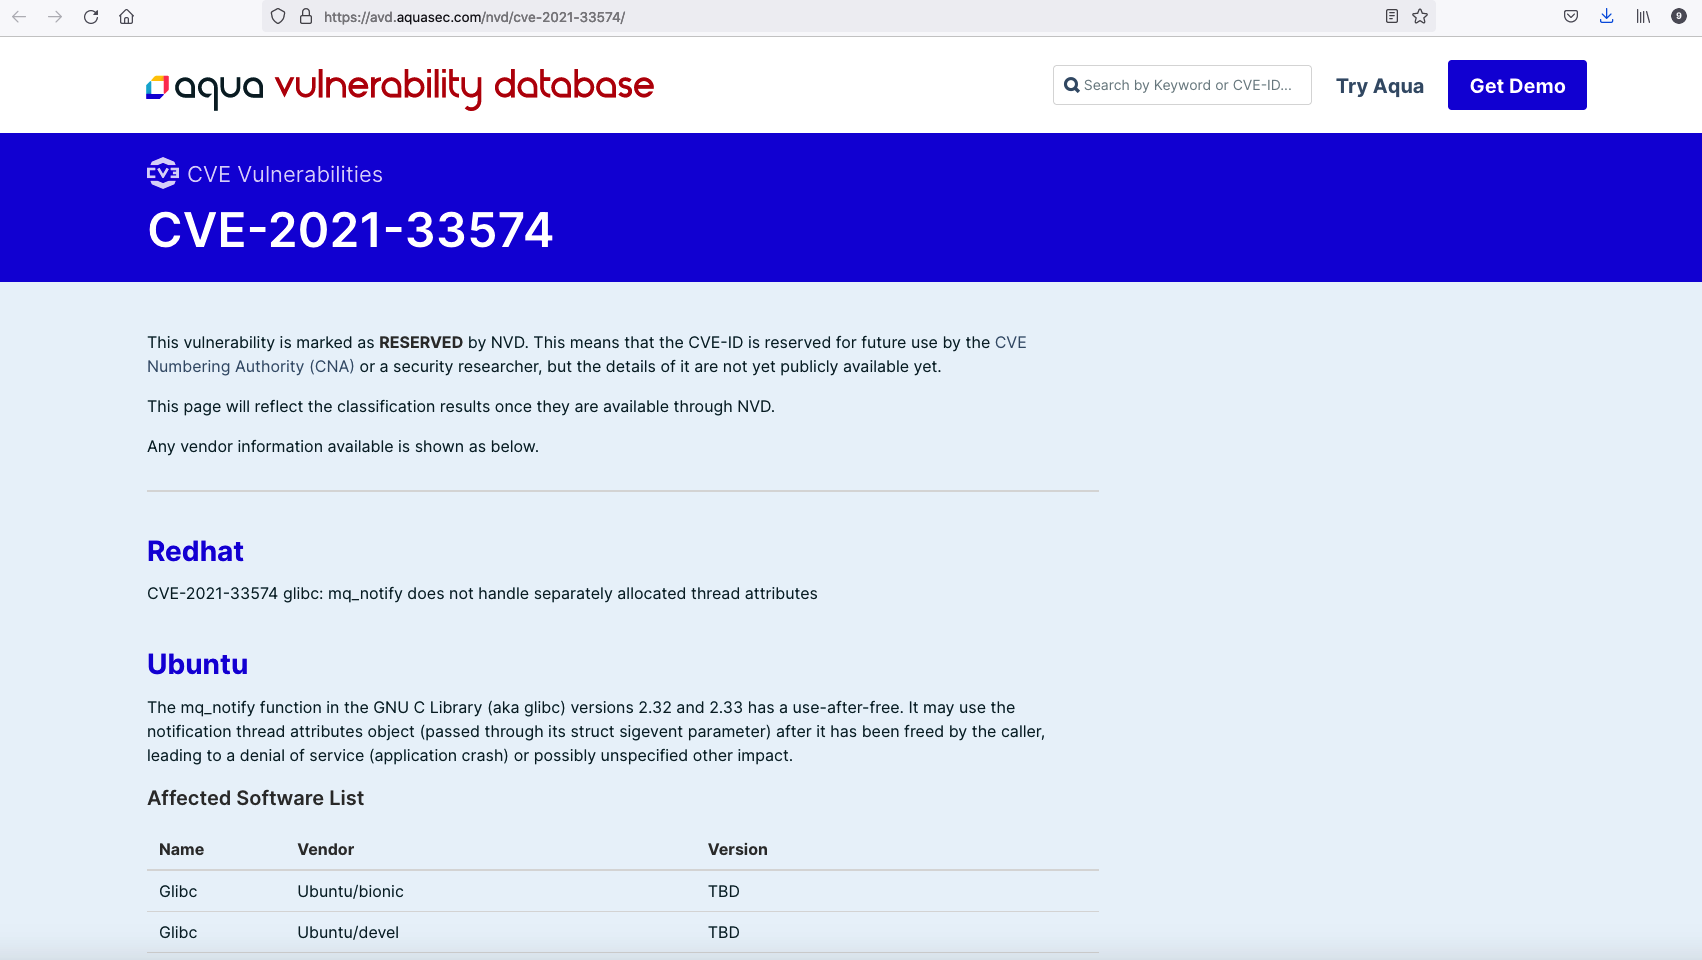
Click CVE missing item code to jump to Aqua Security website to view the detailed description of the CVE defect code.
Mirror signature
TUF is a security software distribution specification, which has a hierarchical role represented by asymmetric keys, and uses the metadata signed by these asymmetric keys to establish trust. Based on the TUF implementation, the open source project Notary provides a complete tool chain to better support the content trust process.
Harbor is deployed in Helm mode. By default, Notary is installed. The signature manager is implemented in harbor kernel service, and the management of Artifact digital signature can be realized through the notation server. Content trust ensures that the Artifact content pulled by the client or container is true and reliable, so as to better improve the security of the system.
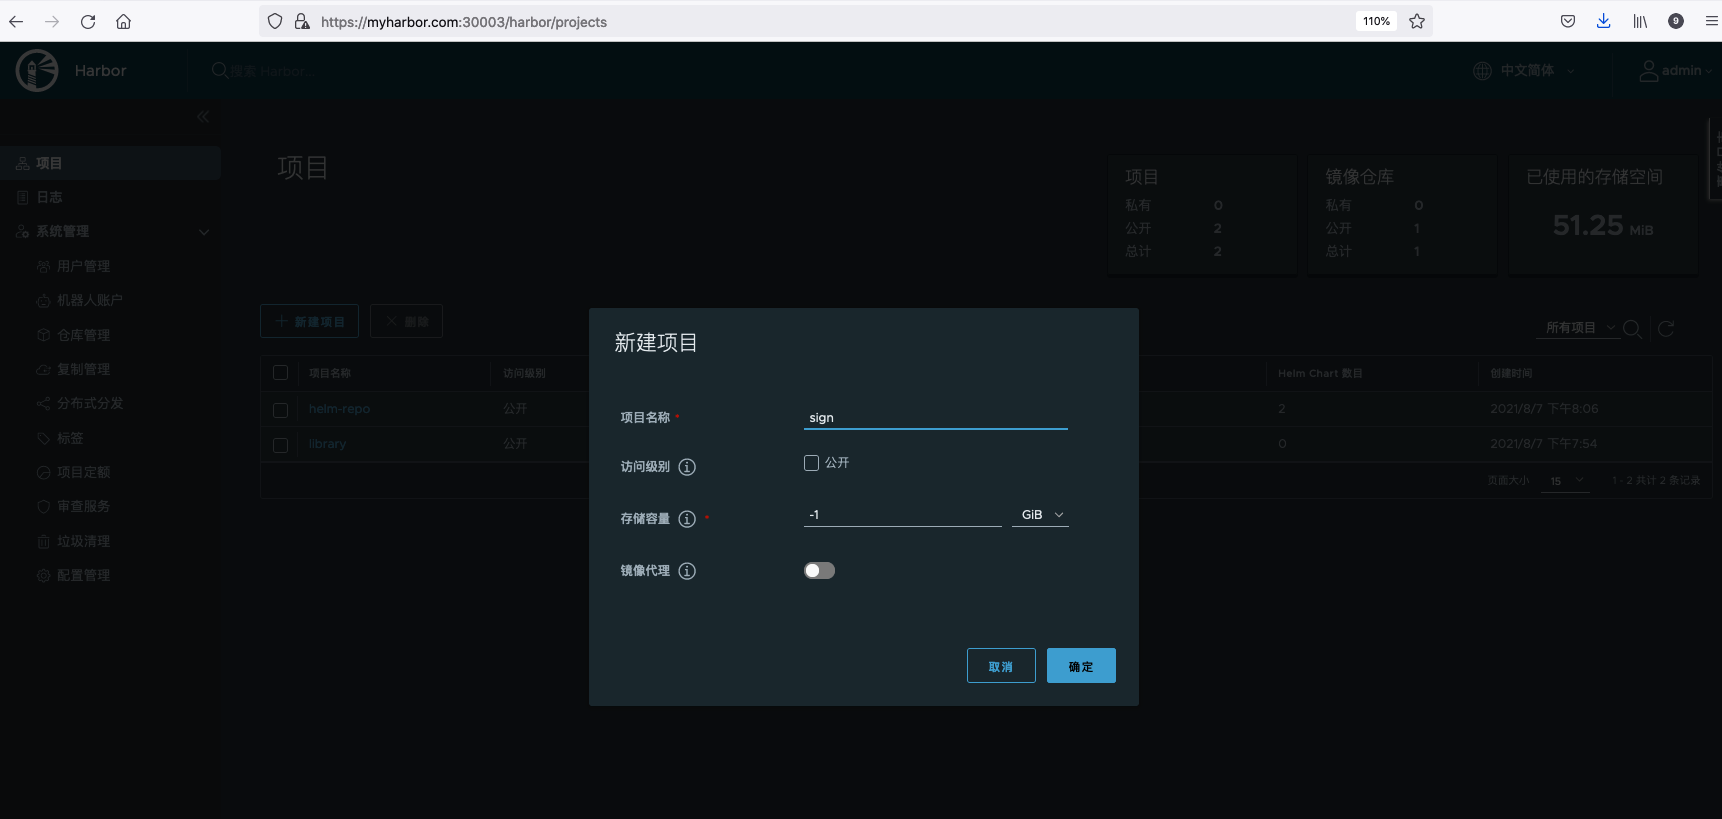
Create a new project sign to store the image of the experiment.
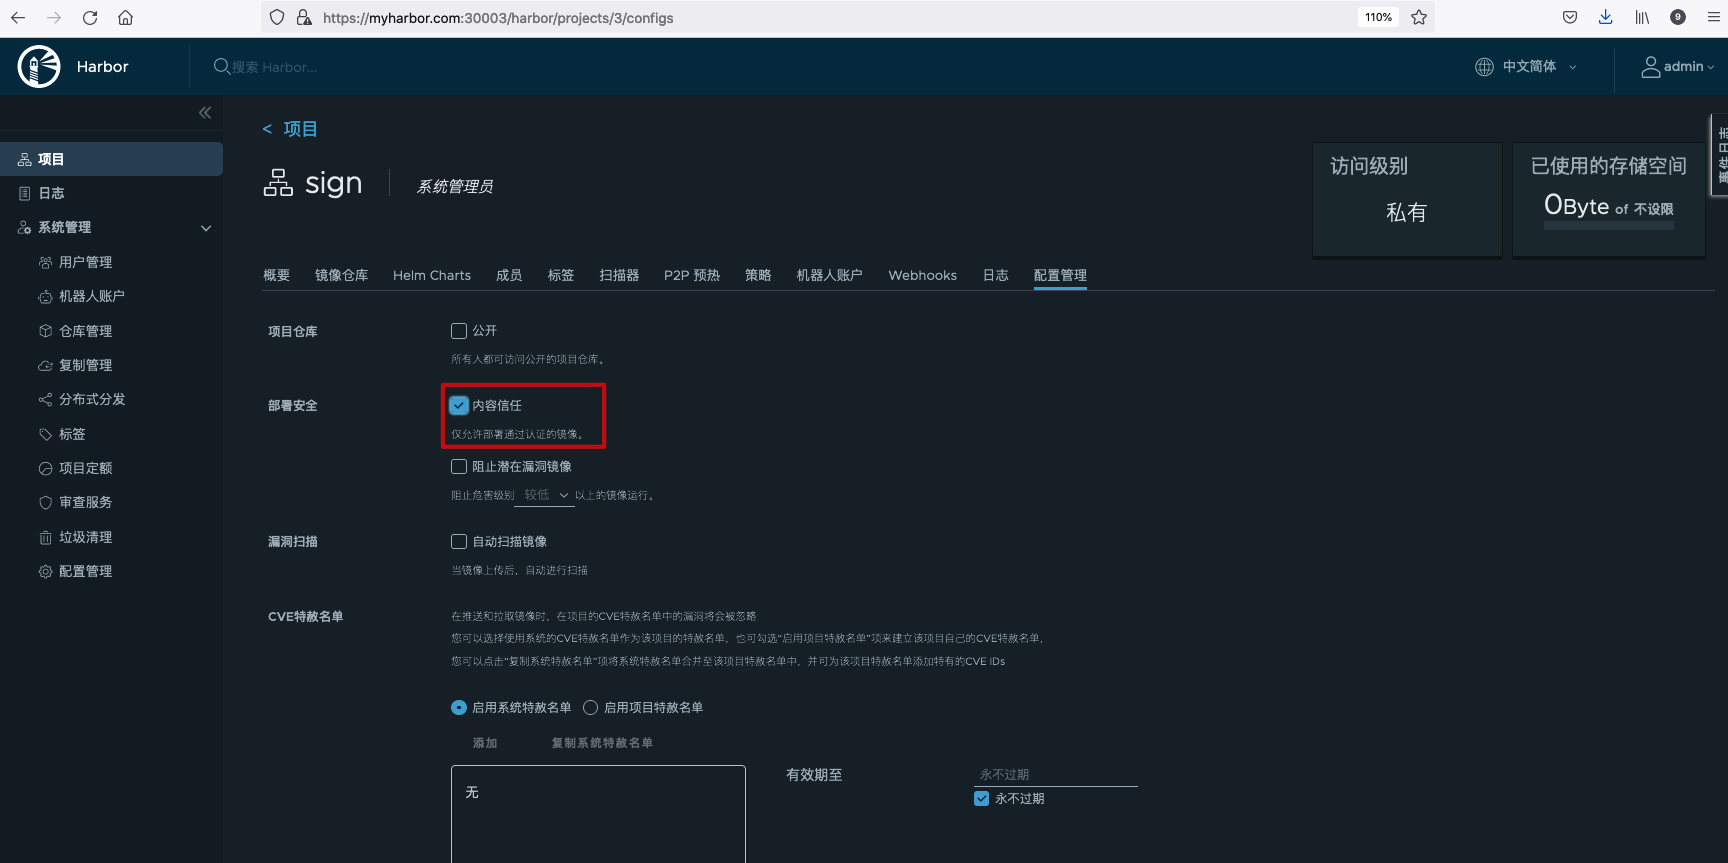
Enable content trust policy. After Harbor enables the content trust policy, if Harbor receives a request from the client to pull the Artifact, the content trust policy middleware processor in the Core component will decide whether the request is allowed according to the signature information of the requested Artifact. If the signature information does not exist, the pull request will be rejected; If the signature information exists and is legal, the pull request will be allowed to pass.
Set the following environment variables on the command line of Docker client to enable the content trust mechanism.
export DOCKER_CONTENT_TRUST=1
export DOCKER_CONTENT_TRUST_SERVER=https://myharbor.com:30004
When I installed Harbor, I enabled TLS and used a self signed certificate. I need to ensure that the CA certificate is copied to the following two directories of the Docker client.
#30004 is the exposed port of Notary service
~/.docker/tls/myharbor.com:30004
#30003 is the exposed port of Portal service
/etc/docker/certs.d/myharbor.com:30003
tag the image locally and push the image to Harbor. After the upload is successful, the signature step of content trust will continue. If the root key has not been created, the system will require you to enter a strong password to create the root key, and then push the image with content trust enabled. At the same time, the system also requires a strong password to create the target key of the image warehouse being pushed.
> docker tag 11.8.36.21:8443/library/nginx:1.19 myharbor.com:30003/sign/nginx-sign:1.19
> docker push myharbor.com:30003/sign/nginx-sign:1.19
The push refers to a repository [myharbor.com:30003/sign/nginx-sign]
f0f30197ccf9: Layer already exists
eeb14ff930d4: Layer already exists
c9732df61184: Layer already exists
4b8db2d7f35a: Layer already exists
431f409d4c5a: Layer already exists
02c055ef67f5: Layer already exists
1.19: digest: sha256:eba373a0620f68ffdc3f217041ad25ef084475b8feb35b992574cd83698e9e3c size: 1570
Signing and pushing trust metadata
#Create root key
You are about to create a new root signing key passphrase. This passphrase
will be used to protect the most sensitive key in your signing system. Please
choose a long, complex passphrase and be careful to keep the password and the
key file itself secure and backed up. It is highly recommended that you use a
password manager to generate the passphrase and keep it safe. There will be no
way to recover this key. You can find the key in your config directory.
Enter passphrase for new root key with ID 00eeb53:
Repeat passphrase for new root key with ID 00eeb53:
#Create the target key of the mirror warehouse being pushed
Enter passphrase for new repository key with ID 45f6c55 (myharbor.com:30003/sign/nginx-sign):
Repeat passphrase for new repository key with ID 45f6c55 (myharbor.com:30003/sign/nginx-sign):
Finished initializing "myharbor.com:30003/sign/nginx-sign"
Successfully signed "myharbor.com:30003/sign/nginx-sign":1.19
The generated key will be marked with ~ / docker/trust/private/<digest>. The key path is stored, and the corresponding TUF metadata file is stored in ~ / Docker / trust / TUF / < harbor host address: port number > / < mirror warehouse Path > / metadata directory.
#tree ~/.docker/trust/
/root/.docker/trust/
├── private
│   ├── root_keys
│   │   └── 00eeb53b454983f95c12718d1dcfdbc1e600253c20eab1ca8ee5743dac9f0fa0.key
│   └── tuf_keys
│       └── myharbor.com:30003
│           └── sign
│               └── nginx-sign
│                   └── 45f6c55ea9846cf0ba552915e0599b4e7f45c742f6418c5f1116b61f2650ca48.key
└── tuf
    └── myharbor.com:30003
        └── sign
            └── nginx-sign
                ├── changelist
                └── metadata
                    ├── root.json
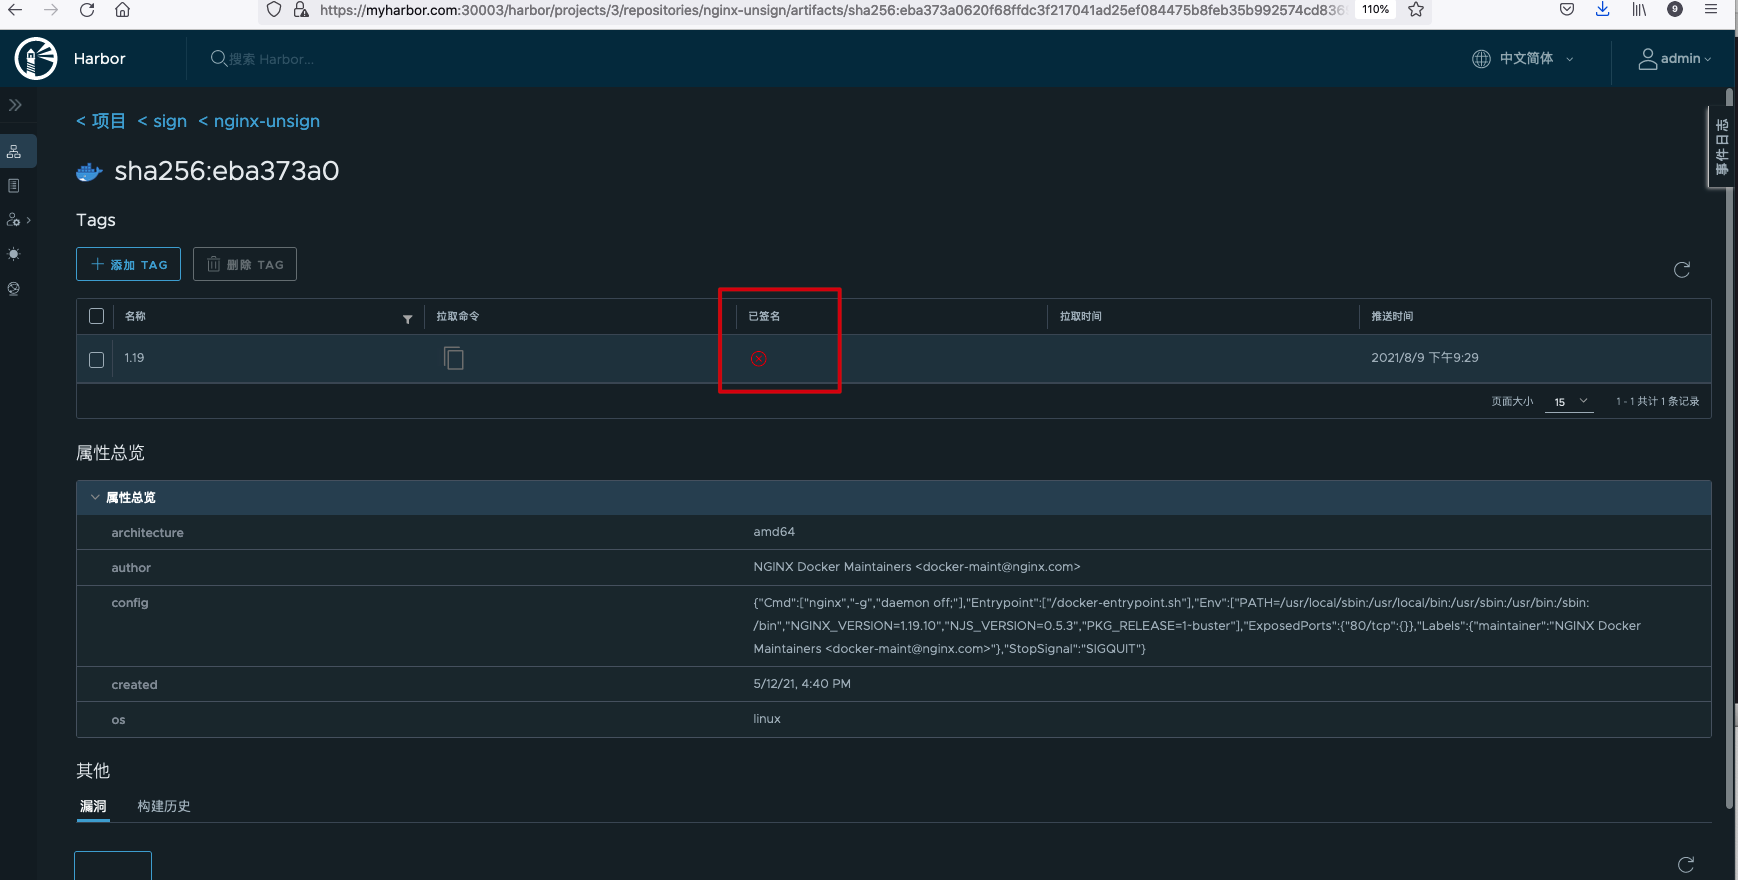
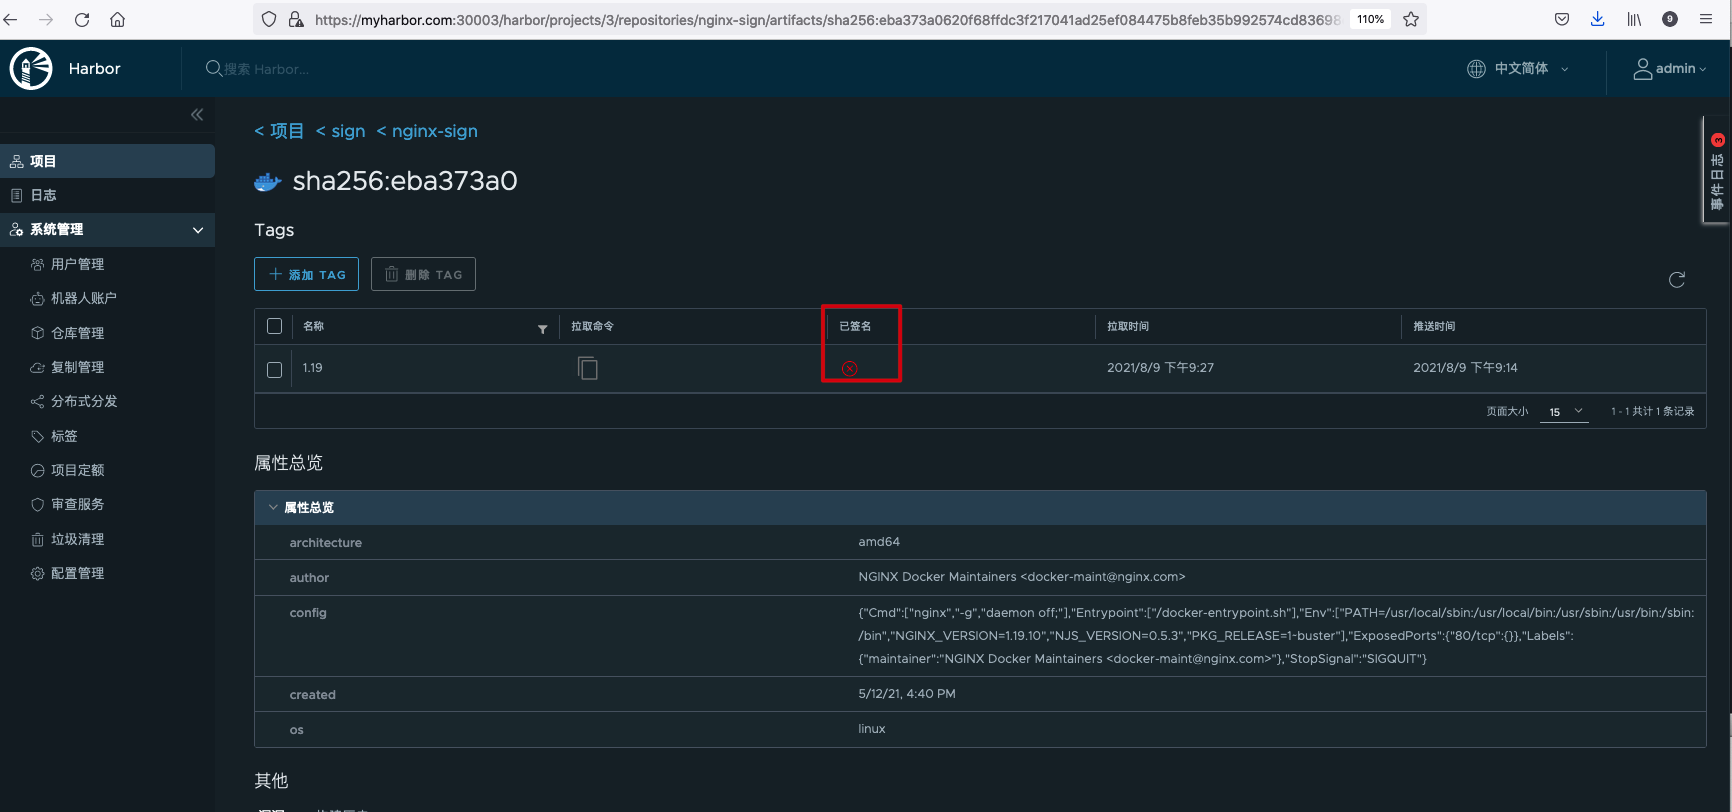
After the signature is successful, log in to the Harbor management interface, and you can view that the image is in the signed state in the tag list of the image.

At this time, we push an unsigned image to Harbor. After uploading the image, we do not sign.
docker tag 11.8.36.21:8443/library/nginx:1.19 myharbor.com:30003/sign/nginx-unsign:1.19
docker push myharbor.com:30003/sign/nginx-unsign:1.19
View the unsigned image.
Unsigned images cannot be pulled. If you try to pull, the following error will be reported.
#docker pull myharbor.com:30003/sign/nginx-unsign:1.19
Error: remote trust data does not exist for myharbor.com:30003/sign/nginx-unsign: myharbor.com:30004 does not have trust data for myharbor.com:30003/sign/nginx-unsign
Signed images cannot be deleted directly through Harbor.
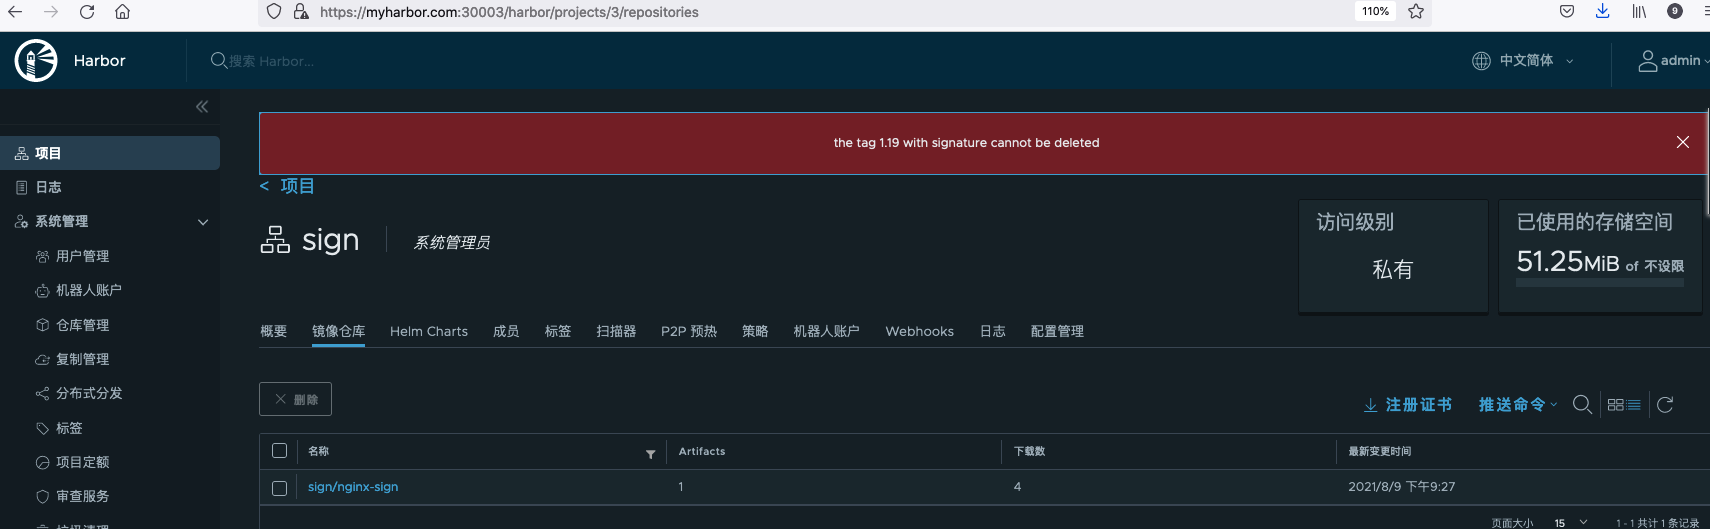
If you want to delete the image, you need to remove the image signature through Notary before deleting it. Use the following command to install the Notary client.
wget https://github.com/theupdateframework/notary/releases/download/v0.6.1/notary-Linux-amd64
mv notary-Linux-amd64 /usr/local/bin/notary
chmod +x /usr/local/bin/notary
Remove the signature of the image. Note that the tag and image name are separated by spaces.
notary -s https://myharbor.com:30004 \
-d ~/.docker/trust/ --tlscacert ~/.docker/tls/myharbor.com:30004/ca.crt \
remove -p myharbor.com:30003/sign/nginx-sign 1.19
When viewing the image, it is found that it has become unsigned.
The mirror can now be deleted.
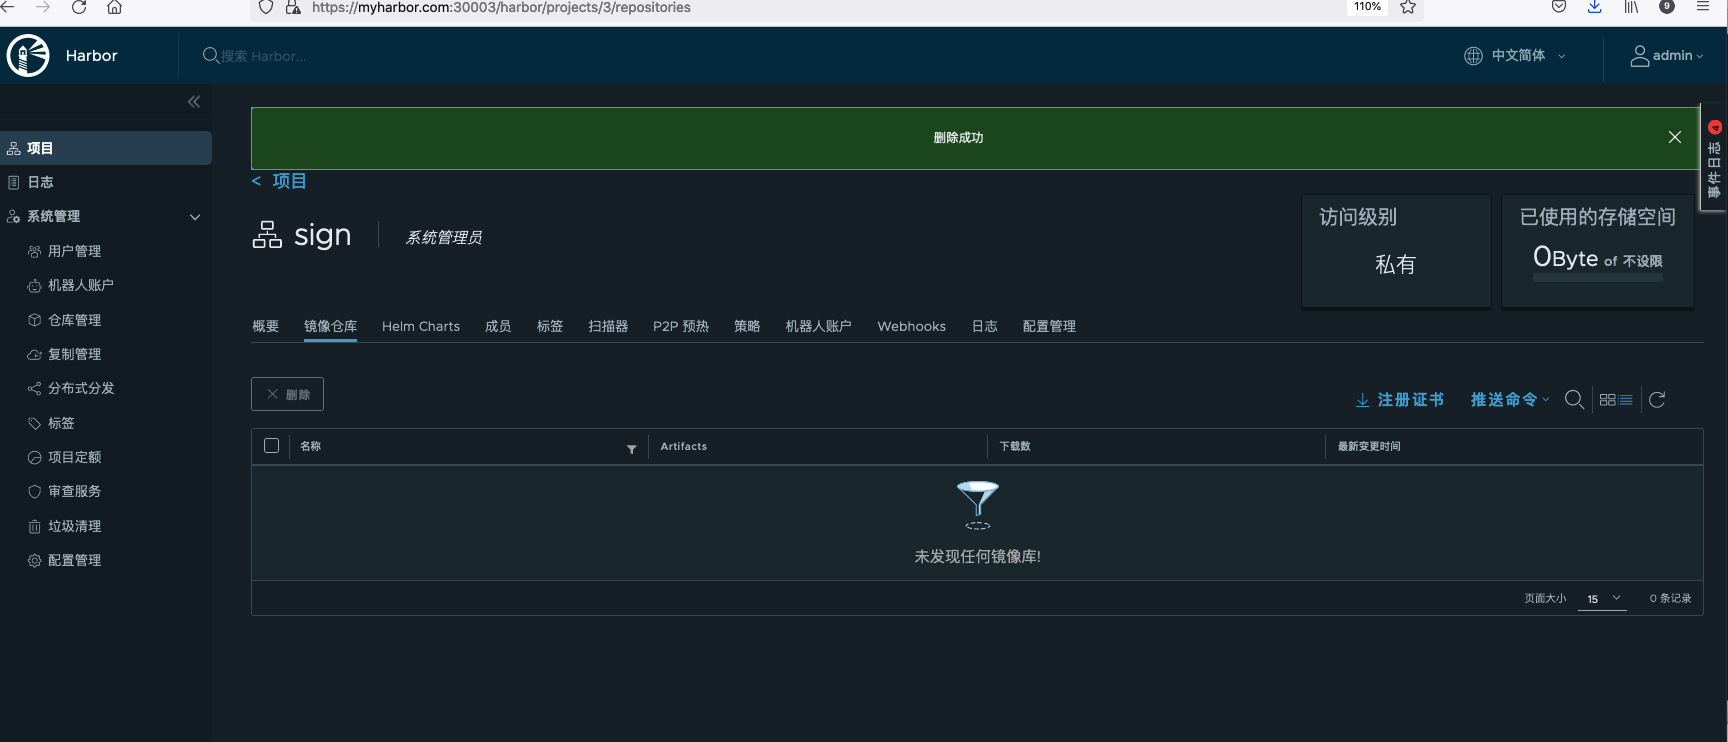
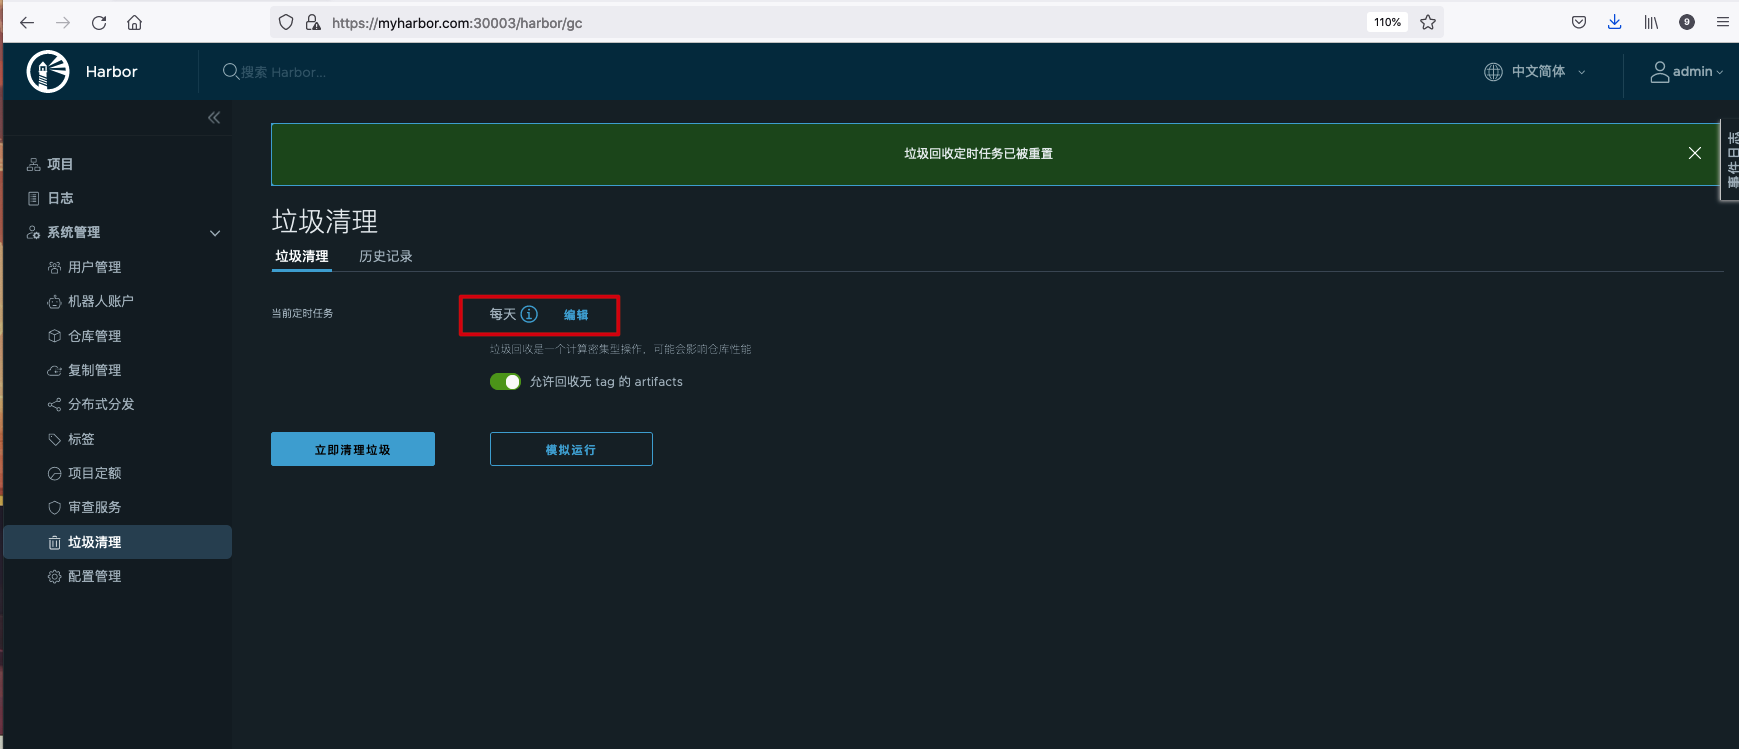
Garbage cleaning
During the daily use of Harbor, the use of resources will increase with the increase of Artifact. Due to limited resources, you need to free up the storage space occupied by the Artifact after deleting it. When you delete an Artifact in Harbor, it is "soft deletion", that is, only the data records corresponding to the Artifact are deleted, not the storage. The essence of garbage collection is the automatic management of storage resources, that is, recycling the storage space occupied by artifacts that are no longer used in Harbor.
Delete manually:
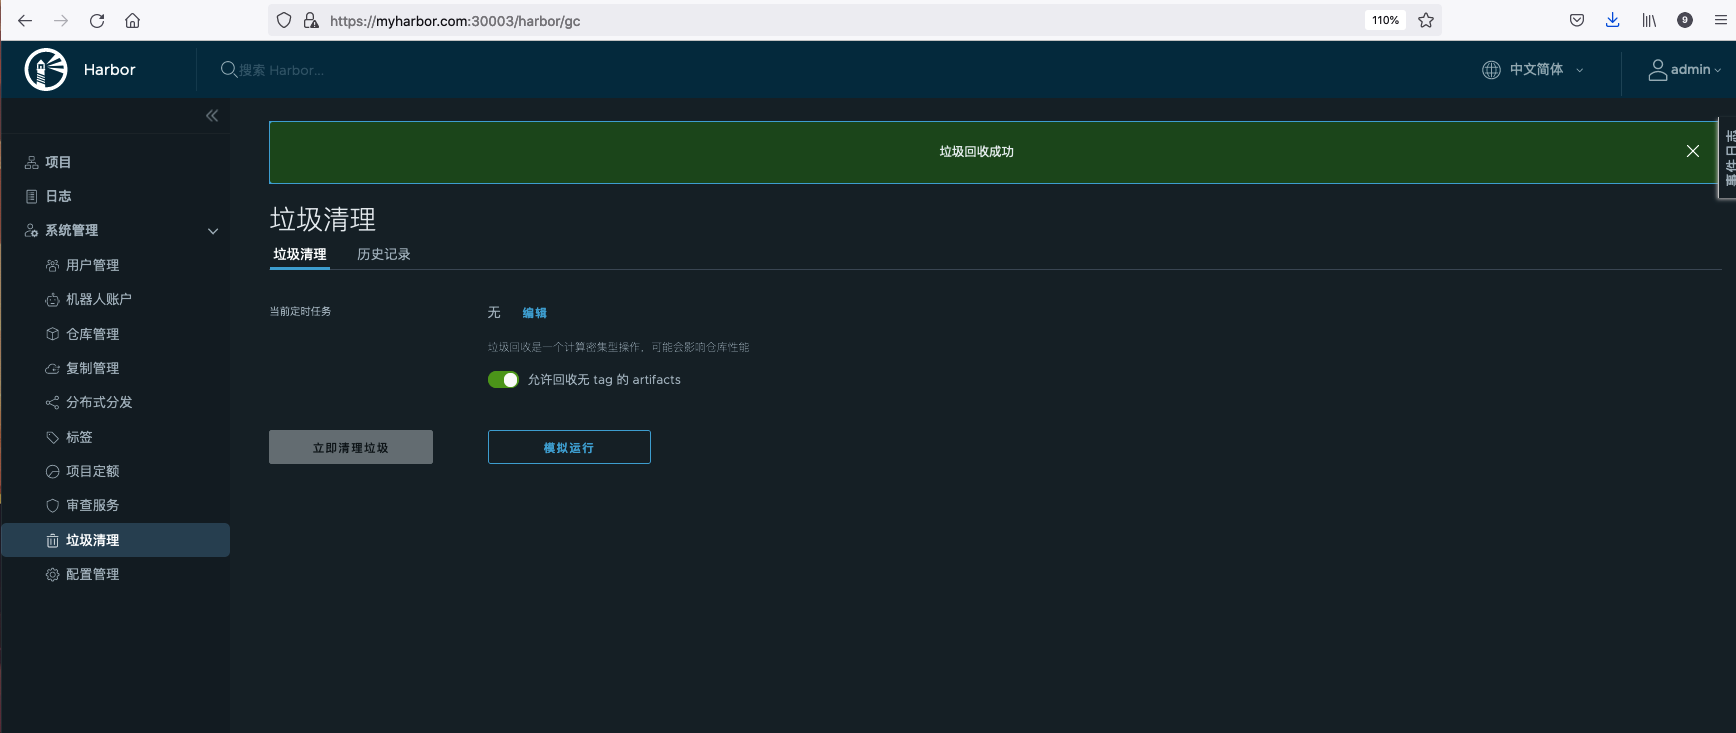
Set scheduled delete task:
A small pit
When logging in to Harbor through Docker client, I encountered an error when the certificate expired. I couldn't log in successfully all night. As a result, I could log in to Harbor again inexplicably the next day.
#docker login https://myharbor.com:30003
Username: admin
Password:
Error response from daemon: Get https://myharbor.com:30003/v1/users/: x509: certificate has expired or is not yet valid
So I thought it might be a matter of time. Maybe the Docker client's time is earlier than the certificate's effective time. After checking the system time, I found that the time was 6 minutes slower than the standard time. After setting the NTP synchronization time, you can log in normally.
#date
Mon Aug  9 20:54:43 CST 2021
root@ydt-net-nginx-cisp:/etc/docker/certs.d/myharbor.com:30003 #

#ntpdate ntp3.aliyun.com
 9 Aug 21:00:47 ntpdate[96996]: step time server 203.107.6.88 offset 355.206298 sec
root@ydt-net-nginx-cisp:/etc/docker/certs.d/

#date
Mon Aug  9 21:00:51 CST 2021

#docker login https://myharbor.com:30003
Username: admin
Password:
Login Succeeded
reference material
- Harbor authoritative guide
- https://blog.csdn.net/weixin_34387468/article/details/91855502
- https://zhuanlan.zhihu.com/p/336866221
- https://fuckcloudnative.io/posts/install-harbor-on-kubernetes/
- https://goharbor.io/docs/1.10/install-config/configure-https/
- https://www.bladewan.com/2020/02/22/harbor_notary/
Welcome to pay attention