This is a study note about RabbitMq tutorial author: Poor programmers. I hope you can support the poor programmers. I think RabbitMq speaks very well, but notes are charged. (Teacher's source code is included, it's cheap.) I shared it here. It's yy. Please support genuine purchase link: www.baizhiedu.xin
RabbitMQ Actual Warfare Tutorial
1.MQ Introduction
1.1 What is MQ
MQ(Message Quene): Translated into a message queue, through a typical producer and consumer model, producers continuously produce messages to the message queue, and consumers continuously get messages from the queue. Because the production and consumption of messages are asynchronous, and only care about the sending and receiving of messages, there is no intrusion of business logic, and decoupling between systems is easy. Alias Messaging Middleware integrates distributed systems by using efficient and reliable messaging mechanisms for platform-independent data communication and based on data communication.
What are 1.2 MQ s
There are many mainstream message middleware on the market today, such as the old ActiveMQ, RabbitMQ, the hot Kafka, Alibaba develops RocketMQ by itself.
1.3 Different MQ Features
# 1.ActiveMQ
		ActiveMQ yes Apache Out of the box, the most popular and powerful open source messaging bus. It's a full support JMS A canonical message middleware. Abundant API,Multiple cluster architecture patterns allow ActiveMQ Message middleware that has become an established brand in the industry,Popular in SMEs!

# 2.Kafka
		Kafka yes LinkedIn Open Source Distributed Publishing-Subscribe to the messaging system, currently owned by Apache Top level projects. Kafka The main features are based on Pull Mode to handle message consumption,
		In the pursuit of high throughput, the goal was initially for log collection and transmission. 0.8 Version supports replication, does not support transactions, and has no strict requirements for message duplication, loss, and error.
		Data collection business for Internet services that generate large amounts of data.

# 3.RocketMQ
		RocketMQ Is Ali open source messaging middleware, it is pure Java Development, with high throughput, high availability, suitable for large-scale distributed system applications. RocketMQ Thinking
		Originate from Kafka,But it's not Kafka Of Copy,It optimizes the reliable transmission and Transactionality of messages, and is currently widely used in Alibaba Group in transaction, recharge, flow calculation, elimination
		Information push, log streaming, binglog Scenes such as distribution.

# 4.RabbitMQ
		RabbitMQ Is used Erlang Open Source Message Queuing System for Language Development, Based on AMQP Protocol implementation. AMQP The main features are message-oriented, queue-oriented, routing (including point-to-point and point-to-point).
		Release/Subscription), Reliability, Security. AMQP Protocols are more used in scenarios where data consistency, stability, and reliability are required within an enterprise system, while performance and throughput are also required
		Secondly.
RabbitMQ is more reliable than Kafka, which is better suited for high-throughput IO processing. It is generally used in large data log processing or scenarios where real-time (small latency) and reliability (small loss of data) are less required, such as ELK log collection.
2. Introduction to RabbitMQ
The author here suggests installing with docker. I was stuck in the startup phase of server because of a long version conflict between rabbitMq and erlang. If you have to go to the official website to install, it is recommended that you check the Erlang version first, then go to Github to download and pull it to the server. The web address for the Erlang version is described below.
2.1 RabbitMQ
Based on AMQP protocol, erlang language is developed, is the most widely deployed open source message middleware, and is one of the most popular open source message middleware.
Official website: https://www.rabbitmq.com/
Official Tutorial: https://www.rabbitmq.com/#getstarted
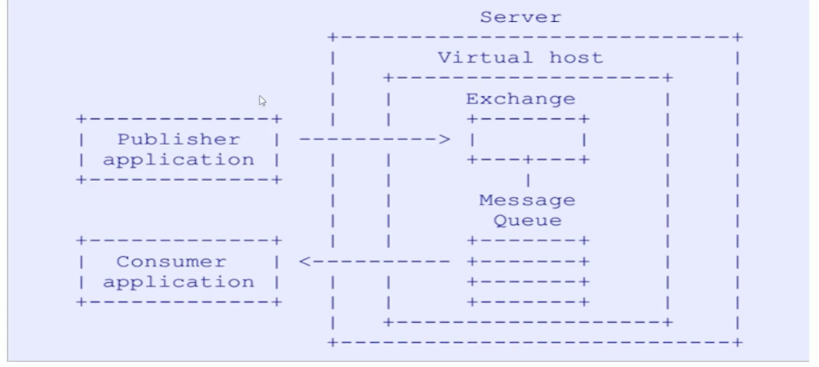
 # AMQP Protocol
 		AMQP(advanced message queuing protocol)`It was first proposed in 2003 to solve the problem of messaging interaction between different platforms of financial collar. Seeing the name of a thing one thinks of its function, AMQP Is an agreement, or more precisely, a binary wire-level protocol(Link protocol). This is its sum JMS Essential differences, AMQP Do not follow API Layer defines, but directly defines, the data format of the network exchange. This makes it possible to AMQP Of provider Naturality is cross-platform. The following are AMQP Protocol Model:
2.2 Installation of RabbitMQ
2.2. 1 Download
Official download address: https://www.rabbitmq.com/download.html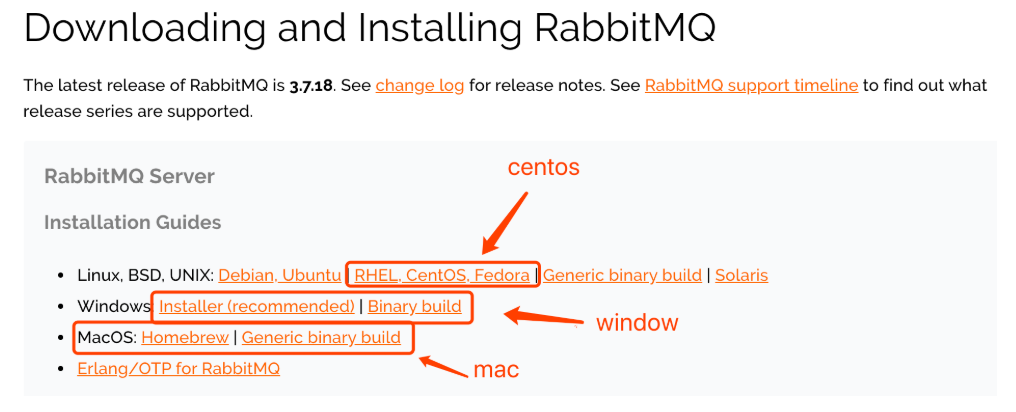
Latest version: 3.7. 18

Note: The installation package here is the centos7 installation package
2.2. 3 Installation steps
# 1. Upload the rabbitmq installation package to the linux system
	erlang-22.0.7-1.el7.x86_64.rpm
	rabbitmq-server-3.7.18-1.el7.noarch.rpm

# 2. Install Erlang dependency packages
	rpm -ivh erlang-22.0.7-1.el7.x86_64.rpm

# 3. Install RabbitMQ installation package (requires networking)
	yum install -y rabbitmq-server-3.7.18-1.el7.noarch.rpm
		Be careful:Profile template after default installation is completed in:/usr/share/doc/rabbitmq-server-3.7.18/rabbitmq.config.example In directory,Need
				Copy Configuration File to/etc/rabbitmq/In directory,And change the name to rabbitmq.config
# 4. Copy Profile
        # Rabbit MQ did not initially provide a configuration file directly under Rabbit Mq under etc, but instead provided us with a template
	cp /usr/share/doc/rabbitmq-server-3.7.18/rabbitmq.config.example /etc/rabbitmq/rabbitmq.config

# 5. View profile location
	ls /etc/rabbitmq/rabbitmq.config

# 6. Modify the configuration file (see figure below:)
	vim /etc/rabbitmq/rabbitmq.config
There's a discrepancy between the author and the files in the video. If your rabbitMq is the latest version, there won't be this example file, but there's also a configuration file, and it's modified the same way as the following image to remove the guest account. Check the blog for more details here.
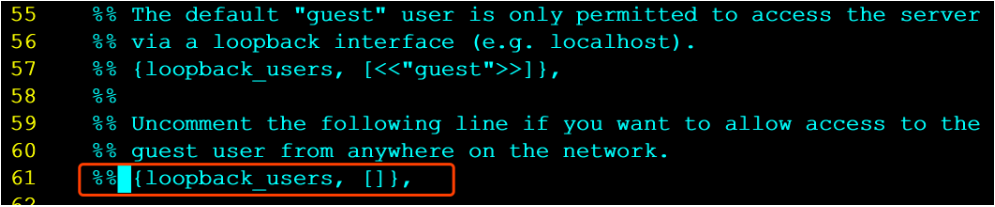
Remove the red part of the configuration file from the figure above by%%, and finally, change the comma to the following:

# 7. Start plug-in management in rabbitmq by executing the following command
	rabbitmq-plugins enable rabbitmq_management

	The following description appears:
		Enabling plugins on node rabbit@localhost:
    rabbitmq_management
    The following plugins have been configured:
      rabbitmq_management
      rabbitmq_management_agent
      rabbitmq_web_dispatch
    Applying plugin configuration to rabbit@localhost...
    The following plugins have been enabled:
      rabbitmq_management
      rabbitmq_management_agent
      rabbitmq_web_dispatch

    set 3 plugins.
    Offline change; changes will take effect at broker restart.

# 8. Start the RabbitMQ service
	systemctl start rabbitmq-server
	systemctl restart rabbitmq-server
	systemctl stop rabbitmq-server


# 9. View the status of the service (see figure below:)
	systemctl status rabbitmq-server
  ● rabbitmq-server.service - RabbitMQ broker
     Loaded: loaded (/usr/lib/systemd/system/rabbitmq-server.service; disabled; vendor preset: disabled)
     Active: active (running) since 3 2019-09-25 22:26:35 CST; 7s ago
   Main PID: 2904 (beam.smp)
     Status: "Initialized"
     CGroup: /system.slice/rabbitmq-server.service
             ├─2904 /usr/lib64/erlang/erts-10.4.4/bin/beam.smp -W w -A 64 -MBas ageffcbf -MHas ageffcbf -
             MBlmbcs...
             ├─3220 erl_child_setup 32768
             ├─3243 inet_gethost 4
             └─3244 inet_gethost 4
      .........

Half the success here, and you can get started with rabbitMq
# 10. Turn off firewall services
	systemctl disable firewalld
    Removed symlink /etc/systemd/system/multi-user.target.wants/firewalld.service.
    Removed symlink /etc/systemd/system/dbus-org.fedoraproject.FirewallD1.service.
	systemctl stop firewalld

# 11. Access the web management interface
	http://10.15.0.8:15672/
Here, if you use Ali Cloud server friends, you must remember to open the port in the security group, and the open is 15672! Otherwise, you will not be able to access the web management interface
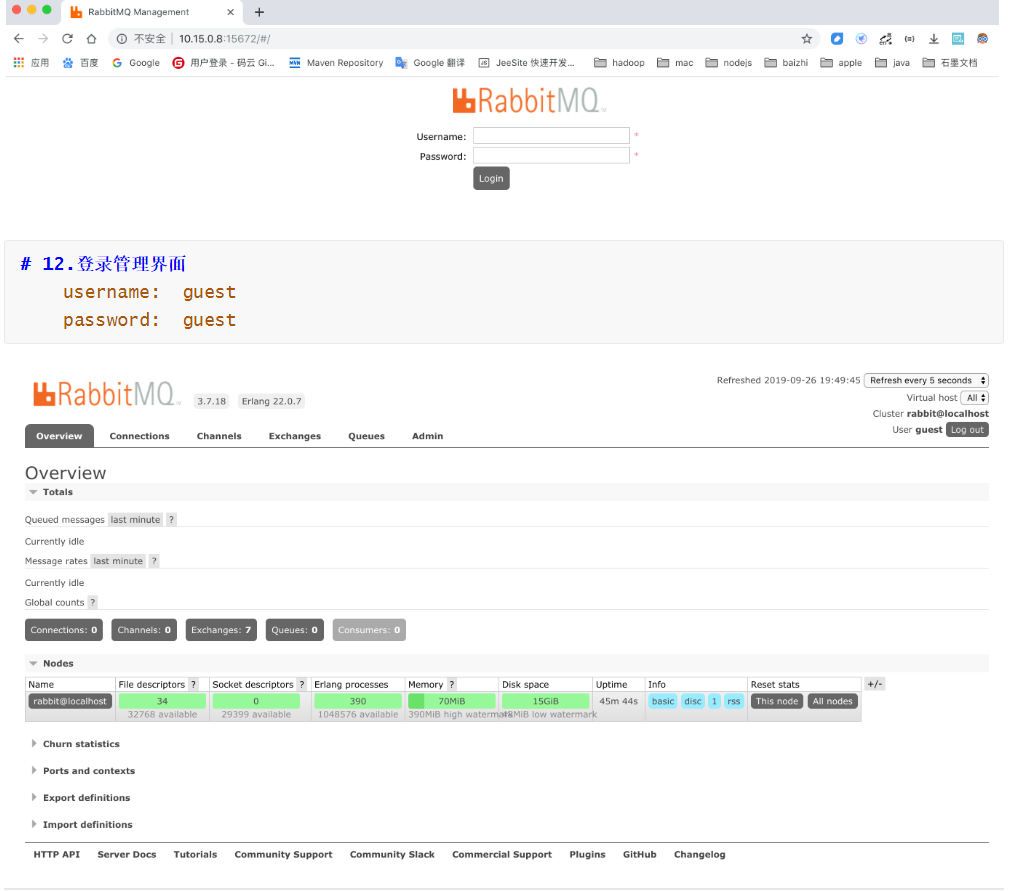
# 12. Login management interface
	username:  guest
	password:  guest
3. RabiitMQ configuration
3.1 RabbitMQ Management Command Line
# 1. Service startup related
	systemctl start|restart|stop|status rabbitmq-server

# 2. The administration command line is used to command RabbitMQ operations without using the web administration interface
	rabbitmqctl  help  You can view more commands

# 3. Plugin Management Command Line
	rabbitmq-plugins enable|list|disable
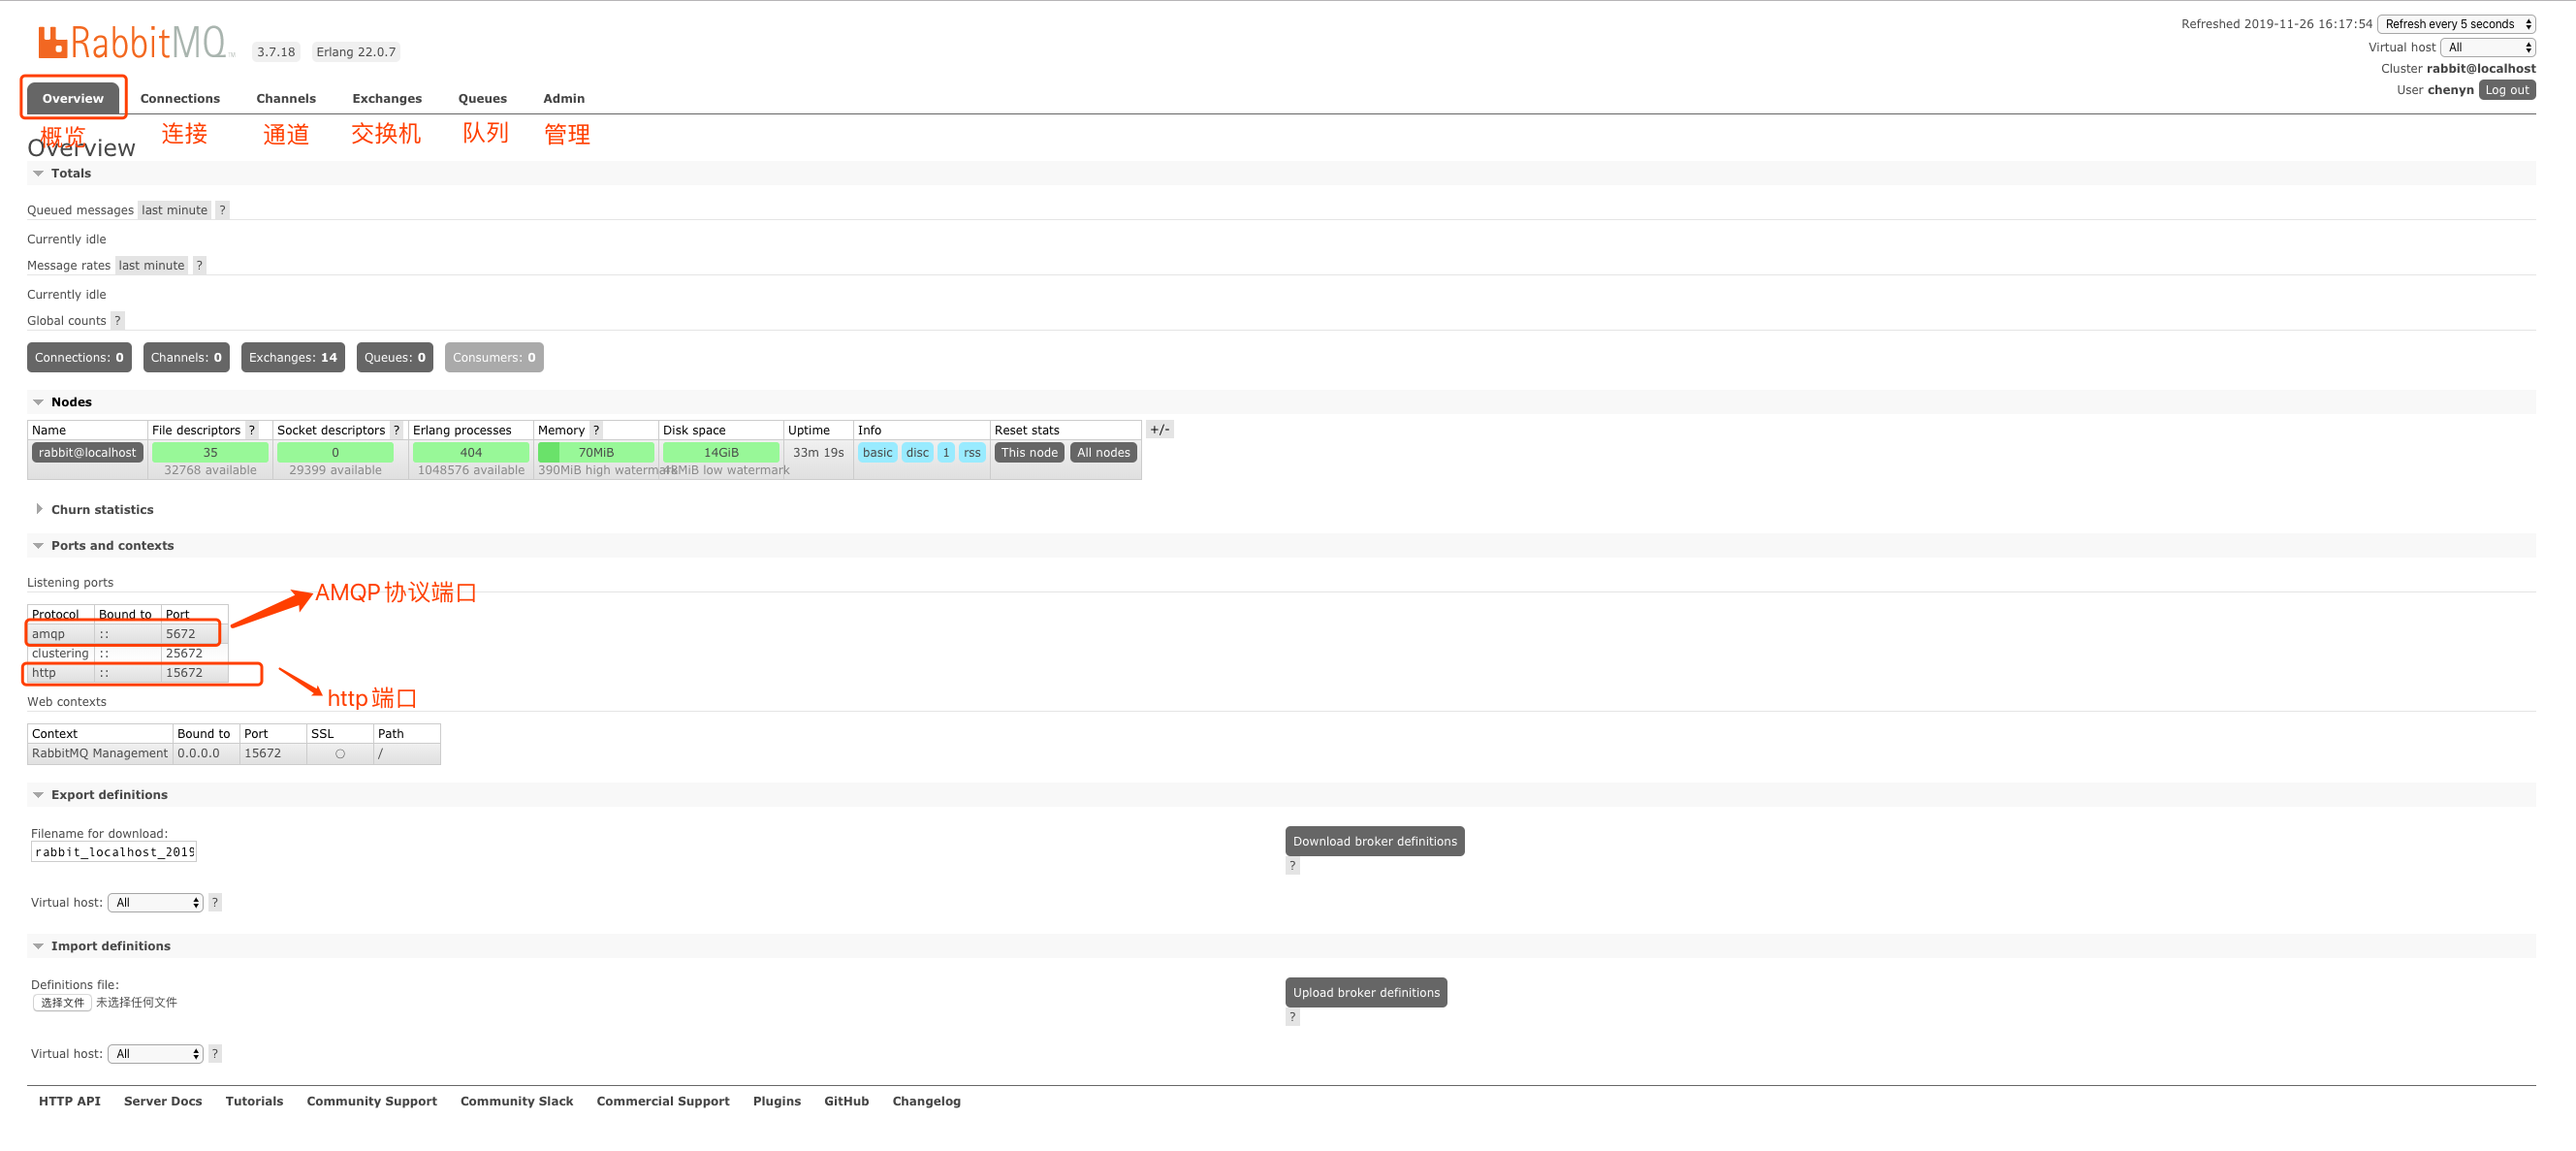
3.2 Introduction to web management interface
3.2.1 overview overview
-
connections: Both producers and consumers need to be connected to RabbitMQ to complete production and consumption of messages, where you can view the connection
-
channels: channels, which form a channel when a connection is established. Message delivery depends on the channel.
-
Exchanges: A switch used to route messages
-
Queues: Queues, that is, message queues, where messages are stored, waiting for consumption, and then being removed after consumption.
3.2.2 Admin User and Virtual Host Management
1. Add users
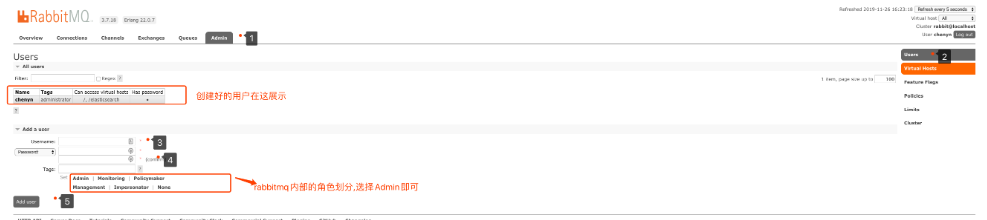
The Tags option above actually specifies the user's role. There are several options:
-
Super Administrator
You can log on to the administration console, view all information, and operate on users, policies. -
Monitor
You can log in to the administration console and view information about the rabbitmq node (number of processes, memory usage, disk usage, etc.) -
Policcymaker
You can log on to the Administration Console and manage the policy at the same time. However, you cannot view the information about the node (the part identified by the red box above). -
General Manager
You can only log on to the management console, you cannot see node information, and you cannot manage policies. -
Other
Unable to log on to the management console, usually the average producer and consumer.
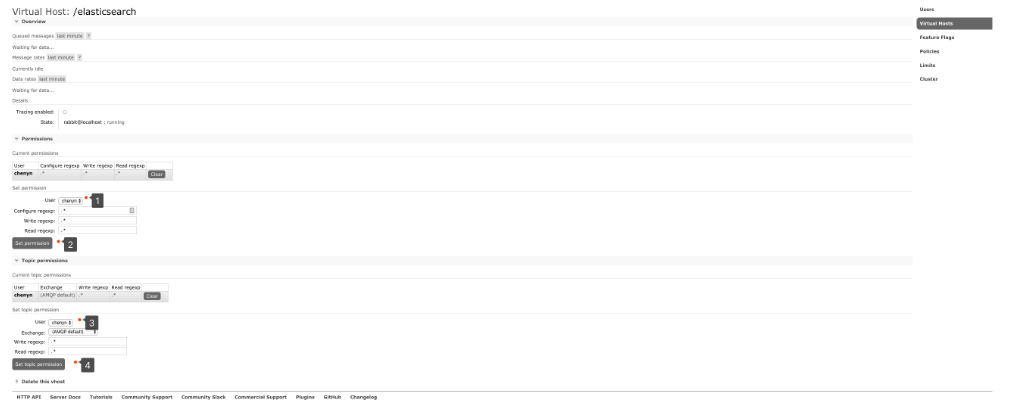
2. Create a virtual host
# Virtual Host
	To allow individual users to work without interruption, RabbitMQ A virtual host was added ( Virtual Hosts)Concept. In fact, it is an independent access path, different users use different paths, each has its own queue, switch, and will not affect each other.

3. Bind virtual hosts and users
Create a virtual host and add access to the user:
Click on the added virtual host:

Enter the virtual machine setup interface:
4. First program of RabbitMQ
Review of 4.0 AMQP Protocol
[External chain picture transfer failed, source station may have anti-theft chain mechanism, it is recommended to save the picture and upload it directly (img-mIDskLzU-1628485076031). ( https://cdn.nlark.com/yuque/0/2021/png/21630572/1628484465042-4fb7b33e-a848-4265-8118-f1eccce24282.png )]
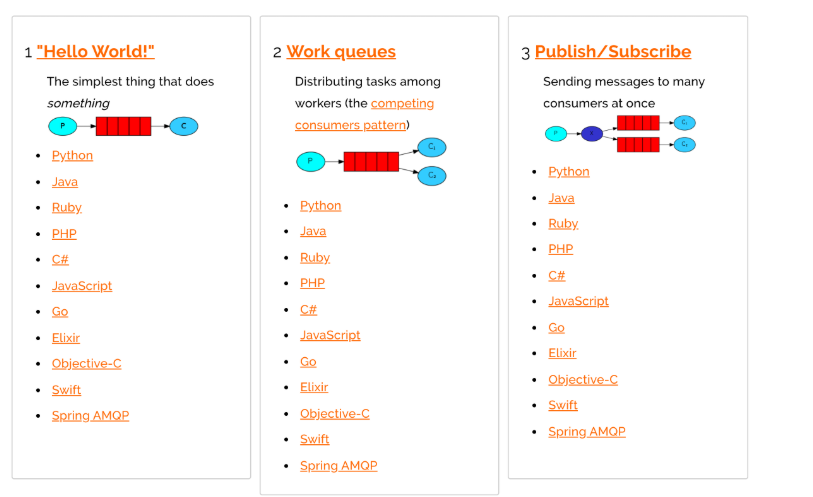
4.1 RabbitMQ Supported Message Model
These models, commonly used in the first five, can be found on rabbitMq website.
4.2 Introducing Dependency
<dependency>
    <groupId>com.rabbitmq</groupId>
    <artifactId>amqp-client</artifactId>
    <version>5.7.2</version>
</dependency>
4.3 First Model (Direct Connection)

In the model illustrated above, there are the following concepts:
-
P: The producer, the program that sends the message
-
C: Consumer: The recipient of the message will always wait for the message to arrive.
-
Queue: Message queue, the red part of the diagram. Like a mailbox, you can cache messages; The producer delivers the message to it and the consumer pulls it out.
1. Developer
//Create Connection Factory
ConnectionFactory connectionFactory = new ConnectionFactory();
connectionFactory.setHost("10.15.0.9");
connectionFactory.setPort(5672);
connectionFactory.setUsername("ems");
connectionFactory.setPassword("123");
connectionFactory.setVirtualHost("/ems");
Connection connection = connectionFactory.newConnection();
//Create Channel
Channel channel = connection.createChannel();
//Parameter 1: Whether to persist parameter 2: Whether to exclusive queue parameter 3: Whether to automatically delete parameter 4: Other properties
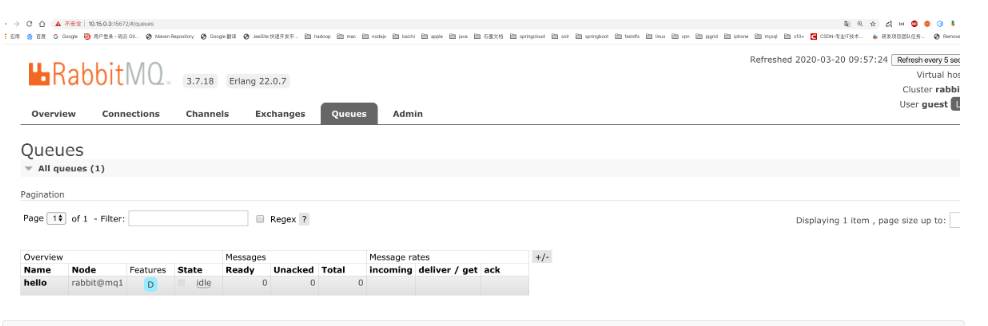
channel.queueDeclare("hello",true,false,false,null);
channel.basicPublish("","hello", null,"hello rabbitmq".getBytes());
channel.close();
connection.close();
2. Develop consumers
  //Create Connection Factory
  ConnectionFactory connectionFactory = new ConnectionFactory();
  connectionFactory.setHost("10.15.0.9");
  connectionFactory.setPort(5672);
  connectionFactory.setUsername("ems");
  connectionFactory.setPassword("123");
  connectionFactory.setVirtualHost("/ems");
  Connection connection = connectionFactory.newConnection();
  Channel channel = connection.createChannel();
  channel.queueDeclare("hello", true, false, false, null);
  channel.basicConsume("hello",true,new DefaultConsumer(channel){
    @Override
    public void handleDelivery(String consumerTag, Envelope envelope, AMQP.BasicProperties properties, byte[] body) throws IOException {
      System.out.println(new String(body));
    }
  });
3. Description of parameters
  channel.queueDeclare("hello",true,false,false,null);
	'Parameter 1':Queue used to declare channel correspondence
  'Parameter 2':Used to specify whether to persist queues
  'Parameter 3':Used to specify whether the queue is exclusive
  'Parameter 4':Used to specify whether queues are automatically deleted
  'Parameter 5':Additional configuration of queues
4.4 Second model (work quene)
Work queues, Also known as (Task queues), task model. When message processing is time consuming, messages may be produced much faster than they are consumed. In the long run, more and more messages will accumulate and cannot be processed in time. work model can be used: multiple consumers are bound to a queue and messages in the queue are consumed together once consumed. The task will not be repeated.

Roles:
-
P: Producer: Publisher of Task
-
C1: Consumer-1, pick up tasks and complete them, assuming they are done slowly
-
C2: Consumer-2: Get tasks and complete them, assuming fast completion
1. Developer
channel.queueDeclare("hello", true, false, false, null);
for (int i = 0; i < 10; i++) {
  channel.basicPublish("", "hello", null, (i+"====>:I'm a message").getBytes());
}
2. Develop Consumers-1
channel.queueDeclare("hello",true,false,false,null);
channel.basicConsume("hello",true,new DefaultConsumer(channel){
  @Override
  public void handleDelivery(String consumerTag, Envelope envelope, AMQP.BasicProperties properties, byte[] body) throws IOException {
    System.out.println("Consumer 1: "+new String(body));
  }
});
3. Develop Consumers-2
channel.queueDeclare("hello",true,false,false,null);
channel.basicConsume("hello",true,new DefaultConsumer(channel){
  @Override
  public void handleDelivery(String consumerTag, Envelope envelope, AMQP.BasicProperties properties, byte[] body) throws IOException {
    try {
      Thread.sleep(1000);   //Processing a message is one second slower than processing a message
    } catch (InterruptedException e) {
      e.printStackTrace();
    }
    System.out.println("Consumer 2: "+new String(body));
  }
});
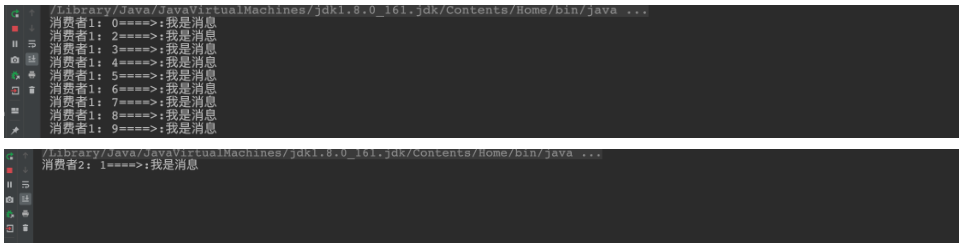
4. Test results

summary:By default, RabbitMQ Each message will be sent sequentially to the next consumer. On average, every consumer receives the same number of messages. This way of distributing messages is called loops.
5. Automatic Message Confirmation Mechanism
Doing a task can take a few seconds. You may wonder what happens if one of the consumers starts a long task and dies with it only partly done. With our current code, once RabbitMQ delivers a message to the consumer it immediately marks it for deletion. In this case, if you kill a worker we will lose the message it was just processing. We'll also lose all the messages that were dispatched to this particular worker but were not yet handled.
But we don't want to lose any tasks. If a worker dies, we'd like the task to be delivered to another worker.
channel.basicQos(1);//Accept only one unacknowledged message at a time
//Parameter 2: Turn off automatic confirmation messages
channel.basicConsume("hello",false,new DefaultConsumer(channel){
  @Override
  public void handleDelivery(String consumerTag, Envelope envelope, AMQP.BasicProperties properties, byte[] body) throws IOException {
    System.out.println("Consumer 1: "+new String(body));
    channel.basicAck(envelope.getDeliveryTag(),false);//Manual confirmation message
  }
});
- Setting channels can consume only one message at a time
- Turn off automatic confirmation of messages and turn on manual confirmation messages
 ng)
ng)
4.5 The third model (fanout)
fanout Fan out is also known as broadcasting

In broadcast mode, the message sending process is as follows:
-
There can be multiple consumers
-
Each consumer has its own queue
-
Each queue is bound to Exchange
-
Messages sent by the producer can only be sent to the switch, which decides which queue to send. The producer cannot decide which queue to send.
-
Switch sends messages to all bound queues
-
Queued consumers get the message. Implement a message consumed by multiple consumers
1. Developer
//Claim Switch
channel.exchangeDeclare("logs","fanout");//Broadcast a message Multiple consumers consume at the same time
//Publish a message
channel.basicPublish("logs","",null,"hello".getBytes());
2. Develop Consumers-1
//Bind switch
channel.exchangeDeclare("logs","fanout");
//Create temporary queue
String queue = channel.queueDeclare().getQueue();
//Bind temporary queue to exchange
channel.queueBind(queue,"logs","");
//Processing messages
channel.basicConsume(queue,true,new DefaultConsumer(channel){
  @Override
  public void handleDelivery(String consumerTag, Envelope envelope, AMQP.BasicProperties properties, byte[] body) throws IOException {
    System.out.println("Consumer 1: "+new String(body));
  }
});
3. Develop Consumers-2
//Bind switch
channel.exchangeDeclare("logs","fanout");
//Create temporary queue
String queue = channel.queueDeclare().getQueue();
//Bind temporary queue to exchange
channel.queueBind(queue,"logs","");
//Processing messages
channel.basicConsume(queue,true,new DefaultConsumer(channel){
  @Override
  public void handleDelivery(String consumerTag, Envelope envelope, AMQP.BasicProperties properties, byte[] body) throws IOException {
    System.out.println("Consumer 2: "+new String(body));
  }
});
4. Develop Consumers-3
//Bind switch
channel.exchangeDeclare("logs","fanout");
//Create temporary queue
String queue = channel.queueDeclare().getQueue();
//Bind temporary queue to exchange
channel.queueBind(queue,"logs","");
//Processing messages
channel.basicConsume(queue,true,new DefaultConsumer(channel){
  @Override
  public void handleDelivery(String consumerTag, Envelope envelope, AMQP.BasicProperties properties, byte[] body) throws IOException {
    System.out.println("Consumer 3: "+new String(body));
  }
});
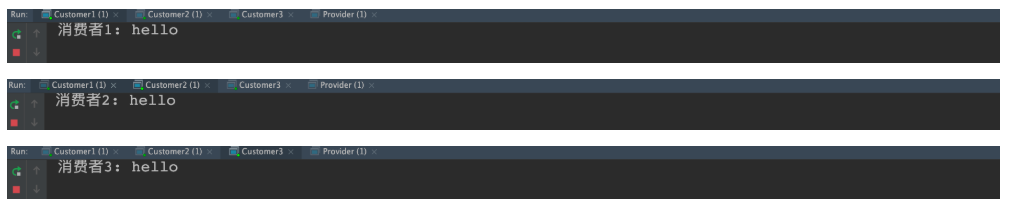
5. Test results
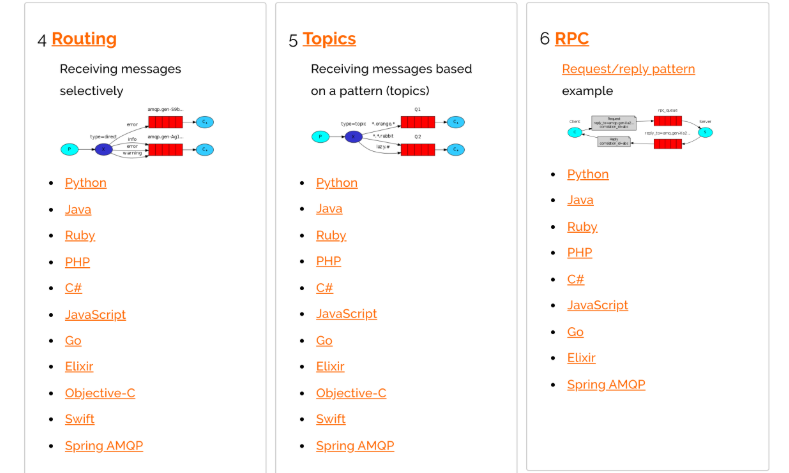
4.6 Fourth model (Routing)
4.6.1 Routing Subscription Model-Direct
stay Fanout In mode, a message is consumed by all subscribed queues. However, in some scenarios, we want different messages to be consumed by different queues. This is the time to use Direct Type Exchange.
Under the Direct model:
-
The binding of a queue to a switch cannot be arbitrary, but specifies a Routing key.
-
When sending a message to Exchange, the sender of the message must also specify the RoutingKey of the message.
-
Exchange no longer delivers messages to each bound queue, but instead judges from the message's Routing key, which receives messages only if the queue's Routing key is identical to the message's Routing key
Technological process:

Illustration:
-
P: Producer, sends a message to Exchange, and when sending a message, specifies a routing key.
-
X:Exchange, receives the producer's message, and delivers it to a queue that matches the routing key exactly
-
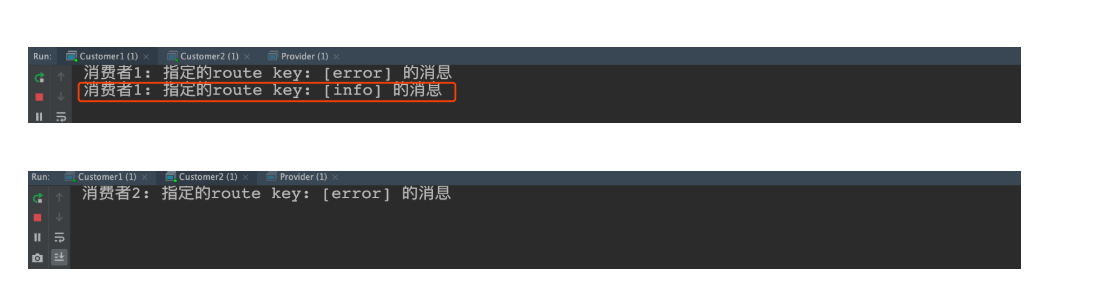
C1: Consumer whose queue specifies a message requiring routing key as error
-
C2: Consumer whose queue specifies messages requiring routing key for info, error, warning
1. Developer
//Declare switch parameter 1: switch name parameter 2: switch type Instruction-based outing key forwarding
channel.exchangeDeclare("logs_direct","direct");
String key = "";
//Publish a message
channel.basicPublish("logs_direct",key,null,("Designated route key"+key+"Message").getBytes());
2. Develop Consumers-1
 //Claim Switch
channel.exchangeDeclare("logs_direct","direct");
//Create temporary queue
String queue = channel.queueDeclare().getQueue();
//Bind queues and switches
channel.queueBind(queue,"logs_direct","error");
channel.queueBind(queue,"logs_direct","info");
channel.queueBind(queue,"logs_direct","warn");

//Consumer News
channel.basicConsume(queue,true,new DefaultConsumer(channel){
  @Override
  public void handleDelivery(String consumerTag, Envelope envelope, AMQP.BasicProperties properties, byte[] body) throws IOException {
    System.out.println("Consumer 1: "+new String(body));
  }
});
3. Develop Consumers-2
//Claim Switch
channel.exchangeDeclare("logs_direct","direct");
//Create temporary queue
String queue = channel.queueDeclare().getQueue();
//Bind queues and switches
channel.queueBind(queue,"logs_direct","error");
//Consumer News
channel.basicConsume(queue,true,new DefaultConsumer(channel){
  @Override
  public void handleDelivery(String consumerTag, Envelope envelope, AMQP.BasicProperties properties, byte[] body) throws IOException {
    System.out.println("Consumer 2: "+new String(body));
  }
});
4. When the test producer sends a message that Route key is error
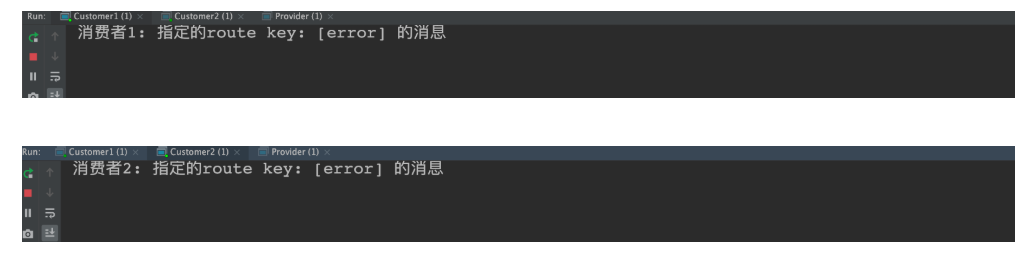
5. When the test producer sends a message that Route key is info
4.6.2 Routing Subscription Model-Topic
Topic`Type`Exchange`and`Direct`By contrast, you can`RoutingKey`Route messages to different queues. Just`Topic`type`Exchange`Queues can be bound`Routing key` When using wildcards! This model`Routingkey` Generally, they consist of one or more words, with "."Split, for example: `item.insert

# wild card
		* (star) can substitute for exactly one word.    Match no more than exactly one word
		# (hash) can substitute for zero or more words. Match one or more words
# For example:
		audit.#    Match audit.irs.corporate or audit.irs, etc.
    audit.*   Only matches audit.irs
1. Developer
//Life switch and switch type topic use dynamic routing (wildcard mode)
channel.exchangeDeclare("topics","topic");
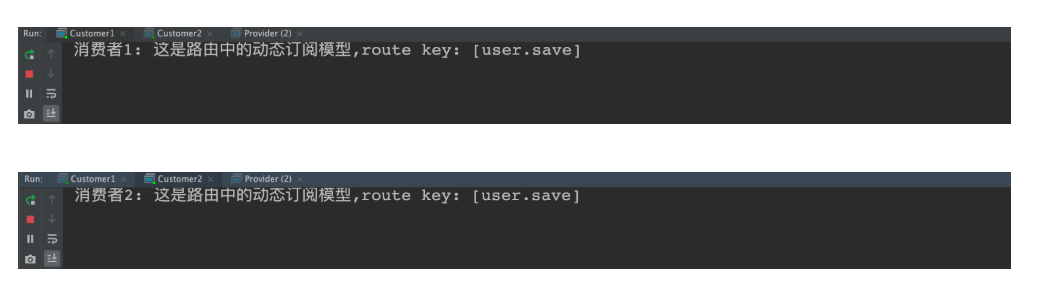
String routekey = "user.save";//Dynamic routing key
//Publish a message
channel.basicPublish("topics",routekey,null,("This is a dynamic subscription model in routing,route key: ["+routekey+"]").getBytes());
2. Develop Consumers-1
Routing Key Use*wildcard
 //Claim Switch
channel.exchangeDeclare("topics","topic");
//Create temporary queue
String queue = channel.queueDeclare().getQueue();
//Bind queues to switches and set get dynamic routes in switches
channel.queueBind(queue,"topics","user.*");

//Consumer News
channel.basicConsume(queue,true,new DefaultConsumer(channel){
  @Override
  public void handleDelivery(String consumerTag, Envelope envelope, AMQP.BasicProperties properties, byte[] body) throws IOException {
    System.out.println("Consumer 1: "+new String(body));
  }
});
3. Develop Consumers-2
Routing Key Use#wildcard
//Claim Switch
channel.exchangeDeclare("topics","topic");
//Create temporary queue
String queue = channel.queueDeclare().getQueue();
//Bind queues to switches and set get dynamic routes in switches
channel.queueBind(queue,"topics","user.#");

//Consumer News
channel.basicConsume(queue,true,new DefaultConsumer(channel){
  @Override
  public void handleDelivery(String consumerTag, Envelope envelope, AMQP.BasicProperties properties, byte[] body) throws IOException {
    System.out.println("Consumer 2: "+new String(body));
  }
});
4. Test results
5. Use RabbitMQ in SpringBoot
5.0 Build Initial Environment
1. Introducing dependencies
<dependency>
  <groupId>org.springframework.boot</groupId>
  <artifactId>spring-boot-starter-amqp</artifactId>
</dependency>
2. Configuration Profile
spring:
  application:
    name: springboot_rabbitmq
  rabbitmq:
    host: 10.15.0.9
    port: 5672
    username: ems
    password: 123
    virtual-host: /ems
RabbitTemplate is used to simplify operation usage by injecting directly into the project
5.1 The first hello world model uses
Developer Producer
@Autowired
private RabbitTemplate rabbitTemplate;

@Test
public void testHello(){
  rabbitTemplate.convertAndSend("hello","hello world");
}
Develop consumers
@Component
@RabbitListener(queuesToDeclare = @Queue("hello"))
public class HelloCustomer {

    @RabbitHandler
    public void receive1(String message){
        System.out.println("message = " + message);
    }
}
5.2 Use of the second work model
Developer Producer
@Autowired
private RabbitTemplate rabbitTemplate;

@Test
public void testWork(){
  for (int i = 0; i < 10; i++) {
    rabbitTemplate.convertAndSend("work","hello work!");
  }
}
-
Develop consumers
@Component
public class WorkCustomer {
    @RabbitListener(queuesToDeclare = @Queue("work"))
    public void receive1(String message){
        System.out.println("work message1 = " + message);
    }

    @RabbitListener(queuesToDeclare = @Queue("work"))
    public void receive2(String message){
        System.out.println("work message2 = " + message);
    }
}
Explain:Default at Spring AMQP In Implementation Work This is fair scheduling,Additional configuration is required if more energy is needed
5.3 Fanout Broadcast Model
Developer Producer
@Autowired
private RabbitTemplate rabbitTemplate;

@Test
public void testFanout() throws InterruptedException {
  rabbitTemplate.convertAndSend("logs","","This is a log broadcast");
}
Develop consumers
@Component
public class FanoutCustomer {

    @RabbitListener(bindings = @QueueBinding(
            value = @Queue,
            exchange = @Exchange(name="logs",type = "fanout")
    ))
    public void receive1(String message){
        System.out.println("message1 = " + message);
    }

    @RabbitListener(bindings = @QueueBinding(
            value = @Queue, //Create temporary queue
            exchange = @Exchange(name="logs",type = "fanout")  //Binding switch type
    ))
    public void receive2(String message){
        System.out.println("message2 = " + message);
    }
}
5.4 Route Routing Model
Developer Producer
@Autowired
private RabbitTemplate rabbitTemplate;

@Test
public void testDirect(){
  rabbitTemplate.convertAndSend("directs","error","error Log information");
}
Develop consumers
@Component
public class DirectCustomer {

    @RabbitListener(bindings ={
            @QueueBinding(
                    value = @Queue(),
                    key={"info","error"},
                    exchange = @Exchange(type = "direct",name="directs")
            )})
    public void receive1(String message){
        System.out.println("message1 = " + message);
    }

    @RabbitListener(bindings ={
            @QueueBinding(
                    value = @Queue(),
                    key={"error"},
                    exchange = @Exchange(type = "direct",name="directs")
            )})
    public void receive2(String message){
        System.out.println("message2 = " + message);
    }
}
5.5 Topic Subscription Model (Dynamic Routing Model)
Developer Producer
@Autowired
private RabbitTemplate rabbitTemplate;

//topic
@Test
public void testTopic(){
  rabbitTemplate.convertAndSend("topics","user.save.findAll","user.save.findAll Message");
}
Develop consumers
@Component
public class TopCustomer {
    @RabbitListener(bindings = {
            @QueueBinding(
                    value = @Queue,
                    key = {"user.*"},
                    exchange = @Exchange(type = "topic",name = "topics")
            )
    })
    public void receive1(String message){
        System.out.println("message1 = " + message);
    }

    @RabbitListener(bindings = {
            @QueueBinding(
                    value = @Queue,
                    key = {"user.#"},
                    exchange = @Exchange(type = "topic",name = "topics")
            )
    })
    public void receive2(String message){
        System.out.println("message2 = " + message);
    }
}
6. MQ application scenarios
6.1 Asynchronous Processing
Scene description: After user registration, they need to send registration email and registration SMS,There are two traditional practices 1.Serial Mode 2.Parallel approach
- Serial mode: After writing the registration information to the database, send the registration email, then send the registration SMS, and return to the client after all three tasks are completed. The problem is that mail, text messages are not required, they are just notifications, and this allows clients to wait for something they don't have to wait for.
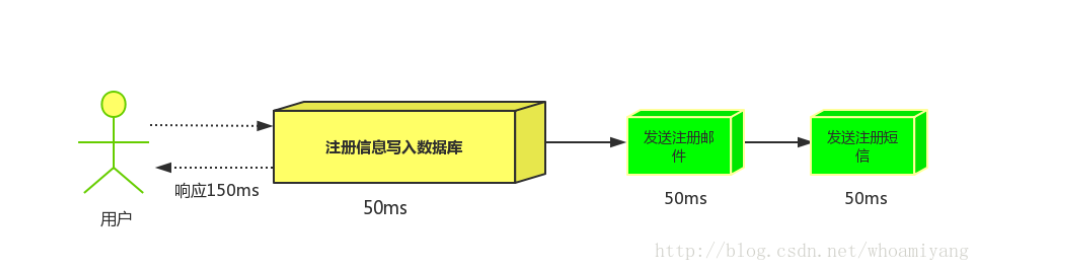
- Parallel mode: Write registration information into the database, send mail while sending text messages, and return to the client after the above three tasks are completed. Parallel mode can improve processing time.
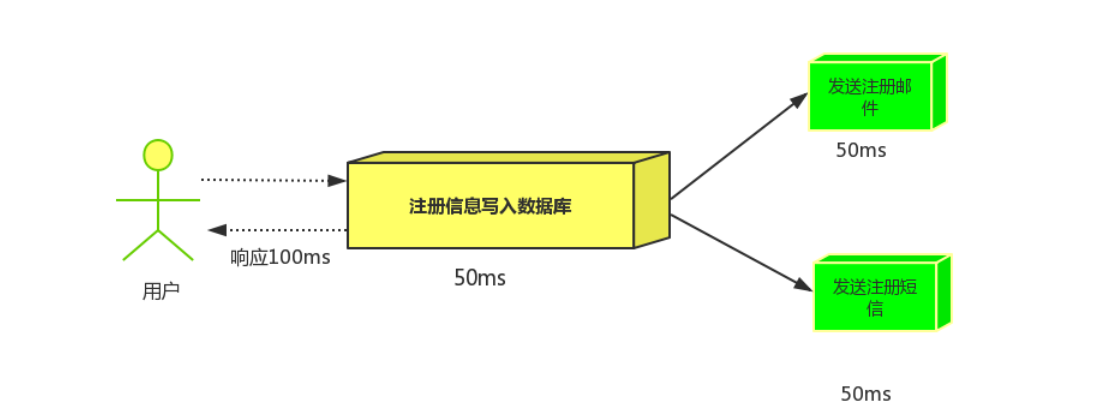
- Message Queuing: Assume three business nodes use 50ms, 150 ms in serial mode, and 100ms in parallel. Although concurrency has improved processing time, as mentioned earlier, e-mail and text messages have no impact on my normal use of the site. Clients do not have to wait for their sending to complete before they show that registration is successful. They should return after writing to the database. Message Queuing: When message queuing is introduced, messages are sent and messages are not processed asynchronously by business logic as required.
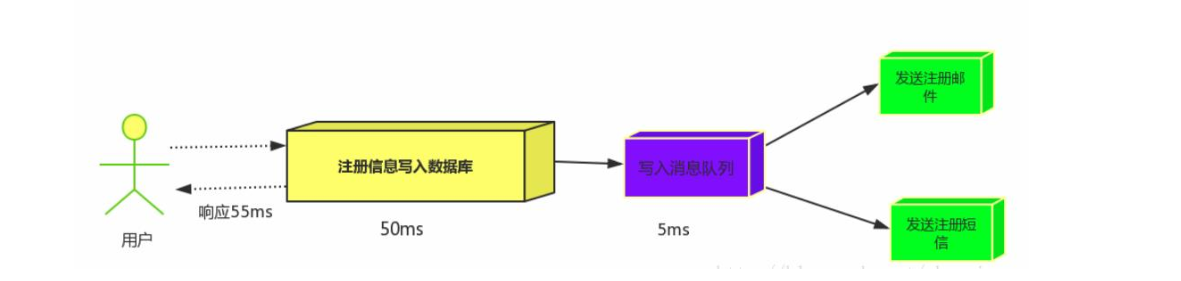
It can be seen that when message queuing is introduced, the response time of the user is equal to the time written to the database + the time written to the message queue (negligible). After message queuing post-processing is introduced, the response time is three times that of the serial and twice that of the parallel.
6.2 Applying decoupling
Scene: Double 11 is a shopping spree,After user orders,Order system needs to notify inventory system,The traditional practice is that the order system calls the interface of the inventory system.

This approach has one drawback:
When the inventory system fails, the order fails. Order system and inventory system are highly coupled. Introduce message queue
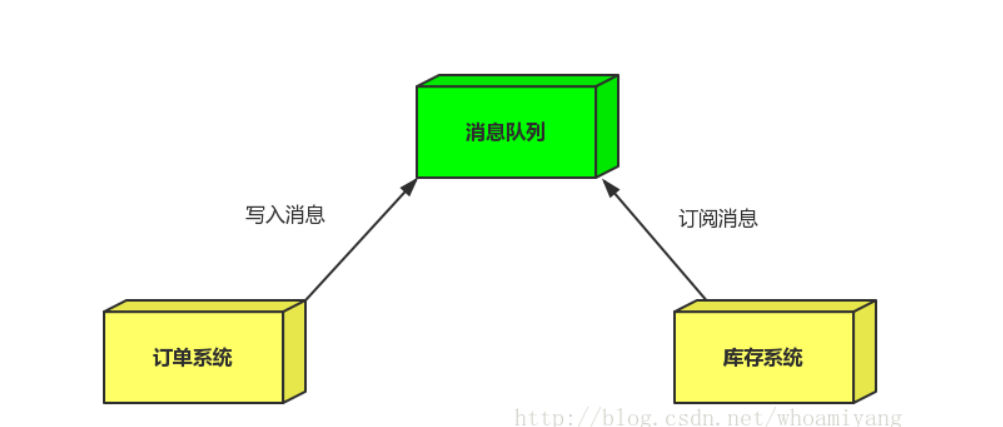
- Order system: After the user places the order, the order system completes the persistence process, writes the message to the message queue, and returns the success of the user's order.
- Inventory system: Subscribe to the order message, get the order message, and do library operation. Message queuing guarantees reliable delivery of messages even if the inventory system fails without causing message loss.
6.3 Flow Peak Clipping
Scenario: Secondary killing usually causes applications to hang due to excessive traffic. To solve this problem, message queues are usually joined at the front of applications.
Effect:
1. You can control the number of people active, and orders that exceed this threshold are discarded directly (why can't I kill once in a second?^)
2. Can alleviate short periods of high traffic crashing applications (applications get orders at their maximum processing power)
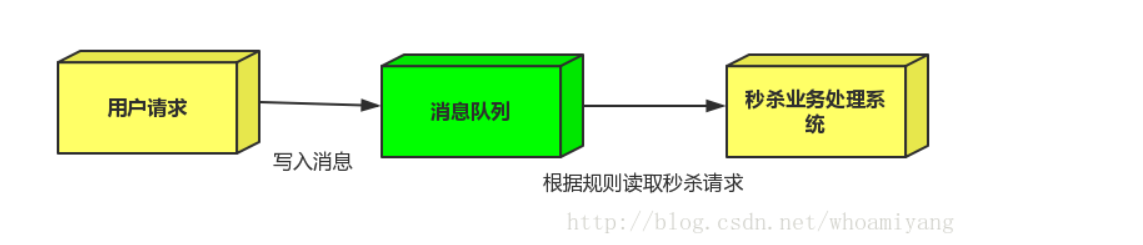
1. When a user's request is received by the server, the server writes the message queue first. If the length of the queue exceeds the maximum, the user's request is discarded directly or the server jumps to the error page.
2.The secondkill service performs subsequent processing based on the requested information in the message queue.
7. RabbitMQ Cluster
7.1 Cluster Architecture
7.1. 1 Ordinary Cluster (Replica Cluster)
All data/state required for the operation of a RabbitMQ broker is replicated across all nodes. An exception to this are message queues, which by default reside on one node, though they are visible and reachable from all nodes. To replicate queues across nodes in a cluster -- from the official website
By default:RabbitMQ All data required for agent operation/The state will be replicated across all nodes. An exception to this is Message Queuing, which by default is on one node, although they can be seen and accessed from all nodes
Architecture diagram
Core problem solving: Quene information can be backed up when the master node is down at some point in the cluster
Cluster building
# 0. Cluster Planning
	node1: 10.15.0.3  mq1  master Primary Node
	node2: 10.15.0.4  mq2  repl1  Replica Node
	node3: 10.15.0.5  mq3  repl2  Replica Node

# 1. Clone three machine hostnames and ip mappings
	vim /etc/hosts join:
		 10.15.0.3 mq1
    	10.15.0.4 mq2
    	10.15.0.5 mq3
	node1: vim /etc/hostname join:  mq1
	node2: vim /etc/hostname join:  mq2
	node3: vim /etc/hostname join:  mq3

# 2.Three machines install rabbitmq and synchronize cookie files to execute on node1:
	scp /var/lib/rabbitmq/.erlang.cookie root@mq2:/var/lib/rabbitmq/
	scp /var/lib/rabbitmq/.erlang.cookie root@mq3:/var/lib/rabbitmq/

# 3. Check if the cookie s are consistent:
	node1: cat /var/lib/rabbitmq/.erlang.cookie
	node2: cat /var/lib/rabbitmq/.erlang.cookie
	node3: cat /var/lib/rabbitmq/.erlang.cookie

# 4. Background boot rabbitmq all nodes execute the following command to launch the successful access management interface:
	rabbitmq-server -detached

# 5. Execute the Join Cluster command on Noe2 and Noe3:
	1.Close       rabbitmqctl stop_app
	2.Join Cluster    rabbitmqctl join_cluster rabbit@mq1
	3.Start Services    rabbitmqctl start_app

# 6. View the state of the cluster, and any node executes:
	rabbitmqctl cluster_status

# 7. If the following shows, the cluster is successfully built:
	Cluster status of node rabbit@mq3 ...
	[{nodes,[{disc,[rabbit@mq1,rabbit@mq2,rabbit@mq3]}]},
	{running_nodes,[rabbit@mq1,rabbit@mq2,rabbit@mq3]},
	{cluster_name,<<"rabbit@mq1">>},
	{partitions,[]},
	{alarms,[{rabbit@mq1,[]},{rabbit@mq2,[]},{rabbit@mq3,[]}]}]

# 8. Login management interface, showing the following status:

# 9. Test cluster on node1, create queue
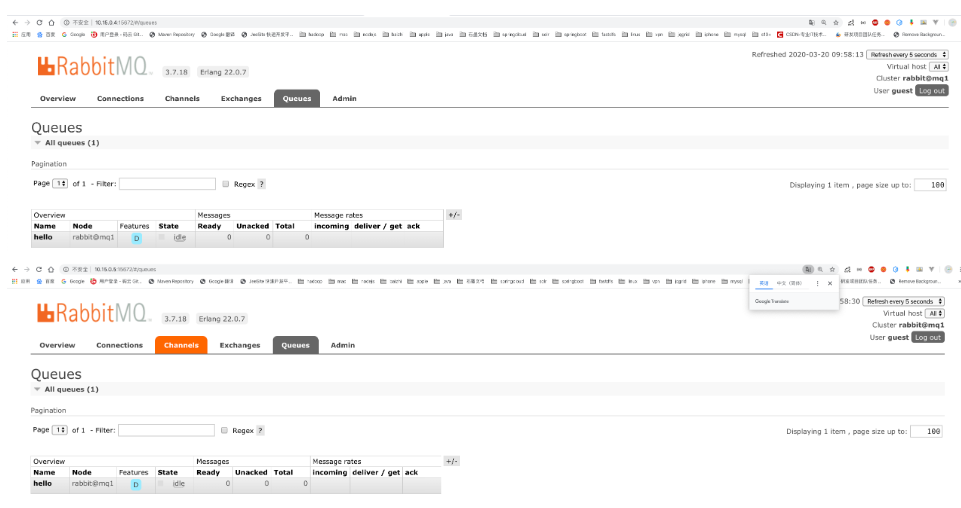
# 10. View node2 and node3 nodes:
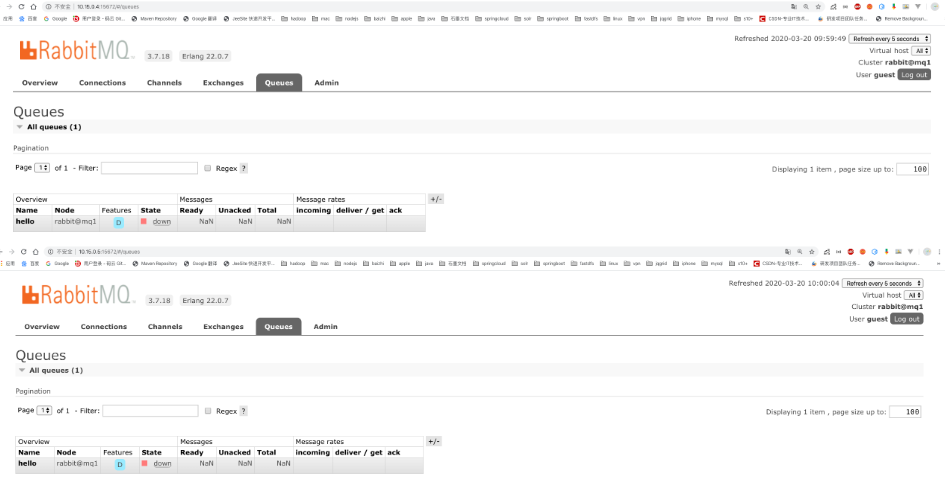
# 11. Close the node1 node and execute the following command to view node2 and node3:
	rabbitmqctl stop_app
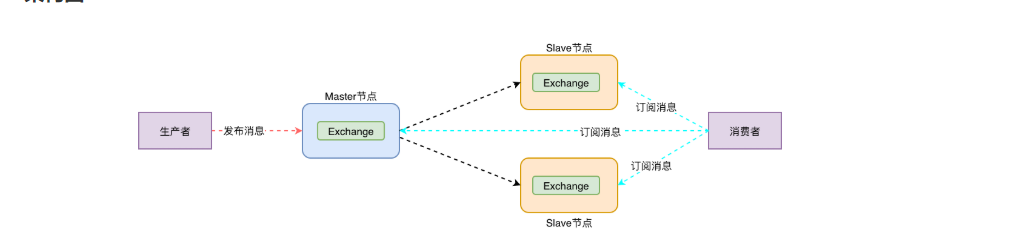
7.1. 2 Mirror Cluster
This guide covers mirroring (queue contents replication) of classic queues -- from the official website
By default, contents of a queue within a RabbitMQ cluster are located on a single node (the node on which the queue was declared). This is in contrast to exchanges and bindings, which can always be considered to be on all nodes. Queues can optionally be made mirrored across multiple nodes. -- From the official website
Mirroring queue mechanism is to set up a master-slave relationship between three nodes. Messages are automatically synchronized among the three nodes. If one of the nodes is unavailable, it will not cause message loss or service unavailability, and promote MQ Overall high availability of clusters.
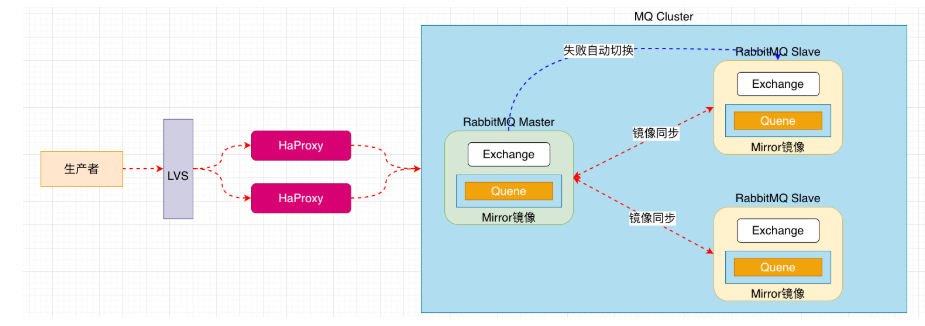
Cluster architecture
2. Configure Cluster Architecture
# 0. Policy Description
	rabbitmqctl set_policy [-p <vhost>] [--priority <priority>] [--apply-to <apply-to>] <name> <pattern>  <definition>
	-p Vhost:  Optional parameters, specified for vhost Lower queue Set up
	Name:     policy Name of
	Pattern: queue Matching pattern of(regular expression)
	Definition: Mirror Definition, which consists of three parts ha-mode, ha-params, ha-sync-mode
           		ha-mode:Indicates the mode of the mirror queue, valid values are all/exactly/nodes
                        all: Represents mirroring on all nodes in a cluster
                        exactly: Represents mirroring on a specified number of nodes by ha-params Appoint
                        nodes: Represents mirroring on a specified node with the node name passed through ha-params Appoint
            	 ha-params: ha-mode Parameters required by the pattern
                ha-sync-mode: Synchronize messages in the queue with a valid value of automatic and manual
                priority: Optional parameters, policy Priority


# 1. View the current policy
	rabbitmqctl list_policies

# 2. Add Policy
	rabbitmqctl set_policy ha-all '^hello' '{"ha-mode":"all","ha-sync-mode":"automatic"}'
	Explain:The policy regular expression is "^" Represents all matching queue names  ^hello:matching hello Beginning Queue

# 3. Deletion Policy
	rabbitmqctl clear_policy ha-all

# 4. Test Cluster