1, centos7 common commands
1. Check CPU, hard disk and memory usage
#View CPU
$ dmesg |grep -i xeon
#view memory
$ free -m  with MB Query memory in units
#View hard disk
$ df -m with Mb Displays disk usage and occupancy in units
2. Firewall
2.1 systemctl command
View status
$ systemctl status firewalld.service
Turn on the firewall
$ systemctl start firewalld.service
Turn off firewall
$ systemctl stop firewalld.service
Boot firewall
$ systemctl enable firewalld.service
Disable firewall startup
$ systemctl disable firewalld.service
2.2 firewall command
View firewall status
$ firewall-cmd --state
View all open ports of firewall
# Only ports that are open through the firewall CMD command can be viewed
$ firewall-cmd --zone=public --list-ports
Open port
$ firewall-cmd --zone=public --add-port=5672/tcp --permanent
Close port
$ firewall-cmd --zone=public --remove-port=5672/tcp --permanent
Configuration takes effect immediately
$ firewall-cmd --reload
3. Port operation command
View port occupancy
$ lsof -i:22
$ netstat -lnpt |grep 22
View listening port
$ netstat -lnpt
2, Docker environment installation
1.VMware installation centos7
Installing CentOS 7
reference resources: https://blog.csdn.net/babyxue/article/details/80970526
CentOS 7 common plug-ins installation
reference resources: https://blog.csdn.net/m0_37822338/article/details/105599692
2.centos7 install MySQL 5 seven
2.1 download & unzip
$ wget https://cdn.mysql.com/archives/mysql-5.7/mysql-5.7.29-linux-glibc2.12-x86_64.tar.gz

$ tar xzf mysql-5.7.29-linux-glibc2.12-x86_64.tar.gz
$ mv mysql-5.7.29-linux-glibc2.12-x86_64 /usr/local/mysql-5.7.29
2.2 installation dependency
yum install libncurses*
2.3 creating data and log folders
$ cd /usr/local/mysql-5.7.29/

# data
$ mkdir -p data
# journal
$ mkdir -p log
2.4 create users and groups and assign permissions
Execute in / usr/local/mysql-5.7.29 /
$ groupadd mysql
$ useradd -r -g mysql mysql		# -g: Specify the user group to which the user belongs, - r: establish a system account
$ chown -R mysql:mysql /usr/local/mysql-5.7.29
2.5 add configuration
vim press i to enter the insertion mode and exit the command: in the insertion mode, successively enter: esc,: WQ (save and exit) /: q! (forced exit)
$ vim /etc/my.cnf

# Write the following and note the path
[mysqld]
bind-address=0.0.0.0
port=3306
user=mysql
basedir=/usr/local/mysql-5.7.29
datadir=/usr/local/mysql-5.7.29/data
socket=/tmp/mysql.sock

lc_messages_dir = /usr/local/mysql-5.7.29/share/
lc_messages = en_US

# character set
character_set_server=utf8mb4
collation-server = utf8mb4_unicode_ci
init_connect='SET NAMES utf8mb4'

symbolic-links=0
explicit_defaults_for_timestamp=true

# Allowed size settings for import package
max_allowed_packet=1024M

max_connections=1500

# Dongba District time zone, Beijing time zone
default-time-zone = '+8:00'

sql_mode=STRICT_TRANS_TABLES,NO_ZERO_IN_DATE,NO_ZERO_DATE,ERROR_FOR_DIVISION_BY_ZERO,NO_AUTO_CREATE_USER,NO_ENGINE_SUBSTITUTION

# Ignore table name case; 1 means ignore case, 0 means resolve case
lower_case_table_names=1

log-error=/usr/local/mysql-5.7.29/log/err.log

pid-file=/usr/local/mysql-5.7.29/mysql.pid

[mysql]
default-character-set=utf8mb4

[client]
default-character-set=utf8mb4
2.6 initialization
initialization
$ /usr/local/mysql-5.7.29/bin/mysqld --defaults-file=/etc/my.cnf --basedir=/usr/local/mysql-5.7.29/ --datadir=/usr/local/mysql-5.7.29/data/ --user=mysql --initialize
Initial password
$ cat /usr/local/mysql-5.7.29/log/err.log

# The password is on the last line
A temporary password is generated for root@localhost: t/0lljLYs9Sj
2.7 command support
Environment variables (mysql -u -p command is supported)
$ vim /etc/profile

# Write at end of file
# mysql
PATH=/usr/local/mysql-5.7.29/bin:$PATH

# Refresh environment variable configuration
$ source /etc/profile
mysqldump command
ln -fs /usr/local/mysql-5.7.29/bin/mysqldump /usr/bin
2.8 test: start / stop / restart
$ cp -a /usr/local/mysql-5.7.29/support-files/mysql.server /etc/init.d/mysql

$ service mysql start	 perhaps  /etc/init.d/mysql start
$ service mysql stop	 perhaps  /etc/init.d/mysql stop
$ service mysql restart	 perhaps  /etc/init.d/mysql restart
2.9 password modification & Remote Access
$ mysql -uroot -p
mysql> alter user user() identified by "New password";
mysql> use mysql;
mysql> update user set authentication_string=password('New password') where user='root';
mysql> update user set host='%' where user='root';
mysql> flush privileges;
mysql> exit;
Open port (configured only when firewall is on)
$ firewall-cmd --zone=public --add-port=3306/tcp --permanen
$ firewall-cmd --reload
2.10 automatic startup
$ cp -a /usr/local/mysql-5.7.29/support-files/mysql.server /etc/rc.d/init.d/mysql
$ vim /etc/rc.d/rc.local

# Add the following at the end
  /etc/rc.d/init.d/mysql start

# Note: / etc / init D is pointing to / etc / RC d/init. D soft link, if implemented, can be saved
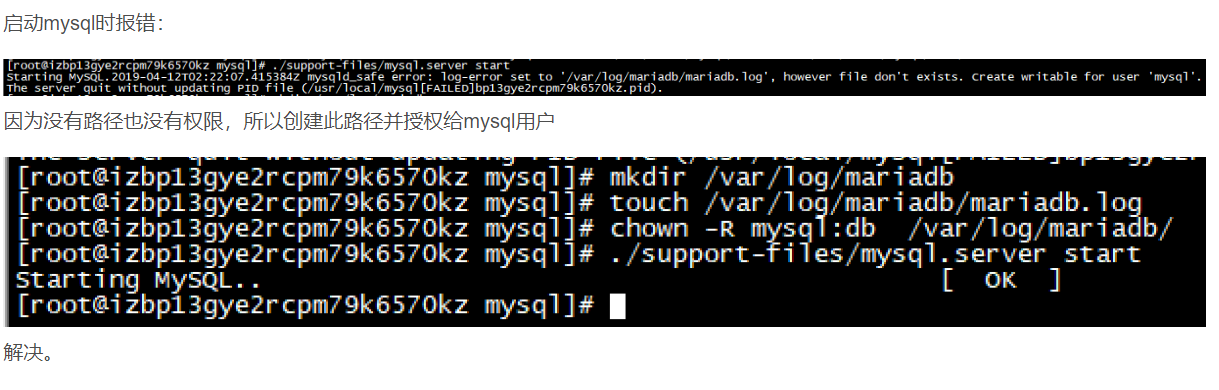
2.11 error resolution
Start mysql and report an error mysqld_safe error: log-error set to ‘/var/log/mariadb/mariadb.log’
3.centos7 install jdk1 eight
3.1 check the original version of the system
[root@localhost /]# java -version
openjdk version "1.8.0_161"
OpenJDK Runtime Environment (build 1.8.0_161-b14)
OpenJDK 64-Bit Server VM (build 25.161-b14, mixed mode)
3.2 further view JDK information
[root@localhost /]# rpm -qa | grep java
python-javapackages-3.4.1-11.el7.noarch
java-1.8.0-openjdk-headless-1.8.0.161-2.b14.el7.x86_64
tzdata-java-2018c-1.el7.noarch
java-1.7.0-openjdk-1.7.0.171-2.6.13.2.el7.x86_64
java-1.8.0-openjdk-1.8.0.161-2.b14.el7.x86_64
javapackages-tools-3.4.1-11.el7.noarch
java-1.7.0-openjdk-headless-1.7.0.171-2.6.13.2.el7.x86_64
3.3 uninstall OpenJDK
[root@localhost /]# rpm -e --nodeps java-1.8.0-openjdk-headless-1.8.0.1612.b14.el7.x86_64
[root@localhost /]# rpm -e --nodeps java-1.8.0-openjdk-1.8.0.1612.b14.el7.x86_64
[root@localhost /]# rpm -e --nodeps java-1.7.0-openjdk-1.7.0.1712.6.13.2.el7.x86_64
[root@localhost /]# rpm -e --nodeps java-1.7.0-openjdk-headless-1.7.0.1712.6.13.2.el7.x86_64
3.4 installing JDK
Download the new jdk1.com from the official website 8 rpm installation package
https://www.oracle.com/technetwork/java/javase/downloads/jdk8-downloads-2133151.html
And upload the new jdk-8u191-linux-x64 RPM software to / usr/local/src / to perform the following operations:
[root@localhost src]# rpm -ivh jdk-8u191-linux-x64.rpm
Warning: jdk-8u191-linux-x64.rpm: head V3 RSA/SHA256 Signature, secret key ID ec551f03: NOKEY
In preparation...
################################# [100%]
Upgrading/install...
1:jdk1.8-2000:1.8.0_191-fcs ################################# [100%]
Unpacking JAR files...
tools.jar...
plugin.jar...
javaws.jar...
deploy.jar...
rt.jar...
jsse.jar...
charsets.jar...
localedata.jar...
[root@localhost src]# java -version
java version "1.8.0_191" Java(TM) SE Runtime Environment (build 1.8.0_191-b12)
Java HotSpot(TM) 64-Bit Server VM (build 25.191-b12, mixed mode)
JDK is installed in / usr/java by default
Verify the installation, and perform the following operations to check whether the information is normal:
[root@localhost src]# java -version
java version "1.8.0_191" Java(TM) SE Runtime Environment (build 1.8.0_191-b12)
Java HotSpot(TM) 64-Bit Server VM (build 25.191-b12, mixed mode)
Configure environment variables
My machine has installed jdk-8u191-linux-x64 After rpm, javac and java – version operations can be performed normally without configuring environment variables. Therefore, I did not configure JDK environment variables. However, for future discomfort, here's how to configure it. The operations are as follows:
Modify the system environment variable file
[root@localhost src]# vi /etc/profile
Add the following contents to the file:
JAVA_HOME=/usr/java/jdk1.8.0_191-amd64 JRE_HOME=/usr/java/jdk1.8.0_191-amd64/jre PATH=$PATH:$JAVA_HOME/bin:$JRE_HOME/bin CLASSPATH=.:$JAVA_HOME/lib/dt.jar:$JAVA_HOME/lib/tools.jar:$JRE_HOME/lib export JAVA_HOME JRE_HOME PATH CLASSPATH
Make changes effective
[root@localhost /]# source /etc/profile
[root@localhost /]# echo $PATH
/usr/local/sbin:/usr/local/bin:/usr/sbin:/usr/bin:/root/bin:/usr/java/jdk1.8.0_1 91-amd64/bin:/usr/java/jdk1.8.
4, Docker installation
1. Uninstall Docker
Query the installed docker package
$ yum list installed | grep docker

Remove installed packages
$ yum -y remove docker
$ yum -y remove docker-client
$ yum -y remove docker-common
2. Check the kernel version
< docker requires the kernel version of CentOS system to be higher than 3.10 >
$ uname -r Local machine<Kernel version: 3.10.0-1062.el7.x86_64>
3. Update yum package to the latest version
**This step is very necessary** I stepped on the pit without updating it before
$ yum update
4. Install important software packages
Yum util provides the yum config manager function, and the other two are dependent on the devicemapper driver
$ sudo yum install -y yum-utils device-mapper-persistent-data lvm2
5. Set yum source
$ sudo yum-config-manager --add-repo https://download.docker.com/linux/centos/docker-ce.repo
6. View the docker version in the warehouse and select a specific version to install
$ yum list docker-ce --showduplicates | sort -r
7. Install docker
$ sudo yum install docker-ce  #Since only the stable warehouse is enabled by default in repo, the latest stable version 17.12.0 is installed here
$ sudo yum install <FQPN>  # For example: sudo Yum install docker-ce-17.12.0.0 ce
8. Start and add startup
$ sudo systemctl start docker
$ sudo systemctl enable docker
9. Verify that the installation was successful
(there are two parts: client and service, which means that the installation and startup of docker are successful)
$ docker version
10. View docker service status
$ systemctl status docker
11. Configure the image accelerator
Register alicloud account
Enter alicloud console( https://cr.console.aliyun.com/cn-zhangjiakou/instances/mirrors )
Copy accelerator address
Modify the daemon configuration file / etc / docker / daemon JSON to use the accelerator
$ vi /etc/docker/daemon.json
#Add the following
{
  "registry-mirrors": ["https://XXXXXXX.mirror.aliyuncs.com"],
  "insecure-registries":["XXXXXXX"]
}
#Registry mirrors your own accelerator address
#Secure registers select the private warehouse address pushed by your docker (if not, it can be omitted)
Restart the daemon
$ systemctl daemon-reload
Restart docker
$ systemctl restart docker
5, Install docker compose
1. Download
$ sudo curl -L https://github.com/docker/compose/releases/download/1.26.2/docker-compose-`uname -s`-`uname -m` -o /usr/local/bin/docker-compose
2. Authorization
$ chmod +x /usr/local/bin/docker-compose
3. View version
$ docker-compose version
6, Install Harbor
1. Download tgz package
https://storage.googleapis.com/harbor-releases/release-1.9.0/harbor-offline-installer-v1.9.4.tgz
2. Decompression
$ sudo tar -zxvf harbor-offline-installer-v1.9.4.tgz
3. Modify harbor YML profile
Enter the harbor folder and modify the harbor yml
$ cd harbor
$ sudo vi harbor.yml
# Change to the internal ip of the server (there must be a space between ":" and ip)
hostname: XXXXXXXX  #Fill in the IP of the virtual machine for this IP
4. Start harbor service
$ sudo ./install.sh
5. Access harbor (the password can be modified in the harbor.yml configuration file)
http://XXXXXXX # fill in virtual machine ip
 accounts:admin
 password:Harbor12345
6.docker login
(if linux does not log in, there will be problems with push in the later stage)
$ sudo docker login XXXXX  #Fill in virtual machine IP

#The login account password is harbor account password
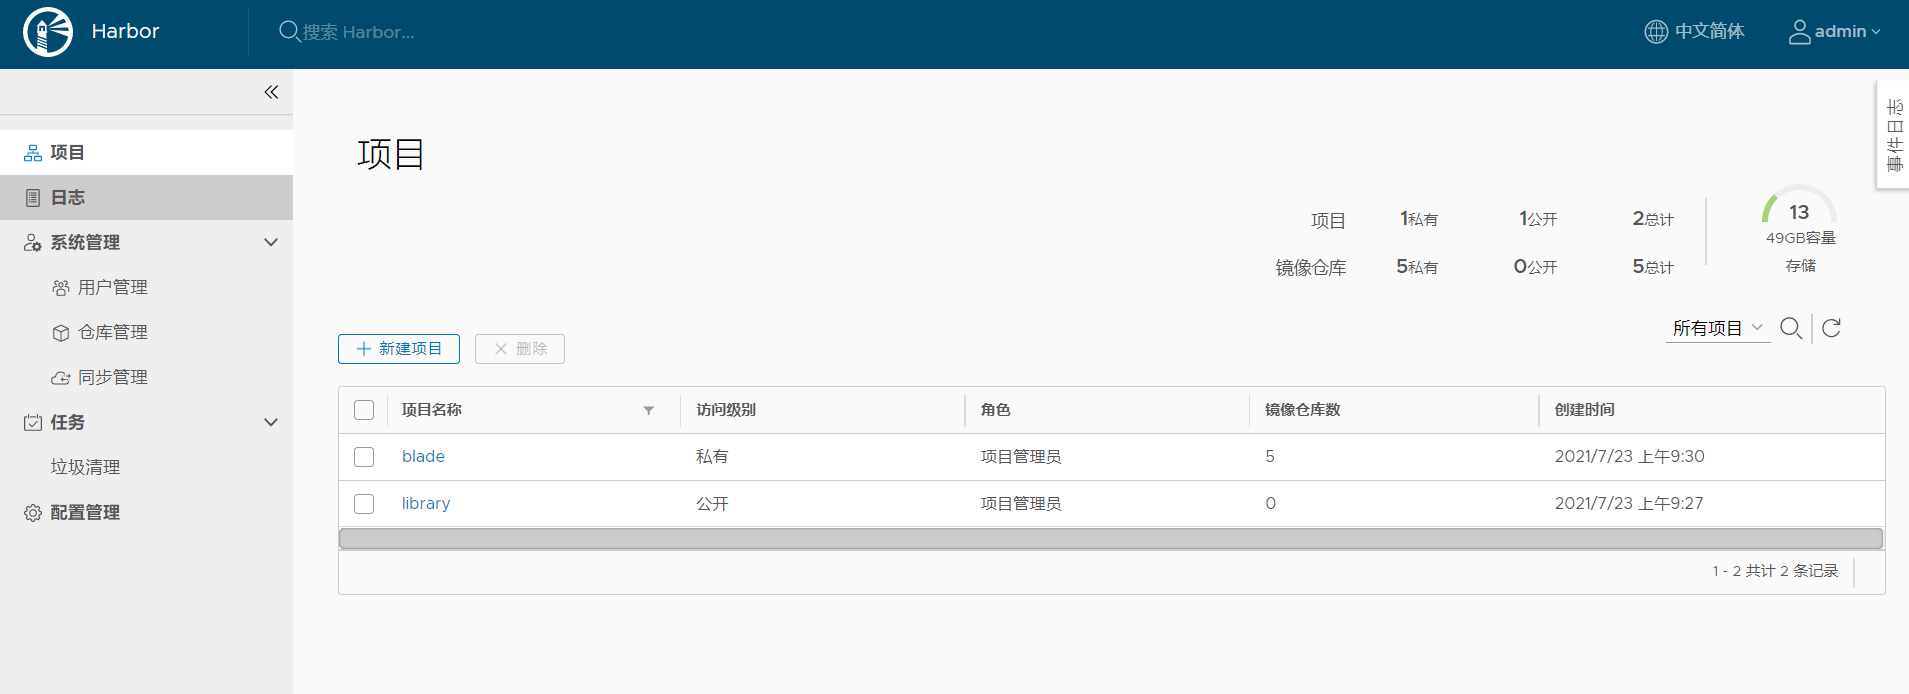
7. New private project in Harbor
7, Maven pushes images to Harbor
1.docker enable remote access
Note: there are security risks when opening up on the Internet. It is only recommended to open up on the intranet
$ vi /lib/systemd/system/docker.service
#Add under the [Service] node
ExecStart=/usr/bin/dockerd -H tcp://0.0.0.0:2375 -H unix://var/run/docker.sock

$ systemctl daemon-reload
$ systemctl restart docker
$ docker-compose stop
$ docker-compose start
$ firewall-cmd --add-port=2375/tcp --permanent
$ service firewalld restart
2.Maven configuration
To use harbor as a private library, you need to configure maven and find setting XML add the following configuration
<pluginGroups>
    <pluginGroup>com.spotify</pluginGroup>
</pluginGroups>
<server>
    <id>192.168.186.129</id>
    <username>admin</username>
    <password>Harbor12345</password>
    <configuration>
        <email>smallchill@163.com</email>
    </configuration>
</server>
3. Add docker environment variable
(adding environment variables may still fail, restart the computer)

Replace XXXXX in the variable value with the address of your virtual machine
4. Push
Execute in the root directory of the project
mvn clean package dockerfile:build dockerfile:push
8, Docker learning
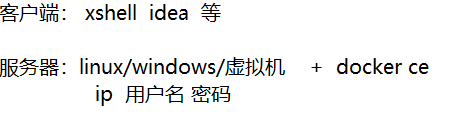
1. Relationship between client / server / image / container
Docker uses client server (C/S) architecture mode and remote API s to manage and create docker containers.
Docker containers are created through docker images.
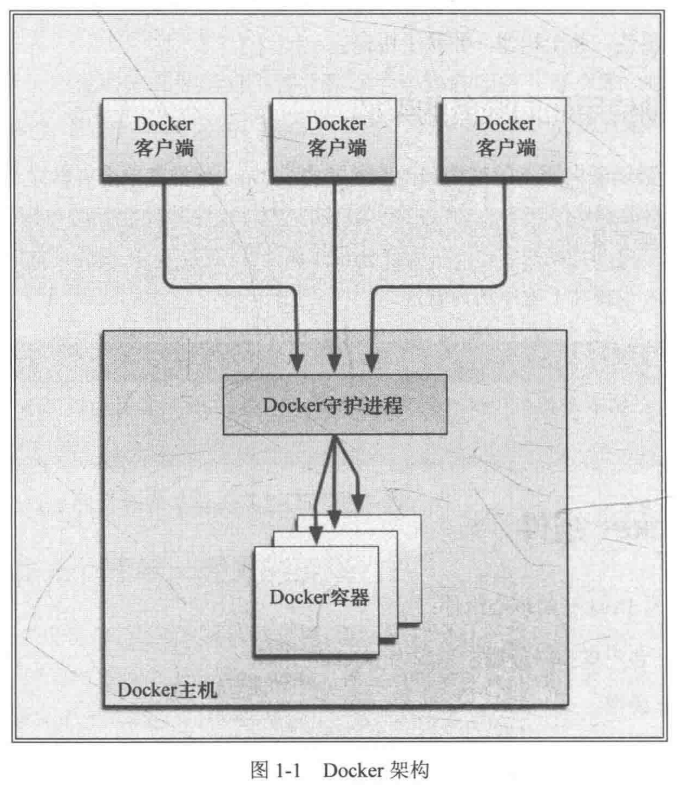
1.1Docker client and server
Docker is a client / server (C/S) architecture program. The docker client only needs to send a request to the docker server or daemon, and the server or daemon will complete all work and return results. The docker daemon is sometimes referred to as the docker engine. Docker provides a command-line tool docker and a complete set of restful APIs to interact with daemons. Users can run the docker daemon and client on the same host, or connect from the local docker client to the remote docker daemon running on another host. Figure 1-1 depicts the architecture of docker.
1.2 docker image
Image is the cornerstone of building Docker world. Users run their own containers based on images. Mirroring is also a "build" part of the Docker lifecycle. Image is a hierarchical structure based on the Union file system, which is built step by step by a series of instructions. For example:
● add a file;
● execute a command;
● open a port;
You can also use the image as the "source code" of the container. The image is small, very "portable" and easy to share, store and update.
1.3Registry
Docker uses registry to save user built images. Registry is divided into public and private. The public registry operated by docker company is called Docker Hub. Users can register an account in Docker Hub, share and save their own images.
According to the latest statistics, there are images built and shared by more than 10000 registered users on the Docker Hub. Do you need the Docker image of the Nginx Web server, the image of the Asterix open source PABX system, or the image of the MySQL database? These images are available on the Docker Hub and have multiple versions.
Users can also save their own private images on the Docker Hub. For example, images that contain source code or patent information that need to be kept confidential, or images that are only visible within the team or organization.
1.4 containers
Docker can help users build and deploy containers. Users only need to package their applications or services into containers. We just mentioned that the container is started based on the image, and one or more processes can run in the container. We can think that the image is the construction or packaging phase in the docker life cycle, while the container is the startup or execution phase.
To sum up, Docker container is:
-
An image format;
-
A series of standard operations;
-
An execution environment.
Docker draws on the concept of standard container. Standard containers transport goods all over the world. Docker applies this model to its own design philosophy. The only difference is that containers transport goods, while docker transport software.
Each container contains a software image, that is, the "goods" of the container, and like real goods, the software image in the container can perform some operations. For example, images can be created, started, shut down, restarted, and destroyed.
Like the container, Docker does not care what is stuffed into the container when performing the above operations, whether it is a Web server, a database, or an application server. All containers "load" content in the same way.
Docker doesn't care where users want to transport containers: users can build containers in their notebooks, upload them to Registry, then download them to a physical or virtual server for testing, and then deploy the containers to the cluster of Amazon EC2 host. Like standard containers, docker containers are easy to replace, can be stacked, easy to distribute, and as general as possible.
Using Docker, you can quickly build an application server, a message bus, a set of utilities, a continuous integration (CI) test environment, or any application, service or tool. You can build a complete test environment locally, or quickly copy a complex application stack for production or development. It can be said that Docker has a wide range of application scenarios.
2. Common docker commands
2.1 docker basic commands
2.1.1 start docker
$ systemctl start docker
2.1.2 close docker
$ systemctl stop docker
2.1.3 restart docker
$ systemctl restart docker
2.1.4 viewing docker running status
$ systemctl status docker
2.1.5 viewing docker version number information
$ docker version
2.1.6 view docker details
$ docker info
2.1.7 docker help command
$ docker --help
2.2 operation commands on mirroring
2.2.2 search image
$ docker search java
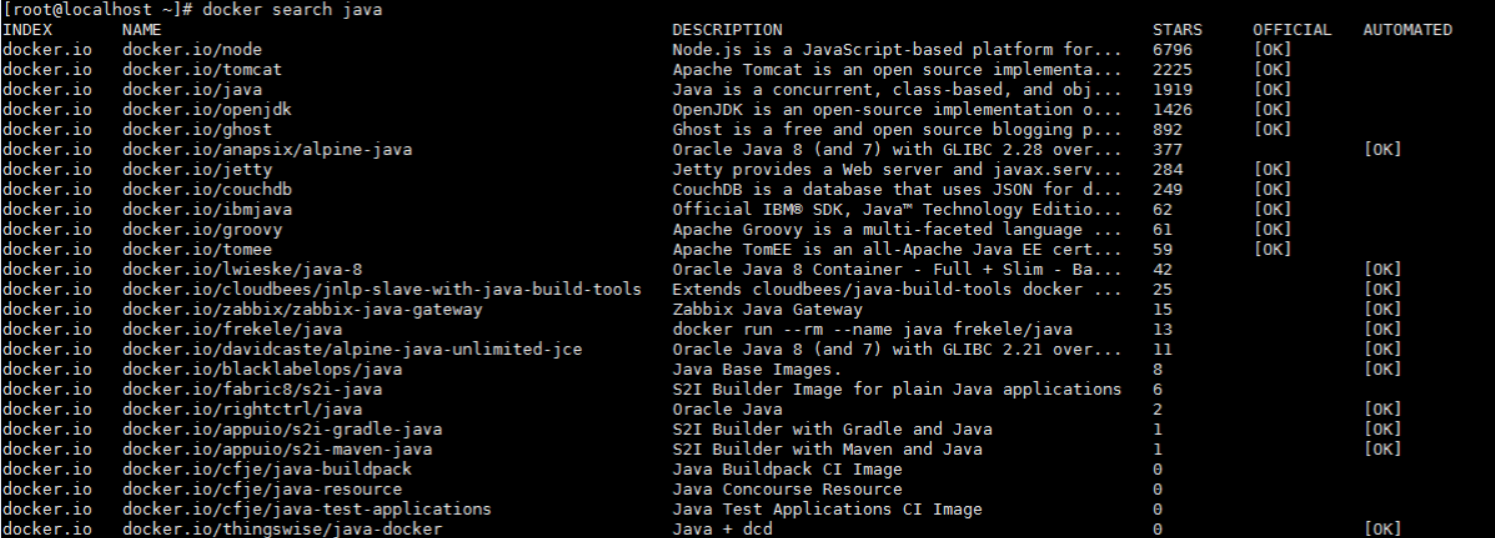
-NAME: image NAME
- DESCRIPTION :
-STARS: number of image warehouse collections
-OFFICIAL: is it an OFFICIAL document
- AUTOMATED: is it an automatically built warehouse
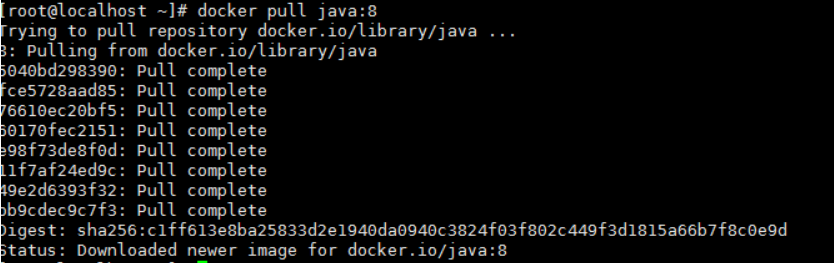
2.2.2 downloading images
Use the docker pull command to download the image.
If you want to specify a version, follow the command with a colon <: version >
$ docker pull java:8
If it is a personal image, you need to use #docker pull user name / warehouse name
$ docker pull 192.168.7.26:5000/test
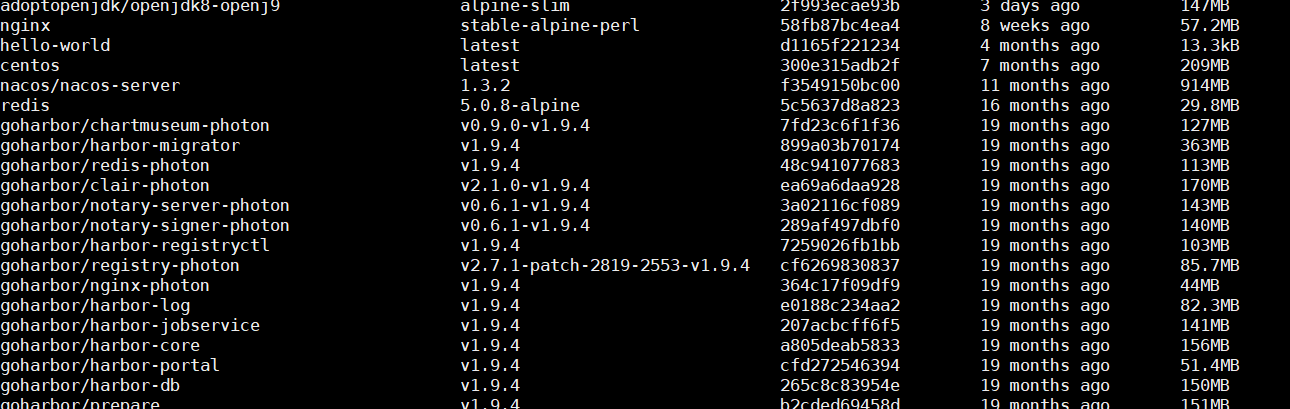
2.2.3 list images
$ docker images
2.2.4 delete local image
$ docker rmi java
2.2.5 delete all images with tag none
$ docker images|grep none|awk '{print $3}'|xargs docker rmi -f
2.2.6 forced image deletion
$ docker image rm Image name/image ID
2.2.7 saving images
$ docker save tomcat -o /myimg.tar
#docker save image name / image ID -o where and what name is the image saved
2.2.8 loading images
$ docker load -i Image save file location
#Any place where docker is installed, load the file saved by the image to restore it to an image
2.3 operation commands for containers
2.3.1 create and start containers through docker compose
start-up
$ docker-compose up -d worker
restart
$ docker-compose restart worker
Turn off all modules
$ docker-compose stop
Delete all modules
$ docker-compose rm
2.3.2 create and start containers with docker command
# Example
$ docker run -itd --privileged=true --name test --hostname test --restart unless-stopped --net=host
--cpus=1 -m 512M -v /tmp:/tmp -w /opt -p 80:80 -e MYSQL_IP=192.168.1.1
--device=/dev/uhid docker.io/nginx:latest
-i, --interactive Keep STDIN open even if not attached
#Even if STDIN (standard input) is not connected, it remains open and an interactive terminal is assigned

-t, --tty Allocate a pseudo-TTY
#Indicates that after the container is started, it will enter its command line for use with it.
#Assign a pseudo tty device to support terminal login

PS: For pure operating system images (without daemons) docker run You need to add it when you need it-it Parameter, otherwise it will exit automatically after startup

-d, --detach Run container in background and print container ID
#Let the container run in the background and print the ID of the container. If your container starts, it will print logs. If you add the - d option there, you won't see it on the terminal. You need to use docker logs -f container ID to view it

--privileged=true Give extended privileges to this container
#Grant the container extension privilege, that is, open the privilege mode;
#In this mode, the container has root access to the docker host, allowing us to run the container with (almost) all the capabilities of its host, including some kernel features and device access. Use it with caution

--name string Assign a name to the container
#Give the container a name and use docker ps to view it

--rm
#After exiting the container, the container will be deleted, which is often used for testing

--hostname string Container host name
#Set the host name in the container and log in to the container to see it

--restart string Restart policy to apply when a container exits (default "no")
#Restart strategy when container exits (4 kinds)

1.no,The default policy is not to restart the container when it exits
2.on-failure,Restart the container only when the container exits abnormally (the exit status is not 0)
3.on-failure:3,Restart the container when the container exits abnormally, up to 3 times
4.always,Always restart the container when it exits
5.unless-stopped,Always restart the container when the container exits. If the container is normal stopped,Then restart the machine or docker When the service is restarted, the container will not be restart

#Change the restart policy for a running container
$ docker update --restart=always test

--network string Connect a container to a network (default "default")

#--network can be omitted as -- net

#The standard Docker supports four network modes

1.bridge 		use docker daemon The specified bridge, the default is docker0;use--net=bridge Specify, as default
2.host 		The container uses the host's network
3.container:NAME_or_ID >		Networks using other containers, sharing IP and PORT Other network resources
4.none 		The container uses its own network,use--net=none appoint

$ docker inspect test View, use the host network, and no longer assign the container separately IP address

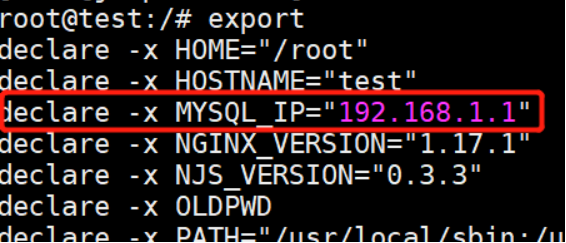
--cpus=1 -m 512M
#Sets the maximum usage of the container's CPU and memory

-v, --volume list Bind mount a volume (default [])
#The container binds a volume to the host

#The difference between volumes and bind mounts

volumes Method: when the host has data, the host shall prevail; If the host has no data, copy it from the container, and then the host will prevail
1.bind The directory of the host for mode must exist
2.bind The host directory in this mode will overwrite the contents of the directory in the container (not deleted, but hidden)

-v /opt/nginx:/etc/nginx
# /If opt/nginx does not exist, it will be created automatically/ opt/nginx overwrites the contents in the / etc/nginx directory

#Set read and write permissions when mounting
ro:Read only. It is read-only in the container and can only be operated by the host
rw:Reading and writing

$ docker run -d --name nginx -v /opt/nginx:/opt/test:ro nginx
#It cannot be operated inside the container and can be operated outside the container

-w --workdir string Working directory inside the container
#Specifies the working directory of the container

-p 80:80
#Port mapping: the port of the host is in the front, and the port of the container service process is in the back. Access to port 80 of the host will eventually be forwarded to port 80 of the container. The implementation method is iptables
#Note: if the – net=host mode is adopted, there is no need for rule forwarding, and you can access it directly

-e, --env list Set environment variables (default [])
#Declare environment variables for the container, which can be viewed through export inside the container
--device list Add a host device to the container (default [])
#Add a device of the host to the container, that is, let the container have access to this device


#By default, the container has the permissions to read, write and create device files. You can control these permissions by using: rwm with – device.

docker run --device=/dev/sda:/dev/xvdc --rm
2.3.3 viewing containers
$ docker ps #View the list of running containers
$ docker ps -a #View all containers
2.3.4 stop the container
$ docker stop Container name/container ID
2.3.5 delete container
#Delete a container
$ docker rm -f Container name/container ID
#Delete multiple containers. Space the container name or container ID you want to delete
$ docker rm -f Container name/container ID Container name/container ID Container name/container ID
#Delete all containers
$ docker rm -f $(docker ps -aq)
2.3.6 entering the container
$ docker exec -it #Container name / container ID /bin/bash

#Enter the redis001 container in front
$ docker exec -it redis001 /bin/bash
2.3.7 exit container
#-----When you exit directly without adding - D (persistent running container), the container will be closed
$ exit

# Graceful exit --- the container will not be closed whether the - d parameter is added or not
Ctrl + p + q
2.3.8 restart the container
$ docker restart container ID/Container name
2.3.9 viewing container logs
$ docker logs -f --tail=How many default lines do you want to see at the end all container ID
3. Container data volume
3.1 what are container data volumes
Let's take a look at Docker's concept:
- Package the application and operation environment to form a container. The operation can be accompanied by the container, but our requirements for data hope to be persistent
- It is hoped that it is possible to share data between containers
If the data generated by the Docker container does not generate a new image through docker commit, the data will be saved as part of the image,
Then, when the container is deleted, the data will naturally disappear.
In order to save data, we use volumes in docker.
In a word, it is a bit like rdb and aof files in redis.
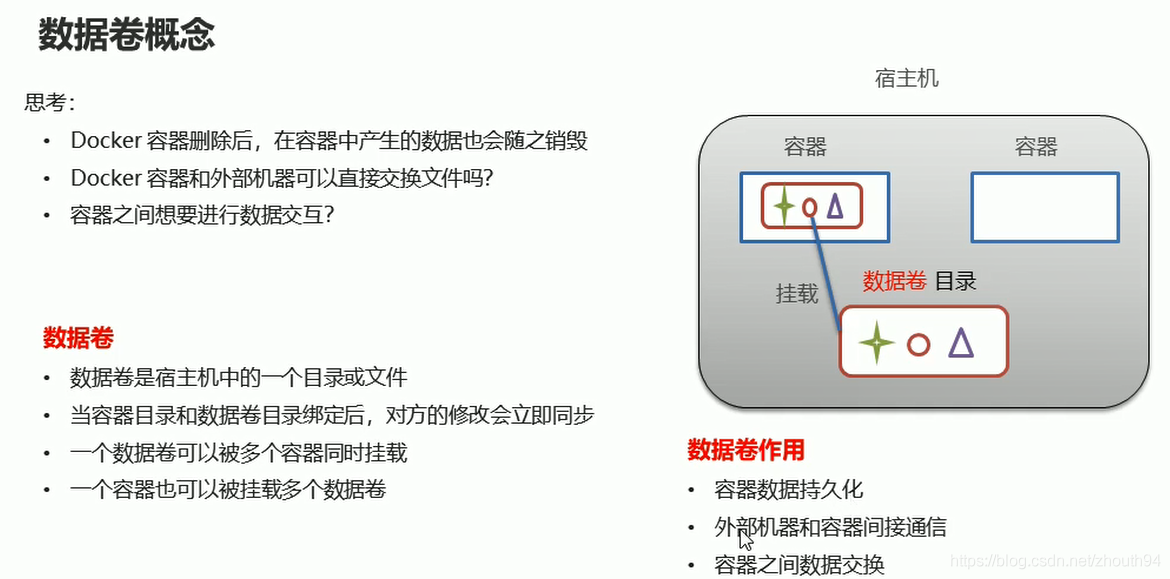
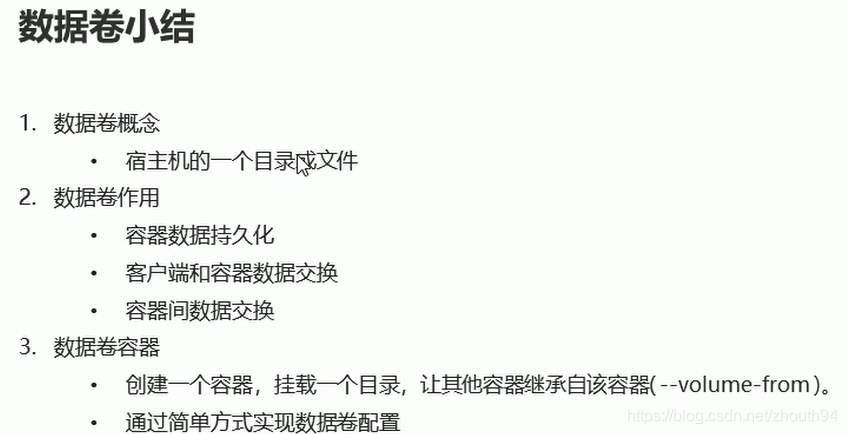
3.2 what is the use of container data volumes
A volume is a directory or file. It exists in one or more containers and is mounted to the container by docker, but it does not belong to the federated file system. Therefore, it can bypass the Union File System and provide some features for continuous storage or sharing of data:
The volume is designed for data persistence, which is completely independent of the container's life cycle. Therefore, Docker will not delete its mounted data volume when the container is deleted
characteristic:
1: Data volumes can share or reuse data between containers
2: Changes in the volume can take effect directly
3: Changes in the data volume are not included in the mirror's updates
4: The life cycle of a data volume continues until no container uses it
3.3 concept of container data volume
A data volume can be understood as a file or a directory in the host computer;
When the container directory and the data volume directory are bound, the other party's modifications will be synchronized immediately;
A data volume can be mounted by multiple containers at the same time;
A container can also mount multiple data volumes
3.4 configuring data volumes
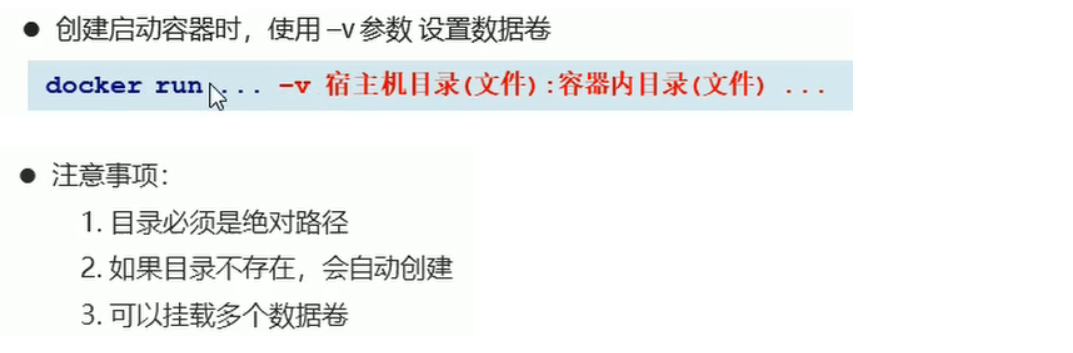
-it: run the container and go inside the container[ root@dbb72956ef0c /]
[root@hadoop101 ~]# docker run -it --name c1 -v /usr/local/redis/data:/root/data_container centos:7 /bin/bash
[root@dbb72956ef0c /]# cd ~
[root@dbb72956ef0c ~]# ll
total 4
-rw-------. 1 root root 3416 Oct  1  2019 anaconda-ks.cfg
drwxr-xr-x. 2 root root    6 May 25 05:11 data_container
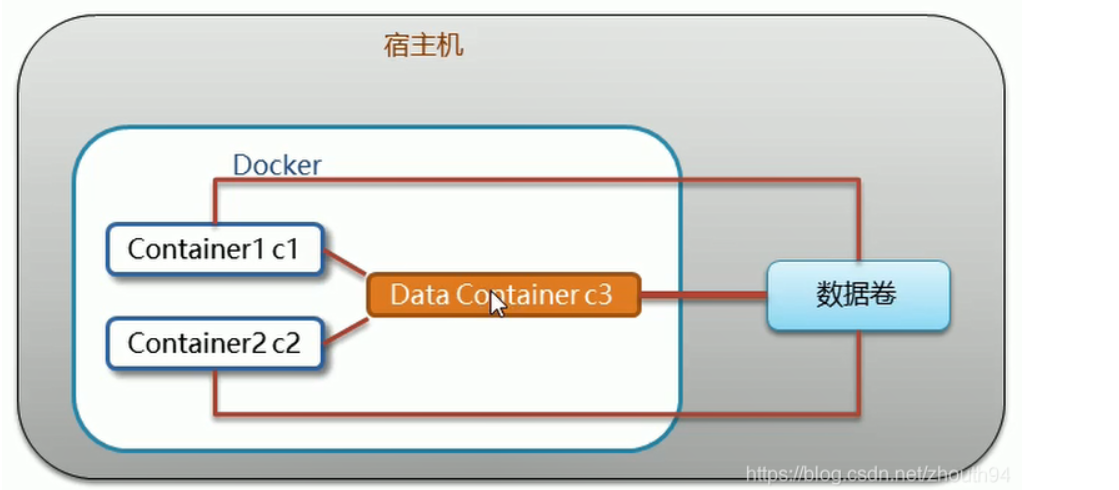
3.5 data volume container
Multi container data exchange:
(1) Multiple containers mount the same data volume
(2) Data volume container
The Data Container c3 is called a data volume container
3.5 check whether the data volume is mounted successfully
$ docker inspect f89b5db98ede
It can bypass the Union File System and provide some features for continuous storage or sharing of data:
The volume is designed for data persistence, which is completely independent of the container's life cycle. Therefore, Docker will not delete its mounted data volume when the container is deleted
characteristic:
1: Data volumes can share or reuse data between containers
2: Changes in the volume can take effect directly
3: Changes in the data volume are not included in the mirror's updates
4: The life cycle of a data volume continues until no container uses it
3.3 concept of container data volume
A data volume can be understood as a file or a directory in the host computer;
When the container directory and the data volume directory are bound, the other party's modifications will be synchronized immediately;
A data volume can be mounted by multiple containers at the same time;
A container can also mount multiple data volumes
[external chain picture transferring... (img-NJSq3y01-1627265370388)]
3.4 configuring data volumes
[external chain picture transferring... (img-sAE2cOOu-1627265370389)]
-it: run the container and go inside the container[ root@dbb72956ef0c /]
[root@hadoop101 ~]# docker run -it --name c1 -v /usr/local/redis/data:/root/data_container centos:7 /bin/bash
[root@dbb72956ef0c /]# cd ~
[root@dbb72956ef0c ~]# ll
total 4
-rw-------. 1 root root 3416 Oct  1  2019 anaconda-ks.cfg
drwxr-xr-x. 2 root root    6 May 25 05:11 data_container
3.5 data volume container
Multi container data exchange:
(1) Multiple containers mount the same data volume
(2) Data volume container
The Data Container c3 is called a data volume container
[external chain picture transferring... (img-9r4gOcs6-1627265370390)]
[external chain picture transferring... (img-JieLH1iC-1627265370391)]
[external chain picture transferring... (img-9KxUUs7v-1627265370392)]
3.5 check whether the data volume is mounted successfully
$ docker inspect f89b5db98ede