With the popularity of the concept of metauniverse, 3D rendering related technologies are frequently mentioned, and Three.js is a framework encapsulated based on WebGL api to simplify the development of 3D scenes. It is a good starting point for getting started with 3D. Today we will get started with Three.js.
We implement a petal rain effect based on Three.js.
Foundation of Three.js
Three.js is used to render a 3D scene, where there will be many objects, such as cubes, cylinders, rings, cones and other Geometry (with Geometry as the suffix), such as basic objects such as Points, lines and sprites. How do you manage all these objects?
Use a Scene to carry, and all objects will be added to the Scene.
Therefore, there is such an api:
 const scene = new THREE.Scene();

 scene.add(xxx);
 scene.add(yyy);
Of course, objects can be grouped into groups. Objects in the Group can be managed uniformly and then added to the Scene.
const scene = new THREE.Scene();

const group = new THREE.Group();

group.add(xxx);
group.add(yyy);

scene.add(group);
This concept of scene, object and grouping has similar APIs in many game engines, which are managed in this way.
For objects that can be added to the Scene, in addition to Geometry, points, lines, and surfaces, there are also auxiliary tools, such as the coordinate system tool (AxisHelper). In fact, these tools are also encapsulated with aggregates, points, lines and surfaces, which are just added to the Scene as tools.
const axisHelper = new THREE.AxisHelper(max);
scene.add(axisHelper)
With the scene and various objects in the scene, how to render it?
Call Renderer, which is specially responsible for rendering various objects in the Scene.
But there is another problem, how to render a three-dimensional world to a two-dimensional screen?
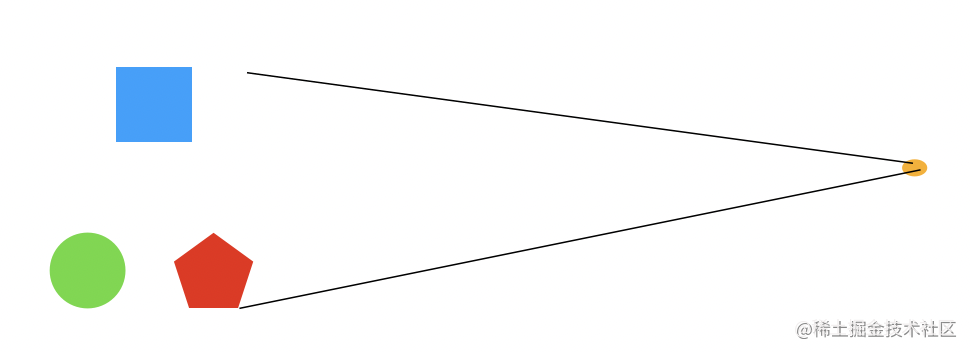
As shown in the figure, if you look at the three-dimensional world from a point or from a plane in parallel, what you see is two-dimensional.
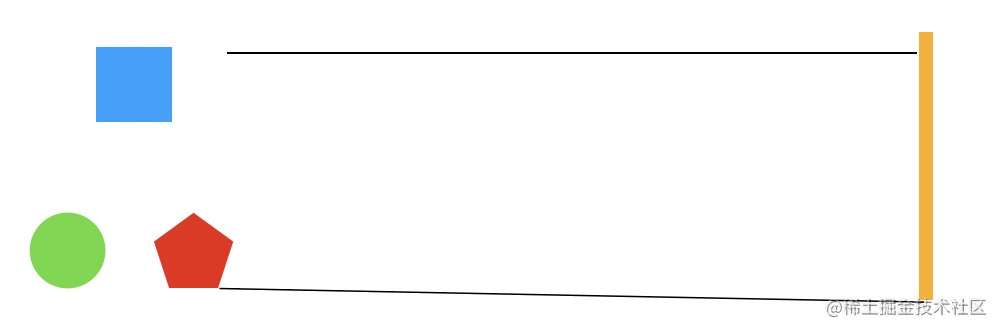
The first is called perspective and the second is called orthogonality.
Generating two-dimensional images is just like the function of a Camera, so this concept is called Camera.
In Three.js, there are perspective camera (perspective camera) and orthographic camera (orthogonal camera), which correspond to the above two ways of 3D to 2D respectively.
There are many parameters for these two cameras, but it's easy to understand them:
new Three.PerspectiveCamera( fov, aspect, near, far )
new Three.OrthographicCamera( left, right, top, bottom, near, far )
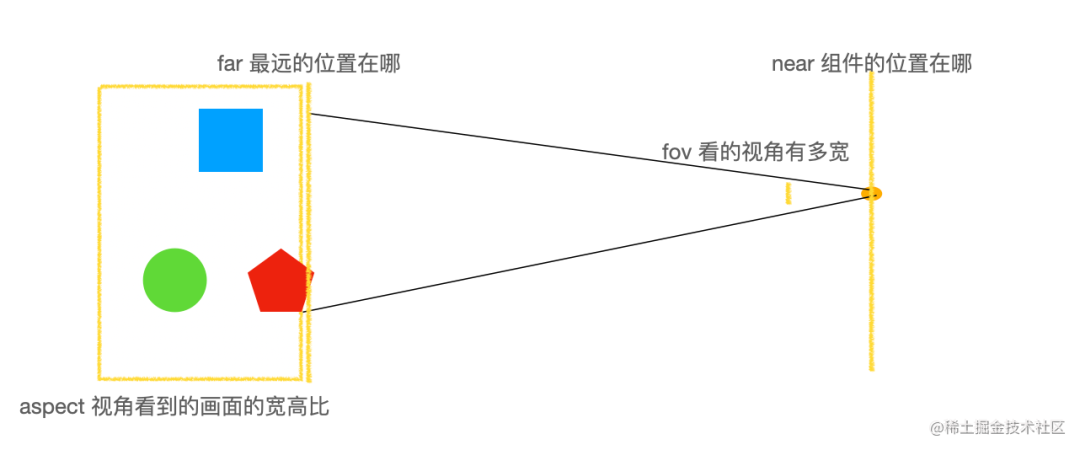
First look at the perspective camera. If it wants to see the three-dimensional world, it needs to have two nearest and farthest positions. Then, from one point, there will be a view angle, and the picture will have an aspect ratio.
This is why perspectamera has four parameters: near, far, fov and aspect.
The parameters of the orthogonal camera have the same meaning, but because they are not viewed from a point, but projected from a face, there are no angle parameters, but the parameters of the positions of the four faces up, down, left and right.

The up, down, left and right positions of the orthogonal camera are not arbitrary, and the proportion should be the same as the aspect ratio of the picture, so it is generally calculated as follows:
const width = window.innerWidth;
const height = window.innerHeight;
//Window aspect ratio
const k = width / height;
//Up and down range of 3D scene display
const s = 200;

// The upper and lower range s multiplied by the aspect ratio k is the left and right range, and just set a number at any distance
const camera = new THREE.OrthographicCamera(-s * k, s * k, s, -s, 1, 1000);
In the parameters of the above orthogonal camera, the distance can be set to 1 and 1000, and the up and down can be set to 200. It can be calculated according to the aspect ratio. This is the range of the two-dimensional picture seen by the camera.
With various objects in the Scene and Camera, you can render the picture with the Renderer.
const renderer = new THREE.WebGLRenderer();
//Set render area size
renderer.setSize(width, height)

renderer.render(scene, camera)
However, generally, you will not render only one frame. If there is animation effect, you will use the api of requestAnimationFrame to render frame by frame.
function render() {
    renderer.render(scene, camera)

    requestAnimationFrame(render)
}
render();
This is the general process of Three.js: there are various objects in the Scene, such as Geometry, points, lines and surfaces, auxiliary tools, etc. the objects can also be grouped, and then the two-dimensional picture can be set by orthogonal or perspective camera, and then rendered by Renderer. If there is animation effect, you should use requestAnimationFrame to render frame by frame.
Let's realize the effect of petal rain.
Petal rain implementation
First, we need to create objects in the Scene, that is, various petals. What needs to be displayed is a plane, which can be used with Sprite.
Sprite means spirit. In Three.js, it is a two-dimensional plane always facing the camera.
Let's just texture Sprite with petals.
Let's prepare some petal maps like this:


There are many petals. We generate 400, add them to the petal group, and then add them to the scene:
const scene = new THREE.Scene();
/**
 * Petal grouping
 */
const petal = new THREE.Group();

function create() {
    var texture1 = new THREE.TextureLoader().load("img/h1.png");
    var texture2 = new THREE.TextureLoader().load("img/h2.png");
    var texture3 = new THREE.TextureLoader().load("img/h3.png");
    var texture4 = new THREE.TextureLoader().load("img/h4.png");
    var texture5 = new THREE.TextureLoader().load("img/h5.png");
    var imageList = [texture1, texture2, texture3, texture4, texture5];

    for (let i = 0; i < 400; i++) {
        var spriteMaterial = new THREE.SpriteMaterial({
            map: imageList[Math.floor(Math.random() * imageList.length)],//Set sprite texture map
        });
        var sprite = new THREE.Sprite(spriteMaterial);
        petal.add(sprite);

        sprite.scale.set(40, 50, 1);
        sprite.position.set(2000 * (Math.random() - 0.5), 2000 * Math.random(), 0)
    }
    scene.add(petal)
}

create();
400 sprites are randomly pasted with texture maps of different petals, and then the lower zoom is set, and then a position in the scene is randomly set.
Let's add a coordinate system auxiliary tool to Scene to see the following coordinates:
const axisHelper = new THREE.AxisHelper(1000);
scene.add(axisHelper)

Red is the x-axis, increasing to the right, green is the y-axis, and increasing upward. We can't use the z-axis for the time being.
So, according to the code, the range of x of the petals is random - 1000 to 1000, and the range of y is 0 to 2000.
Then we create an orthographic camera:
const width = window.innerWidth;
const height = window.innerHeight;
//Window aspect ratio
const k = width / height;
//Up and down range of 3D scene display
const s = 200;
const camera = new THREE.OrthographicCamera(-s * k, s * k, s, -s, 1, 1000);
Set the position and orientation of the camera:
camera.position.set(0, 200, 500)
camera.lookAt(scene.position)
When we create the camera, we specify the two-dimensional display range, and the camera can be anywhere in this range.
Then create a renderer, set the size and background color, and insert the rendered canvas element into the dom.
const renderer = new THREE.WebGLRenderer();
//Set render area size
renderer.setSize(width, height)
//Set background color
renderer.setClearColor(0xFFFFFF, 1)
//Insert canvas object into body element
document.body.appendChild(renderer.domElement)
Then you can render frame by frame with requestAnimation.
function render() {
    petal.children.forEach(sprite => {
        sprite.position.y -= 1;
        sprite.position.x += 0.5;
        if (sprite.position.y < -400) {
            sprite.position.y = 800;
        }
        if (sprite.position.x > 1000) {
            sprite.position.x = -1000
        }
    });

    renderer.render(scene, camera)

    requestAnimationFrame(render)
}
Before each re rendering, we modify the position of the lower petals to produce the falling effect. If it exceeds the range, we move to the top and start falling again. This is the uninterrupted petal rain effect.

The complete code is as follows:
<!DOCTYPE html>
<html lang="en">
<head>
    <meta charset="UTF-8">
    <title>Everfall </title>
    <style>
        body {
            margin: 0;
            overflow: hidden;
        }
    </style>
    <script src="js/three.min.js"></script>
</head>
<body>
<script>

    const scene = new THREE.Scene();
    /**
     * Petal grouping
     */
    const petal = new THREE.Group();

    const width = window.innerWidth;
    const height = window.innerHeight;
    //Window aspect ratio
    const k = width / height;
    //Up and down range of 3D scene display
    const s = 200;
    const camera = new THREE.OrthographicCamera(-s * k, s * k, s, -s, 1, 1000);

    const renderer = new THREE.WebGLRenderer();

    function create() {
        //Set camera position
        camera.position.set(0, 200, 500)
        camera.lookAt(scene.position)

        //Set render area size
        renderer.setSize(width, height)
        //Set background color
        renderer.setClearColor(0xFFFFFF, 1)
        //Insert canvas object into body element
        document.body.appendChild(renderer.domElement)

        // const axisHelper = new THREE.AxisHelper(1000);
        // scene.add(axisHelper)

        var textureTree1 = new THREE.TextureLoader().load("img/h1.png");
        var textureTree2 = new THREE.TextureLoader().load("img/h2.png");
        var textureTree3 = new THREE.TextureLoader().load("img/h3.png");
        var textureTree4 = new THREE.TextureLoader().load("img/h4.png");
        var textureTree5 = new THREE.TextureLoader().load("img/h5.png");
        var imageList = [textureTree1, textureTree2, textureTree3, textureTree4, textureTree5];

        for (let i = 0; i < 400; i++) {
            var spriteMaterial = new THREE.SpriteMaterial({
                map: imageList[Math.floor(Math.random() * imageList.length)],//Set sprite texture map
            });
            var sprite = new THREE.Sprite(spriteMaterial);
            petal.add(sprite);

            sprite.scale.set(40, 50, 1);
            sprite.position.set(2000 * (Math.random() - 0.5), 2000 * Math.random(), 0)
        }
        scene.add(petal)
    }


    function render() {
        petal.children.forEach(sprite => {
            sprite.position.y -= 1;
            sprite.position.x += 0.5;
            if (sprite.position.y < -400) {
                sprite.position.y = 800;
            }
            if (sprite.position.x > 1000) {
                sprite.position.x = -1000
            }
        });

        renderer.render(scene, camera)

        requestAnimationFrame(render)
    }

    create()
    render()
</script>
</body>
</html>
summary
Three.js is a framework to simplify 3D rendering. It provides an api for Scene scene, which can contain various renderable objects: cubes, cones and other Geometry, points, lines and surfaces, coordinate systems and other auxiliary tools. These objects can also be managed uniformly through Group grouping.
To render sense, you need to specify a Camera, which is divided into perspective Camera looking from a point, perspective Camera and orthographic Camera projecting from a plane. Only by understanding their principles can we understand the parameters of Camera.
Then it is rendered by the Renderer. If there is animation, it needs to be rendered frame by frame with requestAnimationFrame.
This is the approximate rendering process of Three.js.
Then we implemented a case of petal rain. Sprite is used. It is a plane always facing the camera. It is very suitable for this effect.
Of course, there are still a lot of things in Three.js. This article is just the next door. Later, we will continue to go deeper and do more interesting 3D scenes and effects.