Redis publish and subscribe
-
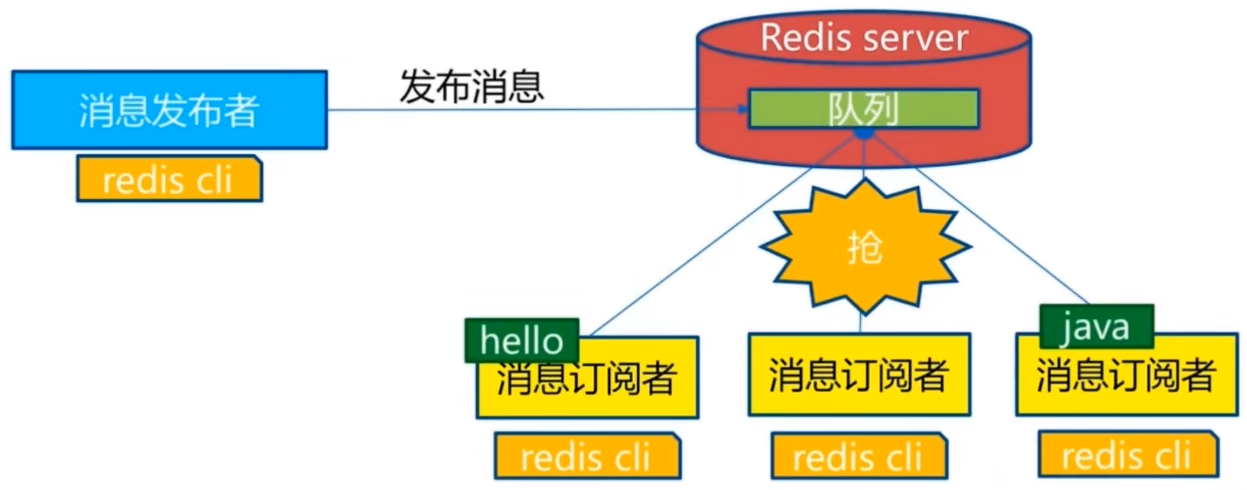
Redis publish / subscribe (pub/sub) is a message communication mode: the sender (pub) sends messages and the subscriber (sub) receives messages
-
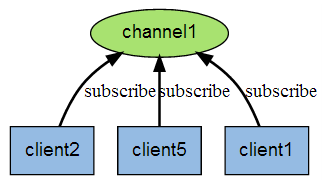
Redis client can subscribe to any number of channels
-
Subscribe / publish message diagram:
-
The following figure shows the relationship between channel 1 and the three clients subscribing to this channel - client2, client5 and client1:
-
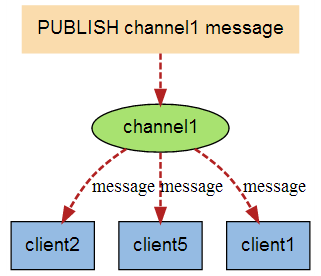
When a new message is sent to channel 1 through the PUBLISH command, the message will be sent to the three clients subscribing to it:
-
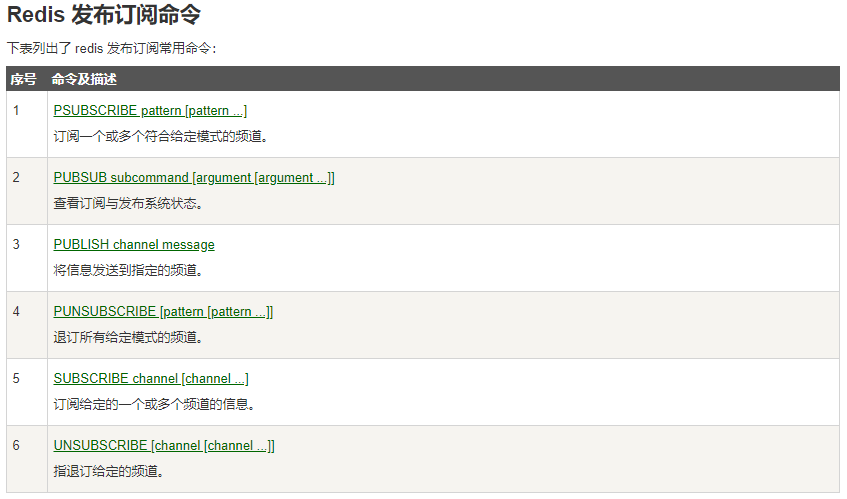
These commands are widely used to build instant messaging applications, such as chat room, real-time broadcast, real-time reminder and so on
-
test
# A client a subscribes to the channel
127.0.0.1:6379> SUBSCRIBE cbc
Reading messages... (press Ctrl-C to quit)
1) "subscribe"
2) "cbc"
3) (integer) 1
# Another client B sends a message to this channel
127.0.0.1:6379> PUBLISH cbc 123
(integer) 1
# A received the message
127.0.0.1:6379> SUBSCRIBE cbc
Reading messages... (press Ctrl-C to quit)
1) "subscribe"
2) "cbc"
3) (integer) 1
1) "message"
2) "cbc"
3) "123"
-
principle
- After subscribing to a channel through the SUBSCRIBE command, a dictionary is maintained in redis server. The key of the dictionary is each channel, and the value of the dictionary is a linked list, in which all clients subscribing to the channel are saved. The key of SUBSCRIBE command is to add the client to the subscription linked list of a given channel
- Send a message to subscribers through the PUBLISH command. Redis server will use the given channel as the key, find the linked list of all clients subscribing to the channel in the channel dictionary maintained by it, traverse the linked list, and PUBLISH the message to all subscribers
- Pub/Sub literally means publish and Subscribe. In Redis, you can set a key value for message publishing and message subscription. When a key value is published, all clients subscribing to it will receive corresponding messages. The most obvious use of this function is to use it as a real-time messaging system, such as ordinary instant chat, group chat and other functions
Redis master-slave replication
concept
-
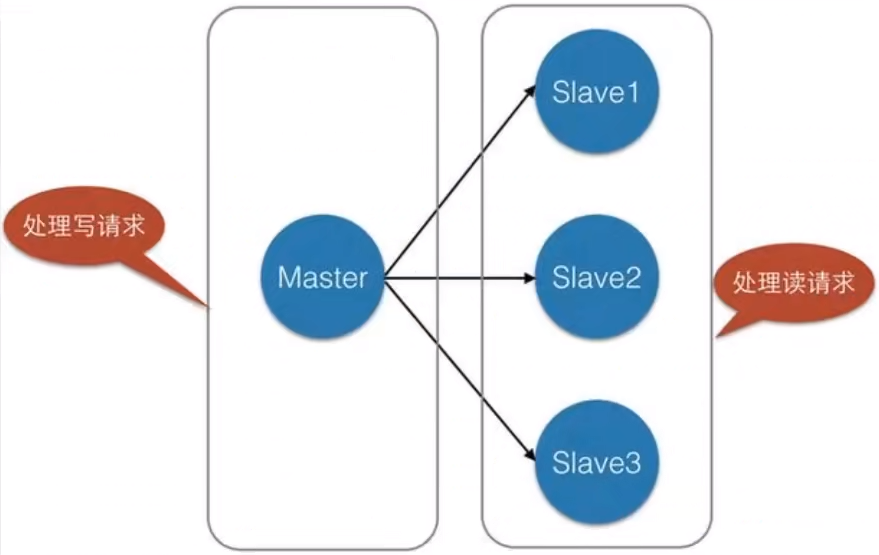
Master Slave replication refers to copying data from one Redis server to other Redis servers. The former is called master / leader and the latter is called Slave / follower. Data replication is unidirectional and can only be from master node to Slave node. Master mainly writes, Slave mainly reads
-
By default, each Redis server is the master node, and a master node can have multiple slave nodes (or no slave nodes), but a slave node can only have one master node
-
The main functions of master-slave replication include:
- Data redundancy: master-slave replication realizes the hot backup of data, which is a way of data redundancy other than persistence
- Fault recovery: when the master node has problems, the slave node can provide services to achieve rapid fault recovery. In fact, it is a kind of redundancy of services
- Load balancing: on the basis of master-slave replication, combined with read-write separation, the master node can provide write services, and the slave node can provide read services (that is, the application connects the master node when writing Redis data, and the application connects the slave node when reading Redis data), so as to share the server load, especially in the scenario of less writing and more reading, the read load can be shared through multiple slave nodes, It can greatly improve the concurrency of Redis server
- Cornerstone of high availability (cluster): in addition to the above functions, master-slave replication is also the basis for sentinels and clusters to implement. Therefore, master-slave replication is the basis for high availability of Redis
-
Generally speaking, to apply Redis to engineering projects, it is absolutely impossible to use only one Redis (downtime). The reasons are as follows:
- Structurally, a single Redis server will have a single point of failure, and one server needs to handle all request loads, which is under great pressure
- In terms of capacity, the memory capacity of a single Redis server is limited. Even if the memory capacity of a Redis server is 256G, all memory can not be used as Redis storage memory. Generally speaking, the maximum memory used by a single Redis should not exceed 20G
-
Commodities on e-commerce websites are usually uploaded at one time and browsed countless times. To be professional is to "read more and write less"
-
For this scenario, we can use the following architecture:
-
Master-slave replication, read-write separation. In 80% of the cases, read operations are carried out to reduce the pressure on the server. It is often used in the architecture, generally one master and two slave
Environment configuration
-
Only configure the slave database, not the master database. The info replication command checks the database information and finds that the default is the master database
127.0.0.1:6379> info replication # View library information
# Replication
role:master # Role master
connected_slaves:0 # No slave
master_failover_state:no-failover
master_replid:2dc52f6af068f911affeb4c7565eb8d9a601c4e8
master_replid2:0000000000000000000000000000000000000000
master_repl_offset:0
second_repl_offset:-1
repl_backlog_active:0
repl_backlog_size:1048576
repl_backlog_first_byte_offset:0
repl_backlog_histlen:0
-
Copy the three configuration files and modify the corresponding information
- port
- pid process file name
- Log log name
- dump.rdb name
-
If docker starts three containers, note that the port and the mounted directory should be different
One master and two slave configuration
-
Slave of no one cancels the master-slave relationship on the slave
-
In general, only the slave machine is used. Recognize the boss mode
# The slaveof command specifies 172.17.0.1:6379 as its own host
127.0.0.1:6379> SLAVEOF 172.17.0.1 6379
OK
# After two slaves are connected, the host can see it
127.0.0.1:6379> info replication
# Replication
role:master
connected_slaves:2
slave0:ip=172.17.0.3,port=6379,state=online,offset=266,lag=0
slave1:ip=172.17.0.4,port=6379,state=online,offset=266,lag=0
-
The real master-slave configuration is configured in the configuration file
-
details
-
Under the default configuration, only the host can write and the slave can read. All information and data in the host will be automatically saved by the slave
127.0.0.1:6379> get k1
"1"
127.0.0.1:6379> set k2 1
(error) READONLY You can't write against a read only replica.
-
When the host is disconnected, the slave is still connected to the host. After the host is reconnected, the set value can still be received by the slave
-
After being set as slave, the data before slave will be cleared
-
If the command is used to configure the master-slave, the slave will change back to the host after restarting, and connect to the host again, and the host data can still be obtained
-
-
Replication principle
- After Slave is successfully started and connected to the master, it will send a sync synchronization command
- After receiving the command, the master starts the background save process and collects all the commands received to modify the dataset. After the background process is executed, the master will transfer the whole data file to the slave and complete a full synchronization (full copy)
- Full copy: after receiving the database file data, the slave service saves it and loads it into memory
- Incremental replication: the Master continues to transmit all the new collected modification commands to the slave in turn to complete the synchronization
- As long as the master is reconnected, a full synchronization (full replication) will be performed automatically
-
Master slave connection
-
The intermediate slave information acts as both slave and host
127.0.0.1:6379> info replication
# Replication
role:slave # 172.17.0.2 slave
master_host:172.17.0.2
master_port:6379
master_link_status:up
master_last_io_seconds_ago:10
master_sync_in_progress:0
slave_repl_offset:1186
slave_priority:100
slave_read_only:1
replica_announced:1
connected_slaves:1 # 172.17.0.4 host
slave0:ip=172.17.0.4,port=6379,state=online,offset=1186,lag=1
master_failover_state:no-failover
master_replid:7df33a210a100f37dbac3f972127c3973ec02b5b
master_replid2:0000000000000000000000000000000000000000
master_repl_offset:1186
second_repl_offset:-1
repl_backlog_active:1
repl_backlog_size:1048576
repl_backlog_first_byte_offset:1
repl_backlog_histlen:1186
-
The slave at the end cannot be connected with the host when the middle one collapses
-
If the host is gone, we can manually set the middle one as the new host: slave of on one to change ourselves back to the host
-
Neither of the above two will be used in development
-
Sentinel mode
summary
-
Mode of automatically selecting the boss
-
The method of master-slave switching technology is: when the master server is down, a slave server needs to be manually switched to the master server, which requires manual intervention, which is laborious and laborious, and the service will not be available for a period of time. This is not a recommended way. More often, we give priority to sentinel mode. Redis has officially provided Sentihel architecture since 2.8 to solve this problem
-
The automatic version of seeking to usurp the throne can monitor whether the host fails in the background. If it fails, it will automatically convert from the library to the main library according to the number of votes
-
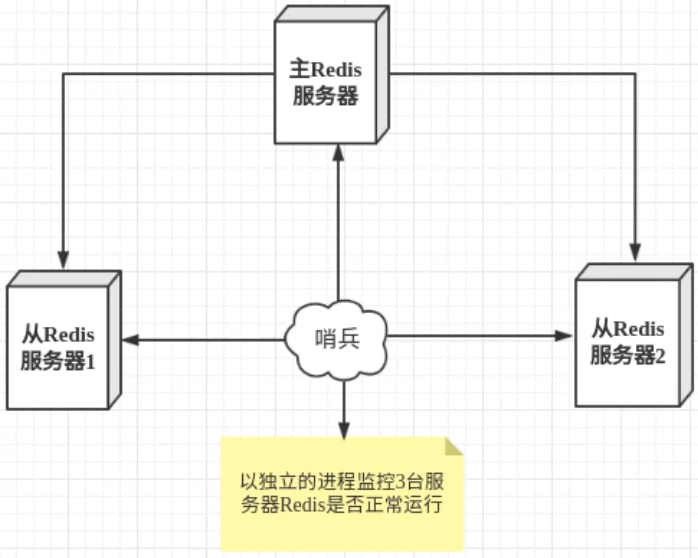
Sentinel mode is a special mode. Firstly, Redis provides sentinel commands. Sentinel is an independent process. As a process, it will run independently. The principle is that the sentinel sends a command and waits for the response of the Redis server, so as to monitor multiple running Redis instances
-
The sentry here has two functions
- Send commands to let Redis server return to monitor its running status, including master server and slave server
- When the sentinel detects that the master is down, it will automatically switch the slave to the master, and then notify other slave servers through publish subscribe mode to modify the configuration file and let them switch hosts
-
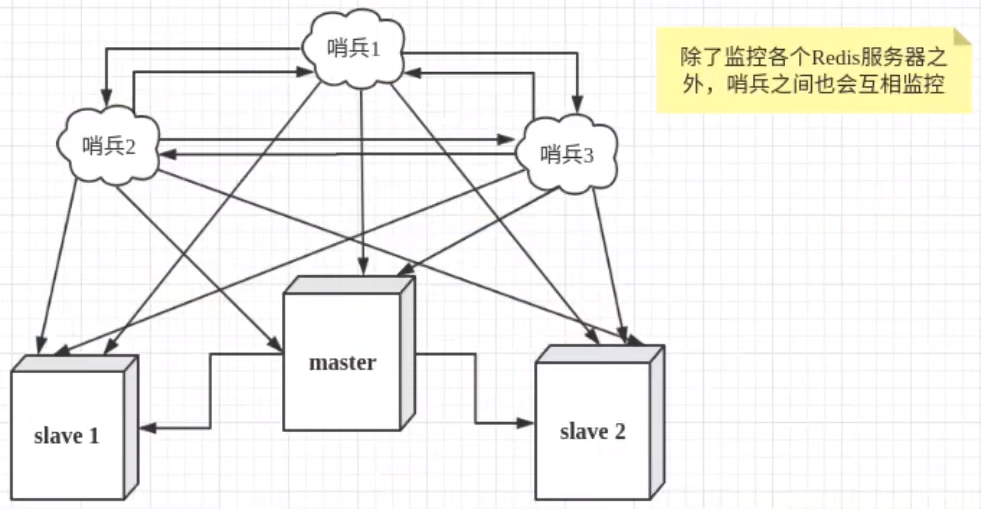
However, there may be problems when a sentinel process monitors the Redis server. Therefore, we can use multiple sentinels for monitoring. Monitoring will also be carried out among various sentinels, thus forming a multi sentinel mode
-
Assuming that the main server goes down, sentry 1 detects this result first, and the system will not fail immediately. Sentry 1 only subjectively thinks that the main server is unavailable, which becomes a subjective offline phenomenon. When the following sentinels also detect that the primary server is unavailable and the number reaches a certain value, a vote will be held between sentinels. The voting result is initiated by a sentinel for "failover". After the switch is successful, each sentinel will switch the host from the server through the publish and subscribe mode. This process is called objective offline
test
- Our current state is one master and two slaves
-
Configure sentinel profile sentinel conf
# sentinel monitor the ip address port where the monitored process name is located. 1 here means that as long as one sentinel thinks that the main server has been offline, the main server will be judged to be offline objectively
sentinel monitor myredis 172.17.0.2 6379 1
-
Activate the sentry
root@00e8f02730fb:/# redis-sentinel sentinel.conf 38:X 06 Jun 2021 15:13:00.331 # oO0OoO0OoO0Oo Redis is starting oO0OoO0OoO0Oo 38:X 06 Jun 2021 15:13:00.331 # Redis version=6.2.4, bits=64, commit=00000000, modified=0, pid=38, just started 38:X 06 Jun 2021 15:13:00.331 # Configuration loaded 38:X 06 Jun 2021 15:13:00.331 * monotonic clock: POSIX clock_gettime _._ _.-``__ ''-._ _.-`` `. `_. ''-._ Redis 6.2.4 (00000000/0) 64 bit .-`` .-```. ```\/ _.,_ ''-._ ( ' , .-` | `, ) Running in sentinel mode |`-._`-...-` __...-.``-._|'` _.-'| Port: 26379 | `-._ `._ / _.-' | PID: 38 `-._ `-._ `-./ _.-' _.-' |`-._`-._ `-.__.-' _.-'_.-'| | `-._`-._ _.-'_.-' | https://redis.io `-._ `-._`-.__.-'_.-' _.-' |`-._`-._ `-.__.-' _.-'_.-'| | `-._`-._ _.-'_.-' | `-._ `-._`-.__.-'_.-' _.-' `-._ `-.__.-' _.-' `-._ _.-' `-.__.-' 38:X 06 Jun 2021 15:13:00.332 # WARNING: The TCP backlog setting of 511 cannot be enforced because /proc/sys/net/core/somaxconn is set to the lower value of 128. 38:X 06 Jun 2021 15:13:00.352 # Sentinel ID is 23e8ce04d62ed08b72e364b8f512f3579e1b6f58 38:X 06 Jun 2021 15:13:00.352 # +monitor master myredis 172.17.0.2 6379 quorum 1 38:X 06 Jun 2021 15:13:00.353 * +slave slave 172.17.0.3:6379 172.17.0.3 6379 @ myredis 172.17.0.2 6379 38:X 06 Jun 2021 15:13:00.355 * +slave slave 172.17.0.4:6379 172.17.0.4 6379 @ myredis 172.17.0.2 6379 # After shutting down the host, the sentry log 38:X 06 Jun 2021 15:16:48.419 # +sdown master myredis 172.17.0.2 6379 38:X 06 Jun 2021 15:16:48.419 # +odown master myredis 172.17.0.2 6379 #quorum 1/1 38:X 06 Jun 2021 15:16:48.419 # +new-epoch 1 38:X 06 Jun 2021 15:16:48.419 # +try-failover master myredis 172.17.0.2 6379 38:X 06 Jun 2021 15:16:48.420 # +vote-for-leader 23e8ce04d62ed08b72e364b8f512f3579e1b6f58 1 38:X 06 Jun 2021 15:16:48.420 # +elected-leader master myredis 172.17.0.2 6379 38:X 06 Jun 2021 15:16:48.420 # +failover-state-select-slave master myredis 172.17.0.2 6379 38:X 06 Jun 2021 15:16:48.483 # +selected-slave slave 172.17.0.4:6379 172.17.0.4 6379 @ myredis 172.17.0.2 6379 38:X 06 Jun 2021 15:16:48.483 * +failover-state-send-slaveof-noone slave 172.17.0.4:6379 172.17.0.4 6379 @ myredis 172.17.0.2 6379 # Failover 38:X 06 Jun 2021 15:16:48.555 * +failover-state-wait-promotion slave 172.17.0.4:6379 172.17.0.4 6379 @ myredis 172.17.0.2 6379 38:X 06 Jun 2021 15:16:49.463 # +promoted-slave slave 172.17.0.4:6379 172.17.0.4 6379 @ myredis 172.17.0.2 6379 38:X 06 Jun 2021 15:16:49.463 # +failover-state-reconf-slaves master myredis 172.17.0.2 6379 38:X 06 Jun 2021 15:16:49.532 * +slave-reconf-sent slave 172.17.0.3:6379 172.17.0.3 6379 @ myredis 172.17.0.2 6379 38:X 06 Jun 2021 15:16:50.359 * +slave-reconf-inprog slave 172.17.0.3:6379 172.17.0.3 6379 @ myredis 172.17.0.2 6379 38:X 06 Jun 2021 15:16:50.359 * +slave-reconf-done slave 172.17.0.3:6379 172.17.0.3 6379 @ myredis 172.17.0.2 6379 38:X 06 Jun 2021 15:16:50.431 # +failover-end master myredis 172.17.0.2 6379 38:X 06 Jun 2021 15:16:50.431 # +switch-master myredis 172.17.0.2 6379 172.17.0.4 6379 38:X 06 Jun 2021 15:16:50.431 * +slave slave 172.17.0.3:6379 172.17.0.3 6379 @ myredis 172.17.0.4 6379 38:X 06 Jun 2021 15:16:50.431 * +slave slave 172.17.0.2:6379 172.17.0.2 6379 @ myredis 172.17.0.4 6379 38:X 06 Jun 2021 15:17:20.485 # +sdown slave 172.17.0.2:6379 172.17.0.2 6379 @ myredis 172.17.0.4 6379- If the Master node is disconnected, a server will be randomly selected from the slave as the host (here is a voting algorithm)
-
The main engine needs to be reconfigured manually, and the main engine needs to be reconfigured
-
advantage:
- Sentinel cluster is based on master-slave replication mode. It has the advantages of all master-slave configurations
- The master and slave can be switched, the fault can be transferred, and the availability of the system is better
- Sentinel mode is the upgrade of master-slave mode, from manual to automatic
-
Disadvantages:
- redis is not easy to expand online. Once the cluster capacity reaches the upper limit, online expansion is very troublesome
- The configuration of sentinel mode is actually very troublesome. There are many other options
Sentinel mode configuration
# Example sentinel.conf

# The sentinel sentinel instance runs on 26379 by default. If there are multiple sentinels, the ports of each sentinel are different
port 26379

# sentinel's working directory
dir /tmp

# The ip port of the redis master node monitored by sentry sentinel
# The master name can be named by itself. The name of the master node can only be composed of letters A-z, numbers 0-9 and the three characters ". -" form.
# Quorumwhen the sentinel of these quorum s thinks that the master master node is lost, it objectively thinks that the master node is lost
# sentinel monitor <master-name> <ip> <redis-port> <quorum>
sentinel monitor mymaster 127.0.0.1 6379 1

# When the requirepass foobared authorization password is enabled in the Redis instance, all clients connecting to the Redis instance must provide the password
# Set the password of sentinel sentinel connecting master and slave. Note that the same authentication password must be set for master and slave
# sentinel auth-pass <master-name> <password>
sentinel auth-pass mymaster MySUPER--secret-0123passw0rd


# After the specified number of milliseconds, the master node does not respond to the sentinel sentinel. At this time, the sentinel subjectively thinks that the master node goes offline for 30 seconds by default
# sentinel down-after-milliseconds <master-name> <milliseconds>
sentinel down-after-milliseconds mymaster 30000

# This configuration item specifies the maximum number of slave s that can synchronize the new master at the same time when a failover active / standby switch occurs,
# The smaller the number, the longer it takes to complete the failover,
# However, if this number is larger, it means that more slave s are unavailable due to replication.
# You can set this value to 1 to ensure that only one slave is in a state that cannot process command requests at a time.
# sentinel parallel-syncs <master-name> <numslaves>
sentinel parallel-syncs mymaster 1


# Failover timeout can be used in the following aspects:
# 1. The interval between two failover s of the same sentinel to the same master.
# 2. When a slave synchronizes data from a wrong master, the time is calculated. Until the slave is corrected to synchronize data to the correct master.
# 3. The time required to cancel an ongoing failover.
# 4. During failover, configure the maximum time required for all slaves to point to the new master. But even after this timeout,
# slaves will still be correctly configured to point to the master, but it will not follow the rules configured by parallel syncs
# The default is three minutes
# sentinel failover-timeout <master-name> <milliseconds>
sentinel failover-timeout mymaster 180000

# SCRIPTS EXECUTION

# Configure the script to be executed when an event occurs. You can notify the administrator through the script. For example, send an email to notify relevant personnel when the system is not running normally.
# There are the following rules for the running results of scripts:
# If the script returns 1 after execution, the script will be executed again later. The number of repetitions is currently 10 by default
# If the script returns 2 after execution, or a return value higher than 2, the script will not be executed repeatedly.
# If the script is terminated due to receiving the system interrupt signal during execution, the behavior is the same as when the return value is 1.
# The maximum execution time of a script is 60s. If it exceeds this time, the script will be terminated by a SIGKILL signal and then re executed.

# Notification script: this script will be called when any warning level event occurs in sentinel (such as subjective failure and objective failure of redis instance),
# At this time, the script should notify the system administrator about the abnormal operation of the system through e-mail, SMS, etc. When calling the script, two parameters will be passed to the script,
# One is the type of event,
# One is the description of the event.
# If sentinel If the script path is configured in the conf configuration file, you must ensure that the script exists in this path and is executable,
# Otherwise sentinel cannot be started normally and successfully.
# Notification script
# sentinel notification-script <master-name> <script-path>
  sentinel notification-script mymaster /var/redis/notify.sh

# Client reconfiguration master node parameter script
# When a master changes due to failover, this script will be called to notify the relevant clients of the change of the master address.
# The following parameters will be passed to the script when calling the script:
# <master-name> <role> <state> <from-ip> <from-port> <to-ip> <to-port>
# At present, < state > is always "failover",
# < role > is one of "leader" or "observer".
# The parameters from IP, from port, to IP and to port are used to communicate with the old master and the new master (i.e. the old slave)
# This script should be generic and can be called multiple times, not targeted.
# sentinel client-reconfig-script <master-name> <script-path>
sentinel client-reconfig-script mymaster /var/redis/reconfig.sh
Redis cache penetration and avalanche
- The use of Redis cache has greatly improved the performance and efficiency of applications, especially in data query. But at the same time, it also brings some problems. Among them, the most crucial problem is the consistency of data. Strictly speaking, this problem has no solution. If the consistency of data is very high, cache cannot be used
- Other typical problems are cache penetration, cache avalanche and cache breakdown. At present, the industry also has more popular solutions
Cache penetration (caused by failure to find)
concept
The concept of cache penetration is very simple. Users want to query a data and find that the redis memory database is missing, that is, the cache misses, so they query the persistence layer database. No, so this query failed. When there are many users, the cache fails to hit, so they all request the persistence layer database. This will put a lot of pressure on the persistence layer database, which is equivalent to cache penetration
Solution
-
Bloom filter
- Bloom filter is a data structure that stores all possible query parameters in the form of hash. It is verified in the control layer first, and discarded if it does not meet the requirements, so as to avoid the query pressure on the underlying storage system
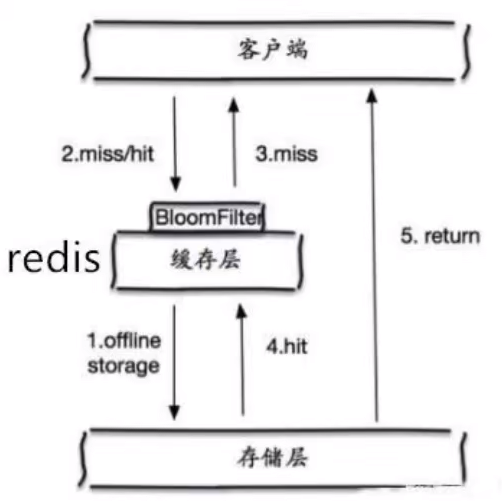
- Bloom filter is a data structure that stores all possible query parameters in the form of hash. It is verified in the control layer first, and discarded if it does not meet the requirements, so as to avoid the query pressure on the underlying storage system
-
Cache empty objects
- When the storage layer fails to hit, even the returned empty object will be cached, and an expiration time will be set. Then accessing the data will be obtained from the cache, protecting the back-end data source
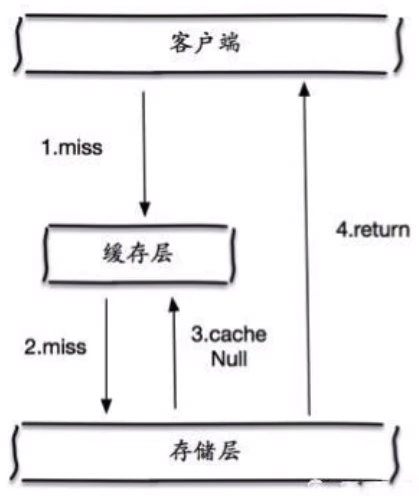
- However, there are two problems with this method:
- If null values can be cached, this means that the cache needs more space to store more keys, because there may be many null keys
- Even if the expiration time is set for the null value, there will still be inconsistency between the data of the cache layer and the storage layer for a period of time, which will have an impact on the business that needs to maintain consistency
- When the storage layer fails to hit, even the returned empty object will be cached, and an expiration time will be set. Then accessing the data will be obtained from the cache, protecting the back-end data source
Cache breakdown (caused by cache expiration)
concept
- Here we need to pay attention to the difference between cache breakdown and cache breakdown. Cache breakdown means that a key is very hot. It is constantly carrying large concurrency. Large concurrency focuses on accessing this point. When the key fails, the continuous large concurrency breaks through the cache and directly requests the database, which is like cutting a hole in a barrier
- When a key expires, a large number of requests are accessed concurrently. This kind of data is generally hot data. Because the cache expires, the database will be accessed to query the latest data at the same time, and the cache will be written back, which will lead to excessive pressure on the database at the moment
Solution
- Set hotspot data never to expire
- From the cache level, no expiration time is set, so there will be no problems after the hot key expires
- Add mutex
- Distributed lock: using distributed lock ensures that there is only one thread for each key to query the back-end service at the same time, and other threads do not have the permission to obtain the distributed lock, so they only need to wait. This method transfers the pressure of high concurrency to distributed locks, so it has a great test on distributed locks
Cache Avalanche (caused by centralized expiration)
concept
-
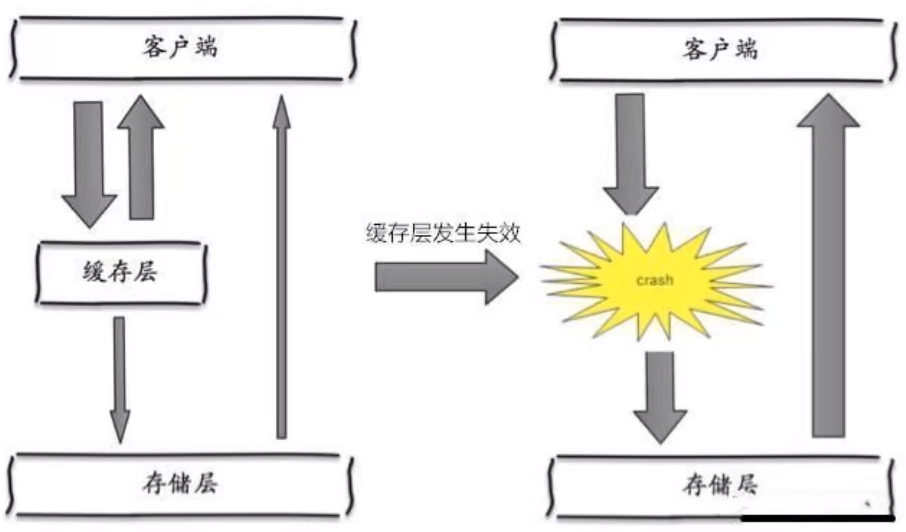
Cache avalanche refers to the expiration of the cache set or the downtime of Redis in a certain period of time
-
One of the reasons for the avalanche is that when writing this article, for example, it is about to arrive at double twelve o'clock, and there will be a wave of rush buying soon. This wave of goods will be put into the cache in a concentrated time, assuming that the cache is one hour. Then at one o'clock in the morning, the cache of these goods will expire. The access and query of these commodities fall on the database, which will produce periodic pressure peaks. Therefore, all requests will reach the storage layer, and the call volume of the storage layer will increase sharply, resulting in the situation that the storage layer will also hang up
-
In fact, centralized expiration is not very fatal. The more fatal cache avalanche is the downtime or disconnection of a node of the cache server. Because of the cache avalanche formed naturally, the cache must be created centrally in a certain period of time. At this time, the database can withstand the pressure. It is nothing more than periodic pressure on the database. The downtime of the cache service node will cause unpredictable pressure on the database server, which is likely to crush the database in an instant
Solution
- redis high availability
- Since redis may hang up, I'll add several more redis. After one is hung up, others can continue to work. In fact, it's a cluster
- Current limiting degradation
- After the cache expires, the number of threads reading and writing to the database cache is controlled by locking or queuing. For example, for a key, only one thread is allowed to query data and write cache, while other threads wait
- Data preheating
- Before the formal deployment, I first access the possible data in advance, so that part of the data that may be accessed in large quantities will be loaded into the cache. Before a large concurrent access is about to occur, manually trigger the loading of different key s in the cache and set different expiration times to make the time point of cache invalidation as uniform as possible