1. Premise
jenkins plug-in address: http://updates.jenkins-ci.org/download/plugins/
- 192.168.211.90 gitlab,jenkins,Maven
- 192.168.211.91 git,httpd
- 192.168.211.92 nexus,sonarqube,docker-ce
192.168.211.93 this is a separate environment for testing jenkins and docker
Turn off the firewall
# systemctl disable  firewalld.service

close NetworkManager
# systemctl stop NetworkManager


close selinux
# cat /etc/selinux/config
	SELINUX=disabled


Install common commands
# yum install  -y net-tools lrzsz tree screen lsof wget ntpdate

Set time
# crontab -e add
# crontab -l
*/5 * * * * /usr/sbin/ntpdate time1.aliyun.com


Change time zone
# ln -sf /usr/share/zoneinfo/Asia/Shanghai /etc/localtime
2. Install gitlab
1.1 installation of gitlab 192.168.211.90
GitHub and GitLab are web-based Git repositories
Installation dependency:
# yum install curl policycoreutils openssh-server openssh-clients policycoreutils-python -y
Download rpm package
# cd /usr/local/src/
#wget https://mirrors.tuna.tsinghua.edu.cn/gitlab-ce/yum/el7/gitlab-ce-11.9.1-ce.0.el7.x86_64.rpm
# rpm -ivh gitlab-ce-11.9.1-ce.0.el7.x86_64.rpm
3. Configure gitlab
The default configuration file of gitlab is located in VIM / etc / gitlab / gitlab RB, modify external_ The URL is the IP address of the local machine or a domain name that can access the local machine
external_url 'http://192.168.211.90'
After modifying the main configuration file, use gitlab CTL reconfigure to reconfigure and load gitlab
4. Start gitlab
After successful reconfiguration, gitlab can be restarted
# gitlab-ctl restart
ok: run: alertmanager: (pid 5060) 1s
ok: run: gitaly: (pid 5078) 0s
ok: run: gitlab-monitor: (pid 5091) 1s
ok: run: gitlab-workhorse: (pid 5114) 0s
ok: run: logrotate: (pid 5125) 0s
ok: run: nginx: (pid 5132) 1s
ok: run: node-exporter: (pid 5216) 0s
ok: run: postgres-exporter: (pid 5227) 1s
ok: run: postgresql: (pid 5238) 0s
ok: run: prometheus: (pid 5246) 1s
ok: run: redis: (pid 5260) 0s
ok: run: redis-exporter: (pid 5430) 0s
ok: run: sidekiq: (pid 5439) 0s
ok: run: unicorn: (pid 5451) 0s
Enter in the browser: http://192.168.211.90/ , the first login requires resetting the root password
After changing the password successfully
Just log in
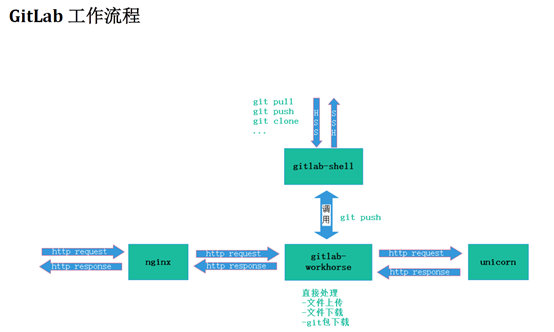
5. Composition of gitlab
Gitlab consists of the following services, which jointly undertake the operation needs of gitlab
- Nginx: static web server
- Gitlab shell: used to process git commands and modify the authorized keys list
- Gitlab workhorse: lightweight reverse proxy server
- logrotate: log file management tool
- postgresql: Database
- redis: cache database
- sidekiq: used to execute queue tasks in the background (asynchronous execution)
- unicorn: An HTTP server for Rack application,gitlab
rails applications are hosted on this server
You can use commands to view the status of individual services
# gitlab-ctl status
run: alertmanager: (pid 5060) 53429s; run: log: (pid 4308) 53665s
run: gitaly: (pid 5078) 53428s; run: log: (pid 3570) 53739s
run: gitlab-monitor: (pid 5091) 53428s; run: log: (pid 4171) 53683s
run: gitlab-workhorse: (pid 5114) 53427s; run: log: (pid 3939) 53700s
run: logrotate: (pid 5125) 53427s; run: log: (pid 4017) 53693s
run: nginx: (pid 5132) 53427s; run: log: (pid 3967) 53699s
run: node-exporter: (pid 5216) 53427s; run: log: (pid 4130) 53688s
run: postgres-exporter: (pid 5227) 53427s; run: log: (pid 4356) 53660s
run: postgresql: (pid 5238) 53426s; run: log: (pid 3660) 53735s
run: prometheus: (pid 5246) 53426s; run: log: (pid 4242) 53672s
run: redis: (pid 5260) 53425s; run: log: (pid 3387) 53746s
run: redis-exporter: (pid 5430) 53425s; run: log: (pid 4210) 53678s
run: sidekiq: (pid 5439) 53424s; run: log: (pid 3906) 53705s
run: unicorn: (pid 5451) 53423s; run: log: (pid 3875) 53709s
5.1 gitlab shell
Gitlab Shell has two functions: Handling git commands for gitlab and modifying the authorized keys list.
When accessing gitlab server via ssh, the gitlab shell will:
- Call gitlab rails api to check permissions
- Execute pre receive hook (called git hook in gitlab Enterprise Edition)
- Execute the action you requested and handle the post receive action of gitlab
- Handle custom post receive actions
When accessing the gitlab server through http\https, the workflow depends on whether you pull the code from the git warehouse or push the code to the git warehouse
If you pull the code from the GIT repository, the gitlab rails application will be fully responsible for user authentication and executing git commands
If you push the code from the GIT repository, the gitlab rails application will neither authenticate users nor execute git commands. It will hand over the following work to the gitlab shell for processing
- Call gitlab rails api to check permissions
- Execute pre receive hook (called git hook in gitlab Enterprise Edition)
- Perform the action you requested
- Handle the post receive action of gitlab
- Handle custom post receive actions
5.2 gitlab workhorse
gitlab workhorse is an agile reverse proxy, which can handle some large http requests, such as file upload, file download, git push/pull and git package download. Other requests will be reverse proxied to the gitlab rails application, that is, to the unicorn on the back end
6. gitlab command
Start all gitlab components
# gitlab-ctl start
 Stop all gitlab assembly
# gitlab-ctl stop
 stop it postgresql assembly
# gitlab-ctl stop postgresql
Stop related data connection services
# gitlab-ctl stop unicorn
# gitlab-ctl stop sidekiq
Restart all gitlab assembly
# gitlab-ctl restart
 restart gitlab-workhorse assembly
# gitlab-ctl restart gitlab-workhorse
View service status
# gitlab-ctl status
 If you change the configuration file[gitlab.rb file],Make the configuration file effective, but initialize it except gitlab.rb All documents except
# sudo gitlab-ctl reconfigure
view log
# sudo gitlab-ctl tail
 inspect redis Log of
# sudo gitlab-ctl tail redis
7. Main directory of gitlab
- /Var / opt / gitlab / git data / repositories /: the default storage directory of the library
- /opt/gitlab /: the storage directory of application code and corresponding dependent programs
- /var/opt/gitlab: the application data and configuration files compiled by gitlab CTL reconfigure command do not need to be manually modified
- /etc/gitlab: configuration file directory
- /var/log/gitlab /: the logs generated by various components are stored in this directory
- /var/opt/gitlab/backups /: the directory generated by the backup file
gitlab turns off the user registration function
After logging into the web interface
Click Admin Area in the upper navigation bar
Click setting on the left
Find the sign up restrictions configuration area and click expand
Remove the √ in front of sign up enabled
Finally, click the save button
8. gitlab warehouse management
Gitlab manages the project and user uniformly through the concept of group. By creating a group, creating a warehouse under the group and adding users to the group, gitlab realizes the permission management of users and warehouses
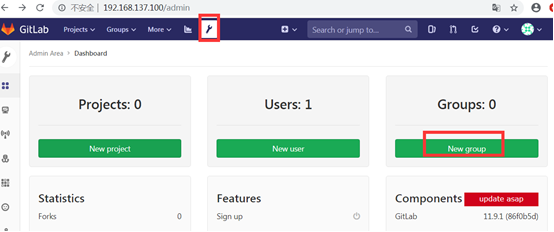
- Create groupcreate group
- Click the Admin area button at the top of the administrator page to enter the administrator area
- Click the new group button
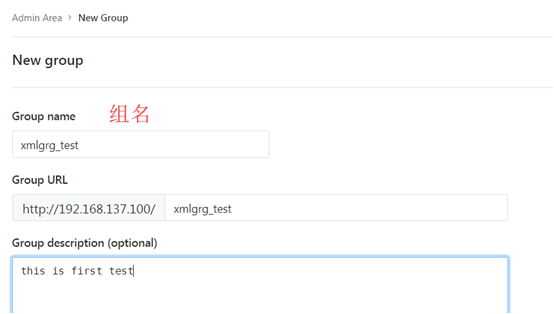
Fill in the necessary information
Group name, group path, group description
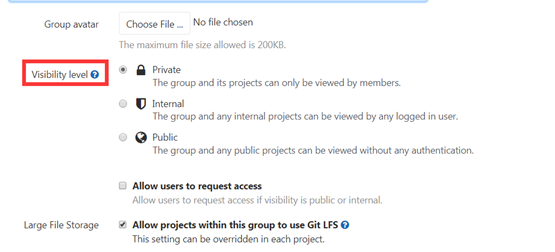
Group visibility level
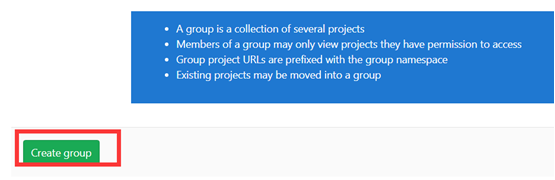
- Visibility level: select who can access the group. We can select private by default
- Private: The group and its projects can only be viewed by members.
Only authorized users can see it - Internal: The group and any internal projects can be viewed by any
logged in user. Any user who logs in to gitlab can see it - Public: The group and any public projects can be viewed without any
authentication. Anyone who can access the gitlab web page can see it
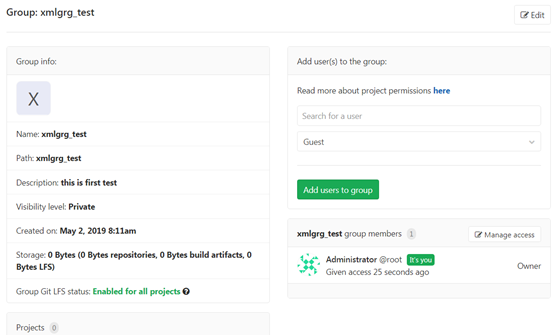
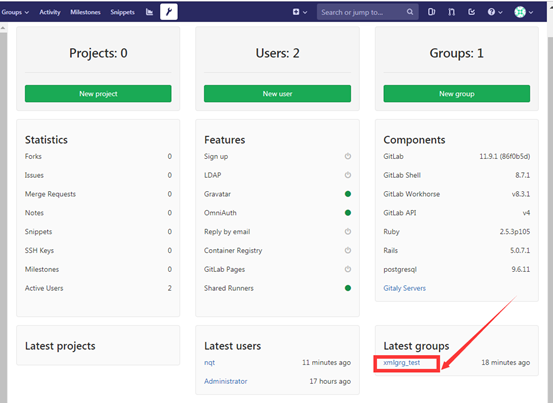
After filling in the information, click create group
Enter the created group management interface
You can find another interface to create a group of users
9. create user
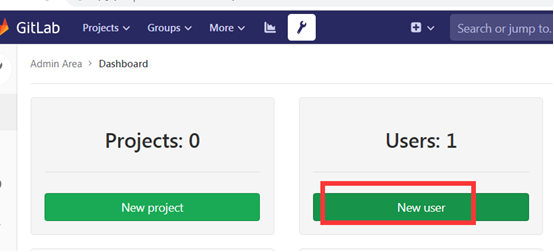
On the administrator page, click the Admin Area button at the top of the page to enter the administrator area
Click create user
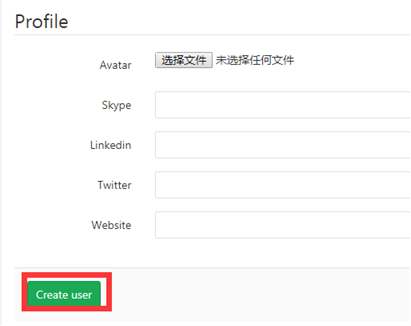
Fill in the necessary information
User name, nickname, user name, email address, select user level
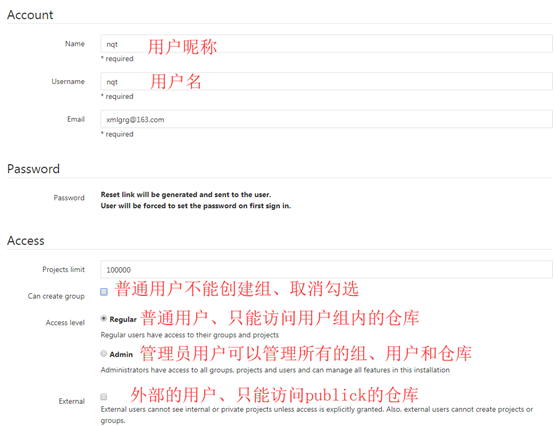
Click create user
Enter the user's management interface
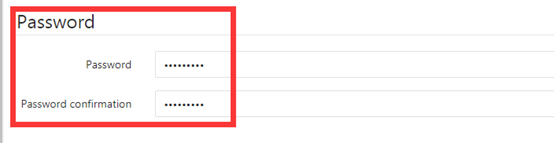
Click the Edit button on the upper right page of the page to set the initial password for the user
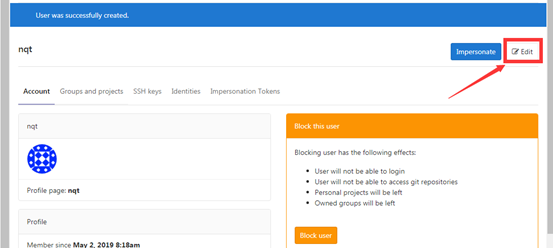
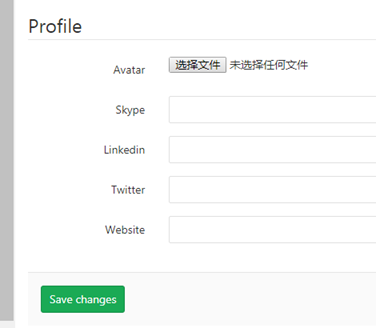
You can also set other user information
Finally, click save to change
10. grant user
After the user is created, we need to authorize the user so that the user can manage the warehouse. There are two ways: one is to add the user to the group so that the user can manage the warehouse in the group; Second, directly authorize users to manage the warehouse. Usually, we add users to corresponding groups and assign them different roles. The user's role in Gitlab is defined by the system and cannot be changed, which may not be in line with our normal thinking habits.
Next, add the newly created nqt user to xmlgrg_test group and give developer permission
In the administrator area, click the created group to enter the group management interface
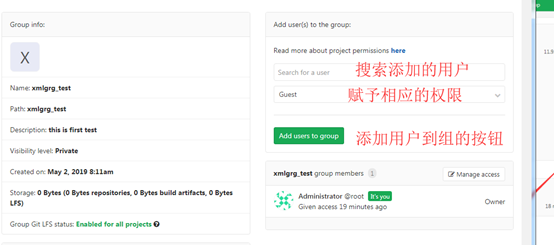
Select a user, give permission, and click Add
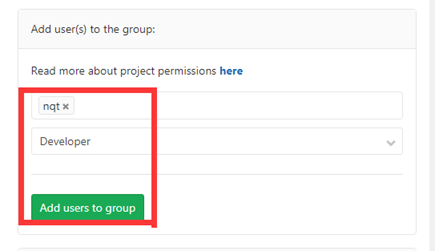
Added successfully

Official document description of corresponding authority: https://docs.gitlab.com/ee/user/permissions.html
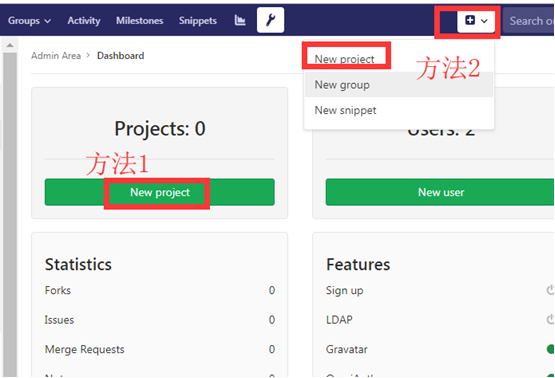
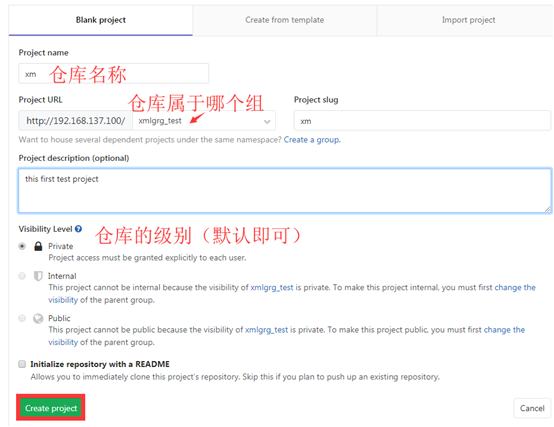
11. Create warehouse create project
In gitlab, create a project to store your program code, as a problem tracker, for code collaboration, for construction, testing and deployment in continuous integration.
Click New project in the administrator area
Fill in the information of the new warehouse
After the creation, the page has these two prompts. Don't worry about it first
When the warehouse related operation line on the left is empty and the warehouse related operation line on the right is displayed in the warehouse related menu bar
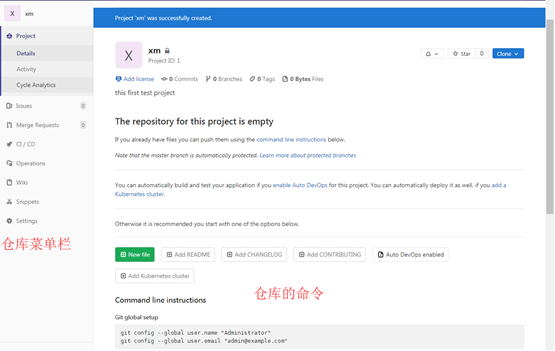
Command line instructions

Git global setup
# git config --global user.name "Administrator"
# git config --global user.email "admin@example.com"

Create a new repository
# git clone http://192.168.137.100/xmlgrg_test/xm.git
# cd xm
# touch README.md
# git add README.md
# git commit -m "add README"
# git push -u origin master

Existing folder
# cd existing_folder
# git init
# git remote add origin http://192.168.137.100/xmlgrg_test/xm.git
# git add .
# git commit -m "Initial commit"
# git push -u origin master

Existing Git repository
# cd existing_repo
# git remote rename origin old-origin
# git remote add origin http://192.168.137.100/xmlgrg_test/xm.git
# git push -u origin --all
# git push -u origin --tags
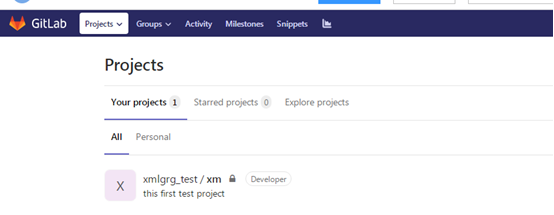
After adding a warehouse to a group, members of the group can see the warehouse
Log in using nqt user. You can see the warehouse xm
12. Configure ssh key
The warehouse is private. Only authorized users can access the warehouse. As long as the user of the client is bound with our gitlab user, the client can access the warehouse on gitlab. It is recommended to use ssh to bind the client and gitlab user. The specific configuration is as follows:
Generate ssh key pair on the client (note that rsa encryption can only be used under windows client)
On 192.168.211.90, gitlab server
Switch to the user running gitlab. I directly use the root user of the server here
# ssh-keygen -t rsa
Generating public/private rsa key pair.
Enter file in which to save the key (/root/.ssh/id_rsa):
Created directory '/root/.ssh'.
Enter passphrase (empty for no passphrase):
Enter same passphrase again:
Your identification has been saved in /root/.ssh/id_rsa.
Your public key has been saved in /root/.ssh/id_rsa.pub.
The key fingerprint is:
SHA256:TPquDQ/XGM5zBefa86ZCfKiGLh8aWHWbbVEdV06etUM root@localhost.localdomain
The key's randomart image is:
+---[RSA 2048]----+
|            ...E*|
|           .  o=+|
|      . o o .  +o|
|     . = + =    .|
|    . . S.o.o    |
|   o   + =++.    |
|  . . +.Bo+.o    |
|    .o.Ooo.  o.  |
|    .++o+  ..o.  |
+----[SHA256]-----+
# ll /root/.ssh/
Total consumption 8
-rw------- 1 root root 1679 5 February 17:07 id_rsa
-rw-r--r-- 1 root root  408 5 February 17:07 id_rsa.pub
# cat /root/.ssh/id_rsa.pub
ssh-rsa AAAAB3NzaC1yc2EAAAADAQABAAABAQDC9rQr5/sh7EJGMmScIJnyG+vWaXpjibA4i81ik14pdyeV80CYTmV7h38fYSKbsGI+MeQX8euvsqveGhNqJsNvTSNm/c5aoHudY6vNrvVkP1SM1gIsdgGb8I2uJeQBPi
KftLnWashuO85vKiZ5hmv9THMW/Zn1NhiCuh3Ixj2PqEiUGxLLMb4NltJSoJOrOkKYZKd6FyLqXoLNJ9QN/m8uCHgS2vlTa7wvNIOZwAQnZ3Rx95dSusosUDHzfwBeMkCuNQpcP2kkQ2E6r+oi+zAlW/q6sUhHQzg0t1zat8IgEpJi3cu0TJRrdAnjNLlSL4Ue+RpmRrwoKs/gUgmrdIlZ root@localhost.localdomain
Bind this user to the root user of gitlab
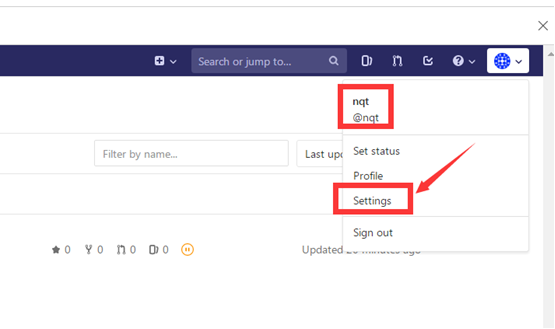
Click the icon of gitlab user and find setting
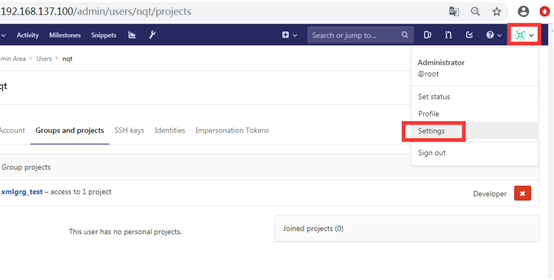
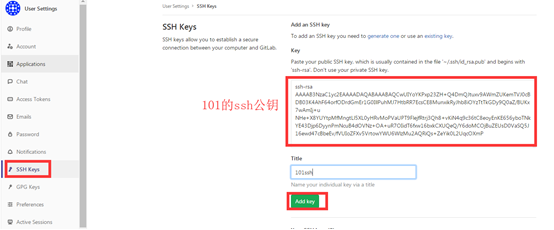
Enter the user's setting page and click ssh keys in the menu bar on the left
This page can also set other user information
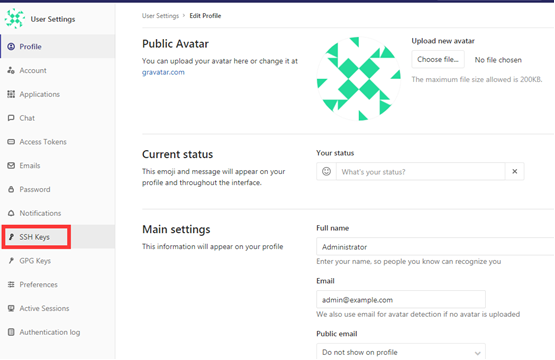
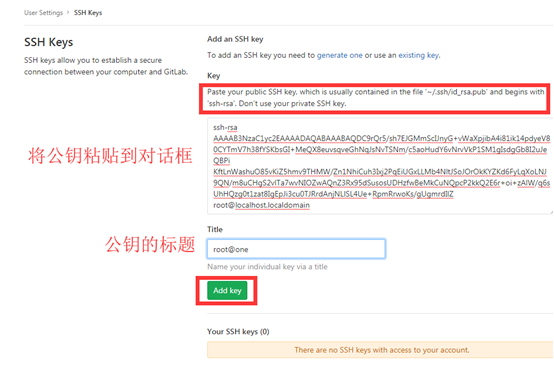
Configuration page of SH
Only public keys can be added here. Note that a public key can only be added once in the whole gitlab system, but a gitlab user can add multiple public keys
13. Push local client warehouse to gitlab
yum install -y git
git --version
Set the global level information of this warehouse
# git config --global user.name quntao
# git config --global user.email xmlgrg@163.com
# git config --list
user.name=quntao
user.email=xmlgrg@163.com
Create an empty warehouse
# pwd
/data/git_test
# git init
 Initialize empty Git Version library at /data/git_test/.git/
# ll -a
 Total consumption 0
drwxr-xr-x 3 root root  18 5 February 20:09 .
drwxr-xr-x 3 root root  22 5 February 20:09 ..
drwxr-xr-x 7 root root 119 5 February 20:09 .git
Set filter file
With the warehouse, we can be in GIT_ We only need to delete the temporary files in the development area, but we don't care about the automatic deletion of other files in the development area. At this time, you need a filter file. Set the filter rules in this file so that git can automatically filter out those temporary files. This file is gitignore file.
Create in the warehouse directory gitignore file
# pwd
/data/git_test
# touch .gitignore
# vim .gitignore
# cat .gitignore
test.txt
/test/
*.txt
- test.txt / / filter test Txt file
- /Test / / filter the test directory
- *. txt / / filter all txt file
Common general configuration rules:
- The directory is indicated by a slash '/'
- Use an asterisk "*" to say one character
- With a question mark Wildcard single character
- Match list containing a single character in square brackets "[]"
- With exclamation mark "!" Indicates that matching files or directories are not ignored (tracked)
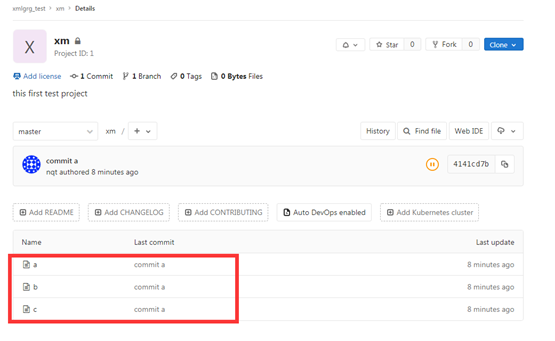
# touch a
# touch b
# touch c
# git add a
# git add b
# git add c
# Git commit - M "commit a" / "commit a" description of the submitted version
[master(Root submission) 4141 cd7] commit a
 3 files changed, 0 insertions(+), 0 deletions(-)
 create mode 100644 a
 create mode 100644 b
 create mode 100644 c
Push local client warehouse to gitlab
# pwd
/data/git_test
# git remote add gitlab git@192.168.137.100:xmlgrg_test/xm.git
You have new messages in / var/spool/mail/root
# git remote
gitlab
# ll -a
 Total consumption 4
drwxr-xr-x 3 root root  63 5 February 20:19 .
drwxr-xr-x 3 root root  22 5 February 20:09 ..
-rw-r--r-- 1 root root   0 5 February 20:19 a
-rw-r--r-- 1 root root   0 5 February 20:19 b
-rw-r--r-- 1 root root   0 5 February 20:19 c
drwxr-xr-x 8 root root 166 5 February 20:25 .git
-rw-r--r-- 1 root root  22 5 February 20:14 .gitignore
# git push -u gitlab master
The authenticity of host '192.168.137.100 (192.168.137.100)' can't be established.
ECDSA key fingerprint is SHA256:zUU81Kb1Q5uS1ewufeZ1qLyErPI0uOyIhEmOabssXoE.
ECDSA key fingerprint is MD5:1a:bc:a7:24:e7:f6:ce:4e:d3:df:56:ac:4a:e2:a5:3c.
Are you sure you want to continue connecting (yes/no)? yes
Warning: Permanently added '192.168.137.100' (ECDSA) to the list of known hosts.
Counting objects: 3, done.
Delta compression using up to 4 threads.
Compressing objects: 100% (2/2), done.
Writing objects: 100% (3/3), 203 bytes | 0 bytes/s, done.
Total 3 (delta 0), reused 0 (delta 0)
To git@192.168.137.100:xmlgrg_test/xm.git
 * [new branch]      master -> master
The branch master is set to track the remote branch master from gitlab.
Prompt that the push is successful. We can see the pushed content on the xm warehouse on gitlab
14. Clone gitlab warehouse to local client
192.168.211.91
Install git on this server
The git version installed by default using yum is 1.8. The version is lower. We can use the source code to install it
First, you need to install the dependent Library:
# yum install -y curl-devel expat-devel gettext-devel openssl-devel zlib-devel gcc perl-ExtUtils-MakeMaker
Download the latest source package
# cd /usr/local/src/
# wget https://mirrors.edge.kernel.org/pub/software/scm/git/git-2.19.2.tar.xz
# tar xf git-2.19.2.tar.xz
# cd git-2.19.2
# make prefix=/usr/local/git all
# make prefix=/usr/local/git install
# rm -rf /usr/bin/git
# ln -s /usr/local/git/bin/git /usr/bin/git
# git --version
git version 2.19.2


generate ssh key
[root@localhost git-2.19.2]# ssh-keygen -t rsa
Generating public/private rsa key pair.
Enter file in which to save the key (/root/.ssh/id_rsa):
Created directory '/root/.ssh'.
Enter passphrase (empty for no passphrase):
Enter same passphrase again:
Your identification has been saved in /root/.ssh/id_rsa.
Your public key has been saved in /root/.ssh/id_rsa.pub.
The key fingerprint is:
SHA256:deiQnPXeqNII+GsnVedBO0255UWtGto4PEbeEYSBTPo root@localhost.localdomain
The key's randomart image is:
+---[RSA 2048]----+
|       o..o+.  oo|
|       oo+.oo o +|
|      . = o.o= =.|
|     . . +ooBo+ .|
|    . . E=.Bo*.  |
|     . ..oO.=    |
|      ..o.oo     |
|      o...       |
|     ..o         |
+----[SHA256]-----+
[root@localhost git-2.19.2]# ll /root/.ssh/
Total consumption 8
-rw------- 1 root root 1675 5 February 20:44 id_rsa
-rw-r--r-- 1 root root  408 5 February 20:44 id_rsa.pub
[root@localhost git-2.19.2]# cat /root/.ssh/id_rsa.pub
ssh-rsa AAAAB3NzaC1yc2EAAAADAQABAAABAQCwUIYoYKPxp23ZH+Q4DmQJtuxv9AWmZUKemTVJ0cBDB03K4AhF64orfODrdGmEr1G0IllPuhMJ7HtbRR7EcsCE8MunxikRyJhb8iOYzTtTkGDy9Q0aZ/BUKx7wAmIj+u
NHe+X8YUYtpMfMngtLl5XL0yHRvMoPVaUPT9FlejfRtrj3Qh8+vKiN4q9c36tC8eoyEnKE656yboTNkYE43Djp6DyynPmNcuB4dOVNz+OA+uR7OIidT6fxw16bxkCXUQeQ/Y6doMCOjBuZEUsD0VaSQ5J16ewd47cBbeEv/fVUIoZFXv5VrtowYWU6WlzMu2AQRiQs+ZeYik0L2UqcOXmP root@localhost.localdomain
Then configure 192.168.211.91 client to bind with nqt user on gitlab
Use the git clone command to clone the warehouse to the 192.168.211.91 local server
[root@localhost data]# mkdir /101
[root@localhost data]# cd /101
[root@localhost 101]# git clone git@192.168.137.100:xmlgrg_test/xm.git
 Cloning to 'xm'...
The authenticity of host '192.168.137.100 (192.168.137.100)' can't be established.
ECDSA key fingerprint is SHA256:zUU81Kb1Q5uS1ewufeZ1qLyErPI0uOyIhEmOabssXoE.
ECDSA key fingerprint is MD5:1a:bc:a7:24:e7:f6:ce:4e:d3:df:56:ac:4a:e2:a5:3c.
Are you sure you want to continue connecting (yes/no)? yes
Warning: Permanently added '192.168.137.100' (ECDSA) to the list of known hosts.
remote: Enumerating objects: 3, done.
remote: Counting objects: 100% (3/3), done.
remote: Compressing objects: 100% (2/2), done.
remote: Total 3 (delta 0), reused 0 (delta 0)
In receiving object: 100% (3/3), complete.
[root@localhost 101]# ll -a
 Total consumption 0
drwxr-xr-x   3 root root  16 5 February 20:49 .
dr-xr-xr-x. 19 root root 247 5 February 20:49 ..
drwxr-xr-x   3 root root  45 5 February 20:49 xm
[root@localhost 101]# cd xm
[root@localhost xm]# ll -a
 Total consumption 0
drwxr-xr-x 3 root root  45 5 February 20:49 .
drwxr-xr-x 3 root root  16 5 February 20:49 ..
-rw-r--r-- 1 root root   0 5 February 20:49 a
-rw-r--r-- 1 root root   0 5 February 20:49 b
-rw-r--r-- 1 root root   0 5 February 20:49 c
drwxr-xr-x 8 root root 163 5 February 20:49 .git
[root@localhost xm]#
[root@localhost xm]# git remote
origin
You can see that the xm warehouse on gitlab has been cloned to 192.168.137.101, and a remote warehouse pointing to the xm warehouse on gitlab has been added to the local warehouse
Create a dev branch on xm of 192.168.137.101 and push the dev branch to gitlab
[root@localhost 101]# cd xm
[root@localhost xm]# pwd
/101/xm
[root@localhost xm]# pwd
/101/xm
[root@localhost xm]# git checkout -b dev
 Switch to a new branch 'dev'
[root@localhost xm]# git status
 In branch dev
 No documents to be submitted, clean work area
[root@localhost xm]# git push -u origin dev
 Total 0 (difference 0), reuse 0 (difference 0)
remote:
remote: To create a merge request for dev, visit:
remote:   http://192.168.137.100/xmlgrg_test/xm/merge_requests/new?merge_request%5Bsource_branch%5D=dev
remote:
To 192.168.137.100:xmlgrg_test/xm.git
 * [new branch]      dev -> dev
Branch 'dev' is set to track remote branch 'dev' from 'origin'.
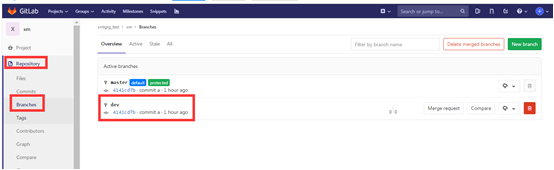
After completion, you can see the pushed dev branch on gitlab
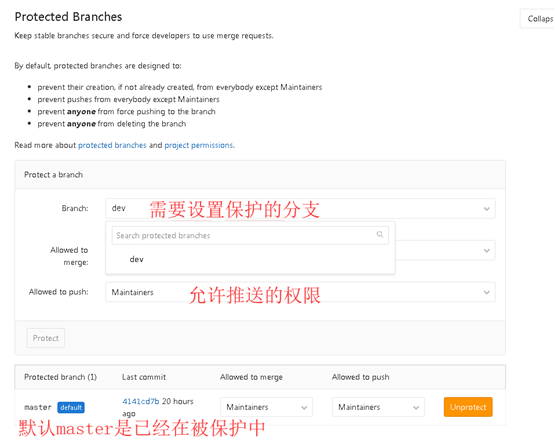
15. Set Branch protection
In the actual use process, the stability of the master branch is usually maintained. It is used for the version release of the production environment. Only authorized users can merge code with the master. To achieve this function, you need to set the master as the protection branch and authorize which users can push code to the master user.
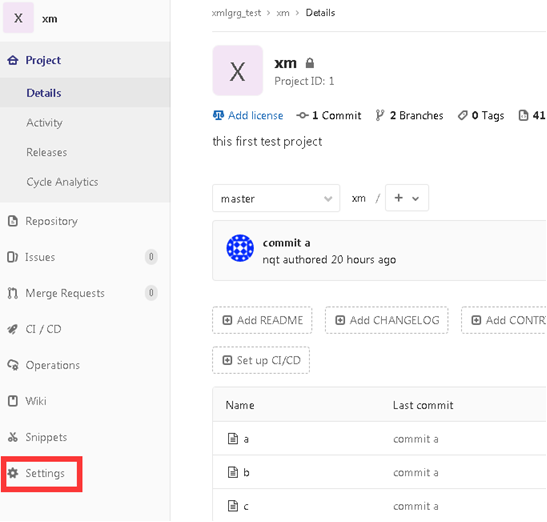
Log in to gitlab as root and click setting in the lower left corner of xm warehouse page
Enter the setup page and select the Repository option under the setup menu bar
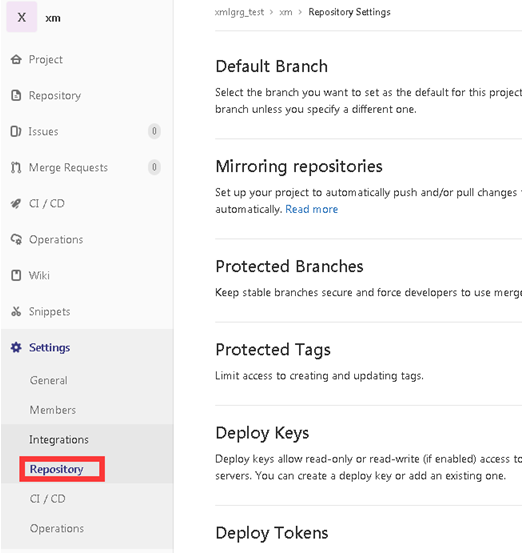
Find Protected Branches and click expand
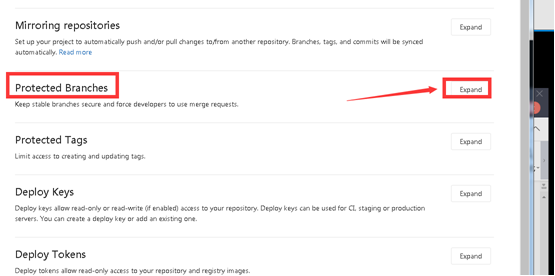
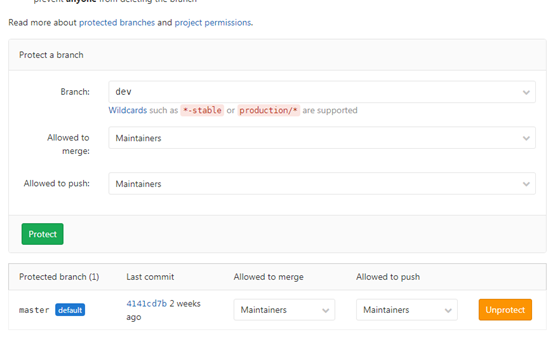
Expand Protected Branches
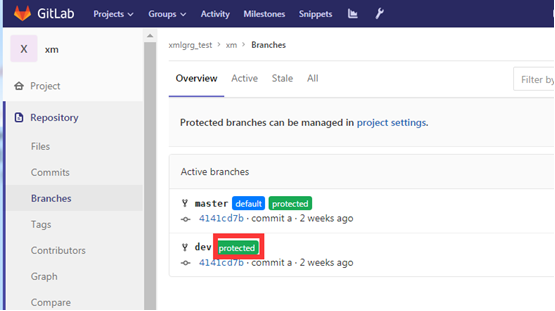
After setting dev as protected, you can see a green protected after the branch on the branch page of the warehouse
By default, the master branch does not allow the developer role to push content to it
16. Backup, recovery and upgrade of gitlab
Backing up gitlab will create an archive file containing all libraries and attachments. The backup can only be restored to the same version of gitlab at the time of backup. The best way to migrate gitlab to another server is through backup and restore. Gitlab provides a simple command line to back up the whole gitlab, and can flexibly meet the requirements.
Backup configuration
The backup file will be saved in the backup defined in the configuration file_ Path, the file name is TIMESTAMP_GITLAB_BACKUP.TAR, TIMESTAMP is the TIMESTAMP of the backup. The format of TIMESTAMP is EPOCH_YYYY_MM_DD_Gitlab-version.
The default backup file directory is: / var/opt/gitlab/backups. If you customize the backup directory, you need to give git permission to the directory. The specific operations are as follows:
Add to the configuration file:
#  vim /etc/gitlab/gitlab.rb
### Backup Settings
###! Docs: https://docs.gitlab.com/omnibus/settings/backups.html
#gitlab_rails['manage_backup_path'] = true
gitlab_rails['backup_path'] = "/data/gitlab/backups"  #Backup directory

##!Docs:https://docs.gitlab.com/ce/raketasks/backup_restore.html#backup-archive-permissions
# gitlab_rails['backup_archive_permissions'] = 0644

# gitlab_rails['backup_pg_schema'] = 'public'

###! The duration in seconds to keep backups before they are allowed to be deleted
gitlab_rails['backup_keep_time'] = 604800   #Backup retention time (in seconds, this is the default value of 7 days)
Execute the following command on the command line
# mkdir -pv /data/gitlab/backups
# chown -R git.git /data/gitlab/backups/
# gitlab-ctl reconfigure
# gitlab-ctl restart
16.1 manual backup
On the command line:
# gitlab-rake gitlab:backup:create
2019-05-18 21:26:25 +0800 -- Dumping database ...
Dumping PostgreSQL database gitlabhq_production ... [DONE]
2019-05-18 21:26:25 +0800 -- done
2019-05-18 21:26:25 +0800 -- Dumping repositories ...
 * xmlgrg_test/xm ... [DONE]
[SKIPPED] Wiki
2019-05-18 21:26:26 +0800 -- done
2019-05-18 21:26:26 +0800 -- Dumping uploads ...
2019-05-18 21:26:26 +0800 -- done
2019-05-18 21:26:26 +0800 -- Dumping builds ...
2019-05-18 21:26:26 +0800 -- done
2019-05-18 21:26:26 +0800 -- Dumping artifacts ...
2019-05-18 21:26:26 +0800 -- done
2019-05-18 21:26:26 +0800 -- Dumping pages ...
2019-05-18 21:26:26 +0800 -- done
2019-05-18 21:26:26 +0800 -- Dumping lfs objects ...
2019-05-18 21:26:26 +0800 -- done
2019-05-18 21:26:26 +0800 -- Dumping container registry images ...
2019-05-18 21:26:26 +0800 -- [DISABLED]
Creating backup archive: 1558185986_2019_05_18_11.9.1_gitlab_backup.tar ... done
Uploading backup archive to remote storage  ... skipped
Deleting tmp directories ... done
done
done
done
done
done
done
done
Deleting old backups ... done. (0 removed)
# ll /data/gitlab/backups / generate corresponding backup files in the specified directory
 Total consumption 112
-rw------- 1 git git 112640 5 June 18-21:26 1558185986_2019_05_18_11.9.1_gitlab_backup.tar
16.2 scheduled backup
By adding:
Automatic backup at 2 a.m. every day: it is realized by using the backup command through crontab, and the cron service needs to be restarted
#Enter the command crontab -e
sudo crontab -e
#Enter the corresponding task environment variable CRON=1 to suppress all progress output of the backup script if no error occurs
0 2 * * * /opt/gitlab/bin/gitlab-rake gitlab:backup:create CRON=1

# systemctl restart crond restart service
In the crontab file, each line represents a task, and each field in each line represents a setting. Its format is divided into six fields. The first five segments are the time setting segment, and the sixth segment is the command segment to be executed. Each field is separated by spaces, and the useless segment is replaced by * with the following format:
m h dom mon dow user command
Of which:
- m: Represents minutes, which can be any integer from 0 to 59.
- h: Represents the hour, which can be any integer from 0 to 23.
- dom: represents the date and can be any integer from 1 to 31.
- mon: represents the month and can be any integer from 1 to 12.
- dow: represents the day of the week. It can be any integer from 0 to 7. Here, 0 or 7 represents Sunday.
- User: indicates the user executing the.
- Command: the command to be executed can be a system command or a script file written by yourself (such as a shell file).
16.3 recovery practice
Gitlab recovery can only be restored to the system with the same gitlab version as the backup file. During recovery, stop the process connected to the database (that is, stop the data writing service), but keep gitlab running.
# gitlab-ctl stop unicorn
ok: down: unicorn: 1s, normally up
# gitlab-ctl stop sideki
# gitlab-ctl status
run: alertmanager: (pid 11282) 1356s; run: log: (pid 1872) 5129s
run: gitaly: (pid 11298) 1355s; run: log: (pid 1859) 5129s
run: gitlab-monitor: (pid 11338) 1355s; run: log: (pid 1865) 5129s
run: gitlab-workhorse: (pid 11376) 1354s; run: log: (pid 1861) 5129s
run: logrotate: (pid 11387) 1354s; run: log: (pid 1860) 5129s
run: nginx: (pid 11397) 1353s; run: log: (pid 1852) 5129s
run: node-exporter: (pid 11407) 1353s; run: log: (pid 1862) 5129s
run: postgres-exporter: (pid 11508) 1352s; run: log: (pid 1869) 5129s
run: postgresql: (pid 11524) 1351s; run: log: (pid 1847) 5129s
run: prometheus: (pid 11540) 1350s; run: log: (pid 1877) 5129s
run: redis: (pid 11559) 1349s; run: log: (pid 1875) 5129s
run: redis-exporter: (pid 11598) 1349s; run: log: (pid 1870) 5129s
run: sidekiq: (pid 11609) 1346s; run: log: (pid 1878) 5129s
down: unicorn: 29s, normally up; run: log: (pid 1876) 5129s
#
Perform recovery operation
# gitlab-rake gitlab:backup:restore
During the whole recovery process, you can see that you are basically deleting tables and creating tables
2 Input required at yes
Before restoring the database, we will remove all existing
tables to avoid future upgrade problems. Be aware that if you have
custom tables in the GitLab database these tables and all data will be
removed.

Do you want to continue (yes/no)? yes

 This task will now rebuild the authorized_keys file.
You will lose any data stored in the authorized_keys file.
Do you want to continue (yes/no)? yes