1, Spring MVC first experience
Starting from this section, I want to learn the Web application framework Spring MVC that we must master in the Spring ecosystem.
1. Introduction to spring MVC
MVC has been known before when learning J2EE. MVC is a famous architecture pattern (Note: it is not a design pattern).
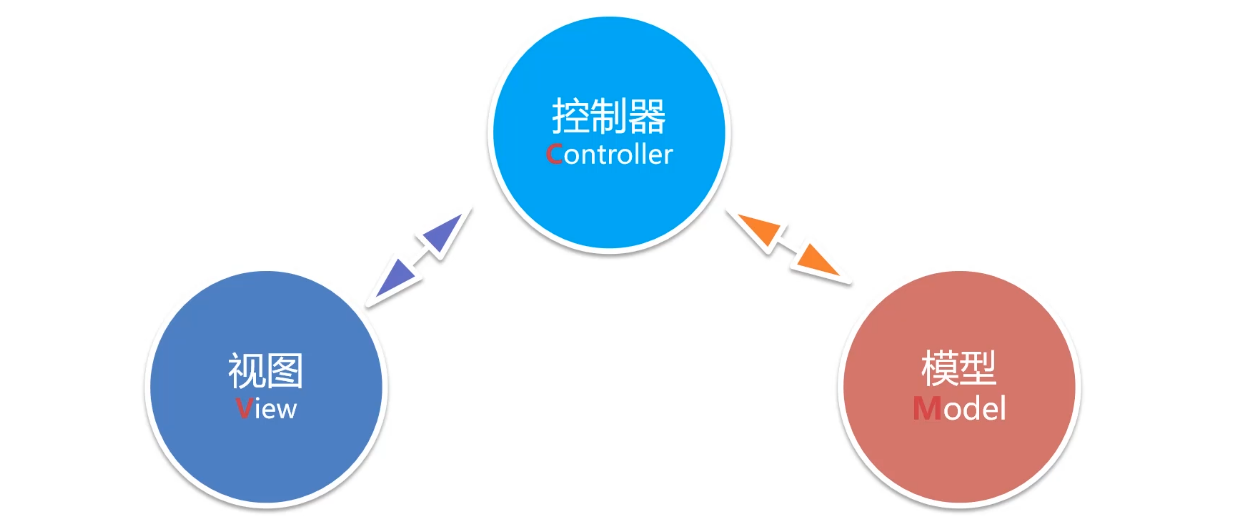
The abbreviation of MVC is the acronym of model view Controller. View view is part of the interface and is used to interact with users, such as displaying query results through the interface, providing forms, receiving user input information, etc. The latter model usually refers to our data, which is placed in java code, which is part of business logic. In the design concept of MVC, if the data in the view, such as a table, comes from the back-end model, the view does not actively call a method in the model through java to obtain a certain data, but through the Controller, which is equivalent to an intermediary. The Controller is the most important part of the whole MVC. Its purpose is to receive the data transmitted in the view, then call the back-end business logic according to the data to get the results, and finally return the back-end results to the view through the Controller. That is, there is no necessary connection between the view and the model. Everything is called and returned through the Controller. In fact, the servlet mentioned earlier is the technology used to develop the Controller, but these methods provided in the servlet are sometimes not so convenient to use. It is precisely because there are many inconveniences in the development process of servlet that spring has developed spring mvc, which provides a simple way to help us quickly complete the development of web applications. In other words, as the spring mvc framework, its main purpose is to help us simplify the development of web applications.
2. Introduction to spring MVC
Spring MVC is a lightweight Web MVC framework of spring system. Its main function is to replace the traditional J2EE Servlet to make it easier for us to develop applications.
The core Controller of Spring MVC is used to process requests and generate responses. In MVC, the interface does not allow direct access to the back-end Model business logic, but passes calls through the Controller as an intermediary. The greatest advantage of this is to effectively decouple our interface from the back-end java business logic and improve the maintainability of the program.
Spring MVC runs based on the Spring IoC container, and all objects are managed by IoC.
Spring MVC documentation: https://docs.spring.io/spring-framework/docs/current/reference/html/web.html
3. Version change of spring 5. X
Let's talk about the changes of the version. With the development of the times, Spring is now the version of 5.X.
Spring 5.X minimum requirements JDK8 and J2EE 7 (i.e. Servlet 3.1 / Tomcat 8.5 +)
Spring 5.X supports JDK8/9 and can use new features
The most important new feature of Spring 5.X is that it supports responsive programming. The so-called responsive programming is based on events. For example, if you have done the interface, you know that when you click a button, a single machine response event will be triggered. Then, if we put it in our background programming, we have a similar idea. When an event is triggered, we automatically execute a piece of code. This is reactive programming. Responsive programming is another programming style that focuses on building applications that respond to events.
4.Spring MVC environment configuration
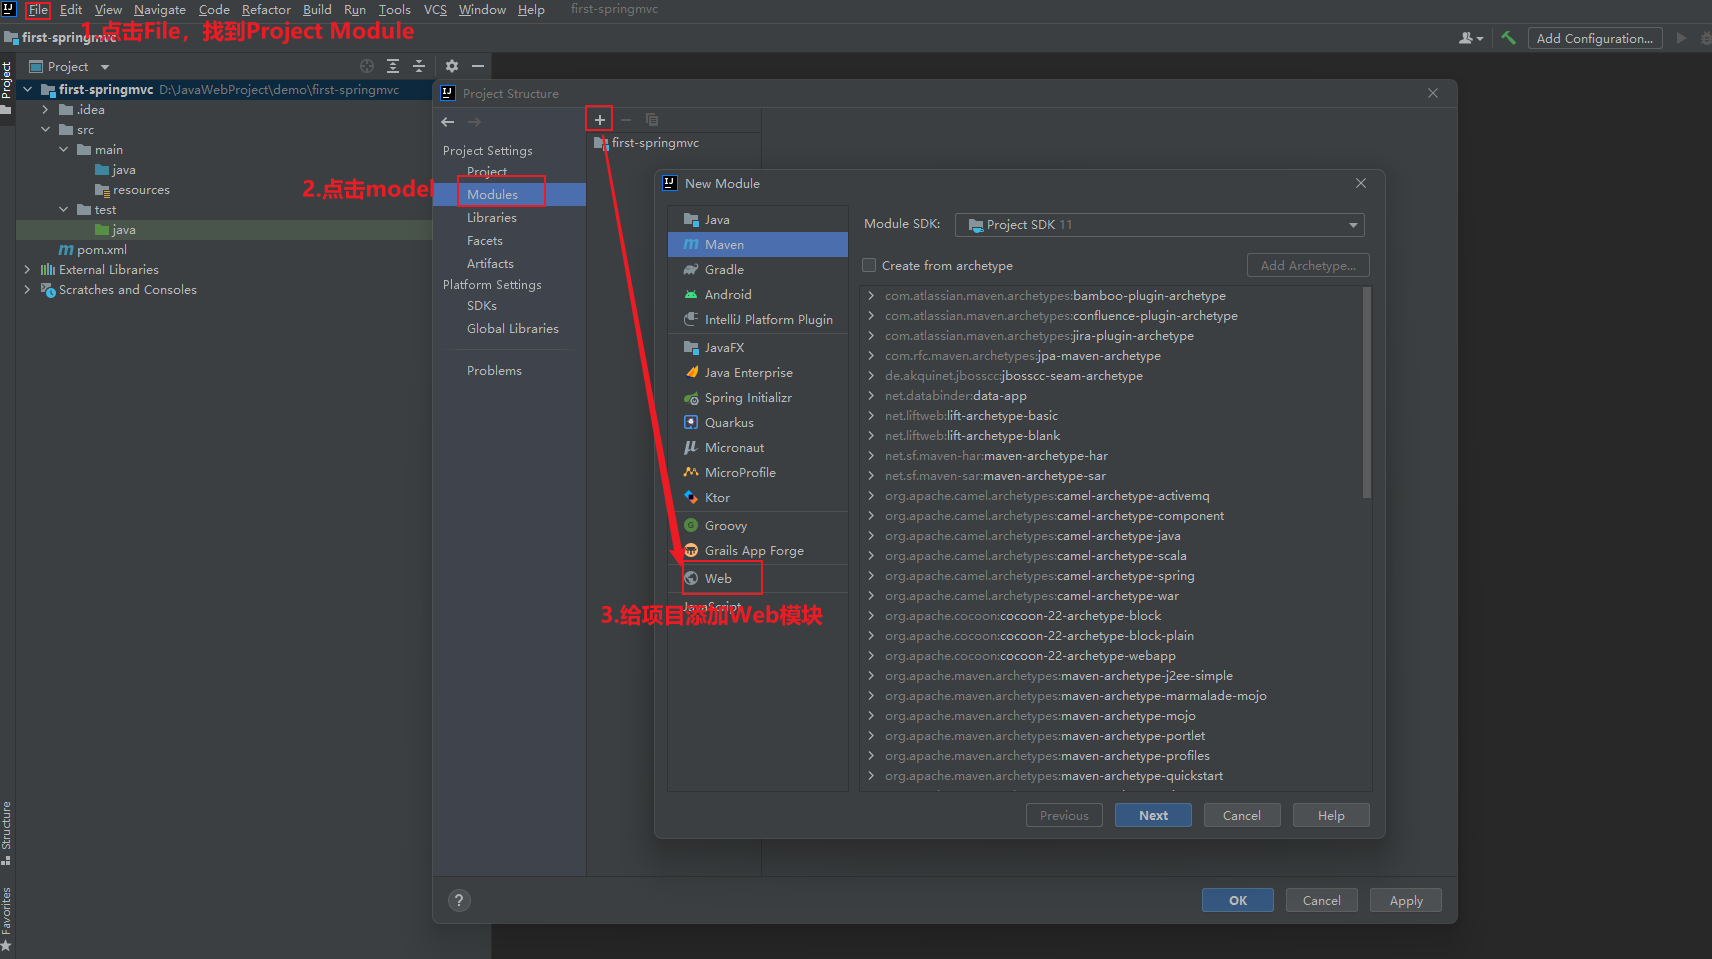
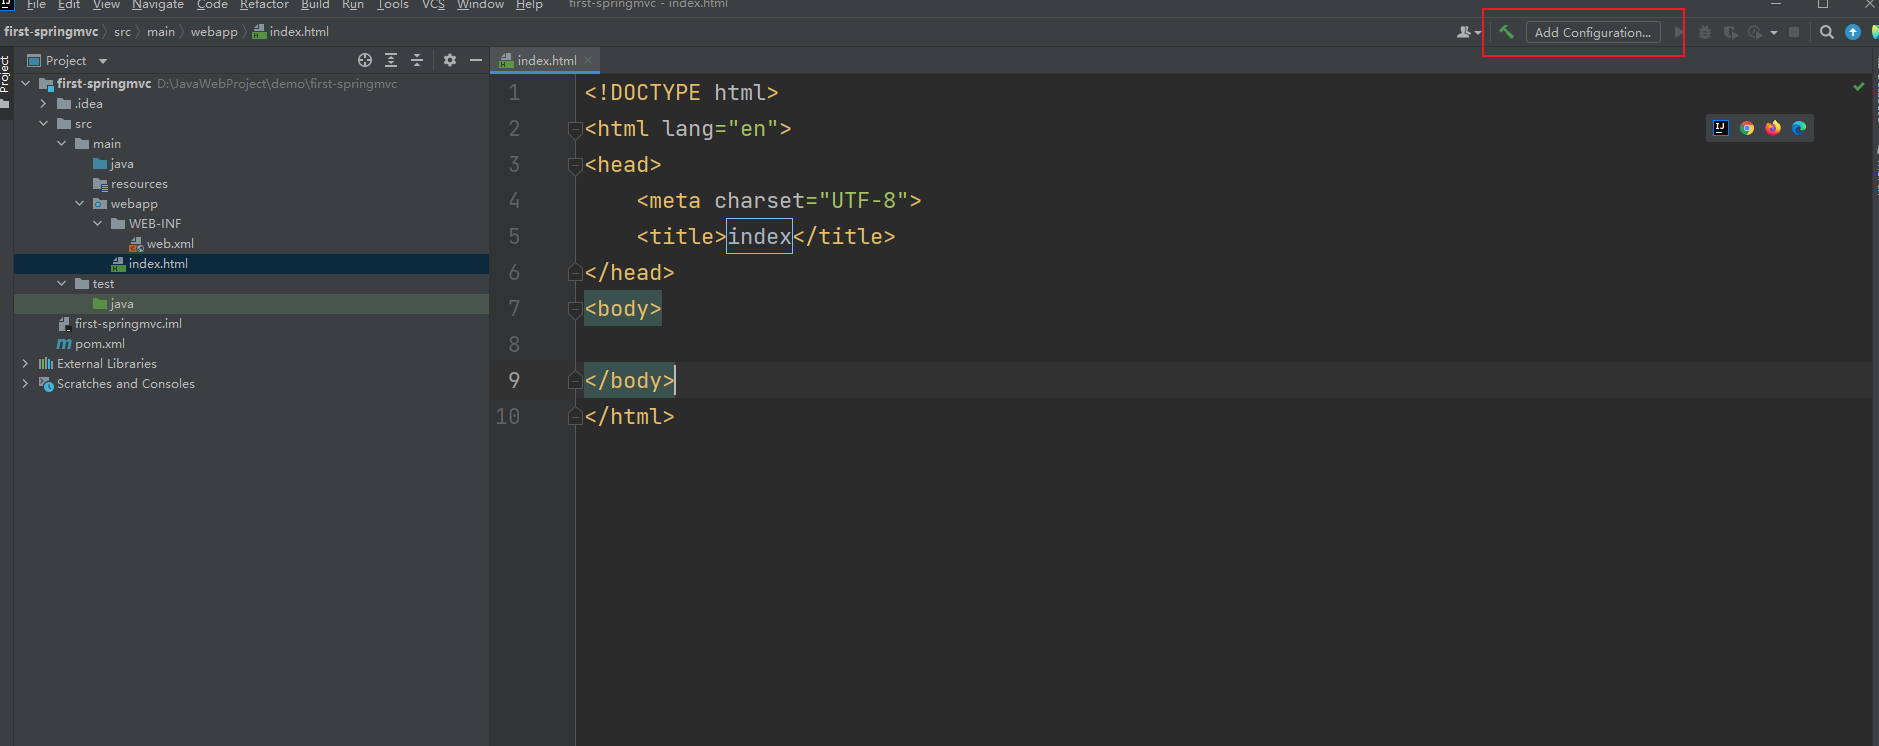
Creating Maven WebApp in IDEA environment
Create an empty Maven project named first springtime, and then configure it as follows:
Add a Web module first (select the module before clicking the plus sign):
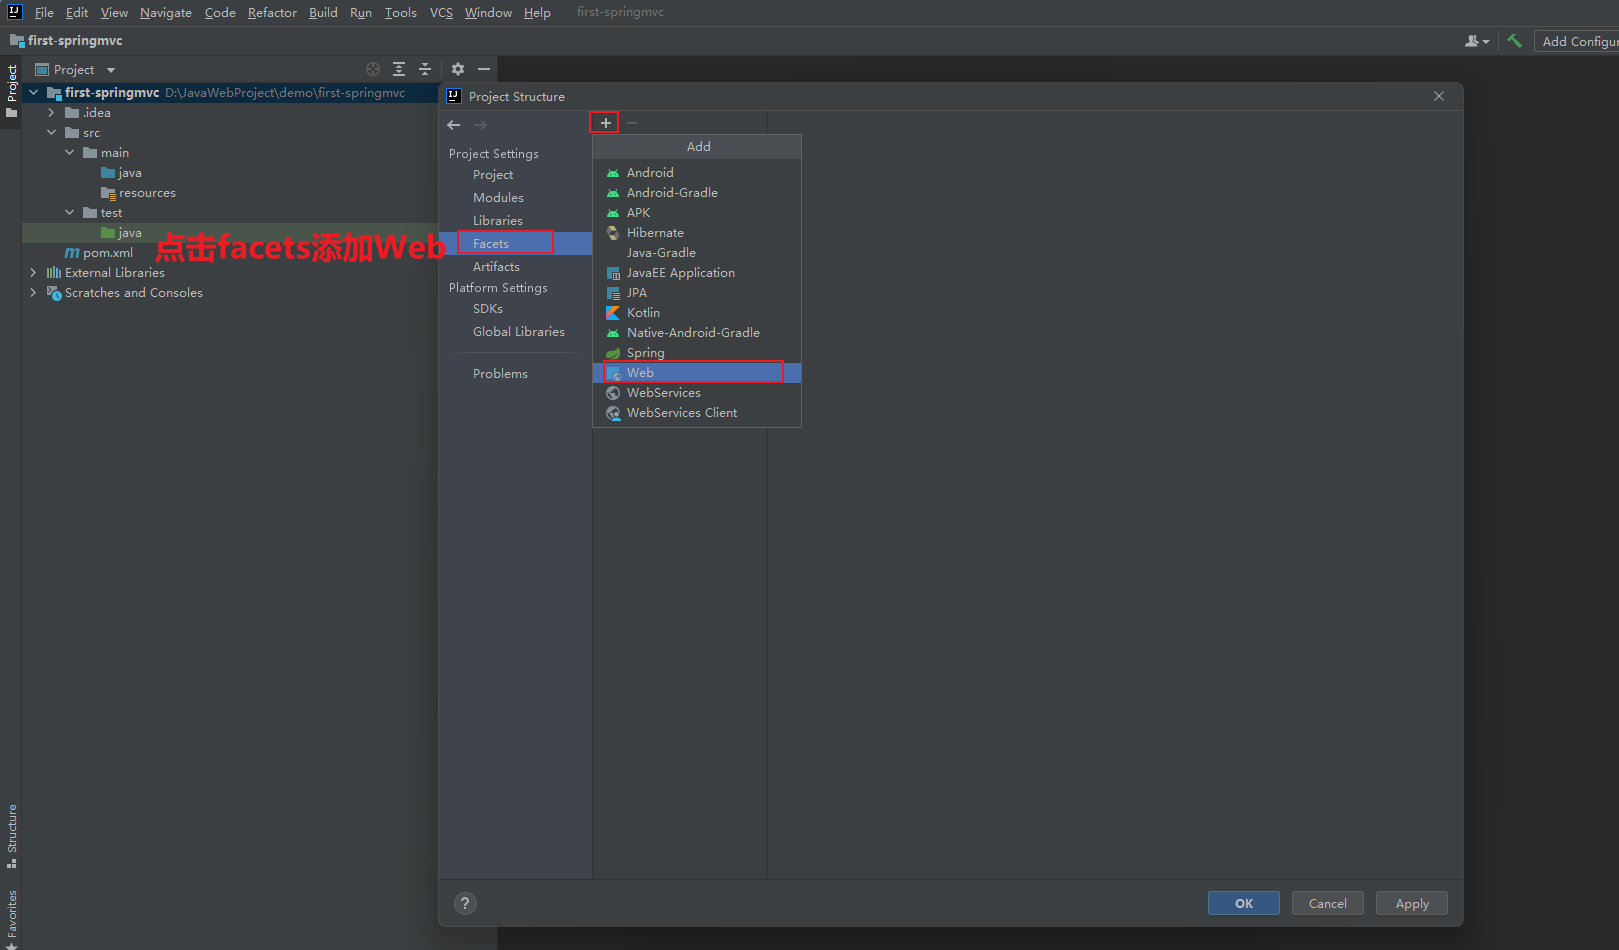
Next, configure the web on the right:
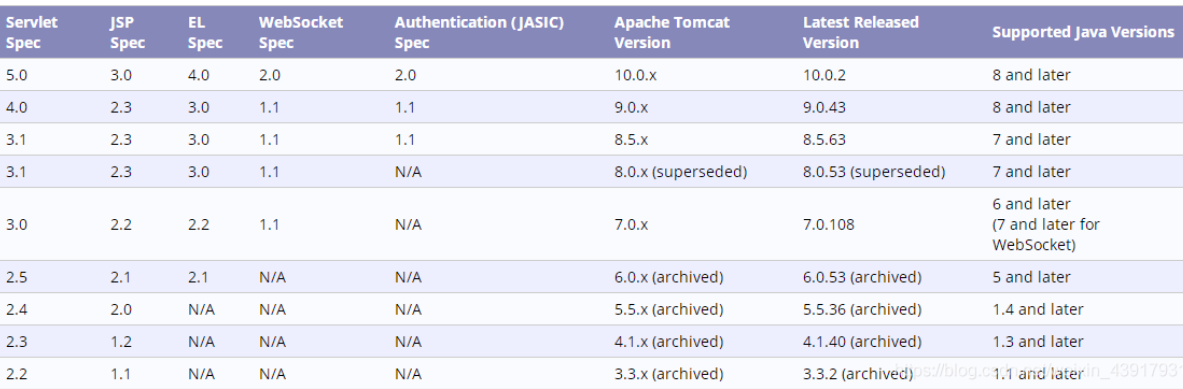
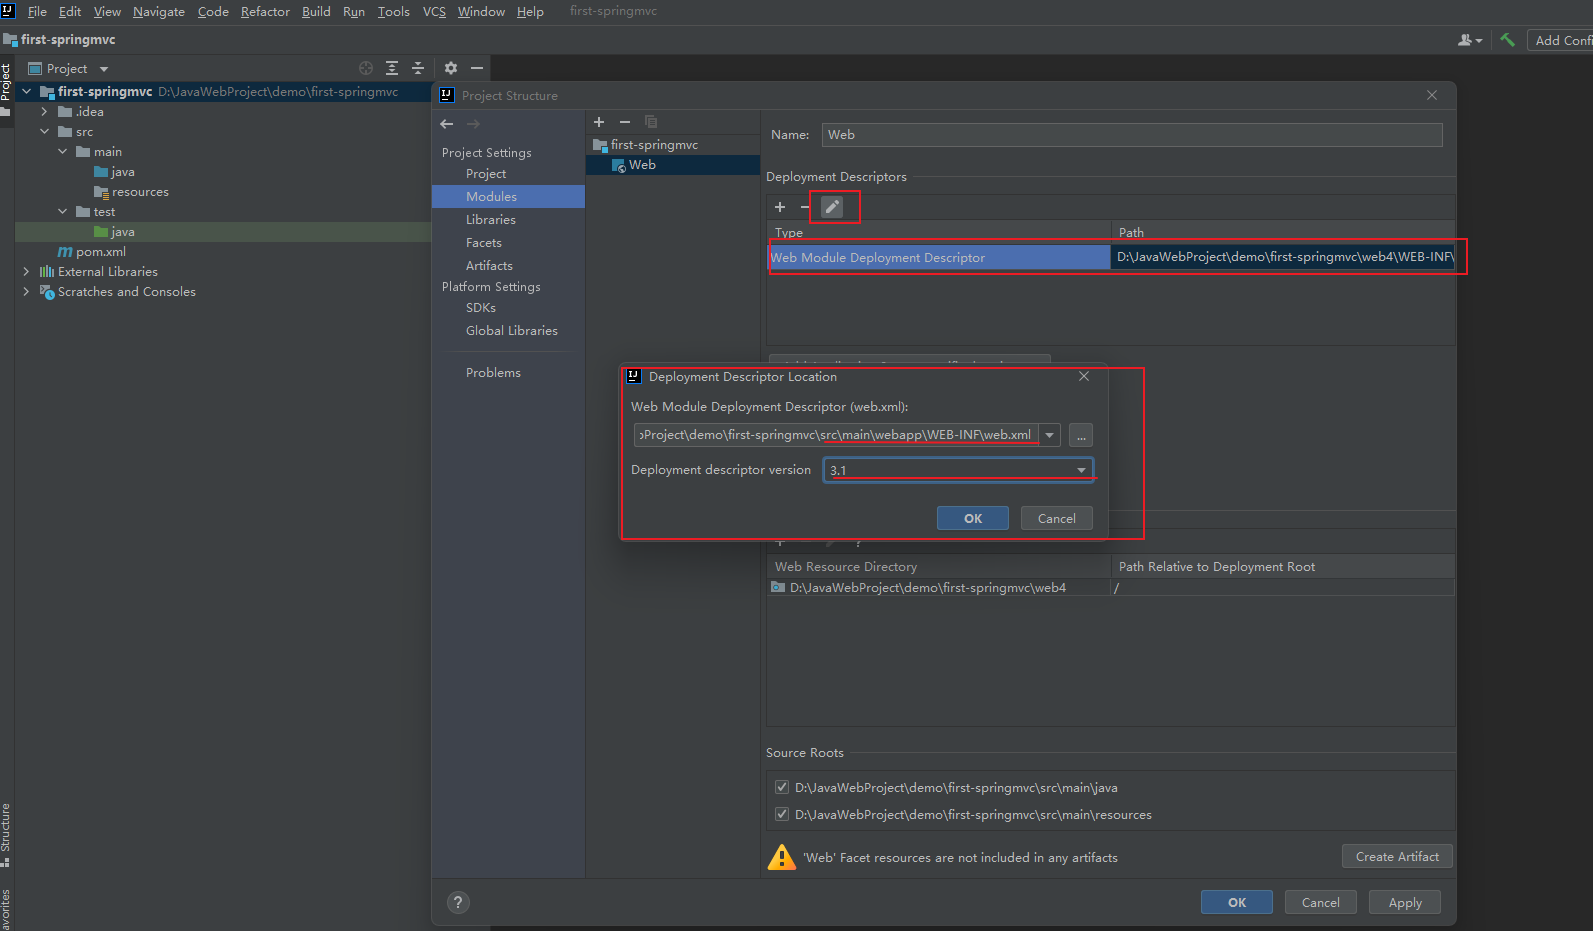
1. First change the address stored in the web directory to the main directory, then change it to src\main\webapp\WEB-INF\web.xml, and then change the version of the web project to 4.0
Note: the version here must correspond to the JDK version and tomcat version, otherwise an error will be reported during operation.
Refer to the following figure for version:
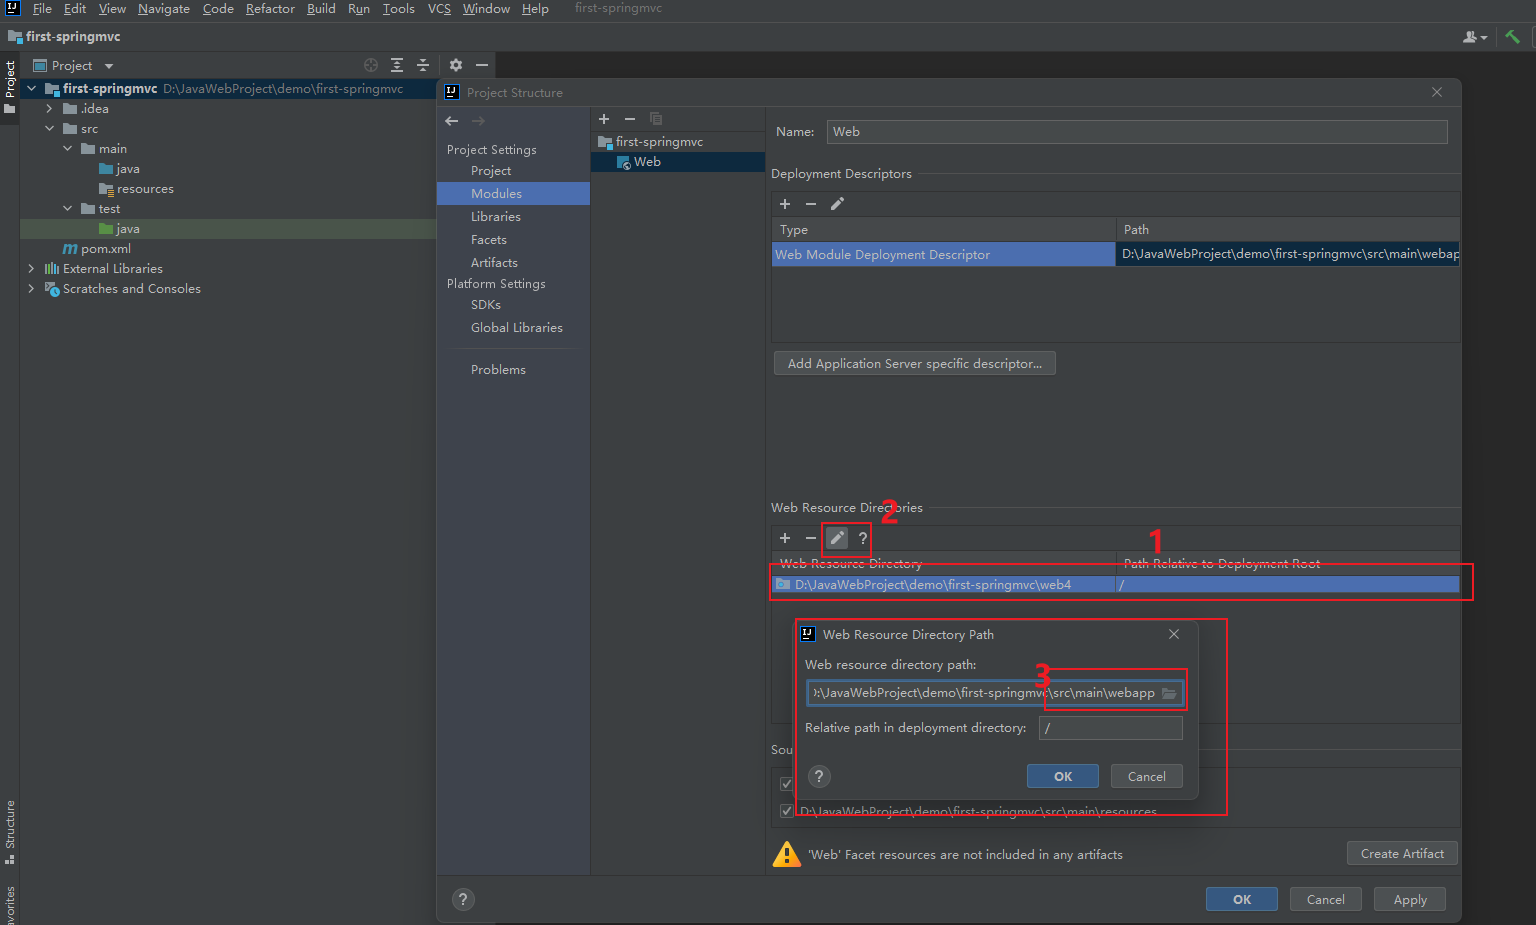
2. Also set the directory for storing pages in src\main\webapp, and then set an application context default / for the application.
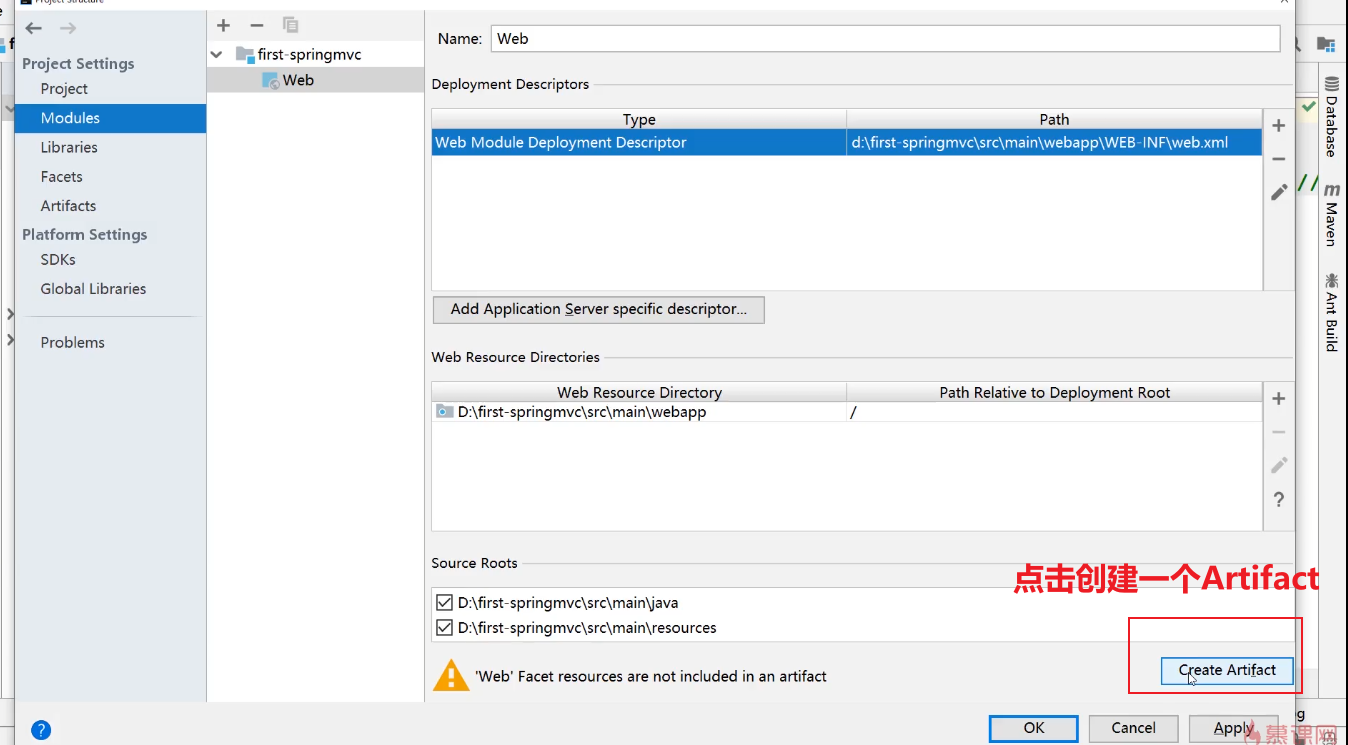
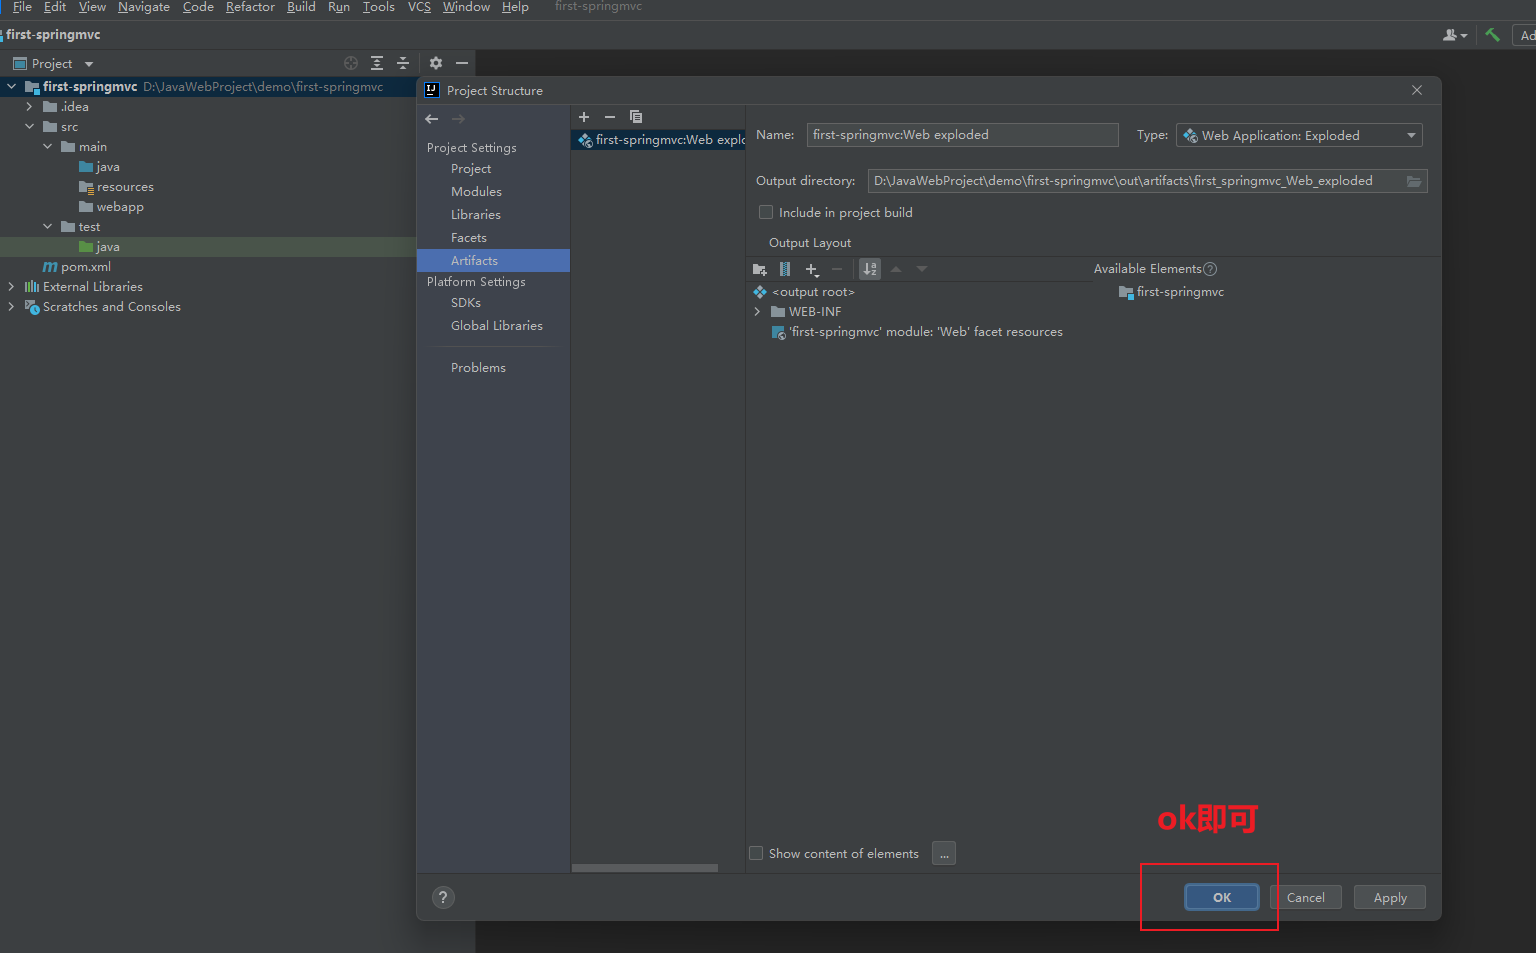
Create Artifact
I won't say more about the configuration below.
The above only configures the web project, and the following is the environment configuration of Spring MVC
Environment configuration of Spring MVC
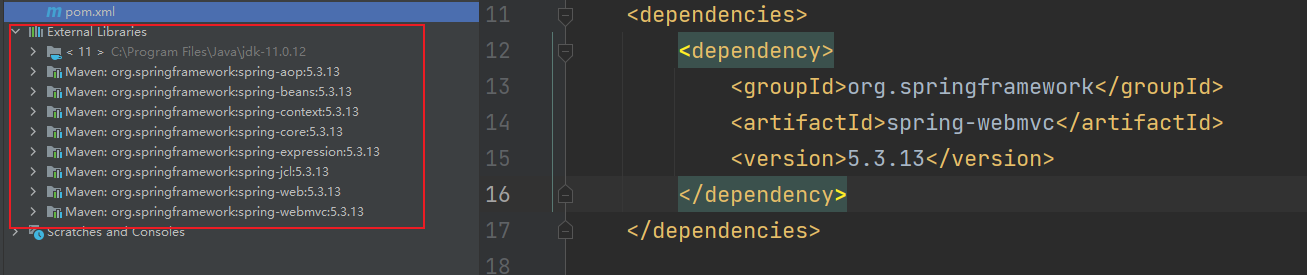
1. Import the dependency spring webmvc in Maven.
Open pom.xml and add the following dependencies:
<dependency>
  <groupId>org.springframework</groupId>
  <artifactId>spring-webmvc</artifactId>
  <version>5.3.13</version>
</dependency>
After adding this dependency, you will find that some underlying packages of spring will be added together.
2. Configure DispatcherServlet in web.xml
DispatcherServlet is the core object in Spring MVC. DispatcherServlet is used to intercept Http requests and call the corresponding Controller method according to the requested URL to complete Http requests.
web.xml:
<?xml version="1.0" encoding="UTF-8"?>
<web-app xmlns="http://xmlns.jcp.org/xml/ns/javaee"
         xmlns:xsi="http://www.w3.org/2001/XMLSchema-instance"
         xsi:schemaLocation="http://xmlns.jcp.org/xml/ns/javaee http://xmlns.jcp.org/xml/ns/javaee/web-app_3_1.xsd"
         version="3.1">

    <!--to configure DispatcherServlet-->
    <servlet>
        <servlet-name>springmvc</servlet-name>
        <servlet-class>org.springframework.web.servlet.DispatcherServlet</servlet-class>
        <!--load applicationContext.xml-->
        <init-param>
            <param-name>contextConfigLocation</param-name>
            <param-value>classpath:applicationContext.xml</param-value>
        </init-param>
        <!--stay web Automatically created when the application starts Spring IoC Container and initialize DispatcherServlet-->
        <load-on-startup>0</load-on-startup>
    </servlet>
    <servlet-mapping>
        <servlet-name>springmvc</servlet-name>
        <!--"/"The representative wants to intercept all requests-->
        <url-pattern>/</url-pattern>
    </servlet-mapping>

</web-app>
Create the applicationContext.xml file in the resources directory. The following is the initial configuration of applicationContext.xml:
applicationContext.xml
<beans xmlns="http://www.springframework.org/schema/beans"
       xmlns:xsi="http://www.w3.org/2001/XMLSchema-instance"
       xmlns:context="http://www.springframework.org/schema/context"
       xmlns:mvc="http://www.springframework.org/schema/mvc"
       xsi:schemaLocation="http://www.springframework.org/schema/beans
            http://www.springframework.org/schema/beans/spring-beans-4.1.xsd
            http://www.springframework.org/schema/context
            http://www.springframework.org/schema/context/spring-context-4.1.xsd
            http://www.springframework.org/schema/mvc
            http://www.springframework.org/schema/mvc/spring-mvc-4.1.xsd">

</beans>
3. In applicationContext.xml, configure the mvc tag of applicationContext
Configure the function of context: component scan tag:
During Spring IoC initialization, automatically create and manage the objects with @ Repository, @ Service, @ Controller, @ Component annotations in the specified package and its sub packages.
<beans xmlns="http://www.springframework.org/schema/beans"
       xmlns:xsi="http://www.w3.org/2001/XMLSchema-instance"
       xmlns:context="http://www.springframework.org/schema/context"
       xmlns:mvc="http://www.springframework.org/schema/mvc"
       xsi:schemaLocation="http://www.springframework.org/schema/beans
            http://www.springframework.org/schema/beans/spring-beans-4.1.xsd
            http://www.springframework.org/schema/context
            http://www.springframework.org/schema/context/spring-context-4.1.xsd
            http://www.springframework.org/schema/mvc
            http://www.springframework.org/schema/mvc/spring-mvc-4.1.xsd">

    <!--Auto scan component,Automatically scan qualified bean-->
    <context:component-scan base-package="com.haiexijun.springmvc"></context:component-scan>
    <!--Enable Spring MVC Annotation development model-->
    <mvc:annotation-driven/>
    <!--Will picture/JS/CSS And other static resources can be excluded to improve execution efficiency-->
    <mvc:default-servlet-handler/>
</beans>
4. Develop Controller
Here, Spring MVC is basically configured. Let's develop a Controller to experience it.
Create a Controller package under com.haiexijun.springmvc, and then create a java class TestController. Add * * @ Controller annotation * * above the class name. It defines a test method, which returns a SUCCESS string. How do you make this method handle requests? We only need to add two annotations to this method@ GetMapping() annotation is used to bind the current method to the URL of a get type request. For example, @ GetMapping("/t") is bound to the URL of localhost/t. enter localhost/t in the address bar to access this method@ The ResponseBody annotation is used to directly output string data to the response without jumping to the page.
package com.haiexijun.springmvc.controller;

import org.springframework.stereotype.Controller;
import org.springframework.web.bind.annotation.GetMapping;
import org.springframework.web.bind.annotation.ResponseBody;

@Controller
public class TestController {
    @GetMapping("/t") //It is used to bind the current method to the URL of a get type request, such as localhost/t
    @ResponseBody  //Function: directly output string data to the response without jumping to the page
    public String test(){
        return "SUCCESS";
    }

}
The following is another configuration to add maven's dependencies to the lib directory when exporting the project:
After selecting all, right-click put.


Run start. Enter localhost:8888/t to print SUCCESS successfully

2, Spring MVC data binding
1.URL Mapping
URL Mapping refers to binding the URL to the Controller method. By binding the URL to the method, Spring MVC can expose the service through Tomcat.
We can understand that as a web application, all exposed interfaces are URLs, and we execute the back-end program code through URLs.
URL Mapping annotation
@RequestMapping bind @ GetMapping bind Get request @ PostMapping bind Post request
The following is a demonstration of these three annotations:
To create a new controller class, write the following code to test:
package com.haiexijun.springmvc.controller;

import org.springframework.stereotype.Controller;
import org.springframework.web.bind.annotation.GetMapping;
import org.springframework.web.bind.annotation.PostMapping;
import org.springframework.web.bind.annotation.ResponseBody;

@Controller
public class URLMappingController {

    @GetMapping("/g")
    @ResponseBody
    public String getMapping(){
        return "this is get method";
    }

    @PostMapping("/p")
    @ResponseBody
    public String postMapping(){
        return "this is post method";
    }

}
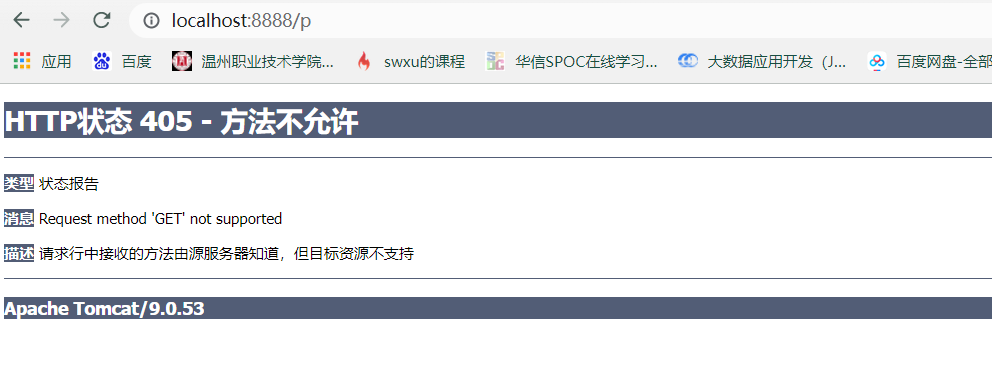
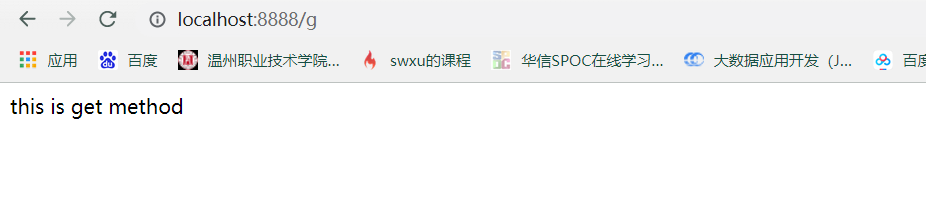
After running the project, open the browser and enter the corresponding url address respectively. The get request is responded successfully. The post request is reported as 405 error because it cannot be accessed through the browser.
We can verify the post request by writing a form. There is no demonstration here.
**@RequestMapping can be written before the class name. In most cases, this annotation is used to set the URL globally. As we all know, as a URL, it may have a multi-level structure** For example, you want all mapped addresses in the current Controller to start with / um. If @ RequestMapping is not used, GetMapping and PostMapping should be changed to "/ um/g" and "/ um/p"
package com.haiexijun.springmvc.controller;

import org.springframework.stereotype.Controller;
import org.springframework.web.bind.annotation.GetMapping;
import org.springframework.web.bind.annotation.PostMapping;
import org.springframework.web.bind.annotation.RequestMapping;
import org.springframework.web.bind.annotation.ResponseBody;

@Controller
@RequestMapping("/um")
public class URLMappingController {

    @GetMapping("/g")
    @ResponseBody
    public String getMapping(){
        return "this is get method";
    }

    @PostMapping("/p")
    @ResponseBody
    public String postMapping(){
        return "this is post method";
    }
}
@RequestMapping can also be written in front of the method name, indicating that the method does not distinguish between post requests and get requests. That is, all types of requests can access the URL mapped by this method. However, it is not recommended to use @ RequestMapping. It can also be configured to divide post requests and get requests. Just configure value and method.
    @RequestMapping(value = "/g",method = RequestMethod.GET)
    @ResponseBody
    public String getMapping(){
        return "this is get method";
    }
2.Controller method parameters receive request parameters
In most cases, when a request is sent, it contains some data, which is usually reflected by the request parameters. For example, when users log in, they need to enter the user name and password, and these data will be sent to the Controller method in the form of post request parameters.
Common practices for receiving request parameters: you can receive parameters through the Controller method or use Java beans to receive data.
The following is the request parameters received through the Controller method parameters. The method will automatically perform type conversion.
There is a small note for get requests. If the request parameter entered in the get request is manager_ Name (localhost:8888/g?manager_name=lily), how to write the parameters in the controller method? java does not support manager_ Naming rules for name. At this time, a new annotation will be used: @ RequestParam
This annotation is written in front of the parameter and is dedicated to the description of this special parameter. The @ RequestParam also passes in the original request parameter.
    @RequestMapping(value = "/g",method = RequestMethod.GET)
    @ResponseBody
    public String getMapping(@RequestParam("manager_name") String managerName){
        return "this is get method";
    }
In fact, if the original parameter name is added in the annotation, the subsequent request parameters can be any, such as abc.
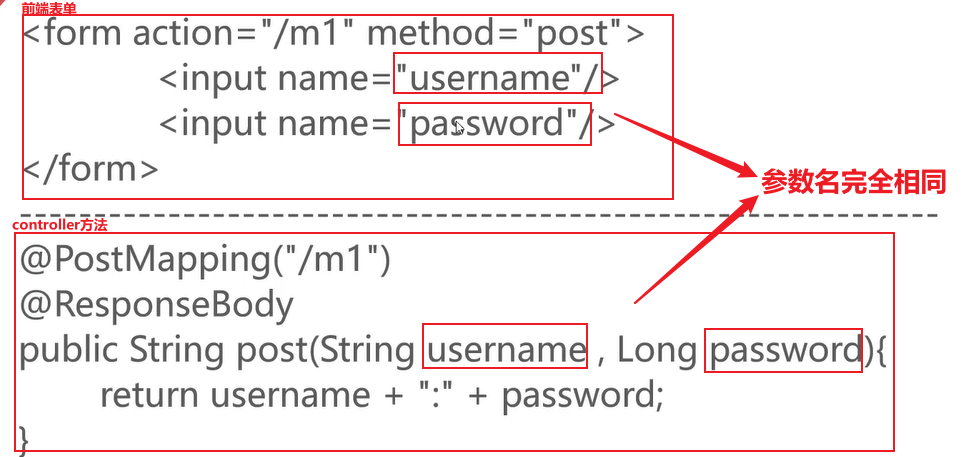
##3. The controller entity object receives request parameters (using javaBean to receive request parameters). Assuming that there are very many input items in a form, the problem arises. Should I write the parameters of these more than 100 input items in the controller method one by one? Imagine how long the method statement should be? It is very difficult to maintain. To solve this problem, Spring MVC allows us to save the data we input in the foreground as a specified javaBean at one time. In one step, the transformation from data to object is completed.
Here are the specific steps:
Create an entity package and create a User entity class under the package. This entity class is a standard javaBean.
package com.haiexijun.springmvc.entity;

public class User {
    private String username;
    private Long password;

    public String getUsername() {
        return username;
    }

    public void setUsername(String username) {
        this.username = username;
    }

    public Long getPassword() {
        return password;
    }

    public void setPassword(Long password) {
        this.password = password;
    }
}
Write a form:
<form action="/um/p1" method="post">
    <input type="text" name="username">
    <input type="password" name="password">
    <input type="submit" value="Submit">
</form>
Then write a method in the Controller:
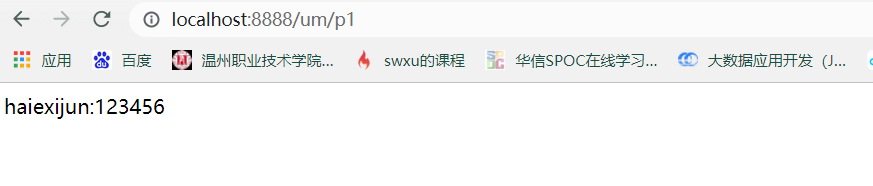
When the program is running, Spring MVC will automatically create the User object, and according to the previous request parameters, it will find the attribute with the same name in the entity and assign values to the attributes in the User entity. To ensure that the parameter name passed in from the foreground is consistent with the attribute name, and for numerical types, the data passed in from the foreground must be successfully converted to the type corresponding to the entity attribute.
    @PostMapping("/p1")
    @ResponseBody
    public String postMapping1(User user){
        return user.getUsername()+":"+user.getPassword();
    }
Start operation:
3. Receive form composite data
The following is a case to demonstrate composite data acquisition. For example, data from check boxes.
Knowledge: first, we will use array or List to receive composite data in the request. Use @ RequestParam to set the default value for the parameter. Use the Map object to receive request parameters and precautions.
Learn from the code below:
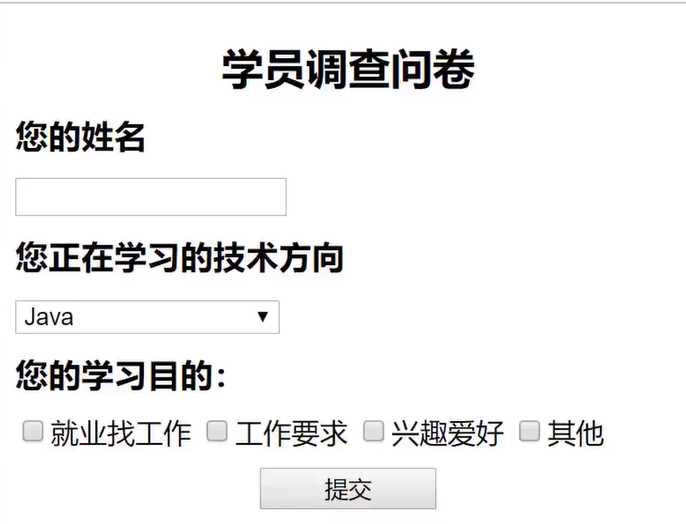
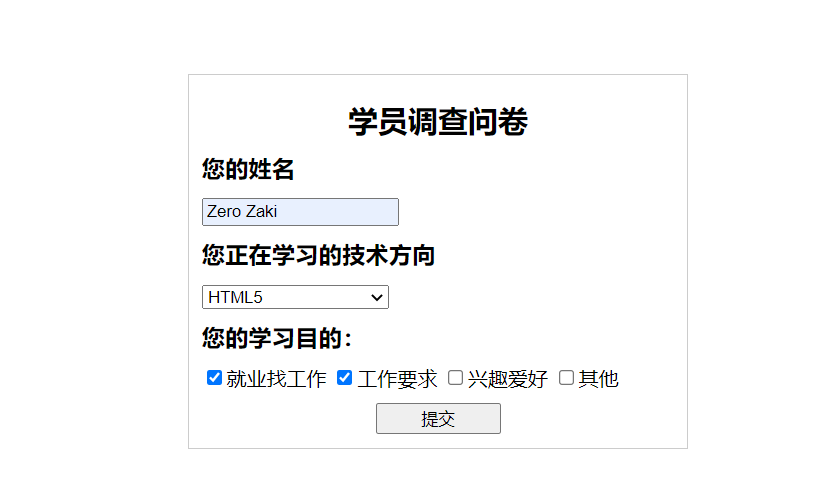
The following is the code of the front-end html form:
<!DOCTYPE html>
<html lang="en">
<head>
    <meta charset="UTF-8">
    <title>Student questionnaire</title>
    <style>
        .container {
            position: absolute;
            border: 1px solid #cccccc;
            left: 50%;
            top: 50%;
            width: 400px;
            height: 300px;
            margin-left: -200px;
            margin-top: -150px;
            box-sizing: border-box;
            padding: 10px;
        }
        h2{
            margin: 10px 0px;
            text-align: center;
        }
        h3{
            margin: 10px  0px;
        }
    </style>
</head>
<body>
    <div class="container">
        <h2>Student questionnaire</h2>
        <form action="./apply" method="post">
        <h3>Your name</h3>
        <input name="name" class="text"  style="width: 150px">
        <h3>Technical direction you are learning</h3>
        <select name="course" style="width: 150px">
            <option value="java">Java</option>
            <option value="h5">HTML5</option>
            <option value="python">Python</option>
            <option value="php">PHP</option>
        </select>
        <div>
            <h3>Your learning objectives:</h3>
            <input type="checkbox" name="purpose" value="1">Employment and job hunting
            <input type="checkbox" name="purpose" value="2">Job requirements
            <input type="checkbox" name="purpose" value="3">hobby
            <input type="checkbox" name="purpose" value="4">other
        </div>
        <div style="text-align: center;padding-top:10px" >
            <input type="submit" value="Submit" style="width:100px">
        </div>
        </form>

    </div>
</body>
</html>
Create a FormController class under the Controller package. Write the following code to process the form:
package com.haiexijun.springmvc.controller;
import org.springframework.stereotype.Controller;
import org.springframework.web.bind.annotation.PostMapping;
import org.springframework.web.bind.annotation.ResponseBody;
@Controller
public class FormController {
//Receive form composite data through an array
@PostMapping("/apply")
@ResponseBody
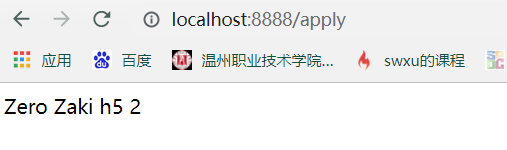
public String apply(String name,String course,Integer[] purpose){
return name+" "+course+" "+purpose.length;
}
}
Start operation:
Here is another small knowledge point. As the form above, if we don't fill in anything. Then, when receiving, the parameter in the controller will be an empty value, and the program is likely to produce an error when performing subsequent operations on the empty value. To solve this problem, we can also set default values for parameters that may not exist. The @ RequestParam annotation is also used here to set the default value. As follows:
    @PostMapping("/apply")
    @ResponseBody
    public String apply(@RequestParam(value = "name",defaultValue = "haiexijun") String name, String course, Integer[] purpose){
        return name+" "+course+" "+purpose.length;

    }
Above, the default value of name is set to haiexijun. When the name item of the form is the fill parameter, the default value will be haiexijun.
Let's go back to the acceptance of composite data. There is no problem receiving data as an array, but we have found that arrays are actually used less and less. Because java provides a more effective data structure, that is, collection. You can save data through the List collection. In fact, the usage is similar. By default, ArrayList is used to store data. The difference is that to receive the matching data with the List set, add the @ RequestParam annotation in front, and write the code below:
    //Receive form composite data through List
    @PostMapping("/apply")
    @ResponseBody
    public String apply(String name, String course, @RequestParam List<Integer> purpose){
        return name+" "+course+" "+purpose.size();

    }
The above parameters are received separately. Let's try to receive them in the form of objects.
Create a new entity class Form under the entity package
package com.haiexijun.springmvc.entity;

import java.util.List;

public class Form {
    private String name;
    private String course;
    private List<Integer> purpose;

    public String getName() {
        return name;
    }

    public void setName(String name) {
        this.name = name;
    }

    public String getCourse() {
        return course;
    }

    public void setCourse(String course) {
        this.course = course;
    }

    public List<Integer> getPurpose() {
        return purpose;
    }

    public void setPurpose(List<Integer> purpose) {
        this.purpose = purpose;
    }
}
Modify the apply method in the controller:
    //Receive form composite data through List
    @PostMapping("/apply")
    @ResponseBody
    public String apply(Form form){
        return form.getName()+" "+form.getCourse()+" "+form.getPurpose().size();
    }
Next, expand an additional knowledge point to receive form data with Map. The @ RequestParam annotation should also be added, and the parameters passed from the form cannot have composite data, otherwise only the first item of composite data will be displayed.
    //Receive form composite data through List
    @PostMapping("/apply")
    @ResponseBody
    public String apply(@RequestParam Map map){
        return (String) map.get("name");
    }
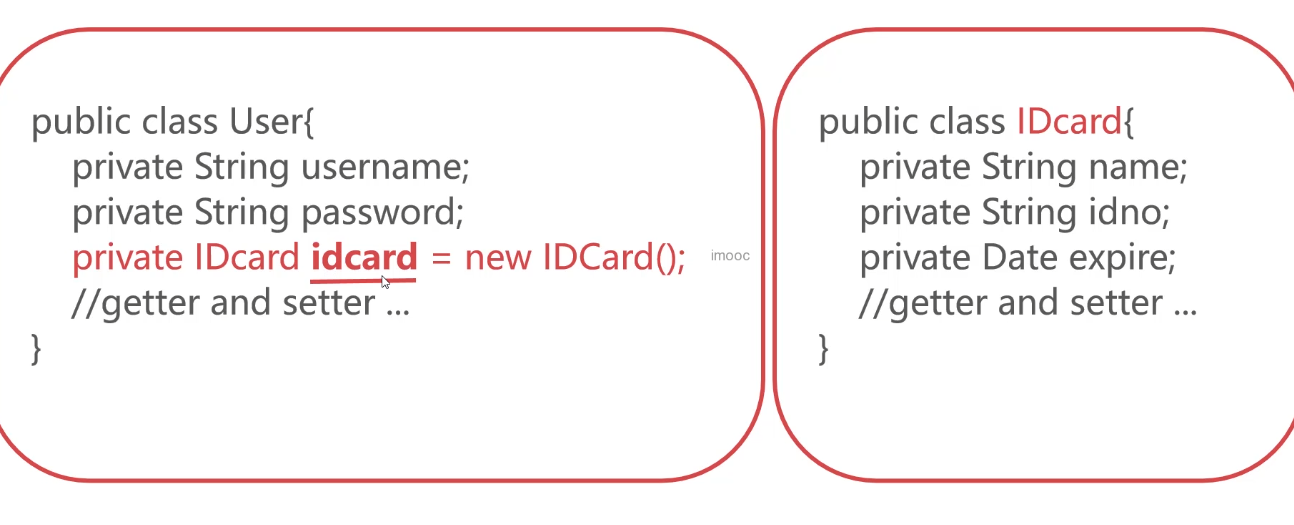
4. Associated object assignment
An associated object refers to another object in an object. We need to assign a value to the referenced object.
Let's use a case to understand
When we go online, some key operations are often authenticated by real names. For example, we go to 12306 to buy tickets. Besides entering user names and passwords, you have to register your name, ID number and expiration date of your ID card. Wait for this information. At this time, the IdCard object association will be assigned.
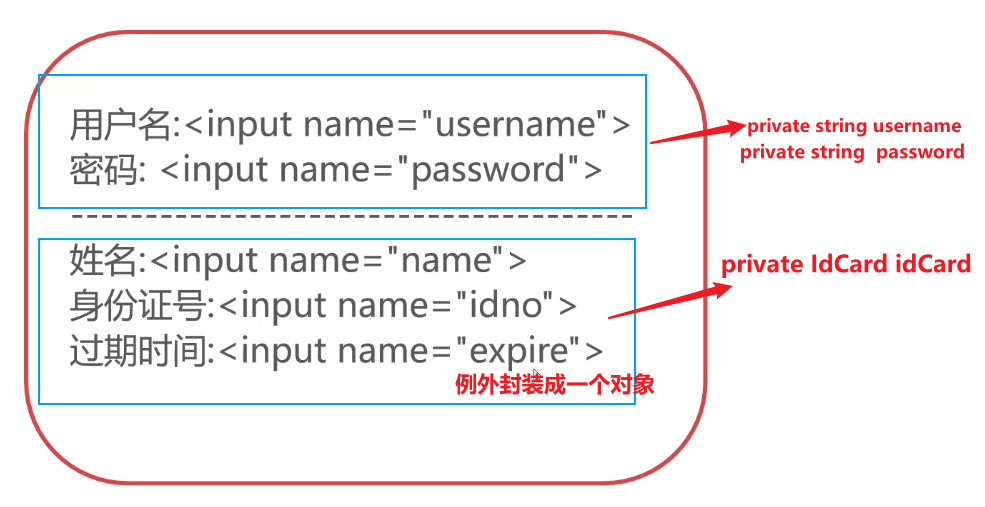
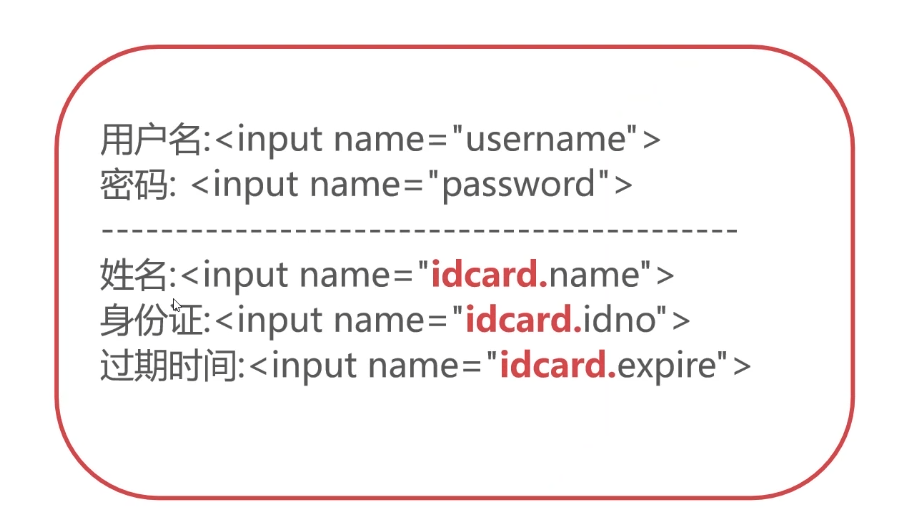
We need to modify the front-end form to change the relevant input part of the original ID card into the form of object name and attribute name.
5. Date type conversion
This section learns a very practical technique to receive date type data in spring MVC. We all know that the expression of date is different all over the world. How do we receive the date data in the program and convert it into a date object?
<form action="/apply" method="post">
    <input type="text" name="createTime">
    <input type="submit" value="Submit">
</form>
The above is a simple form in the front end. Enter the date, and then perform new processing in the following methods in the controller:
    @PostMapping("/apply")
    @ResponseBody
    public String apply(Date createTime){
        return createTime;
    }
But it obviously doesn't work. spring mvc cannot convert it to a date type
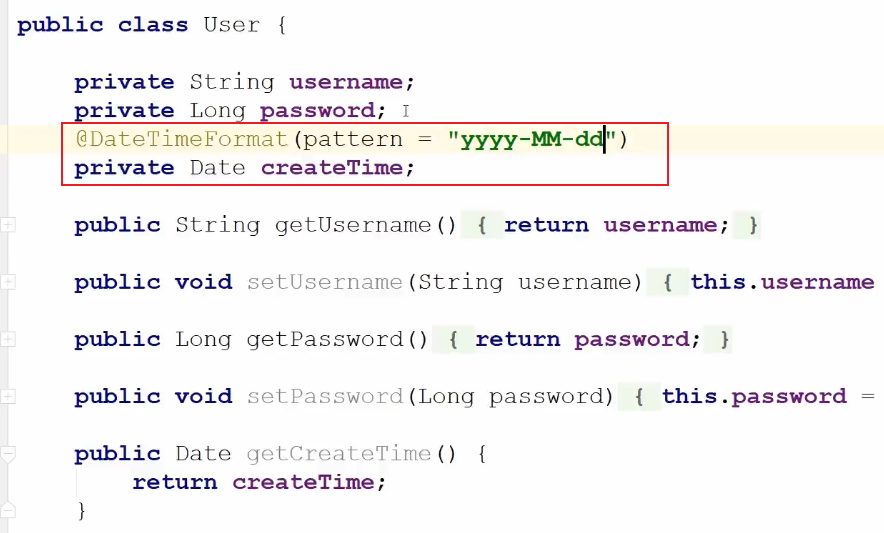
The @ DateTimeFormat annotation must be added. This annotation is dedicated to converting the date string passed in from the foreground to date format. The pattern in the annotation needs to be passed into a specific date format.
    @PostMapping("/apply")
    @ResponseBody
    public String apply(@DateTimeFormat(pattern = "yyyy-MM-dd") Date createTime){
        return createTime.toString();
    }
Run the test below:


If you want to receive parameters in a javaBean, you need to add the @ DateFormat annotation on the Date type parameters in the Bean.
3, Solve the problem of Chinese garbled code
In this section, learn how to solve the problem of Chinese garbled code in Spring MVC.
The default character set used by Tomcat is ISO-8859-1, which belongs to the Western European character set. The core idea to solve garbled code is to convert ISO-8859-1 to UTF-8. UTF-8 character set shall be set for both request and response in Controller.
Chinese garbled code configuration:
Get request garbled - add URIEncoding attribute to server.xml (in tomcat).

Post request garbled code - configure the characterencoding filter in web.xml (project) to solve the problem of Chinese garbled code in post requests through the filter provided by spring.
<web app xmlns="http://xmlns.jcp.org/xml/ns/javaee"
         xmlns:xsi="http://www.w3.org/2001/XMLSchema-instance"
         xsi:schemaLocation="http://xmlns.jcp.org/xml/ns/javaee http://xmlns.jcp.org/xml/ns/javaee/web-app_4_0.xsd"
         version="4.0">
	   ···············
	   ················
    <filter>
        <filter-name>characterFilter</filter-name>
        <filter-class>org.springframework.web.filter.CharacterEncodingFilter</filter-class>
        <init-param>
            <param-name>encoding</param-name>
            <param-value>UTF-8</param-value>
        </init-param>
    </filter>

    <filter-mapping>
        <filter-name>characterFilter</filter-name>
        <url-pattern>/*</url-pattern>
    </filter-mapping>

</web app>
Response response garbled code - Spring configures the StringHttpMessageConverter, which is a message converter to and from Chinese for response output.
Open the applicationContext.xml file and add the following code in < MVC: annotation driven >:
<beans xmlns="http://www.springframework.org/schema/beans"
       xmlns:xsi="http://www.w3.org/2001/XMLSchema-instance"
       xmlns:context="http://www.springframework.org/schema/context"
       xmlns:mvc="http://www.springframework.org/schema/mvc"
       xsi:schemaLocation="http://www.springframework.org/schema/beans
            http://www.springframework.org/schema/beans/spring-beans-4.1.xsd
            http://www.springframework.org/schema/context
            http://www.springframework.org/schema/context/spring-context-4.1.xsd
            http://www.springframework.org/schema/mvc
            http://www.springframework.org/schema/mvc/spring-mvc-4.1.xsd">

    <!--Auto scan component,Automatically scan qualified bean-->
    <context:component-scan base-package="com.haiexijun.springmvc"></context:component-scan>
    <!--Enable Spring MVC Annotation development model-->
    <mvc:annotation-driven>
        <mvc:message-converters>
            <bean class="org.springframework.http.converter.StringHttpMessageConverter">
                <property name="supportedMediaTypes">
                    <list>
                        <value>text/html;charset=utf-8</value>
                    </list>
                </property>
            </bean>
        </mvc:message-converters>
    </mvc:annotation-driven>
    <!--Will picture/JS/CSS And other static resources can be excluded to improve execution efficiency-->
    <mvc:default-servlet-handler/>
</beans>
Basically, these three departments should be set up in any of our projects.
4, Response output
I've been learning how to receive data in a request and how to map URL s. In this section, I'll learn how to output results externally.
There are two main ways to generate results in response. The first is to add @ ResponseBody annotation to our Controller method to generate response text. It is often not enough for us to generate text. We often need to display the corresponding page. The ModelAndView object is used to render the output using the template engine.
1.@ResponseBody
@The ResponseBody directly generates the data of the response body. The process does not involve any views. The @ ResponseBody can generate data in standard string / JSON/XML and other formats@ ResponseBody is affected by StringHttpMessageConverter.
2. Usage of modelandview object
During the development of our project, we often need page rendering. If we want to perform page rendering in Spring MVC, we need to use the ModelAndView object. The so-called ModelAndView object refers to the "model (data) and View (Interface)" object. The function of this object is to bind the model and View. Through the ModelAndView object, you can bind the containing data object to the template engine. The default View in Spring MVC is JSP, and other template engines can also be configured.
Here's a little demonstration:
    //The return value type is ModelAndView
    @GetMapping("/view")
    public ModelAndView showView(){
        //A jsp page is passed in the constructor
        ModelAndView mav=new ModelAndView("view.jsp");
        return mav;
    }
Then create the view.jsp page.
<%@ page contentType="text/html;charset=UTF-8" language="java" %>
<html>
<head>
    <title>Title</title>
</head>
<body>
<h1>I am view page</h1>
</body>
</html>
After the browser enters the URL address:

In the above case, you may think it's no big deal. In fact, you can render the parameters passed in the method and output them.
The following explains the changes:
    @GetMapping("/view")
    public ModelAndView showView(Integer userId){
        //A jsp page is passed in the constructor
        ModelAndView mav=new ModelAndView("view.jsp");
        User user=new User();
        if (userId==1){
            user.setUsername("lily");
        }else if (userId==2){
            user.setUsername("smith");
        }
        mav.addObject("u",user);
        return mav;
    }
The above receives the parameters of a get request, and then passes the parameters into the JSP for rendering.
<%@ page contentType="text/html;charset=UTF-8" language="java" %>
<html>
<head>
    <title>Title</title>
</head>
<body>
<h1>I am view page</h1>
<hr/>
<h2>uaername:${u.username}</h2>
</body>
</html>
But these are still far from enough. Let's learn more about ModelAndView.
As a data binding, the ModelAndView object provides an addObject() method, and the properties set by the addObject() method are stored in the current request by default. The stored object can be any java object. The ModelAndView object uses request forwarding to the page by default.
If you want to use response redirection, you need to use new ModelAndView("redirect:/xxx.jsp"), that is, add redirect
ModelAndView can not write the jump address in the constructor when creating the object. After creating the object, you can set the jump view address through the setViewName() method of ModelAndView object.
 ModelAndView mav=new ModelAndView();
 mav.setViewName("/view.jsp")
Next, let's extend a knowledge point by using String and ModelMap objects to realize a function similar to ModelAndView.
The Controller method returns String:
1. The method is annotated with @ ResponseBody, and the spring MVC annotation responds to the String itself.
2. The @ ResponseBody annotation does not exist in the method. Spring MVC processes strings as views (pages)
    @GetMapping("/view")
    public String showView(Integer userId, ModelMap modelMap){
        String view="/view.jsp";
        User user=new User();
        if (userId==1){
            user.setUsername("lily");
        }else if (userId==2){
            user.setUsername("smith");
        }
        //It is exactly the same as the addObject of ModelAndView
        modelMap.addAttribute("u",user);
        return view;
    }
5, Spring MVC integrates FreeMarker
The steps of integration are mainly divided into three steps:
1.pox.xml introduces freemaker's maven dependency and a support package for Spring context. The support package of Spring context should be consistent with the Spring webmvc version.
    <dependencies>
        <dependency>
            <groupId>org.springframework</groupId>
            <artifactId>spring-webmvc</artifactId>
            <version>5.3.13</version>
        </dependency>
        <dependency>
            <groupId>org.freemarker</groupId>
            <artifactId>freemarker</artifactId>
            <version>2.3.31</version>
        </dependency>
        <dependency>
            <groupId>org.springframework</groupId>
            <artifactId>spring-context-support</artifactId>
            <version>5.3.13</version>
        </dependency>
    </dependencies>
2. Enable Freemarker template engine
Add the following configuration in applicationContext.xml:
    <bean id="ViewResolver" class="org.springframework.web.servlet.view.freemarker.FreeMarkerViewResolver">
        <!--Set response output,Solve Chinese garbled code-->
        <property name="contentType" value="text/html;charset=utf-8"/>
        <!--appoint FreeMarker Template file extension-->
        <property name="suffix" value=".ftl"/>
    </bean>
3. Configure Freemarker parameters
Add the following configuration in applicationContext.xml:
    <bean id="freemarkerConfig" class="org.springframework.web.servlet.view.freemarker.FreeMarkerConfigurer">
        <!--Set the directory where the template is saved-->
        <property name="templateLoaderPath" value="/WEB-INF/ftl"/>
        <!--Other settings-->
        <property name="freemarkerSettings">
            <props>
                <!--set up Freemarker Character set used in script and data rendering-->
                <prop key="defaultEncoding">UTF-8</prop>
            </props>
        </property>
    </bean>
For specific use, future cases will be used in demonstration.