preface
Hello, my friends. I've worked hard this time to bring you a project that has been absolutely fruitful.
The analysis is in place. It is also the first time to write such a long article. I look forward to your feedback ✨✨
This article is right Stop B Shangsi Valley greedy snake project Complete parsing of.
The original video is very good for TypeScript. It is recommended to watch it when you have time. For small partners with insufficient time
The purpose of this article is to let everyone get a big harvest in less time.
The construction of the project environment is a difficulty. If the partners can't understand it, they can study the video to ensure that relevant knowledge points will be mentioned in the video. This is very helpful for the code writing process, but it will not affect the output of the final code. (it means that if you can't understand it, just throw it up with my integrated code).
You can leave a message directly in the comment area or send a private letter. I'll send you a complete project directly for comparative research.
1. Preparation stage:
VSCode is used to write the program.
You need to have a general knowledge of HTML, CSS and JavaScript.
For typescript, node JS has a preliminary understanding.
Master preprocessor less
The packaging tool webpack collates the code
The project will not be compatible with old browsers. Try to use chrome browser to verify the effect
2. Project analysis:
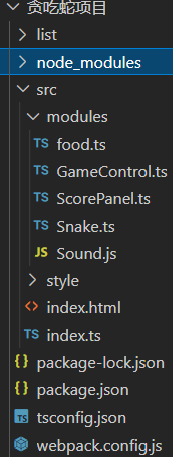
There are three class objects: snake, food and scene. And set the control module
To prepare four js sub modules, finally set up an index module for integration
Sound.js is the BGM I set. You can also set one as an ornament
1. Scenario module requirements
Style and structure:
1. It has a long and wide container, which is divided into the scene of Snake Movement and the upper and lower plates of the scoreboard
2. Set the boundary line in the scene where the snake moves
3. The score board records the score and level of food eaten by the snake (the higher the level, the faster the snake speed)
Logic:
1. When the snake eats food, the score will increase by one point, and each score level will increase by one level
2. There is an upper limit for the grade
3. The level is related to the moving speed of the snake
2. Food module requirements
Style and structure: in a scene where snakes move
Logic:
1. The start is automatically generated at any position in the scene
2. After the snake eats it, it disappears and refreshes in a new position
3. Module requirements
Style and structure:
1. The snake is in the moving scene as a whole
2. The snake is divided into two parts: the head and the body
Logic:
1. At the beginning, only the snake's head, and the snake's body rises by one section every time it eats food
2. The snake head touches his body or the boundary line in the scene module. The game ends
3. The snake can only change its direction and can't stop.
4. Control module requirements
Logic:
1. Press any key to start the game
2. Only four direction keys can be used to change the direction of the snake
3. It can detect whether the snake dies and whether the snake eats food
4. Control whether the scores and grades increase accordingly, and whether the food is refreshed
The above are the general requirements to be realized. The author gives some optimization directions here, which you can realize by yourself:
1. Beautification of snake, food, scene and page
2. Add the pause function,
3. Add BGM, sound effects, etc
4. Scene complexity improvement: such as randomly generating ground spikes, dynamically adjusting scene size, etc
5. Press the space to build the acceleration function
6. Add automatic restart function
7. With the improvement of scores, encouraging words appear, death appears, and the game end text style appears
8. Change to bean eater
3. Project construction
1. Configuration file of TS to JS
 //With this file, one tsc instruction can directly compile all ts files, which is the ts configuration file
    //Extensions defines which to inherit
    //Path: * * indicates any directory * indicates any file
{
  //Include (specify which ts files need to be compiled)
  //Path: * * indicates any directory, * indicates any file
    "include":[
        "./'You're going to be compiled ts The path to the root directory of the file'/**/*"
    ],
    //Compiler options
    "compilerOptions":{
        //Specifies the modular specification to use
        "module":"ES2015",
        //target: the version of ES to be compiled
        "target":"ES2015",
        //Strict mode on
        "strict":true,
        //Error codes are not compiled
        "noEmitOnError":false
    }
}
main points:
1. We want to create a project named tsconfig JSON file as configuration file
2. Its function is to convert all our ts files under the project into js files when we open the project in the form of integrated terminal and enter the tsc instruction.
3. This document mainly specifies some specifications for ts to translate js
4. If you do not write anything, you can just create this file, because the tsc command cannot be used without creating this file.
5. The TSC command can only be compiled once. tsc -w means continuous monitoring and will be compiled automatically later
6. It is not necessary to compile with tsc command when using webpack. As will be discussed below
2. Prepare node js
In node Download node.js from the official website JS into the same hard disk as the project,
The effects are as follows: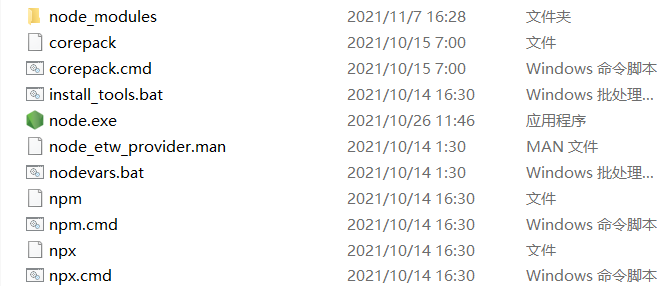
And suggest node_ Copy a copy of the modules folder and put it into the project
main points:
1. We need to pass node JS download webpack and other modules
2. The network speed of domestic downloads may be slow, so you can try to use some image servers to download.
3.package.json package configuration file
Using the webpack packaging tool also requires the name package JSON file for packaged configuration.
For example, tell the project what dependencies are needed.
first
{
    "name": "snake",
    "version": "1.0.0",
    "description": "",
    "main": "index.js",
    "scripts": {
        "test": "echo \"Error: no test specified\" && exit 1",
        "build": "webpack",
        "start": "node E:/VScode/Snake project/list/bundle.js"
    },
    "keywords": [],
    "author": "",
    "license": "ISC",
    "dependencies": {
        "express": "^4.17.1"
    },
    # The following shows the development dependencies
    "devDependencies": {
    	# css loader is used to integrate css and webpack
        "css-loader": "^6.5.1",
        "html-webpack-plugin": "^4.5.0",
        # Style loader is used to integrate css and webpack
        "style-loader": "^3.3.1",
        # TS loader is used to integrate typescript and webpack
        "ts-loader": "^9.2.6",
        # ts core package
        "typescript": "^4.4.4",
        # After downloading, you can use the webpack command in the integration terminal
        "webpack": "^5.64.0",
        "webpack-cli": "^4.9.0"
    }
}
main points:
1. Ensure your node JS installed
2. Right click the project in vscade, select open in the integration terminal and enter the code npm init -y for project initialization. Generally, a preliminary package will be generated in your project at this time JSON file, and then we further improve it
3. The json file cannot write comments. Please delete my comments when pasting the code
4. Input the instruction NPM i - D webpack cli typescript TS loader in the integration terminal to download relevant dependencies (if you can see that the dependencies you downloaded are updated in depDependencies of package.json, it indicates that the download is successful). i means install download, and - D means downloaded as a dependency
5. Continue to input NPM I - D CSS loader and other dependencies, which are useful later
6. Please pay attention to the "build": "webpack" key value pair in the scripts in the above code. This setting shows that we can use the code of npm run build to enable the webpack packaging tool (see 15 minutes to 20 minutes in video 09 for details)
4.webpack.config.js packaging tool configuration
// Introduce a package
const path = require('path')
//Introducing html plug-ins
const HTMLWebpackPlugin = require('html-webpack-plugin')
//All configuration information in webpack should be written in module In exports
module.exports = {
    //Specify entry file
    entry:"./src/index.ts",


    //Specify the directory where the packaged files are located
    output:{
        //Specify the directory of the package file
        path:path.resolve("E:/VScode/Snake project/list"),
        //filename the name of the packaged file is usually called bundle js
        filename:"bundle.js",

    },
    //Specify the module to use when packaging the webpack
    module:{
        //Specify the data to load
        rules:[
            {
                //test specifies the file in which the rule takes effect, that is, all files in ts end file
                test:/\.ts$/,
                use:'ts-loader',
                //Specify the files to exclude
                exclude:/node-modules/
            },
            {
                //Which files match
                test: /\.css$/,
                //Which loader s are used for processing
                use:[
     //The execution order in the use array is from back to front
     //Create a style tag, insert the style resource in js, and add it to the head to take effect
                    'style-loader',
      //Change the css file into a commonjs module and load it into js, where the content is a style string
                    'css-loader'
                ]
            },

        ]

    },
    plugins:[
        new HTMLWebpackPlugin({
                template:'./src/index.html'
            }) ,
          ],
    //Tell webpack which files can be introduced as modules
    resolve:{
        extensions:['.ts','.js']
    },
    mode:'development'
}
main points:
1. Finally, the related configuration of the webpack packaging tool, also named a webpack config. js
And paste the above code
2. Since the use of webpack is not the focus of this article, I have made notes on several important configurations. Interested partners can refer to video 09-11
3. What is put in output is the file after packaged output
At this point, TypeScript compilation configuration, node JS configuration and webpack configuration are completed, and you can officially roll out the code! O(∩_∩)O
4. CSS and HTML construction
1.HTML
<!DOCTYPE html>
<html lang="zh">
<head>
    <meta charset="UTF-8">
    <meta http-equiv="X-UA-Compatible" content="IE=edge">
    <meta name="viewport" content="width=device-width, initial-scale=1.0">
     //The following css is introduced here
    <link rel="stylesheet" href="./style/index.css">
    <title>Greedy snake</title>
</head>
<body>
    <!--Game main container-->
    <div id="main">
        <p>Press any direction key to start the game</p>
        <!--Set the stage of the game-->
        <div id="stage">
            <!--Set snake-->
            <div id="snake">
                <!--snake All parts of the body-->
                <div id="head"></div>
            </div>
        <!--Set food-->
        <div id="food">
            <!--Add four div Set food style-->
            <div></div>
            <div></div>
            <div></div>
            <div></div>
        </div>
        </div>
        <!--Set the game's scoreboard-->
        <div id="score-panel">
            <div>
                SCORE: <span id="score">0</span>
            </div>
            <div>
                LEVEL: <span id="level">1</span>
            </div>
        </div>
    </div>
    // The following is the BGM code added by the author
    <audio autoplay="autopaly" loop="loop" id="audios">
        <source src="./bgm.mp3" type="audio/mp3" />
    </audio>
</body>
</html>
Hierarchical order:
Main container = > snake = > snake head, snake body
= > food
= > integral disc = > integral, grade
2.CSS
1. First of all, remember to clear the default style of the browser and catch a lot of it on the Internet.
2. It was originally written with the less preprocessor and then translated into CSS. Here, it is directly given to the translated CSS
3. In terms of style, just note that the length and width are multiples of 10px, because the number of displacement cells behind the snake is 10px by default.
4. In this CSS style, by default, the snake head is centered at the beginning and the food position is fixed
* {
  margin: 0;
  padding: 0;
  box-sizing: border-box;
}
body {
  font: bold 20px "Comic Sans MS";
  position: absolute;
  display: flex;
  flex-direction: column;
  background-color: red;
  flex: 1;
  width: 100%;
  height: 100%;
  # Background picture arbitrary selection of image source
  background: url('bg.jpg') no-repeat;
  background-size: 100% 100%;
  background-attachment: fixed;
}
#main {
  width: 360px;
  height: 420px;
  background-color: #b7d4a8;
  margin: 100px auto;
  border: 10px solid black;
  border-radius: 40px;
  display: flex;
  flex-flow: column;
  align-items: center;
  justify-content: space-around;
}
#main #stage {
  width: 304px;
  height: 304px;
  border: 2px solid black;
  position: relative;
}
#main #stage #food {
  width: 10px;
  height: 10px;
  background-color: black;
  left: 100px;
  top: 100px;
  position: absolute;
  display: flex;
  flex-flow: row wrap;
  justify-content: space-between;
  align-content: space-between;
}
#main #stage #food > div {
  width: 4px;
  height: 4px;
  border: 1px solid #b7d4a8;
}
#main #stage #snake > div {
  width: 10px;
  height: 10px;
  background-color: #fff;
  border: 1px solid #b7d4a8;
  position: absolute;
  left: 140px;
  top: 140px;
}
#main #stage #snake #head {
  background-color: black;
}
#main #score-panel {
  width: 250px;
  display: flex;
  justify-content: space-between;
}
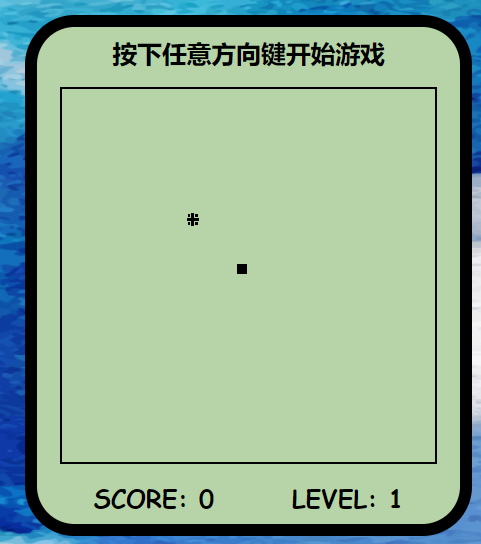
At this time, the basic style of the page has been built, as shown in the following figure:
5. Inject soul
Now, as long as we code the logic of several modules according to the requirements in the project analysis.
But first we need to write it more rigorously in ts language.
First of all, we should understand that the class name {} is to build an object template in which we can write some properties and methods, so that when other js files call the template object, we can create an object that conforms to the template specification. You can analogy constructors and create instance objects
1. Food module
//Define the Food class Food as the template object
class Food{
//Define the element type as HTMLElement, which has some features
    element: HTMLElement;

    constructor(){
//We get div from the web page according to the ID attribute value
//Add it here! Because we can get food 100% in html
        this.element = document.getElementById('food')!;
        this.element.style.left = Math.round(Math.random()*29) * 10 + 'px';
        this.element.style.top = Math.round(Math.random()*29) * 10 + 'px'
    }
    //Define a method to obtain the X-axis coordinates of food
    get X(){
        return this.element.offsetLeft
    }
    //Define a method to obtain the Y-axis coordinates of food
    get Y(){
        return this.element.offsetTop
    }
    //Define a method that can modify the location of food
    change(){
 //Generate a random location
 //Math.random() generates a random number of 0-1, but does not contain 0 and 1
 //Math. The round () method represents rounding
        let left = Math.round(Math.random()*29) * 10;
        let top = Math.round(Math.random()*29) * 10;
        this.element.style.left = left + 'px'
        this.element.style.top = top + 'px'
    }
}
export default Food;//Expose the Food class
main points:
1. We set strict mode when configuring typescript, so
this.element = document.getElementById('food')! If we don't add! It will make the program not sure whether we will get food and report an error
2. It will not be mentioned later. All the codes in the constructor method will be executed once when the template object is instantiated, that is, we use the random number random. When the page is just refreshed, the food will not be in a fixed position as defined in css, but we call the code here for a random refresh at the beginning. Make the game more real.
3. The get() method is prepared to obtain the specific location of food in the control module at any time
4. The change() method is to refresh food at random
5. This will not be mentioned later. The export default Food code must be added at the end. The purpose is to expose the food template object to the global, otherwise other modules cannot reference it
2. Scoreboard module
//Defines a class that represents a scoreboard
class ScorePanel{
    score = 0;
    level = 1;
    scoreEle:HTMLElement;
    levelEle:HTMLElement;
    //Set variable limit level
    maxLevel :number;
    //Set a variable to indicate the time-sharing upgrade
    upScore:number;
    constructor(maxLevel:number = 10,upScore:number = 10){
        this.scoreEle = document.getElementById('score')!;
        this.levelEle = document.getElementById('level')!;
        this.maxLevel = maxLevel;
        this.upScore = upScore;
    }
    //Set a bonus method
    addScore(){
        //Increase the score
        this.scoreEle.innerHTML = ++this.score + ''//String form is required
        //What is the judgment score
        if(this.score % 3 == 0){
            this.levelUp()
        }
    }
    levelUp(){
        //Also design an upper level limit
        if(this.level < this.maxLevel){
            this.levelEle.innerHTML = ++this.level + ''
        }
    }
}
export default ScorePanel;//Expose the ScorePanel class
main points:
1. Two methods are required, and the score and level can be improved by calling
2. We have set the upper limit of the level to no more than ten levels, which can be modified according to your preference
3. If you can roughly understand the food module, the scoreboard module is not difficult to understand
3. Snake module
This is the most complex module in logic, but most of them are annotated. If you get it done, it's not far from success!
class Snake{
    head:HTMLElement;
//The body of a snake, including its head, is refreshed by HTMLCollection,
//If you add a new element, it automatically gets the new element
    bodies:HTMLCollection;
//Get container for snake
    element:HTMLElement
//Get p
    p:HTMLElement
    constructor(){
 //querySelctor only takes one, so the first div is regarded as the snake head
 //As hemlement type assertion, because querySelector gets the element
 //To assert an HTMLElement
        this.head = document.querySelector('#snake > div') as HTMLElement;
        this.bodies = document.getElementById('snake')!.getElementsByTagName('div');
        this.element = document.getElementById('snake')!
        this.p = document.querySelector('#main > p')!
    };
     //Get the coordinates of the snake head
    get X(){
        return this.head.offsetLeft;
    }
    get Y(){
        return this.head.offsetTop;
    }
    set X(value:number){
 //Optimization: because the movement of the snake in this game will only change one value of X and y at a time
 //So you can make a judgment mechanism. If the value is the same as before, you won't change the CSS style again
        if(this.X === value){
            return
        }

// The legal value of X ranges from 0 to 290px (the snake itself occupies 10px of the stage)
        if(value < 0 || value > 290){
            //It means that the snake hit the wall and died
            throw console.error("The snake is dead");
        }

//Judge whether the snake turns around and compare it with the coordinates of the first section of the snake's body
//At the same time, the premise is to have the first section of the body
        if(this.bodies[1]&&(this.bodies[1] as HTMLElement).offsetLeft === value){
            if(value>this.X){
                value = this.X - 10
            }else{
                value = this.X + 10
            }
        }
        this.movebody()
        this.head.style.left = value + 'px'
        //Check whether you hit yourself. You must check after the coordinates change
        this.checkHeadBody()
    }


    set Y(value:number){
        if(this.Y === value){
            return
        }
        if(value < 0 || value > 290){
            //It means that the snake hit the wall and died
            throw console.error("The snake is dead");
        }
//Judge whether the snake turns around, compare with the coordinates of the first section of the snake's body, and at the same time, there must be the first section of the snake's body
          if(this.bodies[1]&&(this.bodies[1] as HTMLElement).offsetTop === value){
            //If an error occurs, let the snake move in the opposite direction, that is, it will not turn the snake 180 °
            if(value>this.Y){
                value = this.Y - 10
            }else{
                value = this.Y + 10
            }
        }
        this.movebody()
        this.head.style.top = value + 'px'
        //Check whether you hit yourself. You must check after the coordinates change
        this.checkHeadBody()
    }
    //The snake's way to increase its body is to continue adding div after the div of its head
    addBody(){
//Add two parameters to the div insertAdjacentHTML method to the Element
//The first is where to add the HTML tag, and the second is the input HTML code
        this.element.insertAdjacentHTML("beforeend","<div></div>")
    }
    //Add a method for snake body movement
    movebody(){
//Set the back body to the front body
//And start from the tail to avoid the front moving first, so that the back body doesn't know which position it is
        //Traversal traversal from back to front
        for(let i = this.bodies.length-1;i>0;i--){
            //Get the position of the front body
            let X = (this.bodies[i-1] as HTMLElement).offsetLeft;
            let Y = (this.bodies[i-1]as HTMLElement).offsetTop;
            //Sets the value to the current body
            (this.bodies[i] as HTMLElement).style.left = X + 'px';
            (this.bodies[i] as HTMLElement).style.top = Y + 'px'
        }
    }
    //Check for head and body collisions
    checkHeadBody(){
        //Get all the bodies and check whether they overlap with the coordinates of the snake head
        for(let i=1;i<this.bodies.length;i++){
            if(this.X === (this.bodies[i] as HTMLElement).offsetLeft && this.Y === (this.bodies[i] as HTMLElement).offsetTop ){
                throw new Error('Hit yourself')
            }
        }
    }
}
export default Snake;
main points:
1. First, it only adds three function functions addbody,movebody and checkbody
2. Why does the movebody move from the tail of the snake? According to ordinary people's concept, the snake does move from the beginning. However, what happens when the head of the snake moves first in the code? Yes, it is difficult for the body behind the snake to judge whether its next move is the position before or after the snake head moves.
Therefore, the best way is to judge the coordinates of the previous body from the motionless snake tail, and change your own coordinates in cooperation.
3. Why do get,set, and the code to judge whether the snake is dead and whether the snake moves later must be written in the constructor() function instead of outside?
There is also a control module in the rear
Firstly, get() method is used to obtain the snake head coordinates. When the snake head moves once, the refreshed snake head coordinates are fed back to the snake object
After the snake object is updated, the constructor code will be executed again. During the execution process, firstly, the coordinates of the snake head will be reset with the set() function, and then the snake's movebody function will be executed once. Finally, judge whether the snake is dead or not.
In this way, the code is executed once. At this time, the whole snake advanced once. Then we set a time through the timer to keep the snake moving.
4. Controller module
//Only by introducing other classes can you control
import Snake from "./Snake";
import Food from "./food";
import ScorePanel from "./ScorePanel";
//Game controller to control all other classes
class GameControl{
//Snakes
snake:Snake;
//Food category
food:Food;
//Fractional class
scorePanel:ScorePanel;
//Create an attribute to store the moving direction of the snake. The default setting is an empty string
direction:string = '';
//Create an attribute to record whether the game is over
islive = true
//Create a keyboard press response function, which is the most convenient to modify
keydoenHandler(event:KeyboardEvent){
//Modify the properties of direction
this.direction = event.key;
}
//Define a method to detect whether a snake eats food
checkEat(x:any,y:any){
if(x === this.food.X && y === this.food.Y){
console.log('The snake ate the food')
//Change food location
this.food.change();
//The score is increased by one point
this.scorePanel.addScore();
//The snake's body adds a section
this.snake.addBody()
}
}
//This function is used to control snake movement
run(){
//According to the direction this Direction to change the position of the snake
//Up / down, top increase / decrease, left / right, left increase / decrease
//By assigning the X and Y attributes in the snake attribute, we can obtain the current coordinates of the snake
let x = this.snake.X
let y = this.snake.Y
//Determine whether the coordinates of the snake head are the same as those of the food
this.checkEat(x,y)
//switch to determine the parameters passed in, so as to move the snake,
switch(this.direction){
case "ArrowUp":
y -= 10 ;
break;
case "ArrowDown":
y += 10;
break;
case "ArrowLeft":
x -= 10;
break;
case "ArrowRight":
x += 10;
break;
}
try{
//The modified value is assigned back to the snake, and the set method in snake will change the CSS style
this.snake.X = x
this.snake.Y = y
}catch(e){
//Enter catch, indicating that an exception is caught, the game is over, and a prompt message pops up
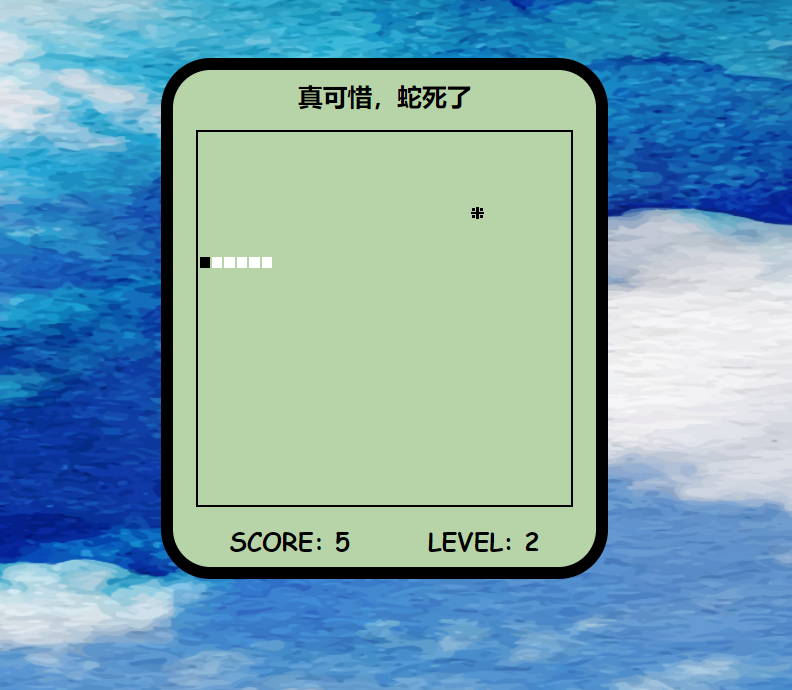
this.snake.p.innerHTML = 'It's a pity that the snake is dead'
this.islive = false
}
//Start a timer and call the run function regularly to achieve the effect of continuous automatic movement
//Because the function is called by document, bind is used to restore the object bound by this to gamecontrol
//Automatically determine whether the game is over
this.islive && setTimeout(this.run.bind(this), 200-(this.scorePanel.level-1)*20);
}
changep(){
this.snake.p.innerHTML = 'The game begins!'
}
//Once called, the constructor method that executes automatically
constructor(){
this.snake = new Snake();
this.food = new Food();
this.scorePanel = new ScorePanel();
this.init()
}
//The initialization method of the game calls the game to start
init(){
//Bind the event of keyboard key pressing, but it will cause the object of this to point to document because it is called
//bind is to create a new function. The passed in this is bound to the original GameControl, not document
document.addEventListener('keydown',this.keydoenHandler.bind(this));
document.addEventListener('keydown',this.changep.bind(this));
this.run()
}
}
export default GameControl
main points:
1. Four new methods are added: check whether the food is eaten, run() keyboard controls the movement of snake head, change the text in the page to game start (embellishment) and init() press any key to start the game.
2. this object in init refers to who it is. Please study it by yourself. In addition, it is quite clear in the video
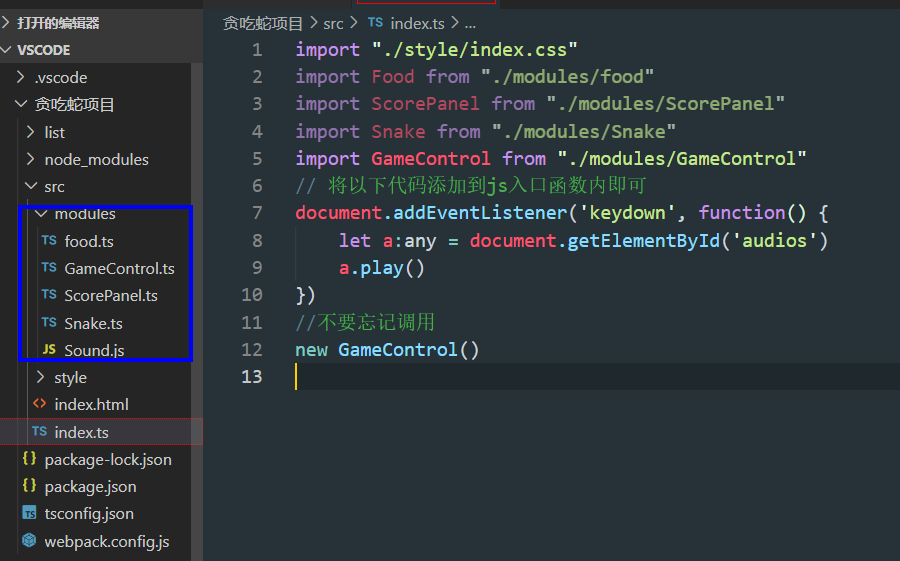
5.index
import "./style/index.css"
import Food from "./modules/food"
import ScorePanel from "./modules/ScorePanel"
import Snake from "./modules/Snake"
import GameControl from "./modules/GameControl"
// Add the following code to the js entry function
document.addEventListener('keydown', function() {
    let a:any = document.getElementById('audios')
    a.play()
})
//Don't forget to call
new GameControl()
Make a final summary of the above modules
6. Closure
Right click the project to open it in the form of integrated terminal, enter the command npm run build, and then press enter,
The purpose is to use the instructions of webpack to package it and output it where we want.
As shown in the figure below, the integration is basically successful.

webpack will help you integrate all js modules together, and then automatically reference it to your html file. As follows: list is where I package the output
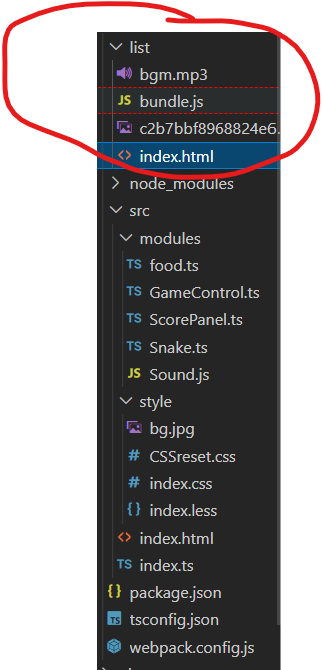
We can start playing by opening html files with a browser!!
It's the first time to write such a long article. It's all drawn here. For the sake of such hard codewords, you little friends can't praise too much!!!
(~ ̄▽ ̄)~
Previous articles are also wonderful
Sorting out HTML related knowledge points
Arrangement of CSS related knowledge points (super detailed high collapse)
Basic knowledge of JavaScript (step by step and orderly)
Supplement 01 to basic JavaScript knowledge points (explain in detail what is a prototype object)