There are many schemes for cross domain requests. Let's talk about some simple schemes
Solution 1:
It is also a relatively simple and straightforward way: use Google Chrome browser to realize JavaScript cross domain requests and reduce the security level. The window method is as follows:.
Operation method:
Find the Google Chrome browser icon and right-click to find the "target path address" in "shortcut" in "properties".
Add to the link – allow file access from files – disable web security.
Finally, in the JS code (it can be executed in this way):
$(function(){
    $.ajax({
        type : "post",
        url : "http://172.0.0.1:9090/robot/getAnswerByUserId",
        data : shopparams,
        async : false,
        success : function(data){
              if(data){
                alert(data);
              }
         }
    });
 });
PS: just write the URL in ajax to the ip address of the other party!
mac mode, please check here: here
Solution 2: implement agent with nginx
Select nginx version: http://nginx.org/en/
I use nginx-1.9.2.
Operation steps:
Locate the nginx.conf configuration file
Modify nginx-1.9.2 – > conf
Configuration code:
#user  nobody;
worker_processes  1;
#error_log  logs/error.log;
#error_log  logs/error.log  notice;
#error_log  logs/error.log  info;
#pid        logs/nginx.pid;
events {
    worker_connections  1024;
}
http {
    include       mime.types;
    include   ./conf.d/*.conf;
    default_type  application/octet-stream;
    #log_format  main  '$remote_addr - $remote_user [$time_local] "$request" '
    #   '$status $body_bytes_sent "$http_referer" '
    #  '"$http_user_agent" "$http_x_forwarded_for"';
    #access_log  logs/access.log  main;
    sendfile        on;
    #tcp_nopush     on;
    #keepalive_timeout  0;
    keepalive_timeout  65;
    #gzip  on;
        charset GBK;
        error_page   500 502 503 504  /50x.html;
    }
Find include. / conf.d / *. Conf in line 12; (this configuration is another file referenced because the contents of this file should not be modified as much as possible). Try not to move other places. This refers to another file to be modified I created a new conf.d folder under D:\nginx-1.9.2 \ (nginx installation directory), and a new file ending in. Conf (try not to speak Chinese) under the conf.d folder. My file is www.example.com.conf.
The configuration of www.example.com.conf is as follows:
upstream tomcat_cluster {
   #server 10.1.1.1:8080 weight=1 max_fails=2 fail_timeout=30s;
   server  10.100.142.50:9090 weight=1 max_fails=2 fail_timeout=30s;
}
server {
        server_name  localhost;
        listen       80;
        charset utf-8;
        sendfile        off;
        location = /favicon.ico {
                log_not_found off;
                access_log off;
        }
    index index.html index.htm index.jsp index.do index.action;
        root  D:/workspace/lnmp64/toumi-h5;
    location / {
            proxy_next_upstream http_502 http_504 error timeout invalid_header;
            proxy_set_header Host  $host;
            proxy_set_header X-Real-IP $remote_addr;
            proxy_set_header X-Forwarded-For $proxy_add_x_forwarded_for;
            proxy_pass http://tomcat_cluster;
            #proxy_http_version 1.1;
            #proxy_set_header Connection "";
            expires      30d;
        }
        location ~.*\.(jpg|png|jpeg)$
        {
                expires 30d;
        }
        location ~.*\.(js|css)?$
        {
            expires 7d;
        }
        location ~ .*\.(html|htm|gif|jpg|jpeg|bmp|png|ico|txt|js|css|apk|ipa|zip|plist)$ {
            root D:/workspace/lnmp64/toumi-h5;
            expires      30d;
        }
        proxy_ignore_client_abort on;
        proxy_redirect off;
        server_name_in_redirect off;
        proxy_set_header Host $host:$server_port;
        proxy_set_header X-Real-IP $remote_addr;
        proxy_set_header X-Forwarded-For $proxy_add_x_forwarded_for;
        proxy_set_header Via "nginx";
        proxy_buffering on;
        client_max_body_size 10m;
        client_body_buffer_size 128k;
        proxy_connect_timeout 150;
        proxy_send_timeout 150;
        proxy_read_timeout 150;
}
PS:
Just modify Line 3, line 16 and line 39. The third line stores the ip and port number of the server Line 16 and line 39 are your project Lujin address. Then start nginx.
Solution 3: implement agent with vagrant
In fact, vagrant can be regarded as a box. The box can hold any configuration (virtual machine). Here, I also use nginx for processing. Pack its nginx into the vagrant box, which is cumbersome to configure. You need to install vagrant!
Introduction to Vagrant
Vagrant is a tool used to build a virtual development environment. It is very suitable for developing web applications in languages such as php/python/ruby/java. The saying that "there is no problem running the code on my machine" will become history.
We can package a Linux development environment through Vagrant and distribute it to team members. Members can develop programs on their favorite desktop system (Mac/Windows/Linux), but the code can run in a unified encapsulated environment, which is very aggressive.
Procedure for using Vagrant
Access link address: http://segmentfault.com/a/1190000000264347
PS: after nginx is set, you can see what you want when refreshing the page.
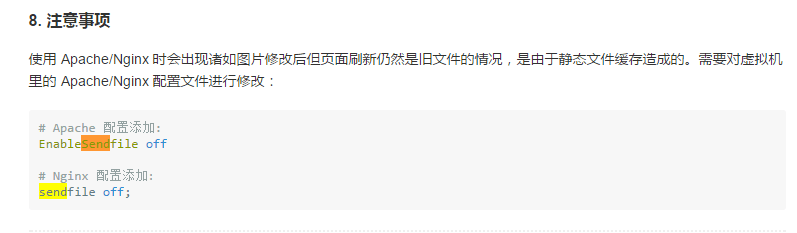
Attachment: nginx cache configuration.