This paper summarizes the implementation of a character changing H5 2D game with pixijs
If you are interested in this game, come with me
If you don't know the usage of pixi, you can read this article
pixijs requirements level entry
Contents of this article
1. Game introduction
2. Code implementation
3. Code warehouse
Game introduction
If you experience the above address, you can know that the play is very simple
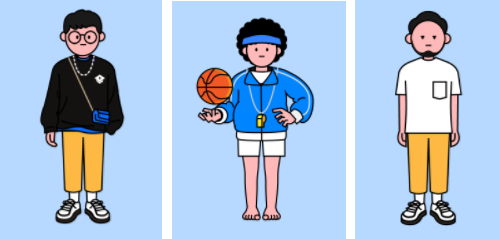
It's about adding characters, changing hair styles, changing clothes, adding accessories and changing the background
People can drag, zoom, rotate, and support multiple people
Although the game function looks simple, the logic of implementation is not simple at all
Let's first introduce the components of the whole role
1 role composition
A character has five components: hair, accessories, expression, coat and pants
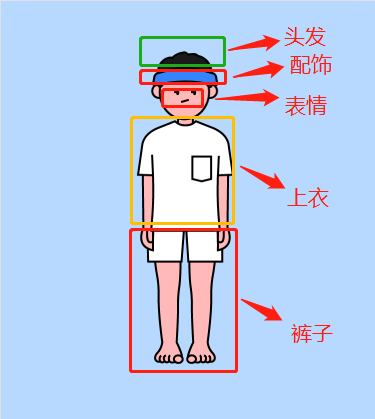
These five parts can be changed separately, so you can customize and match a variety of characters
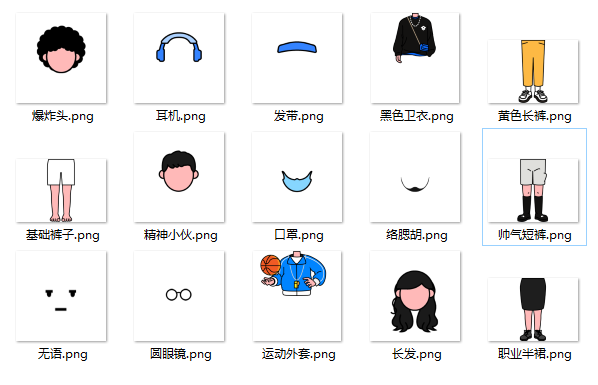
2 material introduction
Because the characters are divided into five parts, there are five kinds of materials, but the materials are of different sizes and positions. It is not necessary to adjust the position of each material separately to render to the appropriate position
It's troublesome to think about it. If more than 100 materials are adjusted one by one, it's going to explode
Our processing is to fix the size proportion of all materials, and the position difference is adjusted by the design
We can even fix the width and height of all materials according to the width and height of the characters, and then give it to the design to control the position of the materials in the picture
In this way, you don't need to set the position when rendering, and you can directly overlap the pictures

However, considering that the picture size will be increased, we will cut it appropriately, compromise between the picture size and the material position, minimize the picture size, and simplify the code for setting the material position
code implementation
This is mainly to explain the main logic of code implementation, and will not involve complicated details.
It is mainly divided into these parts to explain
1. Data introduction
2. Code architecture diagram
3. Character rendering
4. Enabling logic
5. Event listening
1
Data introduction
Look at the data structure of the material
{
    name: 'Basic coat', // Corresponding unique name
    dataType: DataType.JACKET, // Material type
    width: 0,
    height: 0,
    belong: [ROLE_MAP.Man, ROLE_MAP.Women], // Character of the material
    thumbnail: "xxxx-min.png", // thumbnail
    textureUrl:"xxxx.png", // Actual drawing
},
{
    name: 'Speechless',
    dataType: DataType.FACE,
    width: 0,
    height: 0,
    belong: [ROLE_MAP.Man, ROLE_MAP.Women],
    thumbnail: "xxxx-min.png", // thumbnail
    textureUrl:"xxxx.png", // Actual drawing
}
All material types will be managed using a map
enum Datatype{
  ROLE = 'role', // role
  FACE = 'face', // face
  HAIR = 'hair', // Hair
  JACKET = 'jacket', // jacket
  TROUSERS = 'trousers', // trousers
  ACCESSORIES = 'accessories', // ornaments
  SCENE = 'scene', // scene
  PROP = 'prop', // prop
}
There are two kinds of characters, men and women
const ROLE_MAP = {
  Man: 1,
  Women: 2,
}
This ROLE_MAP is to add [long] characters to each material. If different characters are selected, the appearance will be different
For example, only male characters have beard materials, and only female characters have skirts
The image is divided into thumbnail thumbnail and actual rendered texture URL
Considering the actual situation, the actual rendering includes a lot of blank and position processing, and the thumbnail will be divided into two types in order to clearly reflect the content
2
Code architecture diagram
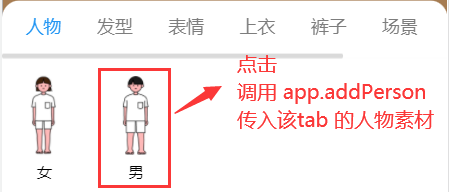
Look at the main code architecture diagram of the whole code, which is divided into five parts
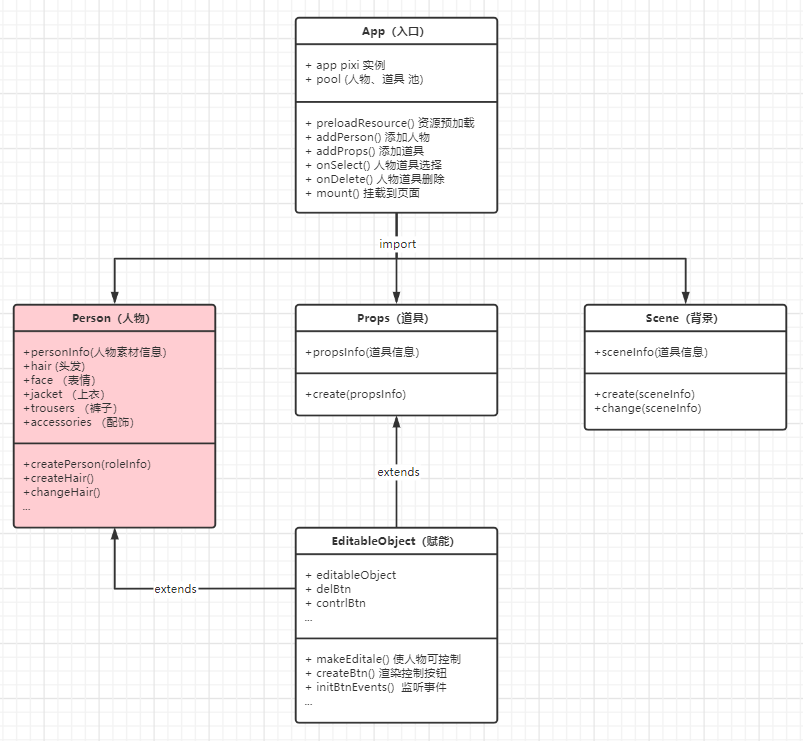
1App
Functional entry
The function is to create PIXI root container and control CRUD of characters, props and background
The main control room of the whole function, the selection and creation of characters and props need to be notified to it
class App{
  constructor(defaultInfo) {
    super();
    this.app = new PIXI.Application({
      width: window.innerWidth,
      height: window.innerHeight - 195,
      antialias: true, // default: false anti aliasing
      autoDensity: true, // Whether the CSS size of the canvas view should be automatically adjusted to the screen size.
      resolution:2, // default: 1 resolution
    });
  }
  addPerson(){ ... }
  addProp(){ ... }
}
2Person
Responsible for the details of character rendering. Through the external input of material information, the creation and update of five parts of the character (hair, expression, accessories, coat and trousers) are completed
class Person {
  constructor(app,personInfo) {
    super(app);
    this.app = app;
    this.personInfo = personInfo;
  }

  createHair() {...}
  createFace() {...}

  changeHair() {...}
  changeFace() {...}
}
3Props,Scene
Props and background, relatively simple, not much content
class Props {
  constructor(app, propsInfo) {
    super(app);
    this.propsInfo = propsInfo;
  }
  create() { ... }
}
class Scene {
  constructor(app, sceneInfo) {
    super(app);
    this.sceneInfo = sceneInfo;
  }
  create() { ... }
  change() { ... }
}
4EditableObject
Empower (characters and props), inject them with ability, and complete the ability of [drag] [zoom] [render] [delete] [activate]
Person and Props inherit these capabilities by inheriting EditableObject
This piece of code will be more complex, which will be described in detail below
3
Character rendering
App controls the rendering of characters and props, and the details of rendering are realized inside characters and props
class App{
    addPerson(personInfo){
        new Person(personInfo)
    }
    addProp(propInfo){
        new Prop(propInfo)
    }
}
The app does not manage materials internally. All materials are externally transmitted to the app, which then distributes them to the corresponding Person, Prop and Scene
A character contains five kinds of materials, so you need to create five Sprite instances and create a character container to add these five elements
class Person {
  constructor(app, personInfo) {
    super(app);
    this.app = app;
    // personInfo contains all the material information of the character
    this.personInfo = personInfo;
    this.createRole();
  }
  createPerson() {
    const container = new PIXI.Container();
    this.obj = container;
    this.createHair();
    // ... omit creating expressions, tops, pants and other similar parts
    this.app.stage.addChild(container);
  }
  ...
}
When creating a character, all five parts of the character will be created at the same time (the code is the same, and the hair part will be created below)
class Person {
  ...
  createHair() {
    this.hair = this.createSprite(DataType.HAIR);
    // Add the created character container after creation
    this.obj.addChild(this.hair);
  }
  getMaterialByType = (type) => {
    // The materialList contains the five material data of the character, and filters out the corresponding material types
    return this.personInfo.materialList.find((item) => item.type === type);
  };
  createSprite(dateType) {
    const dress = this.getMaterialByType(dateType);

    const { x, y, name, width, height } = dress;
    // Get from cache
    const texture = app.loader.resources[name].texture;
    const sprite = PIXI.Sprite.from(texture);

    sprite.x = x || 0;
    sprite.y = y || 0;
    width && (sprite.width = width);
    height && (sprite.height = height);

    return sprite;
  }
  ...
}
After that, when you click other materials and need to update the character dress, you can directly replace the texture of the corresponding part
class Person {
  ...
  changeHair(dressInfo) {
    this.hair.texture = app.loader.resources[dressInfo.name].texture;
  }
  ...
}
Set character position
After experiencing the game, it is clear that when adding characters, the characters appear in the center of the screen, and the position needs additional settings, otherwise they will appear in the upper left corner
In addition, it is also necessary to set the center of the character as the base point of the element, so that the character scaling and other operations take the center as the origin, which is in line with the visual habit
let addedNum = 0; // Who is the current character added
const offsetList = [0, 20, 40];

class Person{
 createPerson(){
    // ... omit other code such as creating a container
    this.setCenterPosition()
 }
 setCenterPosition(container) {
    const { screen } = this.app;

    // The characters are placed in the center, and there is a certain deviation
    container.x = screen.width / 2 + offsetList[addedNum++ % 3];
    container.y = screen.height / 2;

    // Set the base point of the people container as the center point
    container.pivot.x = container.width / 2;
    container.pivot.y = container.height / 2;
  }
}
As you can see in the above code, we will make a horizontal deviation while placing the characters in the center, so as to ensure that when adding multiple characters, they will not overlap each other, so as to avoid difficult operation
4
Enabling logic
The enabled logic code will be in the EditableObject class, and the characters and props will inherit this class and be enabled
The logic of empowerment is the most complex because it performs many functions
1. Character activation state
2. Drag
3. Zoom
4. Spin
Let's explain them one by one
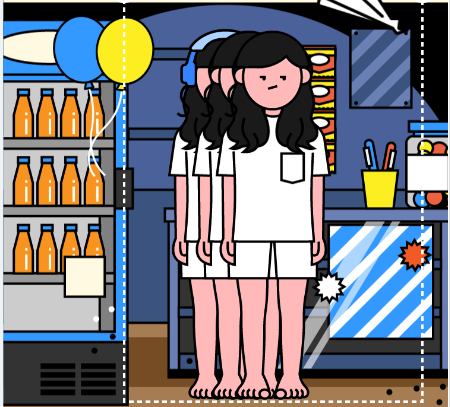
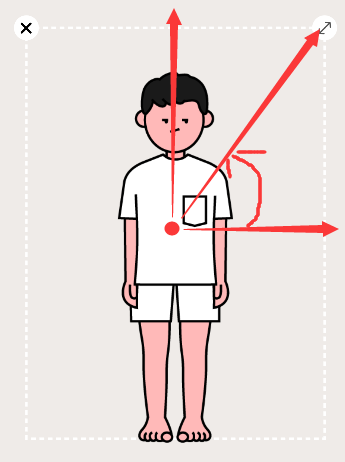
1 character activation status
When you add a character or select a character, you can find that changing the character will have a dotted box and two operation buttons
When it is active, it means that the character can operate
And only one character on the field will be activated. When one character is activated, the others will be deactivated
So now, we need to create three sprites (delete btn, control btn, dotted box)
Then add these three sprites to the character container?
No no no
These three sprites are not part of the character in theory, so they should not be coupled
We will create a new container and add the character container and the three sprites
class Person extends EditableObject{
    createPerson(){
       // ... omit others
       this.makeSpriteEditable()
    }
}

class EditableObject {
    makeSpriteEditable=()=>{
      // ....
      // There are dashed boxes and two buttons in editing status
      this.dashLine = new Dashline(obj).create();
      this.delBtn = new DelBtn(this.app, obj).create();
      this.controlBtn = new ControlBtn(this.app, obj).create();

      // Create a new container
      const container = new PIXI.Container();
      container.addChild(this.dashLine, this.obj, this.delBtn, this.controlBtn);

      this.editableObject = container; // Save new container
      // ....
    }
}
The code for creating DelBtn and ControlBtn is also relatively simple. Give a DelBtn example
const name = "deleteIcon";

class DeleteIcon {
  constructor(app, obj) {
    this.app = app;
    this.obj = obj;
  }
  create() {
    // Priority is taken from the preload cache
    const texture = this.app.loader.resources[name].texture;
    const sprite = PIXI.Sprite.from(texture);
    sprite.width = 21;
    sprite.height = 21;
    sprite.anchor.set(0.5); // Set center point

    this.obj.y = 0;
    const { x, y } = this.obj;

    sprite.x = x;
    sprite.y = y;

    this.icon = sprite;

    // Given a name, it is convenient to find the sprite directly from the parent container
    sprite.name = "delBtn";
    return this.icon;
  }
}
Base point and location of the new container
Although we have created a new container to contain buttons and characters, it is only for the sake of clear code structure. In fact, the effect of the new container is the same as that of the character container
Therefore, we need to transfer all position data [base point] [coordinates x, y] of the character container to the new container
And the base point and position of the original character container need to be reset to 0, otherwise the character container will have a large offset relative to the new container
class EditableObject {
   makeSpriteEditable = () => {

    // ....
    // Save the position data of the character container first
    const obj = this.obj;
    const originX = obj.x;
    const originY = obj.y;
    const originPX = obj.pivot.x;
    const originPY = obj.pivot.y;

    // Transfer person container location data to new container
    container.x = originX;
    container.y = originY;
    container.pivot.x = originPX;
    container.pivot.y = originPY;

    // After the transfer, the person position information needs to be reset. Because obj is added to the new container, obj is relative to the container to prevent position offset from the new container
    // The center point is the center of the character obj. If it is set to 0, it will become the middle of the upper left corner
    obj.x = 0;
    obj.y = 0;
    obj.pivot.x = 0;
    obj.pivot.y = 0;

    // ....
  };
}
2 drag
The implementation of drag is relatively general, which is similar to our usual implementation of DOM element drag
We won't put all the codes here. You can go to the warehouse and put pixi related codes here
unction makeObjectDraggable(obj) {
  obj.interactive = true; // So that it can be monitored for events

  // Event press trigger
  const onDragStart = (e) => {};
  // Event lift trigger
  const onDragEnd = () => {};
  // Event movement trigger
  const onDragMove = (e) => {};

  // Binding event
  obj.on("pointerdown", onDragStart);
  obj.on("pointerup", onDragEnd);
  obj.on("pointerupoutside", onDragEnd);
  obj.on("pointermove", onDragMove);

  return obj;
}
class EditableObject {
  makeSpriteEditable = () => {
    // .....
    makeObjectDraggable(container)
  }
}
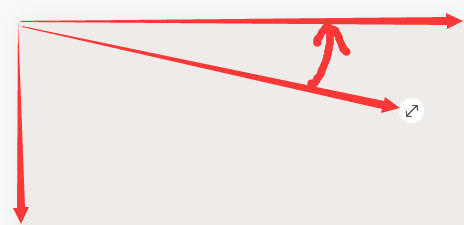
3. Zoom and rotate
The trigger of the two events is to click the button in the upper right corner, and the effect is as follows
Therefore, the button needs to be bound with events (press, lift and move)
class EditableObject {
  makeSpriteEditable = () => {
    // .....
    this.initCtrlEvent(container)
  }
  initCtrlEvent() {
    // Make the action buttons interactive
    this.controlBtn.interactive = true;

    // Cursor selected event
    this.controlBtn.on("pointerdown", this.onCtrlDown);

    // Cursor off event
    this.controlBtn.on("pointerup", this.onCtrlUp);

    // Cursor drag event
    this.controlBtn.on("pointermove", this.onCtrlMove);
  }

  onCtrlUp = () => { ... }
  onCtrlDown = (e) => { ... }
  onCtrlMove = (e) => { ... }
}
zoom
The main thing is to get a scaling rate and multiply it by the width and height of the container to get the final scaling result
The zoom rate is obtained by comparing the distance between two points before and after dragging
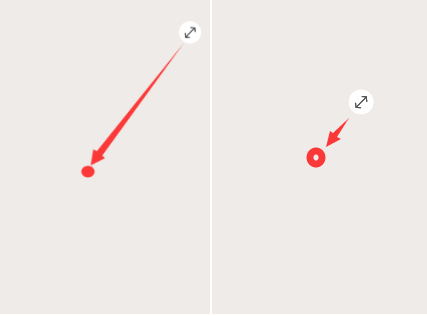
When creating a new character, a copy of the original two point distance defaultDistance will be saved, and then all dragging will be compared with this distance to obtain the zoom rate
The middle point is the X and y of the container. Because the container sets the base point as the center point, its X and y are the center point
How to calculate the distance between two points?
It's the Pythagorean theorem, but a Vec2 library is used to simplify the calculation here
class EditableObject {

  onCtrlMove = (e) => {
     const a = new Vec2(editableObject?.x || 0, editableObject?.y || 0);
     const b = new Vec2(e.data.global.x, e.data.global.y);

     // Get the distance between two points
     const distance = a.distance(b)
  }
}
In addition, when we click the button for the first time, we save a copy of the original state of the original character without scaling
class EditableObject {

  defaultDistance = 0

  onCtrlDown = (e) => {

    const editableObject = this.editableObject;

    // A copy of the default value is saved only when you click it for the first time
    if (!this.defaultDistance) {
      const a = new Vec2(editableObject?.x || 0, editableObject?.y || 0);
      const b = new Vec2(e.data.global.x, e.data.global.y);

      // Get the distance between two points
      const distance = a.distance(b)

      this.defaultDistance = distance;
    }
  }
}
Then it is used to compare with the distance after moving
class EditableObject {
  onCtrlMove = (e) => {
     const a = new Vec2(editableObject?.x || 0, editableObject?.y || 0);
     const b = new Vec2(e.data.global.x, e.data.global.y);

     // Get the distance between two points
     const distance = a.distance(b)

     const vScale = distance/ this.defaultDistance

     // Multiply the zoom rate by the original width and height of the character
     this.editableObject.width = vScale * editObjOriginData.width;
     this.editableObject.height = vScale * editObjOriginData.height;
  }
}
As you can see above, we use the zoom rate to multiply the initial width and height of the character. Of course, the initial width and height are saved when a new character is created
class EditableObject {

  // Save all data of the character's initial state for later calculation
  originDataMap = {}

  makeSpriteEditable = () => {
    // .....
    this.saveObjectOriginData()
  }
  saveObjectOriginData = ()=>{

    this.originDataMap.editableObject = {
      width: this.editableObject.width,
      height: this.editableObject.height,
      x: this.editableObject?.x,
      y: this.editableObject?.y,
    }
  }
}
rotate
Rotation is to set the angle, but the unit of rotation set by pixi is radians, so we can only calculate radians here
How to calculate radians?
Math. Atan2 (y, x) is used here. If you pass in a coordinate, you will get the radian corresponding to this coordinate, which is as follows

Specific information can be understood
https://developer.mozilla.org/zh-CN/docs/Web/JavaScript/Reference/Global_Objects/Math/atan2
Can we get radians by putting the coordinates of the current movement into Math.atan2
Yes, but the radian is relative to the whole container (0,0)
But what we want is the radian relative to the center of our character container
So we need to convert and calculate the coordinates relative to the center of the character
The coordinates of the person center point and the moving point are the same, relative to the upper left corner of the root container, and if we make the person center point the origin of the coordinate axis (0,0)
As long as we subtract the coordinates of the center point of the character container from the coordinates of the current moving point, we can get the coordinates of the current moving point relative to the center of the character
class EditableObject {
  onCtrlMove = (e) => {
     // .....
     // Get the radian of the current moving point relative to the center of the character
     const rodian = Math.atan2(
        e.data.global.y - (editableObject?.y || 0),
        e.data.global.x - (editableObject?.x || 0)
     )
     // .....
  }
}
But if we want to rotate the character, we must get the offset radian. Since it is offset, there must be a reference, that is, the original radian
The original radian is the same as the previous scaling. We can calculate the radian state at the beginning of the new character creation
Similar logic
Save the character's original radian when onCtrlDown is triggered for the first time
In onCtrlMove, the radian is subtracted, and then set to the character
class EditableObject {
  onCtrlMove = (e) => {
     // ....
     const rodian = Math.atan2(
        e.data.global.y - (editableObject?.y || 0),
        e.data.global.x - (editableObject?.x || 0)
     )
     const vRotain = angle-  this.defaultRotain
     this.editableObject.rotation = vRotain
     // ....
  }
}
5
event listeners
As mentioned earlier, the App entry class is used to manage the generation, removal and activation of characters and props, and the specific details will be handed over to the characters and props class
How do they communicate? Event monitoring is implemented through the eventemitter3 library
When you create a character in the App, you will listen to the Select and Delete events of the character
class App{
  addPerson(personInfo){
    const person = new Person(this.app, personInfo);
    this.MaterialPool[person.key] =person;
    person.on('Selected', this.onSelect);
    person.on('Delete', this.onDelete);
  }
  onSelect =()=>{}
  onDelete =()=>{}
}
In Person, these events will be triggered
class Person extends EditableObject {
    constructor(){
        this.createRole()
    }
    createRole() {
        .....
        // Empower characters
        this.makeSpriteEditable()
        .....
    }
}
class EditableObject extends EventEmitter {
  initDeleteIconEvent() {
      // Make the delete button interactive
      this.delBtn.interactive = true;
      this.delBtn.on('pointerdown', () => {
        this.emit('Delete', this);
        this.editableObject = null;
      });
  }
  makeSpriteEditable = () =>{
    .....
    this.delBtn.interactive = true;
    // When the container clicks, it means that the character needs to start the select event to activate
    this.editableObject.on('pointerup', ()=>{
       this.emit("onSelect",this)
    });
    .....
  }
}
What's the use of monitoring these two events?
The Select event is to inactivate all other characters (hide the edit box) when selecting a character
The Delete event is to remove from the App
Select event
Because when selecting a character, we need to inactivate other characters, so we use a pool to manage all characters and props in the App
When generated, one is added to the pool and removed from the pool
This pool is an object map, which stores the unique id of the object as the key and the character container as the value
class App {
    MaterialPool = {}
    addPerson(personInfo){
        const person = new Person(this.app, personInfo);
        this.MaterialPool[person.key] = person
        ...
    }
    addProp(propInfo){
        const prop = new Person(this.app, propInfo);
        this.MaterialPool[prop.key] =prop
        ...
    }
}
Therefore, when Select is triggered, it traverses the pool and deactivates all but the non current elements
class App {
  ......
  onSelect = (selectItem) => {
    for (const item of Object.entries(this.MaterialPool)) {
      const [, obj] = item;

      if (obj.key !== selectItem.key) {
       obj.makeObjectUnEditable(); // Non selective element deactivation
      } else {
       obj.recoverEditable(); // Activate selected element
      }
    }
  }
  ......
}
The inactivation process is to find [delete btn] [control btn] [dotted box] and hide them
The activation is to display the sprite.visible property set
class Person extends EditableObject { ... }

class EditableObject extends EventEmitter {
  getAllControlSprite = () => {
    const getSprite = this.editableObject?.getChildByName.bind(
      this.editableObject
    );
    const delBtn = getSprite?.('delBtn');
    const ctrlBtn = getSprite?.('ctrlBtn');
    const dashline = getSprite?.('dashline');

    return { delBtn, ctrlBtn, dashline};
  }
  makeObjectUnEditable() {
    const { delBtn, ctrlBtn, dashline } = this.getAllControlSprite();
    delBtn.visible = false;
    ctrlBtn.visible = false;
    dashline.visible = false;
  }
  recoverEditable = () => {
    const { delBtn, ctrlBtn, dashline } = this.getAllControlSprite();
    delBtn.visible = true;
    ctrlBtn.visible = true;
    dashline.visible = true;
  }
}
Delete event
Deleting is relatively simple, just removing it from the app view
class App {
  onDelete = (item) => {
      delete this.MaterialPool[item.key];
      this.app.stage.removeChild(item?.editableObject);
  }
}
Code warehouse
Refer to the complete code for more details
https://gitee.com/hoholove/study-code-snippet/tree/master/PIXI/PERSON_DRESS