1. Environmental Instructions
| Environment & Software | Edition |
|---|---|
| Operating System & MacOs | 11.2.1 |
| Virtual Machine & VMware Fusion | 12.1 |
| Server & CentOS | 7.8 |
| jdk | 1.8 |
| hadoop | 2.9.2 |
2. Virtual Machine Preparation
1. Configure static ip
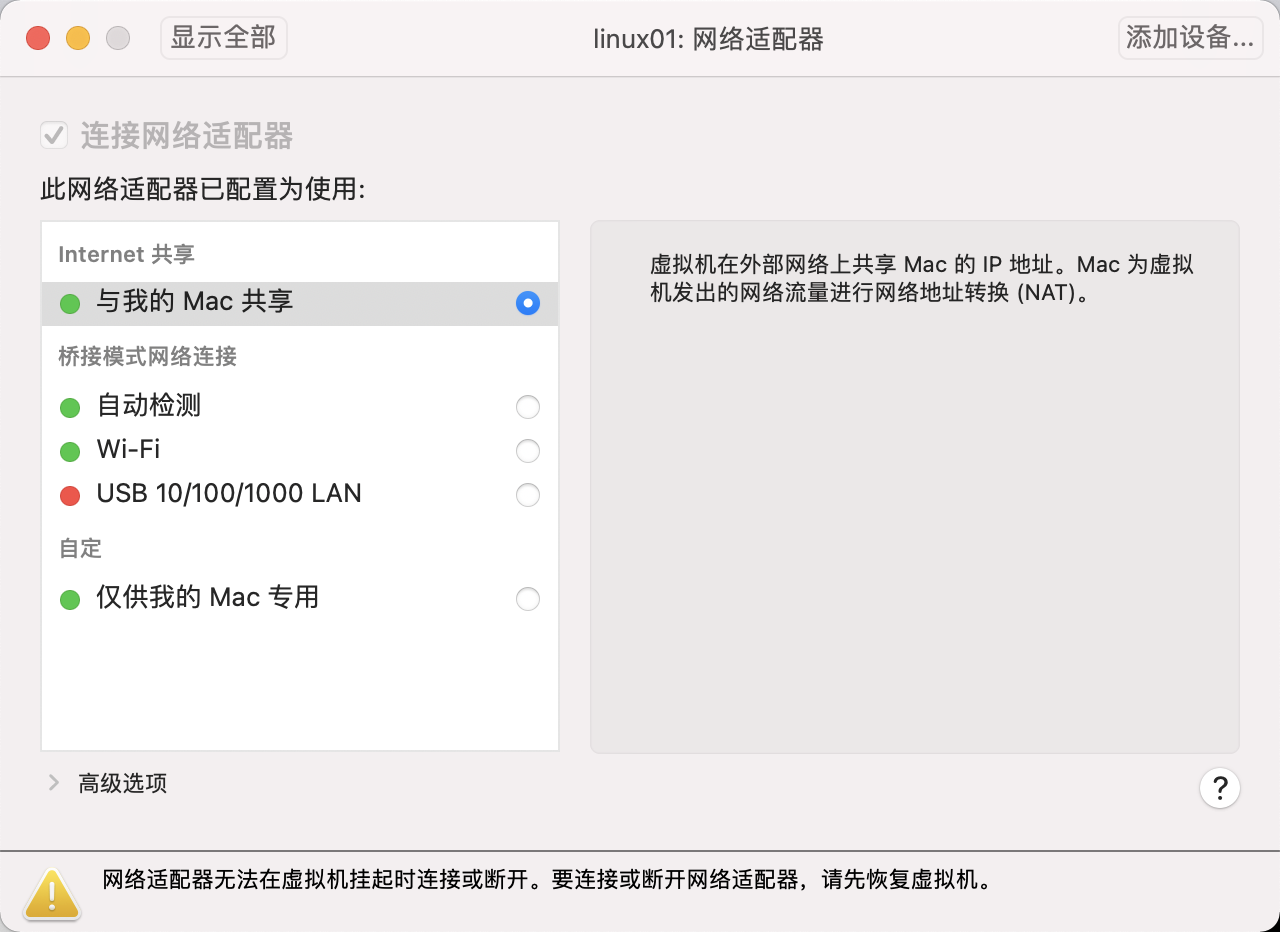
1.1 Virtual Machine Network Settings (NAT)
VMWARE Fusion sets the virtual machine network adapter link mode to "Share with my Mac"
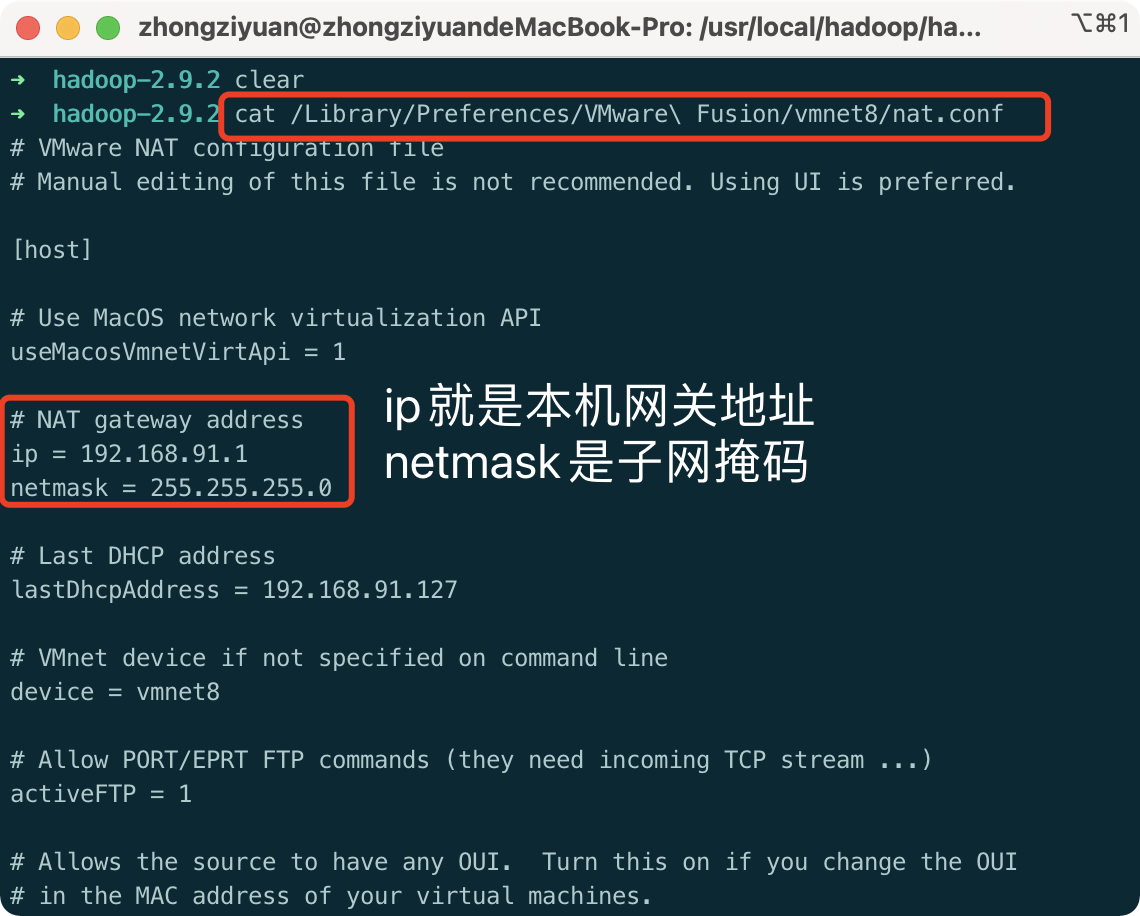
1.2 View local network configuration
- View the local gateway address and subnet mask:
cat /Library/Preferences/VMware\ Fusion/vmnet8/nat.conf
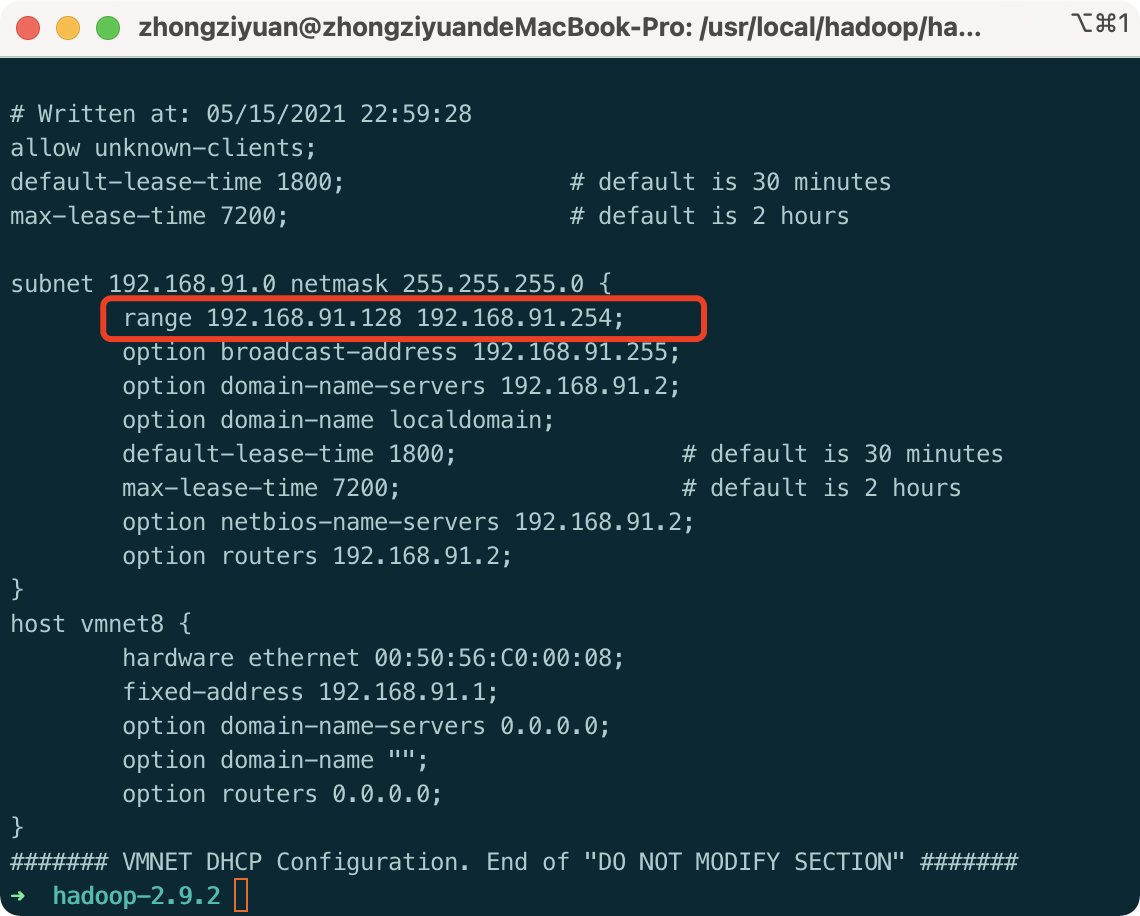
2. View the range of static ip addresses the virtual machine allows to select
cat /Library/Preferences/VMware\ Fusion/vmnet8/dhcpd.conf
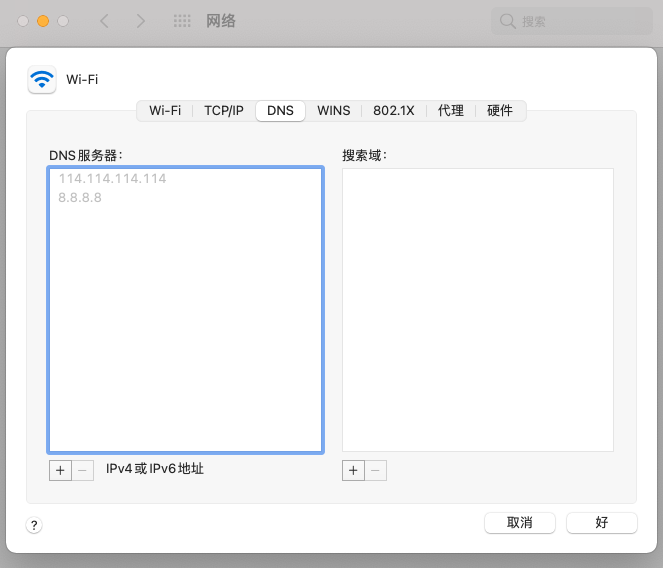
3. View mac native dns: Settings - Network - Advanced
1.3 Modify virtual machine configuration
Configuring static ip only requires this step, all of which is to see what information the current machine should configure
- Log on to the virtual machine (you can use mac command line ssh) username@ip )
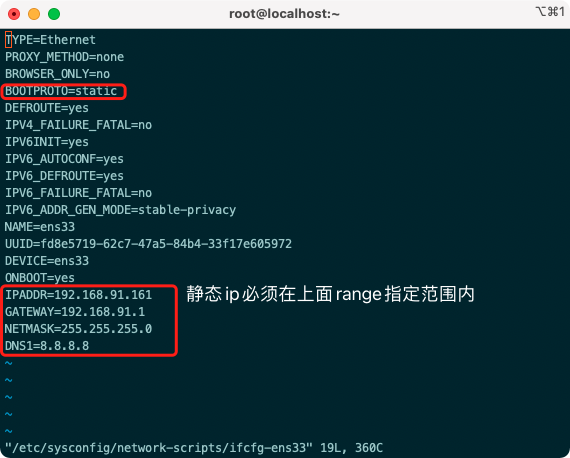
- Modify the configuration file, noting that the file name begins with ifcfg-en
vi /etc/sysconfig/network-scripts/ifcfg-ens33

IPADDR=192.168.91.161
GATEWAY=192.168.91.1
NETMASK=255.255.255.0
DNS1=8.8.8.8
1.4 Verify static ip
Restart Network Service Effective
service network restart
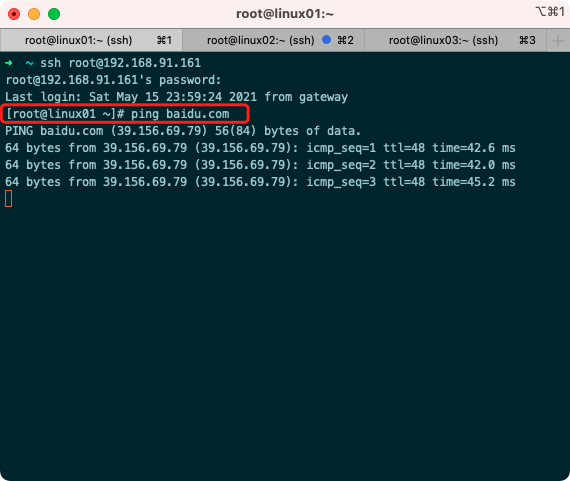
ping extranet
ping baidu.com
2. Configure hostname
2.1 Set Host Name
hostnamectl set-hostname linux01
2.2 View hostname
hostname
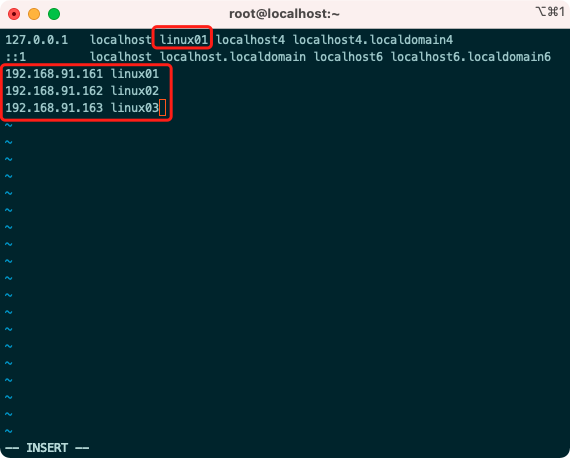
2.2 Cluster Host Name Settings
vi /etc/hosts
3. Close the firewall
systemctl stop iptables
systemctl stop firewalld
systemctl disable firewalld.service
4. Implement ssh Secret-Free Interchange
Id_to be generated per machine Rsa. Pub append to the same authorized_keys, and then authorized_keys sent to other remote hosts
4.1 Generate public and private keys for each machine, and use default values for line-break returns
ssh-keygen -t rsa
4.2 Append each public key to the same server
ssh-copy-id 192.168.91.161
4.3 Authorized_to be generated on machines with public keys Keys file sent to other hosts
scp -r ~/.ssh/authorized_keys 192.168.91.162:~/.ssh
scp -r ~/.ssh/authorized_keys 192.168.91.163:~/.ssh
4.4 Verify ssh Interchange
ssh linux01
ssh linux02
ssh linux03
Problems you may encounter during virtual machine preparation:
- The ifconfig command is not available: yum-y install net-tools
- The Yum command failed to execute: execute the nmtui command, then select Edit a connection - select ens33 - Automatically connect tick, exit retry the yum command
3. Setting up a hadoop cluster
1. jdk and hadoop software installation
1.1 Specify the software installation folder
Software Installation Package Storage Directory
mkdir -p /opt/dayu/software
 Software Installation Directory
mkdir -p /opt/dayu/servers
1.2 Upload installation package
scp -r jdk-8u231-linux-x64.tar.gz root@192.168.91.161:/opt/dayu/software
scp -r hadoop-2.9.2.tar.gz  root@192.168.91.161:/opt/dayu/software
1.3 Unzip the software to the specified installation directory
tar -zxvf jdk-8u231-linux-x64.tar.gz -C /opt/dayu/servers/
tar -zxvf hadoop-2.9.2.tar.gz -C /opt/dayu/servers/
1.4 Append environment variables
vi /etc/profile
##JAVA_HOME
export JAVA_HOME=/opt/dayu/servers/jdk1.8.0_231
export PATH=$PATH:$JAVA_HOME/bin
##HADOOP_HOME
export HADOOP_HOME=/opt/dayu/servers/hadoop-2.9.2
export PATH=$PATH:$HADOOP_HOME/bin
export PATH=$PATH:$HADOOP_HOME/sbin
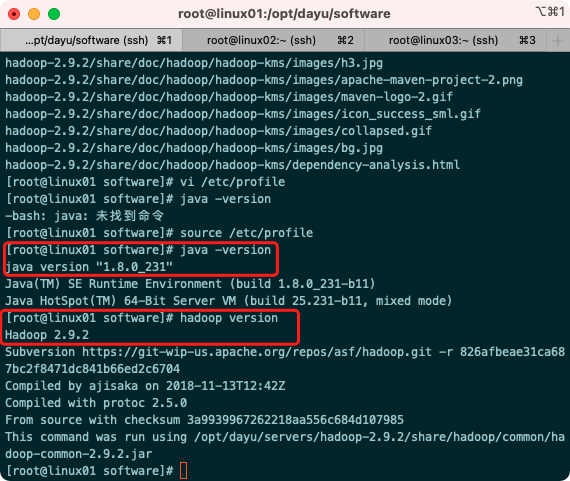
1.5 Verify successful software installation
source /etc/profile
java -version
hadoop version
2. hadoop cluster configuration
Hadoop Cluster Configuration= HDFS Cluster Configuration + MapReduce Cluster Configuration + Yarn Cluster Configuration
The folder where the profile is located:
/opt/dayu/servers/hadoop-2.9.2/etc/hadoop
To avoid confusion, modify the users and user groups that the Hadoop installation directory belongs to
chown -R root:root /opt/dayu/servers/hadoop-2.9.2
2.1 HDFS cluster configuration
- Clearly configure the JDK path to HDFS (modify hadoop-env.sh)
export JAVA_HOME=/opt/dayu/servers/jdk1.8.0_231
- Specify NameNode node and data store directory (modify core-site.xml)
  <property>
    <name>fs.defaultFS</name>
    <value>hdfs://linux01:9000</value>
  </property>
  <!-- Appoint Hadoop Storage directory where files are generated at runtime -->
  <property>
    <name>hadoop.tmp.dir</name>
    <value>/opt/dayu/servers/hadoop-2.9.2/data/tmp</value>
  </property>
- Specify the SecondaryNameNode node (modify hdfs-site.xml)
  <!-- Appoint Hadoop Secondary Name Node Host Configuration -->
  <property>
    <name>dfs.namenode.secondary.http-address</name>
    <value>linux03:50090</value>
  </property>
  <!--Number of copies -->
  <property>
    <name>dfs.replication</name>
    <value>3</value>
  </property>
- Specify DataNode slave nodes (modify the slaves file, one line for each node configuration information)
linux01
linux02
linux03
2.2 MapReduce Cluster Configuration
- Clearly configure the JDK path to MapReduce (modify mapred-env.sh)
export JAVA_HOME=/opt/dayu/servers/jdk1.8.0_231
- Specify the MapReduce Computing Framework to run the Yarn Resource Scheduling Framework (modify mapred-site.xml)
// Change profile template name to formal profile name first
mv mapred-site.xml.template mapred-site.xml
  <!-- Appoint MR Run on Yarn upper -->
  <property>
    <name>mapreduce.framework.name</name>
    <value>yarn</value>
  </property>
2.3 Yarn Cluster Configuration
- Clearly configure the JDK path to Yarn (modify yarn-env.sh)
export JAVA_HOME=/opt/dayu/servers/jdk1.8.0_231
- Specify the computer section where the ResourceManager master node is located (modify yarn-site.xml)
  <!-- Appoint YARN Of ResourceManager Address -->
  <property>
    <name>yarn.resourcemanager.hostname</name>
    <value>linux03</value>
  </property>
  <!-- Reducer How to get data -->
  <property>
    <name>yarn.nodemanager.aux-services</name>
    <value>mapreduce_shuffle</value>
  </property>
- Specify the NodeManager node (no configuration required, determined by the contents of the slaves file)
3. Distribution Configuration on Machine Nodes (rsync)
rsync is mainly used for backup and mirroring. It has the advantages of fast speed, avoiding duplication of the same content and supporting symbolic links.
Difference between rsync and scp: Files copied with rsync are faster than scp, rsync only updates the difference files. SCP is all text
Copy them all over.
3.1 Install rsync
yum install -y rsync
3.2 Writing shell scripts
# Create script
touch rsync-script
# Modify script has execute permission
chmod 777 rsync-script
# This command allows you to synchronize configuration files after scripting
rsync-script /opt/dayu/servers/hadoop-2.9.2
#!/bin/bash

#1 Get the number of command input parameters, if the number is 0, exit the command directly
paramnum=$#
if((paramnum==0)); then
echo no params;
exit;
fi

#2 Get the file name from the incoming parameter
p1=$1
file_name=`basename $p1`
echo fname=$file_name

#3 Get absolute path of input parameter
pdir=`cd -P $(dirname $p1); pwd`
echo pdir=$pdir

#4 Get the user name
user=`whoami`

#5 Loop execution rsync
for((host=1; host<4; host++)); do
echo ------------------- linux0$host --------------
rsync -rvl $pdir/$file_name $user@linux0$host:$pdir
done
3. hadoop cluster startup
Initialize if not started
hadoop namenode -format
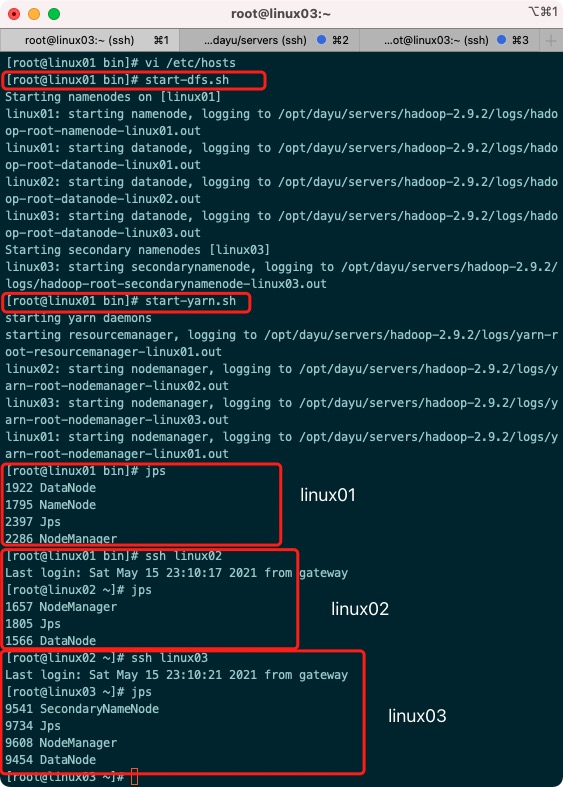
1. Clustering
start-dfs.sh
start-yarn.sh
2. View cluster startup status
jps
3. web side view Hdfs interface
http://192.168.91.161:50070/dfshealth.html#tab-overview