Building Hadoop distributed platform in linux system
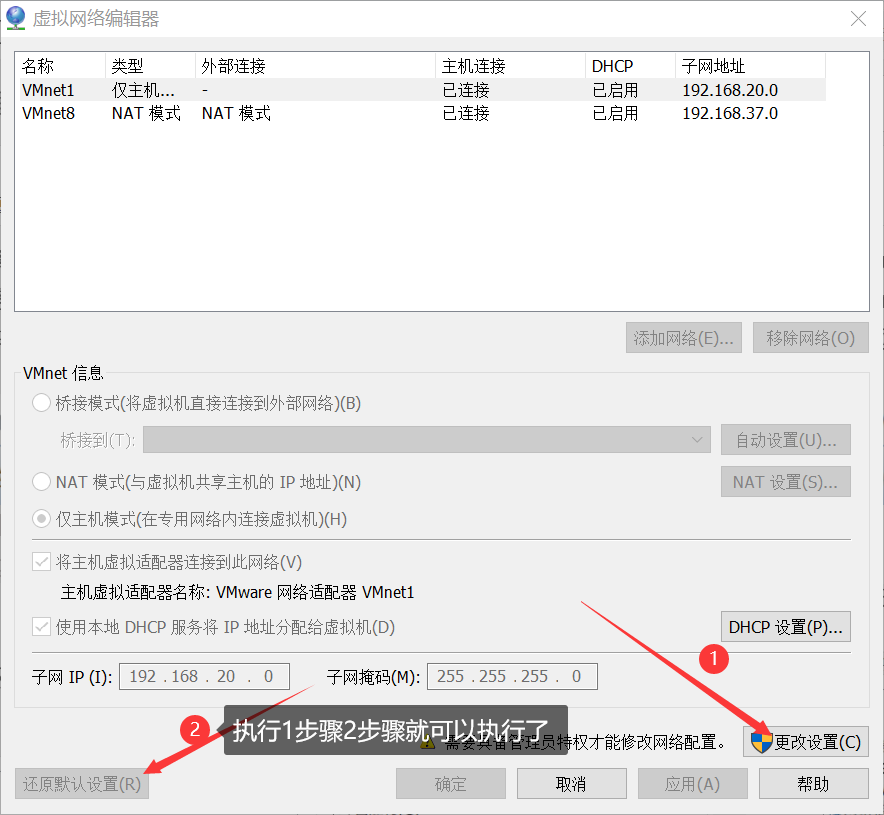
First, if the liunx network cannot be connected, click "Edit" in the VMwvare main interface, and then select "virtual network editor"

After entering, restore the default settings in the following two steps. Generally, you can restore them after setting
1. Environmental preparation
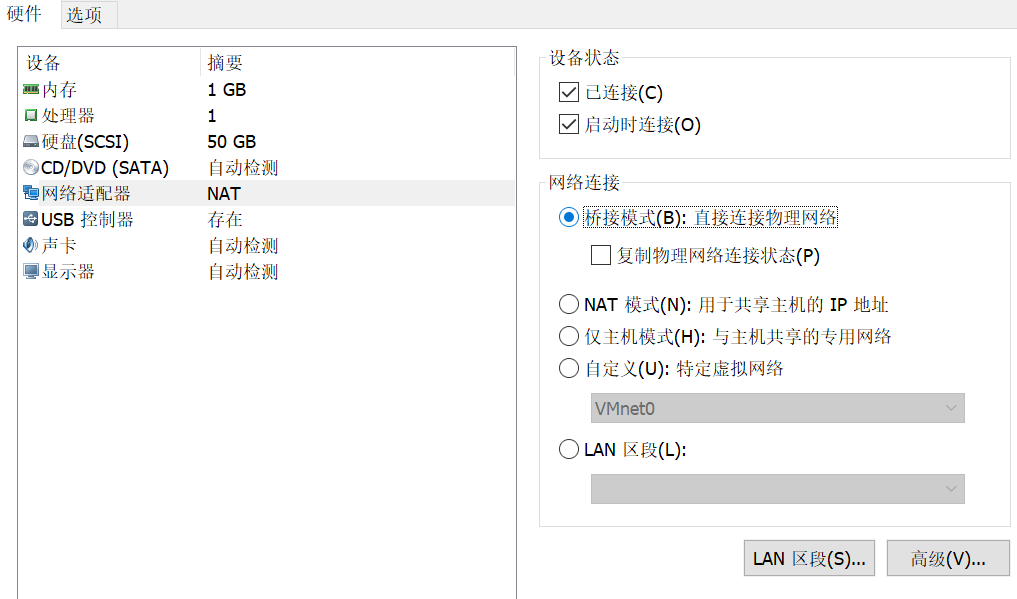
Change the virtual machine network connection mode to bridge mode
For ease of use, we use the following commands on the Master node to modify the host name. Change the Master node to Master and slave node to slave1
sudo vim /etc/hostname
#If the Master restarts, the change will be successful
Use the following command to know the ip addresses of the master node and the slave node
ifconfig -a
#192.168.43.186	Master
#192.168.43.129	slave1
Then, execute the following command in the Master node to open and modify the "/ etc/hosts" file in the Master node:
sudo vim /etc/hosts
After modification, see the following figure:
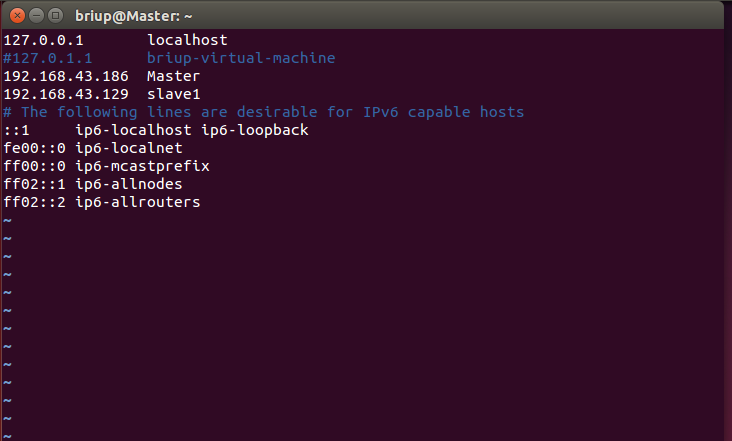
It should be noted that there can only be one 127.0.0 in the general hosts file 0.1, the corresponding host name is localhost, if there is more than 127.0 0.1 mapping should be deleted. In particular, mapping records such as "127.0.0.1 Master" cannot exist. After modification, you need to restart the Linux system.
Generally speaking, the ip address of the computer will change. In order to prevent the change, we can fix the ip address * * (if the network cannot be connected, ignore the fixed ip step)**
sudo vim /etc/network/interfaces
The original configuration of this file is as follows (if the following contents are not opened, it is best not to change the contents):
# This file describes the network interfaces available on your system
# and how to activate them. For more information, see interfaces(5).

source /etc/network/interfaces.d/*

# The loopback network interface
auto lo
iface lo inet loopback

# The primary network interface
auto enp0s3
iface enp0s3 inet dhcp
The modified configuration is as follows:
# This file describes the network interfaces available on your system
# and how to activate them. For more information, see interfaces(5).

source /etc/network/interfaces.d/*

# The loopback network interface
auto lo
iface lo inet loopback

# The primary network interface
auto enp0s3
#iface enp0s3 inet dhcp
iface enp0s3 inet static
address 192.168.43.186 #IP address
netmask 255.255.255.0  #Subnet mask
gateway 192.168.43.1   #gateway
dns-nameservers 8.8.8.8
Do the above work and restart the following virtual machines
sudo reboot     #restart
sudo poweroff   #Shut down
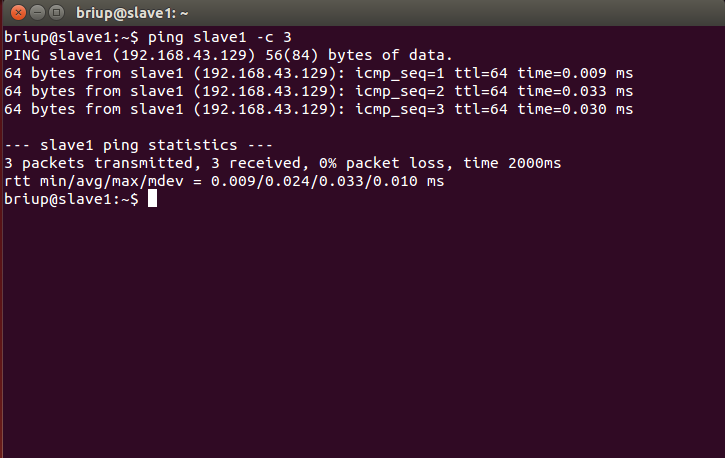
This completes the configuration of the Master node and the slave node. Then, you need to execute the following commands on each node to test whether they ping each other (in the networked state). If the ping fails, the subsequent configuration cannot succeed:
ping Master -c 3   # Ping only 3 times will stop. Otherwise, press Ctrl+c to interrupt the ping command
ping slave1 -c 3

2. Configure SSH password less login node
SSH login is required for both cluster and single node modes (similar to remote login, you can log in to a Linux host and run commands on it). By default, Ubuntu has installed SSH client and SSH server:
sudo apt-get install openssh-server
ssh localhost
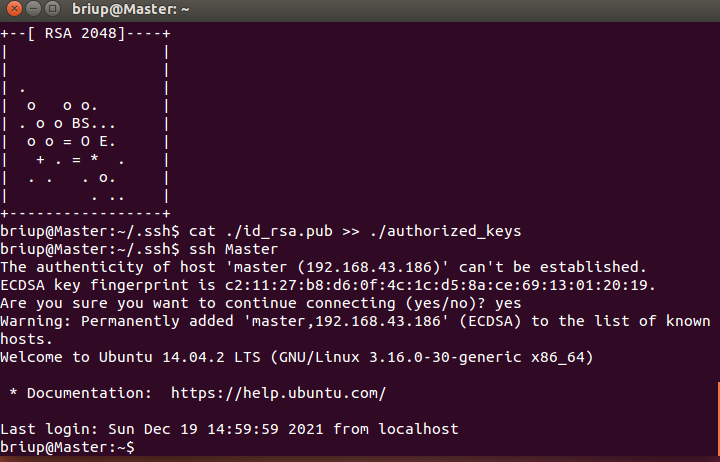
The Master node must be able to log in to each slave node via SSH without password. First, generate the public key of the Master node. If the public key has been generated before, you must delete the originally generated public key and regenerate it again, because we modified the host name earlier. The specific commands are as follows:
cd ~/.ssh              # If you do not have this directory, first execute ssh localhost
rm ./id_rsa*           # Delete the previously generated public key (if it already exists)
ssh-keygen -t rsa       # After executing this command, if you encounter a prompt message, press enter all the time
In order to enable the Master node to log in to the machine without password SSH, you need to execute the following commands on the Master node:
cat ./id_rsa.pub >> ./authorized_keys
After completion, you can execute the command "ssh Master" to verify. You may encounter a prompt message. Just enter yes. After the test is successful, please execute the command "exit" to return to the original terminal.
ssh Master
exit
As shown in the figure below:
Next, transfer the public key on the Master node to the slave 1 node:
scp ~/.ssh/id_rsa.pub briup@slave1:~/.ssh
#My slave user and hostname are briup@slave1
In the above command, scp is short for secure copy, which is used to remotely copy files under Linux. It is similar to the cp command, but cp can only be copied locally.
If the following error (connection rejected) is encountered during execution:

First, check whether slave1 has ssh installed. If not, execute the following command to install
sudo apt-get update
sudo apt-get install openssh-server
ssh localhost
If the ssh service is installed and still fails, use the following command to check whether the port number is correct
ss -lnt
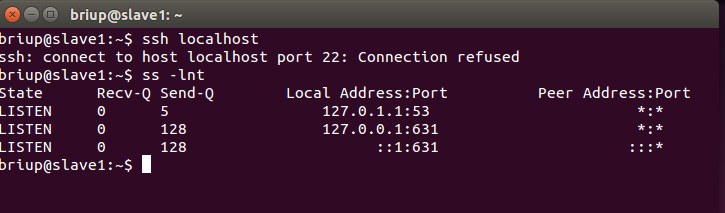
The above situation indicates that the SSH service has not been successfully installed. Continue to install the SSH service
If you need to change the port number, you can use the following command to change the port number
cd /etc/ssh
sudo vim sshd_config
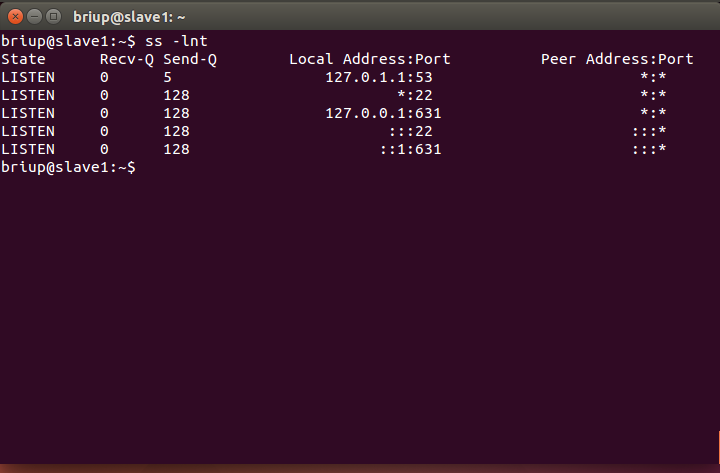
If all SSH services are executed correctly, the following results will be realized after ss -lnt:
If SCP also appears during execution: / SSH: permission denied and other errors, the above sshd_ Change no or without password after permitrotlogin in config to yes
When scp is executed, you will be asked to enter the password of the briup user on slave1. After entering, you will be prompted that the transmission is complete, as shown in the following figure:

Then, on the slave 1 node, add the SSH public key to the authorization:
mkdir ~/.ssh       # If the folder does not exist, you need to create it first. If it already exists, this command will be ignored
cd .ssh
cat id_rsa.pub >> ~/.ssh/authorized_keys
rm ~/id_rsa.pub    # You can delete it after you use it
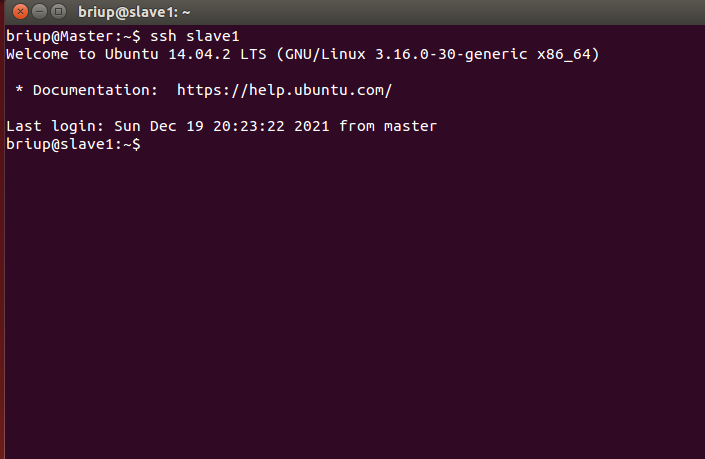
If there are other slave nodes, transfer the Master key to the slave node and add authorization to the slave node. In this way, you can log in to each slave node without password SSH on the Master node. You can execute the following commands on the Master node for verification:
ssh slave1
#The ssh Master can be used to return the Master user, but the password of the Master is required to return the Master user
3. Install hadoop and java environment
In this step, you need to install hadoop and java environment on the Master node. slave1 only needs to install java environment.
Here I use hadoop 3.0 Version 3, and JDK uses the jdk-8u91 version. Use the following command to unzip the compressed packages of hadoop and JDK to the corresponding directory:
sudo tar -zxvf jdk-8u91-linux-x64.tar.gz -C /usr/lib/jvm
sudo tar -xvf  hadoop-3.0.3.tar -C /usr/local
Next, continue to execute the following command to set the environment variable:
cd ~
vim ~/.bashrc
Open the user's environment variable configuration file, and add the following lines at the beginning of the file:
export JAVA_HOME=/usr/lib/jvm/jdk1.8.0_91
export JRE_HOME=${JAVA_HOME}/jre
export CLASSPATH=.:${JAVA_HOME}/lib:${JRE_HOME}/lib
export PATH=${JAVA_HOME}/bin:$PATH
preservation. Bashrc file and exit the vim editor. Then, continue to execute the following command The configuration of the bashrc file takes effect immediately:
source ~/.bashrc
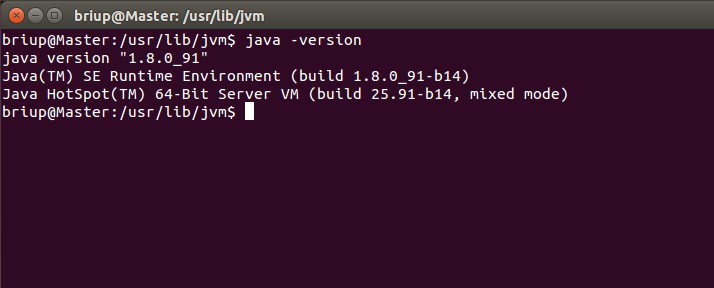
At this time, you can use the following command to check whether the installation is successful:
java -version
Use the following command to change the folder name and give corresponding permissions
cd /usr/local/
sudo mv ./hadoop-3.0.3/ ./hadoop            # Change the folder name to hadoop
sudo chown -R briup ./hadoop    #briup is the user name and hadoop is the file name
Or you can give hadoop-3.0 3 and jdk-8u91 establish a soft connection
cd /usr/local
sudo ln -s hadoop-3.0.3  hadoop
sudo ln -s jdk1.8.0_91  jdk
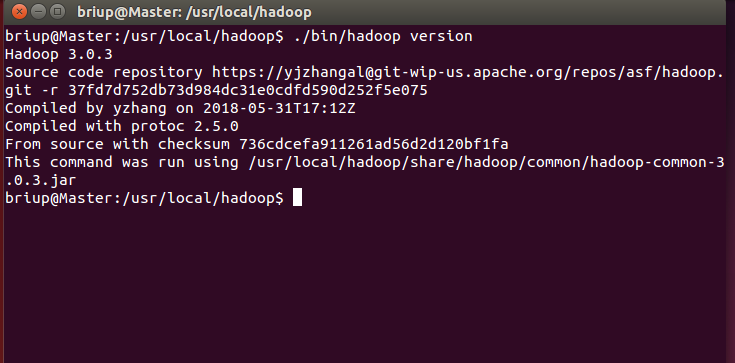
Hadoop can be used after decompression. Enter the following command to check whether Hadoop is available. If successful, the Hadoop version information will be displayed:
cd /usr/local/hadoop
./bin/hadoop version
If you can't see the version information, use VIM ~ / Profile or VIM ~ / Bashrc deletes all hadoop configurations, and then executes the following command:
vim ~/.bashrc
#Add unset Hadoop to the last sentence of the file_ HOME
source ~/.bashrc
View the version information again, as shown in the following figure:
4. Configure cluster / distributed environment
When configuring the cluster / distributed mode, you need to modify the configuration file in the "/ usr/local/hadoop/etc/hadoop" directory. Here, only the setting items necessary for normal startup are set, including workers and core site xml,hdfs-site.xml,mapred-site.xml,yarn-site.xml has 5 files in total. For more settings, please see the official instructions.
(1) Modify file workers
The host names of all data nodes need to be written into the file, one per line, The default is localhost (that is, the local machine is used as a data node). Therefore, in the pseudo distributed configuration, this default configuration is adopted, so that the node can be used as both a name node and a data node. In the distributed configuration, you can keep the localhost and let the Master node act as both a name node and a data node, or you can delete the line localhost and let the Master node only act as a name node Node usage.
In this tutorial, the Master node is only used as a name node, so the original localhost in the workers file is deleted and only the following line is added:
cd /usr/local/hadoop/etc/hadoop
vim workers
#Change the content to slave1
(2) Modify the file core-site.xml
Put the core site The content between and in the XML file is modified as follows:
cd /usr/local/hadoop/etc/hadoop #The following files are the directory
vim core-site.xml #Change which file and use the vim command directly
<configuration>
        <property>
                <name>fs.defaultFS</name>
                <value>hdfs://Master:9000</value>
        </property>
        <property>
                <name>hadoop.tmp.dir</name>
                <value>file:/usr/local/hadoop/tmp</value>
                <description>Abase for other temporary directories.</description>
        </property>
</configuration>
(3) Modify the file hdfs-site.xml
For Hadoop distributed file system HDFS, redundant storage is generally adopted, and the redundancy factor is usually 3, that is, one data saves three copies. However, in this tutorial, there is only one slave node as the data node, that is, there is only one data node in the cluster, and only one copy of the data can be saved. Therefore, DFS The value of replication is still set to 1. hdfs-site. The specific contents of XML are as follows:
<configuration>
        <property>
                <name>dfs.namenode.secondary.http-address</name>
                <value>Master:50090</value>
        </property>
        <property>
                <name>dfs.replication</name>
                <value>1</value>
        </property>
        <property>
                <name>dfs.namenode.name.dir</name>
                <value>file:/usr/local/hadoop/tmp/dfs/name</value>
        </property>
        <property>
                <name>dfs.datanode.data.dir</name>
                <value>file:/usr/local/hadoop/tmp/dfs/data</value>
        </property>
</configuration>
(4) Modify the file mapred-site.xml
If there is only one mapred site in the "/ usr/local/hadoop/etc/hadoop" directory xml. Template, you need to change the file name and rename it mapred - site XML, and then put mapred - site The XML file is configured as follows:
Mapred site xml. Rename the template to mapred site The XML command is as follows:
sudo mv ./mapred-site.xml.template/ ./mapred-site.xml
Configure the contents as follows:
<configuration>
        <property>
                <name>mapreduce.framework.name</name>
                <value>yarn</value>
        </property>
        <property>
                <name>mapreduce.jobhistory.address</name>
                <value>Master:10020</value>
        </property>
        <property>
                <name>mapreduce.jobhistory.webapp.address</name>
                <value>Master:19888</value>
        </property>
        <property>
                <name>yarn.app.mapreduce.am.env</name>
                <value>HADOOP_MAPRED_HOME=/usr/local/hadoop</value>
        </property>
        <property>
                <name>mapreduce.map.env</name>
                <value>HADOOP_MAPRED_HOME=/usr/local/hadoop</value>
        </property>
        <property>
                <name>mapreduce.reduce.env</name>
                <value>HADOOP_MAPRED_HOME=/usr/local/hadoop</value>
        </property>
</configuration>
(5) Modify the file yarn-site.xml
Put the yarn site The XML file is configured as follows:
<configuration>
        <property>
                <name>yarn.resourcemanager.hostname</name>
                <value>Master</value>
        </property>
        <property>
                <name>yarn.nodemanager.aux-services</name>
                <value>mapreduce_shuffle</value>
        </property>
</configuration>
After all the above five files are configured, you need to copy the "/ usr/local/hadoop" folder on the Master node to each node. If you have run pseudo distributed mode before, it is recommended to delete the temporary files generated in pseudo distributed mode before switching to cluster mode. Specifically, first execute the following commands on the Master node:
cd /usr/local
sudo rm -r ./hadoop/tmp     # Delete Hadoop temporary files
sudo rm -r ./hadoop/logs/*   # Delete log file
tar -zcf ~/hadoop.master.tar.gz ./hadoop   # Compress before copy
cd ~     #Because Hadoop master. tar. GZ this compressed package is placed in the home directory
scp ./hadoop.master.tar.gz slave1:/home/briup
If it is sent successfully, the following prompt will appear:

Then execute the following command on the slave1 node:
sudo rm -r /usr/local/hadoop    # Delete old (if any)
sudo tar -zxf ~/hadoop.master.tar.gz -C /usr/local
sudo chown -R briup /usr/local/hadoop #briup indicates the user name of the machine slave1
Similarly, if there are other slave nodes, you should also execute Hadoop master. tar. GZ transfers to the slave node and decompresses files at the slave node.
When starting the Hadoop cluster for the first time, you need to format the name node on the Master node (only this time, and do not format the name node again when starting Hadoop later). The commands are as follows:
cd /usr/local/hadoop
./bin/hdfs namenode -format
Now you can start Hadoop. Start it on the Master node and execute the following command:
./sbin/start-dfs.sh
./sbin/start-yarn.sh
./sbin/mr-jobhistory-daemon.sh start historyserver
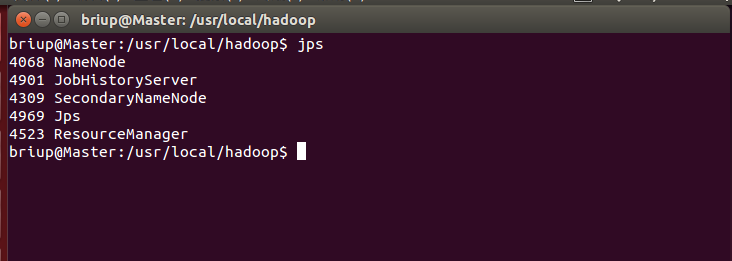
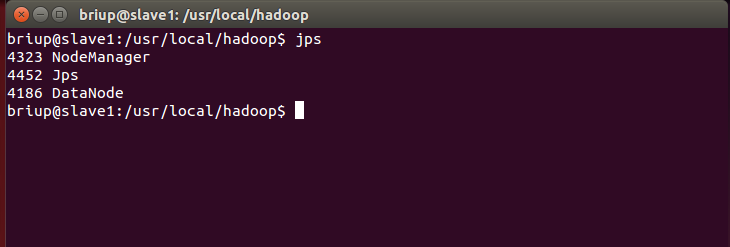
You can view the processes started by each node through the jps command. If it has been started correctly, the NameNode, ResourceManager, SecondrryNameNode and JobHistoryServer processes can be seen on the Master node, as shown in the following figure:
Master node:
slave1 node:
Then you can enter the IP address in the browser, Hadoop 3 The port number of version 0.3 is 9870, as shown in the figure:
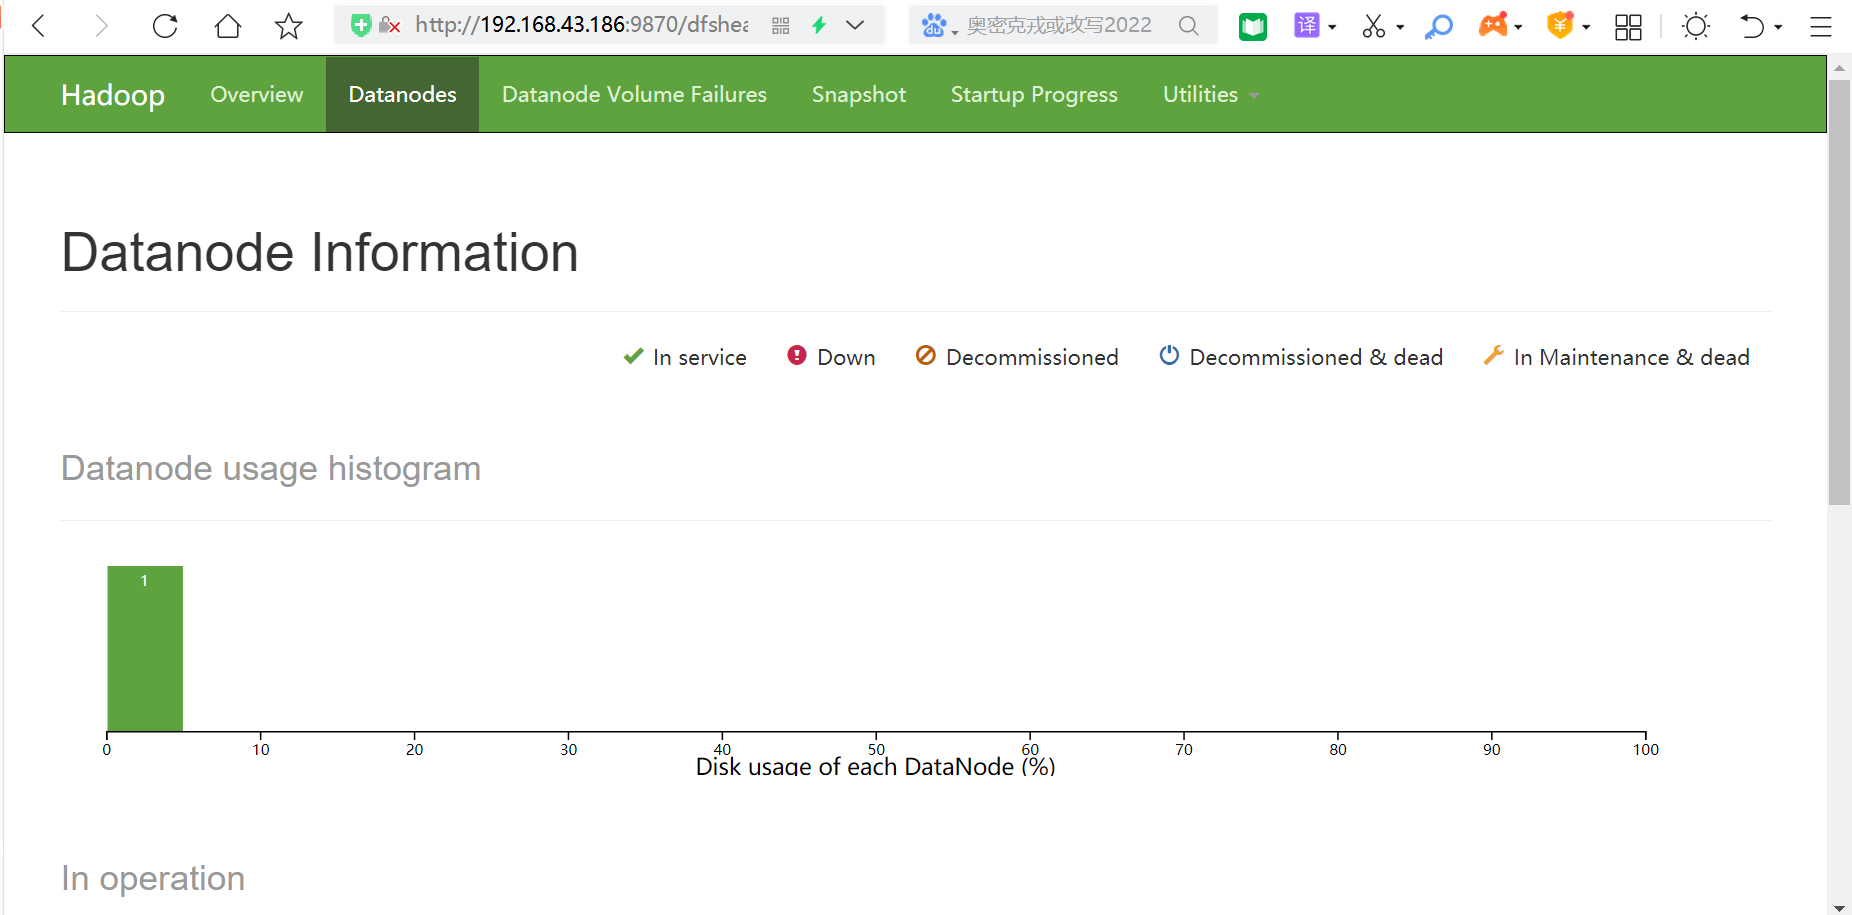
In this way, no matter whether you are in the Master node or slave1 node, you can perform operations. Finally, you can see all files in Browse the file system under Utilities above the browser.
Finally, to close the Hadoop cluster, you need to execute the following commands on the Master node:
./sbin/stop-yarn.sh
./sbin/stop-dfs.sh
./sbin/mr-jobhistory-daemon.sh stop historyserver
5. Execute distributed instances
The process of executing distributed instances is the same as that of pseudo distributed mode. First, create a user directory on HDFS. The command is as follows:
./bin/hdfs dfs -mkdir -p /user/hadoop
Then, create an input directory in HDFS and copy the configuration file in "/ usr/local/hadoop/etc/hadoop" directory as the input file to the input directory. The command is as follows:
./bin/hdfs dfs -mkdir input
./bin/hdfs dfs -put /usr/local/hadoop/etc/hadoop/*.xml input