Hadoop learning
1.Hadoop overview
- Infrastructure of a distributed system
- It mainly solves the problems of massive data storage and distributed computing
1.1 three major releases of Hadoop
- The original version of Apache was released in 2006
- Cloudera integrates many big data frameworks internally, and the corresponding product is CDH released in 2008
- HortonWorks has good documentation, and the corresponding product HDP was released in 2011
1.2 advantages of Hadoop
- High reliability: Hadoop maintains multiple copies of data at the bottom, so Hadoop will not lose data when calculating an element or storage fails
- High scalability: allocating task data among clusters can easily expand thousands of nodes.
- Efficiency: under the idea of MapReduce, Hadoop works in parallel to speed up task processing.
- High fault tolerance: it can automatically expand the failed tasks
1.3 differences between Hadoop versions
-
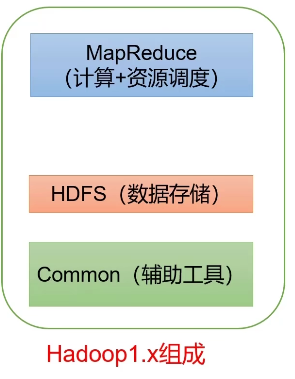
1.x composition
-
Composition of 2.x

- 3.x is similar in composition to 2 X doesn't make much difference, but there are some tuning in other performance aspects.
1.4 composition of Hadoop
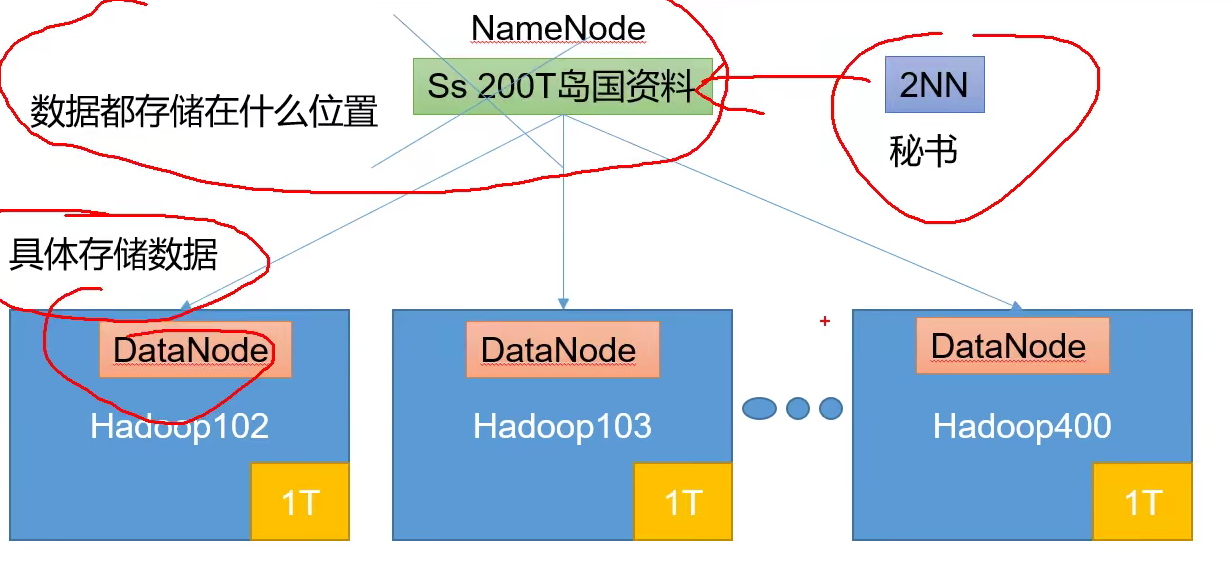
1.4.1 overview of HDFS architecture
Hadoop Distributed File System (HDFS for short) is a distributed file system.
- Namenode (NN): stores the metadata, file name, structure and attribute of the file. And the block list of each file and the DataNode where the block is located.
- DataNode (dn): stores file block data and data checksum in the local file system.
- Secondary NameNode (2nn): Backup metadata of NameNode at regular intervals
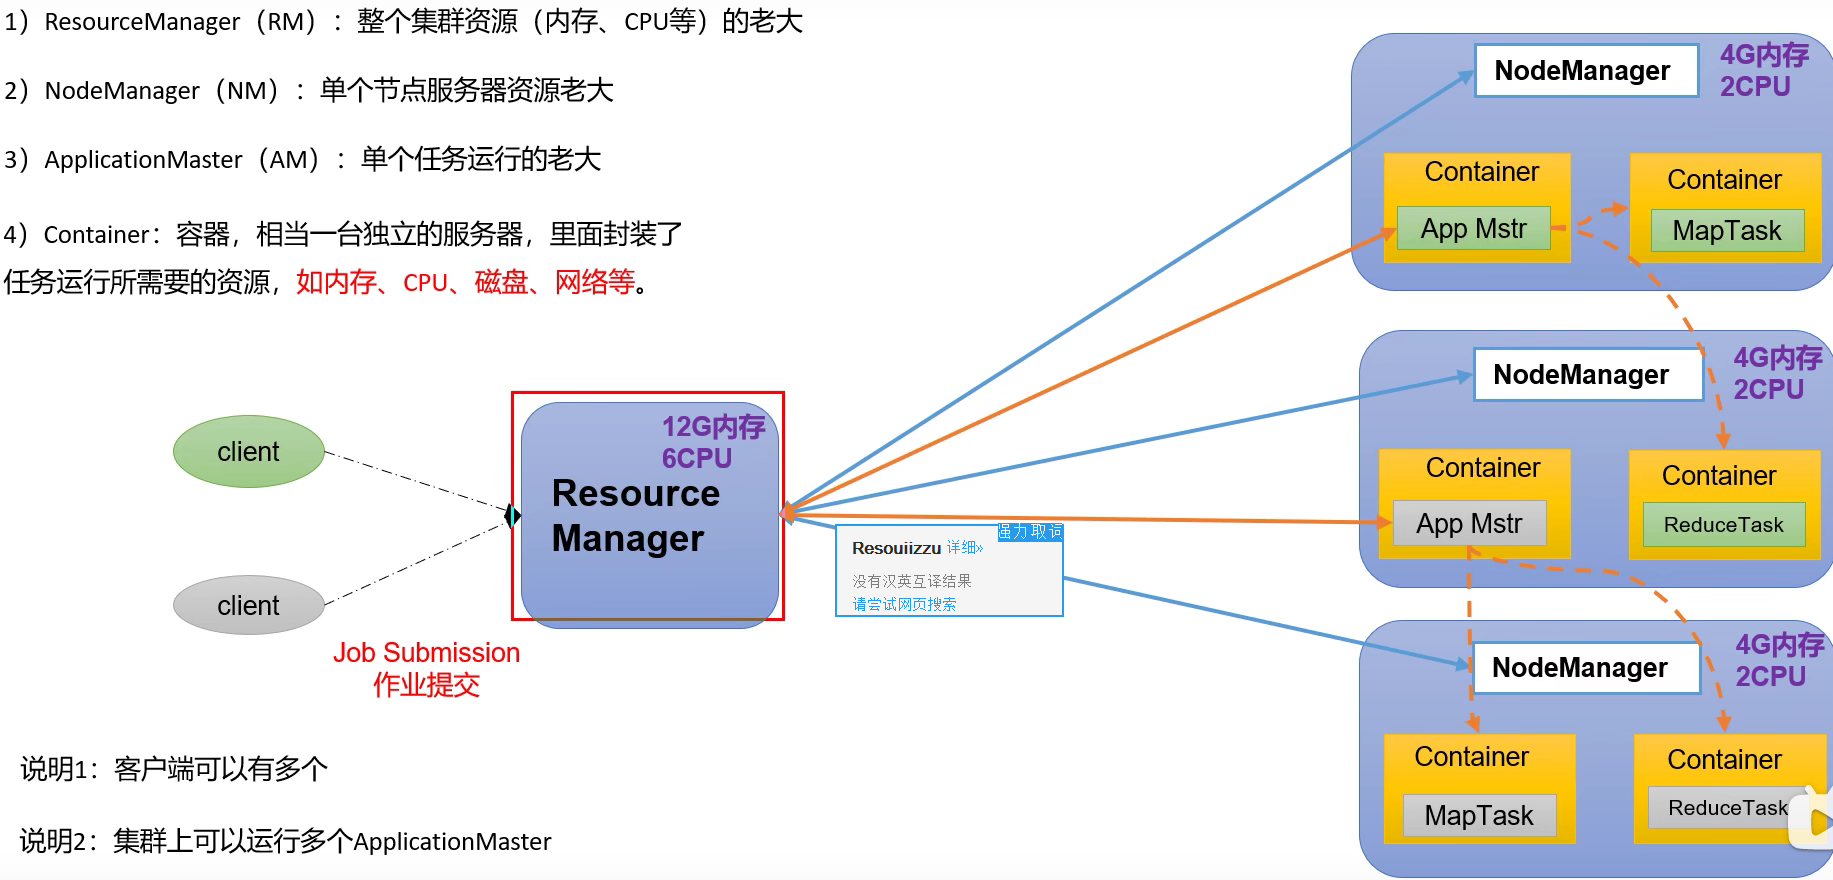
1.4.2 overview of yarn architecture
It is mainly responsible for the resource scheduling and operation of the whole cluster
- Resource Manager (RM): the leader of the entire cluster resources
- NodeManager (NM): resource manager of a single node server
- Application master (AM): the boss of a single task
- Container: container is equivalent to an independent server, which encapsulates the resources required for task operation, such as memory, CPU, disk, network, etc.
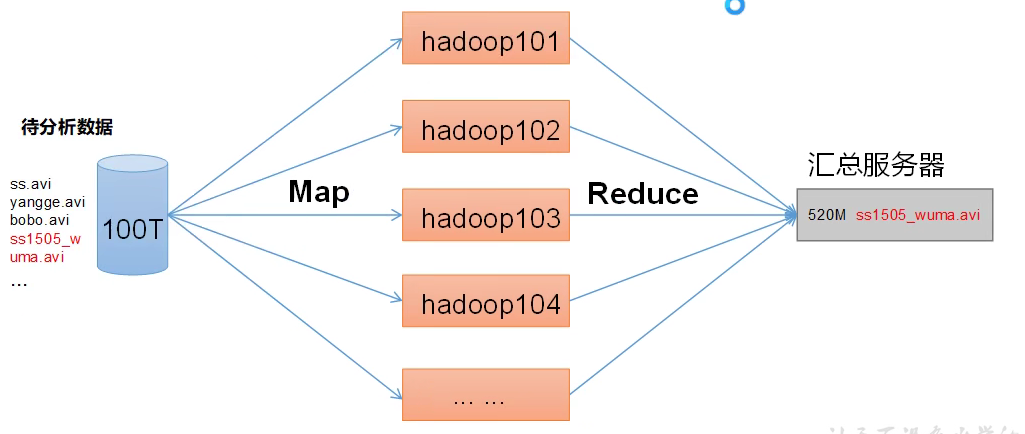
1.4.3 overview of MapReduce architecture
MapReduce divides the calculation process into two stages: Map and Reduce
- The Map stage processes the input data in parallel
- In the Reduce phase, the Map results are summarized
1.4.4 relationship among the three

1.5 Hadoop installation
1.5.1 installation of virtual machine
- First set up some hardware memory, and then install the image.
- Allocate memory, configure time zone, set root user and ordinary user
- Network settings after entering. Configure static address.
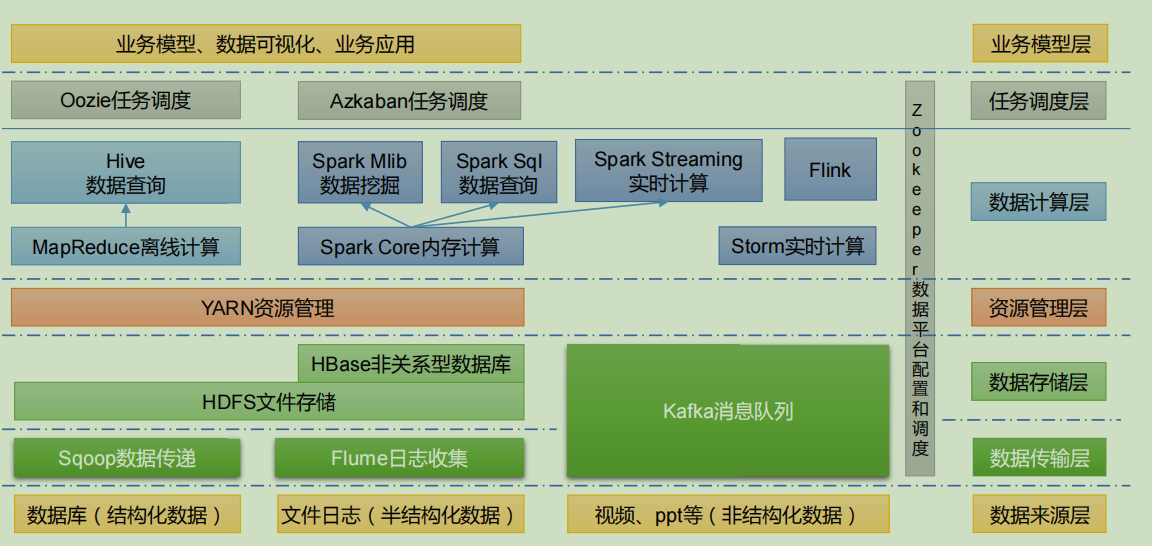
1.6 big data technology ecosystem
-
Sqoop: sqoop is an open source tool, which is mainly used to transfer data between Hadoop, Hive and traditional database (MySQL). It can import the data in a relational database (such as mysql, Oracle, etc.) into Hadoop HDFS or HDFS into relational database.
-
Flume: flume is a highly available, highly reliable and distributed system for massive log collection, aggregation and transmission. Flume supports customization of various data senders in the log system for data collection;
-
Kafka: Kafka is a high-throughput distributed publish subscribe message system;
-
Spark: spark is currently the most popular open source big data memory computing framework. It can be calculated based on the big data stored on Hadoop.
-
Flink: Flink is currently the most popular open source big data memory computing framework. There are many scenarios for real-time computing.
-
Oozie: oozie is a workflow scheduling management system that manages Hadoop job s.
-
HBase: HBase is a distributed, column oriented open source database. HBase is different from the general relational database. It is a database suitable for unstructured data storage.
-
Hive: hive is a data warehouse tool based on Hadoop. It can map structured data files into a database table and provide simple SQL query function. It can convert SQL statements into MapReduce tasks for operation. Its advantage is low learning cost. It can quickly realize simple MapReduce statistics through SQL like statements without developing special MapReduce applications. It is very suitable for statistical analysis of data warehouse.
-
ZooKeeper: it is a reliable coordination system for large-scale distributed systems. Its functions include configuration maintenance, name service, distributed synchronization, group service, etc.
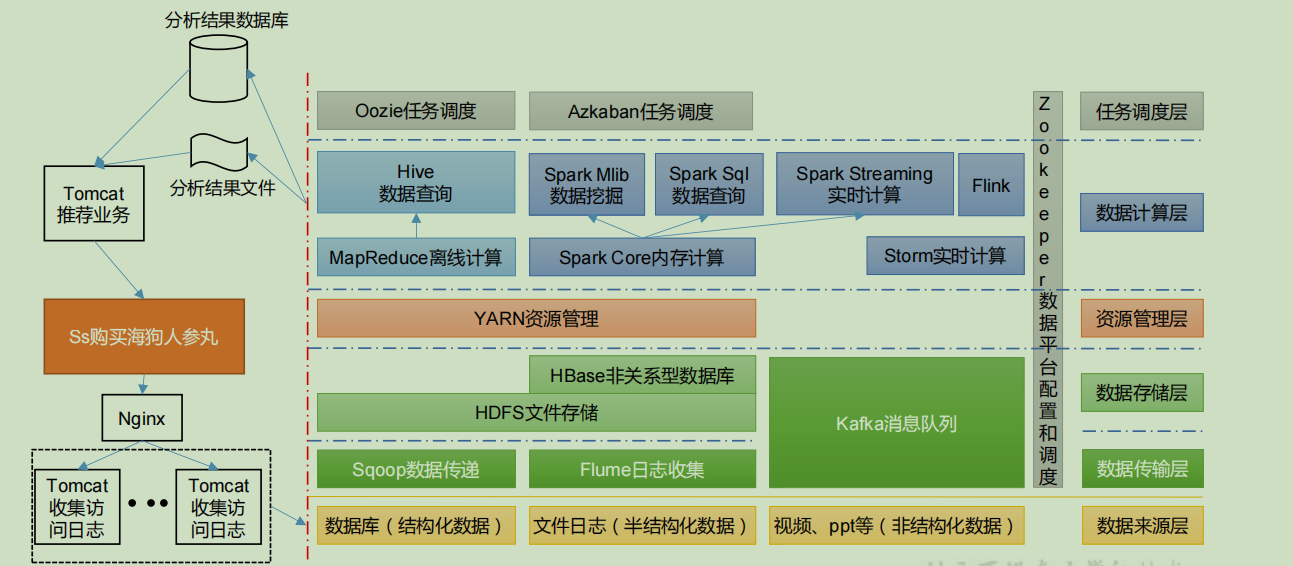
1.7 block diagram of recommendation system
2. Hadoop environment construction
2.1 environmental preparation
-
Install the template virtual machine with IP address 192.168.10.100, host name Hadoop 100, memory 4G and hard disk 50G.
-
Configure virtual machine
- Configure the static network to ensure that the ping network can access the Internet
- Install EPEL release
Extra Packages for Enterprise Linux is an additional software package for the "red hat" operating system,
Applicable to RHEL, CentOS and Scientific Linux. It is equivalent to a software warehouse. Most rpm packages are in the official
(not found in repository)
yum install -y epel-release
- If you are installing the smallest system, you need to install vim and net tool tools
 yum install -y net-tools
 yum install -y vim
- Turn off firewall and turn off firewall self startup
 systemctl stop firewalld
 systemctl disable firewalld.service
Note: during enterprise development, the firewall of a single server is usually turned off. The company as a whole will set up a very secure firewall
- Create a user jack and change the password
useradd jack
passwd 123456
- Configure the jack user to have root permission, which is convenient for sudo to execute the command with root permission later
 vim /etc/sudoers
# Add the line jack to% wheel

 ## Allow root to run any commands anywhere
root ALL=(ALL) ALL
## Allows people in group wheel to run all commands
%wheel ALL=(ALL) ALL
jack ALL=(ALL) NOPASSWD:ALL
Note: the line atguigu should not be placed directly under the root line, because all users belong to the wheel group. You first configured atguigu to have a password free function, but when the program runs to the% wheel line, the function is overwritten and requires a password. So atguigu should put it under the line% wheel.
- Create a folder in the / opt directory and modify the owner and group
# Create the module and software folders in the / opt directory
mkdir /opt/module
mkdir /opt/software
#Modify that the owner and group of the module and software folders are atguigu users
chown jack:jack /opt/module
chown jack:jack /opt/software
- Uninstall the JDK that comes with the virtual machine
 rpm -qa | grep -i java | xargs -n1 rpm -e
--nodeps
# notes
rpm -qa: Query all installed rpm software package
grep -i: ignore case
xargs -n1: Indicates that only one parameter is passed at a time
rpm -e –nodeps: Force uninstall software
- Restart the virtual machine
reboot
-
Clone virtual machine
- Using the template machine Hadoop 100, clone three virtual machines: Hadoop 102, Hadoop 103, Hadoop 104
Note: when cloning, close Hadoop 100 first
-
Modify the clone machine IP, which is illustrated by Hadoop 102 below
- Modify the static IP of the cloned virtual machine
 vim /etc/sysconfig/network-scripts/ifcfg-ens33

 # content
DEVICE=ens33
TYPE=Ethernet
ONBOOT=yes
BOOTPROTO=static
NAME="ens33"
IPADDR=192.168.10.102
PREFIX=24
GATEWAY=192.168.10.2
DNS1=192.168.10.2
- Edit the network compiler of Linux virtual machine, VMnet8, and set the subnet of NAT to 192.168.10.0 and the gateway to 192.168.10.2
- Adapt VMnet8 in windows, set the Internet Protocol version 4 (TCP/IPv4) attribute in its attributes, set the default gateway to 192.168.10.2, set the DNS server address to 192.168.10.2 and standby 8.8.8.8, and click OK
- Ensure that the ip address of the network configuration in ifcfg-ens33 in the Linux system is the same as that in Window VM8
-
Modify the host name of the clone machine. The following is an example of Hadoop 102
- Modify host name
vim /etc/hostname
hadoop102
- Configure the Linux clone host name mapping hosts file and open / etc/hosts
 vim /etc/hosts
 # Add the following
192.168.10.100 hadoop100
192.168.10.101 hadoop101
192.168.10.102 hadoop102
192.168.10.103 hadoop103
192.168.10.104 hadoop104
192.168.10.105 hadoop105
192.168.10.106 hadoop106
192.168.10.107 hadoop107
192.168.10.108 hadoop108
-
Recoloning virtual machine reboot
-
Modify the mapping file in windows
 # Enter C:\Windows\System32\drivers\etc, open the host file and add the following contents
192.168.10.100 hadoop100
192.168.10.101 hadoop101
192.168.10.102 hadoop102
192.168.10.103 hadoop103
192.168.10.104 hadoop104
192.168.10.105 hadoop105
192.168.10.106 hadoop106
192.168.10.107 hadoop107
192.168.10.108 hadoop108
- Install JDK in hadoop 102
Note: be sure to uninstall before installing
- The transport tool of xshell imports the JDK into the software folder under the opt directory,
- Unzip the JDK to the / opt/module directory
[jack@hadoop102 software]$ tar -zxvf jdk-8u212-linuxx64.tar.gz -C /opt/module/
- Configure JDK environment variables
- Create a new / etc / profile d/my_ env. SH file
sudo vim /etc/profile.d/my_env.sh
#Add the following to it

#JAVA_HOME
export JAVA_HOME=/opt/module/jdk1.8.0_212
export PATH=$PATH:$JAVA_HOME/bin
Exit after saving. Remember to use resource to make the environment variable PATH effective
source /etc/profile
Check whether the JDK is successfully installed java -version
-
Install hadoop
Import the installation package into / opt/software, extract it into the module folder, and configure its environment variables
[jack@hadoop102 software]$ tar -zxvf hadoop-3.1.3.tar.gz -C /opt/module/

# Edit configuration environment variables
sudo vim /etc/profile.d/my_env.sh
# Add the following at the end of the file,
#HADOOP_HOME
export HADOOP_HOME=/opt/module/hadoop-3.1.3
export PATH=$PATH:$HADOOP_HOME/bin
export PATH=$PATH:$HADOOP_HOME/sbin
Save and exit. Click the resource configuration file to check whether the hadoop version is successfully installed.
2.2 Hadoop directory structure
drwxr-xr-x. 2 atguigu atguigu 4096 5 June 22, 2017 bin
drwxr-xr-x. 3 atguigu atguigu 4096 5 June 22, 2017 etc
drwxr-xr-x. 2 atguigu atguigu 4096 5 June 22, 2017 include
drwxr-xr-x. 3 atguigu atguigu 4096 5 June 22, 2017 lib
drwxr-xr-x. 2 atguigu atguigu 4096 5 June 22, 2017 libexec
-rw-r--r--. 1 atguigu atguigu 15429 5 June 22, 2017 LICENSE.txt
-rw-r--r--. 1 atguigu atguigu 101 5 June 22, 2017 NOTICE.txt
-rw-r--r--. 1 atguigu atguigu 1366 5 June 22, 2017 README.txt
drwxr-xr-x. 2 atguigu atguigu 4096 5 June 22, 2017 sbin
drwxr-xr-x. 4 atguigu atguigu 4096 5 June 22, 2017 share
-
bin directory: stores scripts that operate Hadoop related services (hdfs, yarn, mapred)
-
etc Directory: Hadoop configuration file directory, which stores Hadoop configuration files
-
lib Directory: the local library where Hadoop is stored (the function of compressing and decompressing data)
-
sbin Directory: stores scripts for starting or stopping Hadoop related services
-
share Directory: stores the dependent jar packages, documents, and official cases of Hadoop
3. Operation mode of Hadoop
3.1 official website
http://hadoop.apache.org/
3.2 operation mode
Hadoop operation modes include: local mode, pseudo distributed mode and fully distributed mode.
- Local mode: stand-alone operation, just to demonstrate the official case. Not used in production environment.
- Pseudo distributed mode: it is also a stand-alone operation, but it has all the functions of Hadoop cluster. One server simulates a distributed environment. Individual companies that are short of money are used for testing, and the production environment is not used.
- Fully distributed mode: multiple servers form a distributed environment. Use in production environment.
3.3 fully distributed operation mode
analysis:
- Prepare three clients (firewall off, static ip, host name)
- Install JDK, hadoop
- Configuration environment
- Configure cluster
- Single point start
- Configure ssh
- Get together and test
3.3.1 virtual machine preparation
Look at the previous preparation, use the template machine to copy, and then change the corresponding configuration one by one
3.3.2 writing scripts for cluster distribution
-
scp (secure copy)
- scp definition
scp can copy data between servers. (from server1 to server2)
- Basic grammar
scp -r $pdir/$fname $user@$host:$pdir/$fname
 Command recurses the path of the file to be copied/Name destination user@host:Destination path/name
-
rsync remote synchronization tool
-
rsync is mainly used for backup and mirroring. It has the advantages of high speed, avoiding copying the same content and supporting symbolic links.
-
Difference between rsync and scp: copying files with rsync is faster than scp. rsync only updates the difference files. scp is to copy all the files.
- grammar
rsync -av $pdir/$fname $user@$host:$pdir/$fname
 The command option parameter is the path of the file to be copied/Name destination user@host:Destination path/name
-a Archive copy
-v Show copy process
-
xsync cluster distribution script
- Create an xsync file in the / home/atguigu/bin directory
cd /home/jack
mkdir bin
cd bin
vim xsync
- Write the following
#!/bin/bash
#1. Number of judgment parameters
if [ $# -lt 1 ]
then
 echo Not Enough Arguement!
 exit;
fi

#2. Traverse all machines in the cluster
for host in hadoop102 hadoop103 hadoop104
do
 echo ==================== $host ====================
 #3. Traverse all directories and send them one by one
 for file in $@
 do
 #4. Judge whether the document exists
 if [ -e $file ]
 then
 #5. Get parent directory
 pdir=$(cd -P $(dirname $file); pwd)
 #6. Get the name of the current file
 fname=$(basename $file)
 ssh $host "mkdir -p $pdir"
 rsync -av $pdir/$fname $host:$pdir
 else
 echo $file does not exists!
 fi
 done
done
- Modify the permissions that the script xsync has
chmod +x xsync
- Copy the script to / bin for global invocation
sudo cp xsync /bin/
- Synchronize environment variable configuration (root owner)
 sudo ./bin/xsync
 /etc/profile.d/my_env.sh
Note: if sudo is used, xsync must complete its path. Make the environment variable effective resource /etc/profile
3.3.3 SSH password less login configuration
- Configure ssh
Basic syntax: ssh the ip address of another computer
ssh hadoop 103
# Always yes. You may need to fill in the password
exit
# After logging in and using, if you want to return to the previous host, exit
- No key configuration
principle
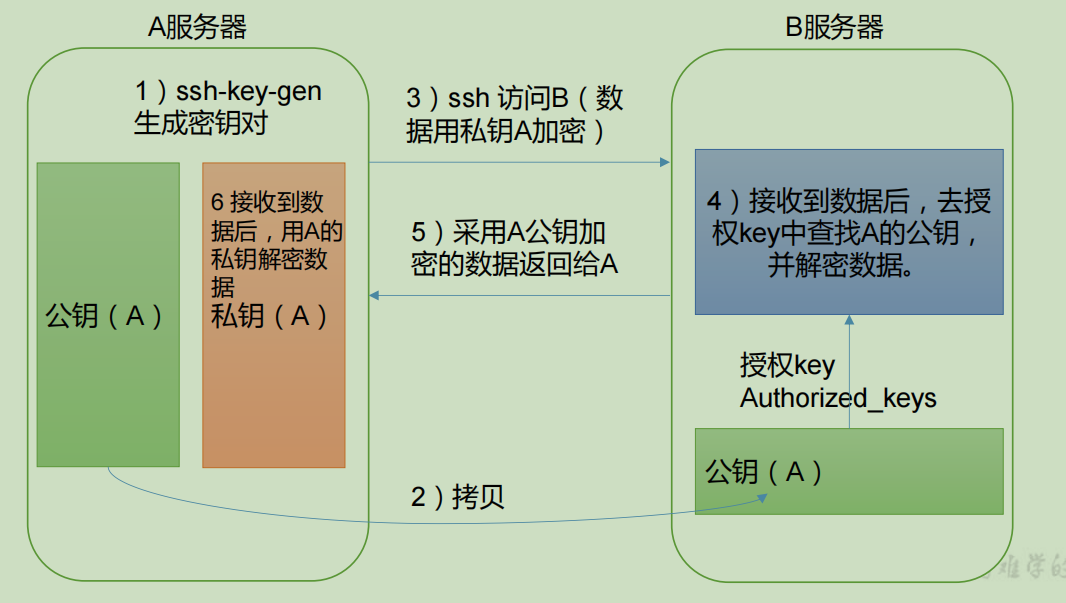
Generate public and private keys
# First enter the corresponding directory The ssh directory may be a hidden directory
/home/jack/.ssh
# Generate key
ssh-keygen -t rsa
# Copy the public key to the password free login machine
 ssh-copy-id hadoop102
 ssh-copy-id hadoop103
 ssh-copy-id hadoop104

 # What are the generated ssh files
 known_hosts      record ssh The public key of the accessed computer
 id_rsa           Generated private key
 id_rsa.pub       Generated public key
 authorized_keys  Store the public key of the service authorized to log in without secret
You also need to configure the user account on Hadoop 103 and Hadoop 104 to log in to Hadoop 102, Hadoop 103
Hadoop 104 server. If you want to log in with a user with root permission, you'd better use the password free login configuration under root user
3.3.4 cluster configuration
- Cluster planning
-
NameNode and SecondaryNameNode should not be installed on the same server
-
Resource manager also consumes a lot of memory. Do not configure it with NameNode and SecondaryNameNode
On the same machine.
| hadoop102 | hadoop103 | hadoop104 | |
|---|---|---|---|
| HDFS | NameNode DataNode | DateNode | SecondaryNameNode DataNode |
| YARN | NodeManger | ResourceManger NodeManger | NodeManger |
- Description of the configuration file
-
Hadoop configuration files are divided into two types: default configuration files and user-defined configuration files. Only when users want to modify a default configuration value, they need to modify the user-defined configuration file and change the corresponding attribute value.
-
core-site.xml,hdfs-site.xml,yarn-site.xml,mapred-site.xml four configuration files are stored in $Hadoop_ On the path of home / etc / Hadoop, users can modify the configuration again according to the project requirements.
- Configure cluster
- Core configuration file, configuring core site xml
cd $HADOOP_HOME/etc/hadoop
vim core-site.xml
<?xml version="1.0" encoding="UTF-8"?>
<?xml-stylesheet type="text/xsl" href="configuration.xsl"?>
<configuration>
 <!-- appoint NameNode Address of -->
 <property>
 <name>fs.defaultFS</name>
 <value>hdfs://hadoop102:8020</value>
 </property>
 <!-- appoint hadoop Storage directory of data -->
 <property>
 <name>hadoop.tmp.dir</name>
 <value>/opt/module/hadoop-3.1.3/data</value>
 </property>
 <!-- to configure HDFS The static user used for web page login is atguigu -->
 <property>
 <name>hadoop.http.staticuser.user</name>
 <value>jack</value>
 </property>
</configuration>
- HDFS configuration file, configure HDFS site xml
vim hdfs-site.xml
<?xml version="1.0" encoding="UTF-8"?>
<?xml-stylesheet type="text/xsl" href="configuration.xsl"?>
<configuration>
<!-- nn web End access address-->
<property>
 <name>dfs.namenode.http-address</name>
 <value>hadoop102:9870</value>
 </property>
<!-- 2nn web End access address-->
 <property>
 <name>dfs.namenode.secondary.http-address</name>
 <value>hadoop104:9868</value>
 </property>
</configuration>
- )YARN configuration file, configure YARN site xml
vim yarn-site.xml
<?xml version="1.0" encoding="UTF-8"?>
<?xml-stylesheet type="text/xsl" href="configuration.xsl"?>
<configuration>
 <!-- appoint MR go shuffle -->
 <property>
 <name>yarn.nodemanager.aux-services</name>
 <value>mapreduce_shuffle</value>
 </property>
 <!-- appoint ResourceManager Address of-->
 <property>
 <name>yarn.resourcemanager.hostname</name>
 <value>hadoop103</value>
 </property>
 <!-- Inheritance of environment variables -->
 <property>
 <name>yarn.nodemanager.env-whitelist</name>

<value>JAVA_HOME,HADOOP_COMMON_HOME,HADOOP_HDFS_HOME,HADOOP_CO
NF_DIR,CLASSPATH_PREPEND_DISTCACHE,HADOOP_YARN_HOME,HADOOP_MAP
RED_HOME</value>
 </property>
</configuration>
- MapReduce configuration file, configure mapred site xml
vim mapred-site.xml
<?xml version="1.0" encoding="UTF-8"?>
<?xml-stylesheet type="text/xsl" href="configuration.xsl"?>
<configuration>
<!-- appoint MapReduce The program runs on Yarn upper -->
 <property>
 <name>mapreduce.framework.name</name>
 <value>yarn</value>
 </property>
</configuration>
- Distribute the configured Hadoop configuration file on the cluster
xsync /opt/module/hadoop-3.1.3/etc/hadoop/
3.3.5 initiate centralization
- Configure workers
vim /opt/module/hadoop-3.1.3/etc/hadoop/workers
Add in file
hadoop102
hadoop103
hadoop104
Note: no space is allowed at the end of the content added in the file, and no blank line is allowed in the file.
# Synchronize the configuration files of all nodes
xsync /opt/module/hadoop-3.1.3/etc
-
Start cluster
-
If the cluster is started for the first time, The NameNode needs to be formatted in the Hadoop 102 node (Note: formatting NameNode will generate a new cluster id, which will lead to the inconsistency between the cluster IDs of NameNode and datanode, and the cluster cannot find the past data. If the cluster reports an error during operation and needs to reformat NameNode, be sure to stop the NameNode and datanode process first, and delete the data and logs directories of all machines before formatting (chemical)
hdfs namenode -format
-
Start HDFS
sbin/start-dfs.sh
- Start YARN on the node (Hadoop 103) * * where ResourceManager * * is configured
@hadoop103 hadoop-3.1.3]$ sbin/start-yarn.sh
-
View the NameNode of HDFS on the Web side
-
Enter in the browser: http://hadoop102:9870
-
View data information stored on HDFS
-
-
View YARN's ResourceManager on the Web
- Enter in the browser: http://hadoop103:8088
- View Job information running on YARN
-
3.3.6 configuring the history server
In order to view the historical operation of the program, you need to configure the history server. The specific configuration steps are as follows:
- Configure mapred site xml
u@hadoop102 hadoop]$ vim mapred-site.xml
Add the following configuration to this file.
<!-- Historical server address -->
<property>
 <name>mapreduce.jobhistory.address</name>
 <value>hadoop102:10020</value>
</property>
<!-- History server web End address -->
<property>
 <name>mapreduce.jobhistory.webapp.address</name>
 <value>hadoop102:19888</value>
</property>
- Distribution configuration
u@hadoop102 hadoop]$ xsync $HADOOP_HOME/etc/hadoop/mapred-site.xml
- Start the history server in Hadoop 102
@hadoop102 hadoop]$ mapred --daemon start historyserver
- Check whether the history server is started
@hadoop102 hadoop]$ jps
- View JobHistory
http://hadoop102:19888/jobhistory
3.3.7 configuring log aggregation
Log aggregation concept: after the application runs, upload the program running log information to the HDFS system.
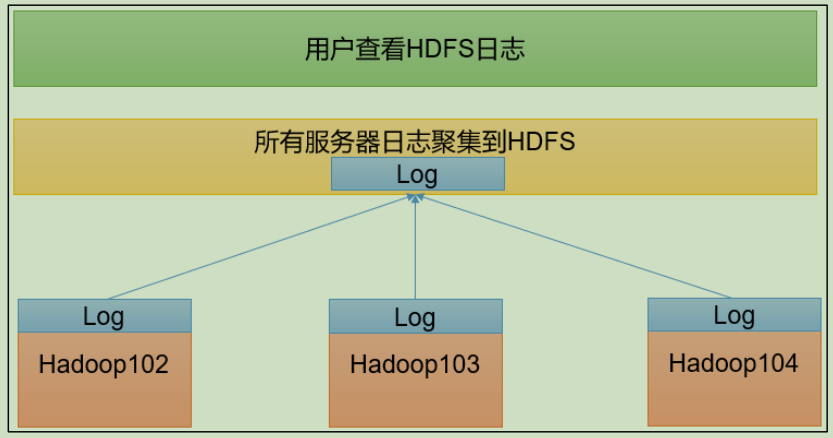
Benefits of log aggregation function: you can easily view the details of program operation, which is convenient for development and debugging.
Note: to enable the log aggregation function, you need to restart NodeManager, ResourceManager and HistoryServer.
- Configure yarn site xml
@hadoop102 hadoop]$ vim yarn-site.xml
<!-- Enable log aggregation -->
<property>
 <name>yarn.log-aggregation-enable</name>
 <value>true</value>
</property>
<!-- Set log aggregation server address -->
<property>
 <name>yarn.log.server.url</name>
 <value>http://hadoop102:19888/jobhistory/logs</value>
</property>
<!-- Set the log retention time to 7 days -->
<property>
 <name>yarn.log-aggregation.retain-seconds</name>
 <value>604800</value>
</property>
- Distribution configuration
@hadoop102 hadoop]$ xsync $HADOOP_HOME/etc/hadoop/yarn-site.xml
- Close NodeManager * *, * * ResourceManager and HistoryServer
@hadoop103 hadoop-3.1.3]$ sbin/stop-yarn.sh
@hadoop103 hadoop-3.1.3]$ mapred --daemon stop historyserver
- Start NodeManager, ResourceManage, and HistoryServer
@hadoop103 ~]$ start-yarn.sh
@hadoop102 ~]$ mapred --daemon start historyserver
- Delete existing output files on HDFS
@hadoop102 ~]$ hadoop fs -rm -r /output
- Execute WordCount program
[jack@hadoop102 hadoop-3.1.3]$ hadoop jar
share/hadoop/mapreduce/hadoop-mapreduce-examples-3.1.3.jar
wordcount /input /output
- view log
- History server
http://hadoop102:19888/jobhistory
-
Historical task list
-
View task run log
-
Operation log details
3.3.8 summary of cluster start / stop
- Each module starts / stops separately (ssh configuration is the premise)
# Overall start / stop HDFS
start-dfs.sh/stop-dfs.sh
# Overall start / stop of YARN
start-yarn.sh/stop-yarn.sh
- Each service component starts / stops one by one
# Start / stop HDFS components respectively
hdfs --daemon start/stop namenode/datanode/secondarynamenode
# Start / stop YARN
yarn --daemon start/stop resourcemanager/nodemanager
3.2.9 writing common scripts for Hadoop clusters
- Hadoop cluster startup and shutdown script (including HDFS, Yan and historyserver): myhadoop sh
[jack@hadoop102 ~]$ cd /home/atguigu/bin
[jack@hadoop102 bin]$ vim myhadoop.sh
#!/bin/bash
if [ $# -lt 1 ]
then
 echo "No Args Input..."
 exit ;
fi
case $1 in
"start")
 echo " =================== start-up hadoop colony ==================="
 echo " --------------- start-up hdfs ---------------"
 ssh hadoop102 "/opt/module/hadoop-3.1.3/sbin/start-dfs.sh"
 echo " --------------- start-up yarn ---------------"
 ssh hadoop103 "/opt/module/hadoop-3.1.3/sbin/start-yarn.sh"
 echo " --------------- start-up historyserver ---------------"
 ssh hadoop102 "/opt/module/hadoop-3.1.3/bin/mapred --daemon start
historyserver"
;;
"stop")
 echo " =================== close hadoop colony ==================="
 echo " --------------- close historyserver ---------------"
 ssh hadoop102 "/opt/module/hadoop-3.1.3/bin/mapred --daemon stop
historyserver"
 echo " --------------- close yarn ---------------"
 ssh hadoop103 "/opt/module/hadoop-3.1.3/sbin/stop-yarn.sh"
 echo " --------------- close hdfs ---------------"
 ssh hadoop102 "/opt/module/hadoop-3.1.3/sbin/stop-dfs.sh"
;;
*)
 echo "Input Args Error..."
;;
esac
Exit after saving, and then grant script execution permission
[jack@hadoop102 bin]$ chmod +x myhadoop.sh
- View the Java * * process scripts of three servers: * * jpsall
[jack@hadoop102 ~]$ cd /home/atguigu/bin
[jack@hadoop102 bin]$ vim jpsall
#!/bin/bash
for host in hadoop102 hadoop103 hadoop104
do
 echo =============== $host ===============
 ssh $host jps
done
Exit after saving, and then grant script execution permission
[jack@hadoop102 bin]$ chmod +x jpsall
- Distribute the / home/atguigu/bin directory to ensure that custom scripts can be used on all three machines
[jack@hadoop102 ~]$ xsync /home/atguigu/bin/
3.3.10 description of common port numbers
| Port name | Hadoop2.x | Hadoop3.x |
|---|---|---|
| NameNode internal communication port | 8020 / 9000 | 8020 / 9000/9820 |
| NameNode HTTP UI | 50070 | 9870 |
| MapReduce view task execution port | 8088 | 8088 |
| History server communication port | 19888 | 19888 |
3.3.11 cluster time synchronization
- If the server is in the public network environment (can connect to the external network), cluster time synchronization can not be adopted, because the server will be synchronized regularly
And public network time;
- If the server is in the Intranet environment, cluster time synchronization must be configured, otherwise time deviation will occur over time,
The cluster execution time is not synchronized.
- demand
Find a machine as a time server. All machines are synchronized with the cluster time at regular intervals. The production environment
Periodic synchronization is required according to the accuracy of the task to the time. In order to see the effect as soon as possible, the test environment adopts one minute synchronization.
- Time server configuration (must be root)
# 1. Check ntpd service status and startup and self startup status of all nodes
[jack@hadoop102 ~]$ sudo systemctl status ntpd
[jack@hadoop102 ~]$ sudo systemctl start ntpd
[jack@hadoop102 ~]$ sudo systemctl is-enabled ntpd
# 2. Modify NTP of Hadoop 102 Conf configuration file
[jack@hadoop102 ~]$ sudo vim /etc/ntp.conf
# Modify 1 (authorize all machines in the 192.168.10.0-192.168.10.255 network segment to query and synchronize time from this machine) and change the following to non annotated
#restrict 192.168.10.0 mask 255.255.255.0 nomodify notrap
 Change to
restrict 192.168.10.0 mask 255.255.255.0 nomodify notrap
#Modification 2 (cluster in LAN, do not use time on other Internet)
server 0.centos.pool.ntp.org iburst
server 1.centos.pool.ntp.org iburst
server 2.centos.pool.ntp.org iburst
server 3.centos.pool.ntp.org iburst
 Change to
#server 0.centos.pool.ntp.org iburst
#server 1.centos.pool.ntp.org iburst
#server 2.centos.pool.ntp.org iburst
#server 3.centos.pool.ntp.org iburst

#Add 3 (when the node loses network connection, the local time can still be used as the time server to provide time synchronization for other nodes in the cluster)
server 127.127.1.0
fudge 127.127.1.0 stratum 10
# 3. Modify the / etc/sysconfig/ntpd file of Hadoop 102
[jack@hadoop102 ~]$ sudo vim /etc/sysconfig/ntpd
# Add the following contents (synchronize the hardware time with the system time)
SYNC_HWCLOCK=yes
# 4. Restart ntpd service
[jack@hadoop102 ~]$ sudo systemctl start ntpd
# 5. Set ntpd service startup
[jack@hadoop102 ~]$ sudo systemctl enable ntpd
- Other machine configurations (must be root)
# (1) Turn off ntp service and self startup on all nodes
[jack@hadoop103 ~]$ sudo systemctl stop ntpd
[jack@hadoop103 ~]$ sudo systemctl disable ntpd
[jack@hadoop104 ~]$ sudo systemctl stop ntpd
[jack@hadoop104 ~]$ sudo systemctl disable ntpd
# (2) Configure other machines to synchronize with the time server once a minute
[jack@hadoop103 ~]$ sudo crontab -e
#The scheduled tasks are as follows:
*/1 * * * * /usr/sbin/ntpdate hadoop102
#(3) Modify any machine time
[jack@hadoop103 ~]$ sudo date -s "2021-9-11 11:11:11"
# (4) Check whether the machine is synchronized with the time server after 1 minute
[jack@hadoop103 ~]$ sudo date