Hadoop practice (2)

Author WenasWei
preface
In the previous Hadoop practical chapter, I introduced the local mode and pseudo cluster mode installation of Hadoop offline batch processing technology. Next, I will continue to learn the Hadoop cluster mode installation; It will be introduced from the following points:
- Linux host deployment planning
- Zookeeper registry installation
- Cluster mode installation
- Hadoop directory structure description and command help document
- The cluster dynamically adds and deletes nodes
I. configuration and installation of Hadoop in Linux Environment
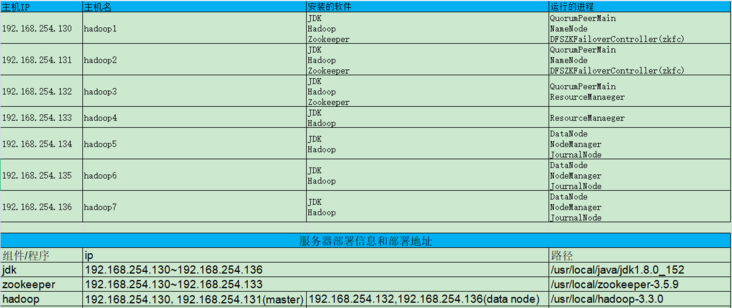
Hadoop cluster deployment planning:
Hadoop needs to use some basic configuration needs on the Linux environment, Hadoop user group and user addition, secret free login operation, JDK installation
1.1 Ubuntu network configuration in VMWare
When installing Ubuntu 18.04-linux operating system with VMWare, the system configuration problem can be configured through the shared blog. CSDN jump link: Ubuntu network configuration in VMWare
It includes the following important steps:
- Ubuntu system information and host name modification
- Windows set up NAT network for VMWare
- Linux gateway setup and configuration static IP
- Modifying the hosts file for Linux
- Linux password free login
1.2 Hadoop user group and user addition
1.2.1 adding Hadoop user groups and users
Log in to Linux-Ubuntu 18.04 virtual machine as root and execute the command:
$ groupadd hadoop
$ useradd -r -g hadoop hadoop
1.2.2 give Hadoop user directory permission
Give the / usr/local directory permission to Hadoop users. The command is as follows:
$ chown -R hadoop.hadoop /usr/local/
$ chown -R hadoop.hadoop /tmp/
$ chown -R hadoop.hadoop /home/
1.2.3 give Hadoop user sodu permission
Edit the / etc/sudoers file and add Hadoop all = (all: all) all under root all = (all: all) all
$ vi /etc/sudoers

Defaults        env_reset
Defaults        mail_badpass
Defaults        secure_path="/usr/local/sbin:/usr/local/bin:/usr/sbin:/usr/bin:/sbin:/bin:/snap/bin"
root    ALL=(ALL:ALL) ALL
hadoop  ALL=(ALL:ALL) ALL
%admin ALL=(ALL) ALL
%sudo   ALL=(ALL:ALL) ALL
1.2.4 give Hadoop user login password
$ passwd hadoop

Enter new UNIX password: Enter new password
Retype new UNIX password: Confirm new password
passwd: password updated successfully
1.3 JDK installation
For Linux JDK installation, please refer to the shared blog article Logstash - data flow engine - < section 3: Logstash installation > -- (Section 2: 3.2 Linux JDK installation) to install and configure it on each host. CSDN jump link: Logstash data flow engine
1.4 Hadoop official website download
Download from the official website: https://hadoop.apache.org/rel... Binary download
- Use wget to name the download (the download directory is the current directory):
For example: version 3.3.0 https://mirrors.bfsu.edu.cn/a...
$ wget https://mirrors.bfsu.edu.cn/apache/hadoop/common/hadoop-3.3.0/hadoop-3.3.0.tar.gz
- Unzip and move to the folder you want to place: / usr/local
$ mv ./hadoop-3.3.0.tar.gz /usr/local

$ cd /usr/local

$ tar -zvxf hadoop-3.3.0.tar.gz
1.5 configuring Hadoop environment
- Modify the configuration file / etc/profile:
$ vi /etc/profile

# Similar to JDK configuration addition
export JAVA_HOME=/usr/local/java/jdk1.8.0_152
export JRE_HOME=/usr/local/java/jdk1.8.0_152/jre
export CLASSPATH=$CLASSPATH:$JAVA_HOME/lib:$JAVA_HOME/jre/lib
export HADOOP_HOME=/usr/local/hadoop-3.3.0
export PATH=$JAVA_HOME/bin:$JAVA_HOME/jre/bin:$PATH:$HOME/bin:$HADOOP_HOME/sbin:$HADOOP_HOME/bin
- Validate profile
$ source /etc/profile
- Check whether the Hadoop configuration is successful
$ hadoop version

Hadoop 3.3.0
Source code repository https://gitbox.apache.org/repos/asf/hadoop.git -r aa96f1871bfd858f9bac59cf2a81ec470da649af
Compiled by brahma on 2020-07-06T18:44Z
Compiled with protoc 3.7.1
From source with checksum 5dc29b802d6ccd77b262ef9d04d19c4
This command was run using /usr/local/hadoop-3.3.0/share/hadoop/common/hadoop-common-3.3.0.jar
It can be seen from the results that the Hadoop version is Hadoop 3.3.0, indicating that the Hadoop environment is installed and configured successfully.
II. Zookeeper Registration Center
The chapter of Zookeeper registration center is mainly introduced as follows:
- Zookeeper introduction
- Zookeeper download and install
- Zookeeper profile
- Start zookeeper cluster validation
Zookeeper cluster host planning:
- hadoop1
- hadoop2
- hadoop3
2.1 introduction to zookeeper
ZooKeeper is a distributed, open-source distributed application coordination service. It is an open-source implementation of Chubby of Google and an important component of Hadoop and Hbase. It is a software that provides consistency services for distributed applications. Its functions include configuration maintenance, domain name service, distributed synchronization, group service, etc.
The goal of ZooKeeper is to encapsulate complex and error prone key services and provide users with simple and easy-to-use interfaces and systems with efficient performance and stable functions, including a simple primitive set to provide Java and C interfaces. In the code version of ZooKeeper, distributed exclusive lock, election and queue interfaces are provided. There are two versions of distributed locks and queues: Java and C, and there is only java version for election.
Zookeeper is responsible for the coordination and scheduling of services. When the client initiates a request, it returns the correct server address.
2.2 Zookeeper download and installation
Download the apache-zookeeper-3.5.9-bin package for Linux (execution host - Hadoop 1), move it to the installation directory: / usr/local /, extract it and rename it as zookeeper-3.5.9:
$ wget https://mirrors.tuna.tsinghua.edu.cn/apache/zookeeper/zookeeper-3.5.9/apache-zookeeper-3.5.9-bin.tar.gz

$ mv apache-zookeeper-3.5.9-bin.tar.gz /usr/local/
$ cd /usr/local/
$ tar -zxvf apache-zookeeper-3.5.9-bin.tar.gz
$ mv apache-zookeeper-3.5.9-bin zookeeper-3.5.9
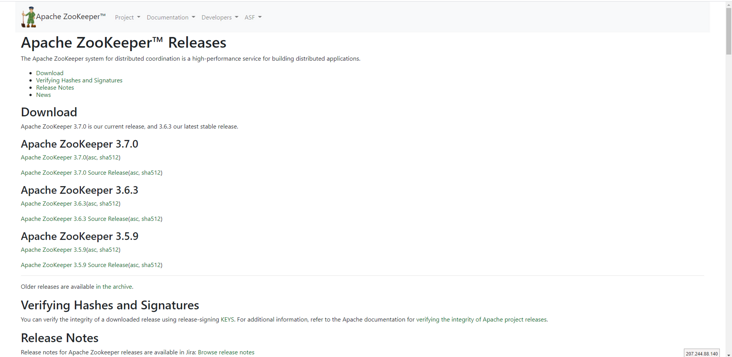
For offline installation, you can download the version package and upload it to the designated official website. The official website address is: http://zookeeper.apache.org/r...
As shown in the figure:
2.3 Zookeeper profile
2.3.1 configuring Zookeeper environment variables
To configure Zookeeper environment variables, you need to modify and add them in the / etc/profile configuration file. The specific configuration is as follows:
export JAVA_HOME=/usr/local/java/jdk1.8.0_152
export CLASSPATH=$CLASSPATH:$JAVA_HOME/lib:$JAVA_HOME/jre/lib
export ZOOKEEPER_HOME=/usr/local/zookeeper-3.5.9
export PATH=$JAVA_HOME/bin:$JAVA_HOME/jre/bin:$PATH:$HOME/bin:$ZOOKEEPER_HOME
Refresh the environment variable configuration file after modification:
$ source /etc/profile
The JDK configuration has been installed. If the JDK is not installed, you can view the installation in the Hadoop actual combat chapter (1)
2.3.2 Zookeeper profile
- Create folders in the root directory of zookeeper / usr/local/zookeeper-3.5.9: data and dataLog
$ cd /usr/local/zookeeper-3.5.9
$ mkdir data
$ mkdir dataLog
Switch to the new data directory, create the myid file, and add the number 1 as follows:
$ cd /usr/local/zookeeper-3.5.9/data
$ vi myid
# Add content Number1
1

$ cat myid
1
- Enter the conf directory to modify the configuration file
Copy profile_ Sample.cfg and change the name to zoo.cfg:
$ cp zoo_sample.cfg zoo.cfg
Modify the zoo.cfg file as follows:
tickTime=2000
initLimit=10
syncLimit=5
dataDir=/usr/local/zookeeper-3.5.9/data
dataLogDir=/usr/local/zookeeper-3.5.9/dataLog
clientPort=2181
server.1=hadoop1:2888:3888
server.2=hadoop2:2888:3888
server.3=hadoop3:2888:3888
2.3.3 copy Zookeeper and system environment variables to other servers
- According to the server planning, copy Zookeeper and configuration file / etc/profile to Hadoop 2 and Hadoop 3 hosts:
$ scp -r zookeeper-3.5.9/ root@hadoop2:/usr/local/
$ scp -r zookeeper-3.5.9/ root@hadoop3:/usr/local/
$ scp /etc/profile root@hadoop2:/etc/
$ scp /etc/profile root@hadoop3:/etc/
- Log in to Hadoop 2 and Hadoop 3
Modify the configuration file contents on Hadoop 2 host and Hadoop 3 host respectively: / usr/local/zookeeper-3.5.9/data/myid to 2 and 3
And refresh the environment variable configuration file:
$ source /etc/profile
2.4 start zookeeper cluster
Start the Zookeeper server on Hadoop 1, Hadoop 2 and Hadoop 3 servers respectively and check the running status of Zookeeper
- Hadoop 1 host:
$ cd /usr/local/zookeeper-3.5.9/bin/
$ ./zkServer.sh start
$ ./zkServer.sh status

ZooKeeper JMX enabled by default
Using config: /usr/local/zookeeper-3.5.9/bin/../conf/zoo.cfg
Client port found: 2181. Client address: localhost. Client SSL: false.
Mode: follower
Description: the running status of zookeeper on Hadoop 1 host is follower
- Hadoop 2 host:
$ cd /usr/local/zookeeper-3.5.9/bin/
$ ./zkServer.sh start
$ ./zkServer.sh status

ZooKeeper JMX enabled by default
Using config: /usr/local/zookeeper-3.5.9/bin/../conf/zoo.cfg
Client port found: 2181. Client address: localhost. Client SSL: false.
Mode: leader
Description: the running status of zookeeper on Hadoop 2 host is leader
- Hadoop 3 host:
$ cd /usr/local/zookeeper-3.5.9/bin/
$ ./zkServer.sh start
$ ./zkServer.sh status

ZooKeeper JMX enabled by default
Using config: /usr/local/zookeeper-3.5.9/bin/../conf/zoo.cfg
Client port found: 2181. Client address: localhost. Client SSL: false.
Mode: follower
Description: the running status of zookeeper on Hadoop 3 host is follower
III. cluster mode installation
3.1 Hadoop configuration file modification
3.1.1 modify the configuration hadoop-env.sh
The host Hadoop 1 configures hadoop-env.sh and specifies Java in the hadoop-env.sh file_ Installation directory of home: / usr/local/hadoop-3.3.0/etc/hadoop. The configuration is as follows:
export JAVA_HOME=/usr/local/java/jdk1.8.0_152
# Configure root account permissions allowed
export HDFS_DATANODE_USER=root
export HADOOP_SECURE_USER=root
export HDFS_NAMENODE_USER=root
export HDFS_SECONDARYNAMENODE_USER=root
export YARN_RESOURCEMANAGER_USER=root
export YARN_NODEMANAGER_USER=root
export HADOOP_SHELL_EXECNAME=root
export HDFS_JOURNALNODE_USER=root
export HDFS_ZKFC_USER=root
3.1.2 modify the configuration core-site.xml
The host Hadoop 1 is configured with core-site.xml, and the cluster node / usr/local/hadoop-3.3.0/etc/hadoop of Zookeeper is specified in the core-site.xml file. The configuration is as follows:
<configuration>
    <property>
      <name>fs.defaultFS</name>
      <value>hdfs://ns/</value>
    </property>
    <property>
      <name>hadoop.tmp.dir</name>
      <value>/usr/local/hadoop-3.3.0/tmp</value>
      <description>Abase for other temporary directories.</description>
        </property>
    <property>
      <name>ha.zookeeper.quorum</name>
      <value>hadoop1:2181,hadoop2:2181,hadoop3:2181</value>
    </property>
</configuration>
3.1.3 modify the configuration hdfs-site.xml
The host Hadoop 1 is configured with hdfs-site.xml, and the namenodes node is specified in the hdfs-site.xml file, / usr/local/hadoop-3.3.0/etc/hadoop. The configuration is as follows:
<configuration>
        <property>
          <name>dfs.nameservices</name>
          <value>ns</value>
        </property>
        <property>
          <name>dfs.ha.namenodes.ns</name>
          <value>nn1,nn2</value>
        </property>
        <!-- nn1 of RPC mailing address, nn1 Address  -->
        <property>
          <name>dfs.namenode.rpc-address.ns.nn1</name>
          <value>hadoop1:9000</value>
        </property>
        <!-- nn1 of http Correspondence address -->
        <property>
          <name>dfs.namenode.http-address.ns.nn1</name>
          <value>hadoop1:9870</value>
        </property>
        <!-- nn2 of RPC mailing address, nn2 Address -->
        <property>
          <name>dfs.namenode.rpc-address.ns.nn2</name>
          <value>hadoop2:9000</value>
        </property>
        <!-- nn2 of http Correspondence address -->
        <property>
          <name>dfs.namenode.http-address.ns.nn2</name>
          <value>hadoop2:9870</value>
        </property>
        <!-- appoint NameNode Metadata for JournalNode Storage location on log(General and zookeeper Deployed together) -->
        <property>
          <name>dfs.namenode.shared.edits.dir</name>
          <value>qjournal://hadoop5:8485;hadoop6:8485;hadoop7:8485/ns</value>
        </property>
        <!-- appoint JournalNode The location where data is stored on the local disk -->
        <property>
          <name>dfs.journalnode.edits.dir</name>
          <value>/usr/local/hadoop-3.3.0/data/journal</value>
        </property>
        <!--Client access through proxy namenode,Access to the file system, HDFS Client and Active Node communication Java Class, use it to determine Active Is the node active  -->
        <property>
          <name>dfs.client.failover.proxy.provider.ns</name>
          <value>org.apache.hadoop.hdfs.server.namenode.ha.ConfiguredFailoverProxyProvider</value>
        </property>
        <!--This is a method to configure automatic switching. There are many methods to use. See the official website for details. Here is the method of remote login  -->
        <property>
          <name>dfs.ha.fencing.methods</name>
          <!-- There can be many values for this parameter, or you can change it to shell(/bin/true)Try it. It's OK. This script do nothing Return 0 -->
          <value>sshfence</value>
        </property>
        <!-- This is used sshfence The isolation mechanism needs to be configured ssh No login -->
        <property>
          <name>dfs.ha.fencing.ssh.private-key-files</name>
          <value>/root/.ssh/id_rsa</value>
        </property>
        <!-- to configure sshfence The timeout time of the isolation mechanism is the same as above. If you switch by script, this should not be configured -->
        <property>
          <name>dfs.ha.fencing.ssh.connect-timeout</name>
          <value>30000</value>
        </property>
        <!-- This is to enable automatic failover. If you do not have automatic failover, this can not be configured first -->
        <property>
          <name>dfs.ha.automatic-failover.enabled</name>
          <value>true</value>
        </property>
</configuration>
3.1.4 modify the configuration mapred-site.xml
The host Hadoop 1 configures mapred-site.xml, specifies mapreduce information in the mapred-site.xml file, / usr/local/hadoop-3.3.0/etc/hadoop, and the configuration is as follows:
<configuration>
   <property>
       <name>mapreduce.framework.name</name>
       <value>yarn</value>
   </property>
   <property>
       <name>yarn.app.mapreduce.am.env</name>
       <value>HADOOP_MAPRED_HOME=${HADOOP_HOME}</value>
   </property>
   <property>
       <name>mapreduce.map.env</name>
       <value>HADOOP_MAPRED_HOME=${HADOOP_HOME}</value>
   </property>
   <property>
       <name>mapreduce.reduce.env</name>
       <value>HADOOP_MAPRED_HOME=${HADOOP_HOME}</value>
   </property>
   <property>
     <name>mapreduce.framework.name</name>
     <value>yarn</value>
   </property>
   <property>
       <name>mapreduce.jobhistory.address</name>
       <value>hadoop1:10020</value>
   </property>
   <property>
       <name>mapreduce.jobhistory.webapp.address</name>
       <value>hadoop1:19888</value>
   </property>
3.1.5 modify configuration yarn-site.xml
The host Hadoop 1 is configured with yarn-site.xml. Specify the ResourceManaeger node in the yarn-site.xml file, / usr/local/hadoop-3.3.0/etc/hadoop. The configuration is as follows:
<configuration>
<property>
  <name>yarn.resourcemanager.ha.enabled</name>
  <value>true</value>
</property>

<property>
  <name>yarn.resourcemanager.cluster-id</name>
  <value>yrc</value>
</property>

<property>
  <name>yarn.resourcemanager.ha.rm-ids</name>
  <value>rm1,rm2</value>
</property>

<property>
  <name>yarn.resourcemanager.hostname.rm1</name>
  <value>hadoop3</value>
</property>

<property>
  <name>yarn.resourcemanager.hostname.rm2</name>
  <value>hadoop4</value>
</property>

<property>
   <name>yarn.resourcemanager.address.rm1</name>
   <value>hadoop3:8032</value>
</property>

<property>
  <name>yarn.resourcemanager.scheduler.address.rm1</name>
  <value>hadoop3:8030</value>
</property>

<property>
  <name>yarn.resourcemanager.webapp.address.rm1</name>
  <value>hadoop3:8088</value>
</property>

<property>
  <name>yarn.resourcemanager.resource-tracker.address.rm1</name>
  <value>hadoop3:8031</value>
</property>

<property>
  <name>yarn.resourcemanager.admin.address.rm1</name>
  <value>hadoop3:8033</value>
</property>

<property>
  <name>yarn.resourcemanager.ha.admin.address.rm1</name>
  <value>hadoop3:23142</value>
</property>

<property>
   <name>yarn.resourcemanager.address.rm2</name>
   <value>hadoop4:8032</value>
</property>

<property>
  <name>yarn.resourcemanager.scheduler.address.rm2</name>
  <value>hadoop4:8030</value>
</property>

<property>
  <name>yarn.resourcemanager.webapp.address.rm2</name>
  <value>hadoop4:8088</value>
</property>

<property>
  <name>yarn.resourcemanager.resource-tracker.address.rm2</name>
  <value>hadoop4:8031</value>
</property>

<property>
  <name>yarn.resourcemanager.admin.address.rm2</name>
  <value>hadoop4:8033</value>
</property>

<property>
  <name>yarn.resourcemanager.ha.admin.address.rm2</name>
  <value>hadoop4:23142</value>
</property>

<property>
  <name>yarn.resourcemanager.zk-address</name>
  <value>hadoop1:2181,hadoop2:2181,hadoop3:2181</value>
</property>

 <!-- Resource scheduling model  -->
<property>
  <name>yarn.nodemanager.aux-services</name>
  <value>mapreduce_shuffle</value>
</property>

 <!-- open mapreduce Intermediate process compression  -->
<property>
  <name>mapreduce.map.output.compress</name>
  <value>true</value>
</property>
</configuration>
3.1.6 modify workers file
The host Hadoop 1 configures workers. Specify the DataNode node in the workers file, / usr/local/hadoop-3.3.0/etc/hadoop. The configuration is as follows:
hadoop5
hadoop6
hadoop7
3.2 Hadoop node copy configuration
3.2.1 copy the configured Hadoop to other nodes
Copy the Hadoop installed and configured on Hadoop 1 to other servers as follows:
scp -r /usr/local/hadoop-3.3.0/ hadoop2:/usr/local/
scp -r /usr/local/hadoop-3.3.0/ hadoop3:/usr/local/
scp -r /usr/local/hadoop-3.3.0/ hadoop4:/usr/local/
scp -r /usr/local/hadoop-3.3.0/ hadoop5:/usr/local/
scp -r /usr/local/hadoop-3.3.0/ hadoop6:/usr/local/
scp -r /usr/local/hadoop-3.3.0/ hadoop7:/usr/local/
3.2.2 copy system environment variables on Hadoop 1
Copy the system environment variables installed and configured on Hadoop 1 to other servers as follows:
sudo scp /etc/profile hadoop2:/etc/
sudo scp /etc/profile hadoop3:/etc/
sudo scp /etc/profile hadoop4:/etc/
sudo scp /etc/profile hadoop5:/etc/
sudo scp /etc/profile hadoop6:/etc/
sudo scp /etc/profile hadoop7:/etc/
Make system environment variables effective
source /etc/profile
hadoop version
3.3 start hadoop cluster (1)
The steps to start hadoop cluster are as follows:
- Start and validate the journalnode process
- Format HDFS
- Format ZKFC
- Start and validate the NameNode process
- Synchronize metadata information
- Start and verify the standby NameNode process
- Start and validate the DataNode process
- Start and verify YARN
- Start and verify ZKFC
- View the running information running on each server
3.3.1 start and verify the journalnode process
(1) Start the journalnode process. Execute the following command on the Hadoop 1 server to start the journalnode process:
hdfs --workers --daemon start journalnode
(2) Verify whether the journalnode process is started successfully. Execute the jps command on Hadoop 5, Hadoop 6 and Hadoop 7 servers respectively. The execution results are as follows
- Hadoop 5 server:
root@hadoop5:~# jps
17322 Jps
14939 JournalNode
- Hadoop 6 server:
root@hadoop6:~# jps
13577 JournalNode
15407 Jps
- Hadoop 7 server:
root@hadoop7:~# jps
13412 JournalNode
15212 Jps
3.3.2 format HDFS
- Execute the following command on the Hadoop 1 server to format HDFS:
hdfs namenode -format
- After execution, the command line will output success information:
common.Storage: Storage directory /usr/local/hadoop-3.3.0/tmp/dfs/name has been successfully formatted.
3.3.3 format ZKFC
- Execute the following command on Hadoop 1 server to format ZKFC:
hdfs zkfc -formatZK
- After execution, the command line will output success information:
ha.ActiveStandbyElector: Successfuly created /hadoop-ha/ns in ZK.
3.3.4 start and verify NameNode process
- Start the NameNode process and execute it on the Hadoop 1 server
hdfs --daemon start namenode
- Verify that the NameNode process started successfully,
# jps
26721 NameNode
50317 Jps
3.3.5 synchronize metadata information
- Execute the following commands on the Hadoop 2 server to synchronize metadata information:
hdfs namenode -bootstrapStandby
- After execution, the command line succeeds with the following information:
common.Storage: Storage directory /usr/local/hadoop-3.3.0/tmp/dfs/name has been successfully formatted.
3.3.6 start and verify the standby NameNode process
- Execute the following command on the Hadoop 2 server to start the standby NameNode process:
hdfs --daemon start namenode
- Validate alternate NameNode process
# jps
21482 NameNode
50317 Jps
3.3.7 start and verify DataNode process
- Execute the following command on the Hadoop 1 server to start the DataNode process
hdfs --workers --daemon start datanode
- Verify that the DataNode process executes on Hadoop 5, Hadoop 6, and Hadoop 7 servers:
Hadoop 5 server:
# jps
31713 Jps
16435 DataNode
14939 JournalNode
15406 NodeManager
Hadoop 6 server:
# jps
13744 NodeManager
13577 JournalNode
29806 Jps
14526 DataNode
Hadoop 7 server:
# jps
29188 Jps
14324 DataNode
13412 JournalNode
13580 NodeManager
3.3.8 start and verify YARN
- Execute the following command on the Hadoop 1 server to start YARN
start-yarn.sh
- Execute the jps command on Hadoop 3 and Hadoop 4 servers to verify that YARN is started successfully
Hadoop 3 server:
# jps
21937 Jps
8070 ResourceManager
7430 QuorumPeerMain
Hadoop 4 server:
# jps
6000 ResourceManager
20183 Jps
3.3.9 start and verify ZKFC
- Execute the following command on the Hadoop 1 server to start ZKFC:
hdfs --workers daemon start zkfc
- Execute the jps command on Hadoop 1 and Hadoop 2 to verify that the DFSZKFailoveController process is started successfully
Hadoop 1 server:
# jps
26721 NameNode
14851 QuorumPeerMain
50563 Jps
27336 DFSZKFailoverController
Hadoop 2 server:
# jps
21825 DFSZKFailoverController
39399 Jps
15832 QuorumPeerMain
21482 NameNode
3.3.10 view the operation information running on each server
- Hadoop 1 server:
# jps
26721 NameNode
14851 QuorumPeerMain
50563 Jps
27336 DFSZKFailoverController
- Hadoop 2 server:
# jps
21825 DFSZKFailoverController
39399 Jps
15832 QuorumPeerMain
21482 NameNode
- Hadoop 3 server:
# jps
8070 ResourceManager
7430 QuorumPeerMain
21950 Jps
- Hadoop 4 server:
# jps
6000 ResourceManager
20197 Jps
- Hadoop 5 server:
# jps
16435 DataNode
31735 Jps
14939 JournalNode
15406 NodeManager
- Hadoop 6 server:
# jps
13744 NodeManager
13577 JournalNode
29833 Jps
14526 DataNode
- Hadoop 7 server:
# jps
14324 DataNode
13412 JournalNode
29211 Jps
13580 NodeManager
3.4 start hadoop cluster (2)
- Format HDFS
- Copy metadata information
- Format ZKFC
- Start HDFS
- Start YARN
- View the running information running on each server
3.4.1 format HDFS
Format HDFS on Hadoop 1 server as follows:
hdfs namenode -format
3.4.2 copy metadata information
Copy the / usr/local/hadoop-3.3.0/tmp directory on Hadoop 1 server to the / usr/local/hadoop-3.3.0 directory on Hadoop 2 server, and execute the following command on Hadoop 1 server:
scp -r /usr/local/hadoop-3.3.0/tmp hadoop2:/usr/local/hadoop-3.3.0/
3.4.3 format ZKFC
Format ZKFC on Hadoop 1 server as follows:
hdfs zkfc -formatZK
3.4.4 start HDFS
Start HDFS through the startup script on the Hadoop 1 server, as shown below:
start-dfs.sh
3.4.5 start YARN
Start YARN through the startup script on the Hadoop 1 server, as shown below:
start-yarn.sh
3.4.6 view the operation information running on each server
- Hadoop 1 server:
# jps
26721 NameNode
14851 QuorumPeerMain
50563 Jps
27336 DFSZKFailoverController
- Hadoop 2 server:
# jps
21825 DFSZKFailoverController
39399 Jps
15832 QuorumPeerMain
21482 NameNode
- Hadoop 3 server:
# jps
8070 ResourceManager
7430 QuorumPeerMain
21950 Jps
- Hadoop 4 server:
# jps
6000 ResourceManager
20197 Jps
- Hadoop 5 server:
# jps
16435 DataNode
31735 Jps
14939 JournalNode
15406 NodeManager
- Hadoop 6 server:
# jps
13744 NodeManager
13577 JournalNode
29833 Jps
14526 DataNode
- Hadoop 7 server:
# jps
14324 DataNode
13412 JournalNode
29211 Jps
13580 NodeManager
IV. directory structure description and command help document of Hadoop
4.1 description of Hadoop directory structure
Use the command "ls" to view the directory under Hadoop 3.3.0, as shown below:
-bash-4.1$ ls
bin  etc  include  lib  libexec  LICENSE.txt  NOTICE.txt  README.txt  sbin  share
Here is a brief introduction to the functions of each directory:
- Bin: bin directory is the directory where Hadoop's most basic management scripts and use scripts are located. These scripts are the basic implementation of management scripts in sbin directory. Users can directly use these scripts to manage and use Hadoop
- etc: the directory where the Hadoop configuration files are located, including: core-site.xml, hdfs-site.xml, mapred-site.xml, yarn-site.xml and other configuration files.
- include: externally provided programming library header files (specific dynamic libraries and static libraries are in the lib directory). These files are defined in C + +. They are usually used for C + + programs to access HDFS or write MapReduce programs.
- lib: contains the programming dynamic library and static library provided by Hadoop, which are used in combination with the header file in the include directory.
- libexec: the directory where the shell configuration file corresponding to each service is located. It can be used to configure basic information such as log output directory and startup parameters (such as JVM parameters).
- sbin: the directory of Hadoop management scripts, which mainly contains the startup / shutdown scripts of various services in HDFS and YARN.
- share: the directory of the compiled Jar package of each Hadoop module, which also contains Hadoop documents.
4.2 Hadoop command help document
- 1. View the contents in the specified directory
hdfs dfs –ls [File directory]
hdfs dfs -ls -R   /                   //Explicit directory structure
eg: hdfs dfs –ls /user/wangkai.pt
- 2. Open an existing file
hdfs dfs –cat [file_path]
eg:hdfs dfs -cat /user/wangkai.pt/data.txt
- 3. Store local files to hadoop
hdfs dfs –put [Local address] [hadoop catalogue]
hdfs dfs –put /home/t/file.txt  /user/t
- 4. Store local folders in hadoop
hdfs dfs –put [Local directory] [hadoop catalogue]
hdfs dfs –put /home/t/dir_name /user/t
(dir_name Is the folder name)
- 5. Download a file on hadoop to the local existing directory
hadoop dfs -get [File directory] [Local directory]
hadoop dfs –get /user/t/ok.txt /home/t
- 6. Delete the specified file on hadoop
hdfs  dfs –rm [File address]
hdfs dfs –rm /user/t/ok.txt
- 7. Delete the specified folder (including subdirectories, etc.) on hadoop
hdfs dfs –rm [Directory address]
hdfs dfs –rmr /user/t
- 8. Create a new directory within the specified directory of hadoop
hdfs dfs –mkdir /user/t
hdfs  dfs -mkdir - p /user/centos/hadoop
- 9. Create a new empty file in the specified directory of hadoop
Use the touchz command:
hdfs dfs -touchz /user/new.txt
- 10. Rename a file on hadoop
Use the mv command:
hdfs dfs –mv /user/test.txt /user/ok.txt (take test.txt Rename to ok.txt)
- 11. Save all contents in the specified directory of hadoop as a file and down to the local directory at the same time
hdfs dfs –getmerge /user /home/t
- 12. kill the running hadoop job
hadoop job –kill [job-id]
- 13. View help
hdfs dfs -help
V. cluster dynamic addition and deletion of nodes
5.1 add DataNode and NodeManager dynamically
5.1.1 viewing cluster status
- View the status of each HDFS node on the Hadoop 1 server, as shown below:
# hdfs dfsadmin -report
Configured Capacity: 60028796928 (55.91 GB)
Present Capacity: 45182173184 (42.08 GB)
DFS Remaining: 45178265600 (42.08 GB)
DFS Used: 3907584 (3.73 MB)
DFS Used%: 0.01%
Replicated Blocks:
    Under replicated blocks: 0
    Blocks with corrupt replicas: 0
    Missing blocks: 0
    Missing blocks (with replication factor 1): 0
    Low redundancy blocks with highest priority to recover: 0
    Pending deletion blocks: 0
Erasure Coded Block Groups:
    Low redundancy block groups: 0
    Block groups with corrupt internal blocks: 0
    Missing block groups: 0
    Low redundancy blocks with highest priority to recover: 0
    Pending deletion blocks: 0

-------------------------------------------------
Live datanodes (3):

Name: 192.168.254.134:9866 (hadoop5)
Hostname: hadoop5
Decommission Status : Normal
Configured Capacity: 20009598976 (18.64 GB)
DFS Used: 1302528 (1.24 MB)
Non DFS Used: 4072615936 (3.79 GB)
DFS Remaining: 15060099072 (14.03 GB)
DFS Used%: 0.01%
DFS Remaining%: 75.26%
Configured Cache Capacity: 0 (0 B)
Cache Used: 0 (0 B)
Cache Remaining: 0 (0 B)
Cache Used%: 100.00%
Cache Remaining%: 0.00%
Xceivers: 1
Last contact: Thu Nov 18 14:23:05 CST 2021
Last Block Report: Thu Nov 18 13:42:32 CST 2021
Num of Blocks: 16

Name: 192.168.254.135:9866 (hadoop6)
Hostname: hadoop6
Decommission Status : Normal
Configured Capacity: 20009598976 (18.64 GB)
DFS Used: 1302528 (1.24 MB)
Non DFS Used: 4082216960 (3.80 GB)
DFS Remaining: 15050498048 (14.02 GB)
DFS Used%: 0.01%
DFS Remaining%: 75.22%
Configured Cache Capacity: 0 (0 B)
Cache Used: 0 (0 B)
Cache Remaining: 0 (0 B)
Cache Used%: 100.00%
Cache Remaining%: 0.00%
Xceivers: 1
Last contact: Thu Nov 18 14:23:06 CST 2021
Last Block Report: Thu Nov 18 08:58:22 CST 2021
Num of Blocks: 16

Name: 192.168.254.136:9866 (hadoop7)
Hostname: hadoop7
Decommission Status : Normal
Configured Capacity: 20009598976 (18.64 GB)
DFS Used: 1302528 (1.24 MB)
Non DFS Used: 4065046528 (3.79 GB)
DFS Remaining: 15067668480 (14.03 GB)
DFS Used%: 0.01%
DFS Remaining%: 75.30%
Configured Cache Capacity: 0 (0 B)
Cache Used: 0 (0 B)
Cache Remaining: 0 (0 B)
Cache Used%: 100.00%
Cache Remaining%: 0.00%
Xceivers: 1
Last contact: Thu Nov 18 14:23:05 CST 2021
Last Block Report: Thu Nov 18 14:09:59 CST 2021
Num of Blocks: 16
You can see that before adding a DataNode, there are three datanodes in total, which are on Hadoop 5, Hadoop 6 and Hadoop 7 servers respectively
- View the status of each node of YARN
# yarn node -list
Total Nodes:3
         Node-Id         Node-State    Node-Http-Address    Number-of-Running-Containers
   hadoop5:34211            RUNNING         hadoop5:8042                               0
   hadoop7:43419            RUNNING         hadoop7:8042                               0
   hadoop6:36501            RUNNING         hadoop6:8042                               0
You can see that the NodeManger process runs on Hadoop 5, Hadoop 6, and Hadoop 7 servers before adding the NodeManager
5.1.2 add DataNode and NodeManager dynamically
- Add a hadoop 4 node in the workers file of all nodes in the hadoop cluster. Currently, modify the host hadoop 1:
# vi /usr/local/hadoop-3.3.0/etc/hadoop/workers
hadoop4
hadoop5
hadoop6
hadoop7
- Copy the modified file to another node
# scp /usr/local/hadoop-3.3.0/etc/hadoop/workers hadoop2:/usr/local/hadoop-3.3.0/etc/hadoop/
# scp /usr/local/hadoop-3.3.0/etc/hadoop/workers hadoop3:/usr/local/hadoop-3.3.0/etc/hadoop/
# scp /usr/local/hadoop-3.3.0/etc/hadoop/workers hadoop4:/usr/local/hadoop-3.3.0/etc/hadoop/
# scp /usr/local/hadoop-3.3.0/etc/hadoop/workers hadoop5:/usr/local/hadoop-3.3.0/etc/hadoop/
# scp /usr/local/hadoop-3.3.0/etc/hadoop/workers hadoop6:/usr/local/hadoop-3.3.0/etc/hadoop/
# scp /usr/local/hadoop-3.3.0/etc/hadoop/workers hadoop7:/usr/local/hadoop-3.3.0/etc/hadoop/
- Start DataNode and NodeManager on Hadoop 4 server as follows:
# hdfs --daemon start datanode
# yarn --daemin start nodemanager
- Refresh the node. Execute the following command on the Hadoop 1 server to refresh the Hadoop cluster node:
# hdfs dfsadmin -refreshNodes
# start-balancer.sh
- To view the running process on the Hadoop 4 node:
# jps
20768 NodeManager
6000 ResourceManager
20465 DataNode
20910 Jps
5.1.3 view the status of the cluster again
- View the status of each HDFS node on the Hadoop 1 server, as shown below:
# hdfs dfsadmin -report
Configured Capacity: 80038395904 (74.54 GB)
Present Capacity: 60257288192 (56.12 GB)
DFS Remaining: 60253356032 (56.12 GB)
DFS Used: 3932160 (3.75 MB)
DFS Used%: 0.01%
Replicated Blocks:
    Under replicated blocks: 0
    Blocks with corrupt replicas: 0
    Missing blocks: 0
    Missing blocks (with replication factor 1): 0
    Low redundancy blocks with highest priority to recover: 0
    Pending deletion blocks: 0
Erasure Coded Block Groups:
    Low redundancy block groups: 0
    Block groups with corrupt internal blocks: 0
    Missing block groups: 0
    Low redundancy blocks with highest priority to recover: 0
    Pending deletion blocks: 0

-------------------------------------------------
Live datanodes (4):

Name: 192.168.254.133:9866 (hadoop4)
Hostname: hadoop4
Decommission Status : Normal
Configured Capacity: 20009598976 (18.64 GB)
DFS Used: 24576 (24 KB)
Non DFS Used: 4058525696 (3.78 GB)
DFS Remaining: 15075467264 (14.04 GB)
DFS Used%: 0.00%
DFS Remaining%: 75.34%
Configured Cache Capacity: 0 (0 B)
Cache Used: 0 (0 B)
Cache Remaining: 0 (0 B)
Cache Used%: 100.00%
Cache Remaining%: 0.00%
Xceivers: 1
Last contact: Thu Nov 18 15:12:30 CST 2021
Last Block Report: Thu Nov 18 15:10:49 CST 2021
Num of Blocks: 0

Name: 192.168.254.134:9866 (hadoop5)
Hostname: hadoop5
Decommission Status : Normal
Configured Capacity: 20009598976 (18.64 GB)
DFS Used: 1302528 (1.24 MB)
Non DFS Used: 4072738816 (3.79 GB)
DFS Remaining: 15059976192 (14.03 GB)
DFS Used%: 0.01%
DFS Remaining%: 75.26%
Configured Cache Capacity: 0 (0 B)
Cache Used: 0 (0 B)
Cache Remaining: 0 (0 B)
Cache Used%: 100.00%
Cache Remaining%: 0.00%
Xceivers: 1
Last contact: Thu Nov 18 15:12:33 CST 2021
Last Block Report: Thu Nov 18 13:42:32 CST 2021
Num of Blocks: 16

Name: 192.168.254.135:9866 (hadoop6)
Hostname: hadoop6
Decommission Status : Normal
Configured Capacity: 20009598976 (18.64 GB)
DFS Used: 1302528 (1.24 MB)
Non DFS Used: 4082335744 (3.80 GB)
DFS Remaining: 15050379264 (14.02 GB)
DFS Used%: 0.01%
DFS Remaining%: 75.22%
Configured Cache Capacity: 0 (0 B)
Cache Used: 0 (0 B)
Cache Remaining: 0 (0 B)
Cache Used%: 100.00%
Cache Remaining%: 0.00%
Xceivers: 1
Last contact: Thu Nov 18 15:12:31 CST 2021
Last Block Report: Thu Nov 18 14:58:22 CST 2021
Num of Blocks: 16

Name: 192.168.254.136:9866 (hadoop7)
Hostname: hadoop7
Decommission Status : Normal
Configured Capacity: 20009598976 (18.64 GB)
DFS Used: 1302528 (1.24 MB)
Non DFS Used: 4065181696 (3.79 GB)
DFS Remaining: 15067533312 (14.03 GB)
DFS Used%: 0.01%
DFS Remaining%: 75.30%
Configured Cache Capacity: 0 (0 B)
Cache Used: 0 (0 B)
Cache Remaining: 0 (0 B)
Cache Used%: 100.00%
Cache Remaining%: 0.00%
Xceivers: 1
Last contact: Thu Nov 18 15:12:33 CST 2021
Last Block Report: Thu Nov 18 14:09:59 CST 2021
Num of Blocks: 16
You can see that before adding a DataNode, there are three datanodes in total, which are on Hadoop 4, Hadoop 5, Hadoop 6 and Hadoop 7 servers respectively
- View the status of each node of YARN
# yarn node -list
Total Nodes:4
         Node-Id         Node-State    Node-Http-Address    Number-of-Running-Containers
   hadoop5:34211            RUNNING         hadoop5:8042                               0
   hadoop4:36431            RUNNING         hadoop4:8042                               0
   hadoop7:43419            RUNNING         hadoop7:8042                               0
   hadoop6:36501            RUNNING         hadoop6:8042                               0
5.2 dynamically delete DataNode and NodeManager
#####5.2.1 deleting DataNode and NodeManager
- Stop the DataNode and NodeManager processes on Hadoop 4 and execute them on Hadoop 4
# hdfs --daemon stop datanode
# yarn --daemon stop nodemanager
- Delete the hadoop 4 configuration information in the workers file of each host of the hadoop cluster
# vi /usr/local/hadoop-3.3.0/etc/hadoop/workers
hadoop5
hadoop6
hadoop7
- Refresh the node. Execute the following command on the hadoop 1 server to refresh the hadoop cluster node:
# hdfs dfsadmin -refreshNodes # start-balancer.sh
Reference documents:
- [1] Yifeiyu.CSDN: https://www.cnblogs.com/yifei... ,2019-06-18.
- [2] Hadoop official website: https://hadoop.apache.org/
- [3] Binghe. Real station of massive data processing and big data technology [M]. 1st edition. Beijing: Peking University Press, 2020-09