1. Create a virtual machine memory settings first It's best to be larger or not to have fun My settings are 100g and then the memory threads are configured on their own computer.
2. Then configure the file to install jdk What is preceded by a written shell script that you can use directly or configure yourself
3. Download the hadoop installation package when you are ready

4. My downloads are already downloaded and placed in the / opt directory first.
5. Then unzip the file
Tar-zxf hadoop-2.6.0-cdh5.14.2.tar.gz Unzip Where to Choose My Own Is Unzipped to Created
/opt/soft/hadoop260 folder
6. Configure environment after decompression is complete
vi /etc/profile
#hadoop environment
export HADOOP_HOME=/opt/soft/hadoop260
export HADOOP_MAPRED_HOME=$HADOOP_HOME
export HADOOP_COMMON_HOME=$HADOOP_HOME
export HADOOP_HDFS_HOME=$HADOOP_HOME
export YARN_HOME=$HADOOP_HOME
export HADOOP_COMMON_LIB_NATIVE_DIR=$HADOOP_HOME/lib/native
export PATH=$PATH:$HADOOP_HOME/sbin:$HADOOP_HOME/bin
export HADOOP_INSTALL=$HADOOP_HOME
Then paste the configuration file in
Then source/etc/proflie makes the file valid
7. Open the unzipped hadoop package and enter the hadoop file in the etc directory
cd etc/hadoop/
Edit the hadoop-env.sh directory Add your jdk file directory My jdk files are unzipped and placed in the soft directory

8.Configuration vi core-site.xml Add the following configuration file to configuration or it will not take effect
        <property>
                <name>fs.defaultFS</name>
                <value>hdfs://192.168.80.181:9000</value>
        </property>
         <property>
                <name>hadoop.tmp.dir</name>
                <value>/opt/soft/hadoop260/tmp</value>
        </property>
         <property>
                <name>hadoop.proxyuser.root.groups</name>
                <value>*</value>
        </property>
        <property>
                <name>hadoop.proxyuser.root.hosts</name>
                <value>*</value>
        </property>
         <property>
                <name>hadoop.proxyuser.root.users</name>
                <value>*</value>
        </property>
9. vi hdfs-site.xml
        <property>
                <name>dfs.replication</name>
                <value>1</value>
        </property>
10.cp mapred-site.xml.template mapred-site.xml Copy the file and modify it
11. vi mapred-site.xml
<configuration>
        <property>
                <name>mapreduce.framework.name</name>
                <value>yarn</value>
        </property>
</configuration>
12.vi yarn-site.xml
<configuration>
        <property>
                <name>yarn.resourcemanager.localhost</name>
                <value>localhost</value>
        </property>
         <property>
                <name>yarn.nodemanager.aux-services</name>
                <value>mapreduce_shuffle</value>
        </property>
</configuration>
13.hadoop namenode-format format file
14.start-all.sh Startup File will keep you entering your password This password is a virtual secret code because ssh is not configured I will configure it later.
Start file until end
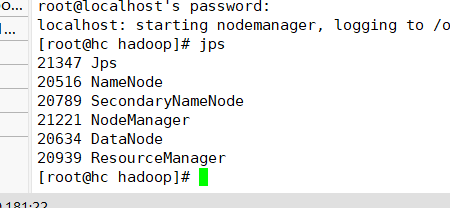
15 Enter jps view task

See how to start these 5 tasks even if you have successfully configured them.
If errors occur during this period, you can check the log files in the log directory to see where the errors are.
16 stop-all.sh Close File View jps Task Close All before configuring ssh

Create public key first
17.
You can see for yourself what it looks like
18.
Then enter ssh-copy-id root@own host name and re-enter the password ssh hc to see if the last login appears and the configuration is successful
exit Exit
Configure it all. Play happily.