Recent simple research on SSR, SSR has a simple understanding, mainly for single-page applications, Nuxt is a good framework for SSR.There have also been some research, simple use, or very good feeling.But you still want to know if you don't depend on the framework and if you're working with SSRs, take a note.
What is SSR
Render the Vue components as server-side HTML strings, send them directly to the browser, and finally mix static tags with fully interactive applications on the client.
Why use SSR
- Better SEO, Search Engine Crawler to view fully rendered pages directly
- Wider content reaches time-to-content, and when the page is requested, the server renders the data and sends the rendered page directly to the browser for rendering.Browsers only need to parse html, not js.
SSR drawbacks
- Development conditions are limited and some lifecycle hook functions for Vue components cannot be used
- Development environment based on Node.js
- This causes more load on the server side.Rendering a complete application in Node.js will obviously consume more CPU resources than simply providing static file servers, so if you expect to use it in high traffic, be prepared to respond to the service load and use the caching strategy wisely.
Dead work
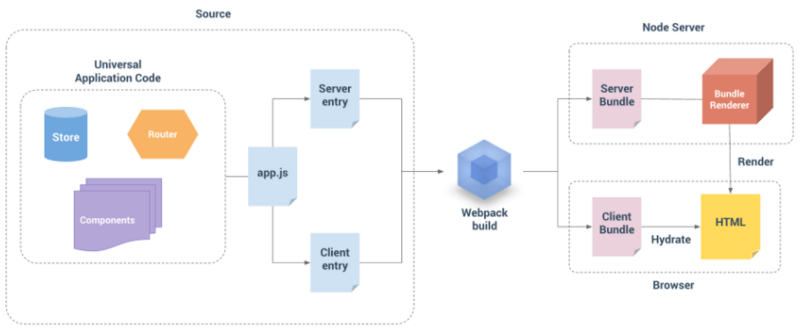
Before the official start, this picture was found on vue's official website, in which the implementation of ssr in Vue is described in detail.Simply put it in the picture below.
An important point in the diagram below is the webpack. The configuration of the webpack will be used during the project. From the far left is the source file that we write. All files have a common entry file, app.js. Then they enter the server-entry and client-entry. Both entry files go through the webpack when accessing the node sideServer-side rendering is used. When rendering on the server side, a server-Bender is generated. Finally, the HTML page can be rendered by server-Bundle. When accessed by the client, the HTML page can be rendered by client-Bundle in the future.so~As you can see clearly from this diagram, two files, a server entry, a client entry, are used next. Finally, server-Bundle and client-Bundle are generated from the webpack. Finally, when a page is requested, the server-Bundle in the node generates HTML interface which is mixed into the HTML page through the client-Bundle.
After you have made some simple understanding of using ssr in vue, let's start with the first step. First, create a project, create a folder, the name is not important, but it's best not to use Chinese.
mkdir dome
cd dome
npm init
The npm init command initializes the package.json file:
{
  "name": "dome",   //  entry name
  "version": "1.0.0",   //  version number
  "description": "",    //  describe
  "main": "index.js",   //  Entry File
  "scripts": {          //  The command line executes commands such as npm run test
    "test": "echo \"Error: no test specified\" && exit 1"
  },
  "author": "Aaron",     //  author
  "license": "ISC"      //  Licence
}
After initialization, you need to install the following packages, which the project depends on, all of which are as follows:
npm install express --save-dev
npm install vue --save-dev
npm install vue-server-render --save-dev
npm install vue-router --save-dev
If you install all the dependencies above, you can proceed to the next step after the installation is complete.As mentioned earlier, SSR s are pre-rendered on the server side, so of course, create a Node service to support them.Create an index.js file under the dome folder and create a service using express.
The code is as follows:
const express = require("express");
const app = express();

app.get('*',(request,respones) => {
    respones.end("ok");
})

app.listen(3000,() => {
    console.log("Service started")
});
After completing the above code, for convenience we need to add a command in package.json to facilitate subsequent development startup projects.
{
  "scripts": {
    "test": "echo \"Error: no test specified\" && exit 1",
    "start": "node index.js"
  }
}
Once created, type npm start directly on the command line, and when the console shows that the service is started, it is successfully started.Next, you need to open your browser to see the results of the rendering.Type locahost:3000 in the browser address bar to see ok.
SSR Rendering Manual Build
Preparations have already been made. Never finish our main purpose is not to render text, but to render *.vue files or html.Next is to do what we want to do.The next step is to modify the index.js file to install the `vue'previously installed
And vue-server-render`.
Since the return is no longer text, but an html template, we'll change the response header to tell the browser what we're rendering, otherwise the browser doesn't know how to render the data returned by the server.
After introducing vue-server-render in index.js, when using it, we need to execute the creteRender method in vue-server-render, which converts instances of Vue into html.
Now that you have the vue-server-render method, you need to introduce the protagonist vue, then create a Vue instance below. When using Vue on the web side, you need to pass some parameters to Vue. However, on the server side, you can also pass some parameters to the Vue instance, which is also the *.vue file added later.To prevent page data from interfering with each other when users access it, it is temporarily necessary to place an instance in a get request, creating a new instance each time they access it, rendering the new template.
The creteRender method is capable of passing an instance of Vue to the browser as an html string.So what should I do next?Below the vueServerRender method is a renderToString method, which can help us do this.The first parameter accepted by this method is an instance of vue, and the second parameter is a callback function. If you do not want to use the callback function, this method also returns a Promise object, which returns the html structure in the then function when the method executes successfully.
The changes are as follows:
const express = require("express");
const Vue = require("vue");
const vueServerRender = require("vue-server-render").creteRender();

const app = express();

app.get('*',(request,respones) => {
    const vueApp = new Vue({
        data:{
            message:"Hello,Vue SSR!"
        },
        template:`<h1>{{message}}</h1>`
    });
    respones.status(200);
    respones.setHeader("Content-Type","text/html;charset-utf-8;");
    vueServerRender.renderToString(vueApp).then((html) => {
        respones.end(html);
    }).catch(error => console.log(error));
})

app.listen(3000,() => {
    console.log("Service started")
});
After that, remember to save it, then restart the server and continue accessing locahost:3000, you will see the HTML structure written on the server side.Doing this is like adding a lot of work to us, is it really different from using it directly on the web?
It's time to witness miracles.Right-click on the source code in the web page and you will see the rendered templates, which are completely different from what you used on the web before.If you're careful, you'll find something interesting, such as a data-server-rendered=true attribute on the h1 tag, which tells us that this page is rendered on the server side.You can visit other major websites.There may be other gains.
In the above case, although the server-side pre-rendering has been implemented, there will be a big drawback, that is, the web page we render is not complete, there is no document declaration, head er, etc. Of course, there may be another idea, that is, splicing using the template string of es6 is good.Indeed, this is also possible, but this is still a problem that can not be solved thoroughly by drinking poisons to quench thirst. If you have done traditional MVC development, you should know that MVC development mode is based on templates, and now this is similar to MVC, templates can also be used.Create index.html under the dome folder and create the HTML template.
How do templates work now?An object can be accepted as a configuration parameter in the creteRender function.One of the configuration parameters is the template, which is the Html template we are going to use.This receive is not a single path, we need to use the fs module to read out the HTML template.
It is configured as follows:
let path = require("path");
const vueServerRender = require("vue-server-render").creteRender({
    template:require("fs").readFileSync(path.join(__dirname,"./index.html"),"utf-8")
});
Now that templates are available, when developing on the web side, you need to hang on a mount point of el so that Vue knows where to render these templates, as well as the server side, and also tells Vue where to render the templates.The next thing to do is do your hands and feet in index.html.To notify creteRender where to add templates.
Change the index.html file:
<!DOCTYPE html>
<html lang="en">
<head>
<meta charset="UTF-8">
<meta name="viewport" content="width=device-width, initial-scale=1.0">
<meta http-equiv="X-UA-Compatible" content="ie=edge">
<title>Document</title>
</head>
<body>
    <!--vue-ssr-outlet-->
</body>
</html>
You can see that a comment has been added to the body of the html, and when the compiled HTML of vueServerRender is passed into the template, the place will be replaced with the precompiled template content of the server, which is a simple pre-rendering of the server.Although writing to simple HTML rendering, no data interaction, no page interaction, is a small step forward.
Build a project using SSR We continue to continue with the previous project and continue to develop down. Everyone usually builds a project using vue-cli under the src folder. In order to keep consistent with the Vue project structure, we also need to create an src folder, and create conponents,router,utils,view in the src folder, so on, as the code programmedWriting gradually adds content to the project.
└─src
|   ├─components
|   ├─router
|   ├─utils
|   ├─view
|   └─app.js
└─index.js
Once the initial directory structure is set up, you need to move on. The first thing you need to do is add an index.js file to the router directory to create the routing information (make sure the route is installed when using it).Routing should play an important role in the project. Routing links pages and components through routes, and one by one, completes the rendering of routes.
Next, the following configuration is written in the index.js file under router:
const vueRouter = require("vue-router");
const Vue = require("vue");

Vue.use(vueRouter);

modul.exports = () => {
    return new vueRouter({
        mode:"history",
        routers:[
            {
                path:"/",
                component:{
                    template:`<h1>This is the first page<h1/>`
                },
                name:"home"
            },
            {
                path:"/about",
                component:{
                    template:`<h1>This is about pages<h1/>`
                },
                name:"about"
            }
        ]
    })
}
In the code above, if you look carefully, the way that you export in vue-cli is different from what you export in normal time. The factory method is used here. Why is this so?Remember in the prototype that in order to ensure a new route is generated every time a user visits, and to prevent user-user interaction, that is, the Vue instance is new, our vue-router instance should also ensure that it is completely new.
Now the Vue instances are mixed with the service side, which is not good for project maintenance, so you need to separate the Vue from the service side and put it in app.js.This uses the factory approach in the same way as Router, ensuring that each visit is a new instance of vue.Import the just written route in app.js, create a new route instance each time the factory is triggered, and bind it to the Vue instance, so that users will be completely new when accessing the route, whether it is the Vue instance or the router.
app.js:
const Vue = require("vue");
const createRouter = require("./router")

module.exports = (context) => {
    const router = createRouter();
    return new Vue({
        router,
        data:{
            message:"Hello,Vue SSR!"
        },
        template:`
            <div>
                <h1>{{message}}</h1>
                <ul>
                    <li>,
                        <router-link to="/">home page<router-link/>
                    </li>
                    <li>
                        <router-link to="/about">About me<router-link/>
                    </li>
                </ul>
            </div>
            <router-view></router-view>
        `
    });
}
It looks like you can use them, but it's not. Think carefully as if you forgot something. You just pulled the vue instance out of index.js, but didn't use it anywhere. Ha-ha, it seems like an embarrassing thing.
Modify the index.js file:
const express = require("express");
const vueApp = require("./src/app.js");
const vueServerRender = require("vue-server-render").creteRender();

const app = express();

app.get('*',(request,respones) => {

    //  Here you can pass some parameters to the vue instance
    let vm = vueApp({})

    respones.status(200);
    respones.setHeader("Content-Type","text/html;charset-utf-8;");
    vueServerRender.renderToString(vm).then((html) => {
        respones.end(html);
    }).catch(error => console.log(error));
})

app.listen(3000,() => {
    console.log("Service started")
});
All the preparations have been made, and the completion is due only to the East wind.Now run npm start to see the effect on the page.See that the page has been rendered, but what seems to be missing?Although the navigation content is already displayed, the components corresponding to the route do not seem to be rendered.What exactly is the reason? The vue-router is rendered by front-end control. When accessing the route, in fact, when rendering the first screen, the server is not authorized to render the route.(), Yes, I am just so lazy...
The solution to this problem also provides corresponding actions, otherwise you will know how to write it down.Since rendering is divided into server-side rendering and client-side rendering, we need two entry files, one for server-side rendering and the other for client-side rendering.
Add two.Js files under the src folder (which you can place elsewhere, of course, just for convenience), entry-client.js is the entry file for the user client, and entry-server.js is the entry file for the server.Now that the entry file has been determined, the next step is to solve the problem just now. The first step is to solve the server rendering. In the server side, you need to pass the path that the user visits to vue-router. If not, vue-router will look at you with a faint face. You don't give me anything. How do I know what to render?
All you need to do in the entry-server is import the app.js, where you can flip up the method saved in app.js to create the vue instance.Write a function in it first, and why not (and also to ensure that there is a new instance for each visit), which takes a parameter ([object]), since there may be asynchronous operations, such as lazy loading, Promise is used in this function to get a couple of things in Promise first, without guessing it.Important vue instances and router instances, so~But it seems that only vue instances are exported in the app, and app.js needs to be changed according to current needs.
app.js:
const Vue = require("vue");
const createRouter = require("./router")

module.exports = (context) => {
    const router = createRouter();
    const app = new Vue({
        router,
        data:{
            message:"Hello,Vue SSR!"
        },
        template:`
            <div>
                <h1>{{message}}</h1>
                <ul>
                    <li>,
                        <router-link to="/">home page<router-link/>
                    </li>
                    <li>
                        <router-link to="/about">About me<router-link/>
                    </li>
                </ul>
            </div>
            <router-view></router-view>
        `
    });
    return {
        app,
        router
    }
}
With the above modifications, you can easily get instances of Vue and router in entry-server.js. Now look at the available parameters in entry-server.js, vue,router, where do the URLs mentioned come from?Since this function is used by the service side, when the service side executes this function, it can be passed in as a parameter to get the parameters we want. Let's assume this parameter is called url. What we need the route to do is jump to the corresponding route (this is an important step), and then mount the instance of router to the Vue instance.Then return the Vue instance for consumption by vueServerRender.This function needs to be exported for use by the server.
Since we can't predict that the route the user visits is configured in vue-router, we need to process it on onReady. We can get the components we imported by router's getMatchedComponents, and one of them can render the matching results by judging the components.
entry-server.js
const createApp = require("./app.js");

model.exports = (context) => {
    return new Promise((reslove,reject) => {
        let {url} = context;
        let {app,router} = createApp(context);
        router.push(url);
        //  router callback function
        //  Triggered when all asynchronous requests are completed
        router.onRady(() => {
            let matchedComponents = router.getMatchedComponents();
            if(!matchedComponents.length){
                return reject({
                    code:404,
                });
            }
            reslove(app);
        },reject)
    })
}
Now that the instance has changed again, the index.js corresponding to the change also needs to be changed.Change the path to the vue instance you just imported to entey-server.js. Since this returns a Promise object, use async/await processing here to receive and get the vue instance.Don't forget to pass in the url parameter that router needs.
index.js:
const express = require("express");
const App = require("./src/entry-server.js");
const vueServerRender = require("vue-server-render").creteRender();

const app = express();

app.get('*',async (request,respones) => {
    respones.status(200);
    respones.setHeader("Content-Type","text/html;charset-utf-8;");

    let {url} = request;
    //  Here you can pass some parameters to the vue instance
    let vm = await App({url});
    vueServerRender.renderToString(vm).then((html) => {
        respones.end(html);
    }).catch(error => console.log(error));
})

app.listen(3000,() => {
    console.log("Service started")
});
This is done. Start the project. When you visit the root path, you will see that the missing components have been rendered. Of course, we can also switch routes, which is no problem.Be accomplished...It seems that there is no emmmmmmm. Why, if you are careful, you should find that when we switch routes, the refresh button next to the address bar keeps blinking. That is to say, we are not making a single-page application (laughing and crying manually). It is also strange that such a problem occurs. After all, we do not configure front-end routes. We take control of all routesEach time a route is accessed, a request is sent to the server to return to the page corresponding to the route.To solve this problem, when we are at the front end, we need to have the service end return control of the route to the front end route, and let the front end control the route jump.
Previously, two files were added under the src folder, only the server-side files were used. In order for the client to return routing control, the web-side routing needs to be configured.Since a document needs to be mounted when the client is using vue, because an instance of Vue has already been created, the hook function of $mount is needed here to complete the client mounting.In order to solve the similar problem of lazy loading, so~also needs to use onReady for routing, only after vue-router loading is completed.
It's easy when the client is using it, just mount the route into the app.
entry-client.js
const createApp = require("./app.js");
let {app,router} = createApp({});

router.onReady(() => {
    app.$mount("#app")
});
This is also the beginning of the whole project, since the server hands over routing control to the client, which requires a complex web pack configuration, so~is no longer redundant, so continue using vue-cli directly below (all you need is the code above).
vue-cli project building
While preparing for the work, I briefly described the running idea of using ssr in vue, which mentioned an important webpack, so we need to change the original webpack directly with the help of vue-cli scaffolding, which is much more convenient.
It is recommended that you go back to the top and look again at the process of rendering on the vue service side, client-bundle and server-bundle in the introduction, so you need to build two configurations, one for the service side and the other for the client side.
To achieve server-side rendering, you need to modify the configuration in each js file in vue-cli.The following shows only some of the code that changed, not all of it.
The files are:
- webpack.server.conf.js - Service-side webpack configuration
- dev-server.js - Get service-side bundle s
- server.js - Create Backend Service
- webpack.dev.conf.js - client bundle
- webpack.base.conf - Modify the entry file
Client Configuration
The client generates a client-side build list, records the client's resources, and eventually injects the files recorded in the client-side build list into the execution template. This list is similar to the server-side, but also generates a JSON file named vue-ssr-client-manifest.json (accessible via address/file name after project startup)Of course, it is also necessary to introduce a module called vue-server-renderer/client-plugin to use as a plug-in for webpack s.
First, install the vue-server-render module, which is the core of the entire server-side rendering. Without the entire ssr, there is no soul.
npm install vue-server-render -S
After the installation, you first find webpack.dev.conf.js and configure it accordingly.
webpack.dev.conf.js
//  Add introducing vue-server-render/client-plugin module
const vueSSRClientPlugin = require("vue-server-render/client-plugin");

const devWebpackConfig = merge(baseWebpackConfig,{
    plugins:[
        new vueSSRClientPlugin()
    ]
});
After adding this configuration, the restart project will have access to vue-ssr-client-manifest.json from the address. http://localhost : 8080/vue-ssr-client-manifest.json), what appears on the page is the required client-bundle.
Server Side Configuration
The server will generate a vue-ssr-server-bundle.json file by default, which records the entire output of the server. How can I generate this file?To make this JSON file, you must import vue-server-renderer/server-plugin as a plug-in to the webpack.
Before you start the server-side configuration, you need to create three files under the src folder, app.js, entry-client.js, entry-server.js, and write code to them when you're done.
src/router/index.js
import vueRouter from "vue-router";
import Vue from "vue";
import HelloWorld from "@/components/HelloWorld");

Vue.use(vueRouter);
export default () => {
    return new vueRouter({
        mode:"history",
        routers:[
            {
                path:"/",
                component:HelloWorld,
                name:"HelloWorld"
            }
        ]
    })
}
app.js
import Vue from "vue";
import createRouter from "./router";
import App from "./App.vue";

export default (context) => {
    const router = createRouter();
    const app = new Vue({
        router,
        component:{App},
        template:"<App/>"
    });
    return {
        app,
        router
    }
}
entry-server.js
import createApp from "./app.js";

export default (context) => {
    return new Promise((reslove,reject) => {
        let {url} = context;
        let {app,router} = createApp(context);
        router.push(url);
        router.onRady(() => {
            let matchedComponents = router.getMatchedComponents();
            if(!matchedComponents.length){
                return reject({
                    code:404,
                });
            }
            reslove(app);
        },reject)
    })
}
entry-client.js
import createApp from "./app.js";
let {app,router} = createApp();

router.onReady(() => {
    app.$mount("#app");
});
webpack.base.conf.js
module.exports = {
    entry:{
        app:"./src/entry-client.js"
    },
    output:{
        publicpath:"http://localhost:8080/"
    }
};
Webpack.server.conf.js (created manually)
const webpack = require("webpack");
const merge = require("webpack-merge");
const base = require("./webpack.base.conf");
//  Manual Installation
//  In server-side rendering, all required files are introduced using require, and there is no need to package the node_modules file
const webapckNodeExternals = require("webpack-node-externals");


const vueSSRServerPlugin = require("vue-server-render/server-plugin");

module.exports = merge(base,{
    //  Inform webpack that it needs to run on the node side
    target:"node",
    entry:"./src/entry-server.js",
    devtool:"source-map",
    output:{
        filename:'server-buldle.js',
        libraryTarget: "commonjs2"
    },
    externals:[
        webapckNodeExternals()
    ],
    plugins:[
        new webapck.DefinePlugin({
            'process.env.NODE_ENV':'"devlopment"',
            'process.ent.VUE_ENV': '"server"'
        }),
        new vueSSRServerPlugin()
    ]
});
Dev-server.js (created manually)
const serverConf = require("./webpack.server.conf");
const webpack = require("webpack");
const fs = require("fs");
const path = require("path");
//  Read in-memory.json files
//  This module needs to be installed manually
const Mfs = require("memory-fs");
const axios = require("axios");

module.exports = (cb) => {
    const webpackComplier = webpack(serverConf);
    var mfs = new Mfs();

    webpackComplier.outputFileSystem = mfs;

    webpackComplier.watch({},async (error,stats) => {
        if(error) return console.log(error);
        stats = stats.toJson();
        stats.errors.forEach(error => console.log(error));
        stats.warnings.forEach(warning => console.log(warning));
        //  Get the json file for the server bundle
        let serverBundlePath = path.join(serverConf.output.path,'vue-ssr-server-bundle.json');
        let serverBundle = JSON.parse(mfs.readFileSync(serverBundlePath,"utf-8"));
        //  Get the json file for the client bundle
        let clientBundle = await axios.get("http://localhost:/8080/vue-ssr-client-manifest.json");
        //  Get Templates
        let template = fs.readFileSync(path.join(__dirname,".."."index.html"),"utf-8");
        cb && cb(serverBundle,clientBundle,template);
    })
};
Root directory/server.js (manually created)
const devServer = require("./build/dev-server.js");
const express = require("express");
const app = express();
const vueRender = require("vue-server-render");

app.get('*',(request,respones) => {
    respones.status(200);
    respones.setHeader("Content-Type","text/html;charset-utf-8;");
    devServer((serverBundle,clientBundle,template) => {
        let render = vueRender.createBundleRenderer(serverBundle,{
            template,
            clientManifest:clientBundle.data,
            //  Create a separate context each time
            renInNewContext:false
        });
        render.renderToString({
            url:request.url
        }).then((html) => {
            respones.end(html);
        }).catch(error => console.log(error));
    });
})

app.listen(5000,() => {
    console.log("Service started")
});
index.html
<!DOCTYPE html>
<html lang="en">
<head>
<meta charset="UTF-8">
<meta name="viewport" content="width=device-width, initial-scale=1.0">
<meta http-equiv="X-UA-Compatible" content="ie=edge">
<title>Document</title>
</head>
<body>
    <div id="app">
        <!--vue-ssr-outlet-->
    </div>
    <!-- built files will be auto injected -->
</body>
</html>
That's all the configuration items you want to change and add, and once you've configured everything, you can finish rendering on the server side.At this point, you need to add a startup item to sctipt in package.json: http:node server.js to get your project running properly.Be sure to access the ports set by the server and make sure your client is also online.
summary
This blog took 3 days to complete. It may take a long time to read, but it is very helpful. I hope you can read this article well and help you.
Thank you for taking a long time to read this article. If there are any errors in this article, I will make corrections as soon as possible.