
HarmonyOS actual combat
At present, CSDN's official App is not adapted to Hongmeng system, but we are programmers and can develop it ourselves. Why wait for CSDN?
Do it yourself. Today, let's realize an interesting Hongmeng card. That is, put the first 10 of your latest blog posts on Hongmeng card and show them to you.
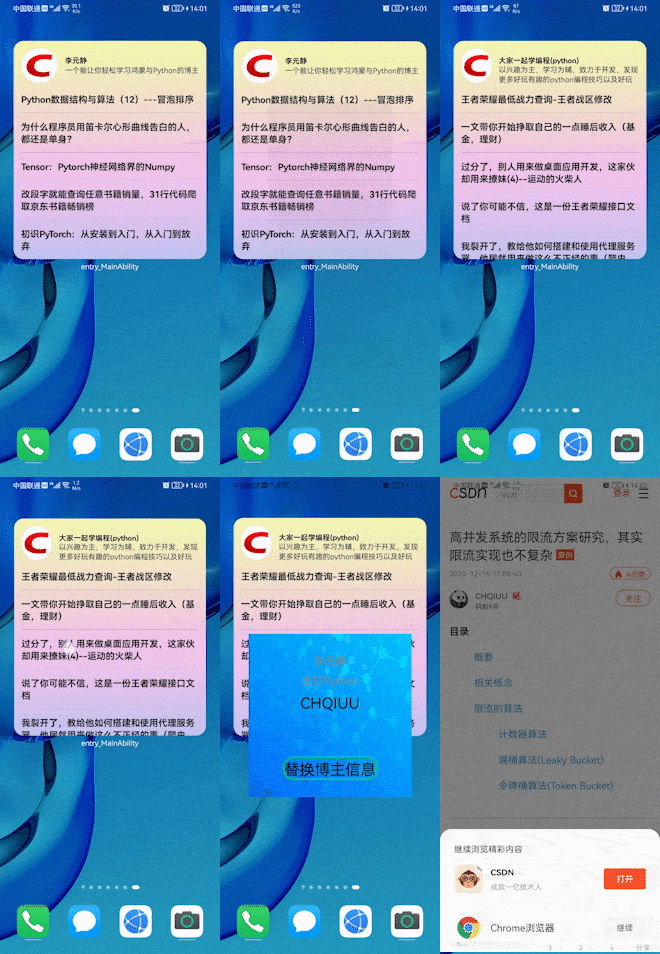
In addition to putting the 10 latest blog posts on Hongmeng card, we also need to provide editable function for Hongmeng card to allow users to replace bloggers and automatically replace the first 10 blog posts of corresponding bloggers.
Next, let's implement these functions one by one.
Create a 4 * 4 card
First, we need to observe the title length of CSDN blog posts. We can find that some CSDN titles are still very long. If you use a small card, you can't even display the title. Therefore, we need to provide 4 * 4 long cards.
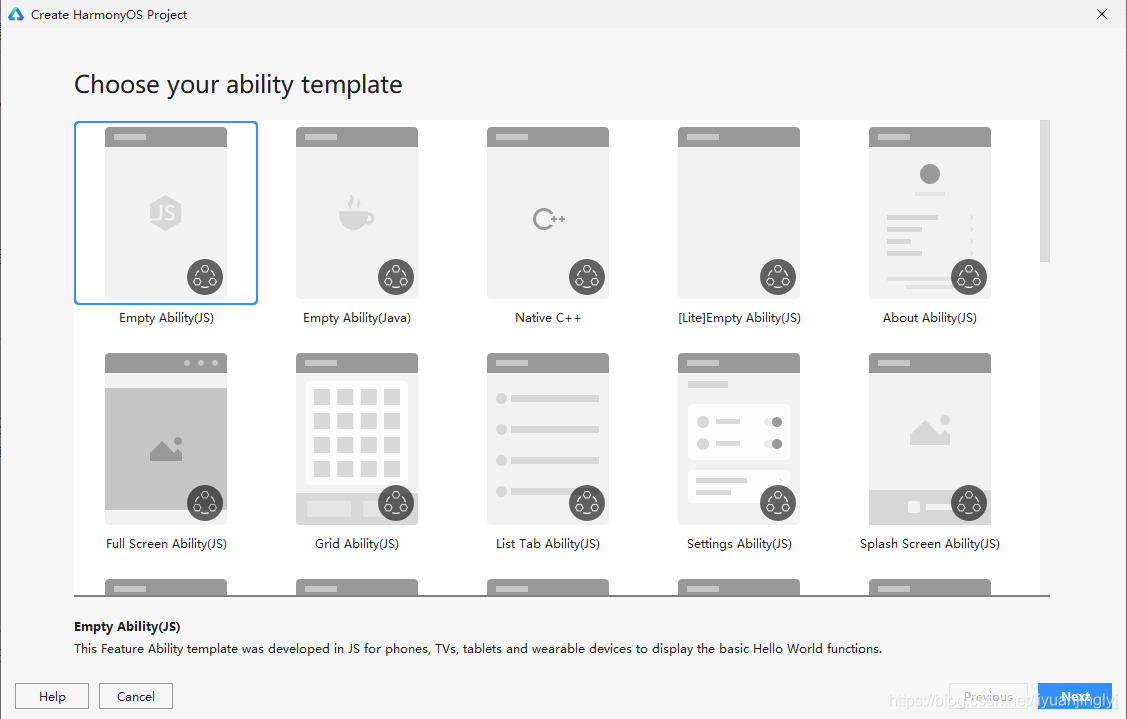
The creation steps are as follows. Here, we first create a pure JS project through DevEco Studio, as shown in the following figure:
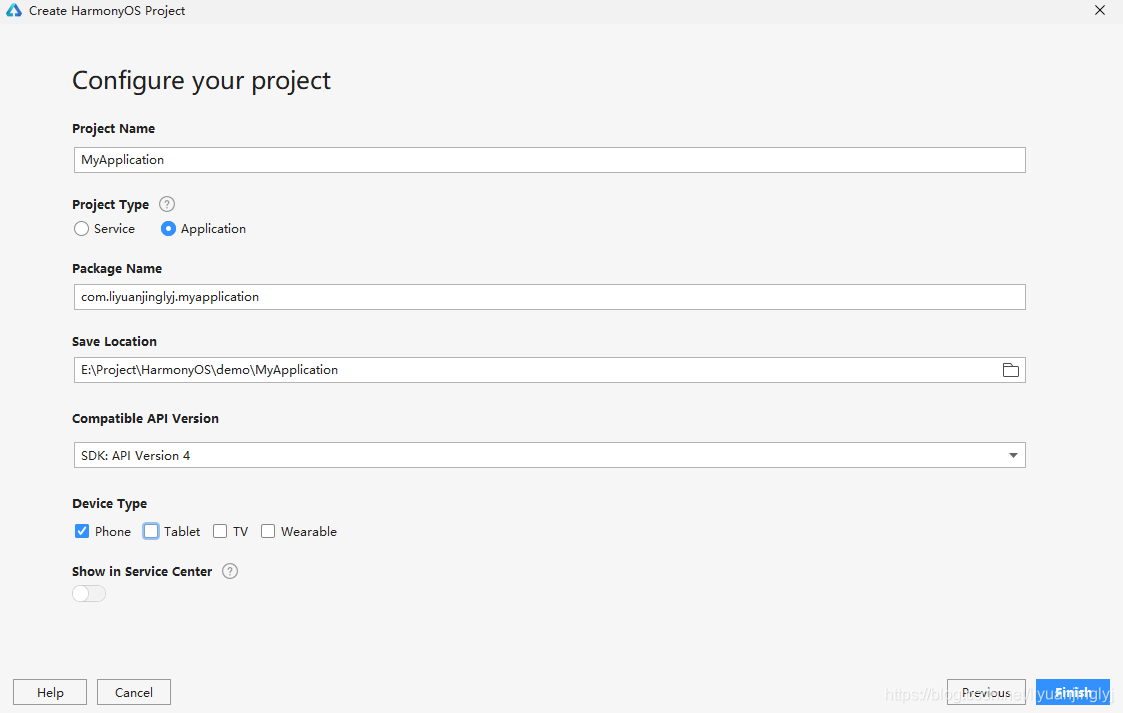
After the project is created, we will enter the project development page. Here, select entry SRC and right-click to create the 4 * 4 card content of JS. The specific creation steps are as follows:
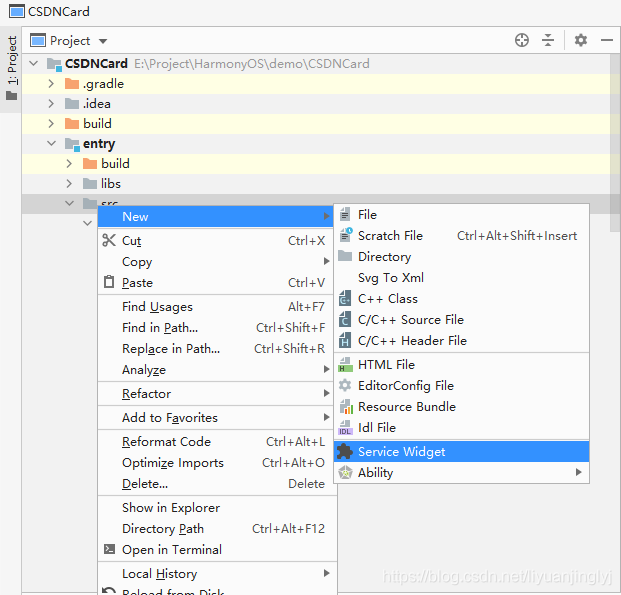
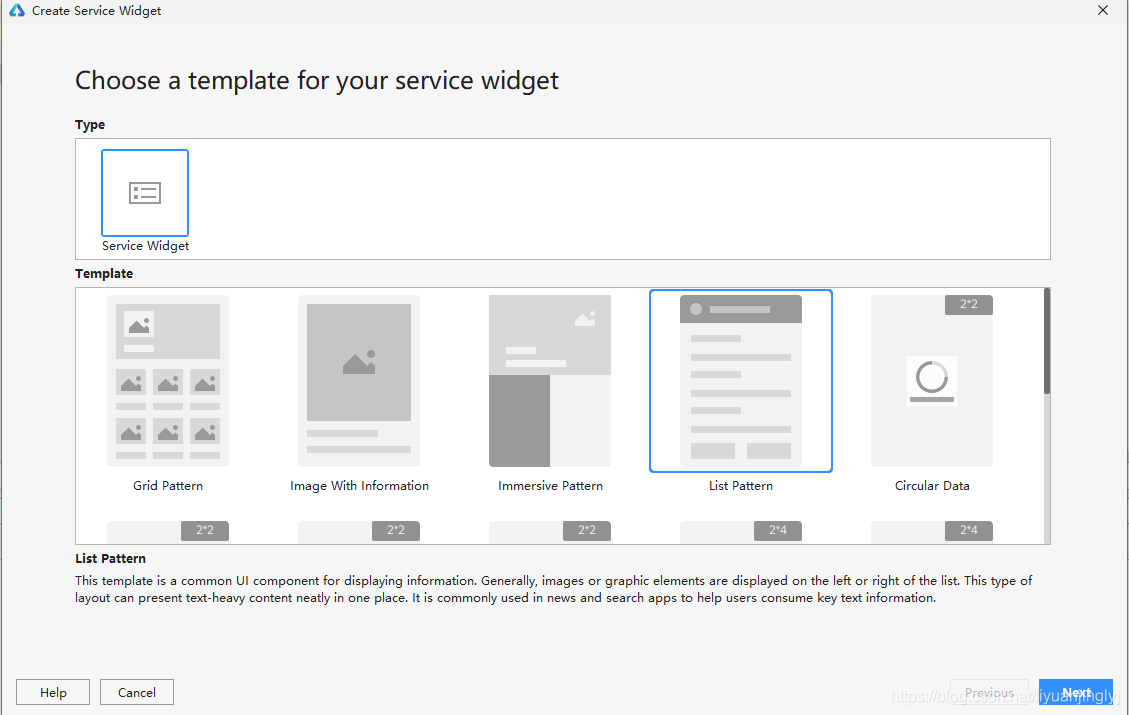
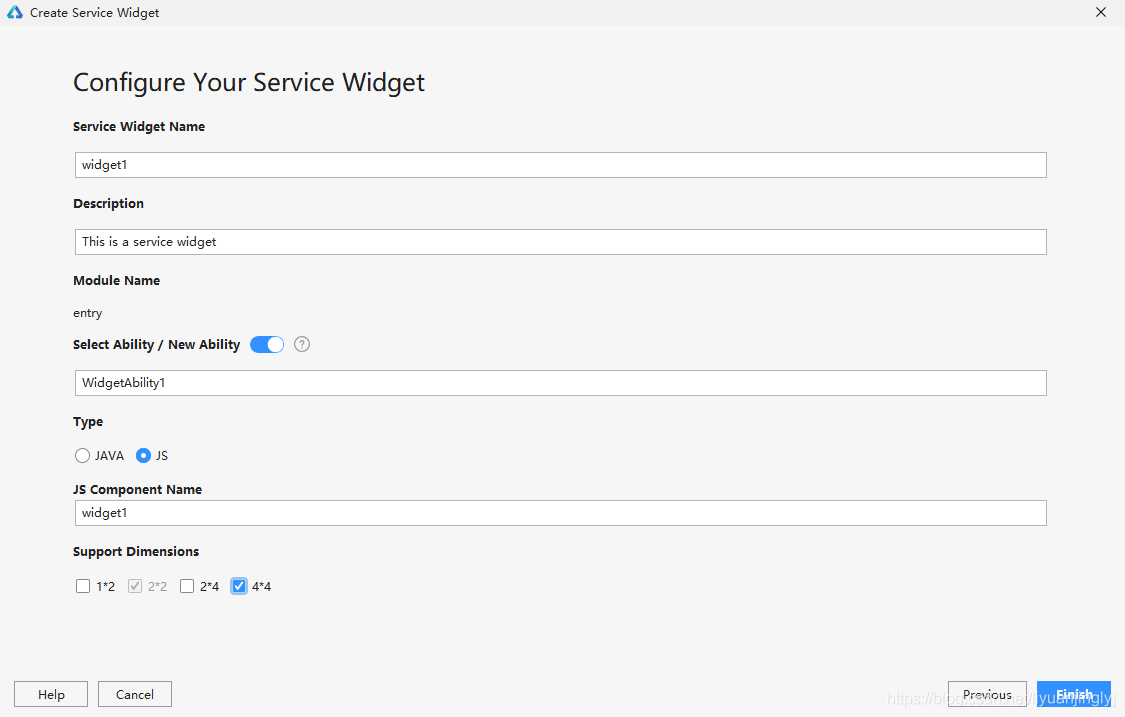
In this way, we have completed the creation of the card. However, generally speaking, when we first create a project, there is no default 2 * 2 card, so 2 * 2 and 4 * 4 cards will be created here.
However, 2 * 2 is too small to fully display the blog list. Next, let's realize the 4 * 4 function card of blog browsing.
Implement 4 * 4 blog list
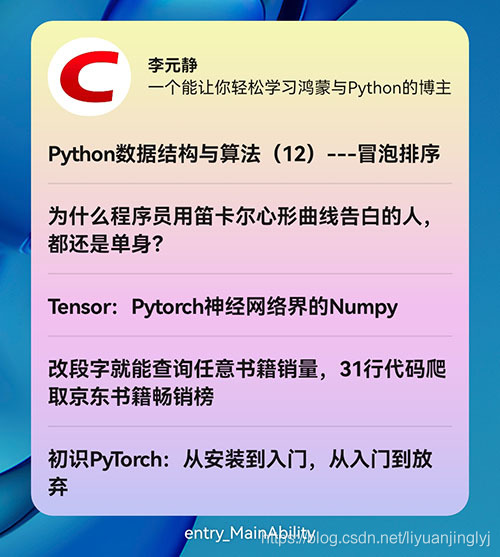
First, we can go back to the top of the blog to see the final implementation effect. It can be found that our 4 * 4 cards have avatars, names, profiles and a list of the latest blog posts.
Definition of blog card
Therefore, we need to create such a layout to perfectly build this information and complete the click interaction of blog posts. First, we need to implement the interface layout code (index.hml):
<div class="div_layout" >
    <div style="flex-direction: row;height: 80px;margin: 12px;" >
        <image class="head_img" src="Fill in any picture link"></image>
        <div style="flex-direction: column;margin-left: 12px;">
            <text class="head_name" >{{name}}</text>
            <text class="head_content" >{{content}}</text>
        </div>
    </div>
    <list>
        <list-item for="{{ blogList }}" style="flex-direction: column;">
            <div class="list_item_container" onclick="sendRouteEvent" >
                <text class="item_title">{{ $item.title }}</text>
            </div>
            <divider class="divider"></divider>
        </list-item>
    </list>
</div>
Here, our image component avatar uses a fixed image image. Because the image component of the CSDN avatar is not updated, only the Java card can perfectly realize this function. (it seems that the js card can only display pictures for the first time, and the later updated pictures will not be displayed)
This is also what I expect to feed back to Hongmeng officials. Therefore, here we use a fixed avatar instead. Except that the avatar picture cannot be replaced, other information can be perfectly replaced.
Next, we need to implement the style (index.css) code:
.div_layout{
    flex-direction: column;
    width: 100%;
    height: 100%;
    background-image: url("common/background.png");
}

.list_item_container{
    margin: 12px;
    flex-direction: column;
}

.item_title{
    font-size: 15px;
    font-weight: bold;
}

.divider {
    min-height: 0.75px;
    background-color: #11000000;
    margin-left: 12px;
    margin-right: 12px;
}

.head_img{
    border-radius: 30px;
    width: 60px;
    height: 60px;
}

.head_name{
    margin-top: 13px;
    font-size: 12px;
    font-weight: bold;
}

.head_content{
    font-size: 12px;
}
Finally, it is to complete the feedback of interactive information. The interactive variables of the card and the interactive jump interface are through index JSON file. The code is as follows:
{
  "data": {
    "blogList": "",
    "head": "https://avatar.csdnimg.cn/6/8/2/3_liyuanjinglyj_1623337572.jpg",
    "name": "Li Yuanjing",
    "content": "One that makes it easy for you to learn Hongmeng and Python Blogger"
  },
  "actions": {
    "sendRouteEvent": {
      "action": "router",
      "bundleName": "com.liyuanjinglyj.csdncard",
      "abilityName": "com.liyuanjinglyj.csdncard.WebViewPage",
      "params": {
        "url": "{{$item.url}}"
      }
    }
  }
}
Among them, blogList is the blog list information, and head is the avatar, but because the image is not updated, it is ignored here. name is the nickname of the owner of the blog, and content is the profile of the blogger.
actions here only defines a jump interface interaction, that is, the user clicks the blog information and then jumps to the detailed page of the blog. The parameter is the link of the blog post, which is loaded through WebView on the blog detail page.
Access to blog information
Since you want to get the blog information on the blog home page and the user's data, it involves crawler analysis. The crawler parsing package that is easy to use in Java is jsoup.
Later, we choose to replace the blogger's blog information in the same way. Therefore, the parsed code needs to be independent to reduce the redundancy of the code. The specific help class is lyjutils java:
public class LYJUtils {
	public static void getData(ZSONObject zsonObject,ZSONArray zsonArray,String url) {
        try {
            Connection connect = Jsoup.connect(url);
            Connection conheader = connect.header("User-Agent", "Mozilla/5.0 (Windows NT 10.0; Win64; x64) AppleWebKit/537.36 (KHTML, like Gecko) Chrome/91.0.4472.124 Safari/537.36");
            Document doc = conheader.get();
            //Get Avatar
            Element head_img=doc.selectFirst(".avatar_pic");
            String head_img_url=head_img.attr("src");
            //Get blogger name
            Element name_ele=doc.selectFirst(".title-box");
            String name=name_ele.selectFirst("a").text();
            //Get blogger profile
            String content=name_ele.selectFirst("p").text();
            //zsonObject.put("head",head_img_url);
            zsonObject.put("name",name);
            if(content.length()>20){
                zsonObject.put("content",content.substring(0,20));
            }else{
                zsonObject.put("content",content);
            }
            Elements list_blog = doc.select(".article-item-box");
            int i=0;
            for (Element div : list_blog) {
                if(i==10){
                    break;
                }
                String titleStr = div.select("h4 a").text();
                String contentStr = div.select(".content").text();
                ZSONObject zsonObject1=new ZSONObject();
                zsonObject1.put("title",titleStr.replace("original ",""));
                zsonObject1.put("content",contentStr.substring(0,20));
                zsonObject1.put("url",div.select("h4 a").attr("href"));
                zsonArray.add(zsonObject1);
                i++;
            }
        } catch (Exception e) {
            e.printStackTrace();
        }
    }
}
The data initialization method of the card is in widgetimpl In the Java class, its initialization code is as follows:
public class WidgetImpl extends FormController {
	//Other codes are omitted. They are basically the default codes for creating cards
	private ZSONObject zsonObject = new ZSONObject();
    private ZSONArray zsonArray=new ZSONArray();
    @Override
    public ProviderFormInfo bindFormData() {
        HiLog.info(TAG, "bind form data");
        LYJUtils.getData(zsonObject,zsonArray,"https://blog.csdn.net/liyuanjinglyj");
        zsonObject.put("blogList",zsonArray);
        ProviderFormInfo providerFormInfo = new ProviderFormInfo();
        providerFormInfo.setJsBindingData(new FormBindingData(zsonObject));
        return providerFormInfo;
    }
}
After running in this way, our initialization card blog style is perfectly realized.
Card interaction
So far, we have only realized the data display of the card. But when we read a blogger's blog, we don't just look at the title, but the content we are interested in. Therefore, clicking the blog title should jump to the blog details interface.
Jump to blog
First, we click the blog title to jump to the blog. Readers can go to the front of the blog to see if there is an index There is an actions definition in the JSON file, and the class here is the jump interface.
WebViewPageSlice. The Java code is as follows:
public class WebViewPageSlice extends AbilitySlice {
    private static final HiLogLabel TAG = new HiLogLabel(HiLog.DEBUG, 0x0, WebViewPageSlice.class.getName());
    private WebView webView;
    @Override
    public void onStart(Intent intent) {
        super.onStart(intent);
        super.setUIContent(ResourceTable.Layout_ability_web_view_page);
        this.webView=(WebView)findComponentById(ResourceTable.Id_ability_web_view_page_webview);
        WindowManager.getInstance().getTopWindow().get().setStatusBarColor(Color.BLUE.getValue()); // Set status bar color
        getWindow().addFlags(WindowManager.LayoutConfig.MARK_TRANSLUCENT_STATUS);//Immersive status bar
        if(intent != null) {
            HiLog.info(TAG, String.valueOf(1111));
            String param = intent.getStringParam("params");//Gets the value of the params field of the jump event definition from intent
            String url = "";
            if(param !=null){
                ZSONObject data = ZSONObject.stringToZSON(param);
                url = data.getString("url");
            }
            HiLog.info(TAG, url);
            this.webView.getWebConfig().setJavaScriptPermit(true);
            this.webView.load(url);
        }
    }

}
The content of this interface is very simple, that is, to obtain the URL parameter information passed by the jump. Then, the WebView component can be based on the content of the website. Of course, it needs to support JavaScript, otherwise the loaded interface is very ugly.
The XML layout file code of the blog post is as follows (ability_web_view_page.xml):
<?xml version="1.0" encoding="utf-8"?>
<DirectionalLayout
    xmlns:ohos="http://schemas.huawei.com/res/ohos"
    ohos:height="match_parent"
    ohos:width="match_parent"
    ohos:alignment="center"
    ohos:orientation="vertical">

    <ohos.agp.components.webengine.WebView
        ohos:id="$+id:ability_web_view_page_webview"
        ohos:height="match_parent"
        ohos:width="match_parent"/>

</DirectionalLayout>
Edit replacement card content
However, these contents are the blogger's own. There must be some readers who are not interested in the content of this blogger. What if they want to see the content of other bloggers?
Here, we can provide a sliding optional component to allow users to select bloggers they are interested in. In this way, the card can be updated to achieve real interaction.
First, we need to define the editing jump interface of the card, which needs to be in config JSON file. The code is as follows:
{
        "name": "com.liyuanjinglyj.csdncard.widget.WidgetAbility",
        "icon": "$media:icon",
        "description": "$string:widget_widgetability_description",
        "formsEnabled": true,
        "label": "$string:entry_WidgetAbility",
        "type": "page",
        "forms": [
          {
            "jsComponentName": "widget",
            "isDefault": true,
            "formConfigAbility": "ability://com.liyuanjinglyj.csdncard.CSDNChoiceBlogAbility",
            "scheduledUpdateTime": "10:30",
            "defaultDimension": "4*4",
            "name": "widget",
            "description": "This is a service widget",
            "colorMode": "auto",
            "type": "JS",
            "supportDimensions": [
              "4*4"
            ],
            "updateEnabled": true,
            "updateDuration": 1
          }
        ],
        "launchType": "singleton"
      },
Here, the main definition code is formConfigAbility, which is responsible for providing a jump interface for card editing interaction. Like the previous jump interface, it is a common Java interface class.
Next, we implement the editing interface here and provide the ability to complete the interaction.
public class CSDNChoiceBlogAbilitySlice extends AbilitySlice {
    private static final HiLogLabel TAG = new HiLogLabel(HiLog.DEBUG, 0x0, CSDNChoiceBlogAbilitySlice.class.getName());
    private Picker picker;
    private Button button;
    private Long formId;
    private Map<String,String> csdnBlog=new HashMap<>();
    private String url="https://blog.csdn.net/qq_39046854";
    private static List<String> headImgUrl=new ArrayList<>();
    @Override
    public void onStart(Intent intent) {
        super.onStart(intent);
        super.setUIContent(ResourceTable.Layout_ability_csdnchoice_blog);
        WindowManager.getInstance().getTopWindow().get().setTransparent(true);
        formId=intent.getLongParam(AbilitySlice.PARAM_FORM_IDENTITY_KEY, -1);
        init();
        getWindow().addFlags(WindowManager.LayoutConfig.MARK_TRANSLUCENT_STATUS);
        this.button=(Button)findComponentById(ResourceTable.Id_ability_csdnchoice_blog_button);
        this.picker=(Picker) findComponentById(ResourceTable.Id_ability_csdnchoice_blog_picker);
        String[] keyStr= Arrays.stream(csdnBlog.keySet().toArray()).toArray(String[]::new);
        this.picker.setDisplayedData(keyStr);
        this.picker.setWheelModeEnabled(true);
        this.picker.setMaxValue(csdnBlog.size()-1);
        this.picker.setValueChangedListener(new Picker.ValueChangedListener() {
            @Override
            public void onValueChanged(Picker picker, int i, int i1) {
                if(i1>=0 && i1<csdnBlog.size()){
                    url=csdnBlog.get(keyStr[i1]);
                }

            }
        });
        this.button.setClickedListener(new Component.ClickedListener() {
            @Override
            public void onClick(Component component) {
                try {
                    HiLog.info(TAG, url);
                    TaskDispatcher globalTaskDispatcher = getGlobalTaskDispatcher(TaskPriority.DEFAULT);
                    Revocable revocable = globalTaskDispatcher.asyncDispatch(new Runnable() {
                        @Override
                        public void run() {
                            try {
                                ZSONArray zsonArray=new ZSONArray();
                                ZSONObject zsonObject=new ZSONObject();
                                LYJUtils.getData(zsonObject,zsonArray,url);
                                getUITaskDispatcher().asyncDispatch(new Runnable() {
                                    @Override
                                    public void run() {
                                        zsonObject.put("blogList",zsonArray);
                                        FormBindingData bindingData = new FormBindingData(zsonObject);
                                        try {
                                            getAbility().updateForm(formId,bindingData);
                                            terminateAbility();
                                        } catch (FormException e) {
                                            e.printStackTrace();
                                        }
                                    }
                                });
                            } catch (Exception e) {
                                e.printStackTrace();
                            }
                        }
                    });
                } catch (Exception e) {
                    HiLog.info(TAG, "12w");
                    e.printStackTrace();
                }
            }
        });
    }

    public void init(){
        this.csdnBlog.put("Old ape Python","https://blog.csdn.net/LaoYuanPython");
        this.csdnBlog.put("Li Yuanjing","https://blog.csdn.net/liyuanjinglyj");
        this.csdnBlog.put("Let's learn programming together","https://blog.csdn.net/qq_39046854");
        this.csdnBlog.put("main Python","https://blog.csdn.net/weixin_54733110");
        this.csdnBlog.put("CHQIUU","https://blog.csdn.net/QIU176161650");
    }
}
Here, the blogger only defines the information of 5 bloggers to be added to the Picker component. If you have just learned Hongmeng development and are unfamiliar with the Picker component, you can refer to the blogger's Hongmeng development column and have a special blog article to explain the component.
After running, long press the card and click Edit to open the following interface.
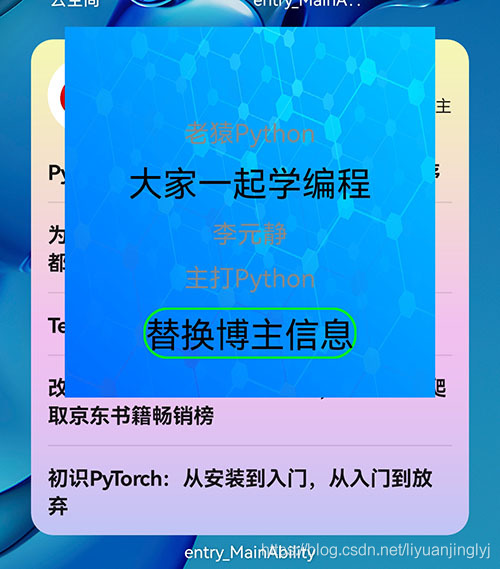
Of course, the pop-up interface is a little ugly, mainly because the blogger has not systematically studied design and color matching, so he just found a background here.
If readers click the "replace blogger information" button above, the content on the card will be automatically replaced, which is consistent with the effect achieved at the beginning of the blog post.
The XML layout file code of the editing interface is as follows:
<?xml version="1.0" encoding="utf-8"?>
<DirectionalLayout
    xmlns:ohos="http://schemas.huawei.com/res/ohos"
    ohos:height="match_parent"
    ohos:width="match_parent"
    ohos:alignment="center"
    ohos:orientation="vertical">

    <DirectionalLayout
        ohos:height="800px"
        ohos:width="800px"
        ohos:background_element="$media:background">

        <DirectionalLayout
            ohos:height="match_parent"
            ohos:width="match_parent"
            ohos:alignment="center">

            <Picker
                ohos:id="$+id:ability_csdnchoice_blog_picker"
                ohos:width="match_parent"
                ohos:height="match_content"
                ohos:normal_text_size="18fp"
                ohos:selected_text_size="25fp"/>

            <Button
                ohos:id="$+id:ability_csdnchoice_blog_button"
                ohos:height="match_content"
                ohos:width="match_content"
                ohos:top_margin="20px"
                ohos:layout_alignment="horizontal_center"
                ohos:background_element="$graphic:button_background_ability"
                ohos:padding="5px"
                ohos:text_size="25fp"
                ohos:text="Replace blogger information"/>
        </DirectionalLayout>
    </DirectionalLayout>
</DirectionalLayout>
Other configurations
Here, our CSDN blog card will be transferred to the card of Hongmeng system. Of course, you can add more popular bloggers for everyone to choose from.
However, there are several points to note:
First, the above HTML parsing requires jsoup Jar file, which you use in the project, you need to copy the jsoup package to the entry LIBS folder and right-click add Libraries.
Second, the above web page request involves network permissions, which need to be in the project configuration file config JSON. The code is as follows:
"module": {
    "reqPermissions": [
      {
        "name": "ohos.permission.INTERNET"
      }
    ],
}
Third, 2 * 2 and 4 * 4 cards are created by default, but we only need 4 * 4 cards. You only need to delete 2 * 2 in the supportDimensions attribute in the configuration file.
Source code address of this article: https://gitee.com/liyuanjinglyj/CSDNCard
This article is participating in the "prize essay | harmony OS essay contest":
Activity link: https://marketing.csdn.net/p/ad3879b53f4b8b31db27382b5fc65bbc