Data backup of HBase
1.1 backup the table based on the class provided by HBase
-
Use the class provided by HBase to export the data of a table in HBase to HDFS, and then to the test HBase table.
-
(1) = = export from hbase table to HDFS==
[hadoop@node01 shells]$ hbase org.apache.hadoop.hbase.mapreduce.Export myuser /hbase_data/myuser_bak
-
(2) = = file import hbase table==
Create backup target table in hbase shell
create 'myuser_bak','f1','f2'
-
Import the data on HDFS into the backup target table
hbase org.apache.hadoop.hbase.mapreduce.Driver import myuser_bak /hbase_data/myuser_bak/*
-
Additional explanation
All of the above are full backups of data. In the later stage, incremental data backup of tables can also be realized. Incremental backup is similar to full backup, except that time stamp should be added later.
For example:
HBase data export to HDFSHBase org.apache.hadoop.hbase.mapreduce.export test / HBase? Data / test? Bak? Increment start timestamp end timestamp
1.2 backup table based on snapshot snapshot
-
The migration and copy of HBase data are realized by snapshot snapshot. This method is more commonly used and efficient, and is also the most recommended data migration method.
-
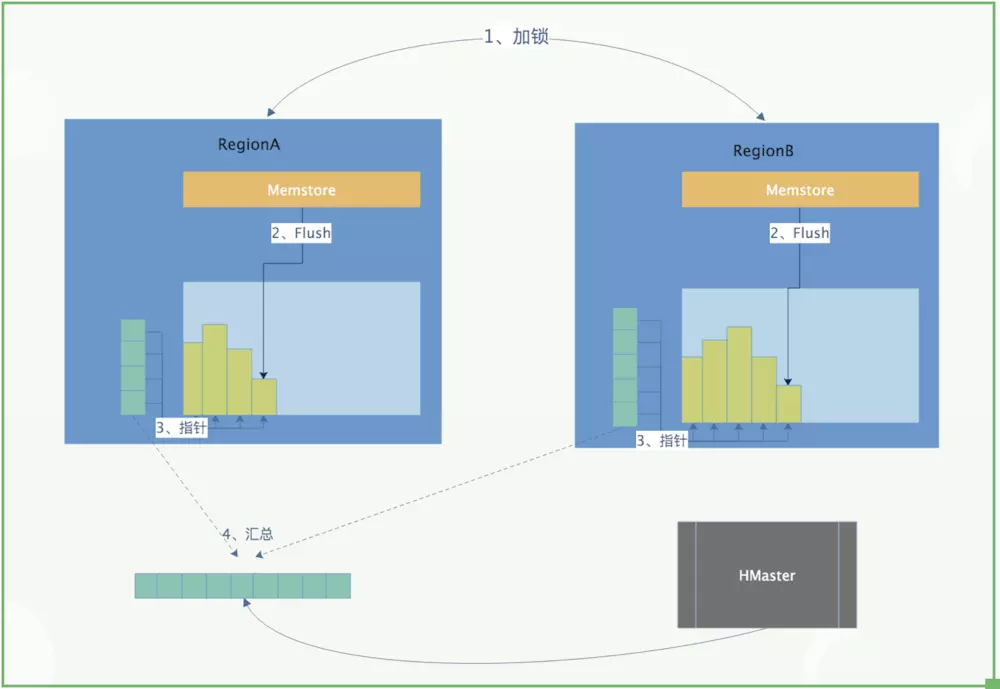
HBase's snapshot is actually a collection of = = metadata = = information (file list). Through the collection of these metadata information, the data of the table can be rolled back to the data at the time of snapshot.
- First of all, we need to understand the so-called LSM type system structure of HBase. We know that in HBase, the data is written to the memory first. When the data in the memory reaches certain conditions, it will flush to HDFS to form HFile. Later, it is not allowed to modify or delete in place.
- If you want to update or delete, you can only append and write new files. Since the data will not be modified or deleted in place after being written, this is where the snapshot does the article. When making a snapshot, you only need to create pointers (metadata sets) for all the files corresponding to the snapshot table. When recovering, you only need to find the corresponding files according to these pointers to recover. This is the simplest description of the principle. The figure below is a simple process to describe the snapshot:

1.3 snapshot practice
- 1. Create a snapshot of a table
snapshot 'tableName', 'snapshotName'
-
2. View snapshot
list_snapshots
Find the snapshot starting with test
list_snapshots 'test.*'
- 3. Restore snapshot
ps: you need to disable the table. First, set the table to unavailable state, and then restore ﹣ snapshot
disable 'tableName'
restore_snapshot 'snapshotName'
enable 'tableName'
-
4. Delete snapshot
delete_snapshot 'snapshotName'
-
5. Migrate snapshot
hbase org.apache.hadoop.hbase.snapshot.ExportSnapshot \
-snapshot snapshotName  \
-copy-from hdfs://src-hbase-root-dir/hbase \
-copy-to hdfs://dst-hbase-root-dir/hbase \
-mappers 1 \
-bandwidth 1024

//For example:
hbase org.apache.hadoop.hbase.snapshot.ExportSnapshot \
-snapshot test  \
-copy-from hdfs://node01:8020/hbase \
-copy-to hdfs://node01:8020/hbase1 \
-mappers 1 \
-bandwidth 1024
Note: this method is used to migrate the snapshot table to another cluster. MR is used to copy the data quickly. When using, remember to set the bandwidth parameter to avoid online business failure caused by full network.
-
6. Using bulkload to import snapshot
hbase org.apache.hadoop.hbase.mapreduce.LoadIncrementalHFiles \
hdfs://dst-hbase-root-dir/hbase/archive/datapath/tablename/filename \
tablename

//For example:
//Create a new table
create 'newTest','f1','f2'
hbase org.apache.hadoop.hbase.mapreduce.LoadIncrementalHFiles hdfs://node1:9000/hbase1/archive/data/default/test/6325fabb429bf45c5dcbbe672225f1fb newTest
dIncrementalHFiles hdfs://node1:9000/hbase1/archive/data/default/test/6325fabb429bf45c5dcbbe672225f1fb newTest
##