1, Introduction to QtQuick
QT provides two independent ways to create user interfaces.
QtQuick module provides a markup language for creating a smooth and vivid user interface. QtQuick module is suitable for interfaces that need animation elements and scenes where applications mainly run on small screens and multi touch devices. The module provides more support for the traditional desktop and more integration with the target platform, whether the target platform is Mac OS X, Windows, KDE or GNome. QtWidgets is a very efficient class library based on C + +, which contains many common user interface components. It can easily extend new functions for existing components.
QtQuick module is a standard library for writing applications in QML language. Qt QML module provides QML engine and language architecture, and QtQuick module provides all basic types of creating user interface using QML language.
QtQuick module provides two sets of interfaces. QML API provides QML type for creating user interface with QML language, and C++ API provides QML application program interface extended with C + + code.
Qt4. QML (Qt meta object language) is a declarative programming language used to describe the user interface of application program. QML uses some visual components and the interaction between these components to describe the user interface. It is a highly readable language, which can make components interact dynamically, and allow components to be easily reused and customized in the user interface. QML allows developers and designers to create high-performance, smooth animation and visually attractive applications in a similar way. QML provides a JSON like declarative syntax with high readability, and provides the necessary support for JavaScript statements and dynamic attribute binding.
2, Qt Quick project example
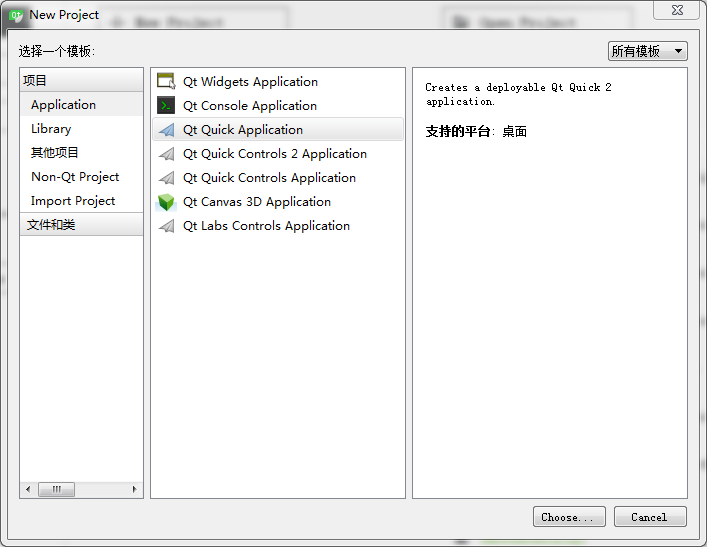
1. Create Qt Quick app

Select Qt Quick Application.
After the project is created, Qt Quick project includes QML file and source file
2. QML documents
Main.qml file:
import QtQuick 2.6
import QtQuick.Window 2.2


Window
{
    visible: true
    width: 640
    height: 480
    title: qsTr("Hello World")
    MainForm
    {
        anchors.fill: parent
        mouseArea.onClicked:
        {
            Qt.quit();
        }
    }
}
The QML document defines a QML object tree, which consists of two parts: an import part and an object declaration part.
The import statement is similar to the #include statement in C + +. The types and functions can be used only when the relevant modules are imported. The imported module QtQuick module is a set of components selected when creating a project, including the basic types and functions required to create a user interface Window type is provided in window module, which can create a top-level window for Qt Quick scene.
In the object declaration section, the object declaration in the QML document defines the content to be displayed in the visual scene. The project creates two objects: Window object and its child object MainForm. Objects are specified by their type, starting with an uppercase letter followed by a pair of braces, which contain the attribute definition of the object, such as the attribute value of the object or its child objects. The outermost object is called the root object, such as Window. The object defined in the root object is called the child object of the root object. For example, MainForm is the child object of Window. visible in Window is the property of Window, which is used to set whether the Window is displayed. You can view all properties and usage of a type in the help document.
MainForm is not a type in QtQuick module, but a customized user interface form (Qt Quick UI Forms). It is a concept proposed after Qt 5.4, similar to the UI file in Qt C + + programming, MainForm ui. QML files can only be edited in design mode.
import QtQuick 2.6

Rectangle {
    property alias mouseArea: mouseArea
    width: 360
    height: 360
    MouseArea {
        id: mouseArea
        anchors.fill: parent
    }

    Text {
        anchors.centerIn: parent
        text: "Hello World"
    }
}
In main In QML file, MainForm is MainForm ui. An instance of QML, and the onClicked event handler of mousearea attribute is called inside MainForm, which is equivalent to calling MainForm ui. onClicked event handler of mousearea object in QML, QT Quit () indicates that the command to execute when clicking the mouse in the whole rectangle is to exit the program.
All QML files are placed in the form of resources In the qrc file, the QML file does not need to be compiled, which is similar to the material.
3. Source file
Main.cpp file:
#include <QGuiApplication>
#include <QQmlApplicationEngine>

int main(int argc, char *argv[])
{
    QGuiApplication app(argc, argv);

    QQmlApplicationEngine engine;

    engine.load(QUrl(QStringLiteral("qrc:/main.qml")));

    return app.exec();
}
A QQmlApplicationEngine object is defined in the main function and used to load main QML file. QQmlApplicationEngine class combines the functions of QQmlEngine and QQmlComponent and provides a convenient way to load a QML file, but all visual contents of the QML file must be placed in the Window object to be finally displayed.
4. Attached documents of pri project
Deployment.pri file:
unix:!android
{
    isEmpty(target.path)
    {
        qnx
        {
            target.path = /tmp/$${TARGET}/bin
        }
        else
        {
            target.path = /opt/$${TARGET}/bin
        }
        export(target.path)
    }

    INSTALLS += target
}

export(INSTALLS)
5. Create QML file
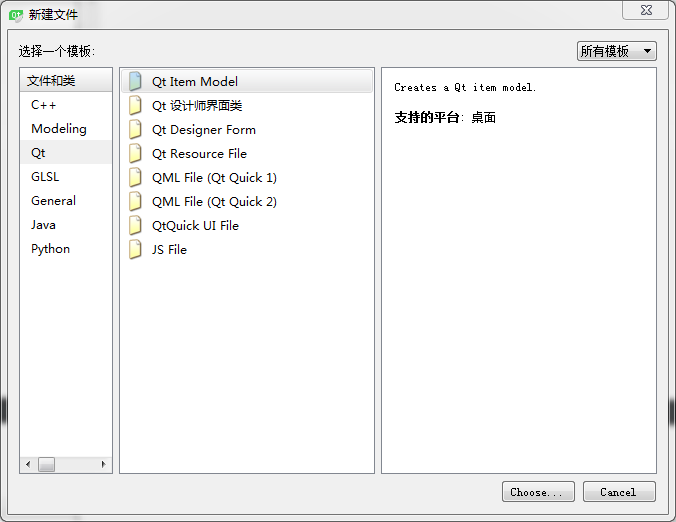
To create QML files in the project, the QML templates for creating QML files can be Qt Quick 1, Qt Quick 2 and QtQuickUI File. Qt Quick 1 will import QtQuick 1.1 module, which is applicable to Qt 4 version; QtQuick 2 imports QtQuick 2.0 module, which is applicable to Qt 5 version; After the QtQuick UI file is generated, the designer will be used by default.

QML files do not need to be compiled and can be run directly. Qt provides two tools for running QML files, qmlviewer and qmlscene. The former is a product of Qt 4 era and is mainly used to display QML files imported with QtQuick 1.1 module, while qmlscene is used to display QML files imported with QtQuick 2.0 version. Select the menu item "tools → external → QtQuick → Qt Quick 2Preview" to display the contents of the currently opened QML document in qmlscene.
3, Extended QML program
1. Add text display
import QtQuick 2.0


Rectangle {
    width: 100
    height: 62
    Text
    {
        text: "hello World"
    }
}
The text object is used to display a piece of text, and its text property is used to specify the text content to be displayed
2. Anchor layout
Each component in QML has a set of invisible anchors, which can define the relative position of the component itself and other components at the top, bottom, left, right, center, etc. centerIn refers to the Text component in the center of the parent component, and parent refers to the Rectangle of the parent component of Text.
import QtQuick 2.0


Rectangle {
    width: 100
    height: 62
    Text
    {
        anchors.centerIn: parent
        text: "hello World"
    }
}
3. Mouse interaction
import QtQuick 2.0


Rectangle {
    width: 100
    height: 62
    Text
    {
        anchors.centerIn: parent
        text: "hello World"
    }

    MouseArea
    {
        anchors.fill: parent
        onClicked:
        {
            Qt.quit()
        }
    }
}
MouseArea sub object is the mouse area, which is an invisible component. Mouse interaction can be realized through MouseArea object. anchors.fill is to fill and cover the whole Rectangle window with the mouse area. onClicked is the signal processing function in Qt C + +, that is, the signal processor. Its syntax is on < signal >, onClicked is the processing of the Clicked signal. QT will be executed after clicking the mouse on the window Quit() global function, the result of execution is to exit the program.
4. id attribute and attribute alias
The id of an object can be determined by referring to the name of another object.
import QtQuick 2.0

Rectangle {
    width: 100
    height: 62
    property  alias mArea:mouseArea
    Text
    {
        anchors.centerIn: parent
        text: "hello World"
    }

    MouseArea
    {
        id:mouseArea
        anchors.fill: parent
    }
}
Mousearea object. Set its id to mousearea. Mousearea object can be accessed through mousearea in Rectangle. For example, the attribute of Rectangle area in the sub object of QM area needs to be declared. For example, the attribute of Rectangle area needs to be the alias of the sub object.
mArea.onClicked:
{
    Qt.quit()
}