preface
I didn't want to make such a fuss, but the previously rented Alibaba cloud student server is about to expire and can't be renewed at the student price. So I want to renew my life with another cloud server, but all platforms of the student server are similar.
The advantage of student server is that it is cheap and can toss around. The disadvantage is also obvious. The bandwidth is low and the access speed of building blog is slow. Although OSS, drawing bed and CDN can also be used to improve the problem of slow access speed.
Because I use markdown syntax to take notes, the wordpress I used before is not particularly easy to use and support, and at the same time, I dislike the slow access speed, so the original blog updates less and runs directly behind CSDN Updated on.
Later, I planned to use Python's Flask framework and Layui framework to send a few blogs to learn about WSGI, Jinjia2, BluePrint, etc. It's still too troublesome (lazy)...
Adhering to the open source spirit of the Internet, those with wheels will never make wheels. I saw the exquisite blogs of other bigwigs. Finally, I decided to use hexo to build blogs.
Deploy Hexo static blog
Introduction to static blog
Static blog, that is, directly compile the blog posts written by the author into final html through generation tools (eg: Hexo; Hugo, etc.); css; js and other static files. The author / blogger only needs to deploy the generated file on the static server to be accessed on the Internet. Users access the server through the browser and directly get the compiled static resources.
advantage:
- The speed is extremely fast, because when users access the blog, they only need to transfer the compiled static resources from the server (such as nginx), without real-time query from the database to obtain blog posts, pictures, comments, visits and other resources. The efficiency is very high, and the speed of opening the website will be very fast!
- The author can concentrate on the production of blog posts, regardless of trivial matters such as server maintenance, and basically does not need maintenance, except for tossing the party.
- The cost is low. There are many open source and free hosting programs on the market (such as gayhub; gitee; coding, etc.), so you don't have to worry about the high server cost.
- Very safe, without worrying about website security problems such as database injection and cross site attack.
- You can add.
Disadvantages:
- Hard injury, unable to support native comments, traffic statistics, registration and login and other functions.
- The operation is cumbersome, although the static blog mentioned above does not need to be maintained by the management server; Don't worry about the high server cost, but it has no background management. It depends on manual compilation. If there are too many changes (beautification; addition and deletion function) on the original basis, it will be difficult to maintain!!!
- It's hard to get started. Because there is no background management function, the static blog is really difficult for novices to use. If you don't understand HTML, JS and CSS, there's no need to talk about using it at all, because you'll have a lot of trouble publishing articles, so it's impossible to play a good static blog without going through a bit of struggle. Don't tell me to be simple, because your simplicity is only based on the original without change.
- Generation speed (compilation speed). The speed of different static blog generators varies. Once there are a large number of pictures in static resources, the speed will change significantly. Of course, for those who are firm in static blogs, this is ignored.
Introduction to Hexo
Hexo is a node based JS static blog framework, less dependence, easy to install and use, can easily generate static web pages, hosted on GitHub and Coding, is the preferred framework for building blogs. You can enter hexo official website Check in detail, because the founder of Hexo is Taiwanese and has friendly support for Chinese. You can choose Chinese to check.
Hexo construction steps
- Install node js
- Install Git
- Installing Hexo
- GitHub creates a personal warehouse
- Generate SSH and add to GitHub
- Deploy hexo to GitHub
- Set personal domain name
- Publish articles
Install node js
First, go to the official website to download node js Download address , npm mirror source Download address.
All installation options are default. Click Next all the way.
Finally, after the installation, press Win+R to open the command prompt and enter node -v and npm -v. if the version number appears, the installation is successful.
Add domestic image source
Use Alibaba's image source
npm config set registry https://registry.npm.taobao.org
You can also directly install the npm manager of Taobao version
npm install -g cnpm --registry=http://registry.npm.taobao.org
cnpm -v    #View cnpm version
cnpm can be directly used instead of npm
Install Git
In order to upload local web files to github, we need to use Git, a distributed version control tool[ Download address].
After installation, enter git --version in the command prompt to verify whether the installation is successful.
New GitHub warehouse
After registering GitHub, select new repository and enter your own project name, which must be added later github.io suffix and README initialization should also be checked. The name must be exactly the same as your GitHub name. For example, your GitHub name is teemos 666, so the warehouse name must be teemos 666 github.io.
Then the project is completed. Click Settings, drop down to the last GitHub Pages, click Choose a theme, and then you can visit your github blog in a moment.
Your blog link is teemos 666 github. io.
Installing Hexo
Create a new folder in the right place to store your blog files.
Right click Git Bash Here under this directory to open the GIT console window. In the future, all our operations will be carried out on the GIT console. Do not use the console provided by Windows.
Locate the directory and enter NPM I Hexo cli - G to install Hexo. There may be several errors, just ignore it.
After installation, enter hexo -v to verify whether the installation is successful.
Then we need to initialize our website, enter the hexo init initialization folder, which is actually cloning the code from GitHub, and then enter npm install to install the necessary components.
In this way, the local website configuration is also done. Enter hexo g to generate a static web page, then enter hexo s to open the local server, and then open the browser http://localhost:4000/ , you can see our blog.
Connecting Github to local
First, right-click to open git bash, and then enter the following command:
git config --global user.name "teemos"
git config --global user.email "zzxxccsung@qq.com"
The user name and email address can be modified according to the information you registered with github.
Then generate the SSH key:
ssh-keygen -t rsa -C "zzxxccsung@qq.com"
open github , click settings under the avatar, and then click SSH and GPG keys to create a new SSH with any name.
Input in git bash
cat ~/.ssh/id_rsa.pub
Copy the output content into the box and click OK to save.
Enter ssh -T git@github.com , your user name appears, and it's successful.
Open the blog under the root directory_ config.yml file, which is the configuration file of the blog. Here you can modify all kinds of information related to the blog.
Modify the configuration of the last line:
deploy:
  type: git
  repository: git@github.com:teemos666/teemos666.github.io.git
  branch: master
Modify the repository to your own github project address
Write and publish articles
First, right-click to open git bash under the blog root directory and install an extension NPM I hexo deployer GIT.
Then enter hexo n "article title" to create a new article.
Then open \ source\_posts directory, you can find one more folder and one more md file, one is used to store your pictures and other data, and the other is your article file.
After writing the markdown file, enter hexo g in the root directory to generate a static web page, then enter hexo s to start the local server, enter localhost:4000 in the browser to preview the effect, and finally enter hexo d to upload to github. Then open your github You can see the published articles on the IO homepage.
Starting from 2.0.0, hexo generator index has supported the article top function. You can directly add the sticky: 1 attribute in the front matter area of the article to put the article at the top. The higher the value, the higher the priority of topping.
Set personal domain name
Now your personal website address is teemos 666 github. IO, if you don't think this website is strong enough, you need to set up your personal domain name, but you need to spend money.
Register an alicloud account and buy a domain name on alicloud. I bought justwalking Cn, the price of each suffix is different, such as the most extensive com is more expensive. It depends on your personal preferences.
You need to conduct real name authentication first, and then see the domain name you purchased in the domain name console.
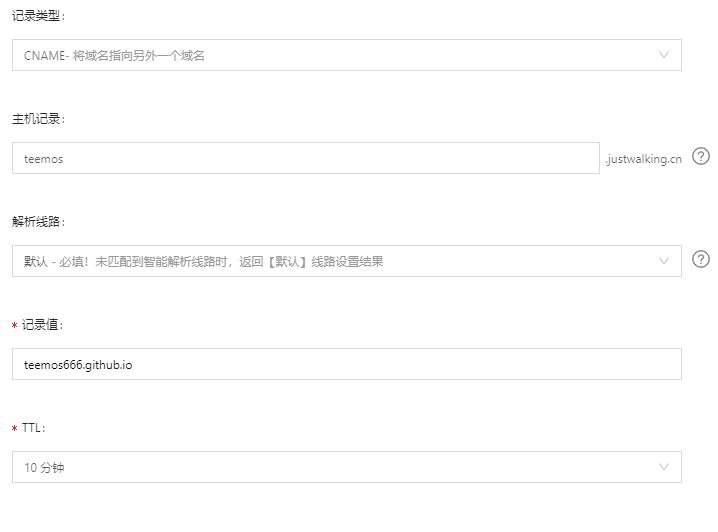
Click resolve to add CNAME, and the address is teemos666 github. io.
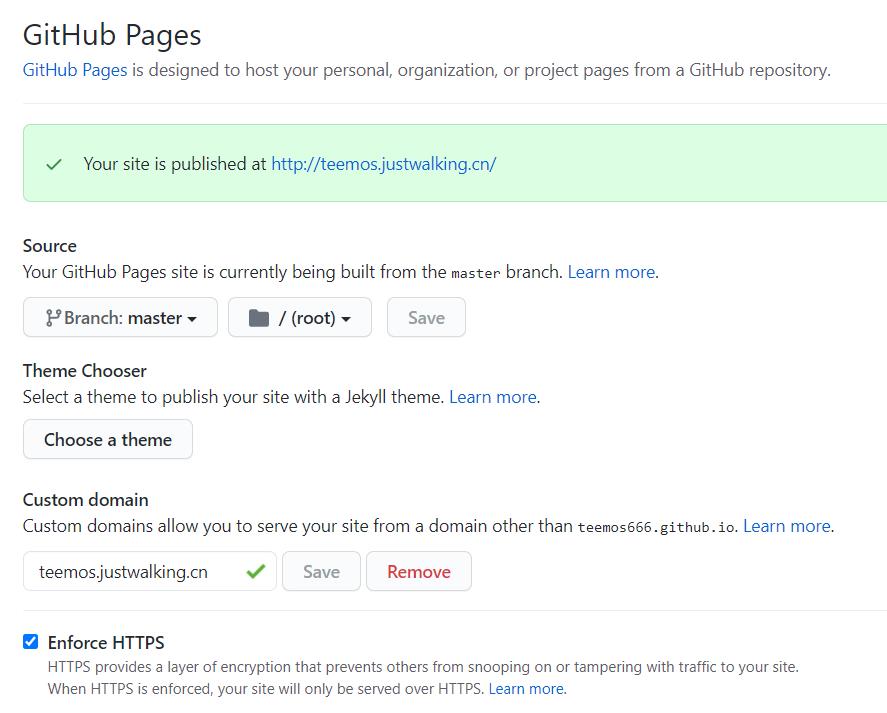
Log in to GitHub, enter the warehouse created before, click settings, set Custom domain, and enter the domain name you purchased.
Then create a file named CNAME in your blog file source without suffix. Write your domain name on the content.
The domain name resolution results are as follows:
The GitHub setting results are as follows:
Using CDN whole station acceleration
Every time you need to request Github's servers far away from home, and due to the high wall in China, it will be slow to visit the blog or sometimes it can't be opened at all, so you need to speed up CDN.
I also thought about using gitee instead of GitHub. After all, gitee is in China, but I found that gitee can't apply for pages recently, and it's not as convenient as GitHub, so I gave up.
The full name of CDN is Content Delivery Network, that is, content distribution network. CDN is an intelligent virtual network built on the basis of the existing network. Relying on the edge servers deployed everywhere, through the load balancing, content distribution, scheduling and other functional modules of the central platform, CDN enables users to obtain the required content nearby, reduce network congestion, and improve user access response speed and hit rate.
The above is Baidu's introduction, which is a lot of wordy. To put it bluntly, it is to let users sitting in front of the computer get the required network resources nearby, instead of running to visit remote servers. Since it's so good, use it! There are some CDN service providers at home and abroad, but as we all know, it's hard to access the external network. There are also many CDN providers in China, and the service is also good.
I use the CDN of Tencent cloud because it sends 20G of traffic every month when it is newly registered. The same is true for others.
In fact, I want to use Alibaba cloud, but if Tencent cloud can whore for nothing, I'll use Tencent cloud first.
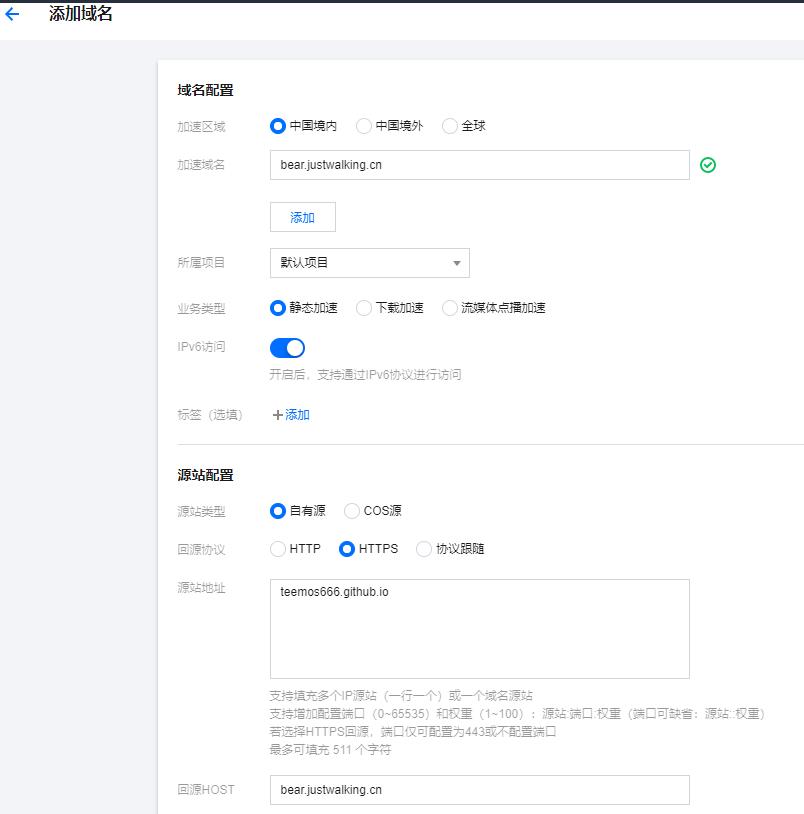
After opening the CDN, add a domain name to the domain name management. You may need to verify the ownership of the domain name. You can complete it according to the prompt. Select the accelerated region in China. The accelerated region has different prices in different places. It depends on your own needs.
Accelerate the domain name, fill in your domain name, select static acceleration for business type, select self owned source for source station configuration, HTTPS for protocol, select source station domain name, fill in your Github Page address, and return to the source HOST. It is generated automatically.
Open the domain name management page and start http2 0 configuration, forced jump to HTTP - > HTTPS.
Open the certificate management page and add the SSL certificate of the domain name.
Open the DNS resolution interface of Alibaba cloud and resolve the domain name to the address teemos666 github. IO change to the address of CNAME provided by Tencent cloud CDN.
So far, the whole CDN station has been accelerated.

Before CDN acceleration:
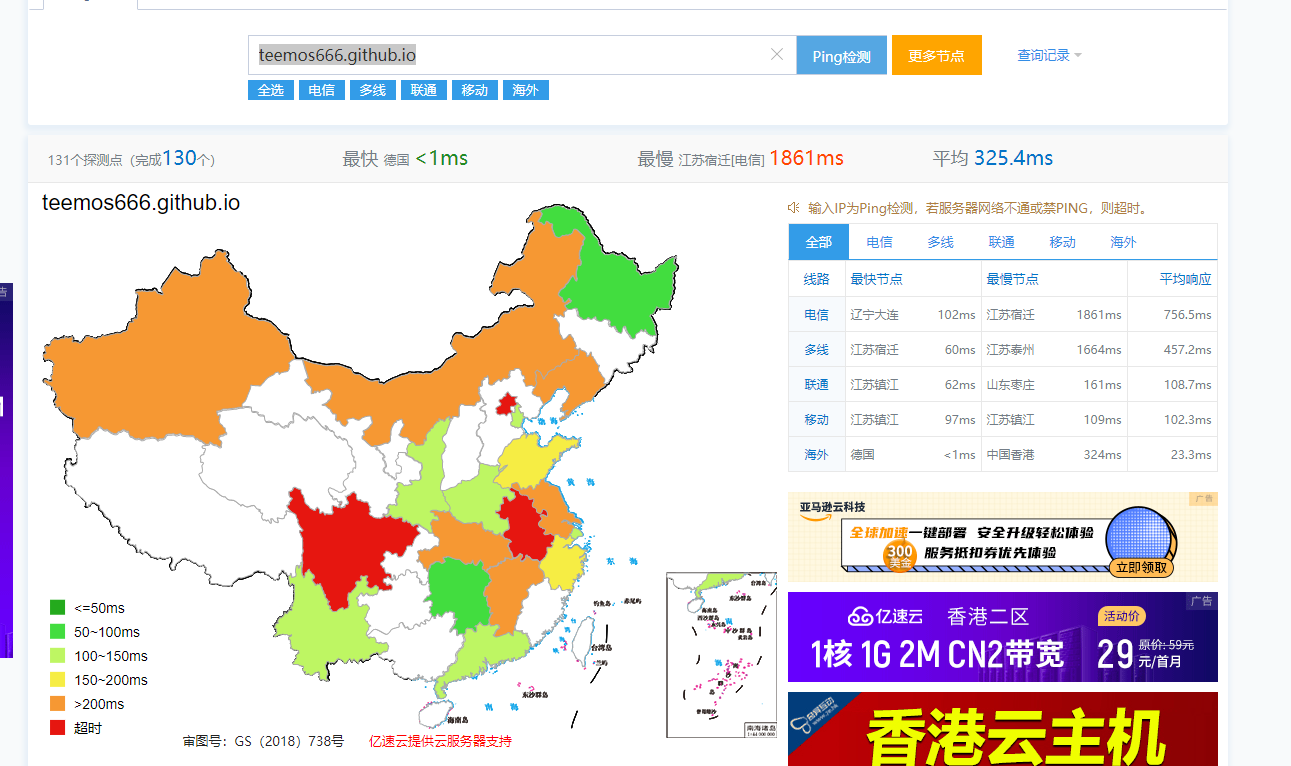
After CDN acceleration:
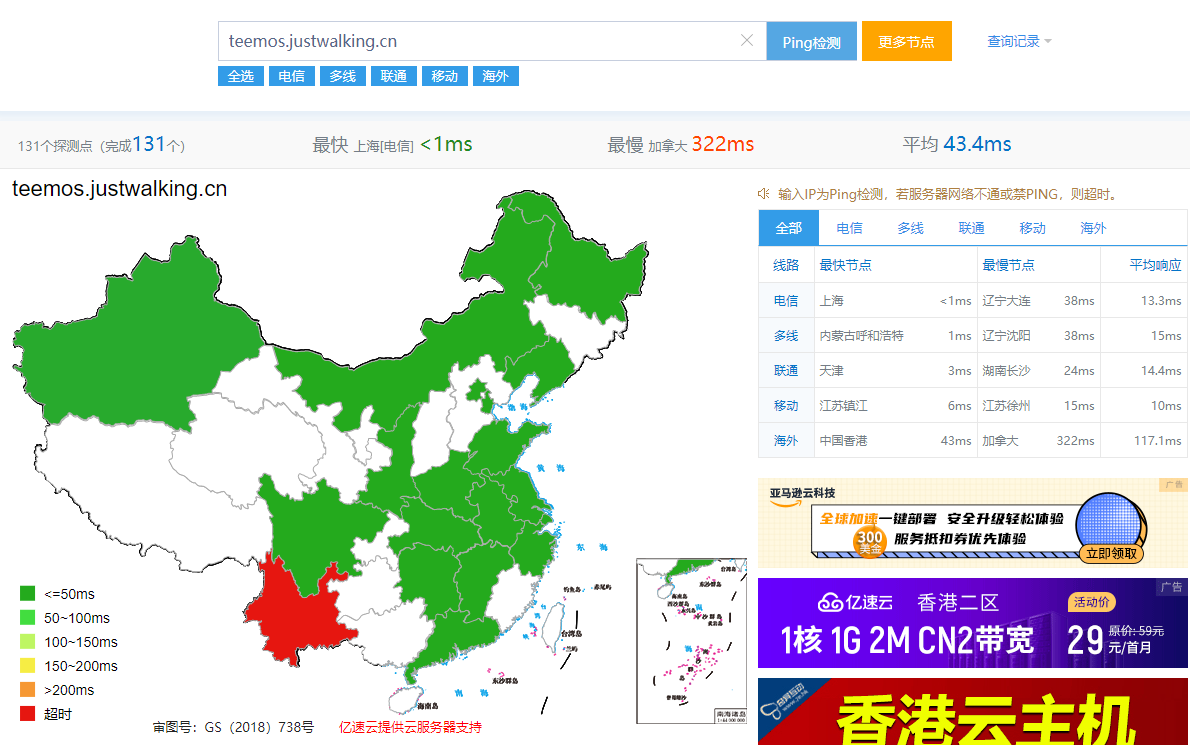
Comparing the two figures, the acceleration effect is obvious. Mom is no longer afraid that I can't read the blog~
Site configuration
Modify site profile_ config.yml
# Site
title: Teemos's Blog
subtitle: 'Teemos wants to be an explorer'
description: 'Teemos wants to be an explorer'
keywords: ''
author: Teemos
language: zh-CN
timezone: ''

deploy:
  type: git
  repo: git@github.com:teemos666/teemos666.github.io.git
  branch: master
So far, hexo has been configured and can meet the basic use.
-
Use hexo n "article" to write articles
-
Using hexo g to generate static blog pages
-
Browse blogs locally using hexo s
-
Use hexo d to push blog to GitHub
hexo directory structure
.
├── _config.yml
├── package.json
├── scaffolds
├── source
|   ├── _drafts
|   └── _posts
└── themes
_config.yml
For the configuration information of the website, you can configure most parameters here.
package.json
Information about the application. EJS, Stylus and Markdown renderer are installed by default and you can remove them freely.
package.json{
  "name": "hexo-site",
  "version": "0.0.0",
  "private": true,
  "hexo": {
    "version": ""
  },
  "dependencies": {
    "hexo": "^3.8.0",
    "hexo-generator-archive": "^0.1.5",
    "hexo-generator-category": "^0.1.3",
    "hexo-generator-index": "^0.2.1",
    "hexo-generator-tag": "^0.2.0",
    "hexo-renderer-ejs": "^0.3.1",
    "hexo-renderer-stylus": "^0.3.3",
    "hexo-renderer-marked": "^0.3.2",
    "hexo-server": "^0.3.3"
  }
}
scaffolds
Template folder. When you create a new article, Hexo will create a file based on scaffold.
The template of Hexo refers to the content filled in by default in the new article file. For example, if you modify scaffold / post For the front matter content in MD, this modification will be included every time an article is created.
source
The resource folder is the place where users' resources are stored. Except_ Outside the posts folder, it starts with_ (underlined) files / folders and hidden files will be ignored. Markdown and HTML files will be parsed and placed in the public folder, while other files will be copied.
themes
Theme folder. Hexo generates static pages based on themes.
Use theme
Use theme butterfly , theme version 3.7.8
Modify site profile_ config.yml, change the theme to butterfly
theme: butterfly
Put in the theme folder_ config. Copy YML to the root directory of Hexo and rename it to_ config.butterfly.yml.
In the future, you only need to_ config. butterfly. Just configure YML.
Hexo automatically merges the in the topic_ config.yml and_ config. butterfly. The configuration in YML will be used if there is a configuration with the same name_ config. butterfly. The configuration of YML has high priority.
The following is the configuration of my theme:
page
Tab
- Go to the root of your Hexo blog
- Enter hexo new page tags
- You will find source / tags / index MD this file
- Modify this file: remember to add type: "tags"
---
title: label
date: 2018-01-05 00:00:00
type: "tags"
---
Classification page
- Go to the root of your Hexo blog
- Enter hexo new page tags
- You will find source / tags / index MD this file
- Modify this file: remember to add type: "tags"
---
title: label
date: 2018-01-05 00:00:00
type: "tags"
---
Links
Similarly, hexo new page link
404 page
During local preview, the website with error will not jump to page 404.
For a local preview, visit http://localhost:4000/404.html
Open in theme profile:
# A simple 404 page
error_404: enable: true subtitle: "Page not found" background:
Navigation menu
Modify theme profile
menu:
  home page: / || fas fa-home
  time axis: /archives/ || fas fa-archive
  label: /tags/ || fas fa-tags
  classification: /categories/ || fas fa-folder-open
  Friend chain: /link/ || fas fa-link
  about: /about/ || fas fa-heart
code
Modify theme profile
Code highlight:
highlight_copy: true
Code Wrap:
code_word_wrap: true
Social Icon
Icon URL: Font Awesome
Modify theme profile
Writing format: icon name: url | descriptive text
social:
   fab fa-github: https://github.com/teemos666 || Github
Top view
Modify theme profile
# The banner image of home page
index_img:
    https://cdn.jsdelivr.net/gh/techfens/img1@main/bgimg.jpg
# If the banner of page not setting, it will show the top_img
default_top_img:
    https://cdn.jsdelivr.net/gh/techfens/img1@main/bgimg.jpg
# The banner image of archive page
archive_img:
    https://cdn.jsdelivr.net/gh/techfens/img1@main/bgimg.jpg
Top of other pages (tags/categories / self built pages) and article pages_ IMG, please go to the corresponding md page to set top in front matter_ img
Article cover
On the markdown document of the article, add cover in front matter and fill in the address of the picture to be displayed.
If cover is not configured, you can set the default cover to be displayed
If you don't want to display cover on the home page, you can set it to false
Modify theme profile
cover:
#Show article cover
index_enable: true
aside_enable: true
archives_enable: true
#Location of cover page display
#Three values can be configured: left, right and both
position: both
#When cover is not set, the default cover is displayed
default_cover: - https://cdn.jsdelivr.net/gh/jerryc127/CDN@latest/cover/default_bg.png - https://cdn.jsdelivr.net/gh/jerryc127/CDN@latest/cover/default_bg2.png - https://cdn.jsdelivr.net/gh/jerryc127/CDN@latest/cover/default_bg3.png
Article page related configuration
Article meta display
This option is used to display information about the article.
Modify theme profile
post_meta:
    page:
        date_type: both
        # created or updated or both
        date_format: date
        # date/relative displays the date or relative date
        categories: true
        # true or false whether the home page displays categories
        tags: true
        # true or false whether the home page displays labels
        label: true
        # true or false displays descriptive text
    post:
        date_type: both
        # created or updated or both the article page date is the creation date or the update date or both
        date_format: date
        # date/relative displays the date or relative date
        categories: true
        # true or false whether the article page displays categories
        tags: true
        # true or false whether the article page displays labels
        label: true
        # true or false displays descriptive text
Article copyright
Display the article copyright and license agreement for your blog post.
Modify theme profile
post_copyright:
  enable: true
  decode: true
  license: CC BY-NC-SA 4.0
  license_url: https://creativecommons.org/licenses/by-nc-sa/4.0/
Since Hexo 4.1 started, the URL is decoded by default, so that if it is a Chinese URL, it will be decoded. You can set decode: true to display the Chinese URL.
If there are articles (such as reprinted articles) that do not need to display copyright, they can be set separately in the article front matter
copyright: false
Starting from 3.0.0, it supports setting copyright information for individual articles, which can be set separately in the article front matter
copyright _author: xxxx
copyright_ author _href: https://xxxxxx.com
copyright_ url: https://xxxxxx.com
copyright _info: This article is copyrighted by xxxxx All, if reprinted, please indicate from the original author
Article reward
At the end of each article, you can add a reward button. Relevant QR codes can be configured by yourself.
For those without QR code, you can configure an icon image of the software, and then add the corresponding reward link on the link. The user clicks on the picture and will jump to the link.
Reward pictures can be placed under sourse/img /
Link can not be written. It will default to the link of the picture.
Modify theme profile
reward:
	enable: true
	QR_code:
		- img: /img/wechatpay.png
		  link:
		  text:WeChat
		- img: /img/alipay.jpg
		  link:
		  text:Alipay
TOC article directory
On the article page, there will be a table of contents for displaying TOC.
Modify theme profile
toc:
	enable: true
	number: true
	style_simple: true
Related articles
The principle of recommendation of related articles is to recommend according to the specific weight of article tags
Modify theme profile
related_post:
	enable: true
	limit: 6 #Displays the number of recommended articles
	date_type: created # or created or updated the article date displays the creation date or update date
head portrait
Modify theme profile
avatar:
	img: /img/avatar.png
	effect: true #The avatar will go in circles
Picture description
Picture Figcaption description text display can be turned on
Modify theme profile
photofigcaption: true
Copy related configuration
You can configure whether the website can be copied and whether copyright information can be added to the copied content
Modify theme profile
copy:
  enable: true
  copyright:
    enable: true
    limit_count: 50
Footer settings
Blog year
since is an option to show the starting time of your site. It is at the bottom of the page.
Modify theme profile
footer:
	owner:
		enable: true
		since: 2020
Footer custom text
custom_text is an option for you to customize text in the footer. Usually you can write the declaration text here. Support HTML.
Modify theme profile
custom_text: Teemos wants to be an explorer.<br><a rel="nofollow" href="http://www.beian. miit. gov.cn" target="_ Blank "> Yue ICP Bei No. 19158324</a>
Sidebar settings
Side layout
You can decide which item needs to be displayed, determine the location, or set not to display the sidebar.
Modify theme profile
aside:
  enable: true
  hide: false
  button: true
  mobile: true # display on mobile
  position: right # left or right
  card_author:
    enable: true
    description:
    button:
      enable: true
      icon: fab fa-github
      text: Follow Me
      link: https://github.com/xxxxxx

  card_tags:
	enable: true
Number of visitors busuanzi (UV and PV)
Visit busuanzi's Official website See more introduction.
Modify theme profile
busuanzi:
	site_uv: true
	site_pv: true
	page_pv: true
Running time
Page run time
Modify theme profile
runtimeshow:
	enable: true
	publish_date: 6 /17/2021 00 :00:00 ##Web page opening time#format:month/day/Year time#You can also write adult / month / day time
Website background
White is displayed by default, and pictures or colors can be set
Modify theme profile
#Picture format URL( http://xxxxxx.com/xxx.jpg )
#Color (HEX value / RGB value / color word / gradient)
#Leave blank to show no background
background:
footer background
Modify theme profile
# Whether the footer displays the picture background (consistent with top_img)
footer_bg:  true
Background effects
Modify theme profile
canvas_ribbon:
  enable: true
  size: 150
  alpha: 0.6
  zIndex: -1
  click_to_change: true
  mobile: true
Page beautification
Will change the style of ol, ul, h1-h5
field the area where the configuration takes effect
-
post only takes effect on the article page
-
Site takes effect in the whole site
Modify theme profile
beautify:
  enable: true
  field: site # site/post
  title-prefix-icon: '\f0c1'
  title-prefix-icon-color: '#F47466'
Website subtitle
You can set the website subtitle or favorite motto displayed in the home page.
Modify theme profile
subtitle:
  enable: true
  # Typewriter Effect
  effect: true
  # loop (circular typing)
  loop: true
  # source calls a third-party service
  # source: false close call
  # source: 1 random quotation calling poten api (Simplified)
  # source: 2 one sentence of calling yiyanwang (Simplified)
  # source: 3 call yijuwang (Simplified)
  # source: 4 call today's Poetry (Simplified)
  # The subtitle will display the source first, and then the content of the sub
  source: false
  # If there is an English comma' , ',Please use escape characters ,
  # If there are double quotation marks' "', please use the escape character & quot;
  # Escape characters are not allowed at the beginning. If necessary, please enclose the whole sentence in double quotation marks
  # If the typing effect is turned off, the subtitle will only display the first line of sub
  sub:
    - When drunk, I don't know the sky is in the water. The boat is full of clear dreams and the Star River is pressed
Page loading animation preloader
When entering a web page, top may be caused due to the problem of loading speed_ The IMG image shows a fault, or the waiting time appears due to incomplete loading of the web page. After the preloader is started, the loading animation will be displayed. When the page is loaded, the loading animation will disappear.
Sometimes it feels like it's useless
To modify a theme profile:
#Loading Animation
preloader:  true
word count
To add word count to Butterfly, you need the following steps:
Open hexo working directory
npm install hexo-wordcount --save
Or yarn add hexo wordcount
To modify a theme profile:
# wordcount (word count)
wordcount:
  enable: true
  post_wordcount: true
  min2read: true
  total_wordcount: true
Picture large view mode
Only one can be opened
fancybox
medium_zoom
Modify theme profile
# fancybox http://fancyapps.com/fancybox/3/
fancybox:  true
medium_zoom: true
Snackbar pop-up window
Snackbar pop-up window, open according to your hobbies
Modify theme profile
snackbar:
  enable: true
  position: top-left
  bg_light: '#49b1f5' # The background color of Toast Notification in light mode
  bg_dark: '#121212' # The background color of Toast Notification in dark mode
Instantpage
When the mouse hovers over a link for more than 65 milliseconds, the Instantpage will preload the link, which can improve the access speed.
Modify profile
# https://instant.page/
# prefetch
instantpage:  true
Notice
card_announcement:
    enable: true
    content: My little broken station has finally been relocated successfully!
common problem
md does not support displaying relative path pictures
Add picture plugin
npm install hexo-asset-image --save
Modification_ config.yml profile
post_asset_folder: true
Then create a new article
hexo new post abc
An abc will appear at this time MD and abc folders, put picture Jpg is placed in abc folder. When referring to pictures:

After the problem is solved, of course, you can also use CDN, OSS, etc. to store pictures, which will be relatively faster.
Summary of common commands
hexo init  # Initialize blog

hexo n "Article name"  # Generate new articles
hexo n [layout] "Article name"  # Generate new articles for layout templates
hexo cl  # Please process the generated static files
hexo g  # Generate blog page file
hexo s  # Start local server
hexo d  # Upload web files to github

#Before generating static files, you need to install plug-ins, pug and style renderer
npm install hexo-renderer-pug hexo-renderer-stylus --save
npm install hexo-renderer-marked --save
#Plug ins need to be installed before uploading
npm install --save hexo-deployer-git

#Article display picture
post_asset_folder: true
npm install hexo-asset-image --save
Time is short, this article may be flawed. If you find anything, please contact me to improve it.