RabbitMQ cluster
rabbitmq has three modes, but the cluster mode is two.
As follows: the first mock exam is that single machine does not cluster, and runs rabbitmq alone. I've been using it before
-
Normal mode: the default mode. Take two nodes (A and B) as an example
-
When the message enters the Queue of node A and the consumer consumes from node B, RabbitMQ will create a temporary channel between a and B for message transmission, take out the message entity in a and send it to the consumer through delivery to B
-
When A fails, B cannot get the message entities not consumed in node A
- If the message is persisted, it can only be consumed after node A recovers
- If there is no persistence, the message will be lost
-
Mirror mode:
- The very classic mirror image mode ensures that 100% data is not lost.
- High reliability solution is mainly to realize data synchronization. Generally speaking, 2 - 3 nodes are used to realize data synchronization. For 100% data reliability solution, 3 nodes are generally used.
- It is also used most in practical work, and the implementation is very simple. Generally, large Internet manufacturers will build this image cluster mode
Cluster construction
Prepare two Linux servers and install RabbitMQ.
-
Cluster steps are as follows:
1. Modify the / etc/hosts mapping file
[root@a ~]# vim /etc/hosts
Server one
127.0.0.1 A localhost localhost.localdomain localhost4 localhost4.localdomain4
::1       A      localhost localhost.localdomain localhost6 localhost6.localdomain6
192.168.152.129 A
192.168.204.130 B
Server 2
127.0.0.1 B localhost localhost.localdomain localhost4 localhost4.localdomain4
::1 B localhost localhost.localdomain localhost6 localhost6.localdomain6
192.168.204.141 A
192.168.204.142 B
Considering that the Host name of some CentOS does not change after changing the Host file, you can execute the following command to change the Host name.
[root@a ~]# Hostnamectl set hostname host name
[root@a ~]# reboot  ##Restart liunx
2. When communicating with each other, the cookies must be consistent, and the cookie files of rabbitmq must be synchronized: cross server copy erlang. Cookies (hidden files, displayed using ls -all)
.erlang. The cookie file is under / var/lib/rabbitmq /
In order to maintain the consistency of rabbitmq cookies, we can copy them across servers erlang.cookie file
root@A opt]# scp /var/lib/rabbitmq/.erlang.cookie 192.168.204.142:/var/lib/rabbitmq
3. Both servers turn off the firewall and turn on the Rabbitmq service
[root@A ~]# systemctl stop firewalld

[root@A ~]# systemctl start rabbitmq-server
4. Join the cluster node
[root@B ~]# rabbitmqctl stop_app   ##Close the native RabbitMQ node

[root@B ~]# rabbitmqctl join_cluster rabbit@A  ##Join the local node cluster to node A

[root@B ~]# rabbitmqctl start_app ##Start native node
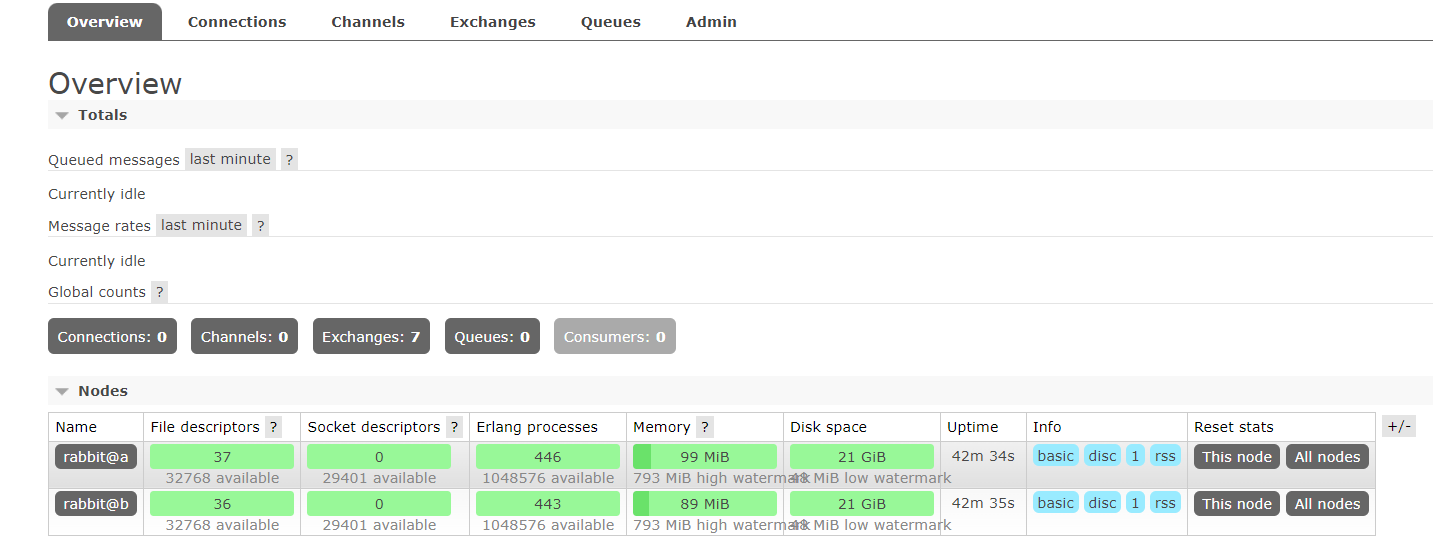
5. View management side
-
After the cluster structure is built, the switches, queues and users previously created belong to a single structure and cannot be used in the new cluster environment
-
Therefore, you can manually add users again in the new cluster (any node can be added and all nodes can share)
-
[root@A ~]# rabbitmqctl add_user username and password
[root@A ~]# rabbitmqctl set_user_tags user name administrator
[root@A ~]# rabbitmqctl set_permissions -p "/" user name ". *" ". *" ". *"
-
Note: when the node is separated from the cluster and restored to a single structure, the switch, queue, user and other data will come back
-
This is the page after the cluster is successful, but the default cluster is the normal mode, and the system availability is not high. So we need to set it to mirror mode
- Set mirror mode
-
Set all queues as mirror queues, that is, the queues will be copied to each node, and the status of each node is the same
-
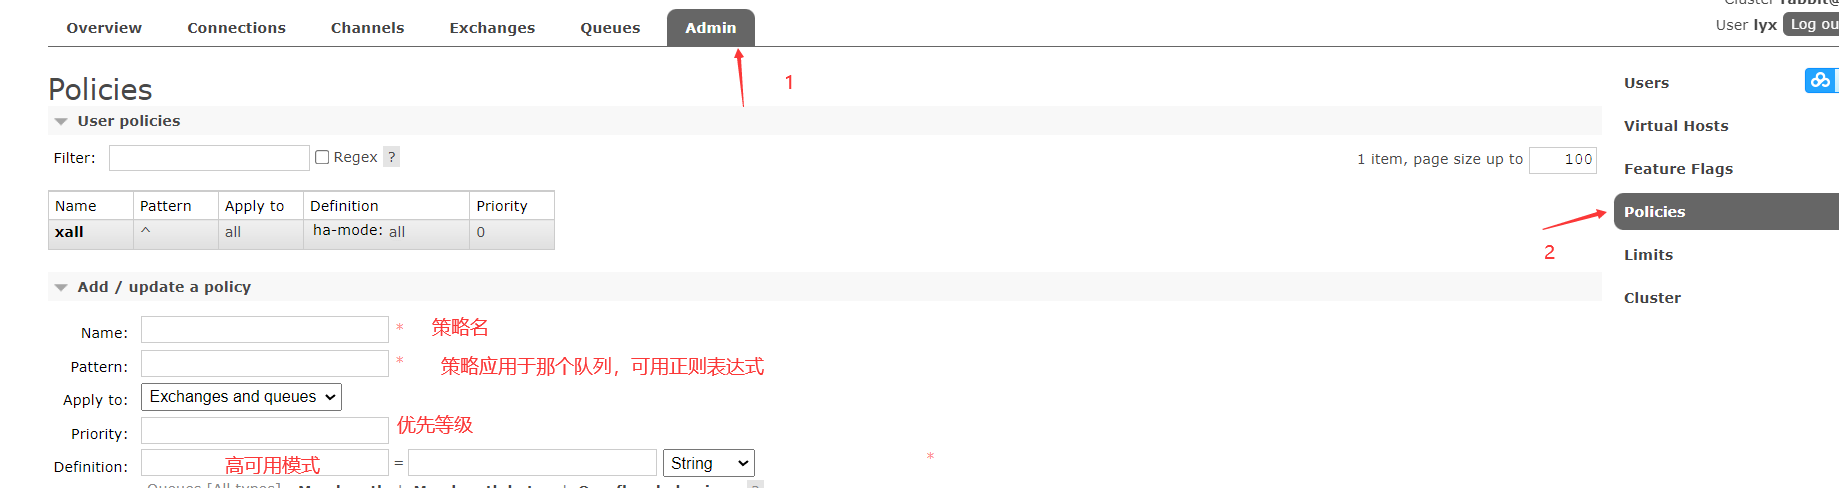
Syntax: set_policy {name} {pattern} {definition}
-
Name: policy name, customizable
-
Pattern: the matching pattern of the queue (regular expression)
- "^" can use regular expressions, such as "^ queue" Indicates that the queue name is marked with "queue_" All queues at the beginning are mirrored, and "^" means that all queues are matched
-
Definition: image definition, including three parts: Ha mode, ha params and ha sync mode
-
Ha mode: (High Available) mode, indicating the mode of the image queue. The valid value is all/exactly/nodes. The current policy mode is all, that is, copy to all nodes, including new nodes
-
all: Indicates that mirroring is performed on all nodes in the cluster
exactly: Indicates that mirroring is performed on a specified number of nodes. The number of nodes is determined by ha-params appoint
nodes: Indicates that the image is mirrored on the specified node, and the node name is passed ha-params appoint
-
Ha params: parameters required for HA mode mode
- Ha sync mode: the synchronization mode of messages in the queue. The valid values are automatic and manua
-
-
[root@A ~]# rabbitmqctl set_policy xall "^" '{"ha-mode":"all"}'
In this way, the mirroring mode is set successfully. After any node sends a message, the cluster node synchronizes the message.
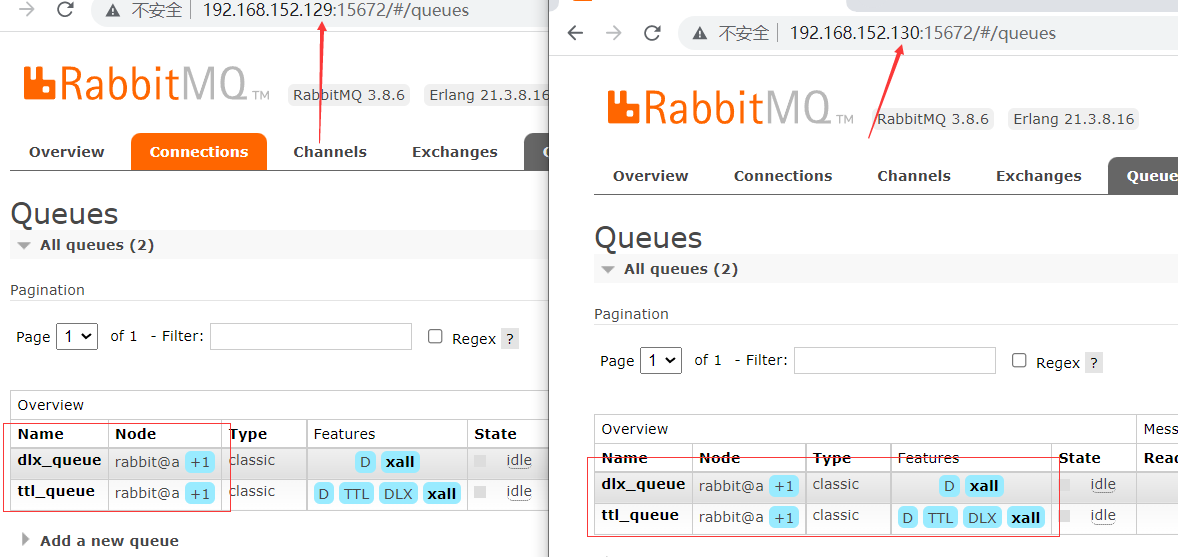
- In addition to setting the image mode in the above way, you can also set it on the management page
HAProxy load balancing
-
Although we access server a in the program, we can synchronize messages. Although we are synchronizing, server a is receiving messages. A is too tired.
-
Can I do load balancing like Nginx? A and B receive messages in turn, and then mirror and synchronize.
install and configure
HAProxy Download: http://www.haproxy.org/download/1.8/src/haproxy-1.8.12.tar.gz
- decompression
[root@localhost opt]# tar -zxvf haproxy-1.8.12.tar.gz
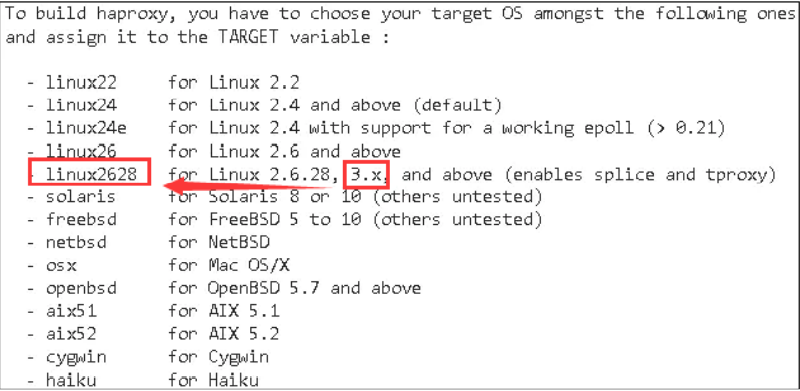
- When making, you need to use TARGET to specify the kernel and version
[root@localhost opt]# uname -r
Select the compilation parameters according to the kernel version
-
Enter the directory, compile and install
[root@localhost opt]# cd haproxy-1.8.12
[root@localhost haproxy-1.8.12]# make TARGET=linux2628
[root@localhost haproxy-1.8.12]# make install PREFIX=/usr/local/haproxy
-
After successful installation, check the version
[root@localhost haproxy-1.8.12]# /usr/local/haproxy/sbin/haproxy -v
-
Configure the startup file, copy the haproxy file to / usr/sbin, and copy the haproxy script to / etc / init D next
[root@localhost haproxy-1.8.12]# cp /usr/local/haproxy/sbin/haproxy /usr/sbin/

[root@localhost haproxy-1.8.12]# cp ./examples/haproxy.init /etc/init.d/haproxy

[root@localhost haproxy-1.8.12]# chmod 755 /etc/init.d/haproxy
- Create system account
[root@localhost haproxy-1.8.12]# useradd -r haproxy
- haproxy.cfg configuration files need to be created by yourself
[root@localhost haproxy-1.8.12]# mkdir /etc/haproxy
[root@localhost haproxy-1.8.12]# vim /etc/haproxy/haproxy.cfg
-
Add configuration information to haproxy cfg
-
#Global configuration global #Set log log 127.0.0.1 local0 info #Current working directory chroot /usr/local/haproxy #Users and user groups user haproxy group haproxy #Run process ID uid 99 gid 99 #Daemon Start daemon #maximum connection maxconn 4096 #Default configuration defaults #Apply global log configuration log global #The default mode is {TCP | http | health}. TCP is layer 4 and HTTP is layer 7. Health only returns OK mode tcp #Log category tcplog option tcplog #Do not record health check log information option dontlognull #Three failures will make the service unavailable retries 3 #Maximum number of connections available per process maxconn 2000 #connection timed out timeout connect 5s #When the client times out for 30 seconds, ha will initiate a reconnect timeout client 30s #When the server times out for 15 seconds, ha will initiate a reconnect timeout server 15s #Binding configuration listen rabbitmq_cluster bind 192.168.204.143:5672 #Configure TCP mode mode tcp #Simple polling balance roundrobin #RabbitMQ cluster node configuration, check the mq cluster every 5 seconds, correctly prove that the service is available twice and fail three times Service Unavailable server A 192.168.204.141:5672 check inter 5000 rise 2 fall 3 server B 192.168.204.142:5672 check inter 5000 rise 2 fall 3 #haproxy monitoring page address listen monitor bind 192.168.204.143:8100 mode http option httplog stats enable # Monitoring page address http://192.168.204.143:8100/monitor stats uri /monitor stats refresh 5s -
Start HAProxy
[root@localhost haproxy]# service haproxy start
- Access monitoring center: http://192.168.204.143:8100/monitor
- Remember to turn off the firewall: systemctl stop firewalld

-
When sending messages to the project, you only need to change the server address to 143, and the rest remain unchanged
-
All requests will be sent to HAProxy, and its load will be balanced to each rabbitmq server