Homology strategy and cross domain
1, What is homology strategy
The Same origin policy is a convention. It is the core and basic security function of the browser. If the Same origin policy is missing, the normal functions of the browser may be affected. It can be said that the Web is built on the basis of homologous strategy, and the browser is only an implementation of homologous strategy.
The same origin policy prevents javascript scripts in one domain from interacting with the content of another domain.
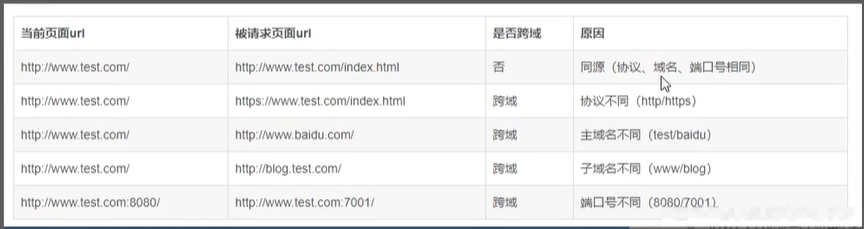
The so-called homology (i.e. in the same domain) means that two pages have the same protocol, host and port number.
2, What is cross domain
When any of the protocol, domain name and port of a request url is different from the current page url, it is cross domain.
3, Cross domain approach
1,jsonp
JSON with Padding, the full name of JSON, is a solution for cross domain resource requests. It is an unofficial cross domain data interaction protocol created by developers.
One is the format of describing information, and the other is the method agreed by both parties for information transmission.
Generation of jsonp:
1.AJAX directly requests ordinary files without permission across domains, whether static pages or not
2. However, we are not affected by cross domain when calling js files, such as introducing jquery framework or calling photos
3. All tags with scr attribute can cross domains, such as
4. If you want to access data across domains through pure web, there is only one possibility, that is to load the data on the remote server into js format files
5. json is a lightweight data format, which is also natively supported by js
6. In order to facilitate the client to use data, an informal transmission protocol has gradually formed, which is called JSONP. One key point of the protocol is to allow the user to pass a callback parameter to the server,
Cross domain implementation based on script tag
For example: I'm here http://study.cn/json/jsonp/jsonp_2.html Next request a remote js file
<!DOCTYPE html>
<html>
<head>
<meta charset="UTF-8">
<title>Insert title here</title>

<script type="text/javascript">
    var message = function(data) {
        alert(data[1].title);
    };
</script>

<script type="text/javascript" src="http://web.cn/js/message.js"></script>
</head>
<body>
<div id='testdiv'></div>
</body>
</html>
2. CORS cross domain resource sharing
https://blog.csdn.net/superaistar/article/details/83618689
CORS requires both browser and server support. At present, all browsers support this function, and IE browser cannot be lower than IE10. The key to realize CORS communication is the server. As long as the server implements the CORS interface, it can communicate across sources.
Pros and cons of CORS
CORS requires the simultaneous support of browser (> ie10) and server. It is the fundamental solution across domains, which is automatically completed by the browser.
The advantage is that it has more powerful functions and supports various HTTP methods. The disadvantage is that its compatibility is not as good as JSONP.
You only need to make some small modifications on the server side:
header("Access-Control-Allow-Origin:*");
header("Access-Control-Allow-Methods:POST,GET");
For example: Website http://localhost:63342/ Page to request http://localhost:3000/users/userlist Page, the userlist page returns the json string lattice {name: 'Mr.Cao', gender: 'male', career: 'IT Education'}:
//Set the same origin policy address on the server side
router.get("/userlist",function(req, res,next){
    var user ={name:'Mr.Cao', gender:'male', career:'IT Education'};
    res.writeHeader(200,{"Access-Control-Allow-Origin":'http://localhost:63342'});
    res.write(JSON.stringify(user));
    res.end();
});
Add the access control allow origin attribute on the response header to specify the address of the same origin policy. The default address of the same origin policy is the web page itself. As long as the browser detects that the response header has CORS and the allowed sources include this website, the request response will not be intercepted.
header("Access-Control-Allow-Origin:*");
//    *: indicates that all other domains can send requests to the current domain

//perhaps

header("Access-Control-Allow-Origin:http://test. COM: 80 (same, no writing by default) ");
//  http://test.com:80 Indicates that the specified domain can send requests to the current domain.
//Of course, you can also specify multiple specific domain names. Multiple addresses can be separated by commas.
3,Websocket
Websocket is a persistent protocol of HTML5. It realizes the full duplex communication between browser and server. At the same time, it is also a cross domain solution.
WebSocket and HTTP are both application layer protocols based on TCP protocol. However, WebSocket is a two-way communication protocol. After the connection is established, both WebSocket server and client can actively send or receive data to each other. At the same time, WebSocket needs to use HTTP protocol when establishing a connection. After the connection is established, the two-way communication between client and server is independent of HTTP.
The native WebSocket API is inconvenient to use. We use socket IO, which well encapsulates the webSocket interface, provides a simpler and more flexible interface, and provides downward compatibility for browsers that do not support WebSockets.
//--------------------------------------Front end code:------------------------------
<div>user input: <input type="text">
</div><script src="./socket.io.js"></script>
<script>
var socket =io('http://www.domain2.com:8080');
// Connection successfully processed
socket.on('connect', function(){
    // Listen for server messages
    socket.on('message',function(msg){
        console.log('data from server: ---> '+ msg);
    });

    // Monitor server shutdown
    socket.on('disconnect', function() {
        console.log('Server socket has closed.');
    });
});
    document.getElementsByTagName('input')[0].onblur = function() {
        socket.send(this.value);
    };
</script>


//---------------------------------------Nodejs socket background:---------------------------
var http = require('http');
var socket =require('socket.io');
// Enable http service
var server = http.createServer(function(req, res) {
    res.writeHead(200, {'Content-type': 'text/html'});
    res.end();
});
server.listen('8080');
console.log('Server is running at port 8080...');
// Listen for socket connections
socket.listen(server).on('connection', function(client) {

// Receive information
    client.on('message', function(msg) {
        client.send('hello: ' + msg);
        console.log('data from client: ---> ' + msg);
    });

// Disconnect processing
    client.on('disconnect', function() {
        console.log('Client socket has closed.');
    });
});
4,postMessage
If two web pages have different sources, you can't get each other's DOM. Typical examples are iframe window and window The open method opens windows that cannot communicate with the parent window. In order to solve this problem, HTML5 introduces a new API: cross document messaging. This API adds a new window for the window object The PostMessage method allows cross window communication, regardless of whether the two windows are homologous or not.
*The first parameter of the postMessage method is the specific information content, and the second parameter is the origin of the window receiving the message, that is, "protocol + domain name + port". It can also be set to, which means that the domain name is not limited and sent to all windows.
Next, let's take an example: http://localhost:63342/index.html Page oriented http://localhost:3000/message.html Pass "cross domain request information"
//Send message page http://localhost:63342/index.html
<html lang="en">
<head>
<meta charset="UTF-8">
<title>Cross domain request</title>
</head>
<body>
<iframe src="http://localhost:3000/users/reg" id="frm"></iframe>
<input type="button" value="OK" onclick="run()">
</body>
</html>
<script>
function  run(){
var frm=document.getElementById("frm");
        frm.contentWindow.postMessage("Cross domain request information","http://localhost:3000");
}
</script>
//Receive information page http://localhost:3000/message.html
 window.addEventListener("message",function(e){
//By listening to the message event, you can listen to the message sent by the other party.
  console.log(e.data);
},false);
All cross domains must be approved by the information provider. If it can be obtained without permission, it is a vulnerability in the browser homology policy.
Five ways to implement cross domain in SpringBoot
https://blog.csdn.net/java_mindmap/article/details/113855939
For cross domain requests of CORS, the following methods are available:
1. Return to the new CorsFilter
2. Override WebMvcConfigurer
3. Use annotation @ CrossOrigin
4. Manually set the response header (HttpServletResponse)
5. Cross domain implementation of custom web filter
be careful:
Corfilter / webmvconfigurator / @ crossorigin requires spring MVC version 4.2 or above to support, corresponding to springboot version 1.3 or above
The first two methods above belong to global CORS configuration, and the last two belong to local CORS configuration. If a local cross domain rule is used, it will override the global cross domain rule, so the @ CrossOrigin annotation can be used for finer grained cross domain resource control.
In fact, the ultimate goal of any scheme is to modify the response header and add the data required by the browser to the response header, so as to realize cross domain
1. Return to the new corsfilter (Global cross domain)
In any configuration class, return a new CorsFIlter Bean, and add the mapping path and specific CORS configuration path.
@Configuration
public class GlobalCorsConfig {
    @Bean
    public CorsFilter corsFilter() {
        //1. Add CORS configuration information
        CorsConfiguration config = new CorsConfiguration();
        //Which original domains are released
        config.addAllowedOrigin("*");
        //Send Cookie
        config.setAllowCredentials(true);
        //Which request methods are released
        config.addAllowedMethod("*");
        //Which original request header information is released
        config.addAllowedHeader("*");
        //What header information is exposed
        config.addExposedHeader("*");
        //2. Add mapping path
        UrlBasedCorsConfigurationSource corsConfigurationSource = new UrlBasedCorsConfigurationSource();
        corsConfigurationSource.registerCorsConfiguration("/**",config);
        //3. Return to the new CorsFilter
        return new CorsFilter(corsConfigurationSource);
    }
}
2. Override webmvcconfigurer (Global cross domain)
@Configuration
public class CorsConfig implements WebMvcConfigurer {
    @Override
    public void addCorsMappings(CorsRegistry registry) {
        registry.addMapping("/**")
        //You can set the global parent interface here, such as / api, such as / api/**
                //Send Cookie
                .allowCredentials(true)
                //Which original domains are released
                .allowedOrigins("*")
                .allowedMethods(new String[]{"GET", "POST", "PUT", "DELETE"})
                .allowedHeaders("*")
                .exposedHeaders("*");
    }
}
3. Using annotations (local, cross domain)
Use the annotation @ CrossOrigin: on the controller (class) to indicate that all methods of this class allow cross domain.
@RestController
@CrossOrigin(origins = "*")
public class HelloController {
    @RequestMapping("/hello")
    public String hello() {
        return "hello world";
    }
}
Use annotation @ CrossOrigin:
@RequestMapping("/hello")
   @CrossOrigin(origins = "*")
    //@CrossOrigin(value = "http://localhost:8081 ") / / specify the specific ip address and allow cross domain
   public String hello() {
       return "hello world";
   }
4. Manually set the response header (local cross domain)
Use the HttpServletResponse object to add a response header (access control allow Origin) to authorize the original domain. Here, the value of Origin can also be set to "*", indicating all release. Recommendation: breakdown and summary of 150 common Java interview questions
@RequestMapping("/index")
public String index(HttpServletResponse response) {
    response.addHeader("Access-Allow-Control-Origin","*");
    return "index";
}
5. Cross domain implementation using custom filter
First write a filter, which can be named mycorsfilter java
package com.mesnac.aop;

import java.io.IOException;
import javax.servlet.Filter;
import javax.servlet.FilterChain;
import javax.servlet.FilterConfig;
import javax.servlet.ServletException;
import javax.servlet.ServletRequest;
import javax.servlet.ServletResponse;
import javax.servlet.http.HttpServletResponse;
import org.springframework.stereotype.Component;
@Component
public class MyCorsFilter implements Filter {
  public void doFilter(ServletRequest req, ServletResponse res, FilterChain chain) throws IOException, ServletException {
    HttpServletResponse response = (HttpServletResponse) res;
    response.setHeader("Access-Control-Allow-Origin", "*");
    response.setHeader("Access-Control-Allow-Methods", "POST, GET, OPTIONS, DELETE");
    response.setHeader("Access-Control-Max-Age", "3600");
    response.setHeader("Access-Control-Allow-Headers", "x-requested-with,content-type");
    chain.doFilter(req, res);
  }
  public void init(FilterConfig filterConfig) {}
  public void destroy() {}
}
On the web Configure this filter in XML to make it effective
<!-- Cross domain access START-->
<filter>
 <filter-name>CorsFilter</filter-name>
 <filter-class>com.mesnac.aop.MyCorsFilter</filter-class>
</filter>
<filter-mapping>
 <filter-name>CorsFilter</filter-name>
 <url-pattern>/*</url-pattern>
</filter-mapping>
<!-- Cross domain access END  -->
Reference link
https://blog.csdn.net/pjmike233/article/details/82461911
https://blog.csdn.net/zlbdmm/article/details/105853736
https://www.cnblogs.com/lenve/p/11724463.html