1. General
1.1 what is ability
The following is an overview of the official documents:
Ability is an abstraction of the capabilities of an application and an important part of an application. An application can have multiple capabilities (that is, it can contain multiple capabilities). HarmonyOS supports application deployment in the unit of capability. Capability can be divided into FA (feature capability) and PA (particle capability). Each type provides developers with different templates to realize different business functions.
When studying Hongmeng, I found that many things in it can be linked to Android, and the Ability is the first one. From the official overview, it should be linked to the concept of components. There are four major components in Android. In Hongmeng, it can provide many capabilities for development.
Ability is an abstraction, which includes two categories, FA and PA. let's see their differences:
- Feature capability (FA): used to support page capability
Only Page is supported, which literally means Page capability. A Page instance contains a group of pages, and each Page is represented by an AbilitySlice instance. - Particle capability (PA): used to support service capability and data capability
① Service capability: used to provide the ability to run tasks in the background
② Data capability: used to provide a unified data access abstraction
Don't make complaints about it. After all, it's great to see the official technical documents of Chinese. 😆
The configuration file of Hongmeng application is config JSON, if you need to register an Ability, you need to specify it. The "type" field is used to specify the Ability type. The values include "page", "data" and "service". The format is as follows:
// config.json
{
    "module": {
        ...
        "abilities": [
            {
                ...
                "type": "page"
                ...
            }
        ]
    }
}
1.2 what to learn?
After reading the overview, I feel that there are only three things to learn: Page Ability, Service Ability and Data Ability.
But I read the official documents and found that things are not so simple:
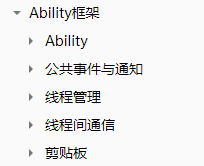
What? Ability is a framework. In addition to ability itself, it also includes event notification, thread processing and clipboard?
Good guy, I learned an Ability, which is equivalent to directly learning a Hongmeng application development.
This article should not explain so many things, mainly FA and PA. as for the following, I will learn from them 🙃
2. Page Ability
Page Ability is a page. Its instance is a page. A page can contain one or more AbilitySlice, which is the Ability fragment, as shown in the following figure:
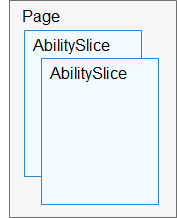
Hongmeng supports jumping between different pages and specifying specific AbilitySlice to jump to a Page. Of course, Page can also display UI without including AbilitySlice. The relationship between Activity and Fragment is the same.
2.1 AbilitySlice routing configuration
We know that a Page can contain multiple AbilitySlice, but only one AbilitySlice is displayed by default when entering the foreground. You need to use the following api to set the fragments displayed by default:
setMainRoute()
If you need to change the default displayed AbilitySlice, you can configure a routing rule for it through the following methods:
// Add an implicit route to the code
addActionRoute()
However, this method needs to add some parameters, which need to be in config Register in JSON:
// config.json
        "abilities": [
            {
                "skills":[
                    {
                        // Here is the ability slice that can be pulled up and displayed
                        "actions":[
                            "action.pay",
                            "action.scan"
                        ]
                  ...
Look at the following code. Other pages can display the specific AbilitySlice by default when opening the Page through Intent:
public class MyAbility extends Ability {
    @Override
    public void onStart(Intent intent) {
        super.onStart(intent);
        // Set master AbilitySlice
        setMainRoute(MainSlice.class.getName());

        // Register the default Page. Other pages can display the specific AbilitySlice by default when opening the Page through Intent
        addActionRoute("action.pay", PaySlice.class.getName());
        addActionRoute("action.scan", ScanSlice.class.getName());
    }
}
2.2 life cycle of page ability
The state machine is as follows:
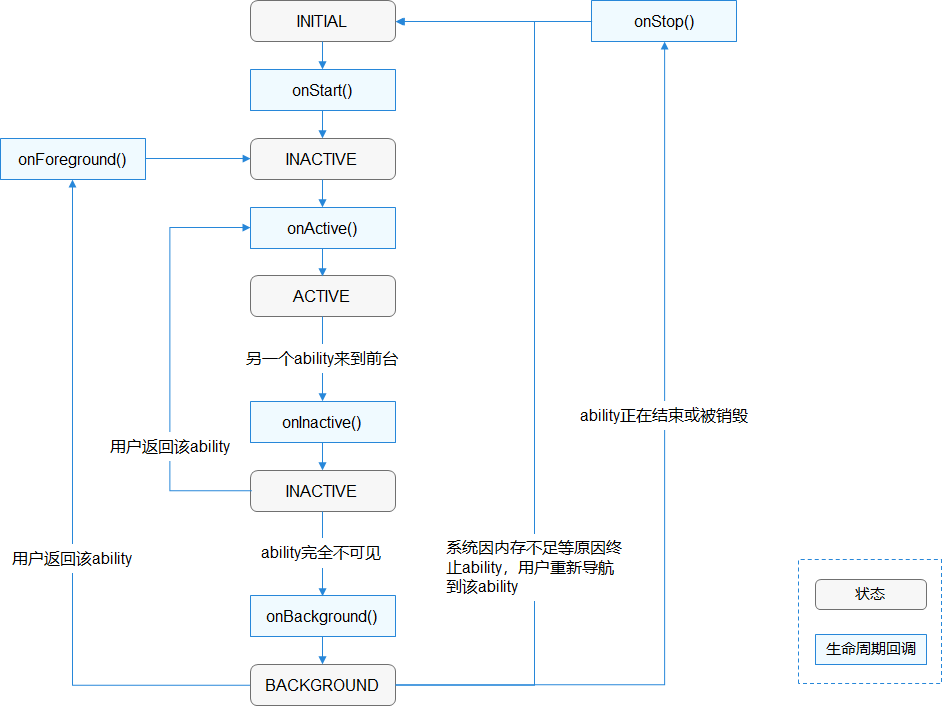
- onStart()
When the system first creates a Page instance. The callback is triggered only once in the life cycle. After the logic, Page will enter the INACTIVE state. The method must be rewritten, and AbilitySlice needs to be set in the method. The template code is as follows:
   @Override
    public void onStart(Intent intent) {
        super.onStart(intent);
        super.setMainRoute(FooSlice.class.getName());
    }
- onActive()
Page will call this method when it enters the INACTIVE state and then goes to the foreground. Here, enter the ACTIVE state, which is the state applied to user interaction.
The Page remains in this state until the Page loses focus. When it occurs, the Page will return to the INACTIVE state. The system calls the onInactive() method. After that, if it returns to the ACTIVE state, it will call onActive() again. - onInactive()
This method is called when the Page loses focus. - onBackground()
This method is called when the Page is no longer visible. After that, the Page enters the backgroup state, which can be used to release useless resources - onForeground()
If the Page still resides in memory when it is in the backgroup state, when it returns to the foreground, it will first call onforegroup() to notify the developer,
Then enter the INACTIVE state - onStop()
This callback function will be triggered when the system is about to destroy the Page. At this time, it is necessary to release system resources. Reason for destroying Page:
① : the user uses the system capability to close the Page, such as the task manager
② : trigger the terminateAbility() method of the Page
③ : the configuration change causes the system to temporarily destroy the Page and rebuild it (vertical screen to horizontal screen?)
④ : for the purpose of resource management, the system reclaims pages in backgroup status
Some differences from Android Activity/Fragment life cycle:
- In Android, onStart() is used to indicate entering the foreground, and it will be called for the first time. Hongmeng uses onforeround() to indicate, but it will not be called for the first time
- None.
2.3 AbilitySlice life cycle
The life cycle of AbilitySlice is the same as that of Page, with callbacks of the same state and the same name. When the Page life cycle changes, its AbilitySlice will also change in the same life cycle. However, if you only navigate the AbilitySlice in the same Page, the Page state will remain unchanged and the AbilitySlice state will change, which is equivalent to independence.
In addition, you must override the onStart() method of AbilitySlice and set the page through setUIContent():
    @Override
    protected void onStart(Intent intent) {
        super.onStart(intent);

        setUIContent(ResourceTable.Layout_main_layout);
    }
In the same Page, the method callback experienced by navigating from A AbilitySlice to B AbilitySlice is:
A.onInactive() -> B.onStart() -> B.onActive() -> A.onBackground()
2.4 navigation in the same Page
2.4.1 presenter()
When the AbilitySlice initiating navigation and the AbilitySlice of the navigation target are on the same Page, the navigation can be realized through presenter(). The code is as follows: navigate to the Target AbilitySlice:
    private void initUi() {
        Text text = (Text) findComponentById(ResourceTable.Id_jump_button);
        text.setClickedListener(listener -> present(new TargetSlice(), new Intent()));
    }
2.4.2 presentForResult()
If you want to bring the result when returning from the AbilitySlice of the navigation target, you need to use presenterForResult(), bring the requestCode, and rewrite the onResult() callback:
    private void initUi() {
        Text text = (Text) findComponentById(ResourceTable.Id_jump_button);
        text.setClickedListener(listener -> presentForResult(new TargetSlice(), new Intent(), 0));
    }

    @Override
    protected void onResult(int requestCode, Intent resultIntent) {
        // The page results are returned here
        super.onResult(requestCode, resultIntent);
    }
2.4.3 AbilitySlice instance stack
Each Page will maintain a stack of AbilitySlice instances, and each AbilitySlice instance entering the foreground will be stacked.
When presenter() is called, the specified AbilitySlice instance has been put on the stack, and the AbilitySlice above this instance in the stack will be out of the stack and terminate its life cycle.
2.5 navigation between different pages
AbilitySlice is an internal unit of a Page and is exposed in the form of an Action.
The navigation between pages uses the startAbility() / startAbilityForResult() method to navigate, and the callback to get the returned result is onAbilityResult(). setResult() in Ability can set the return result.
2.6 cross device migration
Cross device migration supports the migration of pages between different devices of the same user, that is, to transfer A Page from device A to device B, which is an embodiment of the interconnection of all things. The steps are roughly three steps:
- Page request migration on device A
- HarmonyOS handles the migration task and calls back the save data method of Page on device A to save the data necessary for migration
- HarmonyOS starts the same Page on device B and calls back its data recovery method
2.6. 1. Implement the IAbilityContinuation interface
An application may contain multiple pages. You only need to implement the IAbilityContinuation interface in the pages that support migration through the following methods. At the same time, all AbilitySlice contained in this Page also need to implement this interface.
- onStartContinuation
After Page requests migration, the system first calls back this method, and the developer can decide whether the migration can be performed at present. For example, pop up a pop-up window to let the user confirm whether to migrate - onSaveData
If onStartContinuation returns true, this method will be called. The developer will save the data in this method, and the data will be transferred to another device later - onRestoreData
After the Page on the source side device completes saving data, the system calls back this method on the target side device, and the developer receives the data used to restore the Page state in this callback.
This method call will trigger the restart life cycle of the Page on the target device before onStart - onCompleteContinuation
If the data transfer is successful, the source device will call back this method to tell the migration is over, and the source device can end the Page here - onFailedContinuation
If an exception occurs during migration, this method of FA will be called back at the source device. - onRemoteTerminated (may not be necessary)
If the developer uses continueabilityreversible () instead of continueAbility(), he can then use reverseContinueAbility on the source device for fetching. In this scenario, it is equivalent to two instances of the same Page running on two devices. After migration, if the Page life cycle on the target device is destroyed, the source device will call this method
2.6. 2 request migration
After implementing the interface of IAbilityContinuation, you can call continueAbility() / continueAbilityReversibly to request migration within the life cycle, and the latter can fetch:
try {
  continueAbility();
} catch (IllegalStateException e) {
  ....
}
The process of migrating from device A to device B is as follows:
- Page request migration on device A
- The system calls back the Page on device A and the iabilitycontinuation of all AbilitySlice instances in the AbilitySlice stack Onstartcontinuation method to confirm whether the current migration can be performed immediately
- If you can migrate immediately, the system will call back the iabilitycontinuation of the Page and its AbilitySlice instance on device A onSaveData
- If the data is saved successfully, the system starts a Page on B, restores its AbilitySlice stack, and then calls back iabilitycontinuation Onrestore method, transfer the previously saved data, and then the Page of device B starts from the onStart() life cycle
- Call the iabilitycontinuation of A device Page and all its AbilitySlice Oncompletecontinuation method
- If an exception occurs during migration, the system will call back the iabilitycontinuation of all AbilitySlice instances in A's Page and all its AbilitySlice stacks Onfialedcontinuation method, not all exceptions will call back this FA method, which is only limited to the exceptions enumerated by the interface.
There is A problem here. How can device A find device B? This involves obtaining the distributed device class. You need to listen to the click event of the migration button, then obtain the distributed device list, select the device and pass it. See the specific code: Get distributed devices
2.6. 3 request fetch
If continueabilityreversible is called earlier, the source device can call reverseContinueAbility to initiate fetching after the migration is completed:
try {
  reverseContinueAbility();
} catch (IllegalStateException e) {
  ....
}
The specific process is not shown here, which is similar to the migration process.
3. Service Ability
Service based capability mainly provides background running tasks (such as music playing and file downloading), and cannot provide page UI services.
Service is a single instance. There is only one instance of a service on a device. A service can bind multiple capabilities. The service can exit only after all the bound capabilities exit.
Theoretically, it functions the same as the Service component of Android. In this way, Ability is more like a context.
3.1 life cycle of service capability
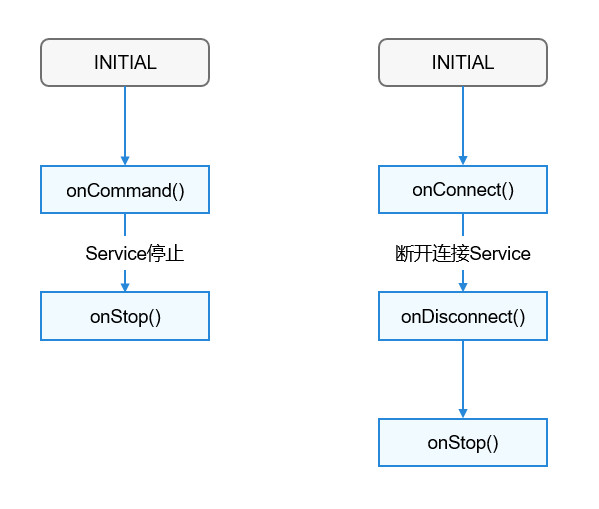
It has two ways to start
- Start the Service. Other abilities are created by calling startAbility() and then kept running. Other abilities stop the Service by calling stopAbility(). After stopping, it will be destroyed
- Bind the Service. Other capabilities bind the Service by calling connectAbility, and unbind it by disconnectAbility(). Multiple capabilities can connect to a Service. When a Service is not bound by any capability, it will be destroyed
Approach to service capability lifecycle:
- onStart
It is called when creating the Ability. It is called only once in the whole life cycle. The incoming Intent should be empty - onCommand
After the Service is created, it will be called when the client starts the Service. The developer can do some operations to call statistics and initialize classes in this method. - onConnect
When Ability is bound to Service Ability, the callback will make the Service create and return an IRemoteObject object. An IPC channel can be generated through this object to facilitate the communication between Service and Ability. Therefore, it can be seen that the Service and communication Ability can not be in the same process.
Secondly, multiple capabilities can bind to the same Service, and the system will cache the IPC channel. Only when the first client binds, the onConnect method will be called. Later, when other capabilities bind again, the IPC channel will be sent without calling the onConnect method again - onDisConnected
Called when Ability and Service are unbound - onStop
Called when the Service is destroyed. Resources can be released here
public class ServiceAbility extends Ability {
    @Override
    public void onStart(Intent intent) {
        super.onStart(intent);
    }

    @Override
    public void onCommand(Intent intent, boolean restart, int startId) {
        super.onCommand(intent, restart, startId);
    }

    @Override
    public IRemoteObject onConnect(Intent intent) {
        return super.onConnect(intent);
    }

    @Override
    public void onDisconnect(Intent intent) {
        super.onDisconnect(intent);
    }

    @Override
    public void onStop() {
        super.onStop();
    }
}
At the same time, it needs to be in config Register in JSON:
{
    "module": {
        "abilities": [
            {
                "name": ".ServiceAbility",
                "type": "service",
                "visible": true
                ...
            }
        ]
        ...
    }
    ...
}
3.2 start Service
Start a Service capability through startAbility(), which can be started by passing in Intent, and can support local or remote services
Three messages can be passed in through Intent:
- DeviceId
The device ID can be blank if it is a local device, and can be empty if it is a remote device through ohos distributedschedule. interwork. Devicemanager get device list - BundleName
Indicates the package name - AbilityName
Indicates the Ability name to be started
The code to start the local device Service is as follows:
Intent intent = new Intent();
Operation operation = new Intent.OperationBuilder()
        .withDeviceId("")
        .withBundleName("com.xxx")
        .withAbilityName("com.xxx.ServiceAbility")
        .withFlag(Intent.FLAG_ABILITYSLCE_MULTI_DEVICE)  // When starting the Service of the remote device, you need to bring it, which means that the distributed dispatching system starts multiple devices
        .build();
intent.setOperation(operation);
startAbility(intent);
3.3 connection Service
If the Service needs to interact with the Service capability of Page or other applications, it must create a Connection for Connection, so that other capabilities can connect to it through the connectcapability () method.
When using connectAbility, you need to pass in the examples of Intent and IAblityConnection of the target Service. It has two methods: callback for successful connection and callback for abnormal death, as shown below:
// Create connection Service callback instance
private IAbilityConnection connection = new IAbilityConnection() {
    // Callback connected to Service
    @Override
    public void onAbilityConnectDone(ElementName elementName, IRemoteObject iRemoteObject, int resultCode) {
        // The Client side needs to define the same IRemoteObject implementation class as the Service side. The developer obtains the IRemoteObject object transmitted from the server and parses the information transmitted from the server.
    }

    // Callback for Service exception death
    @Override
    public void onAbilityDisconnectDone(ElementName elementName, int resultCode) {
    }
};
The code for connecting to the Service needs to bring the Connection:
// Connect Service
Intent intent = new Intent();
Operation operation = new Intent.OperationBuilder()
        .withDeviceId("deviceId")
        .withBundleName("com.domainname.hiworld.himusic")
        .withAbilityName("com.domainname.hiworld.himusic.ServiceAbility")
        .build();
intent.setOperation(operation);
connectAbility(intent, connection);
At the same time, when the Service needs onConnect(), return IRemoteObject to pass the IPC channel. Hongmeng provides a default implementation. You can create this channel by inheriting LocalRemoteObject, and then send it back, as shown below:
private class MyRemoteObject extends LocalRemoteObject {
    MyRemoteObject(){
    }
}

// Return the IRemoteObject to the client
@Override
protected IRemoteObject onConnect(Intent intent) {
    return new MyRemoteObject();
}
3.4 front desk Service
Service generally runs in the background, so it has low priority and is easy to be recycled.
However, in some scenarios (such as file download), users want to keep running all the time, so they need to use the foreground Service. The foreground Service will always keep the running icon displayed in the status bar, that is, it is bound to the notification
To use the foreground Service, you only need the following steps:
- Servce calls keepBackgroundRunning() internally to bind Service and notification
- Declare ohos in the configuration file of the Service permission. KEEP_ BACKGROUND_ Running permissions
- Add the corresponding backgroundModes parameter in the configuration file
- Call cancelBackgroundRunning() in the onStop() method of Serivce.
Examples are as follows:
// Create a notification, where 121 is notificationId
NotificationRequest request = new NotificationRequest(121);
NotificationRequest.NotificationNormalContent content = new NotificationRequest.NotificationNormalContent();
content.setTitle("title").setText("text");
NotificationRequest.NotificationContent notificationContent = new NotificationRequest.NotificationContent(content);
request.setContent(notificationContent);

// Binding notification, 1005 is the notificationId passed in when creating the notification
keepBackgroundRunning(1005, request);
Also modify config Configuration in JSON:
{
    "name": ".ServiceAbility",
    "type": "service",
    "visible": true,
    "backgroundModes": ["dataTransfer", "location"]
}
backgroundModes indicates the background service type. This tag is only applicable to service capability. The values are as follows:
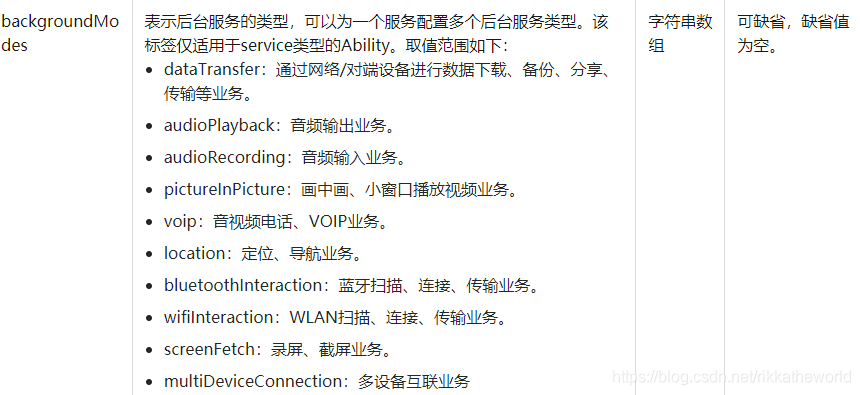
This is the Demo of the music player on the front desk: music player
4. Data Ability
Data capability helps applications manage access to data stored by themselves and other applications, and provides methods to share data with other applications. Data can be used for data sharing of different applications under the same device, and it also supports data sharing of different applications across devices
4.1 URI overview
The APIs provided by Data are URIs to identify a specific Data. The URI of HarmonyOS is based on the general URI standard, and the format is as follows:

- scheme: fixed to "dataability"
- authority: device id. if it is a cross device scenario, it is the id of the target device. If it is a local device scenario, it does not need to be filled in
- Path: resource path information, which represents the location information of a specific resource
- Query: query parameters
- fragment: can be used to indicate which sub resources to access
For example:
Cross device scenario: Da taability://device_id/com.domainname.dataability.persondata/person/10
Local device: Da taability:///com.domainname.dataability.persondata/person/10
Query the 10th data of the person parameter under the persondata path
4.1 creating Data
Data provides functions such as adding, deleting, modifying and querying user-defined data, and provides these interfaces externally
4.1. 1. Determine the data storage mode
Determine the storage mode of data. Data supports the following two data forms:
- Text data: text, pictures, music, etc
- Structured data: such as database, data Bean, etc.
4.1. 2. Implement DataAbility
Data capability is used to receive requests sent by other applications, so it provides an access interface.
In the project directory, click empty Data capability and enter the name of Data to create a default datacapability

Data provides two sets of interfaces:
- file store
- Database storage
4.1. 3 file storage
Operate the file through filedescriptor openFile (uri, uri, string mode). uri is the request target path passed in by the caller, and mode is the developer's operation option for the file. The optional methods include "r" (read-only), "w" (write only), "rw" (read-write), etc
ohos.rpc.MessageParcel provides a static method to get the MessageParcel instance. Through the obtained MessageParcel instance, developers can use dupFileDescriptor() to copy the file descriptor with the operation file stream and return it for remote applications to access the file.
The code is as follows:
@Override
public FileDescriptor openFile(Uri uri, String mode) throws FileNotFoundException {
    // Create messageParcel
    MessageParcel messageParcel = MessageParcel.obtain();
    File file = new File(uri.getDecodedPathList().get(0)); //get(0) is the query parameter field in the get URI complete field.
    if (mode == null || !"rw".equals(mode)) {
        file.setReadOnly();
    }
    FileInputStream fileIs = new FileInputStream(file);
    FileDescriptor fd = null;
    try {
        fd = fileIs.getFD();
    } catch (IOException e) {
        HiLog.info(LABEL_LOG, "failed to getFD");
    }

    // Bind the file descriptor to have the file operation flow
    return messageParcel.dupFileDescriptor(fd);
}
4.1. 4 database storage
To use the database, you need to connect to the database first.
The system will call the onStart() method to create a Data instance when the application starts. Therefore, in this method, the developer needs to create a database connection and obtain the connection object for subsequent operations.
The following is an example code for connecting to the database:
private static final String DATABASE_NAME = "UserDataAbility.db";
private static final String DATABASE_NAME_ALIAS = "UserDataAbility";
private OrmContext ormContext = null;

@Override
public void onStart(Intent intent) {
    super.onStart(intent);
    DatabaseHelper manager = new DatabaseHelper(this);
    ormContext = manager.getOrmContext(DATABASE_NAME_ALIAS, DATABASE_NAME, BookStore.class);
}
The following api is provided to add, delete, modify and query:
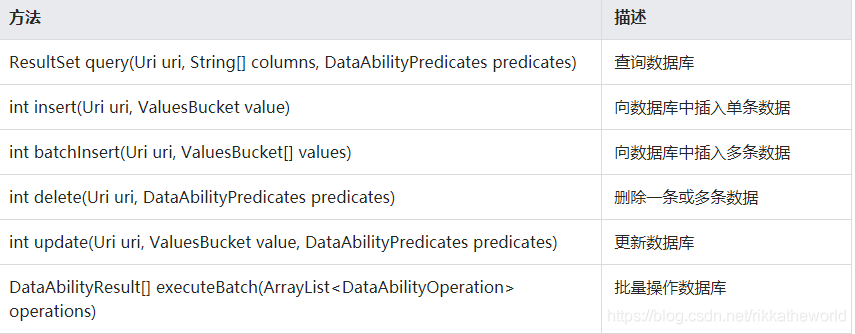
It should be noted that the database supports ORM. ValueBucket, like a Bundle, can pass parameters. For example, insert a piece of data into the database as follows:
public int insert(Uri uri, ValuesBucket value) {
    // Parameter verification
    if (ormContext == null) {
        HiLog.error(LABEL_LOG, "failed to insert, ormContext is null");
        return -1;
    }

    // Construct insert data
    User user = new User();
    user.setUserId(value.getInteger("userId"));
    user.setFirstName(value.getString("firstName"));
    user.setLastName(value.getString("lastName"));
    user.setAge(value.getInteger("age"));
    user.setBalance(value.getDouble("balance"));

    // insert database
    boolean isSuccessful = ormContext.insert(user);
    if (!isSuccessful) {
        HiLog.error(LABEL_LOG, "failed to insert");
        return -1;
    }
    isSuccessful = ormContext.flush();
    if (!isSuccessful) {
        HiLog.error(LABEL_LOG, "failed to insert flush");
        return -1;
    }
    DataAbilityHelper.creator(this, uri).notifyChange(uri);
    int id = Math.toIntExact(user.getRowId());
    return id;
}
Specific orm capabilities can be seen here: Object relational mapping database development guide
4.1. 5 register UserDataAbility
Similar to Service, developers must register Data in the configuration file
Several attributes need to be paid attention to:
- type
The type is set to data - uri
The access path provided externally is globally unique - permission
The requested permission is required to access this data capability
As follows:
{
    "name": ".UserDataAbility",
     "type": "data",
     "visible": true,
     "uri": "dataability://com.example.myapplication5.DataAbilityTest",
     "permissions": [
        "com.example.myapplication5.DataAbility.DATA"
     ]
}
4.2 accessing Data
Developers can access the shared data provided by the current application or other applications through DataAbilityHelper.
4.2. 1 declare access rights
If the Data that needs to be accessed declares permission, the permission to access this Data also needs to be declared in the configuration file
4.2. 2 create DataAbilityHelper
Create the DataAbilityHelper object by passing in a context
DataAbilityHelper helper = DataAbilityHelper.creator(this);
4.2. 3 using DataAbilityHelper
- access files
To operate a file through filedescriptor openFile (uri, uri, string mode) of DataAbilityHelper, two parameters need to be passed in. uri is used to determine the path of the target resource and mode is used to specify the way to open the file. This method returns a descriptor of the target file, which can be encapsulated into a file stream to customize it:
// Read file descriptor
FileDescriptor fd = helper.openFile(uri, "r");
// The file stream encapsulated by the file descriptor is used for file operation
FileInputStream fis = new FileInputStream(fd);
- Access database
The above picture is also an api for database operation, which can be used to add, delete, modify and query the database. The following is a query operation code
DataAbilityHelper helper = DataAbilityHelper.creator(this);

// Construct query criteria
DataAbilityPredicates predicates = new DataAbilityPredicates();
predicates.between("userId", 101, 103);

// Make a query
ResultSet resultSet = helper.query(uri, columns, predicates);

// Processing results
resultSet.goToFirstRow();
do {
    // Process the records in the ResultSet here;
} while(resultSet.goToNextRow());
5. Intent
Intent is the carrier of information transfer between objects.
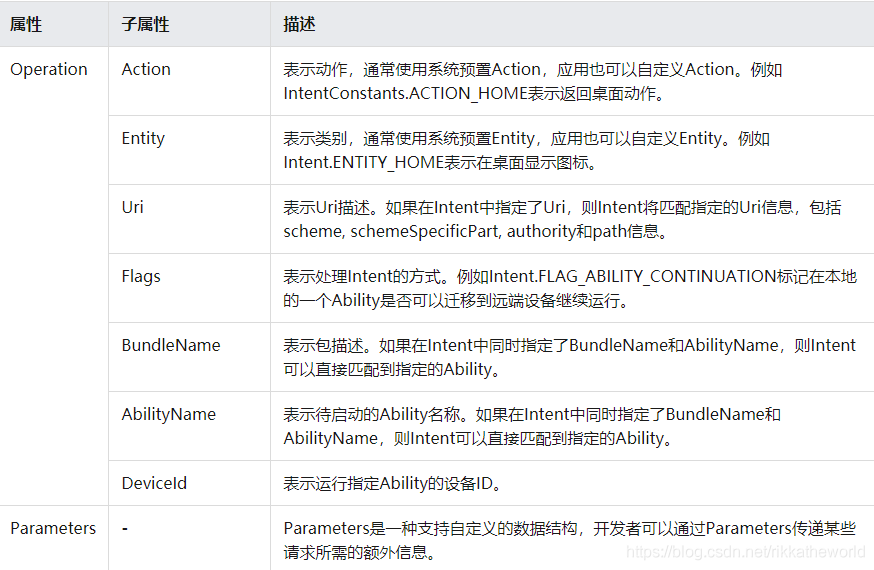
When Intent is used to initiate a request, it can be divided into two types according to different specified elements:
- If BundleName and AbilityName are specified at the same time, the application will be started directly according to the AbilityName
- If BundleName and AbilityName are not specified at the same time, the application will be started according to other properties in the Operation
5.1 start the application according to the full name of Ability
Intent intent = new Intent();

// Construct the operation object through the OperationBuilder class in Intent, and specify the device ID (empty string represents the current device), application package name and capability name
Operation operation = new Intent.OperationBuilder()
        .withDeviceId("")
        .withBundleName("com.demoapp")
        .withAbilityName("com.demoapp.FooAbility")
        .build();

// Set operation to intent
intent.setOperation(operation);
startAbility(intent);
5.2 other attributes
Like Android Intent, you can use the capabilities provided by other applications by setting Action, regardless of which application.
For example, to open a weather query function, you only need to set an ACTION_QUERY_WEATHER is OK:
private void queryWeather() {
    Intent intent = new Intent();
    Operation operation = new Intent.OperationBuilder()
            .withAction(Intent.ACTION_QUERY_WEATHER)
            .build();
    intent.setOperation(operation);
    startAbilityForResult(intent, REQ_CODE_QUERY_WEATHER);
}

@Override
protected void onAbilityResult(int requestCode, int resultCode, Intent resultData) {
    switch (requestCode) {
        case REQ_CODE_QUERY_WEATHER:
            // Do something with result.
            ...
            return;
        default:
            ...
    }
}
The processor, that is, the provider of weather query, needs to declare the ability to provide external information in the configuration file to facilitate the system to find itself:
"abilities": [
            {
                ...
                "skills":[
                    {
                        "actions":[
                            "ability.intent.QUERY_WEATHER"
                        ]
                    }
                ]
                ...
            }
Then support this action in Ability to navigate to this AbilitySlice:
@Override
protected void onStart(Intent intent) {
    ...
    addActionRoute(Intent.ACTION_QUERY_WEATHER, DemoSlice.class.getName());
    ...
}
Finally, process the request in the Ability and call the setResult() method to temporarily store the exchange result:
@Override
protected void onActive() {
    ...
    Intent resultIntent = new Intent();
    setResult(0, resultIntent);   //0 is the resultCode returned after the current Ability is destroyed.
    ...
}
Reference documents
Hongmeng Ability explanation (page life cycle, background service, data access)
Official documents