catalogue
Create a Web API project in Visual Studio
(optional) add database context
Singleton, scope, and transient Service Lifecycle
Service or controller as a service?
This article introduces my work in NET Core 3.1. From the directory, you can see all the different parts of my settings.
step
Creating a Web API project in Visual Studio
1

The screenshot above is the result when you right-click Visual Studio 2019 and select run as administrator, which you may have to do anyway to debug the web API project. This will show you a list of templates and you will choose ASP NET Core Web API:

The final screen (with the Create button) has the following options:
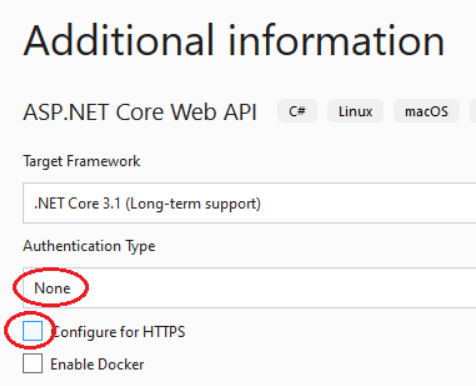
- I don't choose the authentication type because most of the web APIs I write use custom authentication routines, which are discussed below.
- I also did not configure the Web API for HTTPS, because the Web API will run under IIS, which has been configured for HTTPS in the production environment.
2
Alternatively, in VS2019, select File = > New Project, and then select "Installed" and "ASP.NET Core Web Application":

Then you will see some options, including "API":

Strangely, this method does not prompt you for the authentication type and "configure for HTTPS".
IIS configuration
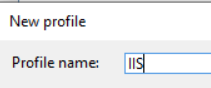
Right click the solution and click Properties from the pop-up menu:

Create a new profile named "IIS" and select IIS as the startup option:


You should now see:

Change the options to launch the browser using the weatherforecast page:

Verify that anonymous authentication is selected and Windows authentication is not selected:

important! I found that I also had to edit launchsettings JSON file, completely remove the reference to iisExpress, otherwise Visual Studio will continue to start the Web API through IIS Express, so this is my launchsettings What the JSON file looks like now:
{
  "iisSettings": {
    "windowsAuthentication": false,
    "anonymousAuthentication": true,
    "iis": {
      "applicationUrl": "http://localhost/Demo",
      "sslPort": 0
    }
  },
  "$schema": "http://json.schemastore.org/launchsettings.json",
  "profiles": {
    "IIS": {
      "commandName": "IIS",
      "launchBrowser": true,
      "launchUrl": "weatherforecast",
      "sqlDebugging": true
    }
  }
}
Why? I don't know!
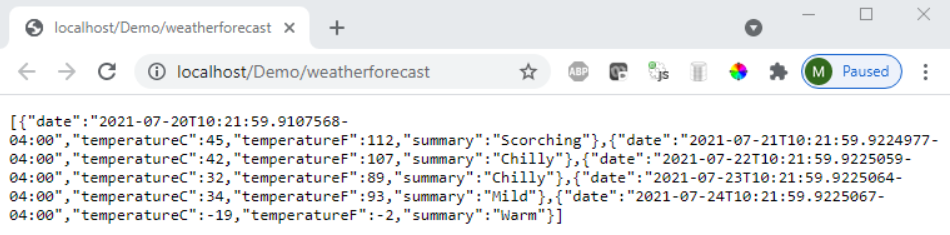
You can now run the template WeatherForecast Web API that Visual Studio created for you, and of course we will delete it:
Visual Studio will automatically provide you with IIS - I really like this feature!
Swashbuckle/Swagger
In the project's build options:
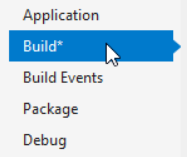
Enable XML documents.

Also, ignore warning 1591:

Otherwise, the IDE will keep warning you of missing XML comments.
Swashbuckle
Swashbuckle can be used to generate pages that describe all API endpoints and clumsy ways to test them. Nevertheless, I find it particularly useful because other developers almost always use these APIs to write front-end code. You can also add attribute tags to each API and automatically generate front-end methods using one of the various front-end "call API" utilities provided by swashbuckle. Note, however, that some of these utilities generate code that looks very strange.
Including Swashbuckle documentation is simple. Right click the project dependency and select manage NuGet packages:

Browse Swash:
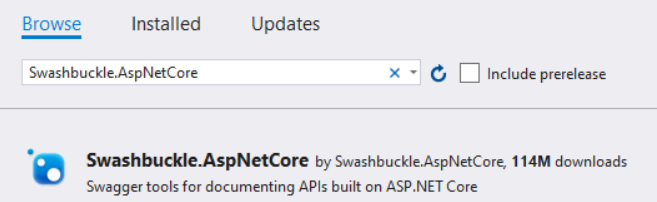
And install the package "Swashbuckle.AspNetCore" (version may be greater than 6.1.4):

At startup CS file, add the Swagger service to the ConfigureServices method as follows:
public void ConfigureServices(IServiceCollection services)
{
  services.AddControllers();

  // ADD THIS:
  services.AddSwaggerGen(c =>
  {
    var xmlFile = $"{Assembly.GetExecutingAssembly().GetName().Name}.xml";
    var xmlPath = Path.Combine(AppContext.BaseDirectory, xmlFile);
    c.IncludeXmlComments(xmlPath);
  });
}
In the Configure method, the app UseRouting(); Add the following code to the application builder:
public void Configure(IApplicationBuilder app, IWebHostEnvironment env)
{
if (env.IsDevelopment())
{
app.UseDeveloperExceptionPage();
}
app.UseRouting();
// ------ ADD THIS ------
app.UseSwagger()
.UseSwaggerUI(c =>
{
c.SwaggerEndpoint("/demo/swagger/v1/swagger.json", "Demo API V1");
});
// ======================
app.UseAuthorization();
app.UseEndpoints(endpoints =>
{
endpoints.MapControllers();
});
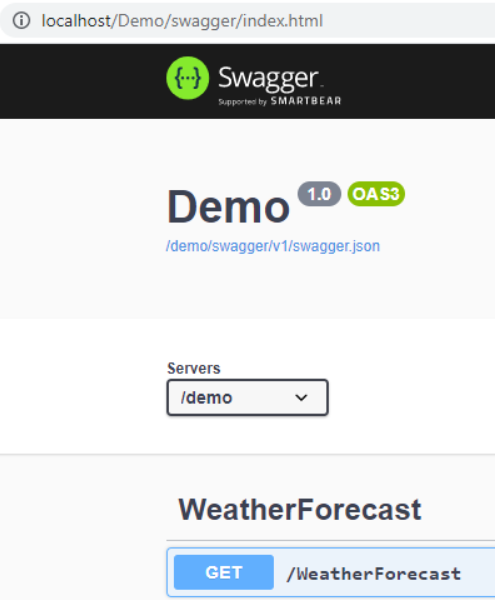
}Notice that the first element in the endpoint path is the same as the application name "demo".
When you launch the application, you can now navigate to Demo/swagger (or whatever you name the project) and you will see:
Newtonsoft.Json
I prefer newtonsoft Jason, because in my opinion, it's better than NET Core built-in default JSON serializer. On the one hand, it handles serialization / deserialization enumerations, maintains case based model properties, handles self reference loops without any special code, and so on. I also like the nice formatting of the returned JSON because it's easier to read for debugging purposes. Similarly, in NuGet package manager, install Microsoft AspNetCore. Mvc. Newtonsoft.Json, make sure to select the latest 3.1 X version:

At startup CS, modify the ConfigureServices method to instruct it to use newtonsoftjason:
public void ConfigureServices(IServiceCollection services)
{
  services.AddControllers()
    // must be version 3.1.13 -- version 5's support .NET 5 only.
    // <a href="https://anthonygiretti.com/2020/05/10/why-model-binding-to-jobject-
    // from-a-request-doesnt-work-anymore-in-asp-net-core-3-1-and-whats-the-alternative/">
    // https://anthonygiretti.com/2020/05/10/why-model-binding-to-jobject-from-a-request-
    // doesnt-work-anymore-in-asp-net-core-3-1-and-whats-the-alternative/</a>
    .AddNewtonsoftJson();

  services.AddSwaggerGen(c =>
  {
    var xmlFile = $"{Assembly.GetExecutingAssembly().GetName().Name}.xml";
    var xmlPath = Path.Combine(AppContext.BaseDirectory, xmlFile);
    c.IncludeXmlComments(xmlPath);
  });
}
Obviously, you can omit my comments if you like.
Especially when debugging, I don't just want 500 internal server errors. I prefer consistent and well formed responses to indicate errors and stack traces.
In the Debug section of the project properties, add ASPNETCORE_ENVIRONMENT variable with environment value of Development:

according to This article ,ASP.NET Core uses this ASPNETCORE_ENVIRONMENT variable to determine the current environment.
Add a MiddlewareExceptionHandler. I usually put the file exceptionservice. In the folder Services CS:

This is the code:
// Borrowed from here: http://netitude.bc3tech.net/2017/07/31/
// using-middleware-to-trap-exceptions-in-asp-net-core/
// Note that middleware exception handling is different from exception filters:
// https://damienbod.com/2015/09/30/asp-net-5-exception-filters-and-resource-filters/
// https://docs.microsoft.com/en-us/aspnet/core/mvc/controllers/filters?
// view=aspnetcore-2.2#exception-filters
// Exception filters do NOT catch exceptions that occur in the middleware.
public class MiddlewareExceptionHandler
{
  private readonly RequestDelegate _next;

  public MiddlewareExceptionHandler(RequestDelegate next)
  {
    _next = next ?? throw new ArgumentNullException(nameof(next));
  }

  public async Task Invoke(HttpContext context)
  {
    try
    {
      await _next(context);
    }

    // This handles the problem when the AUTHORIZATION token doesn't
    // actually validate and ASP.NET Core middleware generates this:
    // An unhandled exception occurred while processing the request.
    // InvalidOperationException: No authenticationScheme was specified,
    // and there was no DefaultChallengeScheme found.
    // We want to handle this error as a "not authorized" response.
    catch (InvalidOperationException)
    {
      if (context.Response.HasStarted)
      {
        throw;
      }

      context.Response.Clear();
      context.Response.StatusCode = 401;
      context.Response.ContentType = "application/json";

      await context.Response.WriteAsync("{\"status\":401,\"message\":\"Not authorized.\"}");
    }
    catch (Exception ex)
    {
      if (context.Response.HasStarted)
      {
        throw;
      }

      context.Response.Clear();
      context.Response.StatusCode = 500;
      context.Response.ContentType = "application/json";

      var exReport = new ExceptionReport(ex);
      var exJson = JsonConvert.SerializeObject(exReport, Formatting.Indented);
      await context.Response.WriteAsync(exJson);
    }
  }
}

// Extension method used to add the middleware to the HTTP request pipeline.
public static class MiddlewareExceptionExtensions
{
  public static IApplicationBuilder UseHttpStatusCodeExceptionMiddleware
               (this IApplicationBuilder builder)
  {
    return builder.UseMiddleware<MiddlewareExceptionHandler>();
  }
}
Also in this file, the rest of the exception report code is:
public static class ExceptionReportExtensionMethods
{
  public static ExceptionReport CreateReport(this Exception ex)
  {
    return new ExceptionReport(ex);
  }

  public static T[] Drop<T>(this T[] items, int n = 0)
  {
    // We could use C# 8's ^ operator to take all but the last n...
    return items.Take(items.Length - (1 + n)).ToArray();
  }
}

public class ExceptionReport
{
  public DateTime When { get; } = DateTime.Now;

  [JsonProperty(NullValueHandling = NullValueHandling.Ignore)]
  public string ApplicationMessage { get; set; }

  public string ExceptionMessage { get; set; }

  public List<StackFrameData> CallStack { get; set; } = new List<StackFrameData>();

  [JsonProperty(NullValueHandling = NullValueHandling.Ignore)]
  public ExceptionReport InnerException { get; set; }

  public ExceptionReport(Exception ex, int exceptLastN = 0)
  {
    ExceptionMessage = ex.Message;
    var st = new StackTrace(ex, true);
    var frames = st.GetFrames()?.Drop(exceptLastN) ?? new StackFrame[0];
    CallStack.AddRange(
      frames
        .Where(frame => !String.IsNullOrEmpty(frame.GetFileName()))
        .Select(frame => new StackFrameData(frame)));
    InnerException = ex.InnerException?.CreateReport();
  }
}

public class StackFrameData
{
  public string FileName { get; private set; }
  public string Method { get; private set; }
  public int LineNumber { get; private set; }

  public StackFrameData(StackFrame sf)
  {
    FileName = sf.GetFileName();
    Method = sf.GetMethod().Name;
    LineNumber = sf.GetFileLineNumber();
  }

  public override string ToString()
  {
    return $"File: {FileName}\r\nMethod: {Method}\r\nLine: {LineNumber}";
  }
}
Start up, then CS, modify the Configure method if env Processing method in isdevelopment():
public void Configure(IApplicationBuilder app, IWebHostEnvironment env)
{
  if (env.IsDevelopment())
  {
    // Do not halt execution. I don't fully understand this.
    // See http://netitude.bc3tech.net/2017/07/31/
    // using-middleware-to-trap-exceptions-in-asp-net-core/
    // "Notice the difference in order when in development mode vs not.
    // This is important as the Developer Exception page
    // passes through the exception to our handler so in order to get the
    // best of both worlds, you want the Developer Page handler first.
    // In production, however, since the default Exception Page halts execution,
    // we definitely to not want that one first."
    app.UseDeveloperExceptionPage();
    app.UseHttpStatusCodeExceptionMiddleware();
  }
  else
  {
    app.UseHttpStatusCodeExceptionMiddleware();
    app.UseExceptionHandler("/Home/Error");
  }
  ...
Because I'm in development mode, I didn't implement the error page.
Through the weatherforecastcontroller Add a GET method that throws an exception to the CS file to test exception handling:
[HttpGet("TestException")]
public void TestException()
{
  throw new Exception("Exception occurred!");
}
Run the application and navigate to http://localhost/Demo/weatherForecast/testException , you should see:
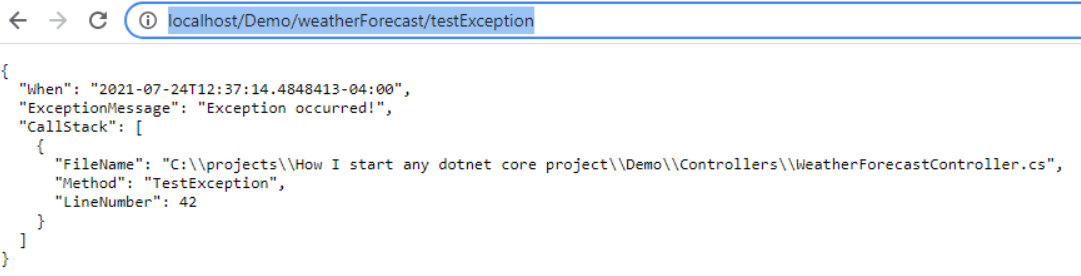
If the exception occurs somewhere inside the code, you will see more stack traces.
CORS strategy
We usually want to enable some kind of CORS (cross source resource sharing) policy( Here Read more information ), although for most applications, I set it to any source. At startup In the ConfigureServices method in the. CS file, add the following:
services.AddCors(options =>
  options.AddDefaultPolicy(builder => builder
    .AllowAnyMethod()
    .AllowAnyHeader()
    .AllowCredentials()
    // Needed because we can't use AllowAnyOrigin with AllowCredentials
    // https://jasonwatmore.com/post/2020/05/20/
    // aspnet-core-api-allow-cors-requests-from-any-origin-and-with-credentials
    // https://docs.microsoft.com/en-us/aspnet/core/security/cors?view=aspnetcore-5.0
    .SetIsOriginAllowed(origin => true)
    .WithExposedHeaders(EXPOSED_HEADERS)
  )
);
In the Configure method, after UseRouting(), add a call to usecos():
app
 .UseRouting()
 .UseCors();
Setting up CORS is a very, very fickle thing. Most of the production problems I finally deal with are related to the picky nature of CORS, so be careful. If an endpoint fails, use the browser's debugger to determine whether the pre flight CORS test fails to determine whether it is an endpoint problem or a CORS problem.
Most API s require authentication (authorization may also be required, but I usually don't implement user role authorization.) To add authentication, I created an authenticationservice in the Services folder using the following template CS file:
public class TokenAuthenticationSchemeOptions : AuthenticationSchemeOptions
{
}

public class AuthenticationService : AuthenticationHandler<TokenAuthenticationSchemeOptions>
{
  private SessionService sessionService;

  public AuthenticationService(
    IOptionsMonitor<TokenAuthenticationSchemeOptions> options,
    ILoggerFactory logger,
    UrlEncoder encoder,
    ISystemClock clock) : base(options, logger, encoder, clock)
  {
    this.sessionService = sessionService;
  }

  protected override Task<AuthenticateResult> HandleAuthenticateAsync()
  {
    Task<AuthenticateResult> result =
        Task.FromResult(AuthenticateResult.Fail("Not authorized."));

    // Authentication confirms that users are who they say they are.
    // Authorization gives those users permission to access a resource.

    if (Request.Headers.ContainsKey("yourAuthKey"))
    {
      // Verify the key...

      // If verified, optionally add some claims about the user...
      var claims = new[]
      {
        new Claim("[key]", "value"),
      };

      // Generate claimsIdentity on the name of the class:
      var claimsIdentity = new ClaimsIdentity(claims, nameof(AuthenticationService));

      // Generate AuthenticationTicket from the Identity
      // and current authentication scheme.
      var ticket = new AuthenticationTicket(new ClaimsPrincipal(claimsIdentity), Scheme.Name);

      result = Task.FromResult(AuthenticateResult.Success(ticket));
    }

    return result;
  }
}
In the constructor, you may also want to pass in some kind of "account service" - a service that allows you to connect to the database to verify user accounts.
In addition, at startup CS file, add the authentication scheme to the ConfigureServices method:
services
 .AddAuthentication("tokenAuth")
 .AddScheme<TokenAuthenticationSchemeOptions, AuthenticationService>("tokenAuth", ops => { });
Since the above code will not be authenticated, unless we provide a header with the key "yourAuthKey", we can test it using the API endpoint (see below).
Finally, add UseAuthentication() to the Configure method:
app
  .UseAuthentication()
  .UseRouting()
  .UseCors();
appsettings.json
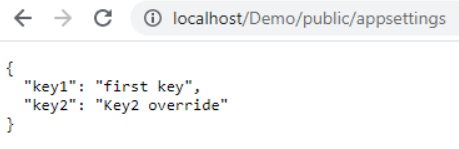
You can here Read ASP Net core. For our purposes, I just want to set up a simple configuration file. The configuration file in the demo has applications JSON and appsettings Development. JSON, and ASPNETCORE_ENVIRONMENT is associated with the value of the environment variable. appsettings containing environment values override applications JSON. For example, in appsetting In JSON, I will define several settings, Key1 and Key2:
{
  "Logging": {
    "LogLevel": {
      "Default": "Information",
      "Microsoft": "Warning",
      "Microsoft.Hosting.Lifetime": "Information"
    }
  },
  "AllowedHosts": "*",

  // I've added these keys:
  "Key1": "first key",
  "Key2": "second key"
}
In Appsettings Development. JSON, I will overwrite Key2:
{
  "Logging": {
    "LogLevel": {
      "Default": "Information",
      "Microsoft": "Warning",
      "Microsoft.Hosting.Lifetime": "Information"
    }
  },

  // I'm overriding Key2:
  "Key2": "Key2 override"
}
In order to put these values into an object so that we do not use hard coded strings to refer to configuration settings, such as Configuration("Key1"), we can create a class using the configuration key of interest and bind it to the configuration. For example, given:
public class AppSettings
{
  public static AppSettings Settings { get; set; }

  public AppSettings()
  {
    Settings = this;
  }

  public string Key1 { get; set; }
  public string Key2 { get; set; }
}
Then we bind in the Startup constructor.
public AppSettings AppSettings { get; } = new AppSettings();

public Startup(IConfiguration configuration)
{
  Configuration = configuration;
  Configuration.Bind(AppSettings);
}
And because the constructor sets the public static variable Settings, we can access the Settings anywhere in the application. For example, we can create an endpoint that returns application Settings (see below for information on adding more basic test endpoints):
[AllowAnonymous]
[HttpGet("AppSettings")]
public object GetAppSettings()
{
  return AppSettings.Settings;
}
We see:

important! Usually, you don't want to expose your application settings because they may contain sensitive information, such as database passwords.
Most web APIs need to connect to the database, and since I only use SQL Server, I will add one or more rows to register the database context, depending on the number of contexts I have:
services.AddDbContext<MyDbContext>(options => options.UseSqlServer("myConnectionString"));Instead of hard coding connection strings, you typically get them from application settings based on your environment (see below). In addition, this requires adding appropriate database support, such as Microsoft EntityFrameworkCore. SqlServer. You can then add the DB context to the constructor of the service:
public SomeService(MyDbContext context)
The. NET Core handles instance creation and dependency injection.
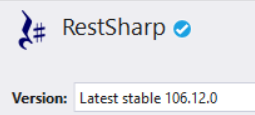
RestSharp
If your service calls other API s, I prefer RestSharp. Again, in NuGet package manager, add the latest version of RestSharp:
JSON
If we modify the registration method of newtonsoftjason:
services.AddControllers()
  .AddNewtonsoftJson(options => options.SerializerSettings.Formatting = Formatting.Indented);
We can add a global format to the returned JSO, for example:
I find this particularly useful when I don't use Postman (which formats itself) to debug endpoints.
Although we added an ExceptionTest API before, I really don't want to use it in the "demo" controller. Also used to add version endpoints. Therefore, these two endpoints are added to the "public" controller because I usually do not intend to authenticate them:
[ApiController]
[Route("[controller]")]
public class Public : ControllerBase
{
  [AllowAnonymous]
  [HttpGet("Version")]
  public object Version()
  {
    return new { Version = "1.00" };
  }

  [AllowAnonymous]
  [HttpGet("TestException")]
  public void TestException()
  {
    throw new Exception("Exception occurred!");
  }
}
Note that I have this class derived from ControllerBase, so we can take advantage of common responses, such as Ok().
For the Version API, you will now see:
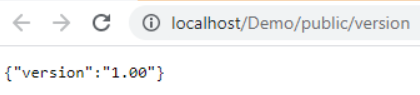
Note the AllowAnonymous attribute because we are now using authentication elsewhere. And do whatever you like in the Version API endpoint to get the version. For example, I often add a check to ensure that the necessary DB connections are also successful.
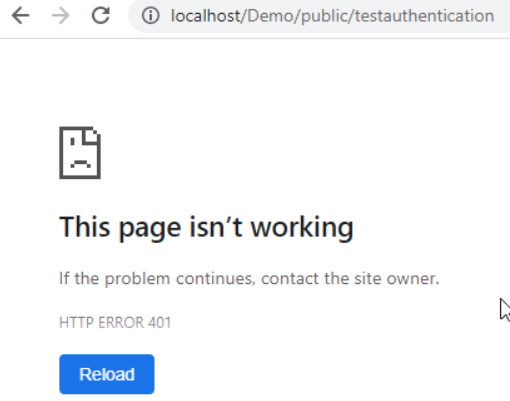
Let's test the authentication service - yes, I put this endpoint in the "public" controller:
[Authorize]
[HttpGet("TestAuthentication")]
public ActionResult TestAuthentication()
{
  return Ok();
}
We see:
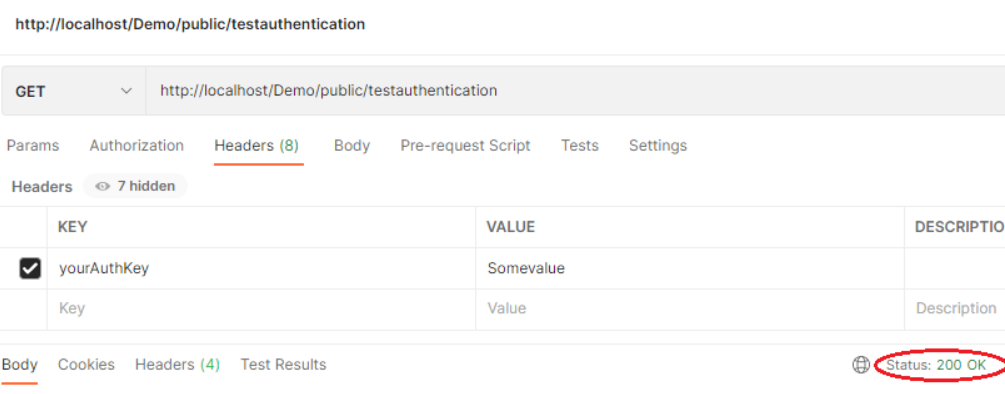
If we use Postman to call the endpoint with "yourAuthKey" value set:
curl --location --request GET 'http://localhost/Demo/public/testauthentication' \
--header 'yourAuthKey: Somevalue'
We see that the endpoint returns OK:
I prefer to set this folder structure:
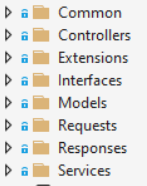
- Common -- common classes, such as auxiliary classes
- Controllers - all controllers supported by the application. If a specific controller file becomes larger, I will create a folder for the controller that contains the partial class of the controller to organize the endpoints.
- Extension - I use a variety of extension methods in my code, and these files are placed in this folder.
- Interface - any interface definition I need (see below)
- Model - database context and model
- Request -- defines the class of incoming requests
- Response -- defines the class of outgoing response
- Services - any services I need (see below)
One of the common patterns I see in other people's code is overusing interfaces when registering services. For example:
services.AddSingleton<IUserCacheService, UserCacheService>();
The result is that each service implements an interface, and the dependency injection in the controller or service constructor depends on the interface rather than the specific service. For example:
public SomeControllerOrService(IUserCacheService userCacheService)
The interface focuses on abstract implementation. If you know that the implementation will never be abstracted, there is absolutely no point in adding an interface -- it just confuses the code, creates more types, and needs to maintain something else when updating the methods of specific services. This is absolutely meaningless - as projects grow and more and more services are added (usually just to define logical boundaries), the number of interface files increases and becomes essentially code. Can override:
services.AddSingleton<CacheServices.UsersCacheService>();
And:
public SomeControllerOrService(UserCacheService userCacheService)
One of the arguments for implementing services as interfaces is to simulate services to test controllers. Although this sounds reasonable, I don't think the reasoning is sufficient. Most, if not all, business rules and common code logic are not in controller endpoint code, but in services -- in fact, it often makes sense to have one or more business rule services to decouple controllers and other services from controllers and other services. Application specific logic. In view of this, when I write integration tests, I don't want to test for simulated services, but for actual services! As with anything, there are reasonable exceptions, such as when a service interacts with other components (databases, third-party API s, etc.), which are only available in a "real-time" staging or production environment. Well, it makes sense to use interfaces to implement services so that it can be simulated, but it should be noted that any business logic is implemented outside the service. Therefore, please consider whether the service will be abstracted. If you have reason (or very) to be sure that it will not be abstracted, don't worry about the interface of the service.
There is a good one written in different types of services here . In short:
- Singleton: "Singleton scope creates a single instance of the service on the first request. It will then use the same instance for each subsequent request. A new request will not create a new instance of the service, but reuse the existing instance."
- Scoped: "a service with a scope lifecycle is created only once per request (SCOPE), that is, it creates a new instance for each request and reuses the instance in the request." For example, if your controller needs a service, and some other code in your controller references another service and needs it, then the scope service will be reused because it is part of the same request.
- Transient: "transient services always create a new instance every time we request it." In contrast to scoped services, any request for transient services from other services during the request will get a new instance.
Why do we have these types of service lifecycles? The main answer is that some services may be rarely used and may take up a lot of memory, although I think if this is the case, you don't have a well-designed service. In any case, you may not want the service to stay outside the requested lifecycle, so a singleton service may not be appropriate. I really can't think of a use case for transient services (can you?), They consume memory (although their life cycle is very short), but they also need the dependency injection system to create a new instance for each referenced transient service, which reduces the performance of the application. I usually only use singleton services because my services do not contain static variables or state information. If I need to keep the state in the request, a limited scope service will be the right service.
As the article mentioned above points out, care must be taken to mix services with different lifecycles. If a singleton service persists a scope or transient service, the scope or transient service will be persisted, contrary to the purpose of "life cycle during request or each access".
Another consideration is, "do I need a service or can I put code into the controller?" For example, does the version require a service?
[AllowAnonymous]
[HttpGet("Version")]
public object Version()
{
  return new { Version = "1.00" };
}
I shouldn't! It can access services, such as verifying database connections. I prefer to write any of the following:
- Simple operation / response dependent on other services
- Contains operations for business rules based on the status of the data in the request or database
The latter is an easier problem to solve. Should business rules be separated from the controller and placed in services or other "business rules" containers? If the endpoint performs a large number of operations (with or without rules), should it be decoupled into workflow services? Where should the request validation belong? Should business rules, workflows, and validation be abstracted from other application configuration settings or runtime user options? These are the questions people should ask themselves when they notice that the code in the endpoint becomes quite lengthy.
This is how I created ASP Net Web API project. I hope you will find this useful when creating your own Web API project!
https://www.codeproject.com/Articles/5309416/How-I-Start-any-NET-Core-Web-API-Project