How does Istio service grid handle security issues?
This article is translated from https://istio.tetratelabs.io/blog/istio-security/>
In this blog, I will explain how Istio solves problems such as traffic encryption, providing flexible service access control, configuring two-way TLS and fine-grained access policy and audit.
Istio security architecture
Istio mainly provides security functions by the following components:
1. Certification authority (CA) for managing keys and certificates
2. Sidecar agent: enables secure communication between client and server (they are used as policy execution point (PEP))
3. Envoy agent extension layer: manage telemetry, audit, etc
4. Configure API server: distribute authentication, authorization policy, security naming information, etc
A policy execution point (PEP) is a component that acts as a resource guardian.
Authentication
By definition, authentication is the process or action of verifying the identity of a user or process. This means that Istio needs to extract the credentials from the request and prove that they are true. Envoy agents in Istio use certificates as their credentials when communicating with each other. These certificates are associated with the service account in Kubernetes.
When two services begin to communicate, they need to exchange credentials with identity information to authenticate each other. The client checks the identity of the server according to the security naming information to see whether it is the authorized operator of the service. On the server side, the server determines what information the client can access according to the authorization policy.
In addition, the server can audit who accessed what at what time and decide whether to approve or reject the client's call to the server. The secure naming information contains the mapping from the service identity to the service name. The server identity code is in the certificate, and the service name is the name used by the discovery service or DNS. A single mapping from identity a to service name B means "a is allowed and authorized service B". Pilot generates secure naming information and distributes it to all sidecar envoys.
Identity
For publishing identities, Istio uses a secure production level identity framework SPIFFE (pronounced spiffy) for everyone. SPIFFE is the specification of a framework that can guide and publish identity.
The cifadel specification is implemented; Another implementation of SPIFFE is called SPIRE (SPIFFE runtime framework).
SPIFFE standard contains three concepts:
SPIFFE ID: defines how the service identifies its own identity namespace
SPIFFE verifiable proof of identity (SVID): specifies how published identities are presented and verified. It encodes the SPIFFE ID.
Workload API: Specifies the API used to publish or retrieve the workload of another workload SVID
In Kubernetes, the service account is used for service identity. The format of the URI representing the SPIFFE ID is as follows: spiffe://cluster-name/ns/namespace/sa/service-account-name . By default, any pod that does not explicitly set a service account will use the default service account deployed in the namespace.
You can view the service account and the corresponding secret as follows:
$ kubectl describe sa default
Name:                default
Namespace:           default
Labels:              <none>
Annotations:         <none>
Image pull secrets:  <none>
Mountable secrets:   default-token-pjqr9
Tokens:              default-token-pjqr9
Events:              <none>
The mountable secret/token name is the secret name in the same namespace containing the certificate and token.
$ kubectl describe secret default-token-pjqr9

Name:         default-token-pjqr9
Namespace:    default
Labels:       <none>
Annotations:  kubernetes.io/service-account.name: default
              kubernetes.io/service-account.uid: fe107ed9-8707-11e9-9803-025000000001

Type:  kubernetes.io/service-account-token

Data
====
ca.crt:     1025 bytes
namespace:  7 bytes
token:      ey....
Therefore, the SPIFFE ID of the default service account will be encoded as follows: spiffe://cluster.local/ns/default/sa/default . The specification also describes how to encode this identity as a certificate that can be used to prove identity. SPIFFE indicates that the identity (URI) needs to be encoded in the subject alternate name (SAN) of the certificate. Finally, the workload API for publishing and retrieving svids in Istio is implemented using the ACME (automatic certificate management environment) protocol.
The Citadel component automatically creates certificates for existing and new service accounts and then stores them as Kubernetes Secret. If you create a deployment and view the pod specification, you will notice the following:
...
 volumeMounts:
    - mountPath: /var/run/secrets/kubernetes.io/serviceaccount
      name: default-token-pjqr9
      readOnly: true
...
Using this code snippet, Kubernetes installs certificates and other information from the service account to the pod.
For security purposes, the certificate issued is short-lived (even if attackers can obtain SVID, they can only use it for a short time), and Citadel ensures that the certificate is automatically rotated.
Mutual TLS authentication
Transport authentication, also known as service to service authentication, is one of the authentication types supported by istio. Istio implements bidirectional TLS as a solution for transport authentication.
TLS stands for transport layer security. TLS is used every time you try to access a secure endpoint. For example, access via HTTPS https://learnistio.com TLS will be used to protect the communication between the server running the website and the browser used. Transmitting sensitive or private information doesn't even matter - the connection is secure anyway.
Using TLS requires a certification authority (CA) to issue a digital certificate to the server, which then hands it over to the browser for authentication through the ca.
mTLS takes the same idea, but applies it to applications or services. This means that the client verifies not only the server's certificate, but also the client's certificate.
An example of a TLS is the need to show a passport (certificate) to a customs officer when crossing a border. Customs officers ensure that passports are valid, not expired, etc. In the case of mTLS, you also need to ask the customs officer for a passport and then verify it.
Once the two sides have verified the certificate through their respective CA, the communication between the two sides can be carried out safely.
For Istio, all communication between services is through the Envoy agent. The following steps occur when calling from service A to service B:
-
Traffic is routed from service A to Envoy agent in the same pod
-
Service A agent starts the mTLS handshake with service B agent (security naming check will also be performed)
-
mTLS connection establishment
-
Traffic is forwarded to service B agent
-
Service B agent forwards traffic to service B in the same pod
Mutual TLS in Istio supports a licensing mode. This mode allows the service to accept both plain text traffic and MTLs traffic. This can help us gradually migrate services to MTLs without destroying the existing plain text traffic. Once the first mock exam is owned by all the services, the mTLS unique mode can be configured.
To configure mTLS between services, use the traffic policy field in the destination rule. For example, if the client is required to use mTLS when communicating with service-b, istio can be used_ Mutual mode:
apiVersion: networking.istio.io/v1alpha3
kind: DestinationRule
metadata:
  name: service-b-istio-mtls
spec:
  host: service-b.default.svc.cluster.local
  trafficPolicy:
    tls:
      mode: ISTIO_MUTUAL
You can also provide your own certificate and set the mode to MUTUAL, as shown below:
apiVersion: networking.istio.io/v1alpha3
kind: DestinationRule
metadata:
  name: service-b-mtls
spec:
  host: service-b.default.svc.cluster.local
  trafficPolicy:
    tls:
      mode: MUTUAL
      clientCertificate: /etc/certs/cert.pem
      privateKey: /etc/certs/pkey.pem
      caCertificates: /etc/certs/cacerts.pem
Finally, you can also set the mode field to SIMPLE so that the client can configure to use TLS:
apiVersion: networking.istio.io/v1alpha3
kind: DestinationRule
metadata:
  name: service-b-tls
spec:
  host: service-b.default.svc.cluster.local
  trafficPolicy:
    tls:
      mode: SIMPLE
Origin authentication
Source authentication, called end user authentication, is used to authenticate the original client requested as an end user or device. Istio enables raw authentication through JSON Web Token (JWT) authentication and open source OpenID connection providers such as Googe Auth, Auth0, or Firebase Auth.
In the case of raw authentication (JWT), the application itself is responsible for obtaining the JWT token and attaching it to the request.
Identity authentication policy
The authentication policy is used to specify the authentication requirements of services in the grid. Similarly, like traffic routing, Pilot monitors the changes of policy resources, and then converts the configuration and pushes it to Envoy agent.
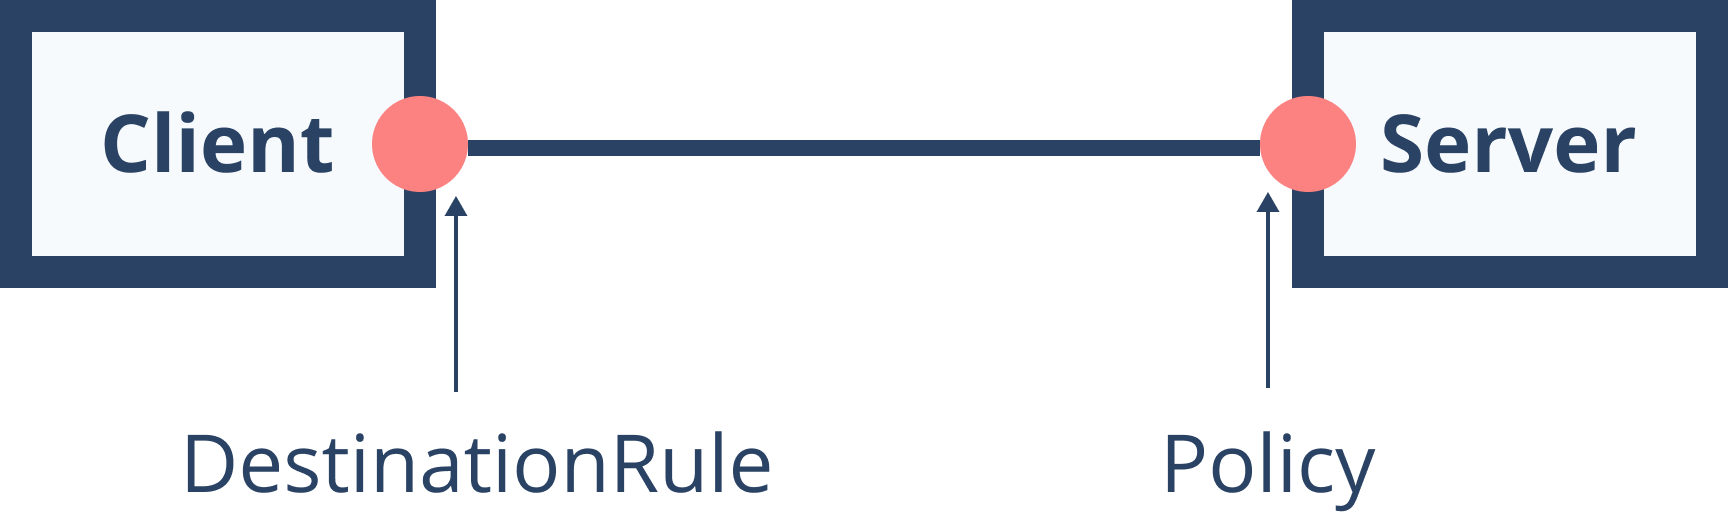
These policies define acceptable authentication methods (i.e., received requests). For outgoing requests, you can use the target rules described earlier in this blog. The following figure illustrates this:
Authentication policies can be defined in the two scopes explained below.
Namespace scoped policy
Namespace wide policies can only affect services running in the same namespace. In addition, you need to specify a namespace name, otherwise the default namespace will be used. The following is an example of a namespace policy for the prod namespace:
apiVersion: security.istio.io/v1beta1
kind: PeerAuthentication
metadata:
  name: default
spec:
  mtls:
    mode: STRICT
Grid wide strategy
Grid wide policies can be applied to all services in the grid. Only one grid wide Policy named default and one empty target part can be defined. One difference from namespace scoped policies is resource names. Namespace wide Policy resources are called "Policy", while grid wide Policy resources are called "MeshPolicy".
Target selector
In order to define the services affected by the policy, a target selector is used. The target selector is a list of rules for the selected service to which the policy applies. If no target selector is provided, the policy will be used for all services in the same namespace.
For example, the following namespace scope policy will apply to service a (regardless of port) and service b on port 8080:
apiVersion: authentication.istio.io/v1alpha1
kind: PeerAuthentication
metadata:
  name: sample-policy
  namespace: prod
spec:
  target:
  - name: service-a
  - name: service-b
    ports:
    - number: 8080
When there are multiple policies, they are evaluated from the narrowest matching policy (such as specific services) to the namespace and grid. If multiple policies apply to a service, select one at random.
Transmission authentication
The field named peers defines the authentication method and any parameters for that method. At the time of writing, the only supported authentication method is mtls. To enable it, use the mtls key (using the previous example):
apiVersion: authentication.istio.io/v1alpha1
kind: PeerAuthentication
metadata:
  name: sample-policy
  namespace: prod
spec:
  target:
  - name: service-a
  - name: service-b
    ports:
    - number: 8080
  peers:
    - mtls:
...
Source authentication
Currently, the only source authentication supported by Istio is JWT. Using the origins field, you can define methods and parameters, such as allowed JWT issuers and enabling or disabling JWT authentication for a specific path. This is an example fragment that shows how to define the original authentication to accept the JWT published by Google. In addition, we exclude the / health path from JWT authentication:
origins:
- jwt:
    issuer: https://accounts.google.com
    jwksUri: https://www.googleapis.com/oauth2/v3/certs
    trigger_rules:
    - excluded_paths:
      - exact: /health
Authorization
The authorization function can be used to enable access control for workloads in the grid. This policy supports ALLOW and DENY policies. If both ALLOW and DENY policies are used, the DENY policy is evaluated first. Each Envoy agent uses an authorization engine that decides whether to ALLOW or DENY requests at run time.
When the request arrives at the agent, the authorization engine evaluates the request and returns the authorization result - allow or reject. The strategy is evaluated in the following order:
-
If any DENY policy matches the request → reject the request
-
If the workload does not have an ALLOW policy → ALLOW requests
-
If any ALLOW policy matches the request → ALLOW the request
-
Reject request
There is no need to enable any authorization functions separately. It is sufficient to create and apply authorization policies for the workload. By default, if no authorization policy is defined, access control is not enforced and all requests are allowed.
The authorization policy is configured using the authorization policy resource. This resource includes a selector (target workload), an action (allow or deny), and a list of rules that specify when an action is triggered.
For example, with the following code snippet, you can apply the authorization policy to any workload with the tags app = greeter service and version=v2. Once the request reaches the Envoy agent of the workload, the authorization engine checks whether the traffic comes from the principal with the provided service account (helloweb), and whether the operation is GET and the x-user header is set to user-1. If all of these are met, the request is allowed, otherwise, the request is rejected.
apiVersion: security.istio.io/v1beta1
kind: AuthorizationPolicy
metadata:
 name: greeter-service
 namespace: default
spec:
 action: ALLOW
 selector:
   matchLabels:
     app: greeter-service
     version: v2
 rules:
 - from:
   - source:
       principals: ["cluster.local/ns/default/sa/helloweb"]
   to:
   - operation:
       methods: ["GET"]
   when:
   - key: request.headers[x-user]
     values: ["user-1"]
We specifically apply authorization policies to workloads labeled app: greeter service and version: v2. If we want to apply the policy to all workloads in the default namespace, we can simply omit the selector field as follows:
apiVersion: security.istio.io/v1beta1
kind: AuthorizationPolicy
metadata:
 name: greeter-service
 namespace: default
spec:
 rules:
 - from:
   - source:
       principals: ["cluster.local/ns/default/sa/helloweb"]
   to:
   - operation:
       methods: ["GET"]
   when:
   - key: request.headers[x-user]
     values: ["user-1"]
You can also define authorization policies that apply to all workloads in the service grid, regardless of the namespace. To do this, you need to create an AuthorizationPolicy in the root namespace. By default, the root namespace is istio system. If you need to change it, you must update the rootNamespace field in MeshConfig.
Value matching
You can use the following matching scheme for most fields in the authorization policy:
Exact: matches the exact string
Prefix: matches a string starting with the specified value [prefix] *. For example: "hello.world" matches "hello.world.blah", but not "blah.hello.world".
[suffix] matches the suffix value of the specified string. For example: "hello.world" matches "blah.hello.world", but not "hell.world.blah".
Presence: matches any value other than null (that is, we must provide a value, but as long as it is not empty, we don't care what it is).
Several fields are exempted and only exact matching is supported:
key field under when section
ipBlocks field under the source section
The ports field under the to section
The following is an example of how to configure any path under the allowed access / api, as long as it is a GET request:
apiVersion: security.istio.io/v1beta1
kind: AuthorizationPolicy
metadata:
 name: greeter-service
 namespace: default
spec:
  selector:
    matchLabels:
      app: greeter-service
  action: ALLOW
  rules:
   - to:
    - operation:
        methods: ["GET"]
        paths: ["/api/*"]
Value mismatch
In addition to including matches, Istio also supports match exclusion. This means that opposite conditions such as NotValue, notPorts, or notIpBlocks can be matched. The following code snippet allows requests that are not under the / private path:
apiVersion: security.istio.io/v1beta1
kind: AuthorizationPolicy
metadata:
 name: greeter-service
 namespace: default
spec:
  selector:
    matchLabels:
      app: greeter-service
  action: ALLOW
  rules:
   - to:
    - operation:
        notPaths: ["/private"]
Allow and deny
To create an authorization policy that allows full access to all workloads in the specified namespace, you can create a policy with an empty rule part, as follows:
apiVersion: security.istio.io/v1beta1
kind: AuthorizationPolicy
metadata:
  name: allow-all
  namespace: default
spec:
  action: ALLOW
  rules:
  - {}
Similarly, you can deny access to all workloads by using empty specification fields:
apiVersion: security.istio.io/v1beta1
kind: AuthorizationPolicy
metadata:
  name: deny-all
  namespace: default
spec:
  {}
case
To demonstrate security features, we will deploy Hello Web, Greeter services, and corresponding virtual services.
Deploy greeter deployment and service:
cat <<EOF | kubectl create -f -
apiVersion: apps/v1
kind: Deployment
metadata:
  name: greeter-service-v1
  labels:
    app: greeter-service
    version: v1
spec:
  replicas: 1
  selector:
    matchLabels:
      app: greeter-service
      version: v1
  template:
    metadata:
      labels:
        app: greeter-service
        version: v1
    spec:
      containers:
        - image: learnistio/greeter-service:1.0.0
          imagePullPolicy: Always
          name: svc
          ports:
            - containerPort: 3000
---
kind: Service
apiVersion: v1
metadata:
  name: greeter-service
  labels:
    app: greeter-service
spec:
  selector:
    app: greeter-service
  ports:
    - port: 3000
      name: http
EOF
Then, deploy Hello Web workloads and services:
cat <<EOF | kubectl create -f -
apiVersion: apps/v1
kind: Deployment
metadata:
  name: helloweb
  labels:
    app: helloweb
    version: v1
spec:
  replicas: 1
  selector:
    matchLabels:
      app: helloweb
      version: v1
  template:
    metadata:
      labels:
        app: helloweb
        version: v1
    spec:
      containers:
        - image: learnistio/hello-web:1.0.0
          imagePullPolicy: Always
          name: web
          ports:
            - containerPort: 3000
          env:
            - name: GREETER_SERVICE_URL
              value: 'http://greeter-service.default.svc.cluster.local:3000'
---
kind: Service
apiVersion: v1
metadata:
  name: helloweb
  labels:
    app: helloweb
spec:
  selector:
    app: helloweb
  ports:
    - port: 3000
      name: http
EOF
Finally, create a virtual service for Hello web so that we can access it through the gateway. Don't forget the deployment gateway steps mentioned in the third blog.
cat <<EOF | kubectl apply -f -
apiVersion: networking.istio.io/v1alpha3
kind: VirtualService
metadata:
  name: helloweb
spec:
  hosts:
    - '*'
  gateways:
    - gateway
  http:
    - route:
      - destination:
          host: helloweb.default.svc.cluster.local
          port:
            number: 3000
EOF
Open http://$GATEWAY and you should see the familiar Hello web and the response from the greeting service.
Let's issue an authorization policy that denies access to all workloads:
cat <<EOF | kubectl apply -f -
apiVersion: security.istio.io/v1beta1
kind: AuthorizationPolicy
metadata:
  name: deny-all
  namespace: default
spec: {}
EOF
With this configuration, we will deny access to all workloads in the default namespace.
Try refreshing http://$GATEWAY or running curl http://$GATEWAY. This time, it will not work and you will see the following error:
RBAC: access denied
To allow Hello Web services to call the Greeter service, we can update the authorization policy, which explicitly allows Hello Web services to make requests to the Greeter service.
Let's run the following command to delete the previous policy:
kubectl delete authorizationpolicy deny-all
Now we can create a new policy:
cat <<EOF | kubectl apply -f -
apiVersion: security.istio.io/v1beta1
kind: AuthorizationPolicy
metadata:
 name: greeter-service
 namespace: default
spec:
 selector:
  matchLabels:
    app: greeter-service
 rules:
  - to:
    - operation:
        methods: ["GET"]
EOF
If you try to revisit the site, you should be able to see the reply again. Note that caching can cause some latency.
Let's further tighten the service role and update the authorization policy so that we can only call the / hello path on it:
cat <<EOF | kubectl apply -f -
apiVersion: security.istio.io/v1beta1
kind: AuthorizationPolicy
metadata:
 name: greeter-service
 namespace: default
spec:
 selector:
  matchLabels:
    app: greeter-service
 rules:
  - to:
    - operation:
        methods: ["GET"]
        paths: ["*/hello"]
EOF
To test this, we'll get a shell in the Hello web container and use curl to make a request to the greeter service. First, let's calculate the name of Hello web pod by running kubectl get pod and then running exec command:
kubectl exec -it [podname] /bin/sh
In the container, let's install curl first:
apk add curl
We can now test the service role. If you run curl on the / hello path, everything will work as expected:
curl greeter-service.default.svc.cluster.local:3000/hello
{"message":"hello 👋 ","version":"1.0.0"}
However, if you make a request for the / version path, you will see a common error message:
curl greeter-service.default.svc.cluster.local:3000/version
RBAC: access denied
To clear everything, simply delete the authorization policy.
summary
In this blog, through several examples, understand how the service grid istio handles security issues and different functions used to define authorization policies.