In this section, we will learn how to deploy Spring Boot applications on Tomcat Server.
It consists of three steps:
- Set up Spring Boot application
- Create a Spring Boot WAR
- Deploy WAR to Tomcat
example
Let's create a Maven example to deploy on Tomcat
Set up Spring Boot application
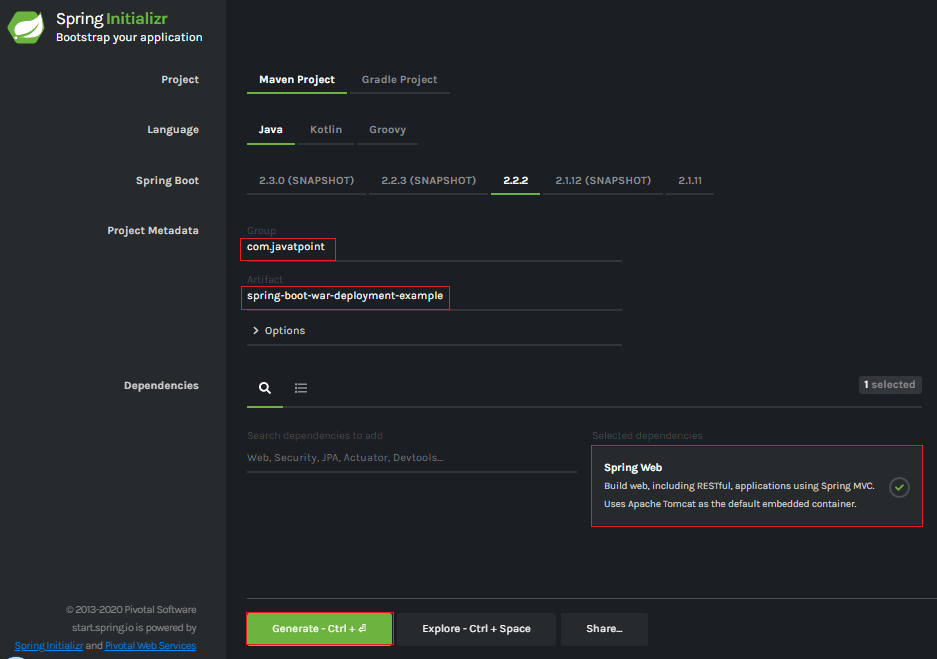
Step 1: open Spring Initializr http://start.spring.io.
Step 2: provide the group name. We offer com javatpoint.
Step 3: provide the workpiece ID. We provide spring boot War deployment example.
Step 4: add Spring Web dependencies.
<dependency>
<groupId>org.springframework.boot</groupId>
<artifactId>spring-boot-starter-web</artifactId>
</dependency>
Step 5: click the generate button. It wraps all the specifications related to the project and downloads the jar file in our local system.
Step 6: unzip the jar file.
Step 7: use the following steps to import the project folder:
File - > Import - > existing Maven project - > next - > Browse - > select project folder - > finish
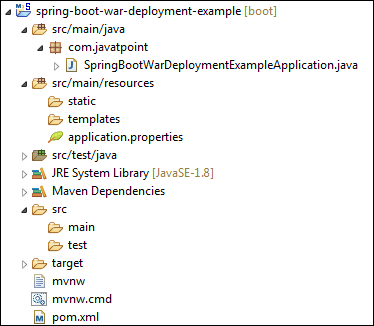
After importing the project, we can see the following directory structure in the Package Explorer part of the IDE.
Step 8: on COM Create a Controller class in the javatpoint package. We created a class called DemoRestController.
In the controller class, we define a method hello() that returns a string.
DemoRestController.java
package com.javatpoint;
import org.springframework.web.bind.annotation.GetMapping;
import org.springframework.web.bind.annotation.RestController;
@RestController
public class DemoRestController
{
@GetMapping("/hello")
public String hello()
{
return "Hello User, have a nice day.";
}
}
Step 9: add springbootwardeploymentexampleapplication Java files run as Java applications.
Step 10: open the browser and call the URL http://localhost:8080/hello .
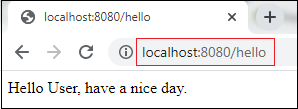
Note: before proceeding to the next step, make sure the application is running properly.
Create a Spring Boot WAR
It takes advantage of the Servlet 3.0 support of the Spring Framework and allows us to configure the application when the servlet container starts. There are three steps to creating a WAR for deployment:
- Extend the SpringBootServletInitializer class in the main class.
- Mark the embedded servlet container as provided.
- Update packaged jars to
Let's implement the above three steps in an application.
Step 11: open springbootwardeploymentexampleapplication Java file to initialize the Servlet Context required by Tomcat. To implement the same extension, the SpringBootServletInitializer interface.
public class SpringBootWarDeploymentExampleApplication extends SpringBootServletInitializer
{
}
Step 12: override the Configure method.
@Override
protected SpringApplicationBuilder configure(SpringApplicationBuilder application)
{
return application.sources(SpringBootWarDeploymentExampleApplication.class);
}
SpringBootWarDeploymentExampleApplication.java
package com.javatpoint;
import org.springframework.boot.SpringApplication;
import org.springframework.boot.autoconfigure.SpringBootApplication;
import org.springframework.boot.builder.SpringApplicationBuilder;
import org.springframework.boot.web.servlet.support.SpringBootServletInitializer;
@SpringBootApplication
public class SpringBootWarDeploymentExampleApplication extends SpringBootServletInitializer
{
@Override
protected SpringApplicationBuilder configure(SpringApplicationBuilder application)
{
return application.sources(SpringBootWarDeploymentExampleApplication.class);
}
public static void main(String[] args)
{
SpringApplication.run(SpringBootWarDeploymentExampleApplication.class, args);
}
}
Step 13: open POM XML file and mark the servlet container (Tomcat) as provided.
<dependency>
<groupId>org.springframework.boot</groupId>
<artifactId>spring-boot-starter-tomcat</artifactId>
<scope>provided</scope>
</dependency>
Step 14: we need to deploy the WAR file, so in POM Change the package type to WAR in the XML file.
<packaging>war</packaging>
Step 15: use the < finalname > tag to modify the final WAR file name to avoid including the version number. We created a WAR file called web services.
<finalName>web-services</finalName>
pom.xml
<?xml version="1.0" encoding="UTF-8"?>
<project xmlns="http://maven.apache.org/POM/4.0.0" xmlns:xsi="http://www.w3.org/2001/XMLSchema-instance"
xsi:schemaLocation="http://maven.apache.org/POM/4.0.0 http://maven.apache.org/xsd/maven-4.0.0.xsd">
<modelVersion>4.0.0</modelVersion>
<groupId>com.javatpoint</groupId>
<artifactId>spring-boot-war-deployment-example</artifactId>
<version>0.0.1-SNAPSHOT</version>
<packaging>war</packaging>
<name>spring-boot-war-deployment-example</name>
<description>Demo project for Spring Boot</description>
<parent>
<groupId>org.springframework.boot</groupId>
<artifactId>spring-boot-starter-parent</artifactId>
<version>2.2.2.RELEASE</version>
<relativePath/> <!-- lookup parent from repository -->
</parent>
<properties>
<project.build.sourceEncoding>UTF-8</project.build.sourceEncoding>
<project.reporting.outputEncoding>UTF-8</project.reporting.outputEncoding>
<java.version>1.8</java.version>
</properties>
<dependencies>
<dependency>
<groupId>org.springframework.boot</groupId>
<artifactId>spring-boot-starter-web</artifactId>
</dependency>
<dependency>
<groupId>org.springframework.boot</groupId>
<artifactId>spring-boot-starter-tomcat</artifactId>
<scope>provided</scope>
</dependency>
<dependency>
<groupId>org.springframework.boot</groupId>
<artifactId>spring-boot-starter-test</artifactId>
<scope>test</scope>
</dependency>
</dependencies>
<build>
<finalName>web-services</finalName>
 <plugins>
<plugin>
<groupId>org.springframework.boot</groupId>
<artifactId>spring-boot-maven-plugin</artifactId>
</plugin>
</plugins>
</build>
</project>
To build our Tomcat deployable WAR application, we execute the maven clean package. After that, our WAR file is in / target / abc Generated in WAR (where abc is assumed to be Artifact Id). We should consider that this new setting makes our Spring Boot application a non stand-alone application.
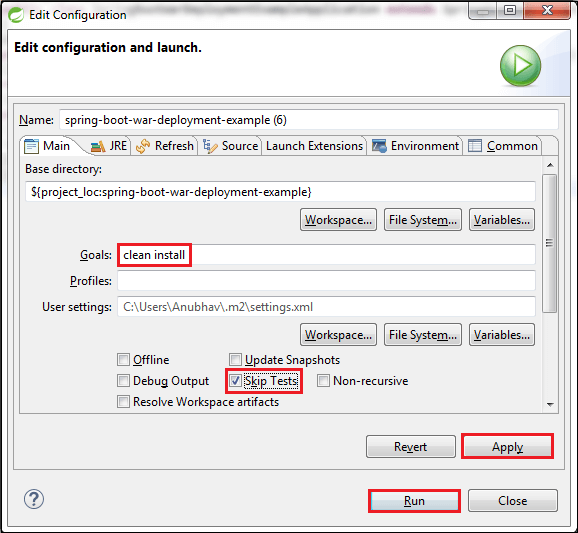
Step 16: use the following steps to create a WAR file:
Right click the project - > operation mode - > 5 Maven build
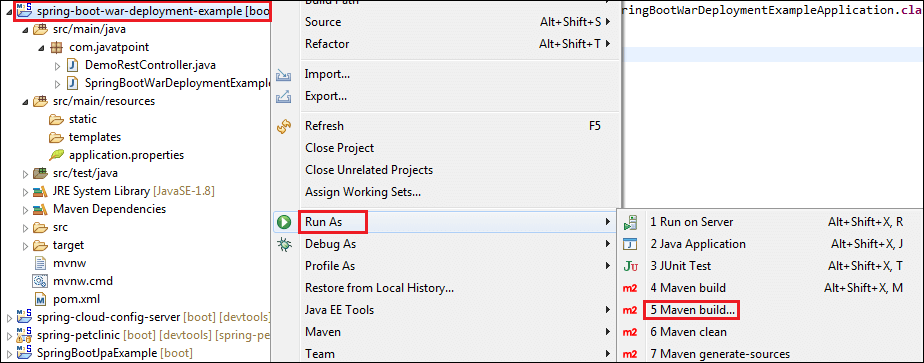
An edit configuration dialog box appears.
Step 17: write a new installation in the "target" tab and check "skip test". Click the apply and run buttons respectively.
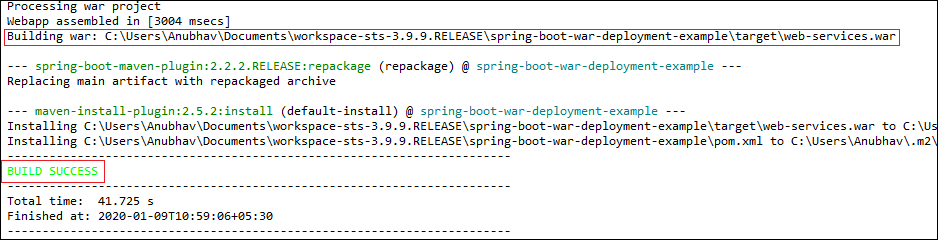
After the WAR file is created successfully, the WAR file path and BUILD SUCCESS message will be displayed on the console, as shown in the following figure.
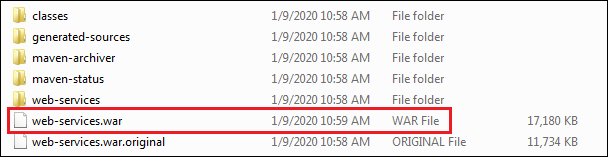
Step 18: copy the path and access the target folder of the application. We found in the target folder what we found in POM A WAR file with the same name as specified in the XML file. In our example, the path is:
- C:\Users\Anubhav\Documents\workspace-sts-3.9.9.RELEASE\spring-boot-war-deployment-example\target
Deploy the WAR file to Tomcat
To deploy a WAR file, perform the following steps:
Step 19: Download and install the Apache Tomcat server (if not installed).
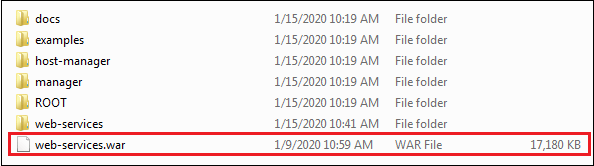
Step 20: copy the WAR file (web-services.war) and paste it into the webapps folder of Tomcat. In our example, the location of the webapps folder is:
- C:\Program Files\Apache Software Foundation\Tomcat 8.5\webapps
Step 21: now open the command prompt and type the following command:
- C:\Cd Program Files\Apache Software Foundation\Tomcat 8.5\bin
- C:\Cd Program Files\Apache Software Foundation\Tomcat 8.5\bin > start
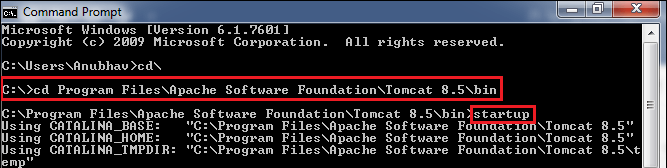
The startup command starts the Tomcat server and deploys the WAR file, as shown below.
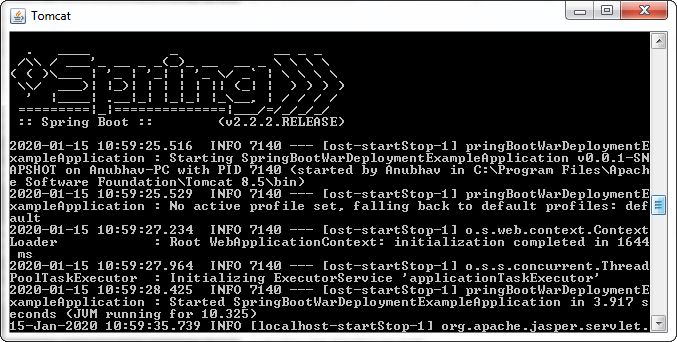
The following figure shows the successful deployment of WAR.

Step 23: open the browser and call the URL http://localhost:8080/web-services/hello. It returns the message Hello User, have a nice day.