nginx hidden version
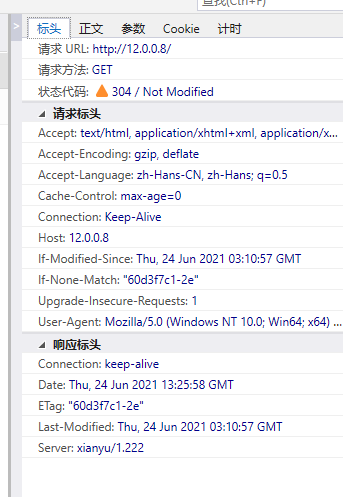
- Under normal circumstances, let's check the current nginx version number. curl can be used
[root@server nginx-1.15.9]# curl -I 12.0.0.8
HTTP/1.1 200 OK
Server: nginx/1.15.9
Date: Thu, 24 Jun 2021 12:39:22 GMT
Content-Type: text/html
Content-Length: 46
Last-Modified: Thu, 24 Jun 2021 03:10:57 GMT
Connection: keep-alive
ETag: "60d3f7c1-2e"
Accept-Ranges: bytes
We can hide the version number so that others can't see the version number of our nginx
Modify profile hide
vim /usr/local/nginx/conf/nginx.conf
http {
    include       mime.types;
    default_type  application/octet-stream;
    server_tokens off;	##Add a line to turn off the version number display
}
- After restarting the service, you can see that the version is not visible
[root@server nginx-1.15.9]# systemctl stop nginx.service
[root@server nginx-1.15.9]# systemctl start nginx.service
[root@server nginx-1.15.9]# curl -I 12.0.0.8
HTTP/1.1 200 OK
Server: nginx
Date: Thu, 24 Jun 2021 12:42:38 GMT
Content-Type: text/html
Content-Length: 46
Last-Modified: Thu, 24 Jun 2021 03:10:57 GMT
Connection: keep-alive
ETag: "60d3f7c1-2e"
Accept-Ranges: bytes
Modify the hidden version number of the source code
- Enter the source file to modify the configuration
#define nginx_version      1015009
#define NGINX_VERSION      "1.222"
#define NGINX_VER          "xianyu/" NGINX_VERSION
- Then perform recompilation again
cd /opt/nginx-1.12.0
./configure \
--prefix=/usr/local/nginx \
--user=nginx \
--group=nginx \
--with-http_stub_status_module

make && make install
- Enter the configuration file and change the hidden version number option to on
vim /usr/local/nginx/conf/nginx.conf
http {
    include       mime.types;
    default_type  application/octet-stream;
    server_tokens on;
}
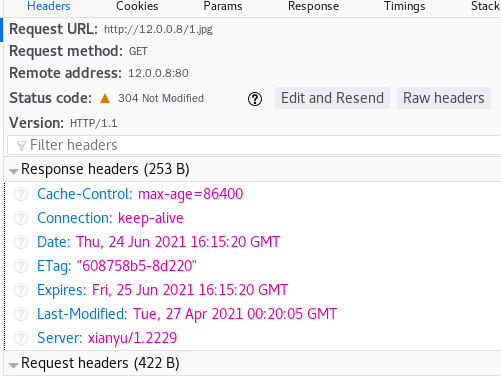
- Restart the configuration, then check the version and find that the version is changed to what you want to change
systemctl stop nginx.service
systemctl start nginx.service
[root@server nginx-1.15.9]# curl -I 12.0.0.8
HTTP/1.1 200 OK
Server: xianyu/1.222
Date: Thu, 24 Jun 2021 12:52:23 GMT
Content-Type: text/html
Content-Length: 46
Last-Modified: Thu, 24 Jun 2021 03:10:57 GMT
Connection: keep-alive
ETag: "60d3f7c1-2e"
Accept-Ranges: bytes
Set cache time
- Modify master profile
vim /usr/local/nginx/conf/nginx.conf
http {
    include       mime.types;
    default_type  application/octet-stream;
    server_tokens on;
    ......
    location ~ \.(gif|jpg|jepg|bmp|ico)$ {  //Matching picture formats
            root html;
            expires 1d;		//Set to one day
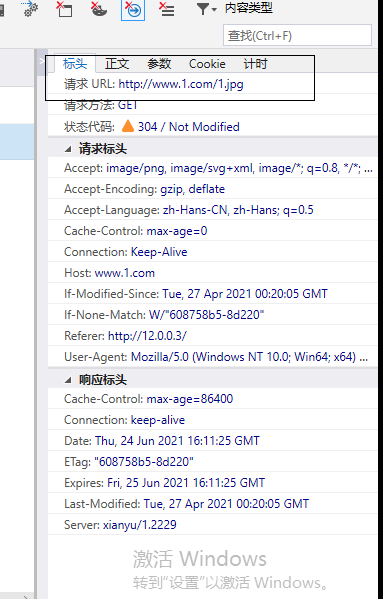
- Upload 1 Jpg pictures, modify site files
cd /usr/local/nginx/html
[root@server html]# ls
1.jpg  50x.html  bbs  index.html  index.php
vim index.html
<h1>Welcome to nginx!</h1>
<img src="1.jpg"/>
- Then test it. You can see the picture and f12 can see the details

Log segmentation
- Log segmentation needs to be controlled by writing a script
vim /opt/fenge.sh
#!/bin/bash
#Filename:fenge.sh
d=$(date -d "-1 day" "+%Y%m%d")  #Displays the time of the previous day, followed by second minute hour day month year
logs_path="/var/log/nginx"  	#Specify the path where the log is saved
pid_path="/usr/local/nginx/logs/nginx.pid"  #Specify the pid of nginx
[ -d $logs_path ] || mkdir -p $logs_path   	#Determine whether the log file exists
mv /usr/local/nginx/logs/access.log ${logs_path}/test.com-access.log-$d  #Move the generated new log to the created file
kill -HUP $(cat $pid_path)  	#Smooth restart service
find $logs_path -mtime +30 | xargs rm -rf 	#Find the file modified 30 days ago and delete it
- Execute the script and view the log generation
[root@server opt]# chmod +x fenge.sh
[root@server opt]# ./fenge.sh
[root@server opt]# cd /var/log/nginx/
[root@server nginx]# ls
test.com-access.log-20210623
- When the time is changed, the log is generated again
[root@server nginx]# date -s 20210625
2021 Friday, June 25, 2000 00:00:00 CST
[root@server opt]# ls /var/log/nginx/
test.com-access.log-20210623  test.com-access.log-20210624
- Life cycle task control
 crontab -e
 0 1 * * * /opt/fenge.sh  //Every hour
connection timed out
- Modify keepalive_timeout to modify the timeout. If it is set to 0, it means to prohibit the connection and enter the main configuration file for modification
vim /usr/local/nginx/conf/nginx.conf
	 keepalive_timeout  60; //The default connection timeout is 65s
  	 client_header_timeout 80;	//Timeout waiting for the client to send the request header. Timeout will send 408 error
  	 client_body_timeout 80;  //Timeout of the request body to be sent by the client
[root@server opt]# nginx -t
nginx: the configuration file /usr/local/nginx/conf/nginx.conf syntax is ok
nginx: configuration file /usr/local/nginx/conf/nginx.conf test is successful
The number of processes can be changed
- Let's check the number of CPU cores with the command first
[root@server opt]# cat /proc/cpuinfo | grep -c "physical id"
4
- Current processes
[root@server opt]# ps aux | grep nginx
root      37476  0.0  0.0  20704  1496 ?        Ss   00:08   0:00 nginx: master process /usr/local/nginx/sbin/nginx
nginx     37486  0.0  0.0  23240  1796 ?        S    00:08   0:00 nginx: worker process
root      37688  0.0  0.0 112724   984 pts/2    S+   00:19   0:00 grep --color=auto nginx
- Now modify the parameters in the main configuration file to increase the process
worker_processes  4;		//Start four processes
worker_cpu_affinity 0001 0010 0100 1000;	//Corresponding to four CPUs
- Restart the service and look at the process. It is found that the process has become four
[root@server opt]# nginx -t
nginx: the configuration file /usr/local/nginx/conf/nginx.conf syntax is ok
nginx: configuration file /usr/local/nginx/conf/nginx.conf test is successful
[root@server opt]# systemctl stop nginx.service
[root@server opt]# systemctl start nginx.service
[root@server opt]# ps aux | grep nginx
root      37759  0.0  0.0  20568   648 ?        Ss   00:22   0:00 nginx: master process /usr/local/nginx/sbin/nginx
nginx     37760  0.0  0.0  23108  1416 ?        S    00:22   0:00 nginx: worker process
nginx     37761  0.0  0.0  23108  1412 ?        S    00:22   0:00 nginx: worker process
nginx     37762  0.0  0.0  23108  1416 ?        S    00:22   0:00 nginx: worker process
nginx     37763  0.0  0.0  23108  1416 ?        S    00:22   0:00 nginx: worker process
root      37767  0.0  0.0 112724   984 pts/2    S+   00:23   0:00 grep --color=auto nginx
Web page compression
- Enter the main configuration file to configure relevant parameters
vim /usr/local/nginx/conf/nginx.conf
   gzip on;                  #Enable gzip compression
   gzip_min_length 1k;       #Compression threshold
   gzip_buffers 4 16k;       #The buffer size is 4 16k buffers
   gzip_comp_level 6;        #Compression ratio, minimum 1, fast processing speed and slow transmission speed, maximum 9 compression ratio, slow processing speed and fast transmission speed (recommended 5-6)
   gzip_types text/plain application/x-javascript text/css image/jpg image/jpeg image/png image/gif application/xml text/javascript application/x-httpd-php application/javascript application/json;   #Compression type
   gzip_disable "MSIE [1-6]\.";  #Configure gzip disable condition
   gzip_vary on;  #Support the front-end cache server to store compressed pages
- Test it with a web page

Anti theft chain
- Three machines are used here, namely, the stealing chain end, and the server end is linux platform and client win0
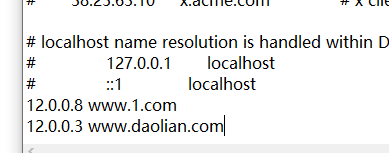
- First, add host mapping on two linux
vim /etc/hosts
12.0.0.8 www.1.com
- win10 also needs to be mapped, and you need to open all the permissions of the hosts file to modify it
C:\WINDOWS\System32\drivers\etc
- Using win10 to access the server

- Set the stealing chain at the stealing chain end
[root@localhost ~]# cd /usr/local/nginx/html/
[root@localhost html]# ls
[root@localhost html]# vim index.html
 <h1>Welcome to nginx!</h1>
<img src="http://www.1.com/1.jpg"/>
- Then visit the stolen chain website in win10

- Prevent chain theft and modify the nginx configuration file of the server host
[root@server html]# vim /usr/local/nginx/conf/nginx.conf
location ~*\.(jpg|gif|swf)$ {
            valid_referers none blocked *.dog.com dog.com;			#Only access sources with local sources are allowed
            if ( $invalid_referer ) {
               rewrite ^/ http://www.1.com/2.jpg;
            }
        }
[root@server html]# nginx -t
nginx: the configuration file /usr/local/nginx/conf/nginx.conf syntax is ok
nginx: configuration file /usr/local/nginx/conf/nginx.conf test is successful
- Then you can see the jump


fpm optimization
-
fpm has two process modes:
static: a fixed number of fpm processes will be generated
Parameter: PM max_ Children: Specifies the number of processes to start
Dynamic: generate fpm process in a dynamic way
Parameter: PM max_ Children: Specifies the maximum number of processes to start
pm.start_servers: initial number of m processes in dynamic mode
pm.min_spare_servers: minimum number of fpm idle processes in dynamic mode
pm.max_spare_servers: maximum number of fpm idle processes in dynamic mode -
Configure master profile
pid = run/php-fpm.pid	//Enable pid support
pm = dynamic
pm.start_servers = 5 //The number of processes opened by default in dynamic mode is generally between the maximum and minimum
pm.min_spare_servers = 2 //Dynamic mode minimum idle processes
pm.max_spare_servers = 8 //Maximum number of empty advanced passes in dynamic mode