Agile development of microservices is not simple
There are thousands of sets of safe environment, and the little brothers of Dabai development are laughing
Microservices bring us the characteristics of agile development. Based on the convenience of agile development, we can develop multiple iterations / features in parallel at the same time. However, the microservice architecture itself also brings some complexity to the development environment: the modification points of each feature may be scattered in multiple applications, and multiple applications need to cooperate with each other to complete the overall logic. These applications need to cooperate well with each other, but they can't influence each other, so agile development is sometimes not so easy.
I believe that students who have practiced agile development of micro services have encountered the following situations:
a. When developing interfaces, applications cannot conduct joint debugging and testing independently and need to rely on downstream returns. Therefore, a complete development environment is generally required, which needs to include all other applications.
b. Classmate a worked hard and finally developed an interface, but after deploying to the development environment, he found that the return value was always wrong, that is, it didn't meet the expectation and couldn't understand it. Finally, according to the log and arthas, it was found that another colleague updated the code of the downstream application, resulting in the change of the original logic.
c. Classmate a is ready to start the joint debugging and testing. At this time, he needs to find developer B and C and roar and confirm: "I'm going to start the testing, brothers, don't move the environment, don't restart and debug". Classmate B and classmate C looked confused and forced: "I still have a logic that I don't understand. Just after changing the code and preparing to test, I can't move the environment for your test joint debugging. When can I develop this function?".
d. It's troublesome to check the problem. Why don't you debug it directly? As soon as the IDEA remote debug was connected, a colleague's voice came: "who XX is blindly moving the environment? How can the interface that just ran make mistakes now".
These problems will obviously affect the progress of the project and easily cause project delay. For the little brother of development at the moment, having his own independent environment may bring more happiness than having his own small house.
Traffic closed loop is the basis of agile development of microservices
The problems mentioned above are actually due to the fact that the flow is not accurately controlled in the feature environment in the development environment.
Why is accurate flow control so important? Take the simplest microservice architecture diagram to illustrate. Here, it is assumed that the calling link of the application is A -- > B -- > C -- > D. now, two features, feature1 and feature2, are developed at the same time. Feature1 needs to modify the codes of A and C, and feature2 needs to modify the codes of B, C and D.
For convenience, we use a, B, C and D to refer to the online stable version of a, B, C and D, also known as the baseline version; A1 and C1 refer to a and C in feature1 environment; B2, C2 and D2 refer to B, C and D in feature2 environment.
Then the students who develop and test feature1 will ask his request to flow accurately in A1 -- > B -- > C1 -- > D. Why is this necessary? Let's briefly analyze:
A. If the traffic reaches the baseline environment of A or C, because they do not contain the code related to feature1, it must be impossible to test and debug the functions corresponding to feature1 normally.
b. If the traffic flows to B2 and D2 environment, it can work normally in most cases, because under normal circumstances, the modifications in B2 and D2 will not affect feature1. However, because feature1 and feature2 may be developed by different students, or have different development schedules and rhythms, and they have their own development, restart and debug rhythms, the scenarios mentioned above will still appear.
To sum up, it is very important to let the traffic flow in the feature environment, which is the basis of micro service agile development.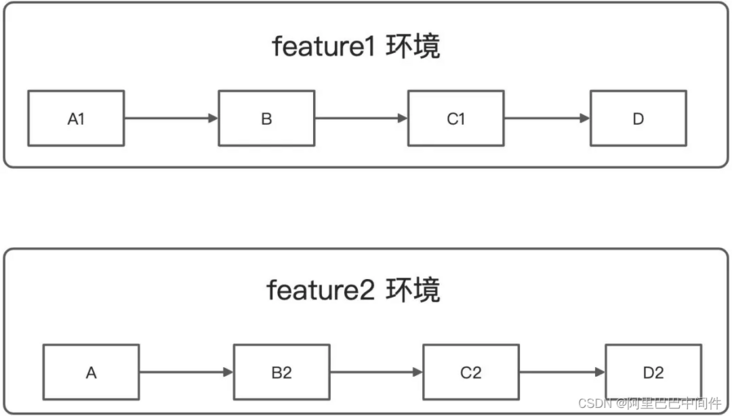
How to accurately make requests flow in the Feature environment? The simplest way is that each iteration / Feature enjoys an independent and complete environment, which includes all applications of the whole microservice application set, including the registry and access layer, so as to ensure that the traffic is closed-loop in the Feature environment without worrying about the interaction between applications.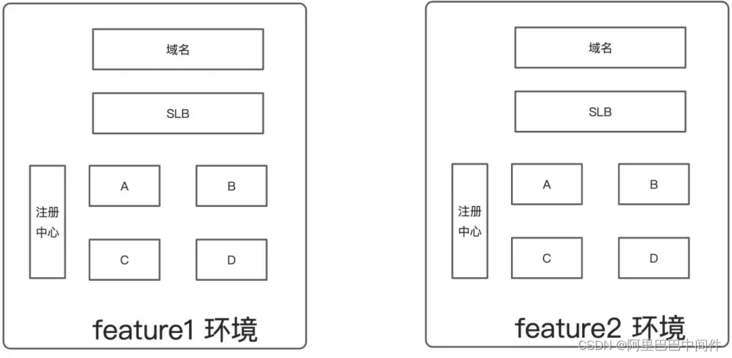
Although this solution is simple, the problem is also obvious and the cost is relatively large. We assume that there are 10 microservice applications, and only one is deployed for each application. Taking java as an example, the cost of deploying a java application is calculated according to the 2C4G shared standard ECS. The cost of maintaining a set of environment for one year is 10 × one hundred and forty × 12 = 16800 yuan. If there are four sets of environments at the same time, that is, only two iterations are supported for parallel development, and each iteration has only two feature s, the cost of one year is 67200 yuan. Moreover, we can find that the calculation formula uses multiplication. When the application and environment increase, the cost increases exponentially.
Note that the cost of ECS used by the application is only calculated here. We haven't calculated other surrounding supporting facilities yet, because our development, joint commissioning and testing need to ensure that the whole process of end-to-end is smooth enough. Then, domain name / SLB / gateway / registry resources will also be involved here. These resources are generally fixed, There will be no need for major modifications, but under the scheme of multiple environments, these resources also need to maintain multiple sets, and the cost will rise further.
So, is there an elegant place that can not only enjoy the convenience of agile development brought by microservice architecture, but also bring great cost to the construction of daily development environment? Based on the label routing function of MSE (micro service engine MSE, hereinafter referred to as MSE), using the development environment isolation scheme is your best choice.
How to play agile development at low cost
What is MSE development environment isolation? In short, it is to change the isolation mode of feature environment from simple physical isolation to logical isolation. With the logical isolation provided by MSE, you only need to maintain a complete baseline environment. When adding a feature environment, you only need to deploy the changed applications involved in the feature separately, instead of deploying a complete set of microservice applications and supporting facilities in each feature environment.
We call this only complete set of environments the baseline environment. The baseline environment includes all micro service applications, as well as service registry, domain name, SLB, gateway and other facilities, while the feature environment only includes the applications that need to be modified in this feature. In this way, the cost of maintaining the environment of N sets of features becomes addition instead of the original multiplication, which is determined by n × m becomes n + m. It is almost equivalent to increasing the feature environment at zero cost, so that we can safely expand multiple sets of feature environments. Each development brother can easily have his own independent environment and enjoy the agile development of micro services.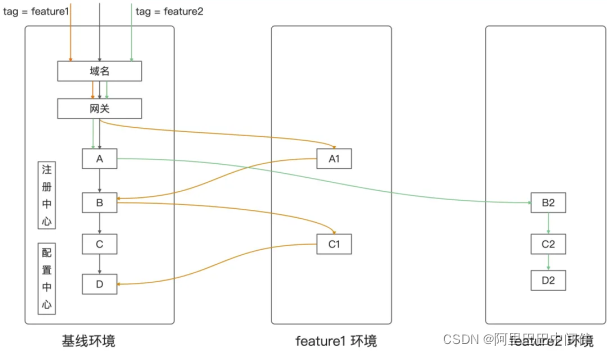
From the above figure, we can see that the traffic corresponding to feature1 will go to node A1 when it is found that there is an A1 application in feature1. When A1 calls B, if it is found that B1 does not exist in feature1 environment, it will send the request to B of the baseline version; When calling C, B finds that there is C1 application in feature1 environment, and will return to feature1 environment, and so on to ensure that the traffic will be closed-loop in feature1 environment.
Note that in this process, you do not need to modify any code and configuration. You can directly access MSE microservice governance and use it without adding any development cost to you.
How to use MSE development environment isolation
Scene analysis
Before describing how to use development environment isolation, let's first analyze the specific scenarios of commonly used development environments. Here are three typical scenarios.
Scene 1
All development environments are local, or IDC built in the company. In such scenarios, all applications of the development environment are deployed in the local computer room.
Scene 2
The company connects the office network with the VPC on Alibaba cloud through a dedicated line, and the networks on both sides are interconnected.
The development and testing environment is mainly deployed in Alibaba cloud, but some of the projects under development are running on the local office network, or even directly on the personal computers of development colleagues.
Scene 3
There is no dedicated line in the company to connect the office network with the VPC on Alibaba cloud.
However, it is hoped that locally launched applications can be connected to the development and test cluster on Alibaba cloud, and accurate traffic isolation can be achieved.
First of all, let's talk about the conclusion. The above three scenarios can be fully supported at present. Neither scenario 1 nor scenario 2 involves the content of network connection. In fact, it can be directly used only according to the basic MSE access method and MSE marking method.
Scenario 3 has one more network connection function than scenario 1 and scenario 2, so there will be one more step of end cloud interconnection, which requires the registry to use the Nacos provided by MSE.
In this best practice, we will practice with scenario 3. If your usage scenario is not scenario 3, you can ignore it and don't need to pay attention to the operations related to end cloud interconnection.
1, Open MSE micro Service Management Professional Edition
Sign in MSE governance center console , if you have not opened MSE microservice governance, please open professional version according to the prompt. If you have opened the basic version of MSE microservice governance, please upgrade to the professional version according to the prompt on the right side of the overview page.
2, Complete baseline environment access
1. Access MSE governance
First, you need to connect all applications in the baseline environment to MSE. The access method is related to the application deployment environment in your development environment. Here we use Alibaba cloud container service ACK. For more access scenarios, please refer to the MSE help document MSE microservice governance quick start.
- Install MSE governance center component in ACK
a. Login Container service console.
b. Click catalog > market navigation on the left.
c. Search the application directory page and click ack MSE pilot.
d. Select a cluster from the cluster list on the right side of the ACK MSE pilot page, and then click create.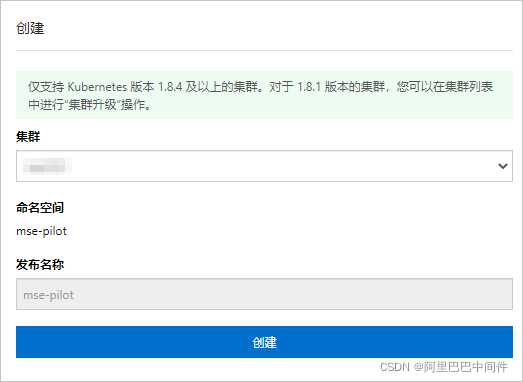
It takes about 2 minutes to install MSE microservice governance component. Please wait patiently.
After the creation is successful, it will automatically jump to the publishing page of the target cluster to check the installation results. If the following page shows the relevant resources, the installation is successful.
- Enable MSE microservice governance for applications in ACK namespace
a. Login MSE governance center console.
b. Select microservice governance center > k8s cluster list in the left navigation bar.
c. Select the cluster name or cluster ID in the search box list on the K8s cluster list page, then enter the corresponding keyword and click 🔍 Icon.
d. Click Manage in the target cluster operations column.
e. In the namespace list area of the cluster details page, click open microservice governance under the target namespace operation column. (if your baseline environment is deployed in the default namespace, the target namespace is default)
f. Click OK in the open microservice governance dialog box
2. Deploy baseline application
First, we will deploy spring-cloud-zuul, spring-cloud-a, spring-cloud-b and spring-cloud-c respectively to simulate a real call link.
The structure diagram of Demo application is shown in the figure below. The calls between applications include both Spring Cloud calls and Dubbo calls, covering the two most commonly used microservice frameworks on the market. These applications are the simplest standard usage of Spring Cloud and Dubbo. You can also directly https://github.com/aliyun/ali... View the source code on the project.
You can deploy applications using kubectl or directly using the ACK console. The yaml file used for deployment is as follows.
Note that as mentioned above, the premise of using end cloud interconnection is that the registry uses Nacos in MSE, so please modify spring. Com in yaml file before deployment cloud. nacos. discovery. Server addr and Dubbo registry. Address is the MSE Nacos address you purchased, otherwise the application will not work normally. If you are using the MSE Nacos domain name, which is a public domain name, you also need to ensure that the white list is opened.
# Deploy business applications
# Deploy business applications
---
apiVersion: apps/v1
kind: Deployment
metadata:
  name: spring-cloud-zuul
spec:
  selector:
    matchLabels:
      app: spring-cloud-zuul
  template:
    metadata:
      annotations:
        msePilotCreateAppName: spring-cloud-zuul
      labels:
        app: spring-cloud-zuul
    spec:
      containers:
        - env:
            - name: JAVA_HOME
              value: /usr/lib/jvm/java-1.8-openjdk/jre
            - name: spring.cloud.nacos.discovery.server-addr
              value: 'mse-xxxxxxx-nacos-ans.mse.aliyuncs.com:8848'
          image: registry.cn-shanghai.aliyuncs.com/yizhan/spring-cloud-zuul:1.0.0
          imagePullPolicy: Always
          name: spring-cloud-zuul
          ports:
            - containerPort: 20000
---
apiVersion: v1
kind: Service
metadata:
  annotations:
    service.beta.kubernetes.io/alibaba-cloud-loadbalancer-spec: slb.s1.small
    service.beta.kubernetes.io/alicloud-loadbalancer-address-type: internet
  name: zuul-slb
spec:
  ports:
    - port: 80
      protocol: TCP
      targetPort: 20000
  selector:
    app: spring-cloud-zuul
  type: LoadBalancer
status:
  loadBalancer: {}
---
apiVersion: apps/v1
kind: Deployment
metadata:
  name: spring-cloud-a
spec:
  selector:
    matchLabels:
      app: spring-cloud-a
  template:
    metadata:
      annotations:
        msePilotCreateAppName: spring-cloud-a
      labels:
        app: spring-cloud-a
    spec:
      containers:
        - env:
            - name: JAVA_HOME
              value: /usr/lib/jvm/java-1.8-openjdk/jre
            - name: spring.cloud.nacos.discovery.server-addr
              value: 'mse-xxxxxxx-nacos-ans.mse.aliyuncs.com:8848'
            - name: dubbo.registry.address
              value: 'nacos://mse-xxxxxxx-nacos-ans.mse.aliyuncs.com:8848'
          image: registry.cn-shanghai.aliyuncs.com/yizhan/spring-cloud-a:1.0.0
          imagePullPolicy: Always
          name: spring-cloud-a
          ports:
            - containerPort: 20001
          livenessProbe:
            tcpSocket:
              port: 20001
            initialDelaySeconds: 10
            periodSeconds: 30
---
apiVersion: apps/v1
kind: Deployment
metadata:
  name: spring-cloud-b
spec:
  selector:
    matchLabels:
      app: spring-cloud-b
  template:
    metadata:
      annotations:
        msePilotCreateAppName: spring-cloud-b
      labels:
        app: spring-cloud-b
    spec:
      containers:
        - env:
            - name: JAVA_HOME
              value: /usr/lib/jvm/java-1.8-openjdk/jre
            - name: spring.cloud.nacos.discovery.server-addr
              value: 'mse-xxxxxxx-nacos-ans.mse.aliyuncs.com:8848'
            - name: dubbo.registry.address
              value: 'nacos://mse-xxxxxxx-nacos-ans.mse.aliyuncs.com:8848'
          image: registry.cn-shanghai.aliyuncs.com/yizhan/spring-cloud-b:1.0.0
          imagePullPolicy: Always
          name: spring-cloud-b
          ports:
            - containerPort: 20002
          livenessProbe:
            tcpSocket:
              port: 20002
            initialDelaySeconds: 10
            periodSeconds: 30
---
apiVersion: apps/v1
kind: Deployment
metadata:
  name: spring-cloud-c
spec:
  selector:
    matchLabels:
      app: spring-cloud-c
  template:
    metadata:
      annotations:
        msePilotCreateAppName: spring-cloud-c
      labels:
        app: spring-cloud-c
    spec:
      containers:
        - env:
            - name: JAVA_HOME
              value: /usr/lib/jvm/java-1.8-openjdk/jre
            - name: spring.cloud.nacos.discovery.server-addr
              value: 'mse-xxxxxxx-nacos-ans.mse.aliyuncs.com:8848'
            - name: dubbo.registry.address
              value: 'nacos://mse-xxxxxxx-nacos-ans.mse.aliyuncs.com:8848'
          image: registry.cn-shanghai.aliyuncs.com/yizhan/spring-cloud-c:1.0.0
          imagePullPolicy: Always
          name: spring-cloud-c
          ports:
            - containerPort: 20003
          livenessProbe:
            tcpSocket:
              port: 20003
            initialDelaySeconds: 10
            periodSeconds: 30
3. Verify that the baseline environment is connected successfully
After completing the above steps, your baseline environment is already deployed. You can find the corresponding Region in the MSE console to view the application list and the nodes on the application details page.
Configure the kubeconfig file corresponding to the K8s cluster locally and execute the command. The results are as follows
➜  ~ kubectl get svc,deploy
NAME                 TYPE           CLUSTER-IP      EXTERNAL-IP    PORT(S)        AGE
service/kubernetes   ClusterIP      192.168.0.1              443/TCP        7d
service/zuul-slb     LoadBalancer   192.168.87.95   47.94.143.53   80:31983/TCP   9m30s
NAME                                READY   UP-TO-DATE   AVAILABLE   AGE
deployment.apps/spring-cloud-a      1/1     1            1           9m30s
deployment.apps/spring-cloud-b      1/1     1            1           9m30s
deployment.apps/spring-cloud-c      1/1     1            1           9m30s
deployment.apps/spring-cloud-zuul   1/1     1            1           9m30s
Here we execute curl http://47.94.143.53:80/A/a Initiate the call and view the returned results
➜  ~ curl http://47.94.143.53:80/A/a
A[10.242.0.90] -> B[10.242.0.91] -> C[10.242.0.152]%
3, The application launched by IDEA accesses the feature environment
In this step, we will demonstrate how to connect your locally launched application to the feature environment when the network is not connected. First, you need to save the kubeconfig file of your K8s cluster to the local machine, and do the following operations.
- Download source code
All source codes of this project are in https://github.com/aliyun/ali... The public beta used in this best practice is to send the code git clone locally and find four applications A, B, C and gateway in the MSE simple demo folder. - Install the CloudToolkit plug-in
Install the latest version of Cloud Toolkit. Please refer to the official website for installation details https://www.aliyun.com/produc.... - Fill in Alibaba cloud AK and SK
Since you need to access your MSE resources when using the end cloud interconnection function, you need to fill in your AK and SK here and ensure that these AK and SK have the permission to access MSE resources.
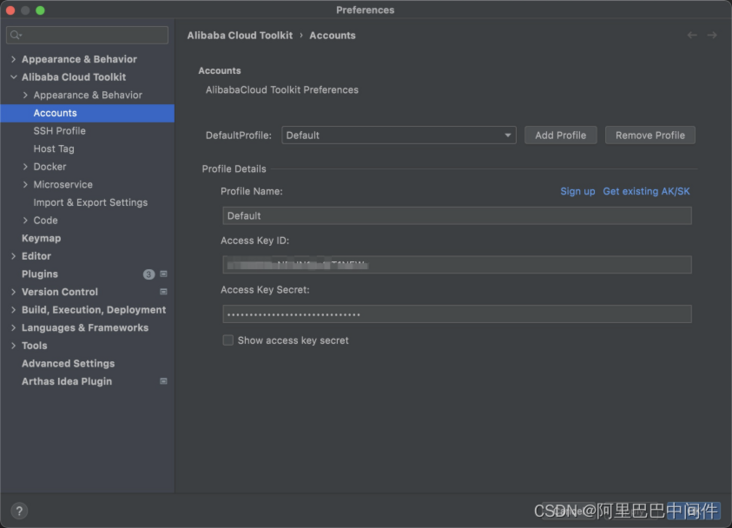
Click Tools in IDEA to find Preference, find Accounts in Alibaba Cloud Toolkit, configure Access Key ID and Access Key Secret information, and click save.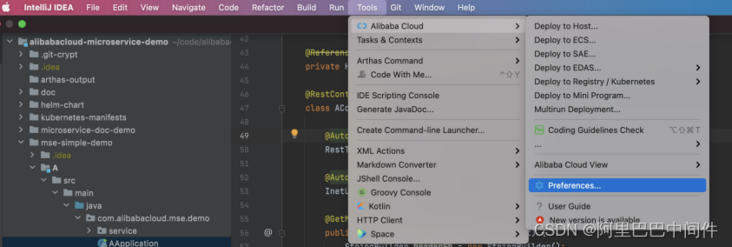
- Configure MSE parameters
Click Tools in IDEA to find Preference and MSE under Microservice in Alibaba Cloud Toolkit. Click to open Microservice governance and install it as shown in the following figure for configuration.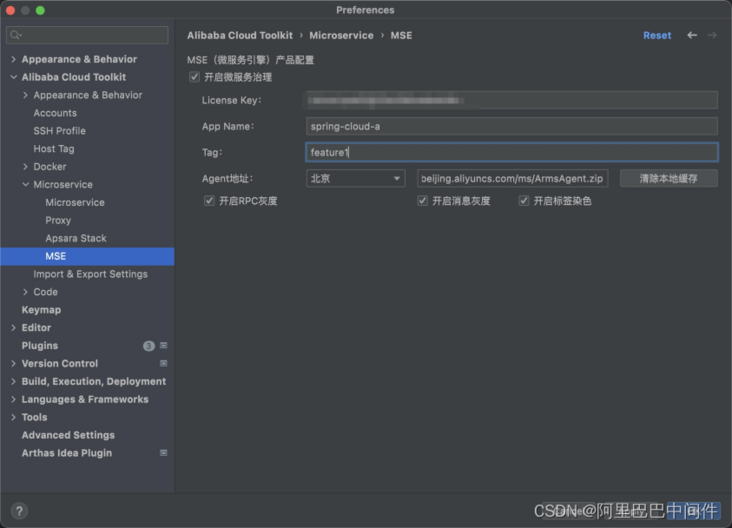
Explain several parameters in the figure
- LicenseKey
The LicenseKey of the MSE product corresponding to your alicloud account, please https://mse.console.aliyun.co... Select ECS cluster in and find the value of LicenseKey in the chapter of installing MSE Agent.
Note: please keep the LicenseKey confidential.
Note: the LicenseKey value of each Region may be inconsistent. Please select the corresponding Region and keep it consistent with the Region accessed by the baseline environment. - App Name
Please configure the application name used by the application when accessing MSE according to the actual business situation. Note that this value should be consistent with the application started this time. - Tag
For the environment Tag of this application, the baseline need not be filled in, and others should be filled in according to the actual business situation. If this application belongs to feature1 environment, please fill in feature1. - Agent address
Select the region where your application is located, which should be consistent with the region where LienseKey is located and the region where the baseline environment is accessed. - Turn on RPC grayscale ✅
It supports accurate control of the traffic of all versions of Spring Cloud and Dubbo in recent 5 years. Please turn it on by default. Do not turn it off unless you know the usage scenario of turning it off. - Turn on label dyeing ✅
It is recommended to open it. After opening, the traffic passing through this application will only flow in the corresponding Tag environment. - Turn on message grayscale ✅
Please choose whether to enable it according to the actual business situation. At present, only rocketmq version 4.5 and above are supported. For more information about message grayscale, please refer to the full link grayscale message section.
5. Configure end cloud interconnection parameters
We already know that when the network is not connected, China Unicom's local environment and K8s cluster on the cloud need to use the end cloud interconnection function, so we need to configure a end cloud interconnection here.
First, you need to configure the Proxy mode as k8s, click Tools in IDEA to find Preference, find the Proxy under Microservice in Alibaba Cloud Toolkit, and click Add profile to add a Proxy named k8s. Then click the Add button on the right, select the agent type as Kubernetes, and select the correct configuration file address and namespace.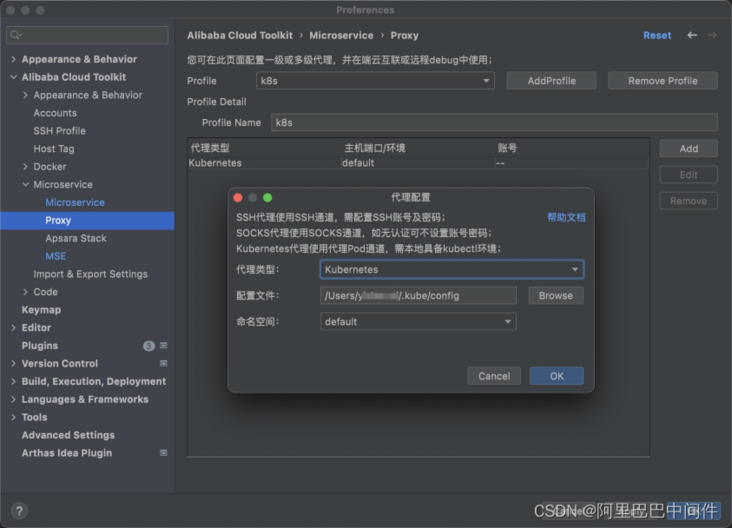
Then, click IDEA of Tools Found in Preference ,find Alibaba Cloud Toolkit in Microservice Lower MicroService ,Find the end cloud interconnection function and call ✅. Select product as micro service engine MSE,And select the one consistent with the deployment above Region , Instance and namespace. The agent selects the one just configured k8s,If your app is Spring Cloud Applications must also be local Spring Cloud Configuration in service port Tomcat Boot port for. 
IV. start the application and start the joint debugging and testing easily
- Verify successful access
After completing the above configuration, we start the application. First, when you start the application, you will see these two prompts to prove that the end cloud interconnection function has taken effect.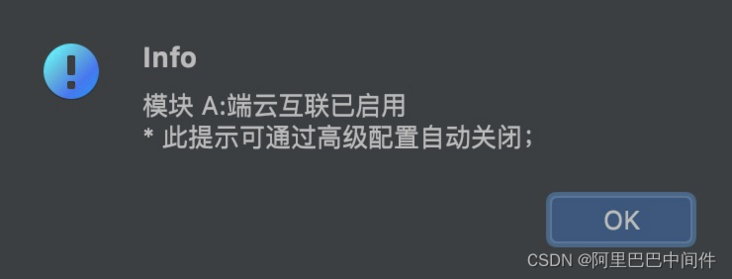

At the same time, in order to verify whether MSE microservice governance is successfully connected, we can log in to the application list interface of MSE console to view it. We can also see from the console that my native application has been successfully connected to MSE and successfully labeled with feature1.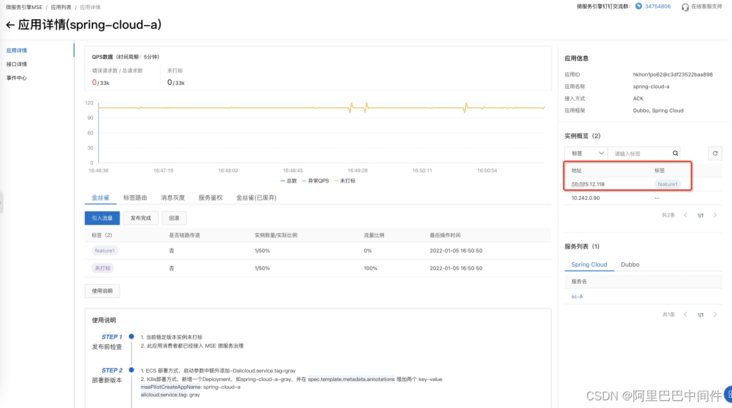
- Initiate traffic call
Suppose that the request we send to the gateway is an http request. We hope that this request will complete the closed loop in feature1. Just add x-mse-tag=feature1 to the request header, and the traffic will automatically complete the closed loop in feature1 environment. Note that the key here is x-mse-tag, which is a fixed value, and feature1 needs to be consistent with the label of the environment (that is, alicloud.service.tag configured above).
If your request source is Dubbo, you need to add Attachment in RpcContext, and the content is x-mse-tag=feature1.
➜  ~ curl http://47.94.143.53:80/A/a
A[10.242.0.90] -> B[10.242.0.91] -> C[10.242.0.152]%
➜  ~ curl http://47.94.143.53:80/A/a
A[10.242.0.90] -> B[10.242.0.91] -> C[10.242.0.152]%
➜  ~ curl -H"x-mse-tag:feature1" http://47.94.143.53:80/A/a
Afeature1[xx.xxx.12.118] -> B[10.242.0.91] -> C[10.242.0.152]%
➜  ~ curl -H"x-mse-tag:feature1" http://47.94.143.53:80/A/a
Afeature1[xx.xxx.12.118] -> B[10.242.0.91] -> C[10.242.0.152]%
➜  ~ curl -H"x-mse-tag:feature1" http://47.94.143.53:80/A/a
Afeature1[xx.xxx.12.118] -> B[10.242.0.91] -> C[10.242.0.152]%
If it is inconvenient for you to add a header to the request, you can also configure rules on the MSE console, such as the traffic set to name=xiaohong or xiaohua enters the feature1 environment. As shown in the figure below.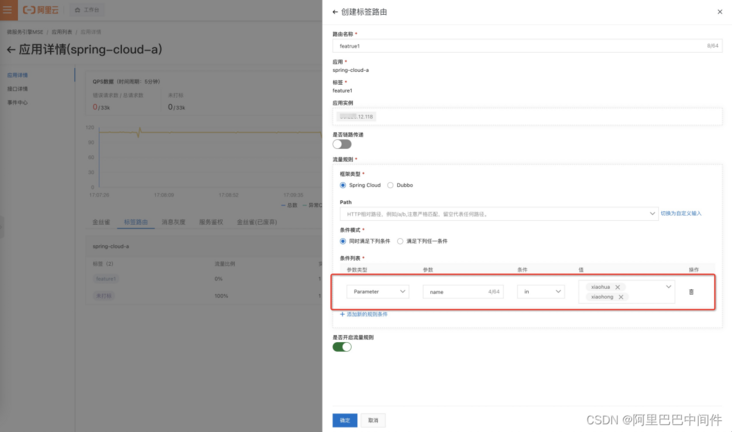
After opening the traffic rules, we continue to verify. We can see that the qualified requests will be forwarded to the feature1 environment.
➜  ~ curl http://47.94.143.53:80/A/a
A[10.242.0.90] -> B[10.242.0.91] -> C[10.242.0.152]%
➜  ~ curl http://47.94.143.53:80/A/a\?name\=xiaohong
Afeature1[30.225.12.118] -> B[10.242.0.91] -> C[10.242.0.152]%
➜  ~ curl http://47.94.143.53:80/A/a\?name\=xiaohua
Afeature1[30.225.12.118] -> B[10.242.0.91] -> C[10.242.0.152]%
If your gateway application does not belong to the Java system, you need to configure rules at the gateway layer. At present, MSE cloud native gateways, Nginx and K8s Ingress are supported. For detailed access methods, see based on MSE cloud native gateway realizes full link grayscale,Realization of full link grayscale based on ingress nginx gateway And other documents.