Some time ago, I was very interested in the details of the implementation of the hand account app, so I wanted to achieve a minimal viable product. Of course, since it's a product in MVP mode, it only realizes "function", but in some places where I especially want to "copy" I have made a little effort to pursue the performance of UI.
Preface
When I was a child, I was a handwritten newspaper enthusiast. In the fourth grade, the class organized a handwritten newspaper competition. The teacher asked each student to make a handwritten newspaper on the weekend to make a comparison and choose the theme. Now I am still very impressed that I did not know what theme to choose at noon. After drawing something on the white paper, I wiped it off and dirty several pieces of paper. Finally, I drew a picture of the earth, which slowly opened my mind.
When I handed it to my teacher on Monday, I dared not be the first to hand it in. I was at the end of the line. When the teacher received my handwritten newspaper, he said, "Come here and see what it is called handwritten newspaper." My heart rate reached a very high point at that time. My face was red and hot. Standing beside the teacher was neither walking nor walking. I laughed embarrassingly, but I was extremely proud.
By junior high school, the head teacher also let us use the weekend time to do a handwritten newspaper, because in primary school when there is a little experience, coupled with the junior high school that basically use computers to complete various tasks are also spread out, I wonder if I can do some innovation. The news of Kodak's collapse was equivalent to a generation's memory. Sometimes I would run into the old house and flip through various films, looking at the reflected images in the sunlight.
Combined with this incident, I thought of using the "film" style to elaborate on the theme of bird protection, downloaded some pictures of birds from the Internet, processed them by myself, and finally handed over the copy to the teacher. When I handed it to the teacher, the teacher smiled happily, and took my hand copy to show the students on the platform, "Look at it, you've done a good job - well, it looks good!"
During the summer vacation after the college entrance examination, Nanguo Metropolitan Daily organized a handwritten newspaper contest for primary and secondary school students. At that time, I participated in the contest as a cousin and won the third prize. The prize was a 500-yuan purchase card for an innovative bookstore.
This is my experience of copying newspapers or hand-painted pictures similar to hand-books. I especially like this way of telling a story, which can well show what I want to express through some words, pictures and paintings.
So, when the hand account app appeared, I quickly downloaded it and used it. I really achieved my original intention of telling a story by organizing some elements and words. Some time ago, I suddenly wondered, if I could make a hand account by myself, by the way, to explore the implementation of a hand account app in need of attention, that would be great!
Design
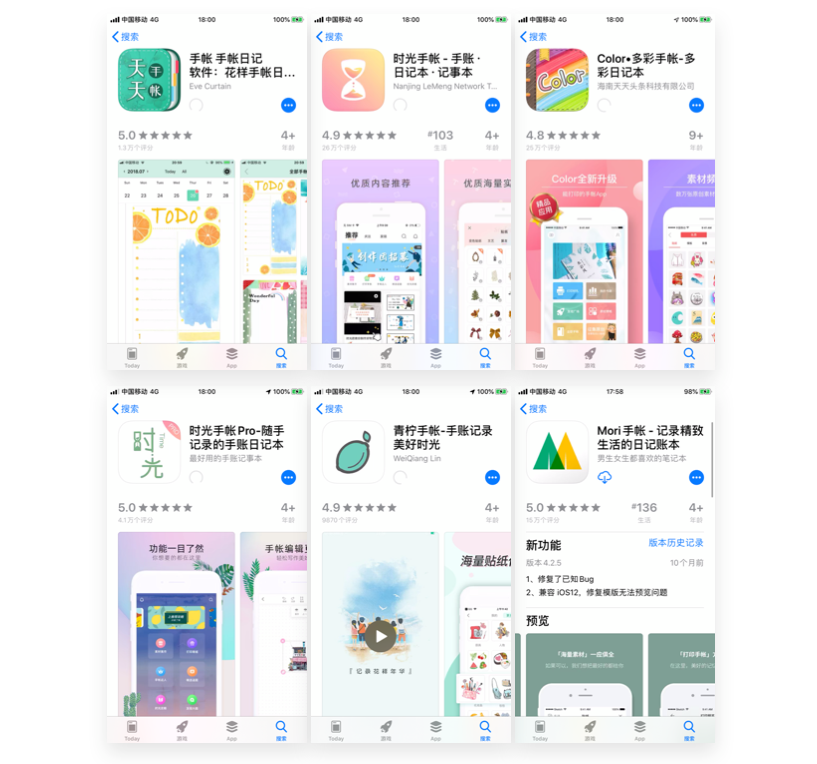
First of all, I used the top 10 apps searched under the keyword "hand account" in the App Store, and summarized some common points of hand account apps:
Add text. It can rotate, enlarge and reduce, rotate fonts.
Add photos. It can rotate and flip, zoom in and out, and has simple or auxiliary image modification tools.
Add stickers. Using some painted stickers, the operation is similar to "adding photos";
Template. Provide a set of templates, users can add content in the area specified by the template.
Provide unlimited length or width of canvas.
Basically, the function of these apps is so much, because in line with the idea of MVP to do this project, so it did not achieve high-fidelity design, directly copied a more concise design of the app.
technology stack
After defining the function points that you need to do, you need to start choosing the technology stack. After all, what you need to do is MVP product instead of demo. My understanding of demo is to realize a function point. My understanding of MVP product is to realize a complete and usable product at a certain stage, and come out in MVP mode. The details of things need not be too harsh, but the overall logic must be complete, incomplete logic can not be, but once it has to be complete, covering the logical path can not be 100%, but the main logic must be fully covered.
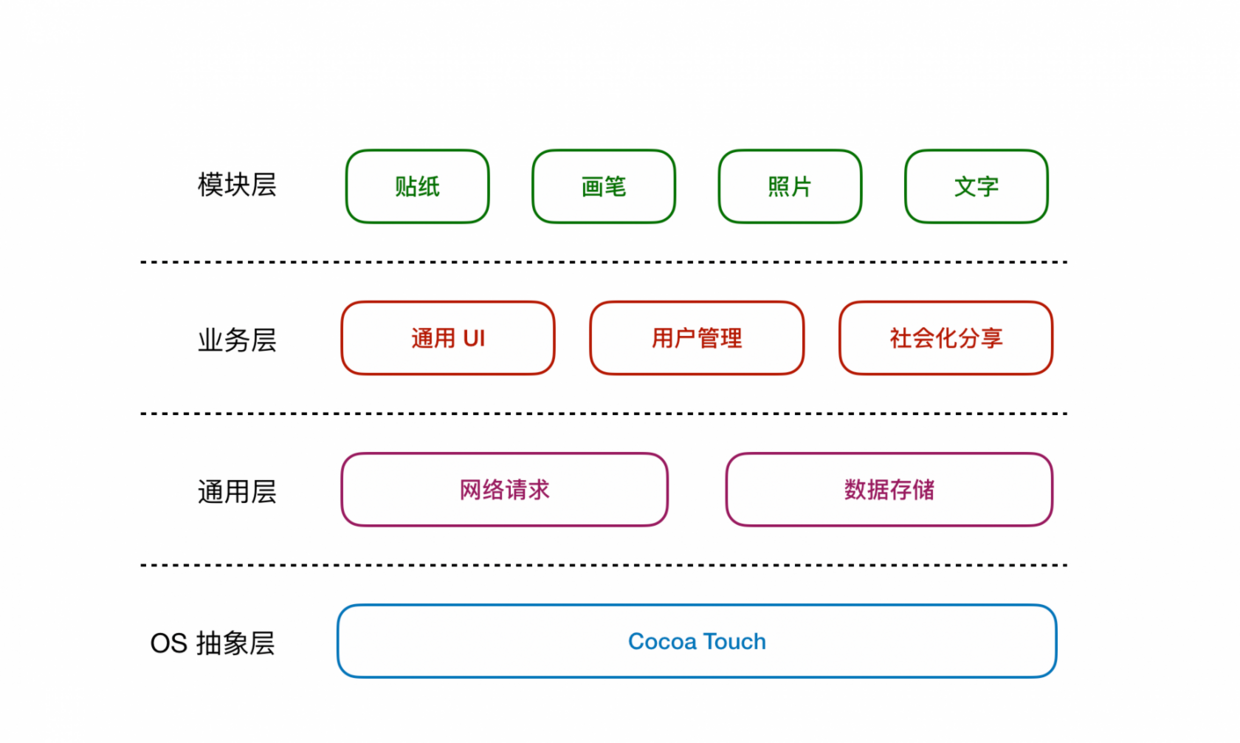
Client
iOS APP Development The technical points are as follows:
Pure native Swift development;
Network request => Alamofire, some simple data go directly to NSFileManager for file persistence management;
UI components are all based on UIKit; social sharing takes system sharing and does not integrate other SDK;
The module provides "sticker", "brush", "photo" and "text". In the process of doing this, we found that in fact, "photos" and "words" are essentially stickers, which saves a lot of things.
Server
In fact, I have a rigid requirement for every new side project I open. When I finish it, I need to increase my technical level. In fact, the "growth" is a very metaphysical thing. How to define "growth"? I found myself the simplest way to do it: with new things!
So on the server side, I chose Vapor directly and mindlessly. Writing on the server through Swift was something I had always wanted to do but couldn't find the time to do, so I got on the bus. As for why I didn't choose Perfect, I didn't actually practice it personally. I just listened to the big guys say that Vapor's API style is more Swifty.
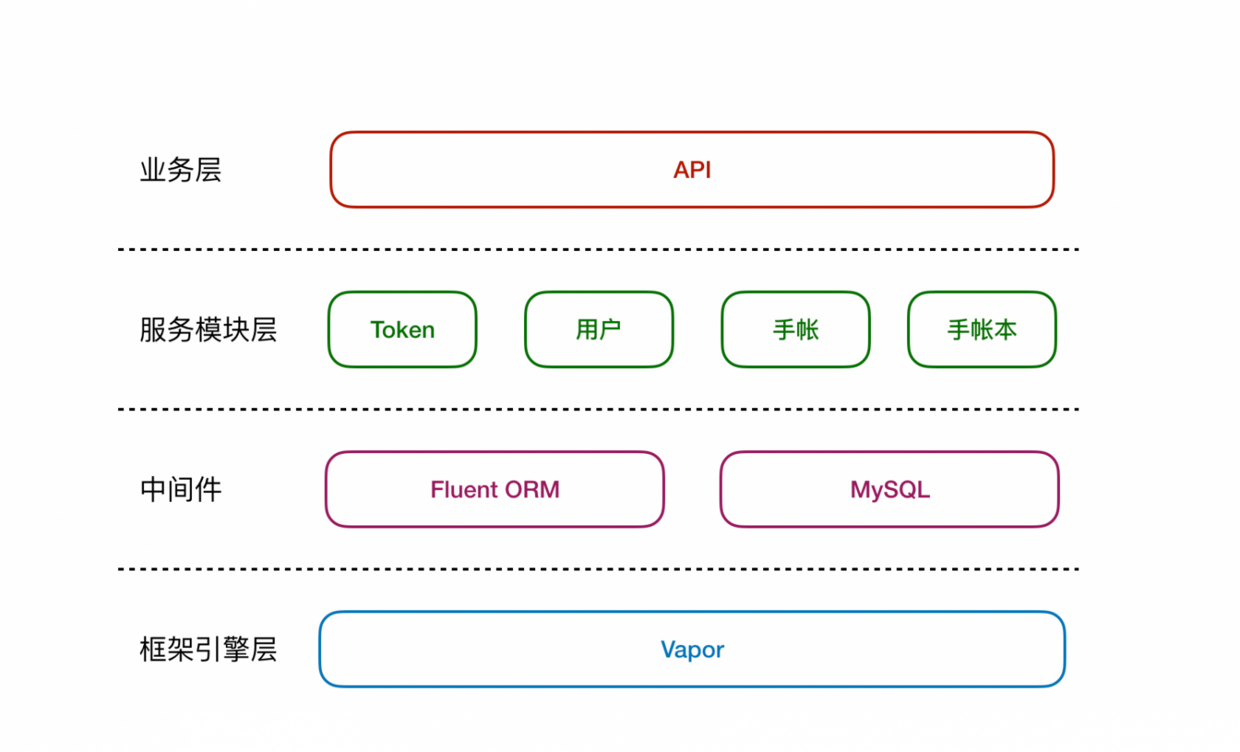
In the first phase of MVP, there is little dependence on the server side, so the current architecture is relatively simple, can be used to complete ~some details about Vapor can be seen in my article, this article will not elaborate on the use of Vapor details.
Realization
gesture
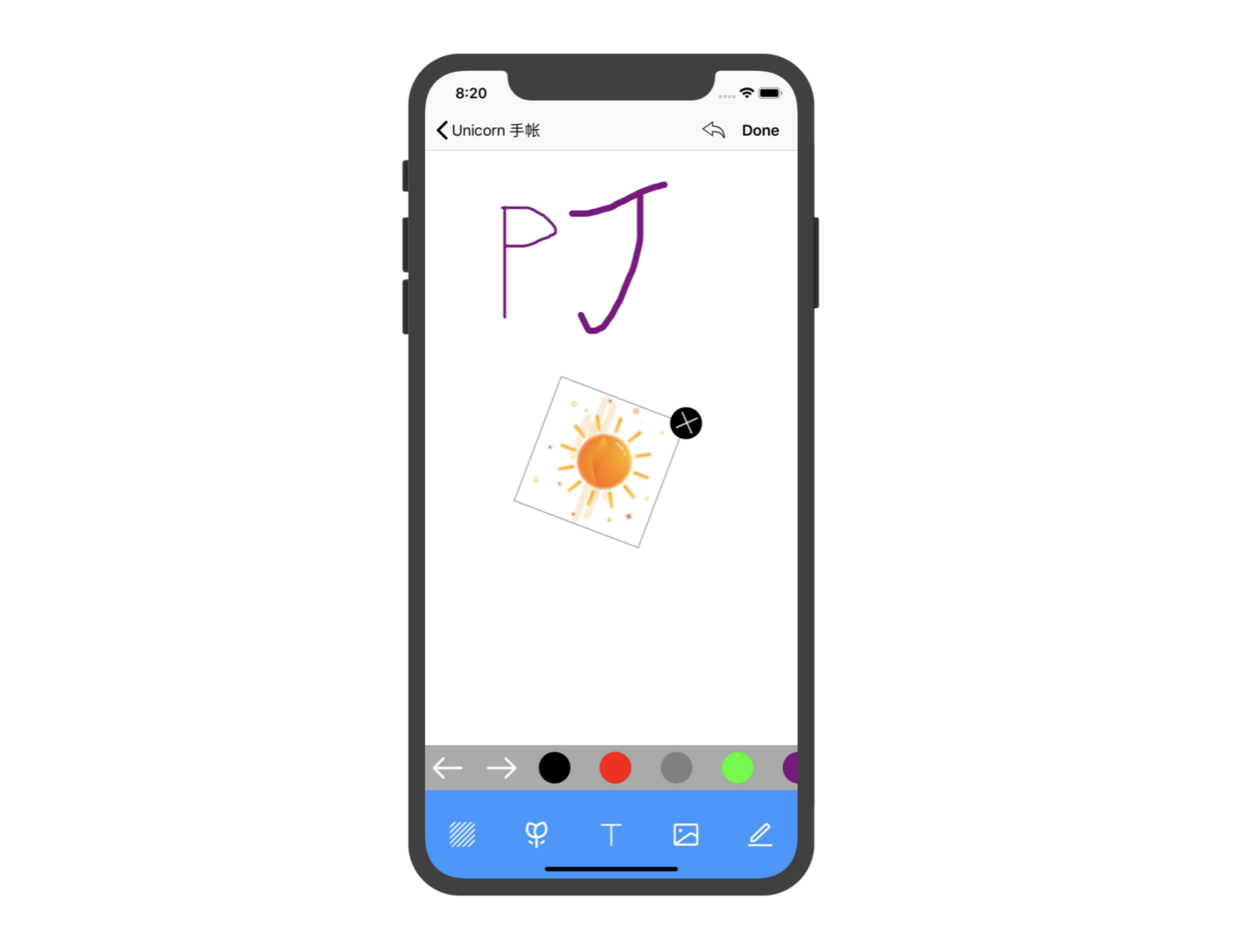
For the hand account, the most important one is the "sticker". How to pull the sticker out of storage and put it on the canvas has been solved in this step, and most of the subsequent content has also been solved.
First of all, we need to make it clear that in this project, "canvas" itself is also a UIView. Adding "sticker" to canvas is essentially adding UIImageView to UIView. Secondly, the control of material is the pursuit of the hand account. Rotary magnification is the basic operation. As mentioned earlier, we can almost regard "photos" and "text" as the inheritance of "stickers". Therefore, the "stickers" itself is the base class that can provide interactive components.
The smoothness of multi-gesture operation of stickers by hand account app is a factor that determines the retention rate of users. So let's take the sticker out of the account and move the basic gesture operations to the higher parent class, leaving business logic in the sticker. The core code logic of gesture operation is as follows:
//pinchGesture scaling gesture // scaling method (file private). Gesture gesture: UI zoom gesture recognizer @objcfileprivate func pinchImage(gesture: UIPinchGesture Recognizer){
//Current gesture status is changing
if gesture.state == .changed {
//Current Matrix 2D Transform Scaling Pass (Gesture Scaling Parameters)
transform = transform.scaledBy(x: gesture.scale, y: gesture.scale)
//To restore to 1 (original size), do not superimpose enlargement
gesture.scale = 1
}}//rotateGesture Rotate gesture // Rotate method (file private). Gesture gesture: UI rotary gesture recognizer @objcfileprivate func rotateImage(gesture: UIRotation Gesture Recognizer){
if gesture.state == .changed {
transform = transform.rotated(by: gesture.rotation)
//0 is radian (angle conversion)
gesture.rotation = 0
}}//panGesture drag/translation gesture//translation method (file private). Gesture gesture: UI translation gesture recognizer @objcfileprivate func panImage(gesture: UIPanGesture Recognizer){
if gesture.state == .changed {
//Conversion of coordinates to parent coordinates
let gesturePosition = gesture.translation(in: superview)
//Calculate by moving distance and original position coordinates. gesturePosition.x
center = CGPoint(x: center.x + gesturePosition.x, y: center.y + gesturePosition.y)
//zero is abbreviated for CGPoint(x: 0, y: 0), coordinates back to 0.
gesture.setTranslation(.zero, in: superview)
}}//Double-click action (UI click gesture recognizer)@objc fileprivate func doubleTapGesture(tap: UITapGesture Recognizer){
//Status: After double-clicking
if tap.state == .ended {
//Flip 90 degrees
let ratation = CGFloat(Double.pi / 2.0)
//Transform rotation angle = previous rotation angle + rotation
transform = CGAffineTransform(rotationAngle: previousRotation + ratation)
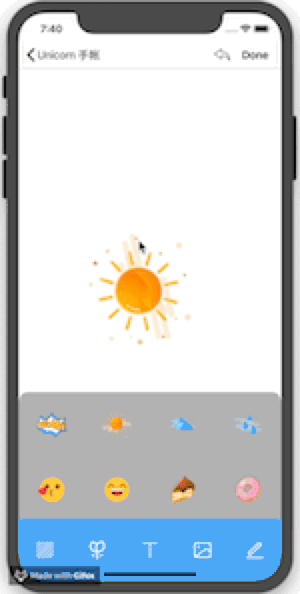
previousRotation += ratation }}The effect of the implementation is shown in the following figure:
Using UICollectionView as a sticker container, icon images corresponding to index mapping of click events are instantiated into sticker objects and passed to parent views through closures:
collectionView.cellSelected = { cellIndex in
    let stickerImage = UIImage(named: collectionView.iconTitle + "\(cellIndex)")
    let sticker = UNStickerView()
    sticker.width = 100
    sticker.height = 100
    sticker.imgViewModel = UNStickerView.ImageStickerViewModel(image: stickerImage!)
    self.sticker?(sticker)}
In the parent view, the whole process from "sticker" to "canvas" is completed by implementing closure to receive sticker objects.
stickerComponentView.sticker = {
    $0.viewDelegate = self
    //The parent view is centered
    $0.center = self.view.center
    $0.tag = self.stickerTag    self.stickerTag += 1
    self.view.addSubview($0)
    //Add to the sticker collection
    self.stickerViews.append($0)}
"Photos" and "Texts"
The toolbar at the bottom of the manual editing page was not well designed before. It is reasonable to go directly to the UITabBar, but ultimately to the UICollectionView. The operation of reading device photos is relatively simple, and there is no need to customize the album, so through the UI Image Picker of the system, students interested in customizing the album can see my article. The code details of the top toolbar are as follows:
//The bottom click event collectionView.cellSelected = cellIndex inswitch cellIndex{
    //Background
    case 0:
        self.stickerComponentView.isHidden = true

        brushView.isHidden = true
        self.bgImageView.image = brushView.drawImage()

        self.present(self.colorBottomView, animated: true, completion: nil)
    //Stickers
    case 1:
        brushView.isHidden = true
        self.bgImageView.image = brushView.drawImage()

        self.stickerComponentView.isHidden = false
        UIView.animate(withDuration: 0.25, animations: {
            self.stickerComponentView.bottom = self.bottomCollectionView!.y        })
    //Text
    case 2:
        self.stickerComponentView.isHidden = true

        brushView.isHidden = true
        self.bgImageView.image = brushView.drawImage()

        let vc = UNTextViewController()
        self.present(vc, animated: true, completion: nil)
        vc.complateHandler = { viewModel in
            let stickerLabel = UNStickerView(frame: CGRect(x: 150, y: 150, width: 100, height: 100))
            self.view.addSubview(stickerLabel)
            stickerLabel.textViewModel = viewModel            self.stickerViews.append(stickerLabel)
        }
    //Photographs
    case 3:
        self.stickerComponentView.isHidden = true

        brushView.isHidden = true
        self.bgImageView.image = brushView.drawImage()

        self.imagePicker.delegate = self
        self.imagePicker.sourceType = .photoLibrary        self.imagePicker.allowsEditing = true
        self.present(self.imagePicker, animated: true, completion: nil)
    //Brushes
    case 4:
        self.stickerComponentView.isHidden = true

        brushView.isHidden = false
        self.bgImageView.image = nil
        self.view.bringSubviewToFront(brushView)
    default: break}
Every module in the bottom toolbar is a UIView, which is not well done. The best way to do this is to make a "Tool Container" based on UIWindow or UIViewController as a container for the UI content elements of each module. This way you can avoid clicking callbacks in the bottom toolbar. Write so many status codes for view display / hiding.
Focus on the code block of the "Photo" section and implement the UIImagePickerController Delegate protocol by:
extension UNContentViewController: UIImagePickerControllerDelegate {
    /// Get the selected picture from the Picture Selector
    func imagePickerController(_ picker: UIImagePickerController,
                               didFinishPickingMediaWithInfo info: [UIImagePickerController.InfoKey : Any]) {
        //Get the edited picture
        let image = info[UIImagePickerController.InfoKey.editedImage] as? UIImage
        if image != nil {
            let wh = image!.size.width / image!.size.height            //Initial stickers
            let sticker = UNStickerView(frame: CGRect(x: 150, y: 150, width: 100, height: 100 * wh))
            //Adding Views
            self.view.addSubview(sticker)
            sticker.imgViewModel = UNStickerView.ImageStickerViewModel(image: image!)
            //Add to the sticker collection
            self.stickerViews.append(sticker)

            picker.dismiss(animated: true, completion: nil)
        }
    }}
Written words
The text module exposed to the parent view is also an instantiated sticker object, but in the text VC it is necessary to select the color, font and font size of the text. After that, I found out that the sticker can be enlarged and reduced by gesture. There is no need to choose the size of the sticker.
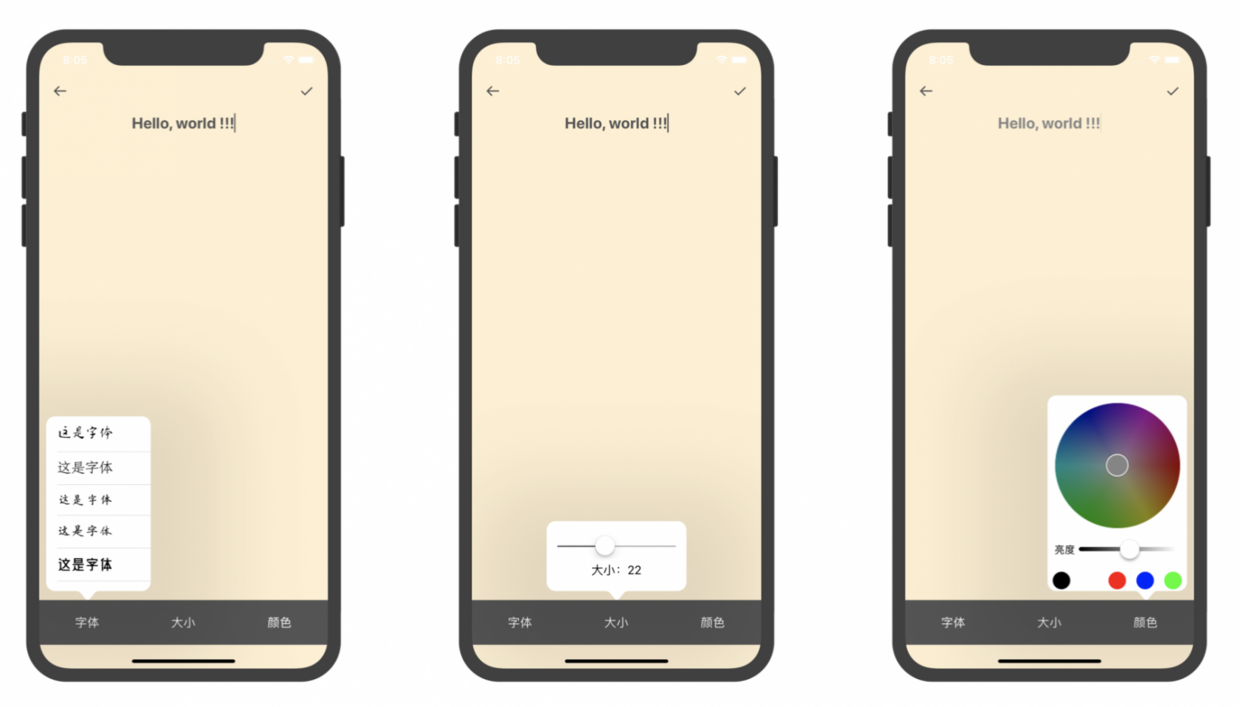
Among them, it is more difficult to choose the color of the text. At first, I thought it would be better to use RGB directly. Later, I thought that if there were three channels through RGB directly, the color would be very difficult. Think of the HSB color mode used in Mad Pinball game before, make a disc color selector, and then in the process of thinking about the details of implementation, EF wrote this library EFColorPicker, very useful, changed the UI and used it directly. Thank EF!
Bubble View itself is a UIViewController, but several properties of it need to be set. It is better to encapsulate these templated codes and turn them into a "bubble view" class for business users to use, but because of the time relationship, they have been copy ing, the core code is as follows:
/// Text size bubble private var sizeBottomView: UNBottom SizeViewController{
    get {
        let sizePopover = UNBottomSizeViewController()
        sizePopover.size = self.textView.font?.pointSize
        sizePopover.preferredContentSize = CGSize(width: 200, height: 100)
        sizePopover.modalPresentationStyle = .popover        let sizePopoverPVC = sizePopover.popoverPresentationController
        sizePopoverPVC?.sourceView = self.bottomCollectionView
        sizePopoverPVC?.sourceRect = CGRect(x: bottomCollectionView!.cellCenterXs[1], y: 0, width: 0, height: 0)
        sizePopoverPVC?.permittedArrowDirections = .down
        sizePopoverPVC?.delegate = self
        sizePopoverPVC?.backgroundColor = .white

        sizePopover.sizeChange = { size in
            self.textView.font = UIFont(name: self.textView.font!.familyName, size: size)
        }

        return sizePopover    }}
Call through present where you need to pop up the bubble view:
collectionView.cellSelected = { cellIndex in
    switch cellIndex {
    case 0: self.present(self.fontBottomView,
                            animated: true,
                            completion: nil)
    case 1: self.present(self.sizeBottomView,
                            animated: true,
                            completion: nil)
    case 2: self.present(self.colorBottomView,
                            animated: true,
                            completion: nil)
    default: break
    }}
Paint brush
Previously, I wrote a component about brushes during my internship (two years ago, actually...), but this brush is based on drawRect: method, which is very unfriendly to memory. If I keep drawing, the memory will keep rising. This time I used CAShape Layer to rewrite one, and the effect is good.
Before withdrawing the brush, it would be very simple to do it based on drawRect: every withdrawal is equivalent to redrawing once. It would be better to remove the withdrawn line from the drawing point array, but the implementation based on CAShapeLayer is different, because each stroke is directly generated in the layer, if If you need to withdraw, you have to regenerate the current layer.
So the last thing I do is to save an image to an array with every stroke. When I perform the withdrawal operation, I replace the last element in the withdrawal array with the current drawing canvas content and remove the element from the withdrawal array.
With the withdrawal, we have to redo it. What we need to do again is to prevent withdrawal, which is similar to withdrawal. Create a redo array and append every image removed from the undo array to the redo array. The following is the core code to undo the redo:
//Undo @objcprivate func undo(){
    //undoDatas number of revocable collections
    guard undoDatas.count != 0 else { return }

    //If there is only one data in the withdrawal set, it means that it is empty after withdrawal
    if undoDatas.count == 1 {
        //redo append add
        redoDatas.append(undoDatas.last!)
        //Withdrawal undo clearance
        undoDatas.removeLast()
        //Clear the picture view
        bgView.image = nil
    } else {
        //Give 3 to redo
        redoDatas.append(undoDatas.last!)
        //Remove undo 3. Remaining 2 1
        undoDatas.removeLast()
        //Clear the picture view
        bgView.image = nil
        //Give 2 to Picture View
        bgView.image = UIImage(data: undoDatas.last!)
    }}//Redo @objcprivate func redo(){
    if redoDatas.count > 0 {
        //First assign values, then remove (last of redo gives the picture view)
        bgView.image = UIImage(data: redoDatas.last!)
        //last of redo to undo to withdraw the array
        undoDatas.append(redoDatas.last!)
        //Remove last redo
        redoDatas.removeLast()
    }}
That's how I think about rubber. According to the real life situation, eraser is used to erase the handwriting that has been written on paper. In fact, eraser is also a kind of brush, which is just a colorless brush, and there are two ways of thinking: eraser, eraser, eraser, eraser, eraser, eraser, eraser, eraser, eraser, eraser and eraser.
Handwriting is directly added to content Layer. At this time, we need to make a mask for the eraser, and make a mask for the path and the bottom of the eraser handwriting, so that the content left by the eraser handwriting is the content of the bottom map.
Handwriting is added to another layer. In this case, the eraser can be set directly to the background of the layer, which is equivalent to clearColor.
The second one I haven't tried, but the first one is very OK.
summary
Above is the smallest viable product of the hand account app. Of course, there are many details that have not been developed, such as the code idea of the server part. Because the server is still around the product, the design is not very good, it is the first time I use Vapor for development, and only 10% of Vapor's power is exerted. At present, the requirements of the server are as follows:
User login registration and authentication;
The creation, deletion and modification of the hand books and the hand books;
Creation, deletion and modification of stickers.
If you don't want to interact with the server, you can directly click on the corresponding button for the class you want to show, and comment out the corresponding server code.