I. Preface
In the advertising ji project, the role's authority management has been a difficult problem for a long time. Firstly, the authority control we determine is divided into two parts, which are more detailed according to the size of the granule:
Privilege Control of Interface Access
Privilege Control of Pages
Is the page in the menu accessible?
Whether the rights control of buttons (add, delete, change) in the page is displayed
Let's take a look at how these privilege controls are implemented.
2. Access Control of Interfaces
Interface privileges are user checks. Normally, when a user logs in, the server needs to return a Token to the front desk, and then bring the Token with it every time the front desk calls the interface.
Then the server obtains the Token and compares it, which can be accessed if it passes.
The existing method is to store the Token returned from the background directly to the session Storage in the successful login callback, but when requested, the Token is taken out and sent to the background in the headers. The code is as follows:
this.$http({ method: 'get', url: 'test/query?id=20', withCredentials: true, headers: { token: sessionStorage.getItem('token'), name: sessionStorage.getItem('name') //User Name Transferred on Background Requirements
 }
 }).then(response => { //Operation after successful request
 })
//Copy code
Later, it was found in some articles that axios could directly insert Token into config.headers.Authorization in the interceptor as a global input. The following is the code section:
//main.jsimport Axios from'axios'// instantiate Axios and set const service = axios. create a timeout({
 timeout: 5000})//BaseURL//axios.defaults.baseURL='https://api.github.com'; //http request interceptor// Authorization field is added to the HTTP header for each request, the content of which is tokenservice.interceptors.request.use (config=> {if (store.state.user.token){
 config.headers.Authorization = `token ${store.state.user.token}`;
 } return config
 }, err => { return Promise.reject(err)
 }
);export default service
//Copy code
3. Control of page permission
As mentioned earlier, page permission control can be divided into two types:
Is the page in the menu accessible?
Whether the rights control of buttons (add, delete, change) in the page is displayed
These permissions are usually configurated on fixed pages and recorded in the database after being saved.
Button permissions are not mentioned for the time being. Page access permissions can be implemented in two ways:
Display all menus. When users access menus that are not within their own permissions, the prompt permissions are insufficient.
Display only the menu within the permission that the current user can access. If the user makes mandatory access through the URL, he will go directly to 404.
Since it can't be displayed, how many meanings can it mean to amuse me? The so-called "invisible is net", after comprehensive consideration, it is sure that the second scheme is more in line with the good user experience.
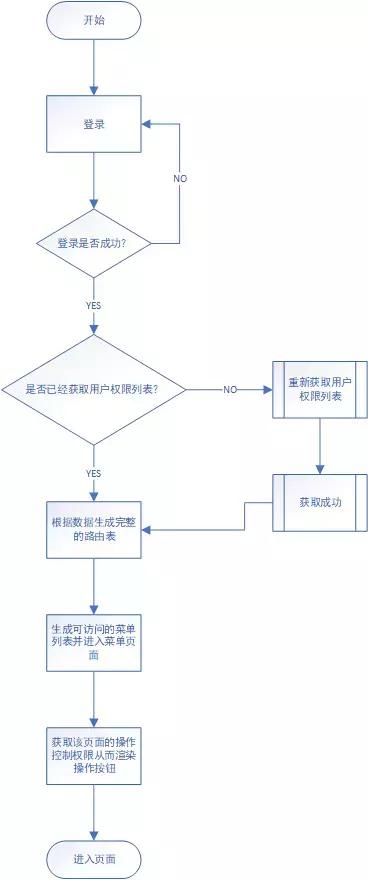
Okay, let's now sort out the general process of page access rights:

After the process is sorted out, we begin to write in detail.
1. Create routing tables
Creating routing tables is actually not difficult, just follow the example given by the official vue-router document. But because some pages don't need access rights,
So you need to write login, 404, maintenance and other pages to the default route, and other pages that need permission to write to a variable or a file, so you can
In order to effectively reduce the subsequent maintenance pressure.
The code of index.js will be pasted below, and the asynchronous routing will be reduced to a certain extent, so as not to occupy too much space.
//router/index.jsimport Vue from'vue'import Router from'vue-router'import App from'@/App'import store from'. / store/index'Vue.use(Router); //manual jump page whitelist
const whiteList = [ '/'];//Default pages that do not require permissions
const constantRouterMap = [
 {
 path: '/',
 name: 'Sign in',
 component: (resolve) => require(['@/components/login'], resolve)
 },
 {
 path: '/index',
 name: 'nav.Home',
 component: (resolve) => require(['@/components/index'], resolve)
 },
 {
 path: '/templateMake',
 name: 'Template production',
 component: (resolve) => require(['@/components/Template/templateMake'], resolve)
 },
 {
 path: '/programMack',
 name: 'Program production',
 component: (resolve) => require(['@/components/Template/programMack'], resolve)
 },
 {
 path: '/release',
 name: 'Program release',
 component: (resolve) => require(['@/components/Program/release'], resolve)
 }
]//Registered route export const router = new Router({
 routes: constantRouterMap
});//Asynchronous routing (pages requiring permissions) export const asyncRouterMap=[
 {
 path: '/resource',
 name: 'nav.Resource',
 meta: {
 permission: []
 },
 component: (resolve) => require(['@/components/Resource/resource'], resolve)
 },
 {
 path: '/template',
 name: 'nav.Template',
 meta: {
 permission: []
 },
 component: (resolve) => require(['@/components/Template/template'], resolve)
 },
 {
 path: '/generalSet',
 name: 'nav.System',
 meta: {
 permission: []
 },
 component: (resolve) => require(['@/components/SystemSet/generalSet'], resolve)
 },
 {
 path: '',
 name: 'nav.Log',
 component: App,
 children: [
 {
 path: '/userLog',
 name: 'nav.UserLog',
 meta: {
 permission: []
 },
 component: (resolve) => require(['@/components/Log/userLog'], resolve),
 },
 {
 path: '/operatingLog',
 name: 'nav.SystemLog',
 meta: {
 permission: []
 },
 component: (resolve) => require(['@/components/Log/operatingLog'], resolve),
 },
 ]
 }
 ]
];
//Copy code
Note: Here is a very important point to note that 404 pages must be loaded last, if placed in the constant Router Map together declared 404, the following pages will be intercepted to 404, detailed questions see addRoutes when you've got a wildcard route for 404s do not work.
2. Page access rights
At the beginning, we sorted out a general process of page access rights. Now let's realize the core part:
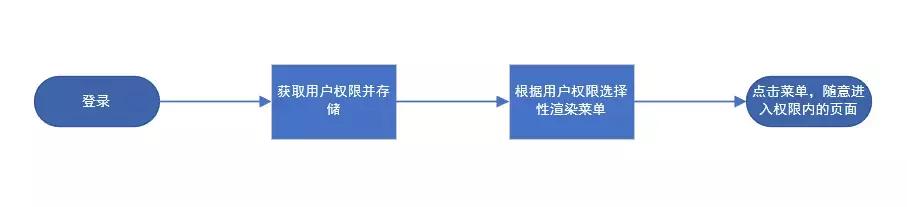

First, we get the list of user rights. Here we will touch on vuex status management. The official documents are detailed. There is not much description here. See the code below:
// store/index.jsimport Axios from 'axios'import Vue from 'vue'import Vuex from 'vuex'Vue.use(Vuex);const axios = Axios.create();const state = { mode: 'login', list: []
};const getters = {};const mutations = { setMode: (state, data) => {
 state.mode = data
 }, setList: (state, data) => {
 state.list = data
 }
};const actions = { //Get a list of permissions
 getPermission({commit}) { return new Promise((resolve, reject) => {
 axios({ url: '/privilege/queryPrivilege?id=' + sessionStorage.getItem('privId'), methods: 'get', headers: { token: sessionStorage.getItem('token'), name: sessionStorage.getItem('name')
 }
 }).then((res) => { //Storage permission list
 commit('setList', res.data.cust.privileges[0].children);
 resolve(res.data.cust.privileges[0].children)
 }).catch(() => {
 reject()
 })
 })
 }
};export default new Vuex.Store({
 state,
 mutations,
 actions,
 getters
})
//Copy code
Okay, now we request the background to get the privilege data and store the data in vuex. Next, we need to use the asynchronous routing table written before returning the data matching to combine the matching result with the static routing table to form the final actual routing table.
The key is to use a new addRoutes method added in vue-router version 2.2.0. Let's see how official documents explain this method:
router.addRoutes(routes) 2.2.0 + dynamically adds more routing rules. The parameter must be an array that meets the requirements of the routes option.
Now we can start using addRoutes for routing matching. Look at the code below:
// router/index.js/**
 * Matching routing according to permission
 * @param {array} permission Privilege List (Menu List)
 * @param {array} asyncRouter Asynchronous routing object
 */function routerMatch(permission, asyncRouter) { return new Promise((resolve) => { const routers = []; //Create routing
 function createRouter(permission) { //Add router objects matched by paths to routers
 permission.forEach((item) => { if (item.children && item.children.length) {
 createRouter(item.children)
 } let path = item.path; //Circular asynchronous routing, adding routers that conform to the permission list
 asyncRouter.find((s) => { if (s.path === '') {
 s.children.find((y) => { if (y.path === path) {
 y.meta.permission = item.permission;
 routers.push(s);
 }
 })
 } if (s.path === path) {
 s.meta.permission = item.permission;
 routers.push(s);
 }
 })
 })
 }
 createRouter(permission)
 resolve([routers])
 })
}
//Copy code
Then we write the navigation hook.
// router/index.jsrouter.beforeEach((to, form, next) => { if (sessionStorage.getItem('token')) { if (to.path === '/') {
 router.replace('/index')
 } else {
 console.log(store.state.list.length); if (store.state.list.length === 0) { //If there is no permission list, a new request will be made to the background.
 store.dispatch('getPermission').then(res => { //Method of calling permission matching
 routerMatch(res, asyncRouterMap).then(res => { //AdRoutes the matched list of permissions
 router.addRoutes(res[0]);
 next({ ...to, replace: true })
 })
 }).catch(() => {
 router.replace('/')
 })
 } else { if (to.matched.length) {
 next()
 } else {
 router.replace('/')
 }
 }
 }
 } else { if (whiteList.indexOf(to.path) >= 0) {
 next()
 } else {
 router.replace('/')
 }
 }
});
//Copy code
Here we have completed the access control of the page. Next, we will explain the operation of the right part of the button.
IV. Data Operating Authority
Do you remember the extra code in the previous routing configuration? Let's take a look at it.
//Asynchronous routing (pages requiring permissions) export const asyncRouterMap=[
 {
 path: '/resource',
 name: 'nav.Resource',
 meta: {
 permission: []
 },
 component: (resolve) => require(['@/components/Resource/resource'], resolve)
 },
 {
 path: '/template',
 name: 'nav.Template',
 meta: {
 permission: []
 },
 component: (resolve) => require(['@/components/Template/template'], resolve)
 },
 {
 path: '/generalSet',
 name: 'nav.System',
 meta: {
 permission: []
 },
 component: (resolve) => require(['@/components/SystemSet/generalSet'], resolve)
 },
 {
 path: '',
 name: 'nav.Log',
 component: App,
 children: [
 {
 path: '/userLog',
 name: 'nav.UserLog',
 meta: {
 permission: []
 },
 component: (resolve) => require(['@/components/Log/userLog'], resolve),
 },
 {
 path: '/operatingLog',
 name: 'nav.SystemLog',
 meta: {
 permission: []
 },
 component: (resolve) => require(['@/components/Log/operatingLog'], resolve),
 },
 ]
 }
 ]
];
//Copy code
Add meta fields for each routing page. In the routerMatch function, the matched detailed permission fields are assigned here. This field is then obtained in the route object of each page.
asyncRouter.find((s) => { if (s.path === '') {
 s.children.find((y) => { if (y.path === path) {
 //assignment
 y.meta.permission = item.permission;
 routers.push(s);
 }
 })
 } if (s.path === path) {
 s.meta.permission = item.permission;
 routers.push(s);
 }
 })
//Copy code
Next, we write a vue custom instruction to judge the elements that need to be authenticated in the page, such as:
<a @click="upload" v-allow="'3'"></a> /* 3 Represents the ID of an upload privilege, with three buttons in the privilege.*/Copy code
We register a global instruction directly and use vnode to access the method of vue. The code is as follows:
// main.js// Press the Torsion permission instruction Vue.directive('allow', {insert: (el, binding, vnode) => {let permissionList = vnode.context.$route.meta.permission; if (!PermissionList.include(binding.value)){
 el.parentNode.removeChild(el)
 }
 }
})
Copy code
So far, the process of privilege control has been completely completed. Let's take a look at the complete flow chart of privilege control in the end.
5. Complete flow chart of routing control