catalogue
2, QEMU executes programs in user mode
1, Operation mode of QEMU
He directly excerpted his "uncover home router 0day vulnerability mining technology", checked it online and found no satisfactory QEMU instructions, so he adopted the introduction in this book. If you can find a satisfactory description of the use method of QEMU later, add it again.
QEMU simulator mainly has two common operation modes: User Mode and System Mode. In User Mode, users only need to run the Linux programs compiled by processing on different platforms in QEMU virtual machine, and all other things are completed by QEMU virtual machine, without user-defined kernel, virtual disk and other files; In System Mode, the most obvious feature is that the user can specify the running kernel or virtual hard disk and other files for QEMU virtual machine. In short, QEMU virtual machine can be configured according to the user's requirements in System Mode.
2, QEMU executes programs in user mode
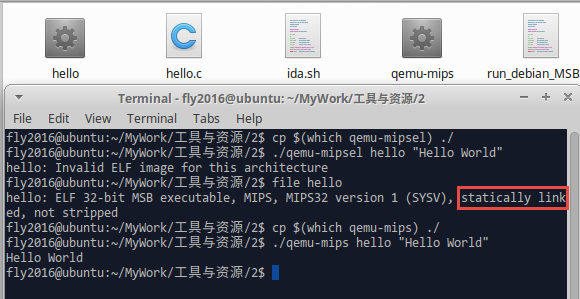
When the program is statically compiled (gcc compiled, the static compilation option "- static") is added. The runtime - does not need to rely on the dynamic link library. When running the compiled Linux program using QEMU, just use the following command:
#View the file type MIPS32 of the executable program hello
$ file hello
hello: ELF 32-bit MSB executable, MIPS, MIPS32 version 1 (SYSV), statically linked, not stripped

$ cp $(which qemu-mips) ./

#Using QEMU MIPS to load the hello program
$ ./qemu-mips hello "Hello World"
Hello World
Screenshot of execution result:
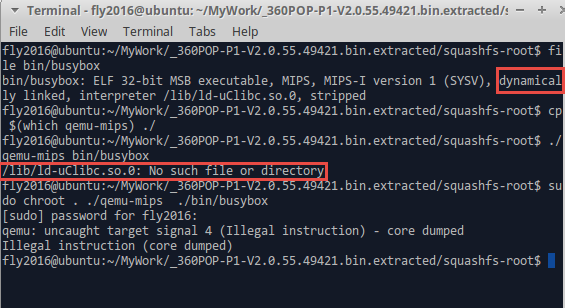
When the program is compiled dynamically (gcc compilation, there is no static compilation option "- static"), and the program needs to rely on the dynamic link library when running. When running the compiled Linux program using QEMU, just use the following command:
#View the type of file to be executed
$ file bin/busybox

#Copy QEMU MIPS to current directory
$ cp $(which qemu-mips) ./

#Direct operation error
$ ./qemu-mips bin/busybox

#Change the root directory of QEMU-MIPS execution to the current directory
$ sudo chroot . ./qemu-mips ./bin/busybox
Screenshot of execution result:
Command line help used in QEMU user mode. Take {QEMU mipsel} as an example:
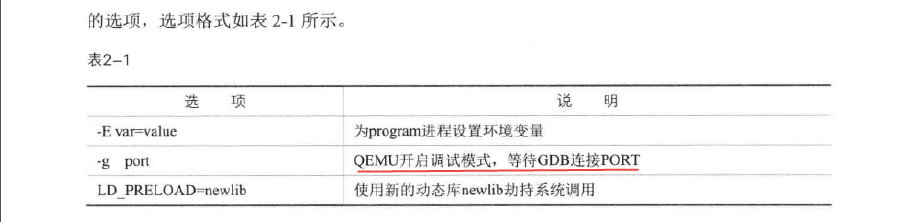
fly2016@ubuntu:~$ qemu-mipsel --help
usage: qemu-mipsel [options] program [arguments...]
Linux CPU emulator (compiled for mipsel emulation)

Options and associated environment variables:

Argument      Env-variable      Description
-h                              print this help
-help
-g port       QEMU_GDB          wait gdb connection to 'port'
-L path       QEMU_LD_PREFIX    set the elf interpreter prefix to 'path'
-s size       QEMU_STACK_SIZE   set the stack size to 'size' bytes
-cpu model    QEMU_CPU          select CPU (-cpu help for list)
-E var=value  QEMU_SET_ENV      sets targets environment variable (see below)
-U var        QEMU_UNSET_ENV    unsets targets environment variable (see below)
-0 argv0      QEMU_ARGV0        forces target process argv[0] to be 'argv0'
-r uname      QEMU_UNAME        set qemu uname release string to 'uname'
-B address    QEMU_GUEST_BASE   set guest_base address to 'address'
-R size       QEMU_RESERVED_VA  reserve 'size' bytes for guest virtual address space
-d item[,...] QEMU_LOG          enable logging of specified items (use '-d help' for a list of items)
-D logfile    QEMU_LOG_FILENAME write logs to 'logfile' (default stderr)
-p pagesize   QEMU_PAGESIZE     set the host page size to 'pagesize'
-singlestep   QEMU_SINGLESTEP   run in singlestep mode
-strace       QEMU_STRACE       log system calls
-seed         QEMU_RAND_SEED    Seed for pseudo-random number generator
-trace        QEMU_TRACE        [[enable=]<pattern>][,events=<file>][,file=<file>]
-version      QEMU_VERSION      display version information and exit

Defaults:
QEMU_LD_PREFIX  = /usr/gnemul/qemu-mipsel
QEMU_STACK_SIZE = 8388608 byte

You can use -E and -U options or the QEMU_SET_ENV and
QEMU_UNSET_ENV environment variables to set and unset
environment variables for the target process.
It is possible to provide several variables by separating them
by commas in getsubopt(3) style. Additionally it is possible to
provide the -E and -U options multiple times.
The following lines are equivalent:
    -E var1=val2 -E var2=val2 -U LD_PRELOAD -U LD_DEBUG
    -E var1=val2,var2=val2 -U LD_PRELOAD,LD_DEBUG
    QEMU_SET_ENV=var1=val2,var2=val2 QEMU_UNSET_ENV=LD_PRELOAD,LD_DEBUG
Note that if you provide several changes to a single variable
the last change will stay in effect.
3, System mode usage of QEMU
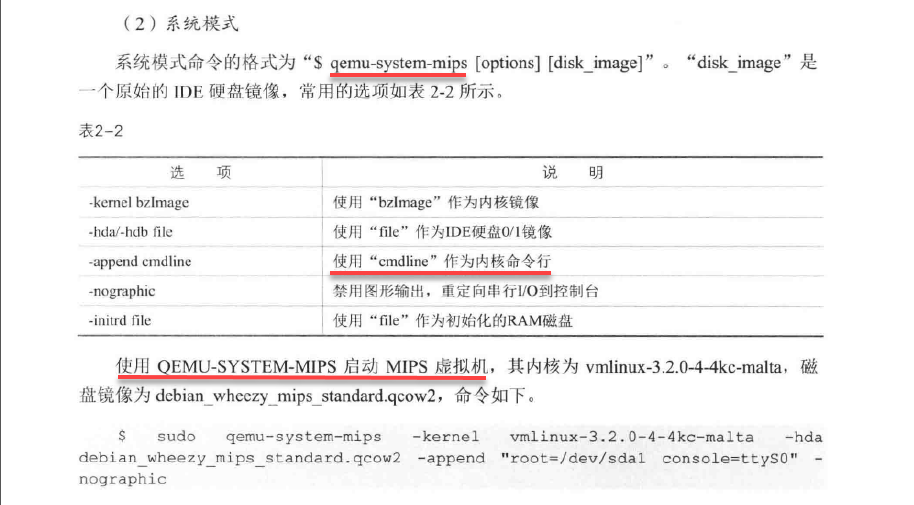
QEMU runs in system mode. QEMU virtual machine can run normally only when QEMU specifies parameters such as kernel image, IDE hard disk 0 / 1 image, kernel command line, etc. Debian official website provides the download of kernel images and hard disk image files of QEMU virtual machine platform architectures. The download address is: Index of /~aurel32/qemu , where mips For large terminal machines, mipsel is for small terminal machines.

Here, take downloading the virtual machine image file of mips mainframe as an example. The specific download website is: Index of /~aurel32/qemu/mips , click in to find the download instructions of mips virtual machine image file. We selectively download the mips virtual machine image file according to the command parameters.
Debian Squeeze and Wheezy mips images for QEMU
==============================================

This directory contains Debian Squeeze and Wheezy mips images for QEMU and
the corresponding kernels and initrds:
  1d58f831f5e5064753c0c138d8d74057  debian_squeeze_mips_standard.qcow2
  cb56139b63b88fdb38776051d28bb750  vmlinux-2.6.32-5-4kc-malta
  7165e80b0e5c5c3e40f2ca46401373ce  vmlinux-2.6.32-5-5kc-malta
  bf699f435160b0bd9ac62905fa64701e  debian_wheezy_mips_standard.qcow2
  1fecbe19ff49a6fd715901483b23647c  vmlinux-3.2.0-4-4kc-malta
  19e6e853d4a7a7b9ed5e787b7f875835  vmlinux-3.2.0-4-5kc-malta

Both images are 25GiB images in QCOW2 format on which a Debian Squeeze or
Wheezy "Standard system" installation has been performed. The other
installation options are the following:
  - Keyboard:       US
  - Locale:         en_US
  - Mirror:         ftp.debian.org
  - Hostname:       debian-mips
  - Root password:  root
  - User account:   user
  - User password:  user

To use this image, you need to install QEMU 1.1.0 (or later). Start QEMU
with the following arguments for a 32-bit machine:
  - qemu-system-mips -M malta -kernel vmlinux-2.6.32-5-4kc-malta -hda debian_squeeze_mips_standard.qcow2 -append "root=/dev/sda1 console=tty0"
  - qemu-system-mips -M malta -kernel vmlinux-3.2.0-4-4kc-malta -hda debian_wheezy_mips_standard.qcow2 -append "root=/dev/sda1 console=tty0"

Start QEMU with the following arguments for a 64-bit machine:
  - qemu-system-mips64 -M malta -kernel vmlinux-2.6.32-5-5kc-malta -hda debian_squeeze_mips_standard.qcow2 -append "root=/dev/sda1 console=tty0"
  - qemu-system-mips64 -M malta -kernel vmlinux-3.2.0-4-5kc-malta -hda debian_wheezy_mips_standard.qcow2 -append "root=/dev/sda1 console=tty0"

By default QEMU emulates a machine with 128MiB of RAM. You can use the -m option
to increase or decrease the size of the RAM. It is however limited to 256MiB
with a 32-bit kernel. With a 64-bit kernel and QEMU >= 1.7, it is possible to
use up to 2047MiB of RAM, passing the memory map to the kernel, adding a mem=
argument to the append parameters as follow: "mem=256m@0x0 mem=XXXm@0x90000000"
where XXX represents the total memory size minus 256MiB. If you don't want to
start QEMU in graphic mode, you can use the -nographic option. The image is
configured to display a login prompt on the first serial port (ttys0). If you
want to switch the boot messages to the serial port, you need to replace
"console=tty0" by "console=ttyS0".
Download the kernel file {vmlinux-2.6.32-5-4kc-malta, disk image} Debian here_ squeeze_ mips_ standard. Qcow2# as the configuration file of MIPs virtual machine.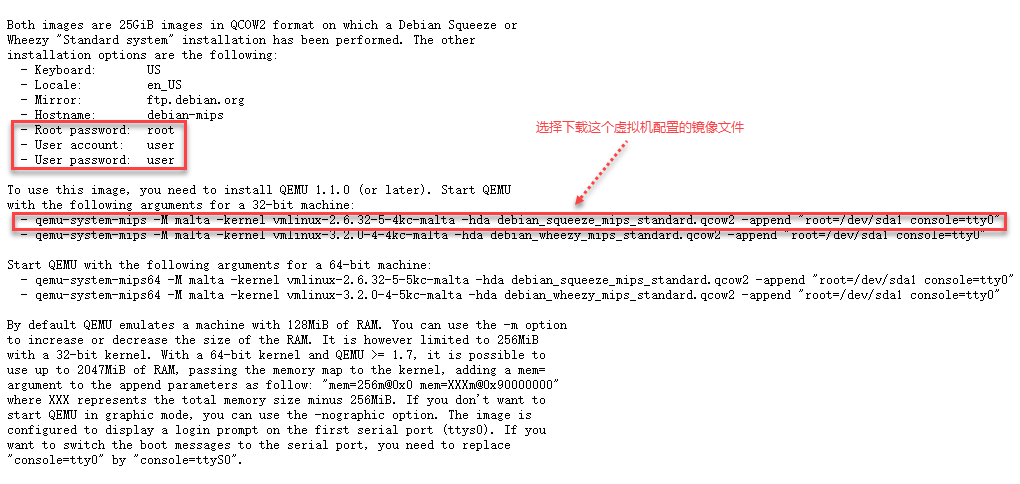
Under ubuntu, you can use the following command to download mips and mipsel virtual machine image configuration files:
# +++++++++++++++++++++++++++++++++++++++++++++++++++++++++++++++++++++++++++++++++++++++++++++++++++++++++++++++++++++++++++
# Start QEMU with the following arguments for a 32-bit machine:
$ qemu-system-mips -M malta -kernel vmlinux-2.6.32-5-4kc-malta -hda debian_squeeze_mips_standard.qcow2 -append "root=/dev/sda1 console=tty0"
$ qemu-system-mips -M malta -kernel vmlinux-3.2.0-4-4kc-malta -hda debian_wheezy_mips_standard.qcow2 -append "root=/dev/sda1 console=tty0"

# for MIPS 32bit ###############:
#The kernel version is 2.6 x
$ wget https://people.debian.org/~aurel32/qemu/mips/vmlinux-2.6.32-5-4kc-malta
$ wget https://people.debian.org/~aurel32/qemu/mips/debian_squeeze_mips_standard.qcow2

#The kernel version is 3.2 x
$ wget https://people.debian.org/~aurel32/qemu/mips/vmlinux-3.2.0-4-4kc-malta
$ wget https://people.debian.org/~aurel32/qemu/mips/debian_wheezy_mips_standard.qcow2

# +++++++++++++++++++++++++++++++++++++++++++++++++++++++++++++++++++++++++++++++++++++++++++++++++++++++++++++++++++++++++++
# Start QEMU with the following arguments for a 64-bit machine:
$ qemu-system-mips64 -M malta -kernel vmlinux-2.6.32-5-5kc-malta -hda debian_squeeze_mips_standard.qcow2 -append "root=/dev/sda1 console=tty0"
$ qemu-system-mips64 -M malta -kernel vmlinux-3.2.0-4-5kc-malta -hda debian_wheezy_mips_standard.qcow2 -append "root=/dev/sda1 console=tty0"

# for MIPS 64bit ###############:
#The kernel version is 2.6 x
$ wget https://people.debian.org/~aurel32/qemu/mips/vmlinux-2.6.32-5-5kc-malta
$ wget https://people.debian.org/~aurel32/qemu/mips/debian_squeeze_mips_standard.qcow2

#The kernel version is 3.2 x
$ wget https://people.debian.org/~aurel32/qemu/mips/vmlinux-3.2.0-4-5kc-malta
$ wget https://people.debian.org/~aurel32/qemu/mips/debian_wheezy_mips_standard.qcow2


# +++++++++++++++++++++++++++++++++++++++++++++++++++++++++++++++++++++++++++++++++++++++++++++++++++++++++++++++++++++++++++
# Start QEMU with the following arguments for a 32-bit machine:
$ qemu-system-mipsel -M malta -kernel vmlinux-2.6.32-5-4kc-malta -hda debian_squeeze_mipsel_standard.qcow2 -append "root=/dev/sda1 console=tty0"
$ qemu-system-mipsel -M malta -kernel vmlinux-3.2.0-4-4kc-malta -hda debian_wheezy_mipsel_standard.qcow2 -append "root=/dev/sda1 console=tty0"

# for MIPSEL 32bit ###############:
#The kernel version is 2.6 x
$ wget https://people.debian.org/~aurel32/qemu/mipsel/vmlinux-2.6.32-5-4kc-malta
$ wget https://people.debian.org/~aurel32/qemu/mipsel/debian_squeeze_mipsel_standard.qcow2

#The kernel version is 3.2 x
$ wget https://people.debian.org/~aurel32/qemu/mipsel/vmlinux-3.2.0-4-4kc-malta
$ wget https://people.debian.org/~aurel32/qemu/mipsel/debian_wheezy_mipsel_standard.qcow2

# +++++++++++++++++++++++++++++++++++++++++++++++++++++++++++++++++++++++++++++++++++++++++++++++++++++++++++++++++++++++++++
# Start QEMU with the following arguments for a 64-bit machine:
$ qemu-system-mips64el -M malta -kernel vmlinux-2.6.32-5-5kc-malta -hda debian_squeeze_mipsel_standard.qcow2 -append "root=/dev/sda1 console=tty0"
$ qemu-system-mips64el -M malta -kernel vmlinux-3.2.0-4-5kc-malta -hda debian_wheezy_mipsel_standard.qcow2 -append "root=/dev/sda1 console=tty0"

# for MIPSEL 64bit ###############:
#The kernel version is 2.6 x
$ wget https://people.debian.org/~aurel32/qemu/mipsel/vmlinux-2.6.32-5-5kc-malta
$ wget https://people.debian.org/~aurel32/qemu/mipsel/debian_squeeze_mipsel_standard.qcow2

#The kernel version is 3.2 x
$ wget https://people.debian.org/~aurel32/qemu/mipsel/vmlinux-3.2.0-4-5kc-malta
$ wget https://people.debian.org/~aurel32/qemu/mipsel/debian_wheezy_mipsel_standard.qcow2
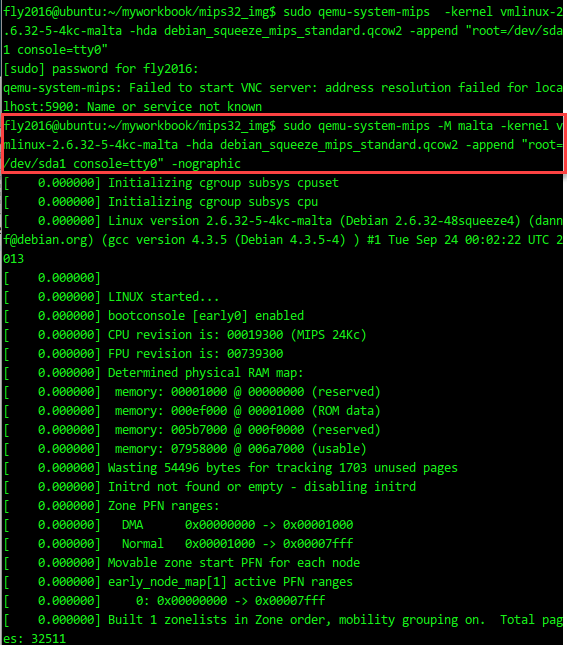
Start kernel 2.6 using QEMU system MIPs X version MIPS 32bit QEMU virtual machine image, QEMU startup failed, and the results are as follows:
$ sudo qemu-system-mips -M malta -kernel vmlinux-2.6.32-5-4kc-malta -hda debian_squeeze_mips_standard.qcow2 -append "root=/dev/sda1 console=tty0" -nographic
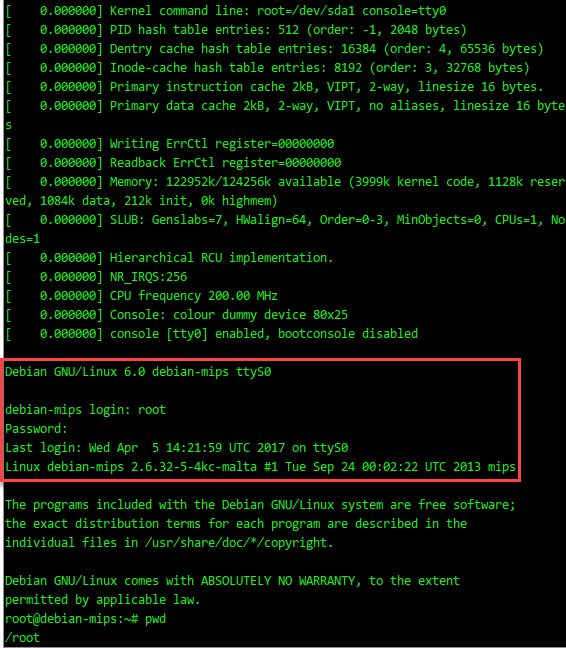
QEMU virtual machine is started successfully in the form of console. The results are as follows:
The command line help used in QEMU systematizer mode, taking "QEMU system MIPS" as an example, is very powerful:
fly2016@ubuntu:~$ qemu-system-mips -h
QEMU emulator version 2.8.92 (v2.9.0-rc2-42-g6499fd1-dirty)
Copyright (c) 2003-2017 Fabrice Bellard and the QEMU Project developers
usage: qemu-system-mips [options] [disk_image]

'disk_image' is a raw hard disk image for IDE hard disk 0

Standard options:
-h or -help     display this help and exit
-version        display version information and exit
-machine [type=]name[,prop[=value][,...]]
                selects emulated machine ('-machine help' for list)
                property accel=accel1[:accel2[:...]] selects accelerator
                supported accelerators are kvm, xen, tcg (default: tcg)
                kernel_irqchip=on|off|split controls accelerated irqchip support (default=off)
                vmport=on|off|auto controls emulation of vmport (default: auto)
                kvm_shadow_mem=size of KVM shadow MMU in bytes
                dump-guest-core=on|off include guest memory in a core dump (default=on)
                mem-merge=on|off controls memory merge support (default: on)
                igd-passthru=on|off controls IGD GFX passthrough support (default=off)
                aes-key-wrap=on|off controls support for AES key wrapping (default=on)
                dea-key-wrap=on|off controls support for DEA key wrapping (default=on)
                suppress-vmdesc=on|off disables self-describing migration (default=off)
                nvdimm=on|off controls NVDIMM support (default=off)
                enforce-config-section=on|off enforce configuration section migration (default=off)
-cpu cpu        select CPU ('-cpu help' for list)
-accel [accel=]accelerator[,thread=single|multi]
               select accelerator ('-accel help for list')
               thread=single|multi (enable multi-threaded TCG)-smp [cpus=]n[,maxcpus=cpus][,cores=cores][,threads=threads][,sockets=sockets]
                set the number of CPUs to 'n' [default=1]
                maxcpus= maximum number of total cpus, including
                offline CPUs for hotplug, etc
                cores= number of CPU cores on one socket
                threads= number of threads on one CPU core
                sockets= number of discrete sockets in the system
-numa node[,mem=size][,cpus=firstcpu[-lastcpu]][,nodeid=node]
-numa node[,memdev=id][,cpus=firstcpu[-lastcpu]][,nodeid=node]
-add-fd fd=fd,set=set[,opaque=opaque]
                Add 'fd' to fd 'set'
-set group.id.arg=value
                set <arg> parameter for item <id> of type <group>
                i.e. -set drive.$id.file=/path/to/image
-global driver.property=value
-global driver=driver,property=property,value=value
                set a global default for a driver property
-boot [order=drives][,once=drives][,menu=on|off]
      [,splash=sp_name][,splash-time=sp_time][,reboot-timeout=rb_time][,strict=on|off]
                'drives': floppy (a), hard disk (c), CD-ROM (d), network (n)
                'sp_name': the file's name that would be passed to bios as logo picture, if menu=on
                'sp_time': the period that splash picture last if menu=on, unit is ms
                'rb_timeout': the timeout before guest reboot when boot failed, unit is ms
-m [size=]megs[,slots=n,maxmem=size]
                configure guest RAM
                size: initial amount of guest memory
                slots: number of hotplug slots (default: none)
                maxmem: maximum amount of guest memory (default: none)
NOTE: Some architectures might enforce a specific granularity
-mem-path FILE  provide backing storage for guest RAM
-mem-prealloc   preallocate guest memory (use with -mem-path)
-k language     use keyboard layout (for example 'fr' for French)
-audio-help     print list of audio drivers and their options
-soundhw c1,... enable audio support
                and only specified sound cards (comma separated list)
                use '-soundhw help' to get the list of supported cards
                use '-soundhw all' to enable all of them
-balloon none   disable balloon device
-balloon virtio[,addr=str]
                enable virtio balloon device (default)
-device driver[,prop[=value][,...]]
                add device (based on driver)
                prop=value,... sets driver properties
                use '-device help' to print all possible drivers
                use '-device driver,help' to print all possible properties
-name string1[,process=string2][,debug-threads=on|off]
                set the name of the guest
                string1 sets the window title and string2 the process name (on Linux)
                When debug-threads is enabled, individual threads are given a separate name (on Linux)
                NOTE: The thread names are for debugging and not a stable API.
-uuid %08x-%04x-%04x-%04x-%012x
                specify machine UUID
:
Block device options:
-fda/-fdb file  use 'file' as floppy disk 0/1 image
-hda/-hdb file  use 'file' as IDE hard disk 0/1 image
-hdc/-hdd file  use 'file' as IDE hard disk 2/3 image
-cdrom file     use 'file' as IDE cdrom image (cdrom is ide1 master)
-blockdev [driver=]driver[,node-name=N][,discard=ignore|unmap]
          [,cache.direct=on|off][,cache.no-flush=on|off]
          [,read-only=on|off][,detect-zeroes=on|off|unmap]
          [,driver specific parameters...]
                configure a block backend
-drive [file=file][,if=type][,bus=n][,unit=m][,media=d][,index=i]
       [,cyls=c,heads=h,secs=s[,trans=t]][,snapshot=on|off]
       [,cache=writethrough|writeback|none|directsync|unsafe][,format=f]
       [,serial=s][,addr=A][,rerror=ignore|stop|report]
       [,werror=ignore|stop|report|enospc][,id=name][,aio=threads|native]
       [,readonly=on|off][,copy-on-read=on|off]
       [,discard=ignore|unmap][,detect-zeroes=on|off|unmap]
       [[,bps=b]|[[,bps_rd=r][,bps_wr=w]]]
       [[,iops=i]|[[,iops_rd=r][,iops_wr=w]]]
       [[,bps_max=bm]|[[,bps_rd_max=rm][,bps_wr_max=wm]]]
       [[,iops_max=im]|[[,iops_rd_max=irm][,iops_wr_max=iwm]]]
       [[,iops_size=is]]
       [[,group=g]]
                use 'file' as a drive image
-mtdblock file  use 'file' as on-board Flash memory image
-sd file        use 'file' as SecureDigital card image
-pflash file    use 'file' as a parallel flash image
-snapshot       write to temporary files instead of disk image files
-hdachs c,h,s[,t]
                force hard disk 0 physical geometry and the optional BIOS
                translation (t=none or lba) (usually QEMU can guess them)
-fsdev fsdriver,id=id[,path=path,][security_model={mapped-xattr|mapped-file|passthrough|none}]
 [,writeout=immediate][,readonly][,socket=socket|sock_fd=sock_fd]
 [[,throttling.bps-total=b]|[[,throttling.bps-read=r][,throttling.bps-write=w]]]
 [[,throttling.iops-total=i]|[[,throttling.iops-read=r][,throttling.iops-write=w]]]
 [[,throttling.bps-total-max=bm]|[[,throttling.bps-read-max=rm][,throttling.bps-write-max=wm]]]
 [[,throttling.iops-total-max=im]|[[,throttling.iops-read-max=irm][,throttling.iops-write-max=iwm]]]
 [[,throttling.iops-size=is]]
-virtfs local,path=path,mount_tag=tag,security_model=[mapped-xattr|mapped-file|passthrough|none]
        [,writeout=immediate][,readonly][,socket=socket|sock_fd=sock_fd]
-virtfs_synth Create synthetic file system image
:
USB options:
-usb            enable the USB driver (will be the default soon)
-usbdevice name add the host or guest USB device 'name'
:
Display options:
-display sdl[,frame=on|off][,alt_grab=on|off][,ctrl_grab=on|off]
            [,window_close=on|off][,gl=on|off]
-display gtk[,grab_on_hover=on|off][,gl=on|off]|
-display vnc=<display>[,<optargs>]
-display curses
-display none                select display type
The default display is equivalent to
    "-vnc localhost:0,to=99,id=default"
-nographic      disable graphical output and redirect serial I/Os to console
-curses         shorthand for -display curses
-no-frame       open SDL window without a frame and window decorations
-alt-grab       use Ctrl-Alt-Shift to grab mouse (instead of Ctrl-Alt)
-ctrl-grab      use Right-Ctrl to grab mouse (instead of Ctrl-Alt)
-no-quit        disable SDL window close capability
-sdl            shorthand for -display sdl
-spice [port=port][,tls-port=secured-port][,x509-dir=<dir>]
       [,x509-key-file=<file>][,x509-key-password=<file>]
       [,x509-cert-file=<file>][,x509-cacert-file=<file>]
       [,x509-dh-key-file=<file>][,addr=addr][,ipv4|ipv6|unix]
       [,tls-ciphers=<list>]
       [,tls-channel=[main|display|cursor|inputs|record|playback]]
       [,plaintext-channel=[main|display|cursor|inputs|record|playback]]
       [,sasl][,password=<secret>][,disable-ticketing]
       [,image-compression=[auto_glz|auto_lz|quic|glz|lz|off]]
       [,jpeg-wan-compression=[auto|never|always]]
       [,zlib-glz-wan-compression=[auto|never|always]]
       [,streaming-video=[off|all|filter]][,disable-copy-paste]
       [,disable-agent-file-xfer][,agent-mouse=[on|off]]
       [,playback-compression=[on|off]][,seamless-migration=[on|off]]
       [,gl=[on|off]][,rendernode=<file>]
   enable spice
   at least one of {port, tls-port} is mandatory
-portrait       rotate graphical output 90 deg left (only PXA LCD)
-rotate <deg>   rotate graphical output some deg left (only PXA LCD)
-vga [std|cirrus|vmware|qxl|xenfb|tcx|cg3|virtio|none]
                select video card type
-full-screen    start in full screen
-vnc <display>  shorthand for -display vnc=<display>
:
Network options:
-netdev user,id=str[,ipv4[=on|off]][,net=addr[/mask]][,host=addr]
         [,ipv6[=on|off]][,ipv6-net=addr[/int]][,ipv6-host=addr]
         [,restrict=on|off][,hostname=host][,dhcpstart=addr]
         [,dns=addr][,ipv6-dns=addr][,dnssearch=domain][,tftp=dir]
         [,bootfile=f][,hostfwd=rule][,guestfwd=rule][,smb=dir[,smbserver=addr]]
                configure a user mode network backend with ID 'str',
                its DHCP server and optional services
-netdev tap,id=str[,fd=h][,fds=x:y:...:z][,ifname=name][,script=file][,downscript=dfile]
         [,br=bridge][,helper=helper][,sndbuf=nbytes][,vnet_hdr=on|off][,vhost=on|off]
         [,vhostfd=h][,vhostfds=x:y:...:z][,vhostforce=on|off][,queues=n]
         [,poll-us=n]
                configure a host TAP network backend with ID 'str'
                connected to a bridge (default=br0)
                use network scripts 'file' (default=/etc/qemu-ifup)
                to configure it and 'dfile' (default=/etc/qemu-ifdown)
                to deconfigure it
                use '[down]script=no' to disable script execution
                use network helper 'helper' (default=/usr/local/libexec/qemu-bridge-helper) to
                configure it
                use 'fd=h' to connect to an already opened TAP interface
                use 'fds=x:y:...:z' to connect to already opened multiqueue capable TAP interfaces
                use 'sndbuf=nbytes' to limit the size of the send buffer (the
                default is disabled 'sndbuf=0' to enable flow control set 'sndbuf=1048576')
                use vnet_hdr=off to avoid enabling the IFF_VNET_HDR tap flag
                use vnet_hdr=on to make the lack of IFF_VNET_HDR support an error condition
                use vhost=on to enable experimental in kernel accelerator
                    (only has effect for virtio guests which use MSIX)
                use vhostforce=on to force vhost on for non-MSIX virtio guests
                use 'vhostfd=h' to connect to an already opened vhost net device
                use 'vhostfds=x:y:...:z to connect to multiple already opened vhost net devices
                use 'queues=n' to specify the number of queues to be created for multiqueue TAP
                use 'poll-us=n' to speciy the maximum number of microseconds that could be
                spent on busy polling for vhost net
-netdev bridge,id=str[,br=bridge][,helper=helper]
                configure a host TAP network backend with ID 'str' that is
                connected to a bridge (default=br0)
                using the program 'helper (default=/usr/local/libexec/qemu-bridge-helper)
-netdev l2tpv3,id=str,src=srcaddr,dst=dstaddr[,srcport=srcport][,dstport=dstport]
         [,rxsession=rxsession],txsession=txsession[,ipv6=on/off][,udp=on/off]
         [,cookie64=on/off][,counter][,pincounter][,txcookie=txcookie]
         [,rxcookie=rxcookie][,offset=offset]
                configure a network backend with ID 'str' connected to
                an Ethernet over L2TPv3 pseudowire.
                Linux kernel 3.3+ as well as most routers can talk
                L2TPv3. This transport allows connecting a VM to a VM,
                VM to a router and even VM to Host. It is a nearly-universal
                standard (RFC3391). Note - this implementation uses static
                pre-configured tunnels (same as the Linux kernel).
                use 'src=' to specify source address
                use 'dst=' to specify destination address
                use 'udp=on' to specify udp encapsulation
                use 'srcport=' to specify source udp port
                use 'dstport=' to specify destination udp port
                use 'ipv6=on' to force v6
                L2TPv3 uses cookies to prevent misconfiguration as
                well as a weak security measure
                use 'rxcookie=0x012345678' to specify a rxcookie
                use 'txcookie=0x012345678' to specify a txcookie