HTML
Introduction to HTML
Hyper Text Markup Language abbreviation: HTML. Label the parts of the web page to be displayed. The web page file itself is a text file. By adding markers to the text file, you can tell the browser how to display its contents (such as how to process words, how to arrange pictures, how to display pictures, etc.)
Code example:
<!DOCTYPE html> <!--Constraints, declarations-->
<html lang="en"> <!--htmL Label representation htmL At the beginning of, lang="zh_CN"Express Chinese html,lang="en"Express English html,The label is generally divided into two parts,namely: head and body
-->
<head> <!--Represents header information, which generally contains three parts, title label, css Style, js code-->
	<meta charset="UTF-8"> <!--Indicates that the current page is in use UTF
-8 character set-->
	<title>title</title>
</head>
<body> <!--body Label is html Topic content displayed on the page-->
	hello
</body>
</html>
Note: java files need to be compiled first, and then run by the Java virtual machine. However, HTML files do not need to be compiled and are directly parsed and executed by the browser.
Writing specification of HTML file
<html>	Represents the whole html Start of page
	<head>	Header information
		<title>title</title>	title
	</head>
	<body>	body Is the main content of the page
		Page body content
	</body>
</html>	Represents the whole html End of page
Html code comments
Introduction to HTML tags
-
Format of label:
< tag name > encapsulated data < / tag name >
-
Tag names are case insensitive.
-
Tags have their own properties.
i. It is divided into basic attributes:
bgcolor="red"
You can modify simple style effects
ii. Event properties:
onclick="alert('Hello!')" You can directly set the code after the event response.
-
Labels are divided into single label and double label.
i. Single label format:
<Tag name /> br Line feed hr level
ii. Double label format:
<Tag name> ...Encapsulated data...</Tag name>

Label syntax
<!-- ①Labels cannot be cross nested -->

correct:<div><span>Good morning, makabaka</span></div>
Error:<div><span>Good morning, makabaka</div></span>

<hr/>
<!-- ②The label must be closed correctly -->

<!-- i.Labels with text content: -->


correct:<div>Good morning, makabaka</div>
Error:<div>Good morning, makabaka

<hr />
<!-- ii.Label without text content: -->correct:<br />Error:<br><hr />
<!-- ③The attribute must have a value, and the attribute value must be quoted -->correct:<font color="blue">Good morning, makabaka</font> Error:<font color=blue>Good morning, makabaka</font> Error:<font color>Good morning, makabaka</font><hr />
<!-- ④Comments cannot be nested -->correct:<!-- Note Content --> <br/>Error:<!-- <!-- This is wrong html notes --> --><hr />
matters needing attention:
- html code is not very rigorous. Sometimes, if the label is not closed, no error will be reported.
Introduction to common labels
font label
<body><!-- Font label requirement 1: display my font label on the web page, and modify the font to Song typeface and the color to red. font Labels are font labels,It can be used to modify the font of text,colour,size(size) color Property to modify the color face Property to modify the font size Property to modify the text size--><font color="red" face="Song typeface" size="7">I'm a font label</font></body>
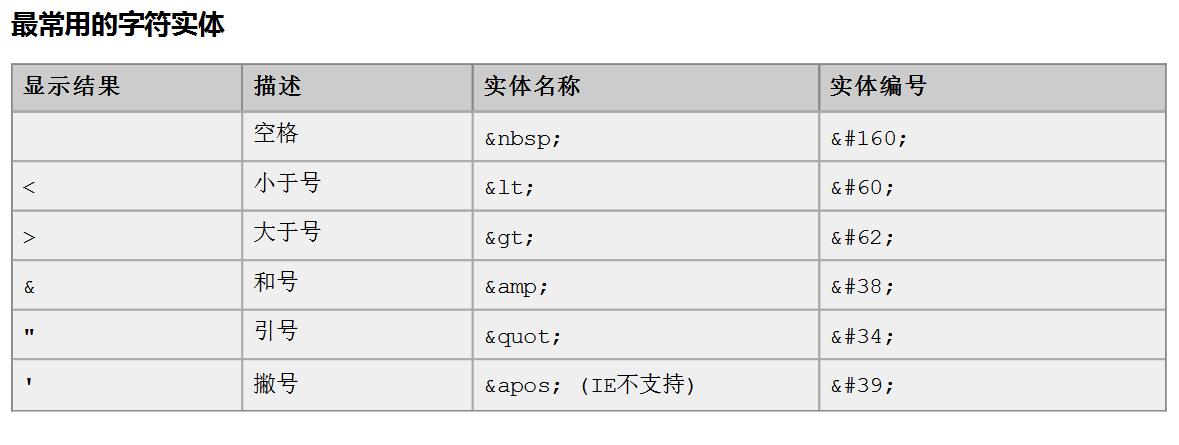
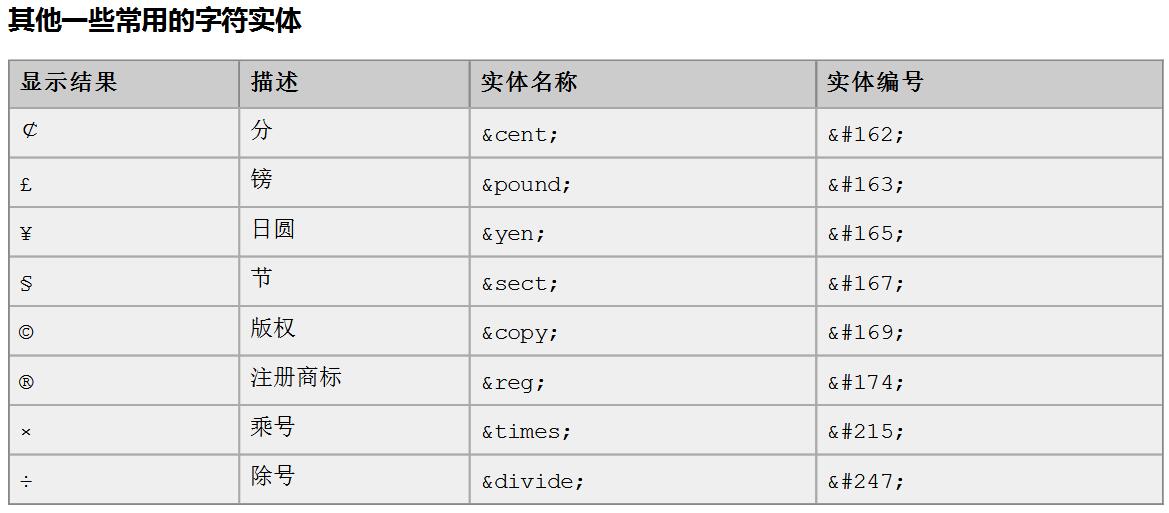
Special characters
Some characters have special meanings in HTML, such as the less than sign (<) used to define the beginning of HTML tags. If we want the browser to display these characters correctly, we must insert character entities into the HTML source code.
A character entity has three parts: a sum (&), an entity name, or # and an entity number, and a semicolon( 😉.
To display the less than sign in an HTML document, we need to write: < or<
The advantage of using entity names instead of entity numbers is that names are relatively easier to remember. The disadvantage of this is that not all browsers support the latest entity names, but almost all browsers support entity numbers very well.
Note: entities are case sensitive.
Special character table:
Title label
<body><!-- Title tag requirement 1: demonstrate the of Title 1 to title 6 h1 - h6 All title labels h1 maximum h6 minimum align Attribute is an alignment attribute left Align left(default)center play right Right align--><h1 align="left">Title 1</h1><h2 align="center">Title 2</h2><h3 align="right">Title 3</h3><h4>Title 4</h4><h5>Title 5</h5><h6>Title 6</h6><h7>Title 7</h7></body>
Hyperlinks
In the web page, all the contents that can be jumped after clicking are hyperlinks
<body><!-- a Tags are hyperlinks href Property to set the address of the connection target Property to set which target to jump to_self Represents the current page(Default value)_blank Indicates that a new page is opened to jump--><a href="http://Localhost: 8080 "> Baidu < / a > < br / > < a href =" " http://localhost:8080 " target="_ Self "> Baidu _self < / a > < br / > < a href =" " http://localhost:8080 " target="_ Blank "> Baidu _blank < / a > < br / ></body>
List label
<body><!--ul Is an unordered list type Property to modify the symbol in front of a list item li Is a list item --><ul type="none"><li>Zhao Si</li><li>Lennon </li><li>Little Shenyang</li><li>Song Xiaobao</li></ul></body>
<body><!--ol Yes, there is a sequence table type Property to modify the symbol in front of a list item li Is a list item --><ol type="a"> <li>Zhao Si</li> <li>Lennon </li> <li>Little Shenyang</li> <li>Song Xiaobao</li></ol></body>
img tag
img tags can display images on html pages.
- src property can set the path of the picture
- The width property sets the width of the picture
- The height property sets the height of the picture
- The border property sets the size of the picture border
- The alt property is used to replace the displayed text content when the picture cannot be found in the specified path
In Java se, paths are also divided into relative paths and absolute paths
- Relative path: calculated from the project name
- Absolute path: drive letter 😕 Directory / file name
In the web, paths are divided into relative paths and absolute paths
Relative path:
- . Indicates the directory where the current file is located
- .. Indicates the upper directory of the current file
- file name Represents the file in the directory where the current file is located, equivalent to/ File name (. / can be omitted)
Absolute path:
- The correct format is: http://ip : port / project name / resource path
- The error format is: drive letter 😕 Directory / file name
<img src=".\img\Picture 1.jpg" width="600" height="500" border="1" alt="The beauty can't be found"/><img src="img\Picture 1.jpg" width="600" height="500" border="1" alt="The beauty can't be found"/>
Table label
-
The table label is a table label
-
Border set table border
-
Width sets the width of the table
-
Height sets the height of the table
-
tr is the row label
-
th is the header label
-
td is the cell label
-
align sets the alignment of the table relative to the page
-
b is a bold label
-
cellspacing sets the spacing between cells
<table align="center" border="1" height="500" width="500" cellspacing="1"> <tr> <th>1</th> <th>2</th> <th>3</th> </tr> <tr> <td><b>a</b></td> <td>b</td> <td>c</td> </tr></table>

Cross row and cross column table
- The colspan property is set to span columns
- rowspan property set cross row
Create a new table with five rows and five columns. The cells in the first row and the first column span two columns, the cells in the first column of the second row span two rows, and the cells in the fourth row and the fourth column span two rows and two columns.
<table width="500" height="500" cellspacing="0" border="1"> <tr> <td colspan="2">1.1</td> <td>1.3</td> <td>1.4</td> <td>1.5</td> </tr> <tr> <td rowspan="2">2.1</td> <td>2.2</td> <td>2.3</td> <td>2.4</td> <td>2.5</td> </tr> <tr> <td>3.2</td> <td>3.3</td> <td>3.4</td> <td>3.5</td> </tr> <tr> <td>4.1</td> <td>4.2</td> <td>4.3</td> <td colspan="2" rowspan="2">4.4</td> </tr> <tr> <td>5.1</td> <td>5.2</td> <td>5.3</td> </tr></table>
 iframe frame label (embedded window)
iframe frame label (embedded window)
Ifame tag, which can open a small window on an html page to load a separate page
Steps for the combination of ifame and a Tags:
- Use the name attribute in the iframe tag to define a name
- Set the name attribute value of iframe on the target attribute of a tag
<iframe src="3.Title label.html" width="500" height="500" name="abc"></iframe> <ol> <li><a href="4.Hyperlinks.html" target="abc">Hyperlinks</a></li> <li><a href="3.Title label.html" target="abc">Title label</a></li> </ol>

Form label
A form is a collection of all elements used to collect user information in an html page Then send this information to the server
Create a form interface for personal information registration. Including user name, password and confirmation password. Gender (single choice), interests (multiple choices), nationality (drop-down list).
Hidden field, self-evaluation (multiline text field). Reset, submit.
-
The form tag is the form
-
input type=text Is the default display content set in the file input box value
-
input type=password is the default display of the password input box value
-
input type=radio Yes radio box The name attribute groups them checked="checked" means checked by default
-
input type=checkbox is the checkbox checked="checked" means it is selected by default
-
input type=reset is to reset the value attribute of the button and modify the text on the button
-
input type=submit is the text on the value attribute modification button of the submit button
-
input type=button is the value attribute of the button to modify the text on the button
-
input type=file is the file upload field input type=hidden Is a hidden field When we want to send some information without user participation, we can use the hidden domain (send it to the server at the same time when submitting)
-
The select tab is a drop-down list box
-
The option tab is the option selected="selected" setting in the drop-down list box, which is selected by default
-
textarea represents a multi line text input box (the contents in the start label and end label are the default values)
The rows property sets the height of several rows that can be displayed
The cols property sets how many characters can be displayed per line
<form> User name:<input type="text" value="Please enter your name"/><br/> User password:<input type="password" maxlength="5"/><br/> Gender:<input type="radio" name="sex" checked="checked" />male<input type="radio" name="sex"/>female<br/> hobby:<input type="checkbox" name="hobby" checked="checked"/>Java<input type="checkbox" name="hobby"/>C++<input type="checkbox" name="hobby" checked="checked">Python<br/> Nationality:<select> <option>Please select nationality</option> <option selected="selected">China</option> <option>U.S.A</option> <option>Japan</option> </select><br/> Self evaluation:<textarea rows="10" cols="20">Love you</textarea><br/><hr> <input type="reset" value="reset"/><br/> <input type="submit" value="submit"/><br/> <input type="button" value="This is a button"><br/> <input type="file"><br/> <input type="hidden" value="avc"/> </form>

Form formatting
<form> <h1 align="center">User registration</h1> <table align="center"> <tr> <td>User name:</td> <td><input type="text" value="Please enter your name"/></td> </tr> <tr> <td>User password:</td> <td><input type="password" maxlength="5"/></td> </tr> <tr> <td>Gender:</td> <td><input type="radio" name="sex" checked="checked" />male <input type="radio" name="sex"/>female </td> </tr> <tr> <td>hobby:</td> <td> <input type="checkbox" checked="checked" name="hobby"/>Java <input type="checkbox" name="hobby"/>C++ <input type="checkbox" checked="checked" name="hobby">Python </td> </tr> <tr> <td>Nationality:</td> <td><select> <option>Please select nationality</option> <option selected="selected">China</option> <option>U.S.A</option> <option>Japan</option> </select></td> </tr> <tr> <td>Self evaluation:</td> <td><textarea rows="10" cols="20">Love you</textarea></td> </tr> <hr> <tr> <td><input type="reset" value="reset"/></td> <td align="center"><input type="submit" value="submit"/></td> <td><input type="hidden" value="avc"/></td> </tr> <tr> <td><input type="button" value="This is a button"></td> <td><input type="file"></td> </tr> </table></form>

Form submission details
The form tag is a form tag
The action property sets the server address of the submission
The method property sets the submission method get (default) or POST
There are three situations when the data is not sent to the server when the form is submitted:
1. The form item has no name attribute value
2. Both radio and check (option tab in the drop-down list) need to add value attribute to send to the server
3. The form item is not in the submitted form tag
GET requests are characterized by:
1. The address in the browser address bar is: action attribute [+? + request parameter]. The format of request parameter is: name = value & name = value
2. Unsafe
3. It has the limitation of data length
POST requests are characterized by:
1. There is only action attribute value in the browser address bar
2. Be secure relative to GET requests
3. Theoretically, there is no limit on data length
<form action="http://Localhost: 8080 "method =" post "> < H1 align =" center "> user registration < / H1 > < table align =" center "> < tr > < td > User Name: < / td > < td > < input type =" text "value =" please enter the name "name =" username "/ > < / td > < / TR > < tr > < td > User Password: < / td > < td > < input type =" password "MaxLen gt h =" 5 "name =" Password "/ > < / td > < / TR > < tr > < td > gender: < / td > < td > < input type =" radio "name =" sex "checked =" checked "value =" boy "/ > male < input type =" radio "name =" sex "value =" girl "/ > female < / td > < / TR > < tr > < td > hobbies: < / td > < td > < input type =" checkbox " checked="checked" name="hobby" value="java"/>Java <input type="checkbox" name="hobby" value="c++"/>C++ <input type="checkbox" checked="checked" name="hobby" value="python "> Python < / td > < / TR > < tr > < td > Nationality: < / td > < td > < Select > < option > please select nationality < / option > < option selected =" name = "nation" value = "China" > China < / option > < option name = "nation" value = "United States" > United States < / option > < option name = "nation "Value =" Japan "> Japan < / option > < / Select > < / td > < / TR > < tr > < td > self evaluation: < / td > < td > < textarea rows =" 10 "cols =" 20 "name =" text "> love you < / textarea > < / td > < / TR > < HR > < tr > < td > < input type =" reset "value =" reset "/ > < / td > < TD align =" center "> < input type =" submit "Value =" submit "/ > < / td > < td > < input type =" hidden "value =" AVC "/ > < / td > < / TR > < tr > < td > < input type =" button "value =" this is a button "> < / td > < td > < input type =" file "> < / td > < / TR > < / Table > < / form >
Other labels
- div tags are exclusive by default
- span tag whose length is the length of the encapsulated data
- p by default, the paragraph label will leave one line above or below the paragraph (if it already exists, it will no longer be empty)

<div>div Label 1</div><div>div Label 2</div><span>span Label 1</span><span>span Label 2</span><p>p Paragraph label 1</p><p>p Paragraph label 2</p>
CSS
CSS is a cascading style form. Is a markup language used to (enhance) control web page style and allow the separation of style information from web page content.
rule of grammar
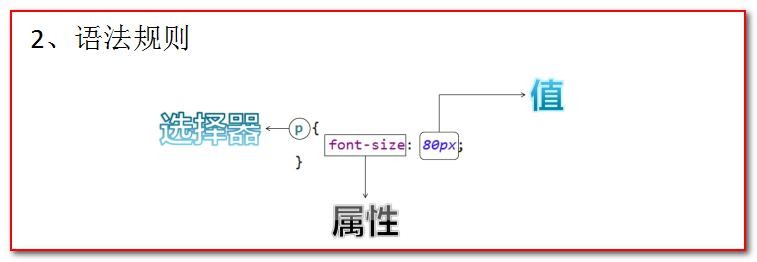
Selector: the browser determines the HTML elements (tags) affected by CSS styles according to the "selector".
Property is the name of the style you want to change, and each property has a value. The attribute and value are separated by colons and surrounded by curly braces, thus forming a complete style declaration, for example: p {color: blue}
Multiple declarations: if you want to define more than one declaration, you need to separate each declaration with a semicolon. Although a semicolon may not be added at the end of the last statement (try to add a semicolon at the end of each statement)
For example:
p{ color:red; font-size:30px;}
Note: generally, each line only describes one attribute
CSS comments: / comment content/
Combination of CSS and HTML
The style tag is specifically used to define css style codes
First kind
Define two div and span labels respectively, and modify the style of each div label as: 1 pixel border, solid line and red.

Solid: solid line
px: pixels
<!DOCTYPE html><html lang="en"><head> <meta charset="UTF-8"> <title>Title</title></head><body> <div style="border: 1px solid red;">div Label 1</div> <div style="border: 1px solid red;">div Label 1</div> <span style="border: 1px solid red">span label</span> <span style="border: 1px solid red">span label</span></body></html>
Disadvantages of this approach?
-
If there are too many labels. There are many styles. The amount of code is very large.
-
Very poor readability.
-
Css code has no reusability
Second
The style tag is full of css content.
<!DOCTYPE html><html lang="en"><head> <meta charset="UTF-8"> <title>Title</title> <style> /* Requirement 1: define two div and span labels respectively, and modify the style of each div label as: 1 pixel border, solid line and red.*/ div{ border: 1px solid red; } span{ border: 1px solid blue } </style></head><body> <div>div Label 1</div> <div>div Label 1</div> <span>span label</span> <span>span label</span></body></html>
-
Code can only be reused in the same page, and css code cannot be reused in multiple pages.
-
It is inconvenient to maintain. There will be thousands of pages in the actual project, which need to be modified in each page. The workload is too heavy.
Third
The css style is written into a separate css file, which can be reused by introducing the link tag.
Use the < link rel = "stylesheet" type = "text / css" href = ". / styles. css" / > tag of html to import css style files.
css file content:
div{ border: 1px solid red;}span{ border: 1px solid blue}
html file code:
<!DOCTYPE html><html lang="en"><head> <meta charset="UTF-8"> <title>Title</title> <link rel="stylesheet" type="text/css" href="cssmode.css"/></head><body> <div>div Label 1</div> <div>div Label 1</div> <span>span label</span> <span>span label</span></body></html>
CSS selector
Tag name selector
The format of the tag name selector is:
Tag name{ Attributes: Values;}
The tag name selector can determine which tags use this style passively.
!DOCTYPE html><html><head><meta charset="UTF-8"><title>CSS selector</title><style type="text/css"> div{border: 1px solid yellow; color: blue;font-size: 30px;}span{border: 5px dashed blue; color: yellow;font-size: 20px;}</style></head><body> <div>div Label 1</div> <div>div Label 2</div> <span>span Label 1</span> <span>span Label 2</span></body></html>
id selector
The format of the id selector is:
#id attribute value{ Attributes: values;}
id selector allows us to selectively use this style through the id attribute.
But it can only be used once, and the class selector can be used repeatedly
<!DOCTYPE html><html><head><meta charset="UTF-8"><title>ID selector</title><style type="text/css">#id001{color: blue; font-size: 30px;border: 1px yellow solid;}#id002{color: red;font-size: 20px;border: 5px blue dotted ;}</ Style > < / head > < body > < div id = "ID002" > div tag1 < / div > < div id = "ID001" > div tag2 < / div ></body></html>
Class selector (class selector)
The format of the class type selector is:
.class Attribute value{ Attributes: Values;}
The class type selector can effectively and selectively use this style through the class attribute.
<!DOCTYPE html><html><head><meta charset="UTF-8"><title>class Type Selectors </title><style type="text/css">.class01{color: blue; font-size: 30px;border: 1px solid yellow;}.class02{color: grey; font-size: 26px;border: 1px solid red;}</style></head><body><!--Requirement 1: modify class The attribute value is class01 of span or div Label, the font color is blue, and the font size is 30 pixels. The border is 1 pixel yellow solid line. Requirement 2: modify class The attribute value is class02 of div Label, the font color is gray, and the font size is 26 pixels. The border is a 1-pixel solid red line.--><div class="class02">div label class01</div><div class="class02">div label</div><span class="class02">span label class01</span><span>span Label 2</span></body></html>
Combination selector
The format of the combination selector is:
Selector 1, selector 2, selector n{ Attributes: Values;}
Combining selectors allows multiple selectors to share the same css style code.
<!DOCTYPE html><html><head><meta charset="UTF-8"><title>class Type Selectors </title><style type="text/css">.class01 , #id01{ color: blue; font-size: 20px;border: 1px yellow solid;}</ style></head><body><!-- Requirement 1: modify div tags of class="class01" and all span tags of id="id01". The font color is blue and the font size is 20 pixels. The border is 1 pixel yellow solid line. -- >< Div id="id01" > div tag class01 < / div > < br / > < span > span tag < / span > < br / > < div > div tag < / div > < br / > < div > div tag id01 < / div > < br / > < body > < HTML / >
Common styles
-
Font color
Color names can be written, such as black, blue, red, green, etc
Color can also write rgb value and hexadecimal value: for example, rgb(255,0,0), #00F6DE. If you write hexadecimal value, you must add#
-
width
width:19px;
Width can write pixel value: 19px; You can also write the percentage value: 20%;
-
height
height:20px;
Height writable pixel value: 19px; You can also write the percentage value: 20%;
-
background color
background-color:#0F2D4C
-
Font style
color: #FF0000; Font color red
font-size: 20px; font size
-
Red 1 pixel solid border
border: 1px solid red;
-
DIV centered
margin-left: auto;
margin-right: auto;
-
Text centered
text-align: center;
-
Hyperlink de underline
text-decoration: none;
-
Table thin line
table {
border: 1px solid black; / Set border / border collapse: collapse/ Merge borders/
}
td,th {
border: 1px solid black; / Set border/
}
-
List de embellishment
ul {
list-style: none;
}
<!DOCTYPE html><html><head><meta charset="UTF-8"><title>06-css Common styles.html</title><style type="text/css">div{color: red;border: 1px yellow solid; width: 300px;height: 300px; background-color: green; font-size: 30px;margin-left: auto; margin-right: auto; text-align: center;}table{border: 1px red solid; border-collapse: collapse;}td{border: 1px red solid;}a{text-decoration: none;}ul{ list-style: none;}</style></head><body><ul><li>11111111111</li><li>11111111111</li><li>11111111111</li><li>11111111111</li><li>11111111111</li></ul><table><tr><td>1.1</td><td>1.2</td></tr></table><a href="http://www.baidu. Com "> Baidu < / a > < div > I'm div tag < / div ></body></html>
JavaScript
The birth of JavaScript language is mainly to complete the data verification of the page. Therefore, it runs on the client and needs to run the browser to parse and execute JavaScript code.
JS is a product of Netscape Netscape, which was first named LiveScript; To attract more java programmers. Renamed JavaScript.
JS is a weak type and Java is a strong type.
A weak type is a variable type.
Strong typing is the time to define variables. Type determined. And immutable.
characteristic:
-
Interactivity (what it can do is the dynamic interaction of information)
-
Security (direct access to local hard disk is not allowed)
-
Cross platform (any browser that can interpret JS can execute, regardless of the platform)
Combination of JavaScript and html code
The first way
Just use the script tag in the head tag or the body tag to write JavaScript code
<!DOCTYPE html><html lang="en"><head> <meta charset="UTF-8"> <title>Title</title> <script type="text/javascript"> alert("hello javascript!") </script></head><body></body></html>
The second way
Use the script tag to introduce a separate JavaScript code file
After using import, you cannot write other statements in the label.
js code:
alert("hello world!");
html code:
<!DOCTYPE html><html lang="en"><head> <meta charset="UTF-8"> <title>Title</title> <script type="text/javascript" src="js.js"></script></head><body></body></html>
variable
What are variables? A variable is the name of memory that can hold certain values.
Variable type of JavaScript:
- Value type: number
- string type: string
- Object type: object
- boolean type: boolean
- Function type: function
Special values in JavaScript:
Undefined: undefined. When all js variables are not assigned initial values, the default value is undefined
Null: null value
NaN: Not a Number. Non numeric. Non numeric.
Format of defined variables in JS:
var variable name;
var variable name = value;
<!DOCTYPE html> <html lang="en"> <head> <meta charset="UTF-8"><title>Title</title> <script type="text/javascript">var i; // alert(i); // undefined i = 12; // typeof() is a function provided by the JavaScript language// alert( typeof(i) ); // numberi = "abc"; // It can take the data type of the variable and return / / Alert (typeof (I))// String var a = 12; var b = "abc"; alert( a * b ); // Nan is non numeric, non numeric</ script> </head> <body></body> </html>
Relational (comparison) operation
be equal to:
==
It's a simple comparison of literal values
All equal to:
===
In addition to comparing literal values, the data types of the two variables are also compared
Logical operation
And operation:&&
Or operation:||
Inverse operation:!
In the JavaScript language, all variables can be used as boolean variables.
0, null, undefined, "" (empty string) are considered false;
-
&&And operation.
There are two situations:
The first: when the expressions are all true. Returns the value of the last expression.
The second: when one of the expressions is false. Returns the value of the first false expression
-
||Or operation
The first case: when all expressions are false, the value of the last expression is returned
The second case: as long as one expression is true. Will return the value of the first expression that is true
And & & there is a short circuit with the operation and 𞓜 or operation.
Short circuit is when the & & or 𞓜 operation has a result. The following expression is no longer executed
array
Array definition method
Definition of array in JS:
var Array name = []; // Empty array var array name = [1, 'abc', true]// Define an array and assign elements at the same time
For arrays in javaScript language, as long as we assign values through the array subscript, the maximum subscript value will automatically expand the capacity of the array.
<!DOCTYPE html> <html lang="en"><head> <meta charset="UTF-8"> <title>Title</title><script type="text/javascript">var arr = [true,1]; // Define an empty array / / Alert (arr.length)// 0 arr[0] = 12; // alert( arr[0] );// 12 // alert( arr.length ); // 0 / / for arrays in JavaScript language, as long as we assign values through the array subscript, the maximum subscript value will automatically expand the capacity of the array. arr[2] = "abc"; alert(arr.length); //3 // alert(arr[1]);// undefined / / traversal of array for VAR (I = 0; I < arr.length; I + +){ alert(arr[i]); }</ script></head><body></body> </html>
function
Two definitions
First kind
You can use the function keyword to define a function
function Function name(parameter list ){ Function body }
How to define a function with a return value in the JavaScript language?
Just use the return statement directly in the function body to return the value!
<!DOCTYPE html><html lang="en"><head> <meta charset="UTF-8"> <title>Title</title> <script type="text/javascript"> function fun(){ alert("Parameterless function called!"); } fun(); function fun2(a,b){ alert("Parametric function fun2 Called a="+a+",b="+b); } fun2(2,4); function sum(a,b){ return a+b; } alert("The summation function is called, and the result is:"+sum(1,1)); </script></head><body></body></html>
Second
var Function name = function(parameter list ) { Function body }
<!DOCTYPE html><html lang="en"><head> <meta charset="UTF-8"> <title>Title</title> <script> var fun = function (){ alert("Parameterless function!"); } fun(); var fun1 = function (a,b){ alert("Parametric function: a="+a+",b="+b); } fun1(20,50); var fun2 = function (a,b){ return a+b; } alert(fun2(15,20)); </script></head><body></body></html>
Note: function overloading is allowed in Java. However, in JS, function overloading will directly overwrite the previous definition
arguments of function (only in function function)
Variables that do not need to be defined in the function function, but can be directly used to obtain all parameters. We call it the stealth parameter. Invisible parameters are especially like java based variable length parameters.
public void fun( Object ... args );
The variable length parameter is an array. Then the invisible parameters in js are the same as the variable length parameters in java. The operation is similar to an array.
<!DOCTYPE html><html lang="en"><head> <meta charset="UTF-8"> <title>Title</title> <script> function sum(num1,num2){ var result = 0; for(var i = 0; i < arguments.length; i++){ if(typeof(arguments[i]) == "number") result += arguments[i]; } return result; } alert(sum(10,20,"abc")); </script></head><body></body></html>
Custom objects in JS
Custom Object in the form of Object
Definition of object:
var Variable name = new Object(); // Object instance (empty object) variable name Attribute name = value// Define an attribute variable name Function name = function() {} / / define a function
Object access:
Variable name.attribute / Function name();
<!DOCTYPE html><html lang="en"><head> <meta charset="UTF-8"> <title>Title</title> <script type="text/javascript"> var oj = new Object(); oj.name = "Horse cow force"; oj.age = 18; oj.fun = function (){ alert("full name:"+this.name+" Age:"+this.age); } oj.fun(); </script></head><body></body></html>
Custom objects in curly braces
var Variable name = {// Empty object property name: value, / / define an attribute property name: value, / / define an attribute function name: function() {} / / define a function};
Object access:
Variable name.attribute / Function name();
<!DOCTYPE html><html lang="en"><head> <meta charset="UTF-8"> <title>Title</title> <script type="text/javascript"> var oj = { name:"Horse cow force", age:18, fun:function (){ alert("full name:"+this.name+" Age:"+this.age) } } oj.fun(); </script></head><body></body></html>
Events in js
What is an event? Event is the response of the computer input device to interact with the page. We call it an event.
Common events:
- onload loading completion event: after the page is loaded, it is often used to initialize the page js code
- onclick click event: commonly used for button click response operations.
- onblur loss of focus event: it is often used to verify whether the input content is legal after the input box loses focus.
- onchange content change event: it is often used to operate after the contents of the drop-down list and input box are changed
- onsubmit form submission event: it is often used to verify whether all form items are legal before form submission.
Event registration can be divided into static registration and dynamic registration:
What is event registration (binding)?
In fact, it tells the browser what operation code to execute after the event response, which is called event registration or event binding.
- Static registration of events: the event attribute of the html tag is directly assigned to the code after the event response. This method is called static registration.
- Dynamic registration event: it refers to getting the dom object of the tag through js code, and then through the dom object Event name = function() {} This form is assigned to the code after the event response, which is called dynamic registration.
Basic steps of dynamic registration:
- Get label object
- Label object Event name = fuction() {}
onload load completion event
Static:
<!DOCTYPE html><html lang="en"><head> <meta charset="UTF-8"> <title>Title</title> <script type="text/javascript"> function onloadfun(){ alert("Static registration function"); } </script></head><body onload="alert('Static registration')"></body></html>
Dynamic:
<!DOCTYPE html><html lang="en"><head> <meta charset="UTF-8"> <title>Title</title> <script type="text/javascript"> window.onload = function(){ alert("Dynamic state registration function"); } </script></head><body></body></html>
onclick click event
<!DOCTYPE html><html lang="en"><head> <meta charset="UTF-8"> <title>Title</title> <script type="text/javascript"> function onclickfun(){ alert("Static registration"); } window.onload = function() { //1. Get tag object / * * document is an object (document) provided by JavaScript language < br / > * get * Element element (i.e. tag) * by.. By.. By* ID attribute * getelementbyid get tag object through ID attribute * / var btnobj = document getElementById("btn02"); // 2. Through the label object Event name = function() {} btnobj Onclick = function() {alert ("dynamically registered onclick event");}}</ Script > < / head > < body > < button onclick = "onclickfun()" > button 1 < / button > < button id = "btn02" > button 2 < / button ></body></html>
onblur loss of focus event
Press F12 to open the console

<!DOCTYPE html><html lang="en"><head> <meta charset="UTF-8"> <title>Title</title> <script type="text/javascript"> // Statically registering a loss of focus event function onblurfun() {/ / console is a console object provided by the JavaScript language. It is specifically used to print output to the browser controller for testing. / / log() is the printing method console.log("statically registering a loss of focus event");}// Dynamically register the onblur event window Onload = function() {/ / 1 get the label object var passwordobj = document.getelementbyid ("password"); / / 2 pass the label object. Event name = function() {}; passwordObj. Onblur = function() {console.log("dynamic registration losing focus event");}}</ Script > < head / > < body > User Name: < input type = "text" onblur = "onblurfun()" > < br / > password: < input type = "text" id = "password" > < br / ></body></html>
onchange content change event
<!DOCTYPE html><html lang="en"><head> <meta charset="UTF-8"> <title>Title</title> <script type="text/javascript"> function onchangeFun() { alert("The language has changed"); } window.onload = function () { //1. Get the tag var sel2 = document getElementById("select2"); // 2. Through the label object Event name = function() {}; sel2. Onchange = function() {alert ("the number has changed")} < / script > < / head > < body > please select the best language you think: < select onchange = "onchangefun()" > < option > C < / option > < option > C + + < / option > < option > java < / option > < option > Python < / option > < / Select > please select your favorite number: < select id = "select2" > <option>1</option> <option>2</option> <option>3</option> <option>4</option></select></body></html>
onsubmit form submission event
<!DOCTYPE html><html lang="en"><head> <meta charset="UTF-8"> <title>Title</title> <script> function onsubmitfun(){ // To verify whether all form items are legal, if one is illegal, prevent the form from submitting alert("static registration form submission event - > illegal found") return false;} window. Onload = function() {var formobj = document.getelementbyid ("form2"); formobj.onsubmit = function() {alert("dynamic registration form submission event - illegal found"); return false;}}</ script></head><body> <!-- Return false to prevent form submission -- > < form action=“ http://localhost:8080 "Method =" get "onsubmit =" return onsubmitfun() "> < input type =" submit "value =" static registration submission "> < / form > < form action =" http://localhost:8080 "Method =" get "id =" form2 "onsubmit =" return onsubmitfun() "> < input type =" submit "value =" dynamic registration submission "> < / form ></body></html>
DOM model
The full name of DOM is Document Object Model
Vernacular is to convert the labels, attributes and text in the document into objects for management.
So how do they manage tags, attributes and text by converting them into objects. This is the focus of our study.
Document object

Understanding of Document object:
The first point: Document, which manages the content of all HTML documents.
The second point: document, which is a tree structured document. There is a hierarchical relationship.
Third: it lets us objectify all tags
Point 4: we can access all tag objects through document.
So what about objectifying html tags?
<body><div id="div01">div01</div></body>
Simulate objectification, equivalent to:
class Dom{private String id; // id attribute private String tagName// Indicates the tag name private Dom parentNode// Father private list < DOM > children// Child node private String innerHTML// Content between start tag and end tag}
Method introduction in Document object
-
document.getElementById(elementId)
Find the tag dom object through the id attribute of the tag, and elementId is the id attribute value of the tag
-
document.getElementsByName(elementName)
Find the dom object of the tag through the name attribute of the tag, and the name attribute value of the elementName tag
-
document.getElementsByTagName(tagname)
Find the dom object by tag name. tagname is the tag name
-
document.createElement(tagName)
Method to create a label object with a given label name. tagName is the tag name to create
Note:
For the three query methods of the document object, if there is an id attribute, the getElementById method is preferred for query. If there is no id attribute, the getElementsByName method is preferred for query. If there is no id attribute and name attribute, finally, check getElementsByTagName by tag name
For regular expressions, you can go to JavaScript RegExp object | rookie tutorial (runoob.com) see.
getElementById method example code:
Verify user name: red ink pop-up prompt
<!DOCTYPE html><html lang="en"><head> <meta charset="UTF-8"> <title>Title</title> <script> function onclickFun(){ //1. When we want to operate a tag, we must obtain the tag object first. var usernameObj = document.getElementById("username"); // Gets the value of the input box var usernametext = usernameobj value; // 2. To verify that the string conforms to a certain rule, you need to use the regular expression technology var patt = / ^ \ w{5,12} $/; / ** The test () method is used to test whether a string matches my rule, * if it matches, it returns true. False if there is no match. **/ var spanObj = document. getElementById("usernamespan"); // InnerHTML indicates the contents of the start tag and the end tag. / / innerHTML is readable and writable if (PAT. Test (usernametext)) {spanobj. InnerHTML = "the user name is legal!";} Else {spanobj. InnerHTML = "illegal user name!";}}</ Script > < / head > < body > User Name: < input type = "text" value = "12345" id = "username" > < span id = "usernamespan" style = "color: Red" > < / span > < br / > < button onclick = "onclickfun()" > verify < / button ></body></html>
Verify user name: ✔❌ Tips
<!DOCTYPE html><html lang="en"><head> <meta charset="UTF-8"> <title>Title</title> <script> function onclickFun(){ //1. When we want to operate a tag, we must obtain the tag object first. var usernameObj = document.getElementById("username"); // Gets the value of the input box var usernametext = usernameobj value; // 2. To verify that the string conforms to a certain rule, you need to use the regular expression technology var patt = / ^ \ w{5,12} $/; / ** The test () method is used to test whether a string matches my rule, * if it matches, it returns true. False if there is no match. **/ var spanObj = document. getElementById("usernamespan"); // InnerHTML indicates the contents of the start tag and the end tag. / / innerHTML is readable and writable if (PAT. Test (usernametext)) {spanobj. InnerHTML = "< img SRC = \" right. Png \ "height = \" 14 \ "width = \" 14 \ "/ >";} else{ spanObj.innerHTML = "<img src=\"wrong.png\" height=\"14\" width=\"14\"/>"; } } </ Script > < / head > < body > User Name: < input type = "text" value = "12345" id = "username" > < span id = "usernamespan" style = "color: Red" > < / span > < br / > < button onclick = "onclickfun()" > verify < / button ></body></html>
getElementsByName method example code:
<!DOCTYPE html><html lang="en"><head> <meta charset="UTF-8"> <title>Title</title> <script> function checkAll(){ // document.getElementsByName(); Query and return multiple tag object collections according to the specified name attribute. / / the operation of this collection is the same as that of an array. / / each element in the collection is a dom object. / / the order of the elements in this collection is their order from top to bottom in the HTML page. Var hobbies = document getElementsByName("hobby"); // Checked indicates the selected status of the check box. If true is checked, false is unchecked. / / checked is readable and writable for (VaR I = 0; I < hobbies. Length; I + +) {hobbies [i]. Checked = true;}} function checkNone(){ var hobbies = document.getElementsByName("hobby"); for(var i = 0;i < hobbies.length;i++){ hobbies[i].checked = false; } } function checkReserve(){ var hobbies = document.getElementsByName("hobby"); for(var i = 0;i < hobbies.length;i++){ if(hobbies[i].checked == false){ hobbies[i].checked = true; } else{ hobbies[i].checked = false; } } } </ Script > < / head > < body > hobbies: < input type = "checkbox" name = "hobby" value = "C + +" > C + + < input type = "checkbox" name = "hobby" value = "Java" > java < input type = "checkbox" name = "hobby" value = "Python" > Python < input type = "checkbox" name = "hobby" value = "C" > C < br / > < button onclick = "checkall()" > select all < / button > < button onclick = "checknone()" >Uncheck < / button > < button onclick = "checkreserve()" > invert < / button ></body></html>
getElementsByTagName method example code:
<!DOCTYPE html><html lang="en"><head> <meta charset="UTF-8"> <title>Title</title> <script> function checkAll(){ var inputs = document.getElementsByTagName("input"); // Query according to the specified tag name and return the collection. / / the operation of this collection is the same as that of an array. / / the collection contains dom objects. / / the order of elements in the collection is from top to bottom in the HTML page. for(var i = 0;i < inputs.length;i++){ inputs[i].checked = true; } } </ Script > < / head > < body > < input type = "checkbox" value = "C + +" > C + + < input type = "checkbox" value = "Java" > java < input type = "checkbox" value = "Python" > Python < input type = "checkbox" value = "C" > C < br / > < button onclick = "checkall()" > select all < / button ></body></html>
Sample code of CreateElement and appendChild methods:
<!DOCTYPE html><html lang="en"><head> <meta charset="UTF-8"> <title>Title</title> <script> window.onload = function (){ //Method 1 var divobj1 = document createElement("div"); divObj1. InnerHTML = "I'm a horse!"; document.body.appendChild(divObj1); // Mode 2 description text is also a node var divobj2 = document createElement("div"); var text = document. CreateTextNode ("year 18"); divObj2. appendChild(text); document. body. appendChild(divObj2); } </ script></head><body></body></html>
Common attributes and methods of nodes
A node is a label object
method
Called through a specific element node
-
getElementsByTagName()
Method to obtain the child node with the specified tag name of the current node
-
appendChild( oChildNode )
Method, you can add a child node. oChildNode is the child node to be added
attribute
-
childNodes
Property to get all child nodes of the current node
-
firstChild
Property to get the first child node of the current node
-
lastChild
Property to get the last child node of the current node
-
parentNode
Property to get the parent node of the current node
-
nextSibling
Property to get the next node of the current node
-
previousSibling
Property to get the previous node of the current node
-
className
Gets or sets the class property value of the label
-
innerHTML
Property to get / set the contents in the start tag and end tag
-
innerText
Property to get / set the text in the start tag and end tag
dom object query exercise
css:
@CHARSET "UTF-8";body { width: 800px; margin-left: auto; margin-right: auto;}button { width: 300px; margin-bottom: 10px;}#btnList { float:left;}#total{ width: 450px; float:left;}ul{ list-style-type: none; margin: 0px; padding: 0px;}.inner li{ border-style: solid; border-width: 1px; padding: 5px; margin: 5px; background-color: #99ff99; float:left;}.inner{ width:400px; border-style: solid; border-width: 1px; margin-bottom: 10px; padding: 10px; float: left;}
html:
<!DOCTYPE html><html><head><meta charset="UTF-8"><title>dom query</title><link rel="stylesheet" type="text/css" href="style/css.css" /><script type="text/javascript"> window.onload = function(){ //1. Find #bj nodes document.getElementById("btn01").onclick = function () { var bjObj = document.getElementById("bj"); alert(bjObj.innerText); } // 2. Find all Li nodes var btn02Ele = document.getElementById("btn02"); btn02Ele.onclick = function(){ var lis = document.getElementsByTagName("li"); alert(lis.length); }; // 3. Find all nodes with name=gender var btn03Ele = document.getElementById("btn03"); btn03Ele.onclick = function(){ var genders = document.getElementsByName("gender"); alert(genders.length) }; // 4. Find #city all Li nodes var btn04Ele = document.getElementById("btn04"); btn04Ele.onclick = function(){ // 1. Get the node with ID of city // 2. Through the city node GetElementsByTagName query child nodes by tag signature var lis = document.getElementById("city").getElementsByTagName("li"); alert(lis.length); }; // 5. Return #city's all child nodes var btn05Ele = document.getElementById("btn05"); btn05Ele.onclick = function(){ // 1. Get the node with ID of city // 2. Get all child nodes through city alert(document.getElementById("city").childNodes.length); }; // 6. Return #phone's first child node var btn06Ele = document.getElementById("btn06"); btn06Ele.onclick = function(){ alert(document.getElementById("phone").firstChild.innerText); }; // 7. Returned #bj parent node var btn07Ele = document.getElementById("btn07"); btn07Ele.onclick = function(){ // 1. Query the node with ID BJ var bjObj = document.getElementById("bj"); // 2. bj node gets the parent node alert(bjObj.parentNode.innerHTML); }; // 8. Return #android's previous sibling node var btn08Ele = document.getElementById("btn08"); btn08Ele.onclick = function(){ alert(document.getElementById("android").previousSibling.innerHTML); }; // 9. Read #username's value attribute value var btn09Ele = document.getElementById("btn09"); btn09Ele.onclick = function(){ alert(document.getElementById("username").value); }; // 10. Set #username's value attribute value var btn10Ele = document.getElementById("btn10"); btn10Ele.onclick = function(){ document.getElementById("username").value = "I'm a horse and cow"; }; // 11. Returned #bj text value var btn11Ele = document.getElementById("btn11"); btn11Ele.onclick = function(){ alert(document.getElementById("bj").innerHTML); }; };</ script></head><body><div id="total"> < div class="inner"> < p> Which city do you like? </ p> < ul id="city"> < Li id = "BJ" > Beijing</li> < Li > Shanghai</li> < Li > Tokyo</li> < Li > Seoul</li> </ ul> < br> < br> < p> What kind of stand-alone game do you like? </ p> < ul id="game"> < Li id = "RL" > Red Alert</li> < Li > Live</li> < Li > Best flying car</li> < Li > Warcraft</li> </ ul> < br /> < br /> < p> What is the operating system of your mobile phone? </ p> < ul id="phone"><li>IOS</li><li id="android">Android</li><li>Windows Phone</li></ul> </ div> < div class="inner"> gender: < input type="radio" name="gender" value="male"/> Male < input type="radio" name="gender" value="female"/> Female < br> < br> name: < input type="text" name="name" id="username" value="abcde"/> </ div></div><div id="btnList"> < Div > < button id = "btn01" > find #bj node < / button > < / div > < Div > < button id = "btn02" > find all Li nodes < / button > < / div > < Div > < button id = "btn03" > find all nodes with name=gender < / button > < / div > < Div > < button id = "btn04" > find all Li nodes under #city < / button > < / div > < Div > < button id = "btn05" > return all child nodes of #city < / button > < / div > < Div > < button id = "btn06" > return #phone's first child node < / button > < / div > < Div > < button id = "btn07" > return #bj the parent node < / button > < / div > < Div > < button id = "btn08" > returns #android's previous sibling node < / button > < / div > < Div > < button id = "btn09" > return #username's value attribute value < / button > < / div > < Div > < button id = "btn10" > set #username's value attribute value < / button > < / div > < Div > < button id = "btn11" > text value returned #bj by div > < / button > < / div > < / div ></body></html>
jQuery
What is jQuery?
jQuery, as its name implies, is JavaScript and Query. It is a js class library that assists JavaScript development.
Core idea of jQuery
Its core idea is write less and do more, so it implements many browser compatibility problems.
jQuery popularity
JQuery has now become the most popular JavaScript library. More than 55% of the world's top 10000 most visited websites use jQuery.
jQuery benefits
JQuery is free and open source. The syntax design of jQuery can make development more convenient, such as operating document objects, selecting DOM elements
Making animation effects, event handling, using Ajax and other functions
Use jQuery to bind click events to a button?
<!DOCTYPE html PUBLIC "-//W3C//DTD HTML 4.01 Transitional//EN" " http://www.w3.org/TR/html4/loose.dtd "><html><head><meta http-equiv="Content-Type" content="text/html; charset=UTF-8"><title>Insert title here</title><script type="text/javascript" src="../ script/jquery-1.7.2. js"></script><script type="text/javascript"> // Use $() instead of window onload $ (function(){ // Use the selector to get the button object, and then bind the click response function $ ("#btnId").click(function(){ // Pop up hello alert('Hello'); }); });</ script></head><body> < button id="btnId">SayHello</button></body></html>
1. Is it necessary to introduce the jQuery library when using jQuery?
Answer: Yes, you must
2. What is the $in jQuery?
Answer: it is a function
3. How to add a click response function for a button?
answer:
1. Use jQuery to query the label object
2. Use label objects click( function(){} );
jQuery core function
The code that runs when the DOM is loaded can be written as follows:
$(document).ready(function(){ // Write your code here...});
Use $(document) Ready (), and the internal jQuery code still uses $as the alias, regardless of the global $name.
$(function($) { // You can continue to use $as an alias here...});
$is the core function of jQuery, which can complete many functions of jQuery$ () is to call the $function
1. When the input parameter is [function]:
Indicates that after the page is loaded. Equivalent to window onload = function(){}
2. When the input parameter is [HTML string]:
This html tag object will be created for us
3. When the incoming parameter is [selector string]:
$ ("#id attribute value");
id selector, which queries the label object according to the id
$ ("tag name");
Tag name selector to query the tag object according to the specified tag name
$ (". Class attribute value"); Type selector, you can query label objects according to the class attribute
4. When the input parameter is [DOM object]:
This dom object will be converted into a jQuery object
jQuery objects are distinguished from dom objects
Dom object
- The tag object queried through getElementById() is a Dom object
- The tag object queried through getElementsByName() is a Dom object
- The tag object queried through getElementsByTagName() is a Dom object
- The object created by the createElement() method is a Dom object
- The effect of DOM object Alert is: [object HTML tag name Element]
jQuery object
- The object created through the API provided by JQuery is a JQuery object
- Dom objects wrapped by JQuery are also JQuery objects
- The objects queried through the API provided by JQuery are JQuery objects
- The effect of jQuery object Alert is: [object Object]
The nature of jQuery objects
JQuery object is an array of dom objects + a series of function functions provided by jQuery.
Differences between jQuery objects and Dom objects
jQuery objects cannot use properties and methods of DOM objects
DOM objects also cannot use the properties and methods of jQuery objects
Dom object and jQuery object rotate to each other
Converting dom objects to jQuery objects
1. DOM object first
2. $(DOM object) can be converted into jQuery object
Convert jQuery object to dom object
1. jQuery object first
2.jQuery object [subscript] retrieves the corresponding DOM object

jQuery selector
Basic selector
-
#id Selector: find label objects by id
-
.class Selector: find label objects by class
-
element selector: finds the label object based on the label name
-
*Selector: represents any and all elements
-
Selector1, selector2 combine selectors: merge the results of selector1 and selector2 and return them
-
p.myClass means that the tag name must be a p tag, and the class type must be myClass. If the tag name is empty, it means that only the myClass tag name is specified
<!DOCTYPE HTML PUBLIC "-//W3C//DTD HTML 4.01//EN" " http://www.w3.org/TR/html4/strict.dtd "><html> < head> < meta http-equiv="Content-Type" content="text/html; charset=UTF-8"> < title>Untitled Document</title> < style type="text/css"> div, span, p { width: 140px; height: 140px; margin: 5px; background: #aaa; border: #000 1px solid; float: left; font-size: 17px; font-family: Verdana; } div.mini { width: 55px; height: 55px; background-color: #aaa; font-size: 12px; } div.hide { display: none; } </ style> < script type="text/javascript" src="../script/jquery-1.7.2.js"></script> < script type="text/javascript"> $ (function (){ // 1. Select the element "background color" with id one, "#bbffaa" $ ("#btn1").click(function (){ $ ("#one").css("background-color","#bbffaa"); }); // 2. Select all elements with class Mini $ ("#btn2").click(function (){ $ (".mini").css("background-color","#bbffaa"); }); // 3. Select all elements whose element name is Div $ ("#btn3").click(function (){ $ ("div").css("background-color","#bbffaa"); }); // 4. Select all elements $ ("#btn4").click(function (){ $ ("*"). css("background-color","#bbffaa"); }) // 5. Select all span elements and elements with ID two $ ("#btn5").click(function (){ $ ("span,#two").css("background-color","#bbffaa"); }); }); </ script> </ head> < body><!-- < div> < H1 > Basic selector</h1> </ div> --> < Input type = "button" value = "select element with id one" id = "BTN1" / > < Input type = "button" value = "select all elements with class mini" id = "btn2" / > < Input type = "button" value = "select all elements whose element name is div" id = "btn3" / > < Input type = "button" value = "select all elements" id = "btn4" / > < Input type = "button" value = "select all span elements and elements with ID two" id = "btn5" / > < br> < div class="one" id="one"> Div with id one and class one < Div class = "mini" > class is mini < / div > </ div> < div class="one" id="two" title="test"> Div with ID two,class one and Title Test < Div class = "mini" title = "other" > class is mini and title is other < / div > < Div class = "mini" title = "test" > class is mini and title is test < / div > </ div> < div class="one"> < Div class = "mini" > class is mini < / div > < Div class = "mini" > class is mini < / div > < Div class = "mini" > class is mini < / div > < div class="mini"></div> </ div> < div class="one"> < Div class = "mini" > class is mini < / div > < Div class = "mini" > class is mini < / div > < Div class = "mini" > class is mini < / div > < Div class = "mini" title = "test1" > class is mini and title is test1 < / div > </ div> < div style="display:none;" Class = "None" > div < / div > < Div class = "hide" > div with "hide" class < / div > < div> Div with input type "hidden" < input type = "hidden" size = "8" > </ div> < Span class = "one" id = "span" > ^ ^ span element^^</span> </ body></html>
Level selector
- ancestor descendant Descendant selector: matches all descendant elements under a given ancestor element
- parent > child Child element selector: matches all child elements under a given parent element
- prev + next Adjacent element selector: matches all the next elements immediately after the prev element
- prev ~ sibings Sibling element selector after: matches all siblings elements after prev element
<!DOCTYPE HTML PUBLIC "-//W3C//DTD HTML 4.01//EN" " http://www.w3.org/TR/html4/strict.dtd "><html> < head> < meta http-equiv="Content-Type" content="text/html; charset=UTF-8"> < title>Untitled Document</title> < style type="text/css"> div, span, p { width: 140px; height: 140px; margin: 5px; background: #aaa; border: #000 1px solid; float: left; font-size: 17px; font-family: Verdana; } div.mini { width: 55px; height: 55px; background-color: #aaa; font-size: 12px; } div.hide { display: none; } </ style> < script type="text/javascript" src="../script/jquery-1.7.2.js"></script> < script type="text/javascript"> $ (document).ready(function(){ // 1. Select all div elements in the body $ ("#btn1").click(function(){ $ ("body div").css("background", "#bbffaa"); }); // 2. In the body, select the div sub element $ ("#btn2").click(function(){ $ ("body > div"). css("background", "#bbffaa"); }); // 3. Select the next div element with id one $ ("#btn3").click(function(){ $ ("#one+div").css("background", "#bbffaa"); }); // 4. Select all div sibling elements after the element with ID two $ ("#btn4").click(function(){ $ ("#two~div").css("background", "#bbffaa"); }); }); </ script> </ head> < body> <!-- < div> < H1 > level selector: select elements according to the hierarchical relationship of elements</h1> ancestor descendant : parent > child : prev + next : prev ~ siblings : </ div> --> < Input type = "button" value = "select all div elements in the body" id = "BTN1" / > < Input type = "button" value = "in the body, select div sub element" id = "btn2" / > < Input type = "button" value = "select the next div element with id one" id = "btn3" / > < Input type = "button" value = "select all div sibling elements after the element with ID two" id = "btn4" / > < br><br> < div class="one" id="one"> Div with id one and class one < Div class = "mini" > class is mini < / div > </ div> < div class="one" id="two" title="test"> Div with ID two,class one and Title Test < Div class = "mini" title = "other" > class is mini and title is other < / div > < Div class = "mini" title = "test" > class is mini and title is test < / div > </ div> < div class="one"> < Div class = "mini" > class is mini < / div > < Div class = "mini" > class is mini < / div > < Div class = "mini" > class is mini < / div > < div class="mini"></div> </ div> < div class="one"> < Div class = "mini" > class is mini < / div > < Div class = "mini" > class is mini < / div > < Div class = "mini" > class is mini < / div > < Div class = "mini" title = "test1" > class is mini and title is test1 < / div > </ div> < div style="display:none;" Class = "None" > div < / div > < Div class = "hide" > div with "hide" class < / div > < div> Div with input type "hidden" < input type = "hidden" size = "8" > </ div> < Span id = "span" > ^ ^ span element^^</span> </ body></html>
Filter selector
- :first Get the first element
- :last Get last element
- :not(selector) Removes all elements that match the given selector
- :even Matches all elements with an even index value, counting from 0
- :odd Matches all elements with odd index values, counting from 0
- :eq(index) An element that matches a given index value
- :gt(index) Matches all elements greater than the given index value
- :lt(index) Matches all elements less than the given index value
- :header Match Title elements such as H1, H2 and H3
- :animated Matches all elements that are performing animation effects
Content filter
- :contains(text) Matches the element that contains the given text
- :empty Matches all empty elements that do not contain child elements or text
- :parent Matches elements that contain child elements or text
- :has(selector) Matches the element that contains the element that the selector matches
<!DOCTYPE HTML PUBLIC "-//W3C//DTD HTML 4.01//EN" " http://www.w3.org/TR/html4/strict.dtd "><html> < head> < meta http-equiv="Content-Type" content="text/html; charset=UTF-8"> < title>Untitled Document</title> < style type="text/css"> div, span, p { width: 140px; height: 140px; margin: 5px; background: #aaa; border: #000 1px solid; float: left; font-size: 17px; font-family: Verdana; } div.mini { width: 55px; height: 55px; background-color: #aaa; font-size: 12px; } div.hide { display: none; } </ style> < script type="text/javascript" src="../script/jquery-1.7.2.js"></script> < script type="text/javascript"> $ (document).ready(function(){ function anmateIt(){ $ ("#mover").slideToggle("slow", anmateIt); } anmateIt(); }); /** : contains(text) : empty : has(selector) : parent */ $ (document).ready(function(){ // 1. Select div element with text 'Di' $ ("#btn1").click(function(){ $ ("div:contains(di)").css("background", "#bbffaa"); }); // 2. Select a div empty element that does not contain child elements (or text elements) $ ("#btn2").click(function(){ $ ("div:empty").css("background", "#bbffaa"); }); // 3. Select div element with class as mini element $ ("#btn3").click(function(){ $ ("div:has(.mini)").css("background", "#bbffaa"); }); // 4. Select a div element that contains child elements (or text elements) $ ("#btn4").click(function(){ $ ("div:parent").css("background", "#bbffaa"); }); }); </ script> </ head> < body> < Input type = "button" value = "select div element with text 'Di'" id = "BTN1" / > < Input type = "button" value = "select a div empty element that does not contain child elements (or text elements)" id = "btn2" / > < Input type = "button" value = "select div element with class Mini element" id = "btn3" / > < Input type = "button" value = "select div element with child element (or text element)" id = "btn4" / > < br><br> < div class="one" id="one"> Div with id one and class one < Div class = "mini" > class is mini < / div > </ div> < div class="one" id="two" title="test"> Div with ID two,class one and Title Test < Div class = "mini" title = "other" > class is mini and title is other < / div > < Div class = "mini" title = "test" > class is mini and title is test < / div > </ div> < div class="one"> < Div class = "mini" > class is mini < / div > < Div class = "mini" > class is mini < / div > < Div class = "mini" > class is mini < / div > < div class="mini"></div> </ div> < div class="one"> < Div class = "mini" > class is mini < / div > < Div class = "mini" > class is mini < / div > < Div class = "mini" > class is mini < / div > < Div class = "mini" title = "test1" > class is mini and title is test1 < / div > </ div> < div style="display:none;" Class = "None" > div < / div > < Div class = "hide" > div with "hide" class < / div > < div> Div with input type "hidden" < input type = "hidden" size = "8" > </ div> < Div id = "mover" > the div element that is executing the animation</ div> </ body></html>
Attribute filter
[attribute] Matches the element that contains the given attribute.
[attribute=value] The element that matches a given attribute is a specific value
[attribute!=value] Matches all elements that do not contain the specified attribute or whose attribute is not equal to a specific value.
[attribute^=value] Matching a given attribute is an element that starts with some value
[attribute$=value] Matching a given attribute is an element that ends with some value
[attribute*=value] Matching a given attribute is an element that contains certain values
[attrSel1] [attrSel2] [attrSelN] Composite attribute selector, used when multiple conditions need to be met at the same time.
<!DOCTYPE HTML PUBLIC "-//W3C//DTD HTML 4.01//EN" " http://www.w3.org/TR/html4/strict.dtd "><html><head><meta http-equiv="Content-Type" content="text/html; charset=UTF-8"><title>Untitled Document</title><style type="text/css">div,span,p { width: 140px; height: 140px; margin: 5px; background: #aaa; border: #000 1px solid; float: left; font-size: 17px; font-family: Verdana;}div.mini { width: 55px; height: 55px; background-color: #aaa; font-size: 12px;}div.hide { display: none;}</ style><script type="text/javascript" src="../script/jquery-1.7.2.js"></script><script type="text/javascript"> /** [attribute] [attribute=value] [attribute!=value] [attribute^=value] [attribute$=value] [attribute*=value] [attrSel1][attrSel2][attrSelN] */ $ (function() { // 1. Select the div element containing the attribute title $ ("#btn1").click(function() { $ ("div[title]").css("background", "#bbffaa"); }); // 2. Select the div element whose attribute Title Value is equal to 'test' $ ("#btn2").click(function() { $ ("div[title='test']").css("background", "#bbffaa"); }); // 3. Select div elements whose attribute Title Value is not equal to 'test' (* those without attribute title will also be selected) $ ("#btn3").click(function() { $ ("div[title!='test']").css("background", "#bbffaa"); }); // 4. Select the div element whose attribute Title Value starts with 'TE' $ ("#btn4").click(function() { $ ("div[title^='te']").css("background", "#bbffaa"); }); // 5. Select the div element whose attribute Title Value ends with 'EST' $ ("#btn5").click(function() { $ ("div[title$='est']").css("background", "#bbffaa"); }); // 6. Select the div element whose attribute Title Value contains' es' $ ("#btn6").click(function() { $ ("div[title*='es']").css("background", "#bbffaa"); }); // 7. First select the div element with attribute ID, and then select the div element with attribute Title Value containing 'es' in the result $ ("#btn7").click(function() { $ ("div[id][title*='es']").css("background", "#bbffaa"); }); // 8. Select the div element that contains the title attribute value and the title attribute value is not equal to test $ ("#btn8").click(function() { $ ("div[title][title!='test']").css("background", "#bbffaa"); }); });</ script></head><body> < Input type = "button" value = "select div element with attribute title." id="btn1" /> < Input type = "button" value = "select the div element whose attribute Title Value is equal to 'test'." id="btn2" /> < input type="button" Value = "select div elements whose attribute Title Value is not equal to 'test' (those without attribute title will also be selected)." id="btn3" /> < Input type = "button" value = "select the div element whose attribute Title Value starts with 'TE'." id="btn4" /> < Input type = "button" value = "select the div element whose attribute Title Value ends with 'EST'." id="btn5" /> < Input type = "button" value = "select the div element whose attribute Title Value contains' es'." id="btn6" /> < input type="button" Value = "combine attribute selectors, first select the div element with attribute ID, and then select the div element with attribute Title Value containing 'es' in the result." id="btn7" /> < input type="button" Value = "select the div element that contains the title attribute value and the title attribute value is not equal to test." id="btn8" /> < br> < br> < div class="one" id="one"> Div with id one and class one < Div class = "mini" > class is mini < / div > </ div> < div class="one" id="two" title="test"> Div with ID two,class one and Title Test < Div class = "mini" title = "other" > class is mini and title is other < / div > < Div class = "mini" title = "test" > class is mini and title is test < / div > </ div> < div class="one"> < Div class = "mini" > class is mini < / div > < Div class = "mini" > class is mini < / div > < Div class = "mini" > class is mini < / div > < div class="mini"></div> </ div> < div class="one"> < Div class = "mini" > class is mini < / div > < Div class = "mini" > class is mini < / div > < Div class = "mini" > class is mini < / div > < Div class = "mini" title = "test1" > class is mini and title is test1 < / div > </ div> < div style="display: none;" Class = "None" > div < / div > < Div class = "hide" > div with "hide" class < / div > < div> Div with input type "hidden" < input type = "hidden" value = "123456789" size="8"> </ div> < Div id = "mover" > the div element that is executing the animation</ div></body></html>
Form Filters
- :input Match all input, textarea, select, and button elements
- :text Match all text input boxes
- :password Match all password input boxes
- :radio Match all radio boxes
- :checkbox Match all check boxes
- :submit Match all submit buttons
- :image Match all img Tags
- :reset Match all Reset buttons
- :button Match all input type=button buttons
- :file Match all input type=file file uploads
- :hidden Match all invisible elements display:none or input type=hidden
Form object properties filter
- :enabled Match all available elements
- :disabled Match all unavailable elements
- :checked Matches all selected radio, check, and option label objects selected in the drop-down list
- :selected Match all selected option s
<!DOCTYPE HTML PUBLIC "-//W3C//DTD HTML 4.01//EN" " http://www.w3.org/TR/html4/strict.dtd "><html> <head> <meta http-equiv="Content-Type" content="text/html; charset=UTF-8"> <title>Untitled Document</title> <script type="text/javascript" src="../ script/jquery-1.7.2. js"></script> <script type="text/javascript"> $(function() {/ * *: input: Text: Password: Radio: checkbox: submit: Image: reset: Button: File: hidden properties of form object: enabled: disabled: checked: Selected */ //1. Assign a value to the available input in the form $("#btn1") click(function(){ $(":text:enabled").val("New Value"); }); // 2. Assign value to unavailable input in the form $("#btn2") click(function(){ $(":text:disabled").val("New Value Too"); }); // 3. Get the number of selected elements in the multiple selection box. Use the size () method to get the number of elements in the selected element set $("#btn3") click(function(){ alert($(":checkbox:checked").size()) }); // 4. Get multiple selection boxes, and the value of each selected value is $("#btn4") click(function(){ var str = ""; var eles = $(":checkbox:checked"); console.log(eles); // eles.each(function (){ // alert(this.value) // }); for(var i=0;i<eles.size(); i++){ str += "["+$(eles[i]).val()+"]"; } alert(str) }); //5. Get the content $("#btn5") selected in the drop-down box Click (function() {var STR = ""; / / pay attention to the particularity of this selector, because the option in select is the real selected item, / / therefore: the relationship between the selected selector and the select[name='test '] selector is a child parent relationship. / / var els = must be selected according to the method of selecting the later generation of the basic selector$( "select option:selected"); console. log(els); for(var i=0;i<els.size(); i++){ str += "["+$(els[i]).val()+"]"; } alert(str) }); }) </ Script > < / head > < body > < H3 > form object attribute filter selector < / H3 > < button id = "BTN1" > assign values to available inputs in the form</ Button > < button id = "btn2" > assignment of unavailable input in the form</ Button > < br / > < br / > < button id = "btn3" > get the number of selected multiple boxes</ Button > < button id = "btn4" > get the selected content of the multiple selection box</ Button > < br / > < br / > < button id = "btn5" > get the selected content in the drop-down box</ Button > < br / > < br / > < form id = "form1" action = "#" > available elements: < input name = "add" value = "available textbox 1" / > < br > unavailable elements: < input name = "email" disabled = "disabled" value = "unavailable textbox" / > < br > available elements: < input name = "Che" value = "available textbox 2" / > < br > unavailable elements: < input name= "Name" disabled = "disabled" value = "unavailable text box" / > < br > < br > multiple selection box: < br > < input type = "checkbox" name = "newsletter" checked = "checked" value = "test1" / > test1 < input type = "checkbox" name = "newsletter" value = "test2" / > test2 < input type = "checkbox" name = "newsletter" value = "test3" />Test3 < input type = "checkbox" name = "newsletter" checked = "checked" value = "test4" / > test4 < input type = "checkbox" name = "newsletter" value = "test5" / > test5 < br > < br > drop down list 1: < br > < select name = "test" multiple = "multiple" style = "height: 100px" id = "sele1" >< option > Zhejiang < / option > < option selected = "selected" > Liaoning < / option > < option > Beijing < / option > < option selected = "selected" > Tianjin < / option > < option > Guangzhou < / option > < option > Hubei < / option > < / Select > < br > < br > drop down list 2: < br > < select name= "Test2" > < option > Zhejiang < / option > < option > Liaoning < / option > < option selected = "selected" > Beijing < / option > < option > Tianjin < / option > < option > Guangzhou < / option > < option > Hubei < / option > < / Select > < / form ></body></html>
jQuery element filtering
- Eq() gets the elements of the given index, and its function is the same as: eq()
- first() gets the first element with the same function as: first
- last() gets the last element. The function is the same as: last
- filter(exp) Leave matching elements
- is(exp) Judge whether it matches the given selector. As long as there is a match, it returns true
- has(exp) Returns the element containing the element matching the selector. The function is the same as: has
- not(exp) Delete the elements matching the selector. The function is the same as: not
- children(exp) returns the child element matching the given selector. The function is the same as parent > child
- find(exp) Returns the descendant element that matches the given selector. The function is the same as that of ancestor descendant
- next() Returns the next sibling element of the current element The function is the same as prev + next
- nextAll() Returns all sibling elements after the current element The function is the same as prev ~ siblings
- nextUntil() Returns the following elements from the current element to the specified matching element
- parent() Returns the parent element
- prev(exp) Returns the previous sibling element of the current element
- prevAll() Returns all sibling elements in front of the current element prevUnit(exp) returns the previous element siblings(exp) from the current element to the specified matching element Returns all sibling elements
- add() Add the element of the selector matching add to the current jquery object
<!DOCTYPE HTML PUBLIC "-//W3C//DTD HTML 4.01//EN" " http://www.w3.org/TR/html4/strict.dtd "><html> <head> <meta http-equiv="Content-Type" content="text/html; Charset = UTF-8 "> < title > DOM query < / Title > < style type =" text / CSS "> div, span, P { width: 140px; height: 140px; margin: 5px; background: #aaa; border: #000 1px solid; float: left; font-size: 17px; font-family: Verdana; } div.mini { width: 55px; height: 55px; background-color: #aaa; font-size: 12px; } div.hide { display: none; } </ style> <script type="text/javascript" src="../script/jquery-1.7.2.js"></script> <script type="text/javascript"> $(document). ready(function(){ function anmateIt(){ $("#mover").slideToggle("slow", anmateIt); } anmateIt(); /** Filter EQ (index| - index) first () last () hasclass (class) filter (expr|obj|ele|fn) is (expr|obj|ele|fn) 1.6 * has (expr|ele) not (expr|ele|fn) slice (start, [End]) find children ([expr]) closest (expr, [con] |obj|ele) 1.6 * Find (expr|obj|ele) next([expr]) nextall([expr]) nextUntil([exp|ele][,fil])1.6* parent([expr]) parents([expr]) parentsUntil([exp|ele][,fil])1.6* prev([expr]) prevall([expr]) prevUntil([exp|ele][,fil])1.6* siblings([expr]) Concatenate add (expr|ele|html|obj [, con]) * / / (1) eq() to select div element $("#btn1") with index value equal to 3 click(function(){ $("div").eq(3).css("background-color","#bfa"); }); // (2) First() selects the first div element $("#btn2") Click (function() {/ / first() select the first element $("div"). First(). CSS ("background color", "#bfa");})// (3) Last() selects the last div element $("#btn3") Click (function() {/ / last() select the last element $("div"). Last(). CSS ("background color", "#bfa");})// (4) Filter () selects $("#btn4") with even index in Div Click (function() {/ / filter() filters the incoming selector string $("div"). Filter (": even"). CSS ("background color", "#bfa");})// (5) Is() determines whether #one is: empty or: parent / / is used to detect whether the jq object conforms to the specified selector $("#btn5") click(function(){ alert($("#one").is(":empty")); }); // (6) Has() select the contained in Div $of mini ("#btn6") Click (function() {/ / has (selector) whether the selector string contains selector $("div"). Has (". Mini"). CSS ("background color", "#bfa");})// (7) Not() select $("#btn7") whose class is not one in Div Click (function() {/ / not (selector) select the element $("div"). Not (". Class"). CSS ("background color", "#bfa");}) that is not a selector// (8) Children() selects all div sub elements $("#btn8") with class one in the body Click (function() {/ / children() to select all child elements $("body"). Children (". One"). CSS ("background color", "#bfa");})// (9) Find() select all div elements with class Mini $("#btn9") in the body Click (function() {/ / find() to select all descendant elements $("body"). Find ("div.mini"). CSS ("background color", "#bfa");})// (10) Next() #one's next div $("#btn10") Click (function() {/ / next() select the next sibling element $("#one"). Next ("div"). CSS ("background color", "#bfa");})// (11) All span elements after nextall() #one $("#btn11") Click (function() {/ / nextall() select all the following elements $("#one"). Nextall ("span"). CSS ("background color", "#bfa");})// (12) Element $("#btn12") between nextuntil() #one and span click(function(){ // $("#one").nextUntil("span").css("background-color","#bfa") }); // (13)parent() . Parent element of mini $("#btn13") click(function(){ $(".mini").parent().css("background-color","#bfa"); }); // (14) Prev() #two's previous div $("#btn14") click(function(){ //prev() $("#two").prev("div").css("background-color","#bfa") }); // (15) Prevlall() span all div $("#btn15") Click (function() {/ / prevlall() select all the previous elements $("span"). Prevlall ("div"). CSS ("background color", "#bfa")})// (16) Prevuntil() span goes forward until #one's element $("#btn16") Click (function() {/ / prevuntil (EXP) find all previous sibling elements until find exp stop $("span"). Prevuntil ("#one"). CSS ("background color", "#bfa")})// (17) All sibling elements of siblings() #two $("#btn17") Click (function() {/ / siblings() to find all sibling elements, including the front and rear $("#two"). Siblings(). CSS ("background color", "#bfa")})// (18) Add() selects all span elements and elements with ID two $("#btn18") click(function(){ // $("span,#two,.mini,#one") $("span").add("#two").css("background-color","#bfa"); }); }); </ Script > < / head > < body > < input type = "button" value = "eq() select div element with index value equal to 3" id = "BTN1" / > < input type = "button" value = "first() select the first div element" id = "btn2" / > < input type = "button" value = "last() select the last div element" id = "btn3" / > < input type = "button" value = "filter() Select "id =" btn4 "/ > < input type =" button "value =" is ") with an even index in the div to judge #one whether it is: empty or: parent" id = "btn5" / > < input type = "button" value = "has(), and select" has "contained in the Div Mini's "id =" btn6 "/ > < input type =" button "value =" not() select "id =" btn7 "/ > < input type =" button "value =" children() select all div sub elements with class one "id =" btn8 "/ > < input type =" button "value =" find() select all div descendant elements with class mini "id =" btn9 "/ > < input type =" button "value =" value = "" in the body " Next() #one's next div "id =" btn10 "/ > < input type =" button "value =" nextall() #one all span elements "id =" btn11 "/ > < input type =" button "value =" nextuntil() #one and the elements between span "id =" btn12 "/ > < input type =" button "value =" parent() Mini's parent element "id =" btn13 "/ > < input type =" button "value =" prev() #two's previous div "id =" btn14 "/ > < input type =" button "value =" prevall() span all div "id =" btn15 "/ > < input type =" button "value =" prevuntil() span moves forward until #one's element "id =" btn16 "/ > < input type =" button "value =" siblings() #two's sibling element "id =" Btn17 "/ > < input type =" button "value =" add() select all span elements and elements with ID two "id =" btn18 "/ > < H3 > Basic selector. < / H3 > < br / > < br / > text box < input type =" text "name =" account "disabled =" disabled "/ > < br > < div class =" one "id =" one "> div with id one and class one < div class =" mini "> class is mini < / div > < / div > < div class =" one "id =" two "title =" test "> ID is two,class is one, div < div class =" mini "title =" other "> < b > class is mini,title is other < / b > < / div > < div class =" mini "title =" test "> class is mini,title is test < / div > < / div > < div class =" one "> < div class =" mini " "> class is mini < / div > < div class =" mini "> class is mini < / div > < div class =" mini "> class is mini < / div > < div class =" mini "> < / div > < div class =" one "> < div class =" mini "> class is mini < / div > < div class =" mini "> class is mini < / div > < div class =" mini "> class is mini < / div > < div class =" mini "> < div class =" mini "> class is mini < / div > < div class =" mini "title =" Testst "> class is mini,title is Testst < / div > < / div > < div style =" display: none; "Class =" None "> div < / div > < div class =" hide "> div < / div > < span id =" span1 "> ^ span element 111 ^ < / span > < div > containing div < input type =" hidden "size =" 8 "> < / div > < span id =" Span2 "> ^ span element 222 ^ < / span > < div id =" mover "> div element executing animation. < / div ></body></html>
Property operation of jQuery
-
html() It can set and get the contents in the start tag and end tag. Just like the dom attribute innerHTML.
-
text() It can set and get the text in the start label and end label. Same as the dom attribute innerText.
-
val() It can set and get the value attribute value of the form item. Same as dom attribute value
val method sets the selected status of multiple form items at the same time:
<!DOCTYPE html><html lang="en"><head> <meta charset="UTF-8"> <title>Title</title> <script type="text/javascript" src="script/jquery-1.7.2.js"></script> <script type="text/javascript"> $(function () { /* // Batch operation single choice $(": Radio") val(["radio2"]); // Check status of batch operation filter box $(": checkbox") val(["checkbox3","checkbox2"]); // The status of the drop-down box for batch operation multi selection is $("#multiple") val(["mul2","mul3","mul4"]); // Select $("#single") in the drop-down box of operation radio val(["sin2"]); */ // Mixed selection $("#multiple, #single,: Radio,: checkbox") val(["radio2","checkbox1","checkbox3","mul1","mul4","sin3"] ); }); </ Script > < / head > < body > single choice: < input name = "radio" type = "radio" value = "radio1" / > radio1 < input name = "radio" type = "radio" value = "radio2" / > radio2 < br / > multiple choice: < input name = "checkbox" type = "checkbox" value = "checkbox1" / > checkbox1 < input name = "checkbox" type = "checkbox" value = "checkbox2" / > checkbox2 < input name = "checkbox" type = "checkbox" value = "checkbox3" />Checkbox3 < br / > drop down multiple selection: < select id = "multiple" multiple = "multiple" size = "4" > < option value = "mul1" > mul1 < / option > < option value = "mul2" > mul2 < / option > < option value = "mul3" > mul3 < / option > < option value = "mul4" > mul4 < / option > < / Select > < br / > drop down single selection: < select id = "single" > < option value = "sin1" > sin1 < / option > < option value = "sin2" >sin2</option> <option value="sin3">sin3</option></select></body></html> -
attr() You can set and obtain the value of the property. Operations such as checked, readOnly, selected, disabled, etc. are not recommended
The attr method can also manipulate non-standard attributes. For example, custom attributes: abc,bbj
-
prop() You can set and get the value of the attribute. Only the recommended operations are checked, readOnly, selected, disabled, and so on
<script type="text/javascript" src="script/jquery-1.7.2.js"></script> <script type="text/javascript"> $(function (){ alert($(":checkbox:first").attr("name")); $(":checkbox:first").attr("name","abc") }); </script>//prop homology
Select exercise
Select all, deselect all, invert selection
<!DOCTYPE html PUBLIC "-//W3C//DTD HTML 4.01 Transitional//EN" " http://www.w3.org/TR/html4/loose.dtd "><html><head><meta http-equiv="Content-Type" content="text/html; charset=UTF-8"><title>Insert title here</title><script type="text/javascript" src="../../ script/jquery-1.7.2. js"></script><script type="text/javascript"> $ (function(){ // Select all $ ("#checkedAllBtn").click(function (){ $ (":checkbox").prop("checked",true); }) // None $ ("#checkedNoBtn").click(function (){ $ (":checkbox").prop("checked",false); }) // Reverse selection $ ("#checkedRevBtn").click(function (){ $ (":checkbox[name='items']").each(function (){ this.checked = !this.checked; }) // Check whether it is fully selected // Total number var allCount = $(":checkbox[name='items']").length; // Number of selected var checkedCount = $(":checkbox[name='items']:checked").length; $ ("#checkedAllBox").prop("checked",allCount==checkedCount); }) // Submit $ ("#sendBtn").click(function (){ $ (":checkbox[name='items']:checked").each(function (){ alert(this.value); }); }) // Select all / uncheck all boxes $ ("#checkedAllBox").click(function (){ // In the function function of the event, there is a this object, which is the dom object currently responding to the event $ (":checkbox[name='items']").prop("checked",this.checked); }) // Attach a click event to all balls $ (":checkbox[name='items']").click(function (){ // Check whether it is fully selected // Total number var allCount = $(":checkbox[name='items']").length; // Number of selected var checkedCount = $(":checkbox[name='items']:checked").length; $ ("#checkedAllBox").prop("checked",allCount==checkedCount); }) }); </ script></head><body> < form method="post" action=""> What's your favorite sport< Input type = "checkbox" id = "checkedallbox" / > select all / deselect all < br /> < Input type = "checkbox" name = "items" value = "football" / > football < Input type = "checkbox" name = "items" value = "Basketball" / > basketball < Input type = "checkbox" name = "items" value = "badminton" / > badminton < Input type = "checkbox" name = "items" value = "ping pong" / > ping pong < br /> < Input type = "button" id = "checkedallbtn" value = "select all" / > < Input type = "button" id = "checkednobtn" value = "None" / > < Input type = "button" id = "checkedrevbtn" value = "inverse selection" / > < Input type = "button" id = "sendbtn" value = "submission" / > </ form></body></html>
Addition, deletion and modification of DOM
Internal insertion
| appendTo() | a.appendTo(b) | Insert a at the end of the b child element to become the last child element |
| prependTo() | a.prependTo(b) | Insert a in front of all the child elements of b to become the first child element |
External insertion
| insertAfter() | a.insertAfter(b) | Get ba |
| insertBefore() | a.insertBefore(b) | Get ab |
replace
| replaceWith() | a.replaceWith(b) | Replace a with b |
| replaceAll() | a.replaceAll(b) | Replace all b with a |
delete
| remove() | a.remove(); | Delete a tag |
| empty() | a.empty(); | Empty the contents of a tag |
Mobile exercise
Left to right, right to left
<!DOCTYPE html PUBLIC "-//W3C//DTD HTML 4.01 Transitional//EN" " http://www.w3.org/TR/html4/loose.dtd "><html><head><meta http-equiv="Content-Type" content="text/html; charset=UTF-8"><title>Insert title here</title> < style type="text/css"> select { width: 100px; height: 140px; } div { width: 130px; float: left; text-align: center; } </ style> < script type="text/javascript" src="script/jquery-1.7.2.js"></script> < script type="text/javascript"> $ (function (){ // The selected is added to the right $ ("button:eq(0)").click(function (){ $ ("select:eq(0) option:selected").appendTo($("select:eq(1)")); }) // Add all to the right $ ("button:eq(1)").click(function (){ $ ("select:eq(0) option").appendTo($("select:eq(1)")); }) // The selected is added to the right $ ("button:eq(2)").click(function (){ $ ("select:eq(1) option:selected").appendTo($("select:eq(0)")); }) // Add all to the left $ ("button:eq(3)").click(function (){ $ ("select:eq(1) option").appendTo($("select:eq(0)")); }) }) </ script></head><body> < div id="left"> < select multiple="multiple" name="sel01"> < Option value = "opt01" > option 1 < / option > < Option value = "opt02" > option 2 < / option > < Option value = "opt03" > option 3 < / option > < Option value = "opt04" > option 4 < / option > < Option value = "opt05" > option 5 < / option > < Option value = "opt06" > option 6 < / option > < Option value = "opt07" > option 7 < / option > < Option value = "opt08" > option 8 < / option > </ select> < Button > select Add to right < / button > < Button > add all to the right < / button > </ div> < div id="rigth"> < select multiple="multiple" name="sel02"> </ select> < Button > select Delete to the left < / button > < Button > delete all to the left < / button > </ div></body></html>
Practice of dynamically adding and deleting row records
<!DOCTYPE HTML PUBLIC "-//W3C//DTD HTML 4.01//EN" " http://www.w3.org/TR/html4/strict.dtd "><html><head><meta http-equiv="Content-Type" content="text/html; charset=UTF-8"><title>Untitled Document</title><link rel="stylesheet" type="text/css" href="styleB/css. css" /><script type="text/javascript" src="../../ script/jquery-1.7.2. js"></script><script type="text/javascript"> $ (function () { var deleteFun = function () { // Confirm is a confirmation prompt function provided by JavaScript language. You can prompt whatever you pass var obj = $(this).parent().parent(); var name = obj.find("td:first").text(); // When the user clicks OK, it returns true; otherwise, it returns false if (confirm("are you sure you want to delete" + name +? ") { // This object in the function function is the dom object that currently responds to the event obj.remove(); } // Return false to block the default behavior of the element return false; } // add to $ ("#addEmpButton").click(function () { var name = $("#empName").val(); var email = $("#email").val(); var salary = $("#salary").val(); var obj = $("<tr>" + "<td>" + name + "</td>" + "<td>" + email + "</td>" + "<td>" + salary + "</td>" + "<td><a href=\"deleteEmp? id=003\">Delete</a></td>" + "</tr>"); obj.appendTo($("#employeeTable")); obj.find("a").click(deleteFun); }) // delete $ ("a").click(deleteFun); })</ script></head><body> < table id="employeeTable"> < tr> < th>Name</th> < th>Email</th> < th>Salary</th> < th> </ th> </ tr> < tr> < td>Tom</td> < td> tom@tom.com </td> < td>5000</td> < td><a href="deleteEmp?id=001">Delete</a></td> </ tr> < tr> < td>Jerry</td> < td> jerry@sohu.com </td> < td>8000</td> < td><a href="deleteEmp?id=002">Delete</a></td> </ tr> < tr> < td>Bob</td> < td> bob@tom.com </td> < td>10000</td> < td><a href="deleteEmp?id=003">Delete</a></td> </ tr> </ table> < div id="formDiv"> < H4 > add new employee < / H4 > < table> < tr> < td class="word">name: </td> < td class="inp"> < input type="text" name="empName" id="empName" /> </ td> </ tr> < tr> < td class="word">email: </td> < td class="inp"> < input type="text" name="email" id="email" /> </ td> </ tr> < tr> < td class="word">salary: </td> < td class="inp"> < input type="text" name="salary" id="salary" /> </ td> </ tr> < tr> < td colspan="2" align="center"> < button id="addEmpButton" value="abc"> Submit </ button> </ td> </ tr> </ table> </ div></body></html>
CSS style actions
- addClass() Add style
- removeClass() Delete style
- toggleClass() Delete if there is one, and add a style if there is none.
- offset() Gets and sets the coordinates of the element.
<script type="text/javascript" src="script/jquery-1.7.2.js"></script><script type="text/javascript"> $(function(){ /*CSScss(name|pro|[,val|fn]) Read and write style attributes of matching elements. a.css('color ') takes out the color of the a element a.css('color ',' Red ') sets the color of element a to redCSS class addClass(class|fn) Add a class value to the element< div class="mini big">removeClass([class|fn]) Delete the class value of the element; Passing a specific class value will delete a specific class a.removeClass(): removes all class values**/ var $divEle = $('div:first'); $('#btn01').click(function(){ //addClass() - adds one or more classes to the selected element $ divEle.addClass("redDiv blackDiv"); }); $ ('#btn02').click(function(){ // Removeclass() - Deletes one or more classes from the selected element $ divEle.removeClass() }); $ ('#btn03').click(function(){ // toggleClass() - switch between adding / deleting classes for the selected element // Switching is to delete the class if it exists, and add it if it does not exist $ divEle.toggleClass("redDiv"); }); $ ('#btn04').click(function(){ // Offset () - returns the position of the first matching element relative to the document. var os = $divEle.offset(); // Note that the object obtained through offset has two properties: Top represents the top margin and left represents the left margin alert("top margin:" + os.top + "left margin:" + os.left); // When calling offset to set the element position, you also need to pass a js object, which has two attributes top and left // offset({ top: 10, left: 30 }); $ divEle.offset({ top:50, left:60 }); }); })</ script>
jQuery animation
Basic animation
- show() Show hidden elements
- hide() Hide visible elements.
- toggle() Visible is hidden, invisible is displayed.
The above animation methods can add parameters.
1. The first parameter is the duration of animation execution, in milliseconds
2. The second parameter is the callback function of the animation (the function automatically called after the animation is completed)
Fade in and fade out animation
- fadeIn() Fade in (slowly visible)
- fadeOut() Fade out (slowly disappear)
- fadeTo() Slowly change the transparency to the specified value within the specified time. 0 transparent, 1 visible, 0.5 translucent
- fadeToggle() Fade in / fade out switch
<!DOCTYPE HTML PUBLIC "-//W3C//DTD HTML 4.01//EN" " http://www.w3.org/TR/html4/strict.dtd "><html> < head> < meta http-equiv="Content-Type" content="text/html; charset=UTF-8"> < title>Untitled Document</title> < link href="css/style.css" type="text/css" rel="stylesheet" /> < script type="text/javascript" src="script/jquery-1.7.2.js"></script> < script type="text/javascript"> /* basic show([speed,[easing],[fn]]) hide([speed,[easing],[fn]]) toggle([speed],[easing],[fn]) slide slideDown([spe],[eas],[fn]) slideUp([speed,[easing],[fn]]) slideToggle([speed],[easing],[fn]) Fade in and out fadeIn([speed],[eas],[fn]) fadeOut([speed],[eas],[fn]) fadeTo([[spe],opa,[eas],[fn]]) fadeToggle([speed,[eas],[fn]]) */ $ (function(){ // Show () $ ("#btn1").click(function(){ $ ("#div1").show(1000); }); // Hide () $ ("#btn2").click(function(){ $ ("#div1").hide(1000); }); // Toggle () $ ("#btn3").click(function(){ $ ("#div1").toggle(1000); }); // Fade fadein () $ ("#btn4").click(function(){ $ ("#div1").fadeIn(500); }); // Fade fadeout () $ ("#btn5").click(function(){ $ ("#div1").fadeOut(500); }); // Fade to fadeto () $ ("#btn6").click(function(){ $ ("#div1").fadeTo("slow",Math.random()); }); // Fade toggle (fadetoggle) $ ("#btn7").click(function(){ $ ("#div1").fadeToggle("slow","linear"); }); })</ script> </ head> < body> < table style="float: left;"> < tr> < Td > < button id = "BTN1" > show() < / button ></td> </ tr> < tr> < Td > < button id = "btn2" > hide() < / button ></td> </ tr> < tr> < Td > < button id = "btn3" > show / hide toggle() < / button ></td> </ tr> < tr> < Td > < button id = "btn4" > fade fadeIn() < / button ></td> </ tr> < tr> < Td > < button id = "btn5" > fadeOut() < / button ></td> </ tr> < tr> < Td > < button id = "btn6" > fade to fadeTo() < / button ></td> </ tr> < tr> < Td > < button id = "btn7" > fade toggle() < / button ></td> </ tr> </ table> < div id="div1" style="float:left;border: 1px solid;background-color: blue;width: 300px;height: 200px;"> JQuery animation defines many kinds of animation effects, which can be easily used </ div> </ body></html>
Brand presentation exercise
<!DOCTYPE html PUBLIC "-//W3C//DTD XHTML 1.0 Transitional//EN" " http://www.w3.org/TR/xhtml1/DTD/xhtml1-transitional.dtd "><html xmlns=" http://www.w3.org/1999/xhtml "><head><meta http-equiv="Content-Type" content="text/html; Charset = UTF-8 "/ > < title > brand presentation exercise < / Title > < style type =" text / CSS "> *{ margin: 0; padding: 0;}body { font-size: 12px; text-align: center;}a { color: #04D; text-decoration: none;}a:hover { color: #F50; text-decoration: underline;}.SubCategoryBox { width: 600px; margin: 0 auto; text-align: center; margin-top: 40px;}.SubCategoryBox ul { list-style: none;}.SubCategoryBox ul li { display: block; float: left; width: 200px; line-height: 20px;}.showmore , .showless{ clear: both; text-align: center; padding-top: 10px;}.showmore a , .showless a{ display: block; width: 120px; margin: 0 auto; line-height: 24px; border: 1px solid #AAA;}.showmore a span { padding-left: 15px; background: url(img/down.gif) no-repeat 0 0;}.showless a span { padding-left: 15px; background: url(img/up.gif) no-repeat 0 0;}.promoted a { color: #F50;}</ style><script type="text/javascript" src="script/jquery-1.7.2.js"></script><script type="text/javascript"> $ (function() { // Basic initial state $ ("li:gt(5):not(:last)").hide(); // $ ("div div a").click(function (){ // Let it disappear or appear $ ("li:gt(5):not(:last)").toggle(); // Judge whether the brand is currently visible if($("li:gt(5):not(:last)").is(":hidden")){ // Change picture $ ("div div").removeClass(); $ ("div div").addClass("showmore"); // Change text $ ("div div a span").text("show all brands"); // Delete highlight $ ("li:contains('patriot ')") removeClass(); $ ("li:contains('canon ')") removeClass(); } else{ // Change picture $ ("div div").removeClass(); $ ("div div").addClass("showless"); // Change text $ ("div div a span").text("show compact brands"); // Add highlight $ ("li:contains('patriot ')") addClass("promoted"); $ ("li:contains('canon ')") addClass("promoted"); } // Avoid jumping return false; }) });</ script></head><body> < div class="SubCategoryBox"> < ul> < Li > < a href = "#" > Canon < / a > < I > (30440) < / I ></li> < Li > < a href = "#" > Sony < / a > < I > (27220) < / I ></li> < Li > < a href = "#" > Samsung < / a > < I > (20808) < / I ></li> < Li > < a href = "#" > Nikon < / a > < I > (17821) < / I ></li> < Li > < a href = "#" > Panasonic < / a > < I > (12289) < / I ></li> < Li > < a href = "#" > Casio < / a > < I > (8242) < / I ></li> < Li > < a href = "#" > Fuji < / a > < I > (14894) < / I ></li> < Li > < a href = "#" > Kodak < / a > < I > (9520) < / I ></li> < Li > < a href = "#" > Pentax < / a > < I > (2195) < / I ></li> < Li > < a href = "#" > Ricoh < / a > < I > (4114) < / I ></li> < Li > < a href = "#" > Olympus < / a > < I > (12205) < / I ></li> < Li > < a href = "#" > BenQ < / a > < I > (1466) < / I ></li> < Li > < a href = "#" > patriot < / a > < I > (3091) < / I ></li> < Li > < a href = "#" > cameras of other brands < / a > < I > (7275) < / I ></li> </ ul> < div class="showmore"> < A href = "more. HTML" > < span > show all brands < / span ></a> </ div> </ div></body></html>
jQuery event action
$(function(){}); And window Onload = function() {}?
When did they trigger?
- After the jQuery page is loaded, the browser kernel parses the page label and creates a DOM object, which will be executed immediately.
- After the native js page is loaded, you should not only wait for the browser kernel to parse the tag and create the DOM object, but also wait for the content required for tag display to be loaded.
The order in which they trigger?
- After the jQuery page is loaded, execute it first
- After the page of native js is loaded
How many times do they perform?
- After the page of native js is loaded, only the last assignment function will be executed.
- After the jQuery page is loaded, all the registered function functions are executed in sequence.
Other event handling methods in jQuery
- click() It can bind click events and trigger click events
- mouseover() Mouse in event
- mouseout() Mouse out event
- bind() You can bind one or more events to an element at once.
- one() It is the same as bind. However, the event bound by the one method will respond only once.
- unbind() The reverse of the bind method is to unbind the event
- live() It is also used to bind events. It can be used to bind events for all elements that the selector matches. Even if this element is dynamically created later, it is also effective
Bubbling of events
What is the bubbling of events?
Event bubbling means that parent and child elements listen to the same event at the same time. When an event of a child element is triggered, the same event is passed to the event of the parent element to respond.
So how to prevent the event from bubbling?
In the body of the child element event function, return false; It can prevent the bubbling transmission of events.
javaScript event object
Event object is a javascript object that encapsulates the triggered event information.
We focus on how to get the event object of javascript. And use.
How do I get javascript event objects?
When binding an event to an element, add a parameter to the function (event) parameter list of the event. We are used to calling this parameter event. This event is the event object that javascript passes the parameter event handler.
1. Get event object with native javascript
window.onload = function () {document.getElementById("areaDiv").onclick = function (event) { console.log(event);}}
2. Get the event object with jQuery code
$(function () {$("#areaDiv").click(function (event) {console.log(event);});});
3. Use bind to bind the same function to multiple events at the same time. How to get what event the current operation is.
$("#Areadiv "). Bind (" mouseover mouseout ", function (event) {if (event. Type = =" mouseover ") {console. Log (" mouse in ");} else if (event.type == "mouseout") {console.log("mouse out";}});
Picture following exercise
<!DOCTYPE html PUBLIC "-//W3C//DTD HTML 4.01 Transitional//EN" "http://www.w3.org/TR/html4/loose.dtd"><html><head><meta http-equiv="Content-Type" content="text/html; charset=UTF-8"><title>Insert title here</title><style type="text/css"> body { text-align: center; } #small { margin-top: 150px; } #showBig { position: absolute; display: none; }</style><script type="text/javascript" src="script/jquery-1.7.2.js"></script><script type="text/javascript"> $(function(){ $("#small").bind("mouseover mouseout mousemove",function (event){ if(event.type=="mouseover"){ $("#showBig").show(); }else if(event.type=="mouseout"){ $("#showBig").hide(); }else if(event.type=="mousemove"){ $("#showBig").offset({ left:event.pageX+10, top:event.pageY+10 }) } }) });</script></head><body> <img id="small" src="img/small.jpg" /> <div id="showBig"> <img src="img/big.jpg"> </div></body></html>
XML
What is xml?
xml is an extensible markup language.
What is the role of xml?
1. It is used to save data, and the data is self descriptive
2. It can also be used as a configuration file for a project or module
3. It can also be used as the format for network data transmission (now JSON is the main format)
xml syntax
-
Document declaration.
-
Element (label)
-
xml attribute
-
xml annotation
-
Text area (CDATA area)
Xml naming rules
1. The name of an element can contain letters, numbers, and other characters
2. The name of an element cannot begin with XML (XML, XML, XML, etc.)
3. The name of an element cannot begin with a number or punctuation
4. Element names cannot contain spaces
5. There are no so-called reserved words in XML documents except XML. Any name can be used, but the element name should be readable as much as possible. It is a good choice to use underscores for names
6. Try to avoid using "-" and ".", Because it could cause chaos.
7. Do not use ':' in XML element naming, because this very special character is required in XML namespace.
xml attribute
xml tag attributes are very similar to html tag attributes. Attributes can provide additional information about elements
Attributes can be written on the label:
Multiple attributes can be written on a label. The value of each attribute must be enclosed in quotation marks.
The rule of attribute is consistent with the writing rule of label.
rule of grammar
All XML elements must have a close tag (that is, close)
-
XML tags are case sensitive
-
XML must be nested correctly
-
The XML document must have a root element
- The root element is the top element,
- An element without a parent tag is called a top-level element.
- The root element is a top-level element without a parent tag and is the only one.
-
XML attribute values must be quoted
-
Text area (CDATA area)
CDATA syntax can tell the xml parser that the text content in CDATA is only plain text and does not need xml syntax parsing
CDATA format:
<![CDATA[ Here you can display the characters you entered as they are without parsing xml ]]>
xml parsing technology
xml is an extensible markup language.
Whether html files or xml files, they are markup documents that can be parsed using dom technology developed by w3c organization.

The document object represents the entire document (either html or xml)
The early JDK provided us with an introduction to two xml parsing technologies DOM and Sax (outdated, but we need to know these two technologies)
dom parsing technology is developed by W3C organization, and all programming languages implement this parsing technology using the characteristics of their own language.
Java also implements dom technology parsing tags.
sun company upgraded dom parsing technology in JDK5 version: SAX (Simple API for XML)
SAX parsing, which is different from the parsing formulated by W3C. It uses a similar event mechanism to tell the user the content being parsed through a callback. It reads and parses the xml file line by line. A large number of dom objects will not be created.
Therefore, when parsing xml, it is in the use of memory. And performance. Are better than Dom parsing.
Third party resolution:
jdom is encapsulated on the basis of dom, dom4j and jdom.
pull is mainly used in Android mobile phone development. It is very similar to sax. It is an event mechanism to parse xml files.
This Dom4j is a third-party parsing technique. We need a good class library provided by a third party to parse xml files.
dom4j parsing technology
dom4j programming steps
- First load the xml file to create a Document object
- Get the root element object through the Document object
- Through the root element Elelemts (tag name); You can return a set, which is placed in the set. All element objects with the tag name you specify
- Find the child element you want to modify or delete and perform the corresponding operation
- Save to hard disk
@Test public void test1() throws DocumentException { // To create a document object, we need to create a SAXReader object SAXReader saxReader = new SAXReader()// This object is used to read the XML file and then return a document. Document document = saxReader.read("src/books.xml"); System. out. println(document); } @ Test public void test2() throws documentexception {/ / 1. Read books.xml SAXReader saxReader = new SAXReader(); / / 2. In junit test, the relative path is to get the document from the module. Document = SAXReader.read ("Src / books. XML") ; // Get the root element element through document, rootelement = document getRootElement(); // Get the book tag object through the root element / / element and elements both find child elements through the tag name, and use s list < element > books = rootelement elements("book"); // Traverse the output for (element book: Books) {/ / asxml() to convert the label object into the label string element nameelement = book.element ("name"); / / system.out.println (nameelement. Asxml()); / / gettext() to obtain the text content in the label String nameText = nameElement.getText(); //System.out.println(name); //elementText directly obtains the text content of the specified tag name string pricetext = book elementText("price"); String authorText = book. elementText("name"); String snValue = book. attributeValue("sn"); System. out. println(new Book(snValue,nameText,authorText,Double.parseDouble(priceText))); } }