A small task of the school Mobile Innovation Application Association is to make a virtual game handle with HTML.
It looks very fresh, and I'm not very familiar with the front end, so I'll try it.
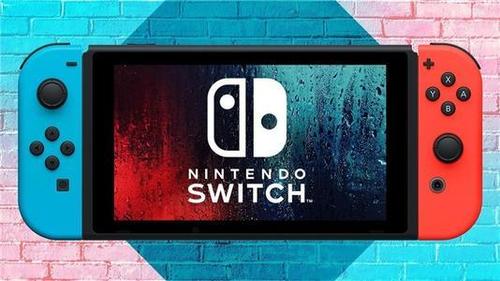
Let's look at the concept map first:
 (concept map is a concept map after all 😅)
It looks troublesome, red, blue, red and blue. It's really high-end, but how many functions do you have to add? There are four buttons on the left and right sides to start. After all, novices are novices. They don't have any ideas and their heads are empty, so I decisively choose to lie down and brush my mobile phone.
When I was lying comfortably, I found that the handle was just adding a few buttons with functions, and then beautifying the interface. Soon, I would add buttons, and then I had my sketch:
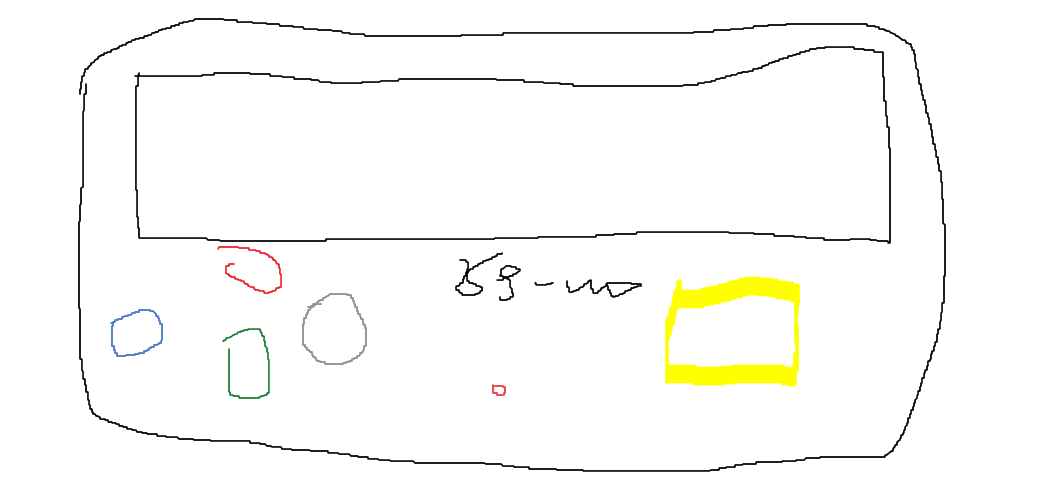 What I paint is very powerful and domineering 😼
It's much easier to look at the sketch, which can be divided into the following steps:
- Frame up
- Join button
- Add function
- Beautify layout
After two hours of visual inspection, I learned to run from climbing (as a result, it took half a day to do almost the same 😭)
Upper code
HTML part
<!DOCTYPE html>
<html>
<head>
<meta charset="utf-8">
<title>Handle</title>
<link rel="stylesheet" href="./css/style.css">
</head>

<body>

<div style="width: 80%; font-family:verdana;padding:20px;border-radius:70px;border:10px solid #000000;margin: auto;">

  <div class="scr" id="times" style="width:100%;height:265px;">
  </div>
  <div class="p1"></div>
  <div class="p2"></div>
    <button class="button1"id="but1">UP</button>
    <button class="button2"id="but2">LEFT</button><br>
    <button class="button3"id="but3">RIGHT</button>
    <button class="button4"id="but4">DOWN</button>
    <button class="button5"onclick="getLocation()"></button>
    <button class="button7"id="btn2"> </button>
    <button class="button8"onclick="history.go(0)"></button>
    <button class="button6"id="btn1">HIT</button>
    <div style="width: 95%; font-family:verdana;padding:20px;border-radius:5px;border:5px solid #000000;margin: auto;">
      <div class="logo">Ye~mo<br>GAMES</div>
      <br><br><br><br><br><br>
      <div class="deo"id="demo"><br><br></div>
      <br><br><br><br><br><br>
  <div id="box" class="box" style="left: 200px; top: 200px;">
    <img src="picture\xi.png" height="30" width="30"  ></div>
</body>

<script>
  var xSpeed=2; //Speed of x-axis
  var ySpeed=2; //Speed of y-axis
  var timer;
  // top
	var btn = document.getElementById("but1");
	var body = document.body;
	btn.onclick = function () {
      clearInterval(timer);
      timer=setInterval(function(){
      ySpeed=-2;
      xSpeed=0;
      var y=parseInt(box.style.top)+ySpeed;
      box.style.top=y+'px';
      if(y<=36) clearInterval(timer);
      },1000/60)
  };
  // bottom
	var btn = document.getElementById("but4");
	btn.onclick = function () {
      clearInterval(timer);
      timer=setInterval(function(){
      ySpeed=2;
      xSpeed=0;
      var y=parseInt(box.style.top)+ySpeed;
      box.style.top=y+'px';
      if(y>=273) clearInterval(timer);
      },1000/60)
  };
  // left
	var btn = document.getElementById("but2");
	btn.onclick = function () {
      clearInterval(timer);
      timer=setInterval(function(){
      xSpeed=-2;
      ySpeed=0;
      var x=parseInt(box.style.left)+xSpeed;
      box.style.left=x+'px';
      if(x<=156) clearInterval(timer);
      },1000/60)
  };
  //right
	var btn = document.getElementById("but3");
	btn.onclick = function () {
      clearInterval(timer);
      timer=setInterval(function(){
      xSpeed=2;
      ySpeed=0;
      var x=parseInt(box.style.left)+xSpeed;
      box.style.left=x+'px';
      if(x>=1330) clearInterval(timer);
      },1000/60)
  };
</script>
<script>
	var btn = document.getElementById("btn2");
	var body = document.body;
	btn.onclick = function () {
		body.style.backgroundColor  = "rgb(255, 223, 233)";
	}
</script>
<script>
	var btn = document.getElementById("btn1");
	var body = document.body;
	let array = ["red", "blue", "yellow", "white", "hsl(170, 91%, 66%)", "green", "orange","#FFF"];
	let index = 0;
	btn.onclick = function () {
		body.style.backgroundColor = array[index];
		index = (index + 1) % array.length;
	}
</script>
<script>
var x=document.getElementById("demo");
function getLocation()
{
  if (navigator.geolocation)
  {
    navigator.geolocation.getCurrentPosition(showPosition,showError);
  }
  else
  {
    x.innerHTML="The browser does not support positioning.";
  }
}
function showPosition(position)
{
  x.innerHTML="latitude: " + position.coords.latitude +
  "<br>longitude: " + position.coords.longitude;
}
function showError(error)
{
  switch(error.code)
  {

    case error.PERMISSION_DENIED:
      x.innerHTML="di~~<br>You rejected the request to get a geographic location"
      break;
    case error.POSITION_UNAVAILABLE:
      x.innerHTML="di~~<br>Location information not available"
      break;
    case error.TIMEOUT:
      x.innerHTML="di~~<br>Request geolocation timeout"
      break;
    case error.UNKNOWN_ERROR:
      x.innerHTML="di~~<br>unknown error"
      break;
  }
}
</script>
<script>
  var myVar=setInterval(function(){myTimer()},1000);
  function myTimer(){
    var d=new Date();
    var t=d.toLocaleTimeString();
    document.getElementById("times").innerHTML=t;
  }
  </script>
</html>
CSS section
body{
    background-color: rgb(255, 223, 233);
}
.box{
    width: 10px;
    height: 10px;
    border-radius: 50px;
    background: rgb(145, 130, 130);
    position: absolute;
}
.button1{

    width: 120px;
    height: 120px;
    border-radius: 40px;
    background-color: #378aff;
    color: white;
    font-weight: 400;
    font-size: 20px;
    font-stretch:ultra-expanded;
    box-shadow: 0 4px 8px 0 rgba(0, 0, 0, 0.2), 0 6px 20px 0 rgba(0, 0, 0, 0.19);
    transition: all 0.5s ease;
    position:absolute;
    left:380px;
    top:360px;
    cursor: pointer;
}
.button2{
    width: 120px;
    height: 120px;
    border-radius: 40px;
    background-color: #07af12;
    color: white;
    font-weight: 400;
    font-size: 20px;
    outline: none;
    font-stretch:ultra-expanded;
    box-shadow: 0 4px 8px 0 rgba(0, 0, 0, 0.2), 0 6px 20px 0 rgba(0, 0, 0, 0.19);
    transition: all 0.5s ease;
    position:absolute;
    left:245px;
    top:460px;
    cursor: pointer;
}
.button3{
    width: 120px;
    height: 120px;
    border-radius: 40px;
    background-color: #e5ff00;
    color: white;
    font-weight: 400;
    font-size: 20px;
    outline: none;
    font-stretch:ultra-expanded;
    box-shadow: 0 4px 8px 0 rgba(0, 0, 0, 0.2), 0 6px 20px 0 rgba(0, 0, 0, 0.19);
    transition: all 0.5s ease;
    position:absolute;
    left:515px;
    top:460px;
    cursor: pointer;
}
.button4{
    width: 120px;
    height: 120px;
    border-radius: 40px;
    background-color: #808080;
    color: white;
    font-weight: 400;
    font-size: 20px;
    outline: none;
    font-stretch:ultra-expanded;
    box-shadow: 0 4px 8px 0 rgba(0, 0, 0, 0.2), 0 6px 20px 0 rgba(0, 0, 0, 0.19);
    transition: all 0.5s ease;
    position:absolute;
    left:380px;
    top:540px;
    cursor: pointer;
}
.button5{
    width: 15px;
    height: 15px;
    border-radius: 40px;
    background-color: #ff0000;
    outline: none;
    transition: all 0.5s ease;
    position:absolute;
    left:50%;
    top:580px;
    cursor: pointer;
}
.button6{
    width: 220px;
    height: 220px;
    border-radius: 40px;
    background-color: #ff9900;
    color: white;
    font-weight: 400;
    font-size: 40px;
    outline: none;
    font-stretch:ultra-expanded;
    box-shadow: 0 4px 8px 0 rgba(0, 0, 0, 0.2), 0 6px 20px 0 rgba(0, 0, 0, 0.19);
    transition: all 0.5s ease;
    position:absolute;
    right:290px;
    top:400px;
    cursor: pointer;
}
.button7{
    width: 15px;
    height: 15px;
    border-radius: 40px;
    background-color: #ffe8fd;
    outline: none;
    transition: all 0.5s ease;
    position:absolute;
    left:50%;
    top:395px;
    cursor: pointer;
}
.button8{
    width: 15px;
    height: 15px;
    border-radius: 40px;
    background-color: #ffffff;
    outline: none;
    transition: all 0.5s ease;
    position:absolute;
    left:50%;
    top:415px;
    cursor: pointer;
}
.deo{
    margin: auto;
    text-align: center;
}
.logo{
    font-style: italic;
    font-size: large;
    font-family: Impact, Haettenschweiler, 'Arial Narrow Bold', sans-serif;
    margin: auto;
    text-align: center;
}
.scr{
    width:500px;
    height:200px;
    border-radius: 50;
    background: #fff;
    background-image:linear-gradient(45deg,#ffd2d2 26%,transparent 0,transparent 75%,#ffd2d2  0),
    linear-gradient(45deg,#ffd2d2 26%,transparent 0,transparent 75%,#ffd2d2 0);
    background-size:30px 30px;
    background-position:0 0,15px 15px;
    background-attachment: fixed;
}
.p1{
    background: #ffd2d2 ;
    opacity:0.9;
    width:130px;
    height:310px;
    border-radius: 60;
    outline-style: ridge;
    box-shadow: 0 4px 8px 0 rgba(0, 0, 0, 0.2), 0 6px 20px 0 rgba(0, 0, 0, 0.19);
    position:absolute;
    left:375px;
    top:355px;
}
.p2{
    background: #ffd2d2 ;
    opacity:0.9;
    width:400px;
    height:130px;
    border-radius: 60;
    outline-style: ridge;
    box-shadow: 0 4px 8px 0 rgba(0, 0, 0, 0.2), 0 6px 20px 0 rgba(0, 0, 0, 0.19);
    position:absolute;
    left:240px;
    top:455px;
}
Then there is the renderings:
 Does it look like a game console you played when you were a child
It would have been nice to make a few small buttons, but I found it very interesting later, so I added a few more functions. As a novice who doesn't even remember the framework, it's really fun to see everything.
- The shell of the game console is just two boxes. I don't know any other way. It's also good to find pictures as the background, but I'm lazy, so I can only rely on my design talent to make it look more like a game console and more comfortable.
- The background of pink and white stripes is used as the screen. It took a long time to find out how to make stripes.
- The top left corner of the screen is Beijing time, which is added when you see it in the rookie tutorial.
- Let's talk about the functions of the four buttons on the left, which respectively control the emoji in the screen to move up, down, left and right in the pink screen. I searched for this function for a long time, and then changed it for a long time. I looked a little satisfied. I spent half of my time studying it, but there were still bug s (emoji seemed to stop moving when it reached the boundary, but if I clicked the button continuously, it would still move two points and two points 😔). Each button has a different function (because you want to adjust the direction, the difference is that the value of variable x or y is + - 2).
- Click the "HIT" button on the right to change the background color of the web page. Eight colors are set in the function.
- Click the pink button in the middle to restore the background color of the web page (pink, because it is to match the color of my browser).
- Click the white button to refresh the page.
- Click the red button to locate, and the result (longitude and latitude) will appear above the red button.
The above is my game console model made of HTML. Generally speaking, the knowledge used is not very deep, but just playing. I haven't systematically studied these things in the front end. If I want to produce something in a short time, I can only rely on online search and quick video. The learning effect is also very good, which also makes me more interested in the front end. If you have a chance, try to play some small games on the front end (but you have to learn about the front end, otherwise you can't be tired to death if you do it like the above).