This article is shared from Huawei cloud community< How do I use Spring configuration files? Let's play with the Spring configuration file >Author: I am a cabbage.
1, Spring application quick start
Step 1: import the coordinates of the basic package developed by Spring
Create a maven project and import the dependencies required by Spring. In order to facilitate testing, I also imported a Junit test package
<dependencies>
        <dependency>
            <groupId>org.springframework</groupId>
            <artifactId>spring-context</artifactId>
            <version>5.3.14</version>
        </dependency>
        <dependency>
            <groupId>junit</groupId>
            <artifactId>junit</artifactId>
            <version>4.12</version>
        </dependency>
    </dependencies>
Step 2: write Dao interface and implementation class
Next, you need to write a Dao interface and its implementation class to build a testing environment. If you don't say much, you can write the code directly
public interface UserDao {
    void save();
}
public class UserDaoImpl implements UserDao {
    @Override
    public void save() {
        System.out.println("Saved successfully~~");
    }
}
Step 3: create Spring core configuration file
After the interface and class are written, I start to get to the point. I create the core configuration file of Spring under the class path (resources). I call it ApplicationContext xml
<?xml version="1.0" encoding="UTF-8"?>
<beans xmlns="http://www.springframework.org/schema/beans"
       xmlns:xsi="http://www.w3.org/2001/XMLSchema-instance"
       xsi:schemaLocation="http://www.springframework.org/schema/beans http://www.springframework.org/schema/beans/spring-beans.xsd">
</beans>
Step 4: configure the UserDaoImpl class in the Spring configuration file
After creating the xml configuration file, if I want to call the save() method, I need to create an object of UserDaoImpl class. Here, I use the container method.
<bean id="userdao" class="com.sht.dao.impl.UserDaoImpl"></bean>
The id here is user-defined, preferably the first letter of the class name in lowercase, which is convenient for memory. The class attribute value is the package path where the class object is to be created. The package path where my UserDaoImpl class is located is com sht. dao. impl. UserDaoImpl, you can't write it wrong!
Step 5: use the Spring API to obtain the Bean instance
Next, test:
public class UserDaoDemo {
    public static void main(String[] args) {
        ApplicationContext applicationContext =
                new ClassPathXmlApplicationContext("applicationContext.xml");
        UserDao userdao = (UserDao) applicationContext.getBean("userdao");
        userdao.save();
    }
}
Get the container - applicationContext through new ClassPathXmlApplicationContext("applicationContext.xml"), and then get the object of UserDaoImpl class through the attribute value corresponding to id, so we don't need to create the object in a new way!
The above java code can also be written in another way:
public class UserDaoDemo {
    public static void main(String[] args) {
        ApplicationContext applicationContext =
                new ClassPathXmlApplicationContext("applicationContext.xml");
        UserDaoImpl userDao = applicationContext.getBean(UserDaoImpl.class);
        userDao.save();
    }
}
Where, when the data type of the parameter is a string, it means that the Bean instance is obtained from the container according to the Bean id, and the return is Object, which needs to be forced.
When the data type of the parameter is Class, it means that Bean instances are matched from the container according to the type. Special attention: when there are multiple beans of the same type in the container, this method will report an error.
Operation results:

The result is correct. Now that you have a basic understanding of the spring configuration file, let's take a look at other details in the spring configuration file!
2, Spring configuration file usage
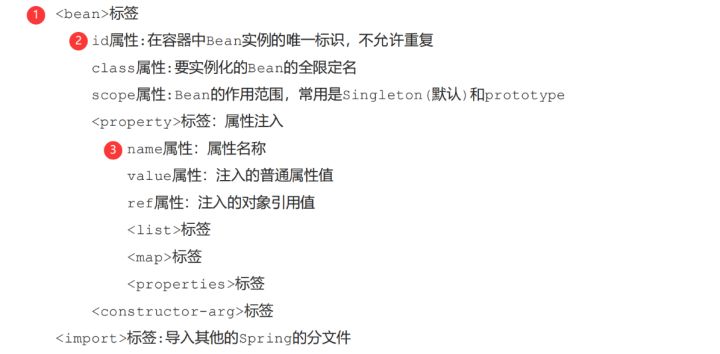
1. Bean tag basic configuration
Basic introduction
The configuration object is created by Spring
By default, it calls the parameterless constructor in the class. If there is no parameterless constructor, it cannot be created successfully. For the parameterless constructor, we will talk about it later
Basic properties
id: the unique identifier of the Bean instance in the Spring container
class: the fully qualified name of the Bean
These two basic properties have been used in the quick start, so I won't introduce them at most
Bean tag scope configuration

Modify the xml configuration file and add scope="singleton" to the original bean, which means that no matter how many objects we create, they are the same
<bean id="userdao" class="com.sht.dao.impl.UserDaoImpl" scope="singleton"></bean>
Write a test code
    public void test1(){
        ApplicationContext context =
                new ClassPathXmlApplicationContext("applicationContext.xml");
        UserDao userdao1 = (UserDao) context.getBean("userdao");
        System.out.println(userdao1);
        UserDao userdao2 = (UserDao) context.getBean("userdao");
        System.out.println(userdao2);
        System.out.println("Whether it is the same object instance:" + (userdao1 == userdao2));
    }
Operation results:

Continue to modify the xml configuration file and change the scope="singleton" to scope="prototype", which means that when we use it to create objects, it is not the same object instance
The above test code remains unchanged, and the running results are as follows:

Bean tag instantiation timing
Friends may have questions. When did the above two methods create object instances? Don't worry, let's take our time.
In order to facilitate the display of the effect, I added a sentence of code to the nonparametric constructor of UserDaoImpl class to distinguish the time of creating an instance
public UserDaoImpl(){
System.out.println("UserDaoImpl Start creating");
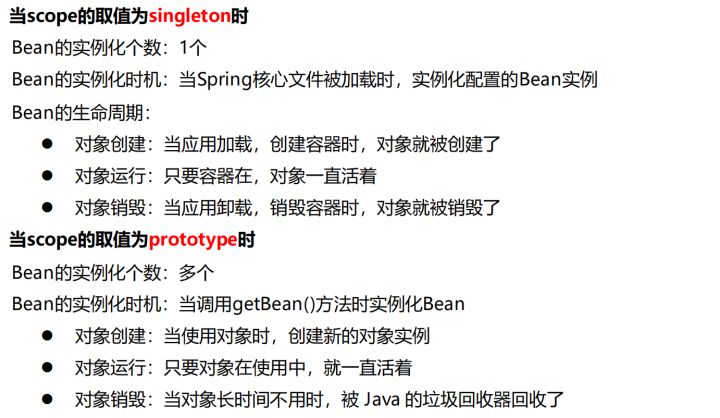
}When scope is singleton
Run debug and click F8

We can find that the object instance is created from the time the configuration file is loaded

When scope is prototype
Run debug and press F8. It is found that the console does not print "UserDaoImpl start creation", indicating that the configuration file does not load the object instance
Press F8 again to next

We can find that the console finally prints "UserDaoImpl start creation"
summary
When the scope value is singleton, when the application loads and creates a container, the object is created; When the scope value is prototype, a new object instance is created only when an object is used.
Bean lifecycle configuration
Add two methods to the UserDaoImpl class
  public void init(){
        System.out.println("Initialization method");
    }
  public void destory(){
        System.out.println("Destruction method");
    }
Modify the xml configuration file, init method: specify the initialization method name in the class, destroy method: specify the destruction method name in the class
<bean id="userdao" class="com.sht.dao.impl.UserDaoImpl"
          scope="singleton"
          init-method="init"
          destroy-method="destory">
</bean>
Write test code
public void test3(){
        ApplicationContext context =
                new ClassPathXmlApplicationContext("applicationContext.xml");
        UserDao userdao1 = (UserDao) context.getBean("userdao");
        System.out.println(userdao1);
        UserDao userdao2 = (UserDao) context.getBean("userdao");
        System.out.println(userdao2);
        System.out.println("Whether it is the same object instance:" + (userdao1 == userdao2));
        //This is used to close the container
        ((ClassPathXmlApplicationContext) context).close();
    }
Operation results:
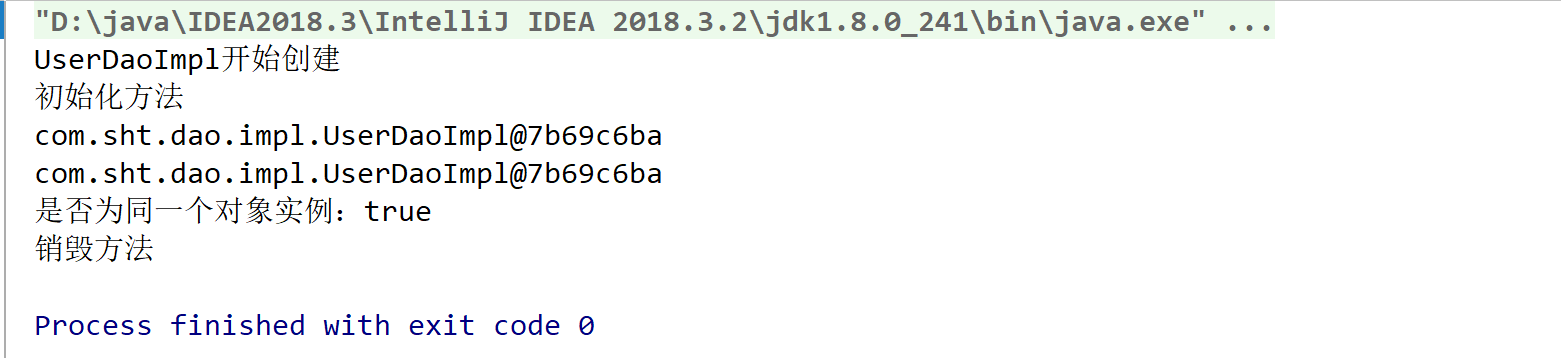
From this example, I believe you can infer the order of object creation, initialization, method call and destruction
There are three ways to instantiate a Bean
Method 1: instantiation of parameterless construction method (key)
In fact, we have been using this method before, but it should be noted that this method will create class objects according to the default parameterless constructor. If there is no default parameterless constructor in the bean, the creation will fail
Method 2: Factory static method instantiation (understand)
Create a static factory class and directly return the object instance of UserDaoImpl class
public class StaticFactory {
    public static UserDao getUserDao(){
        return new UserDaoImpl();
    }
}
For bean s that write xml configuration files, the class attribute value here is the path of the package corresponding to the static factory class, and the attribute value corresponding to factory method is the method name in the class
<bean id="userdao" class="com.sht.factory.StaticFactory" factory-method="getUserDao"></bean>
Write code test
public class UserDaoDemo {
    public static void main(String[] args) {
        ApplicationContext applicationContext =
                new ClassPathXmlApplicationContext("applicationContext.xml");
        UserDao userdao = (UserDao) applicationContext.getBean("userdao");
        userdao.save();
    }
}
The final running result will be: "save successfully ~ ~"
Method 3: factory instance method instantiation (understand)
Create a factory class and return the object instance of UserDaoImpl class
public class DynamicFactory {
    public UserDao getUserDao(){
        return new UserDaoImpl();
    }
}
For the bean that writes the xml configuration file, the class attribute value here is the path of the package corresponding to the factory class. The first bean can get the object of the factory class, and then write a bean to get the object instance of UserDaoImpl class. The factory bean attribute value represents the factory from which it is taken. The attribute value corresponding to factory method is the method name in the class
<bean id="factory" class="com.sht.factory.DynamicFactory"></bean>
<bean id="userdao" factory-bean="factory" factory-method="getUserDao"></bean>
The final running result is: "save successfully ~ ~"
summary
2. Dependency injection of Bean
Basic introduction
Dependency Injection: it is the concrete implementation of the Spring framework core IOC.
When writing the program, the creation of objects is handed over to Spring through control inversion, but there can be no dependency in the code. IOC decoupling only reduces their dependencies, but it will not eliminate them. For example, the business layer will still call the methods of the persistence layer.
After using Spring, Spring can maintain the dependency between the business layer and the persistence layer.
Simply put, it means waiting for the framework to transfer the persistence layer object to the business layer without getting it ourselves.
Dependency injection method of Bean
Method 1: parametric construction method
We talked about the nonparametric construction method. Now we talk about the parametric construction method. Let's first create a UserService interface and its implementation class UserServiceImpl
public interface UserService {
    void save();
}
public class UserServiceImpl implements UserService {
    private UserDao userdao;
    public UserServiceImpl(UserDao userdao) {
        this.userdao = userdao;
    }
    @Override
    public void save() {
        userdao.save();
    }
}
For the bean that writes the xml configuration file, the class attribute value corresponds to the package path under the class respectively< The name attribute value in constructor Arg name = "userdao" ref = "userdao" > < / constructor Arg > is the lowercase initial of the corresponding set method name after removing set. Ref is the imported data type, that is, it represents the injection of object attributes
  <bean id="userdao" class="com.sht.dao.impl.UserDaoImpl"></bean>
  <bean id="userService"  class="com.sht.service.impl.UserServiceImpl">
        <constructor-arg name="userdao" ref="userdao"></constructor-arg>
  </bean>
Mode 2: set method
The interface remains unchanged. Change the UserServiceImpl class. It should be noted that the permission of setUserdao() is public and cannot be written as private
public class UserServiceImpl implements UserService {
    private UserDao userdao;
    //Permission is public
    public void setUserdao(UserDao userdao){
        this.userdao = userdao;
    }
    @Override
    public void save() {
        userdao.save();
    }
}
I won't explain the class attribute of the bean that writes the xml configuration file. It focuses on < property name = "userdao" ref = "userdao" > < / property >; The name attribute value is the lowercase initial of the corresponding set method name after removing set. Ref is the imported data type, that is, it indicates the injection of object attributes; Here, inject the object of UserDaoImpl class into UserServiceImpl class, and you can call its save() method
  <bean id="userdao" class="com.sht.dao.impl.UserDaoImpl"></bean>
  <bean id="userService"  class="com.sht.service.impl.UserServiceImpl">
        <property name="userdao" ref="userdao"></property>
  </bean>
Test code:
public void test5(){
        ApplicationContext context =
                new ClassPathXmlApplicationContext("applicationContext.xml");
        UserService userService = (UserService) context.getBean("userService");
        userService.save();
    }
Operation results:

In addition, there is a special method in the set method: P namespace injection. Its essence is also set method injection, but it is more convenient than the above set method injection, which is mainly reflected in the configuration file, as follows:
Introducing xmlns:p=“ http://www.springframework.org/schema/p "Namespace. Secondly, the P: userdao ref attribute value has the same meaning as the attribute value corresponding to Ref. this method can be used to understand
<?xml version="1.0" encoding="UTF-8"?>
<beans xmlns="http://www.springframework.org/schema/beans"
       xmlns:xsi="http://www.w3.org/2001/XMLSchema-instance"
       xmlns:p="http://www.springframework.org/schema/p"
       xsi:schemaLocation="http://www.springframework.org/schema/beans http://www.springframework.org/schema/beans/spring-beans.xsd">

    <bean id="userdao" class="com.sht.dao.impl.UserDaoImpl"></bean>
    <bean id="userService" class="com.sht.service.impl.UserServiceImpl" p:userdao-ref="userdao"></bean>
</beans>
3. Dependency injection data type of Bean
Injection of common data types
I use the set method to explain the dependency injection of bean s. Continue to add two basic data types and their set methods to the UserDaoImpl class
    private String name;
    private Integer age;
    public void setName(String name) {
        this.name = name;
    }
    public void setAge(Integer age) {
        this.age = age;
    }
    public void show() {
        System.out.println("The name is" + name + "What is your age" + age);
    }
Modify the bean of the xml configuration file. The attribute value of name represents the name of the set method, and the attribute value of value represents the attribute value you want to fill in
<bean id="userDao" class="com.sht.dao.impl.UserDaoImpl">
        <property name="name" value="Cabbage"></property>
        <property name="age" value="20"></property>
</bean>
Write a test class:
   public void test7(){
        ApplicationContext context =
                new ClassPathXmlApplicationContext("applicationContext.xml");
        UserDaoImpl contextBean = context.getBean(UserDaoImpl.class);
        contextBean.show();
    }
Operation results:

Injection of collection data types
List < string > type injection
Continue in UserDaoImpl Code changed in class:
    private List<String> stringList;
    public void setStringList(List<String> stringList) {
        this.stringList = stringList;
    }
    public void showStringList() {
        System.out.println(stringList);
    }
Modify the xml configuration file and inject two basic data types, namely < list > and < value >
  <bean id="userDao" class="com.sht.dao.impl.UserDaoImpl">
       <property name="stringList">
          <list>
              <value>111</value>
              <value>222</value>
              <value>333</value>
          </list>
       </property>
  </bean>
Operation results:

List < user > type injection
First, create a User class with corresponding get and set methods and toString methods to facilitate testing
public class User {
    private Integer id;
    private String username;
    private String password;
    public Integer getId() {
        return id;
    }
    public void setId(Integer id) {
        this.id = id;
    }
    public String getUsername() {
        return username;
    }
    public void setUsername(String username) {
        this.username = username;
    }
    public String getPassword() {
        return password;
    }
    public void setPassword(String password) {
        this.password = password;
    }
    @Override
    public String toString() {
        return "User{" +
                "id=" + id +
                ", username='" + username + '\'' +
                ", password='" + password + '\'' +
                '}';
    }
}
Modify the bean of the xml configuration file. It can be seen that, unlike before, the < ref > tag is used in < list >, which represents the injected reference data type
 <bean id="user01" class="com.sht.domain.User">
        <property name="id" value="1"></property>
        <property name="username" value="Cabbage"></property>
        <property name="password" value="123456"></property>
 </bean>

    <bean id="user02" class="com.sht.domain.User"></bean>

    <bean id="userDao" class="com.sht.dao.impl.UserDaoImpl">
       <property name="userList">
           <list>
               <ref bean="user01"></ref>
               <ref bean="user02"></ref>
           </list>
       </property>
    </bean>
Operation results:

Map < string, user > type injection
Continue to change the code in the UserDaoImpl class:
private Map<String, User> stringUserMap;
public void setStringUserMap(Map<String, User> stringUserMap) {
this.stringUserMap = stringUserMap;
}
public void showStringUserMap() {
System.out.println(stringUserMap);
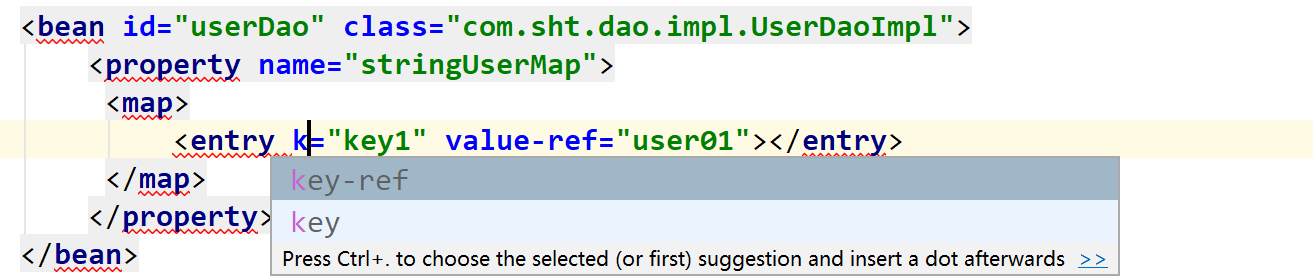
}Modify the xml configuration file. The difference is that when using map, the tags use < Map > and < entry >, which are similar to the list tag
    <bean id="user01" class="com.sht.domain.User">
        <property name="id" value="1"></property>
        <property name="username" value="Cabbage"></property>
        <property name="password" value="123456"></property>
    </bean>

    <bean id="userDao" class="com.sht.dao.impl.UserDaoImpl">
        <property name="stringUserMap">
         <map>
             <entry key="key1" value-ref="user01"></entry>
         </map>
        </property>
    </bean>
Operation results:

It should be noted that when selecting the key attribute, we will be prompted with a key ref as shown in the figure, which means that the key we want to use is an imported data type. Because the key I use is String, I choose key
When using value ref, the value will also appear, and its usage is the same as above

Property type injection
Continue to change the code in the UserDaoImpl class:
    private Properties properties;
    public void setProperties(Properties properties) {
        this.properties = properties;
    }
    public void showProperties(){
        System.out.println(properties);
    }
The difference between modifying the xml configuration file and the previous one is that the tags use < props > and < prop >, and the method is similar to the above method
 <bean id="userDao" class="com.sht.dao.impl.UserDaoImpl">
       <property name="properties">
           <props>
               <prop key="key01">value1</prop>
               <prop key="key02">value2</prop>
           </props>
       </property>
 </bean>
Operation results:

4. Introduce other configuration files (sub module development)
Create a new configuration file applicationcontext1 XML. In the actual development, there are many Spring configurations, which leads to the complexity and large volume of Spring configuration. Therefore, some configurations can be disassembled into other configuration files, and loaded in the main Spring configuration file through the import tag
Put applicationcontext1 The configuration content in the XML configuration file is introduced into ApplicationContext Implementation of XML:
<import resource="applicationContext1.xml"></import>
summary
The above are the relevant knowledge points of Spring configuration files. Let's take a look at the key configurations of Spring:
Click focus to learn about Huawei cloud's new technologies for the first time~