Image features

Similar to text features, image features are also a kind of data that is very difficult to mine by gradient lifting tree model. At present, image related problems, such as image classification and image segmentation, are almost neural network-based models. However, in some multimodal problems, such as commodity search recommendation, it contains both image information and text information, At this time, the modeling scheme based on gradient lifting tree model is still very important. At this time, in order to make better use of all data information, we need to extract image features in multiple directions.
In this section, we will add some of the most classic features after the top 10 features in the previous section.


1. Image pre training features
At present, there are many image features for pre training, including:
-
VGG-16
-
resnet50
-
xception
-
inception_v3
-
EfficientNet
-
NFNet
-
For others, see the link
The pre trained model can be used. We only need to convert the picture into the input form required by the corresponding model, and then input the model. Generally, we will take the model prediction results or the features of the last few layers as the features of the image. This feature is basically the feature most used by the winners in the multimodal data competition.
Note: because the final output of the pre trained network model is often very large, dimensionality reduction can be considered at this time.
-
The features of ResNet50 are extracted as our image features.
from tensorflow.keras.applications import ResNet50
from tensorflow.keras.applications.resnet50 import preprocess_input
from PIL import Image
from tensorflow.keras.preprocessing.image import load_img
from tensorflow.keras.preprocessing.image import img_to_array

model = ResNet50(weights="imagenet", include_top=False)
img   = load_img('./imgs/chapter7/img_example.jpeg', target_size=(224, 224))
img   = img_to_array(img)
img = np.expand_dims(img, axis=0)
img   = preprocess_input(img)
res50_features = model.predict(img)
res50_features.shape
WARNING:tensorflow:6 out of the last 9 calls to <function Model.make_predict_function.<locals>.predict_function at 0x7f9109f04b80> triggered tf.function retracing. Tracing is expensive and the excessive number of tracings could be due to (1) creating @tf.function repeatedly in a loop, (2) passing tensors with different shapes, (3) passing Python objects instead of tensors. For (1), please define your @tf.function outside of the loop. For (2), @tf.function has experimental_relax_shapes=True option that relaxes argument shapes that can avoid unnecessary retracing. For (3), please refer to https://www.tensorflow.org/guide/function#controlling_retracing and https://www.tensorflow.org/api_docs/python/tf/function for  more details.

(1, 7, 7, 2048)
-
inception_ The TopN of the prediction result of V3 is used as the image feature
import os
import numpy as np
import pandas as pd
from tensorflow.keras.preprocessing import image
import tensorflow.keras.applications.resnet50 as resnet50
import tensorflow.keras.applications.xception as xception
import tensorflow.keras.applications.inception_v3 as inception_v3
inception_model = inception_v3.InceptionV3(weights='imagenet')

def image_classify(model, pak, img, top_n=3):
    """Classify image and return top matches."""
    target_size = (299, 299)
    if img.size != target_size:
        img = img.resize(target_size)

    x = image.img_to_array(img)
    x = np.expand_dims(x, axis=0)
    x = pak.preprocess_input(x)
    preds = model.predict(x)
    return pak.decode_predictions(preds, top=top_n)[0]

def classify_and_plot(image_path):
    """Classify an image with different models.
    Plot it and its predicitons.
    """
    img = Image.open(image_path)
    resnet_preds = image_classify(resnet_model, resnet50, img)
    xception_preds = image_classify(xception_model, xception, img)
    inception_preds = image_classify(inception_model, inception_v3, img)
    cv_img = cv2.imread(image_path)
    preds_arr = [('Resnet50', resnet_preds), ('xception', xception_preds), ('Inception', inception_preds)]
    return (img, cv_img, preds_arr)
img   = load_img('./imgs/chapter7/img_example.jpeg', target_size=(224, 224))
inception_preds = image_classify(inception_model, inception_v3, img)
inception_preds
WARNING:tensorflow:8 out of the last 11 calls to <function Model.make_predict_function.<locals>.predict_function at 0x7f9111cb1ee0> triggered tf.function retracing. Tracing is expensive and the excessive number of tracings could be due to (1) creating @tf.function repeatedly in a loop, (2) passing tensors with different shapes, (3) passing Python objects instead of tensors. For (1), please define your @tf.function outside of the loop. For (2), @tf.function has experimental_relax_shapes=True option that relaxes argument shapes that can avoid unnecessary retracing. For (3), please refer to https://www.tensorflow.org/guide/function#controlling_retracing and https://www.tensorflow.org/api_docs/python/tf/function for  more details.

[('n03933933', 'pier', 0.9737361),
 ('n03216828', 'dock', 0.0070415554),
 ('n09332890', 'lakeside', 0.0041139866)]
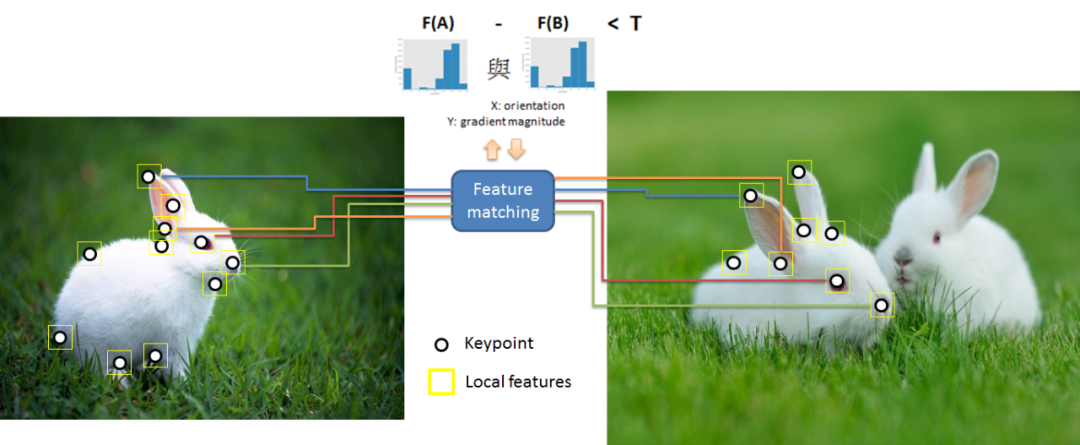
2.SIFT features
SIFT feature is an algorithm used to detect and describe local features in digital images. SIFT feature can resist different transformations (that is, the same feature may look different under different transformations). It is also the most popular algorithm before Deep Learning. SIFT feature point extraction is more convenient, the extraction speed is fast, and it is robust to image scaling and other transformations.

sift = cv2.SIFT_create()
img = cv2.imread('./imgs/chapter7/img_example.jpeg')
kp, des = sift.detectAndCompute(img, None)
img_kp = cv2.drawKeypoints(img, kp, img)
plt.figure(figsize=(10, 10))
plt.imshow(img_kp);
3.SURF features
Sift is a very good feature, but its calculation is relatively slow. In order to improve the calculation speed of SIFT, Bay, H., Tuytelaars, T. and Van Gool, L proposed a new algorithm called SURF (speed up robot features). As its name suggests, it is an accelerated version of sift.
The analysis shows that SURF is three times faster than SIFT and its performance is equivalent to SIFT. SURF is good at dealing with blurred and rotating images, but not good at dealing with viewpoint changes and illumination changes.
###Due to the copyright problem, SURF is not available in some versions. If you want to use it, you need to adjust the version,
### SURF implementations are no longer included in the OpenCV 3 library by default.

surf = cv2.xfeatures2d.SURF_create(400)
# Find keypoints and descriptors directly
kp, des = surf.detectAndCompute(img,None)
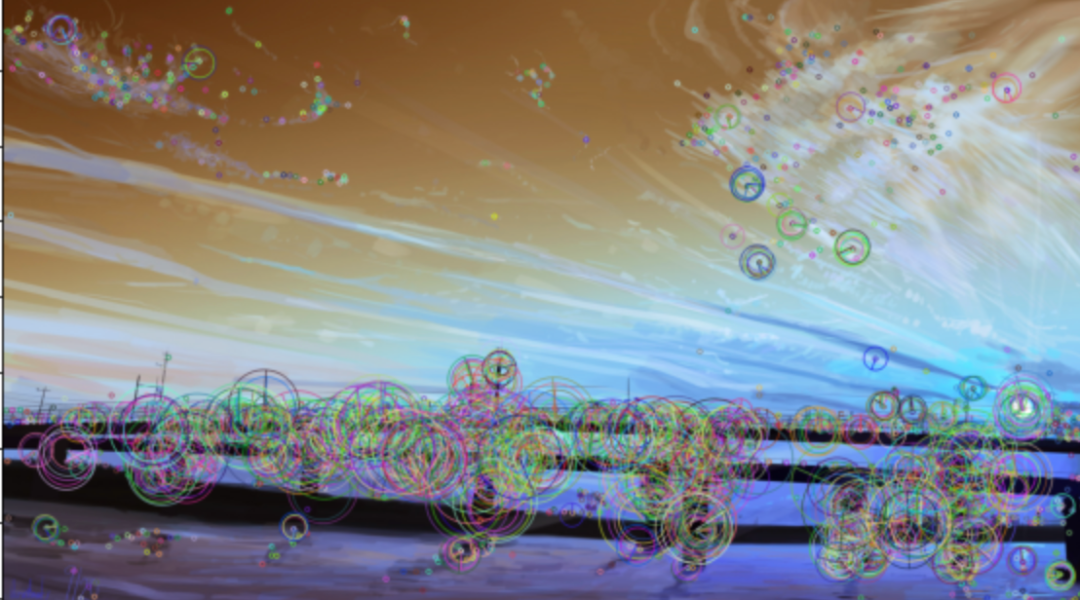
4.ORB features
ORB feature is a good alternative to SIFT and SURF in terms of computational cost and matching performance. Because both SIFT and SURF are patented, you need to pay for their use. However, ORB features are not required. ORB combines FAST key detector and BRIEF descriptor, and makes many improvements to improve performance. Firstly, FAST algorithm is used to find the key points, and then Harris corner measure is used to find the first N points in the key points. In addition, it also uses pyramid to generate multi-scale features.
orb = cv2.ORB_create()  # OpenCV 3 backward incompatibility: Do not create a detector with `cv2.ORB()`.
key_points, description = orb.detectAndCompute(img, None)
img_building_keypoints = cv2.drawKeypoints(img,
                                           key_points,
                                           img,
                                           flags=cv2.DRAW_MATCHES_FLAGS_DRAW_RICH_KEYPOINTS) # Draw circles.
plt.figure(figsize=(10, 10))
plt.title('ORB Interest Points')
plt.imshow(img_building_keypoints);
5.FAST features
The features extracted by algorithms such as SIFT and SURF are excellent (with strong invariance), but the time consumption is large. If they are used in practice, they may not meet our needs. Edward Rosten and Tom Drummond proposed FAST feature points in Machine learning for high-speed corner detection in 2006, and published Features From Accelerated Segment Test (referred to as FAST) with minor modifications in 2010.

path  = './imgs/chapter7/img_example.jpeg'
img    = cv2.imread(path)
fast = cv2.FastFeatureDetector_create(40)
# find and draw the keypoints
kp = fast.detect(img,None)
img2 = cv2.drawKeypoints(img, kp, None, color=(255,0,0))
# Print all default params
print( "Threshold: {}".format(fast.getThreshold()) )
print( "nonmaxSuppression:{}".format(fast.getNonmaxSuppression()) )
print( "neighborhood: {}".format(fast.getType()) )
print( "Total Keypoints with nonmaxSuppression: {}".format(len(kp)) )
Threshold: 40
nonmaxSuppression:True
neighborhood: 2
Total Keypoints with nonmaxSuppression: 1483
plt.figure(figsize=(10, 10))
plt.title('FAST Interest Points')
plt.imshow(img2);
6.BEBLID features
One of the most exciting features in OpenCV 4.5.1 is BEBLID, a new descriptor that can improve image matching accuracy while reducing execution time. BEBLID is a new descriptor introduced in 2020, which has been proved to improve ORB in multiple tasks. Since BEBLID is applicable to multiple detection methods, the proportion of ORB key points must be set to 0.75 ~ 1.
In the comparative experiment of the author of Improving your image matching results by 14% with one line of code, it is found that 77.57% inliers can be obtained by using BEBLID descriptor. If we annotate BEBLID in the description cell and use ORB descriptor, the result will drop to 63.20%:
import cv2
# Comment or uncomment to use ORB or BEBLID
path  = './imgs/chapter7/img_example.jpeg'
img    = cv2.imread(path)
detector = cv2.ORB_create(10000)
kpts1 = detector.detect(img, None)
descriptor = cv2.xfeatures2d.BEBLID_create(0.75)
kpts1, desc1 = descriptor.compute(img, kpts1)
7. Image aggregation features
Scan all pictures for matching, and find the ID of the most matched image according to the custom rules as a new feature to find the nearest neighbor image.
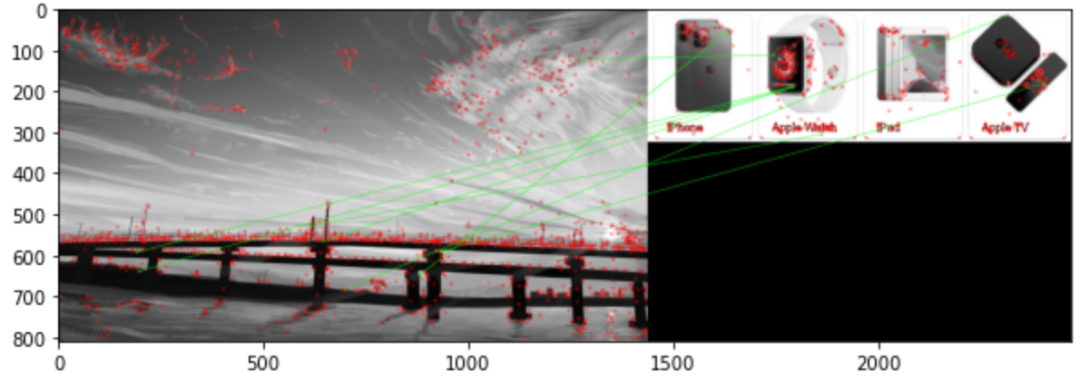
Taking SIFT feature as an example, SURF, ORB, FAST, BEBLID, etc. above can also be used to find nearest neighbor information.
import numpy as np
import cv2
from matplotlib import pyplot as plt
'''
   https://opencv-python-tutroals.readthedocs.io/en/latest/py_tutorials/py_feature2d/py_matcher/py_matcher.html#matcher
'''
img1 = cv2.imread('./imgs/chapter7/img_example.jpeg',0)          # queryImage
img2 = cv2.imread('./imgs/chapter7/Apple.png',0) # trainImage

# Initiate SIFT detector
sift = cv2.SIFT_create()

# find the keypoints and descriptors with SIFT
kp1, des1 = sift.detectAndCompute(img1,None)
kp2, des2 = sift.detectAndCompute(img2,None)
# FLANN parameters
FLANN_INDEX_KDTREE = 0
index_params = dict(algorithm = FLANN_INDEX_KDTREE, trees = 5)
search_params = dict(checks=50)   # or pass empty dictionary
lann = cv2.FlannBasedMatcher(index_params,search_params)
matches = flann.knnMatch(des1,des2,k=2)

# Need to draw only good matches, so create a mask
matchesMask = [[0,0] for i in range(len(matches))]

# ratio test as per Lowe's paper
for i,(m,n) in enumerate(matches):
    if m.distance < 0.7*n.distance:
        matchesMask[i]=[1,0]

draw_params = dict(matchColor = (0,255,0),
                   singlePointColor = (255,0,0),
                   matchesMask = matchesMask,
                   flags = 0)

img3 = cv2.drawMatchesKnn(img1,kp1,img2,kp2,matches,None,**draw_params)
plt.figure(figsize=(10, 10))
plt.imshow(img3,)
<matplotlib.image.AxesImage at 0x7f9163d8a520>