
preface
Recently, I'm learning wechat applet development, and I'm also working with two students to copy the wechat APP applet. Here I mainly share my learning process and some pits I have stepped on, hoping to help you.
"I am an old programmer who has been engaged in Web front-end development for six years. At the beginning of this year, I spent a month sorting out a full set of Web front-end training course which is most suitable for self-study in 2021 Buddy buddy (Video + source + note + project), from the most basic HTML+CSS+JS to mobile terminal HTML5, and various frameworks and new technologies have been arranged, packaged to every front end small partner, here is the front end learners' gathering place, welcome to beginners and advanced junior partners (all front-end courses concerned about my WeChat official account: web front end learning circle, and then reply to web after concern. You can get it).
006.gif
Development preparation
-
Wechat developer tools
-
VScode code editor
-
Get APP wechat applet
-
Like vant component library [1]
-
Alibaba vector icon library [2]
-
markman[3]
Overall architecture
-
The project is based on the cloud development of applets, and the template used is the cloud development quick start template [4]. As it is a full stack project, the front end uses the wxml + wxss + js development mode supported by applets, and the naming adopts the BEM[5] naming specification. The background uses cloud database for data management.
I am mainly responsible for the following parts of the project (some data are fixed data written in config, and the js file is exposed through module.exports. When it needs to be referenced, it is introduced in the corresponding js header of the page, for example const {} = require ('... /.. /.. / config / buys')). I use a lot of vant components in the project and need to introduce vant when building npm package. For details, see npm installation that likes vant [6]. When the third-party component is used on the page, it must be declared in the corresponding json file. In order not to repeat the work, it can be directly displayed in app json. Example: ("usingcomponents": "Van search": "@ vant / web app / search / index"})
    |-config  Corresponding data
        |-assem.js
        |-buys.js
        |-detail.js
        |-kind.js
        |-search.js
    |-pages
        |-buy_page
            |-page
                |-assem   Filter sort page
                |-buy     Purchase home page
                |-detail  Product details page
                |-kinds   Brand classification page
                |-produce Identification introduction page
                |-search  Search page
 Copy code
Project planning
-
Before making this applet, I first analyze the corresponding functions of each page, understand the interaction details of this applet, and understand the data collection data items. This can be roughly divided into four steps: analyzing the page, creating a data set, deconstructing the basic layout of the page, data binding and jump.
Referring to the wechat applet of dewu APP, the following is the tabBar of my applet. (it's a little rough, but it's still visible 😶)

000.png
  "tabBar": {
    "selectedColor": "#000000",
    "borderStyle": "white",
    "backgroundColor": "#fff",
    "list": [
      {
        "text": "purchase",
        "pagePath": "pages/buy_page/page/buy/buy",
        "iconPath": "images/buy.png",
        "selectedIconPath": "images/buy_active.png"
      },
      {
        "text": "Authentication query",
        "pagePath": "pages/disting/disting",
        "iconPath": "images/disting.png",
        "selectedIconPath": "images/disting_active.png"
      },
      {
        "text": "Wash and protect",
        "pagePath": "pages/wash/wash",
        "iconPath": "images/wash.png",
        "selectedIconPath": "images/wash_active.png"
      },
      {
        "text": "I",
        "pagePath": "pages/my_page/my/my",
        "iconPath": "images/my.png",
        "selectedIconPath": "images/my_active.png"
      }
    ]
  },
Copy code
Cloud database
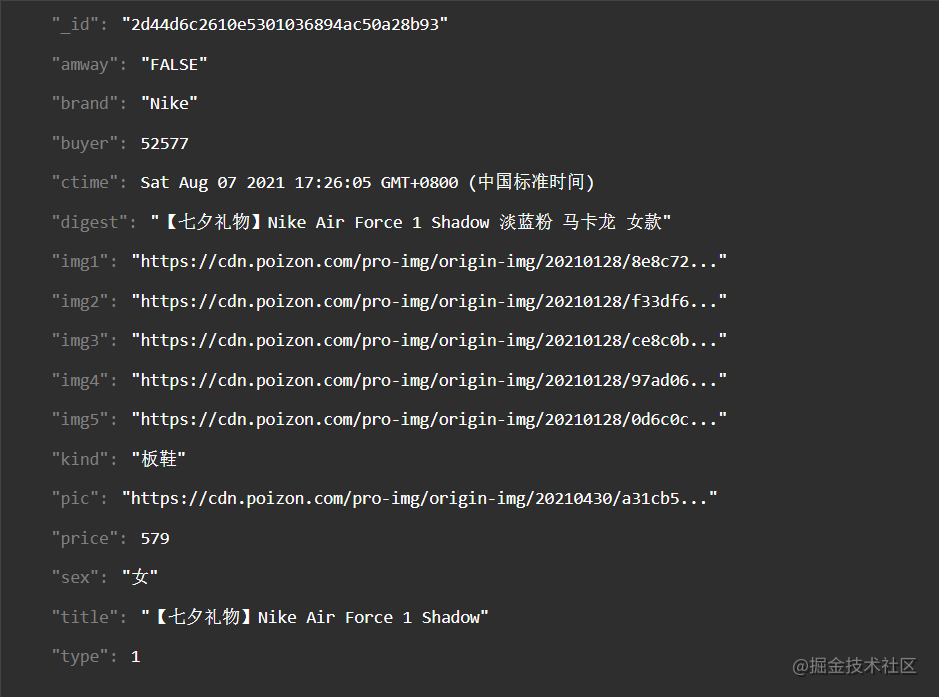
Cloud database is a NoSQL database. Each table is a set. For my project part, I mainly set up a commodity collection.
dewu_goods Commodity list Used to store the information of the product
    - _id
    - amway  Is it recommended
    - brand  brand
    - buyer  Number of people purchased
    - ctime  Data creation time
    - digest Details
    - img    Detail drawing
    - pic    Commodity display diagram
    - kind   type
    - price  Price
    - sex    Adaptive population
    - title  brief introduction
    - type   Home page index
 Copy code
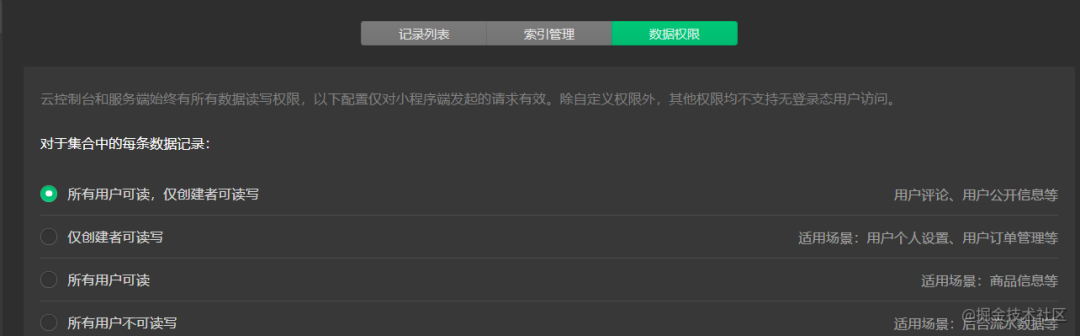
After the data set is established, the data permission needs to be modified before normal access.

These operations can be performed in the database. Note that the imported data format needs to be csv or json file, you can first use excel to establish a data set. How to convert it into a corresponding format file and directly import it into the database.
0101.png
const db = wx.cloud.database() //Cloud database
const dewuCollection = db.collection('dewu') //Import data collection in js file
 Copy code
Project deconstruction
The following is my main APP applet interface
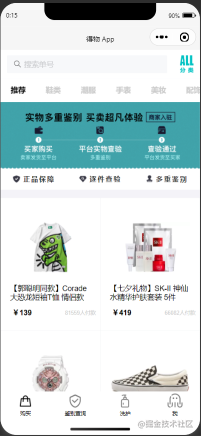

Next, the details of each page are deconstructed.
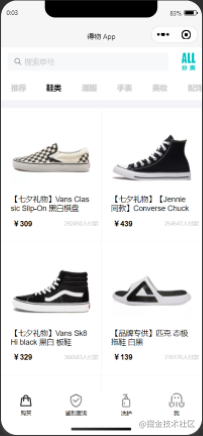
Purchase home page
000.gif
Buy home page style

00.png
<view class="page">
  <!-- use van-sticky set up dewu-hd Ceiling Search bar-->
  <van-sticky>
  <!-- dewu-hd use flex layout -->
    <view class="dewu-hd">
      <view class="dewu-hd-search" bindtap="gotoSearch">
        <van-search placeholder="Search order No" disabled />
      </view>
      <view class="dewu-kinds" bindtap="kinds"><image src=""></image>
      </view>
    </view>
  </van-sticky>
  <!-- van-tabs Realize the navigation of purchase page and corresponding to content page -->
  <van-tabs class="dewu-tabs">
    <van-tab title="recommend">
      <view class="dewu-tip">
        <view class="dewu-tip-img-hd"><image src=""></image>
        </view>
        <!-- use van-grid Layout settings border hide quick positioning -->
        <van-grid>
          <van-grid-item use-slot>
            <image style="" src=""></image>
            <text>Genuine guarantee</text>
          </van-grid-item>
        </van-grid>
      </view>
      <view class="van-items">
        <van-grid class="van-grid-bd">
        <!-- grid Layout customization van-grid-item style -->
          <van-grid-item use-slot>
            <view class="item-img"><image src=""></image></view>
            <view class="item-text">
              <span>{{}}</span>
            </view>
          </van-grid-item>
        </van-grid>
      </view>
    </van-tab>
  </van-tabs>
</view>
Copy code
Absolute positioning is adopted in Van grid item. By setting the direction attribute to horizontal in tips, the contents of the palace grid can be arranged horizontally. Set the disabled property of the search box to disabled to solve the problem of click autofocus. When using van grid layout, you need to set the use slot attribute for customizing the attributes of each item, otherwise it will not take effect.
The layout of this page is not complicated, but I still encountered a pit when writing this layout (I felt that I jumped into it myself) 🐖 (see below). When doing dewu HD ceiling, I directly wrap it with van sticky, but the actual effect is that tabs also need to be fixed under dewu HD. You can't use the same method as above here. The actual effect will make the whole van tabs ceiling and make the page unable to slide. In fact, you only need to add a sticky attribute to van tabs and set offset top. Note that these two attributes need to be used together to take effect.
Get item
  async onLoad() {
     this.proData()   //Get recommended data items
     this.shoeData()  //Get footwear data item
  },
  proData() {
     const {data} = await dewuCollection
    .where({
      amway: db.command.eq('TRUE')
    })
    .field({          //Gets the specified data item to improve performance
      _id:true,
      pic:true,
      title:true,
      buyer:true,
      price:true
    })
    .get()
    // console.log(data);
    this.setData({
      produces: data,
    })
  }
  shoeData() {
    let data1 = await dewuCollection
    .where({
      type: 1
    })
    .get()
    // console.log(data1.data);
    this.setData({
      shoes: data1.data
    })
  }
Copy code
Binding details page
  gotoDetail(e) {
    // console.log(e);
    wx.navigateTo({
      url: '/pages/buy_page/page/detail/detail?id='+e.currentTarget.dataset.id,
    })
  },
Copy code
Use goods_ The id attribute is unique when the set data item id is equal to_ id, jump to the details page and display the corresponding data.
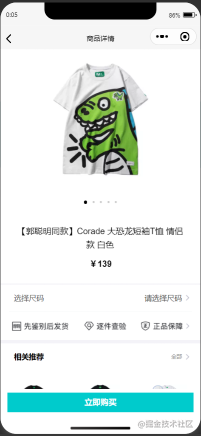
Product details page
001.gif
Product details page style
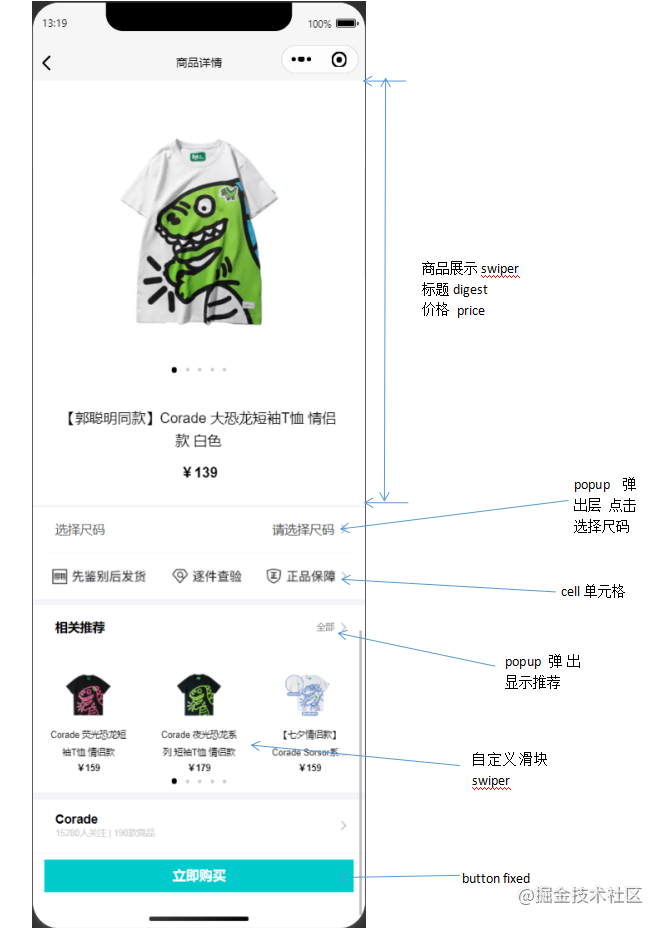
03.png
<view class="page">
<!-- head Slider and title -->
  <view class="detail_hd">
    <swiper class="swiper__hd">
        <swiper-item class="swiper_hd"></swiper-item>
    </swiper>
    <view class="dots1">
        <view class="{{current==index?'active':''}}"></view>
    </view>
    <view class="detail_hd-title">{{img.digest}}</view>
    <view class="detail_hd-price">
      <text id="p2">¥{{img.price}}</text>
    </view>
  </view>
  <van-cell class="size" bind:click="showPopup1">
    <view class="size-l">Choose a size</view>
    <view class="size-r">Please choose a size</view>
    <image class="ricon" style="width:26rpx;height:26rpx;" src=""></image>
  </van-cell>

  <!-- flex layout every last swiper-item Contains three items -->
  <view class="detail_bd">
  <swiper></swiper></view>

  <van-goods-action>
    <button>Buy now</button>
  </van-goods-action>
</view>
Copy code
The whole is divided into detail_hd and detail_bd two parts. To customize the swiper, you need to set the dot corresponding display picture and change the style. The circular property is set to whether to enable slider switching animation. Here, the three category operator is used to judge whether to add a new style class name. When defining the style of commodity price, you can define the ¥ symbol style through the first letter pseudo element. The reference component van goods action makes the purchase button suck the bottom.
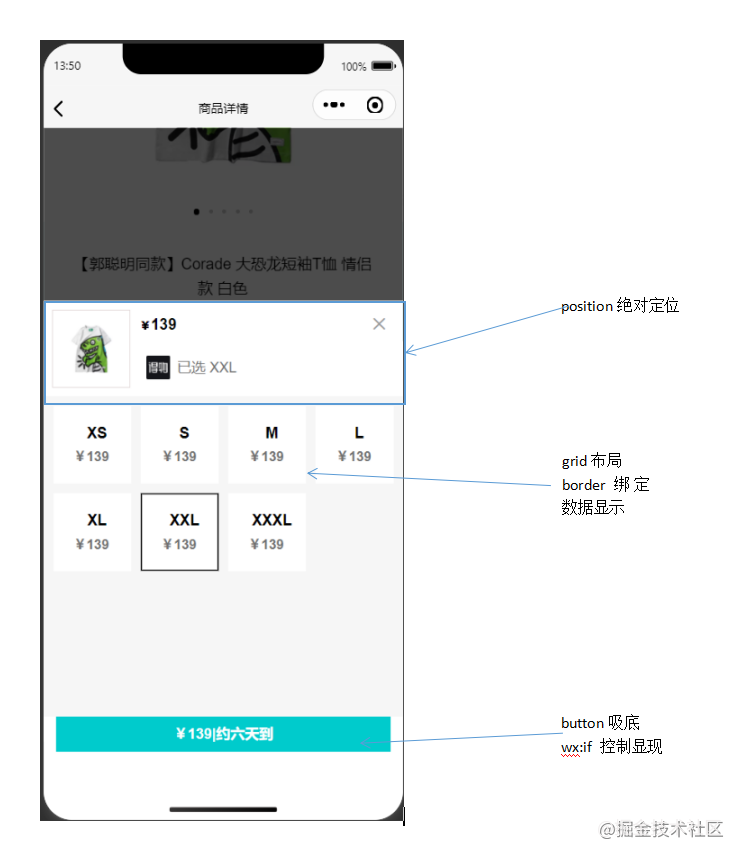
05.png
<van-popup closeable position="bottom" custom-style="height: 75%">
    <view class="detail_size-hd">
      <view class="detail_size-hd-img">
        <image bindtap="previewImage" mode="aspectFit" src="{{img.pic}}">
        </image>
      </view>
      <view class="detail_size-hd-price">
        <text style="font-size:25rpx;">¥</text>
        <text wx:if="{{activeSizeIndex==-1}}">--</text>
        <text wx:if="{{activeSizeIndex==index}}">{{item.price}}</text>
      </view>
      <view>
        <image src=""></image>
        <text wx:if="{{activeSizeIndex==-1}}">Please select an item</text>
        <text wx:if="{{activeSizeIndex==index}}">Selected {{item.size}}</text>
      </view>
    </view>
    <!-- Size layout -->
    <view class="detail_size-bd">
      <van-grid square gutter="10">
        <van-grid-item>
          <view class="size">
            <text id="p3">{{item.size}}</text>
            <text id="p4">¥{{item.price}}</text>
          </view>
        </van-grid-item>
      </van-grid>
    </view>
    <view>
      <button>{{}}</button>
    </view>
  </van-popup>
Copy code
Use the van popup component to set events for the corresponding tag to bind the pop-up. Example: < Van Cell bind: Click = "showpopup" > < / Van Cell >. The ternary operator sets the default style, controls the selected border style, sets the closeable property, and enables the close button. Square sets van grid item to square, and gutter sets grid spacing.
06.png
<van-sticky sticky offset-top="{{ 180 }}">
      <view class="head">
        <view class="detail_produce-hd">Relevant recommendations</view>
        <view class="detail_close" bindtap="onClose2">
          <image style="width:40rpx;height:40rpx;" src=""></image>
        </view>
      </view>
    </van-sticky>
Copy code
Set detail_ Produce HD ceiling, and bind:close="onClose" event to close icon on the right side.
Get product details
  async onLoad(options) {  //Get corresponding_ Item data for id
    console.log(options);
    let id = options.id
    console.log(id);
    wx.cloud.database().collection('dewu')
    .doc(id)
    .get()
    .then(res => {
      console.log(res);
      this.setData({
       img :res.data
      })
    })
  },
Copy code
Popup
  showPopup() {   //Show pop-up layer
    this.setData({
      show: true,
    });
  },
  onClose() {     //Turn off pop-up layer
    this.setData({
      show: false,
    });
  },
Copy code
Choose a size
  pickSize(e) {
    let flag = e.currentTarget.dataset.flag
    let index = e.currentTarget.dataset.index
    if(flag==index) {
      this.setData({
        activeSizeIndex: -1,
        flag: -1
      })
    }
    else {
      this.setData({
        activeSizeIndex: index,
        flag: index
      })
    }
  },
Copy code
Click the size, and flag==index is the selected state. When you click again or click other sizes, it is set to the unselected state. Otherwise, make the flag equal to index and turn it into the selected state.
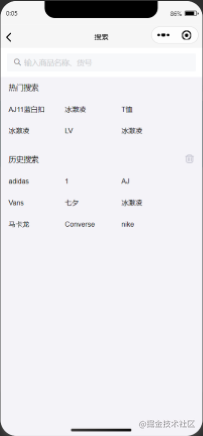
Search page
002.gif
Search page style
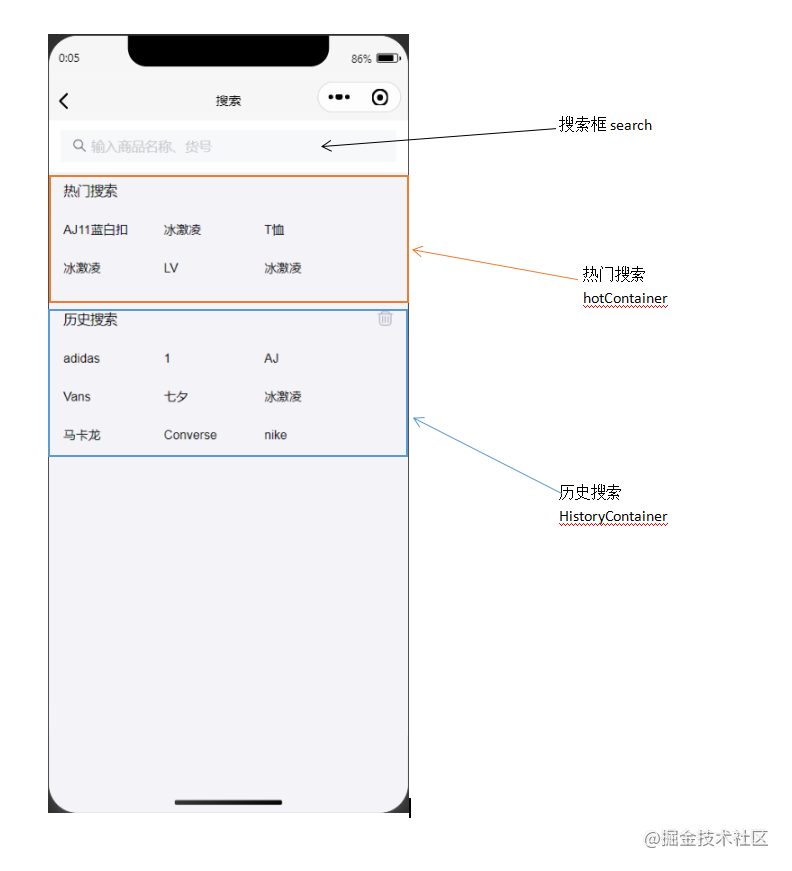
01.png
<view class="page">
  <view class="search">
    <van-stichy>
      <van-search value="{{value}}" bind:clear="onClear" placeholder="Enter the commodity name and article number"/>
    </van-stichy>

    <!-- block packing  flex layout -->
    <block wx:if="{{showHistory == true && historyList.length > 0}}">
      <view class="historyContainer">
        <view class="title">Historical Search<image class="delete" src=""></image>
        </view>
        <view class="historyList">
          <view class="historyItem">
            <text class="order">{{}}</text>
          </view>
        </view>
      </view>
    </block>
  </view>
</view>
Copy code
The search page is mainly divided into two parts: the header search box and the content (search recommendation, history and searched product list). Here, van sticky is used to wrap the search box to make it attractive, and the content part is wrapped with block label. wx:if is used to judge whether it is displayed.
Search records
  async onSearch(e) {
    // console.log(e);
    if (!e.detail.trim()) {
      wx.showToast({
        title: 'Please enter the trade name',
      })
      return
    }
    let {value, historyList} = this.data
    if(historyList.indexOf(value) !== -1) {
      historyList.splice(historyList.indexOf(value), 1)
    }
    historyList.unshift(value)
    this.setData({
      historyList
    })
    wx.setStorageSync('value', historyList)
    let keyword = e.detail.trim()
    let results = await dewuCollection
      .where({
        title: db.RegExp({
          regexp: keyword,
          options: 'i'
        })
      })
      .get()
    if (results.data.length == 0 || keyword == '') {
      wx.showToast({
        title: 'non-existent'+keyword,
      })
    }
    else {
      await dewuCollection
      .where({
        title: db.RegExp({
          regexp: keyword,
          options: 'i'
        })
      })
      .orderBy('hot', 'desc')
      .get()
      .then(res => {
        console.log(res);
        this.setData({
          results: res.data
        })
      })
    }
  },
onLoad() {
    this.getSearchHistory()  //Get historical search
  },
getSearchHistory() {
    let historyList = wx.getStorageSync('value')
    if(historyList) {
      this.setData({
        historyList
      })
    }
  },
Copy code
When the page is loaded, the historical search record is obtained from the local storage. When determining the search onSearch, judge whether the value is empty, and insert the legal value into the historyList. The time unshift method used here can ensure that the recent search record is displayed in the front. The matching items in the database are fuzzy queried by regular expression and stored in the array results. When results When length > 0, the product list is displayed. Using Wx Setstoragesync caches value, Wx Get getstoragesync and print it out. Use the indexOf method to determine whether value already exists. If yes, delete the item in the historyList.
Historical Search
  async historySearch(e) {
    // console.log(e);
    let historyList = this.data.historyList
    let value = historyList[e.currentTarget.dataset.index]
    this.setData({
      value,               //Modify value
      showHotList: false,  //Hide popular search
      showHistory: false,  //Hide History Search
      results: []          //Empty item list
    })
  },
Copy code
When clicking the historical search term, setData changes the corresponding value, and then calls the onSearch method.
Empty control
  onClear() {
    this.setData({
      results: [],
      value: '',
      showHotList: true,
      showHistory: true
    });
  },
  onChange(e) {  //In the search box, you can modify the data in real time when changing the input
    // console.log(e.detail);
    this.setData({
      value: e.detail,
      showHotList: false,
      showHistory: false,
      results: []
    })
    // console.log(this.data.showHotList);
    if (this.data.value=='') {
      this.setData({
        showHotList: true,
        showHistory: true
      })
    }
  },
Copy code
Clear search history
  deleteSearchHistory() {
    wx.showModal({
      content: 'Confirm clearing history',
      success: (res) => {
        if(res.confirm) {
          this.setData({
            historyList: []
          })
        }
      }
    })
    wx.removeStorageSync('value')
  },
Copy code
Click Delete icon to pop up the dialog box Wx Showmodal realizes interaction. The user clicks OK to clear the historyList and use Wx Removestoragesync deletes the history stored locally.
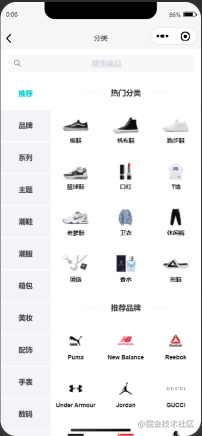
Brand classification page
003.gif
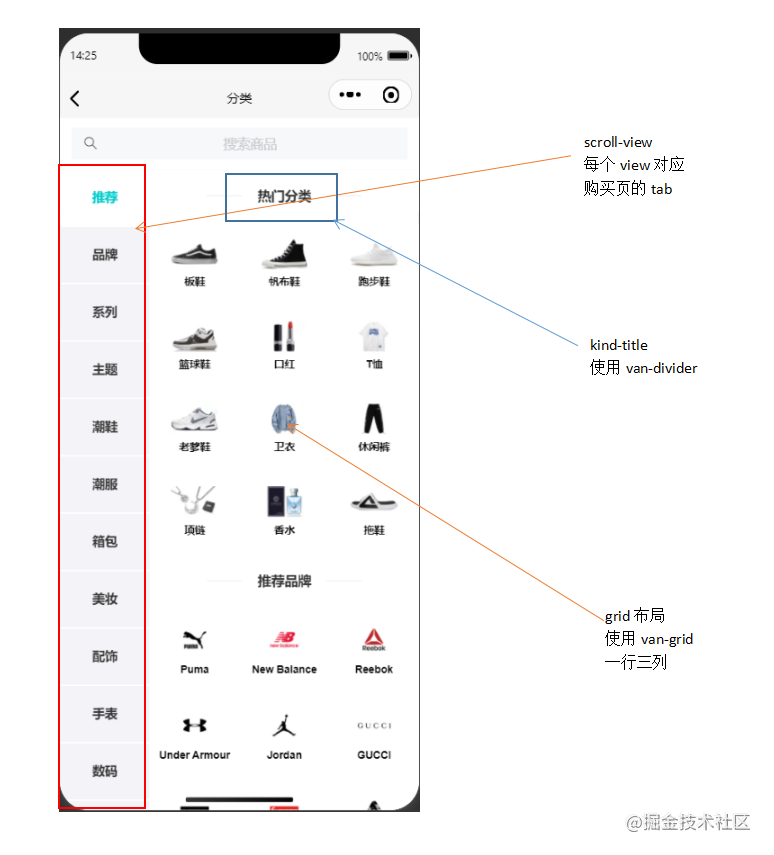
Category page style
07.png
<view class="page">
  <van-sticky>
    <view class="search" bindtap="gotoSearch">
    <van-search placeholder="Search for products" input-align="center" disabled />
  </view>
  </van-sticky>

  <view class="kinds">
    <view class="hd">
    <scroll-view class="scroll-view-left">
      <view class="scroll-view-left-item {{activeNavIndex == index?'active': ''}}">
        <text>{{}}</text>
      </view>
    </scroll-view>
  </view>

  <view class="bd">
    <scroll-view>
      <view>
        <view class="kind-title">
        <van-divider contentPosition="center">{{}}</van-divider>
        </view>
        <van-grid>
        <van-grid-item>{{}}</van-grid-item>
        </van-grid>
      </view>
    </scroll-view>
  </view>
  </view>
</view>
Copy code
The classification page mainly uses scroll view to set vertical scrolling. When you click scroll view left item on the left, this item becomes a search (#00cbcc) and displays the corresponding brand category item kinditem. The overall layout adopts flex. The pit here is scroll view left. Font size should be set to 0 and font should be set in the sub element scroll view left item to avoid the influence of block element margin on the layout.
Initialize category
  onLoad: function (options) {
      this.setData({
        kindNav: kindNav,
        kindall: kindItem,
    // console.log(this.data.kindall);
    let kinds=[];
    // console.log(this.data.kindall)
    this.data.kindall.forEach(kind => { //Loop to get the corresponding kindNav from all categories and store it in the array
      if(kind.camptype == 0) {
        kinds.push(kind)
      }
    })
    this.setData({
      kindItem: kinds,
    })
    }, )
  },
Copy code
Select classification
  changeKinds(e) {
    console.log(e);
    let {index, type} = e.currentTarget.dataset;
    console.log(index, type);//The index is related to the index of recommended brands. type and kind JS camptype
    this.setData({
      activeNavIndex: index,
    })
    let title=[]
    this.data.kindTitles.forEach(kindTitle => {
      if(index == kindTitle.titletype) {
        title.push(kindTitle)
      }
    })
    this.setData({
      kindItem: kinds,
    })
  },
Copy code
Bind filter page
  gotoAssem(e) {
    // console.log(e); Use the kind attribute value to be unique (the title of the tabs on the buy page)
    wx.navigateTo({
      url: '/pages/buy_page/page/assem/assem?title='+e.currentTarget.dataset.title,
    })
  },
Copy code
Filter sort page
004.gif
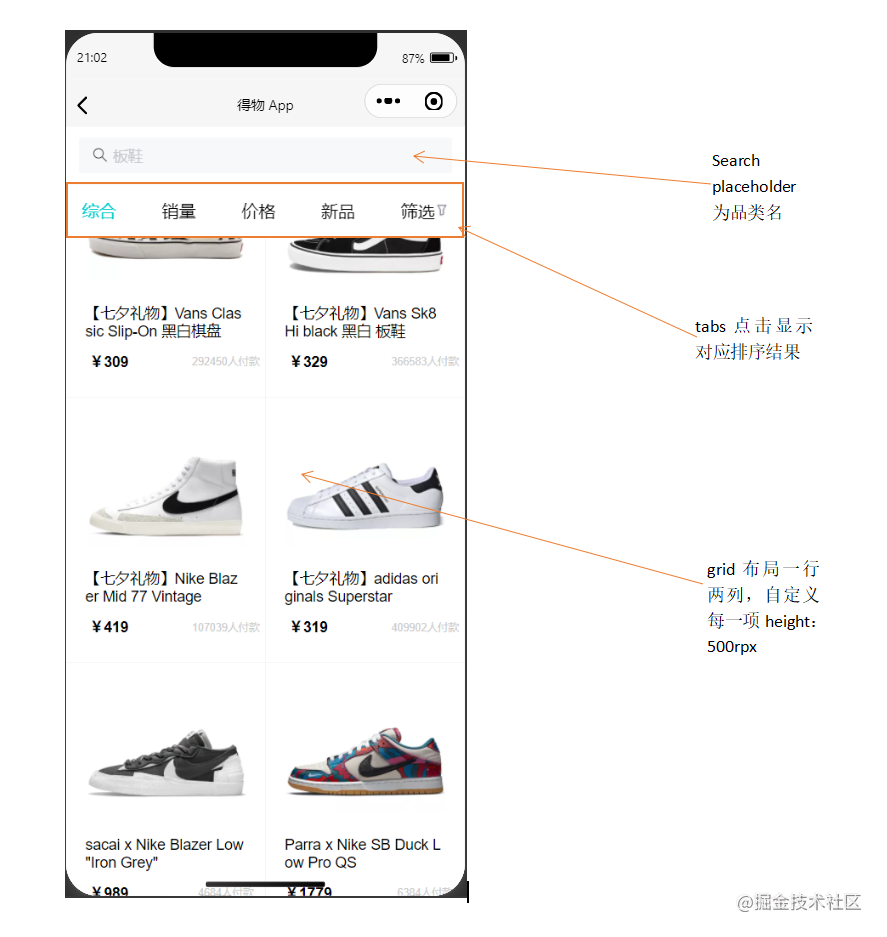
Sort page style
08.png
<view class="page">
  <van-sticky>
    <view class="search" bindtap="gotoSearch">
      <van-search placeholder="{{titles}}" disabled />
    </view>
    <view class="tab">
      <view wx:for="{{tabs}}" wx:key="index" data-index="{{index}}"
        class="tab-item {{activeTabIndex == index?'active': ''}}" bindtap="changeItem">
        <text>{{item.title}}</text>
        <image style="width:26rpx;height:26rpx;" src="{{item.pic}}"></image>
      </view>
    </view>
  </van-sticky>
</view>
Copy code
tab uses flex layout. The layout of the goods section refers to the commodity layout on the buy page.
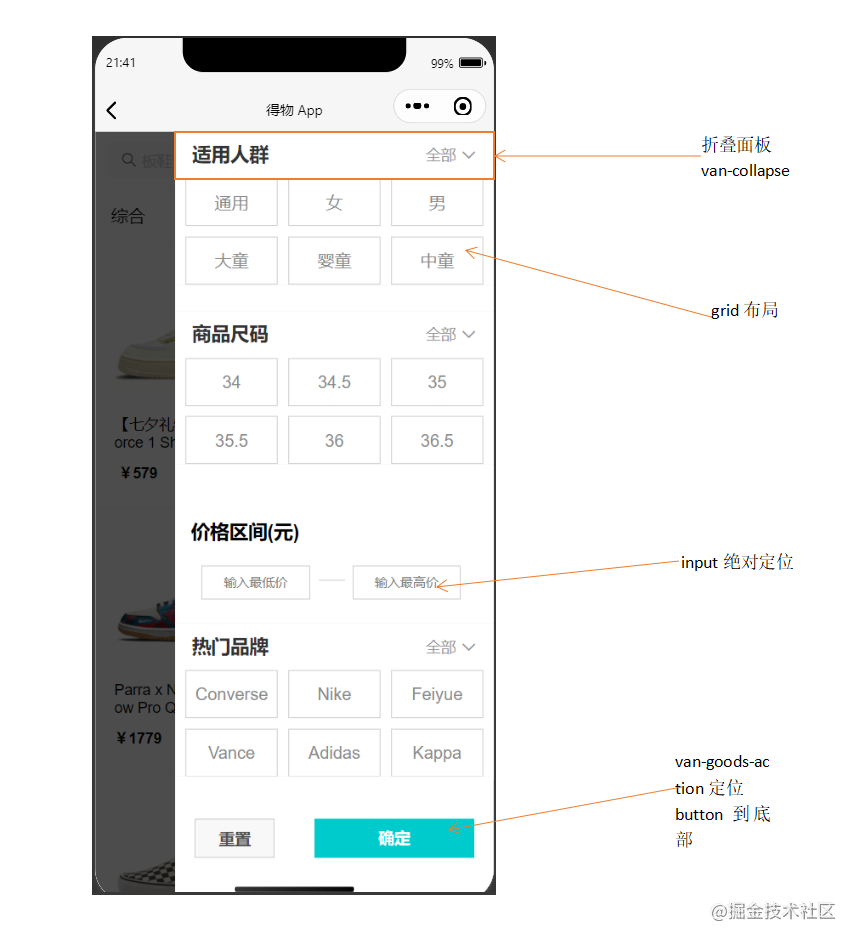
011.png
  <van-popup>
    <scroll-view class="pop" scroll-y>
      <van-collapse>
        <van-collapse-item title="intended for" value="whole" name="1">
        </van-collapse-item>
        <van-grid column-num="3" gutter="{{ 10 }}">
          <van-grid-item class="{{activeIndex1==index?'active1':''}}">{{}}</van-grid-item>
        </van-grid>
      </van-collapse>

      <van-goods-action>
        <button>Reset</button>
        <button>determine</button>
      </van-goods-action>
    </scroll-view>
  </van-popup>
Copy code
When using the van collapse component as a folding panel, there is a pit. The van grid content should not be placed in the van collapse item, but should be at the same level as it. Otherwise, a blank will be formed under the cell and the content cannot be displayed normally. After many attempts, it is still placed outside to facilitate the effect.
Initial product sorting
  async onLoad(options) {
    // console.log(options);
    let title = options.title
    let data1 = await dewuCollection
    .where({
      kind: title        //Get the corresponding data when Binding jump (kind is unique)
    })
    .get()
    // console.log(data1);
    this.setData({
      goods: data1.data,
      titles: title
    })
  },
Copy code
Basic sorting
  async changeItem(e) {
    // console.log(e);
    let index = e.currentTarget.dataset.index  //index corresponding sorting method
    this.setData({
      activeTabIndex: index
    })
    // console.log(index);
    if(index == 1) {                        //Sales ranking
    await dewuCollection
    .where({
      kind: this.data.titles
    })
    .orderBy('buyer', 'desc')
    .get()
    .then(res => {
      this.setData({
        goods: res.data,
        index: index
      })
      // console.log(this.data.index);
    })
    }
    if(index == 0) {                        //Comprehensive sorting
      await dewuCollection
      .where({
        kind: this.data.titles
      })
      .get()
      .then(res => {
        this.setData({
          goods: res.data
        })
      })
    }
    if(index == 2 && this.data.flag == -1) {  //Price descending sort
      await dewuCollection
      .where({
        kind: this.data.titles
      })
      .orderBy('price', 'desc')
      .get()
      .then(res => {
        this.setData({
          goods: res.data,
          flag: 1
        })
      })
      return
    }
    if(index == 3) {                         //Create time sort
      await dewuCollection
      .where({
        kind: this.data.titles
      })
      .orderBy('ctime', 'desc')
      .get()
      .then(res => {
        this.setData({
          goods: res.data
        })
      })
    }
    if(index == 4) {                         //Pop up filter layer
      this.setData({
        show: true,
      })
    }
    else if(index == 2 && this.data.flag == 1) {    //Price ascending sort
      await dewuCollection
      .where({
        kind: this.data.titles
      })
      .orderBy('price', 'asc')
      .get()
      .then(res => {
        this.setData({
          goods: res.data,
          flag: -1
        })
      })
    }
  },
Copy code
Set the default value of a flag attribute to - 1. When flag==-1, click price descending sort and set flag==1. When flag==1, click price ascending sort and set flag==-1.
Filter sort
  pick(e) {
    let flag = e.currentTarget.dataset.flag
    let index = e.currentTarget.dataset.index
    let cd = this.data.human[index].kind
    if(flag==index) {
      this.setData({
        activeIndex1: -1,
        flag1: -1,
        cd1: ''
      })
    }
    else {
      this.setData({
        activeIndex1: index,
        flag1: index,
        cd1: cd
      })
    }
  },
Copy code
Filter reset
  replace() {    //Click the reset button to return all filter criteria to the default
    this.setData({
      flag1: -1,
      activeIndex1: -1,
      flag2: -1,
      activeIndex2: -1,
      flag3: -1,
      activeIndex3: -1,
      cd1: '',
      cd2: '',
      cd3: 0,
      cd4: 10000000,
    })
  },
Copy code
One of the pitfalls here is that it cannot be declared in data (num: Infinity). Here Infinity will not take effect. At present, the optimization is declared as a constant
Confirm filter
  async ischeck() {   //Click OK to filter and display the results
    let cd3 = Number(this.data.cd3)
    let cd4 = Number(this.data.cd4)==0?1000000:Number(this.data.cd4)
    let index = Number(this.data.index)
    if(this.data.cd1!='' && this.data.cd2!=''){
      await dewuCollection
    .where({
      kind: this.data.titles,
      sex: this.data.cd1,
      brand: this.data.cd2,
      price: _.gt(cd3).and(_.lt(cd4)),
    })
    .get()
    .then(res => {
      this.setData({
        goods: res.data,
        show: false,
      })
    })
    return
    }
  },
Copy code
Difficult pit drainage
    <van-grid-item use-slot wx:for="{{shoes}}" data-item="{{item}}"
    wx:key="index" data-id="{{item._id}}" bindtap="gotoDetail"></van-grid-item>

      gotoDetail(e) {
    // console.log(e);
    wx.navigateTo({
      url: '/pages/buy_page/page/detail/detail?id='+e.currentTarget.dataset.id,
    })
  },
Copy code
Jump to the details page and keep the corresponding data items. Use here_ The id is unique, and each item's_ id is assigned to data id. when the IDs are equal, you can jump and accept the corresponding_ id data.
        <van-grid-item class="{{activeSizeIndex==index?'size-active':''}}"
        use-slot wx:for="{{size}}" wx:key="index" data-flag="{{flag}}"
        data-index="{{index}}" bindtap="pickSize">
          <view class="size">
            <text id="p3">{{item.size}}</text>
            <text id="p4">¥{{item.price}}</text>
          </view>
        </van-grid-item>

         pickSize(e) {
            let flag = e.currentTarget.dataset.flag
            let index = e.currentTarget.dataset.index
            if(flag==index) {
              this.setData({
                activeSizeIndex: -1,
                flag: -1
              })
            }
            else {
              this.setData({
                activeSizeIndex: index,
                flag: index
              })
            }
          },
Copy code
When clicking the size, select and change the text. Click this item again to reset the style. If you click other items, deselect and select the clicked item. Here, you can double control whether to select by setting one more flag in combination with index.
      <view
      wx:for="{{kindNav}}"
      wx:key="index"
      data-index="{{index}}"
      data-type="{{item.type}}"
      bindtap="changeKinds"
      class="scroll-view-left-item {{activeNavIndex == index?'active': ''}}">
        <text>{{item.text}}</text>
      </view>

    changeKinds(e) {
        console.log(e);
        let {index, type} = e.currentTarget.dataset;
        console.log(index, type);//The index is related to the index of recommended brands. type and kind camptype of JS
        this.setData({
          activeNavIndex: index,
        })
        let kinds = []
        this.data.kindall.forEach(kind => {
          if(kind.camptype == type) {
            kinds.push(kind)
          }
        })
        this.setData({
          kindItem: kinds,
        })
      }
Copy code
Bind type and kind Camptype: when the clicked item changes, assign the current item index to activeNavIndex, use kindall to store all data items, and use foreach loop to traverse kindall to meet the condition kind The data of camptype = = type is stored in an array, kings, and then setData.
  deleteSearchHistory() {
    wx.showModal({
      content: 'Confirm clearing history',
      success: (res) => {
        if(res.confirm) {
          this.setData({
            historyList: []
          })
        }
      }
    })
    wx.removeStorageSync('value')
  },
Copy code
When emptying the history, not only set the historyList to empty, but also use Wx Removestoragesync clears the locally stored cache.
Little suggestion
When writing your own projects, use console Log () print and follow up data changes; Check the documents w3cschool[7], wechat development documents [8], vant weapp [9].
Source code
Source code of the project [10]: https://gitee.com/onepiece1205/dewu_weapp
epilogue
The process of writing a project is a challenge for me. After all, I focus on cooperative projects for the first time. The bug s encountered in the project will be annoying, but I feel very successful after adhering to the writing function. I thank my teachers and classmates who helped me in the process of writing a project. If you like my article or see it here to help you, you might as well like it 😺! At the same time, I hope you can give me some suggestions. I look forward to discussing and learning wechat applet with you! (click) 👉 Learn more [11])