Foreword: The greatest advantage of custom composite control is reusability, which can save us a lot of code. But when we customize composite control, the encapsulated control is either used by ourselves or by others. The encapsulated code should be readable and easy to modify. There is no need to encapsulate too many attributes. Generally, it is best to control two or three attributes. After all, we are not Google... Okay, it's a bit too far. Today I'm going to take you to encapsulate a simple and easy-to-use composite control, so that you can get a preliminary exposure to how to customize the composite control!
----------------------------------------------------------------------------------------------------------------------------------------------------------------
Look at the effect map:
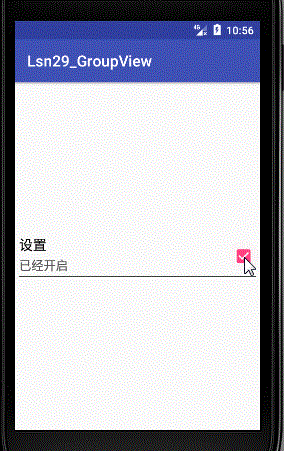
Of course, this effect is very simple, you can easily achieve it without custom combination control.
----------------------------------------------------------------------------------------------------------------------------------------------------------------
Implementation: 1. Write a class to inherit RelativeLayout(ViewGroup)
2. Write layout files
3. Add layout to Relative Layout (initView method)
4. Increase api
5. Custom attributes (1. values/attrs.xml, 2. declaring namespaces, 3. configuring attributes in custom views, 4. loading attribute values in custom views)
----------------------------------------------------------------------------------------------------------------------------------------------------------------
Custom property implementation:
First: Create a new attrs file under the values file and add the following code in it:
<?xml version="1.0" encoding="utf-8"?>
<resources>

    <declare-styleable name="SettingItemView">
        <attr name="title" format="string" />
        <attr name="desc_on" format="string" />
        <attr name="desc_off" format="string" />
    </declare-styleable>
</resources>2.attr is the property of the control. Strings, values and Boolean values can be added.
2. Obtain the value of the attribute in the construction method:
TypedArray ta = context.obtainStyledAttributes(attrs, R.styleable.SettingItemView);
String text = ta.getString(R.styleable.SettingItemView_title);
Once these values are obtained, further logical events can be made.
Three: How to use custom controls:1. Add code to the outermost layer of your layout:
2. Use this propertyxmlns:app="http://schemas.android.com/apk/res-auto"
  <com.fly.lsn29_groupview.SettingItemView
        android:id="@+id/siv"
        android:layout_width="match_parent"
        android:layout_height="wrap_content"
        app:desc_off="Closed"
        app:desc_on="It's already started."
app:title="Set up" />Complete code:
import android.content.Context;
import android.content.res.TypedArray;
import android.util.AttributeSet;
import android.view.View;
import android.widget.CheckBox;
import android.widget.RelativeLayout;
import android.widget.TextView;


public class SettingItemView extends RelativeLayout {

    private TextView tvTitle;
    private TextView tvDesc;
    private CheckBox cbCheck;
    private String mDescOn;
    private String mDescOff;

    public SettingItemView(Context context, AttributeSet attrs, int defStyle) {
        super(context, attrs, defStyle);
        initView();
    }

    public SettingItemView(Context context, AttributeSet attrs) {
        super(context, attrs);
        initView();

        TypedArray ta = context.obtainStyledAttributes(attrs, R.styleable.SettingItemView);
        String text = ta.getString(R.styleable.SettingItemView_title);
        mDescOn = ta.getString(R.styleable.SettingItemView_desc_on);
        mDescOff = ta.getString(R.styleable.SettingItemView_desc_off);
        ta.recycle();
        setTitle(text);
    }

    public SettingItemView(Context context) {
        super(context);
        initView();
    }

    /**
     * Initialize layout
     */
    private void initView() {
        View child = View.inflate(getContext(), R.layout.setting_item_view, null);// Initialize Composite Control Layout

        tvTitle = (TextView) child.findViewById(R.id.tv_title);
        tvDesc = (TextView) child.findViewById(R.id.tv_desc);
        cbCheck = (CheckBox) child.findViewById(R.id.cb_check);

        this.addView(child);// Add layout to the current RelativeLayout object
    }

    /**
     * Setting titles
     *
     * @param title
     */
    public void setTitle(String title) {
        tvTitle.setText(title);
    }

    /**
     * Setting Expressions
     *
     * @param desc
     */
    public void setDesc(String desc) {
        tvDesc.setText(desc);
    }

    /**
     * Judging whether to tick
     *
     * @return
     */
    public boolean isChecked() {
        return cbCheck.isChecked();
    }

    /**
     * Set the selected state
     *
     * @param checked
     */
    public void setChecked(boolean checked) {
        cbCheck.setChecked(checked);

        // Update Description Information
        if (checked) {
            setDesc(mDescOn);
        } else {
            setDesc(mDescOff);
        }
    }

}<?xml version="1.0" encoding="utf-8"?>
<LinearLayout xmlns:android="http://schemas.android.com/apk/res/android"
android:layout_width="match_parent"
android:layout_height="match_parent"
android:orientation="vertical">
<RelativeLayout
android:layout_width="match_parent"
android:layout_height="65dp"
android:padding="5dp">
<TextView
android:id="@+id/tv_title"
android:layout_width="wrap_content"
android:layout_height="wrap_content"
android:layout_alignParentLeft="true"
android:layout_alignParentTop="true"
android:text="Title"
android:textColor="#000"
android:textSize="18sp" />
<TextView
android:id="@+id/tv_desc"
android:layout_width="wrap_content"
android:layout_height="wrap_content"
android:layout_below="@id/tv_title"
android:layout_marginTop="3dp"
android:text="describe"
android:textColor="#a000"
android:textSize="16sp" />
<CheckBox
android:id="@+id/cb_check"
android:layout_width="wrap_content"
android:layout_height="wrap_content"
android:layout_alignParentRight="true"
android:layout_centerVertical="true"
android:clickable="false"
android:focusable="false"
android:focusableInTouchMode="false" />
<View
android:layout_width="match_parent"
android:layout_height="1dp"
android:layout_alignParentBottom="true"
android:background="#494949" />
</RelativeLayout>
</LinearLayout><?xml version="1.0" encoding="utf-8"?>
<resources>
<declare-styleable name="SettingItemView">
<attr name="title" format="string" />
<attr name="desc_on" format="string" />
<attr name="desc_off" format="string" />
</declare-styleable>
</resources><?xml version="1.0" encoding="utf-8"?>
<LinearLayout xmlns:android="http://schemas.android.com/apk/res/android"
xmlns:app="http://schemas.android.com/apk/res-auto"
xmlns:tools="http://schemas.android.com/tools"
android:layout_width="match_parent"
android:layout_height="match_parent"
android:gravity="center"
android:orientation="vertical"
tools:context="com.fly.lsn29_groupview.MainActivity">
<com.fly.lsn29_groupview.SettingItemView
android:id="@+id/siv"
android:layout_width="match_parent"
android:layout_height="wrap_content"
app:desc_off="Closed"
app:desc_on="It's already started."
app:title="Set up" />
</LinearLayout>import android.support.v7.app.AppCompatActivity;
import android.os.Bundle;
import android.view.View;
public class MainActivity extends AppCompatActivity {
@Override
protected void onCreate(Bundle savedInstanceState) {
super.onCreate(savedInstanceState);
setContentView(R.layout.activity_main);
final SettingItemView siv = (SettingItemView) findViewById(R.id.siv);
siv.setChecked(true);//Initialization settings
siv.setOnClickListener(new View.OnClickListener() {
@Override
public void onClick(View v) {
if (siv.isChecked()) {
siv.setChecked(false);
//processing logic
} else {
siv.setChecked(true);
//processing logic
}
}
});
}
}