After learning a lot of ios knowledge, today we will realize a classic little game, tom cat game, without much nonsense, and directly enter the topic.
1, Effect display

2, Preparation and knowledge points
1. Because the program generates various effects through a series of animations formed by pictures, we need to prepare the pictures required for implementation, and the sound effects also need to be prepared. At the end of the article, I will post the resources used in this project.
2. Through this project, we can learn the use of some basic syntax in oc, including switch structure, button connection binding method, local package image resource acquisition and so on.
The latest project code has been pushed to this address: https://gitee.com/suwu150/tom-cat-play
Here are the picture resources and audio resources involved: https://download.csdn.net/download/suwu150/20464032
3, Code development and sharing
3.1 description of creating project and directory structure
When we start a project, the most basic thing is to create a project. Because we are a mobile app, we will create an ios application accordingly. Let me teach you the specific process
First, create a project, move the mouse to the top [file - > New - > Project...], and click it hard. The following interface will appear:
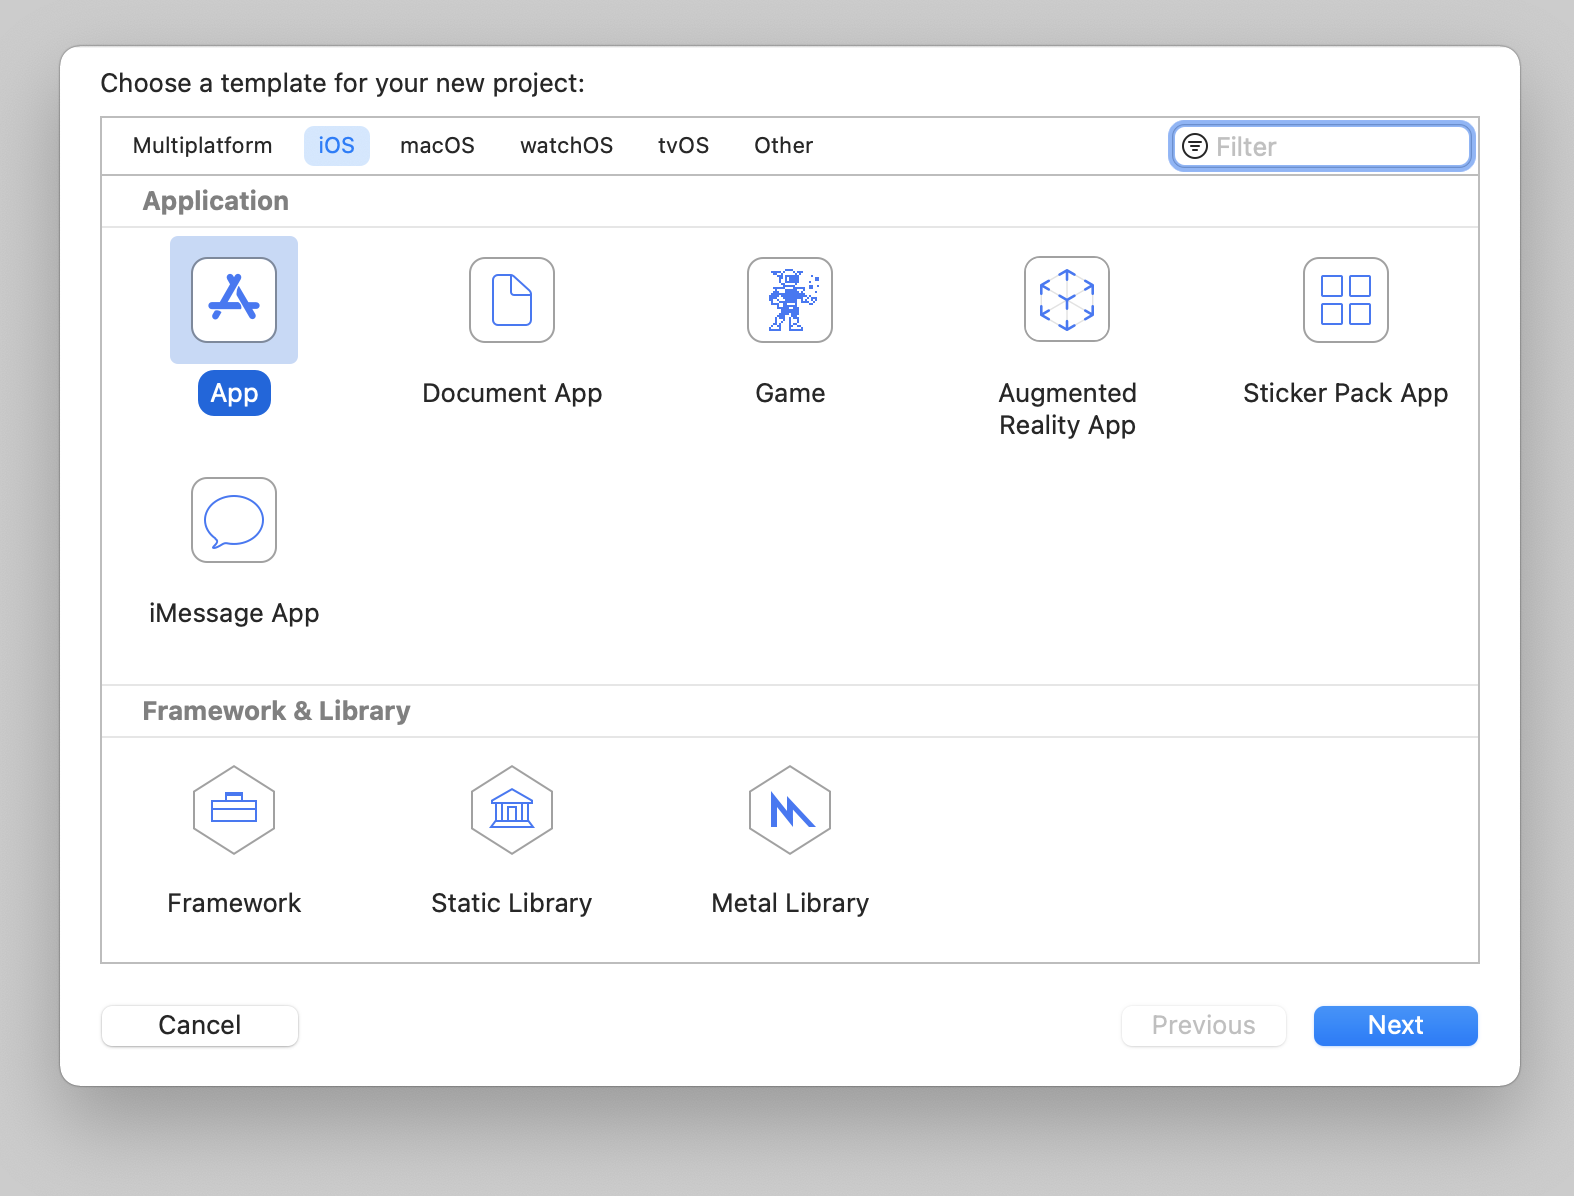
Click the [Next] button to enter the Next channel, then present the project information and fill in it as follows:
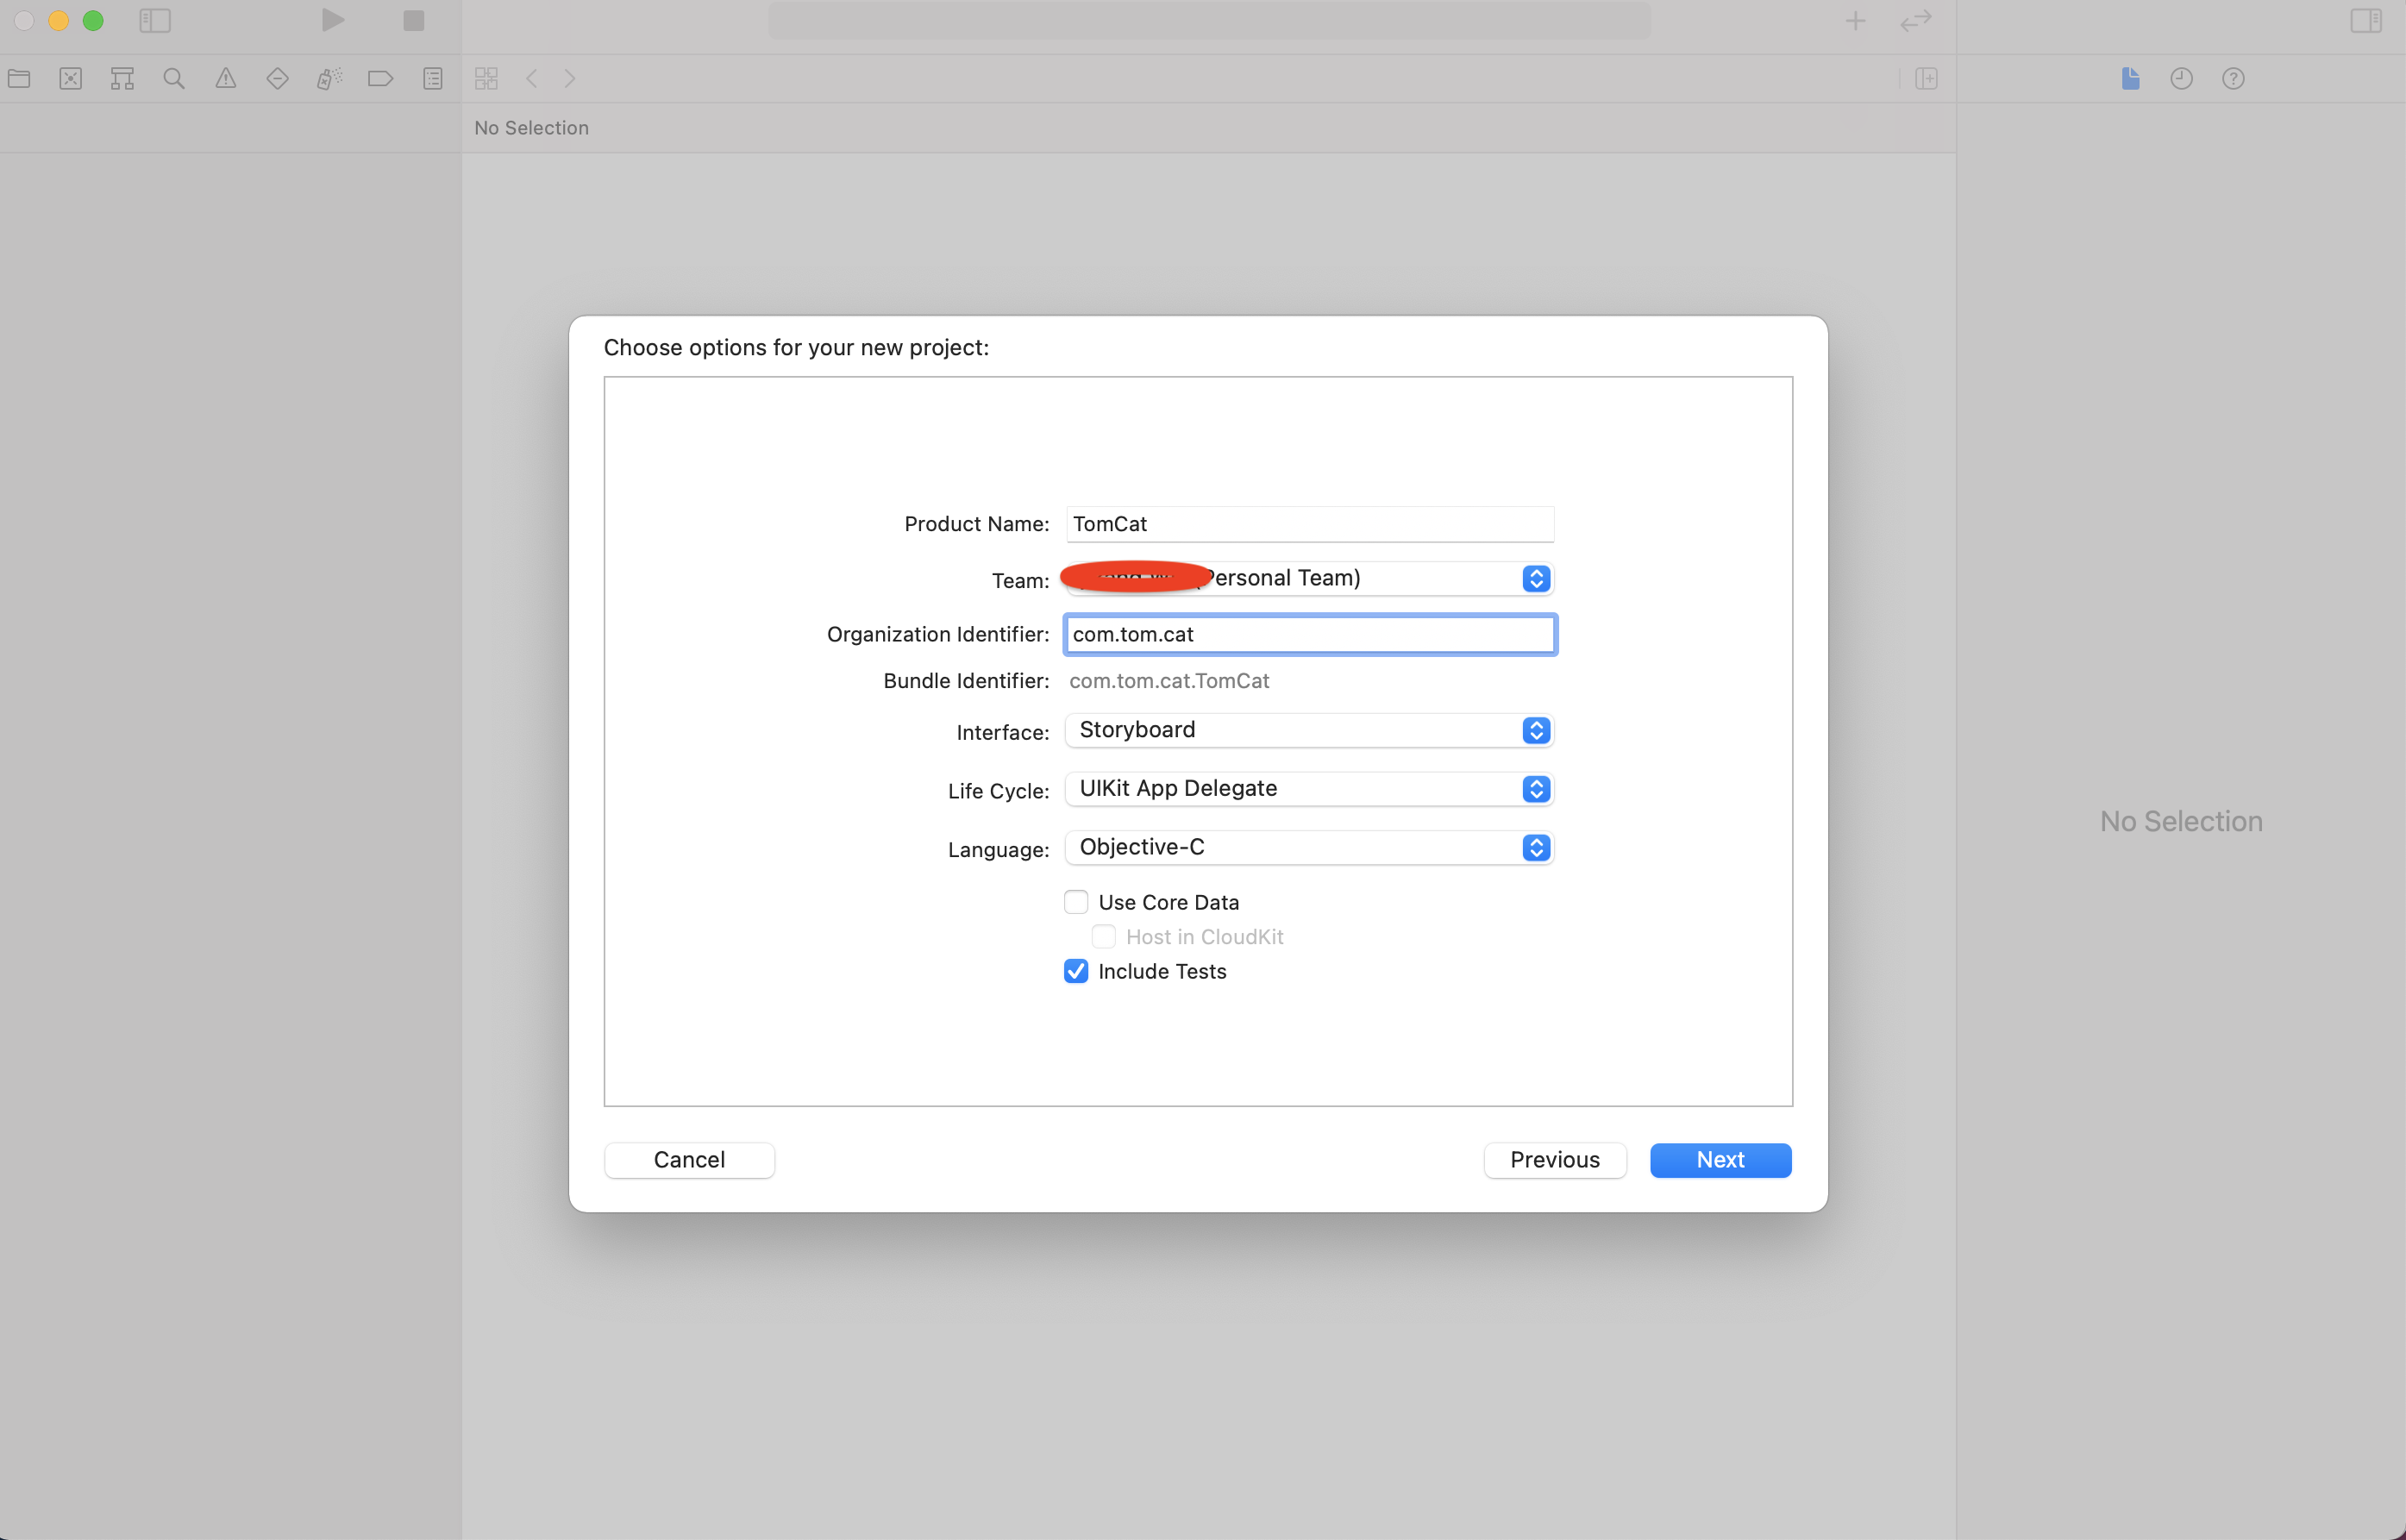
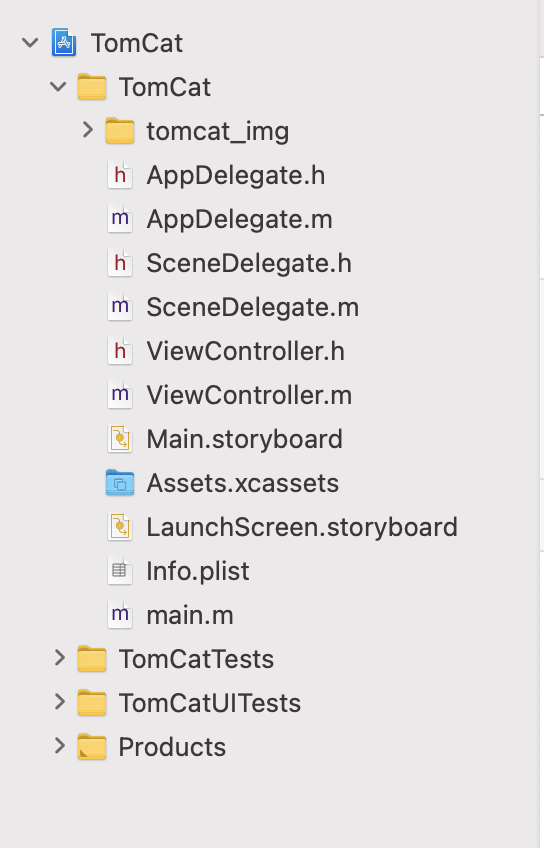
After filling in, such a directory structure will appear. In the final analysis, there are only four files useful to us in this structure, namely:
- tomcat_img: store picture resources and audio information
- ViewController: implements event response when a button is clicked
- Main.storyboard: small game interface, main layout, picture display, effect stage
- Assets.xcassets: button resource file store
3.2 page layout, button layout and click trigger layout
There are generally two ways to generate layout in ios. One is to generate each sub component through code, and then add the sub component to the parent container through a specific method. Today, we use the simplest way to realize this layout. OK, let's drag and drop the big method.
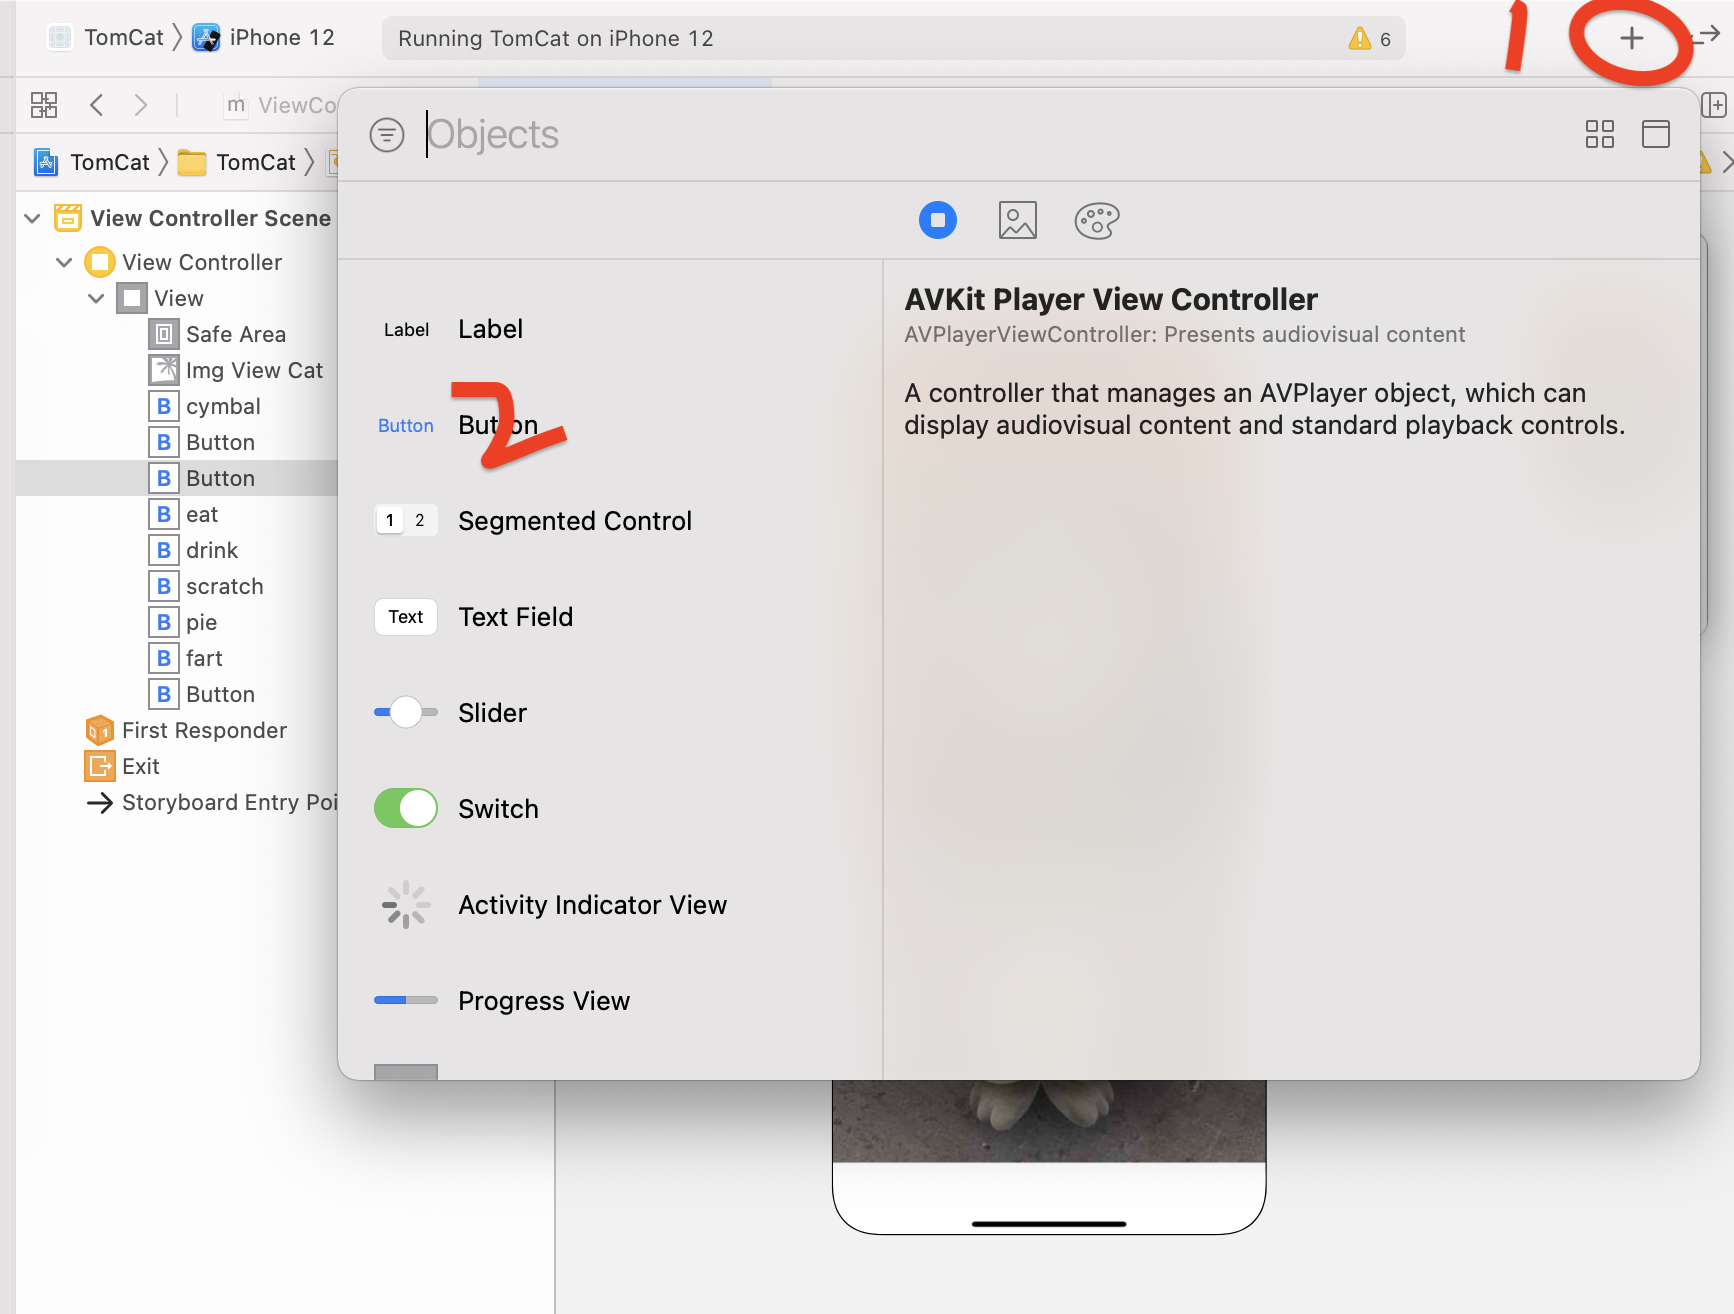
According to the above steps, we click the [+] sign at the top, and then place the components according to the position we need to place. The effect is as follows. Ha, it depends on everyone's mood. Among the components we use are:
- Image View: display initialization interface and animated pictures
- Button: corresponding click effect, display action icons, and respond to action events when clicking on the head and left and right feet
In fact, at first, after we push and drag, there will be no picture buttons. We need to select our button for editing. When we select the button, there will be a button attribute on the right side of the Xcode editor to prompt us to modify it. Next, we can modify it according to our effect, mainly to replace the background picture
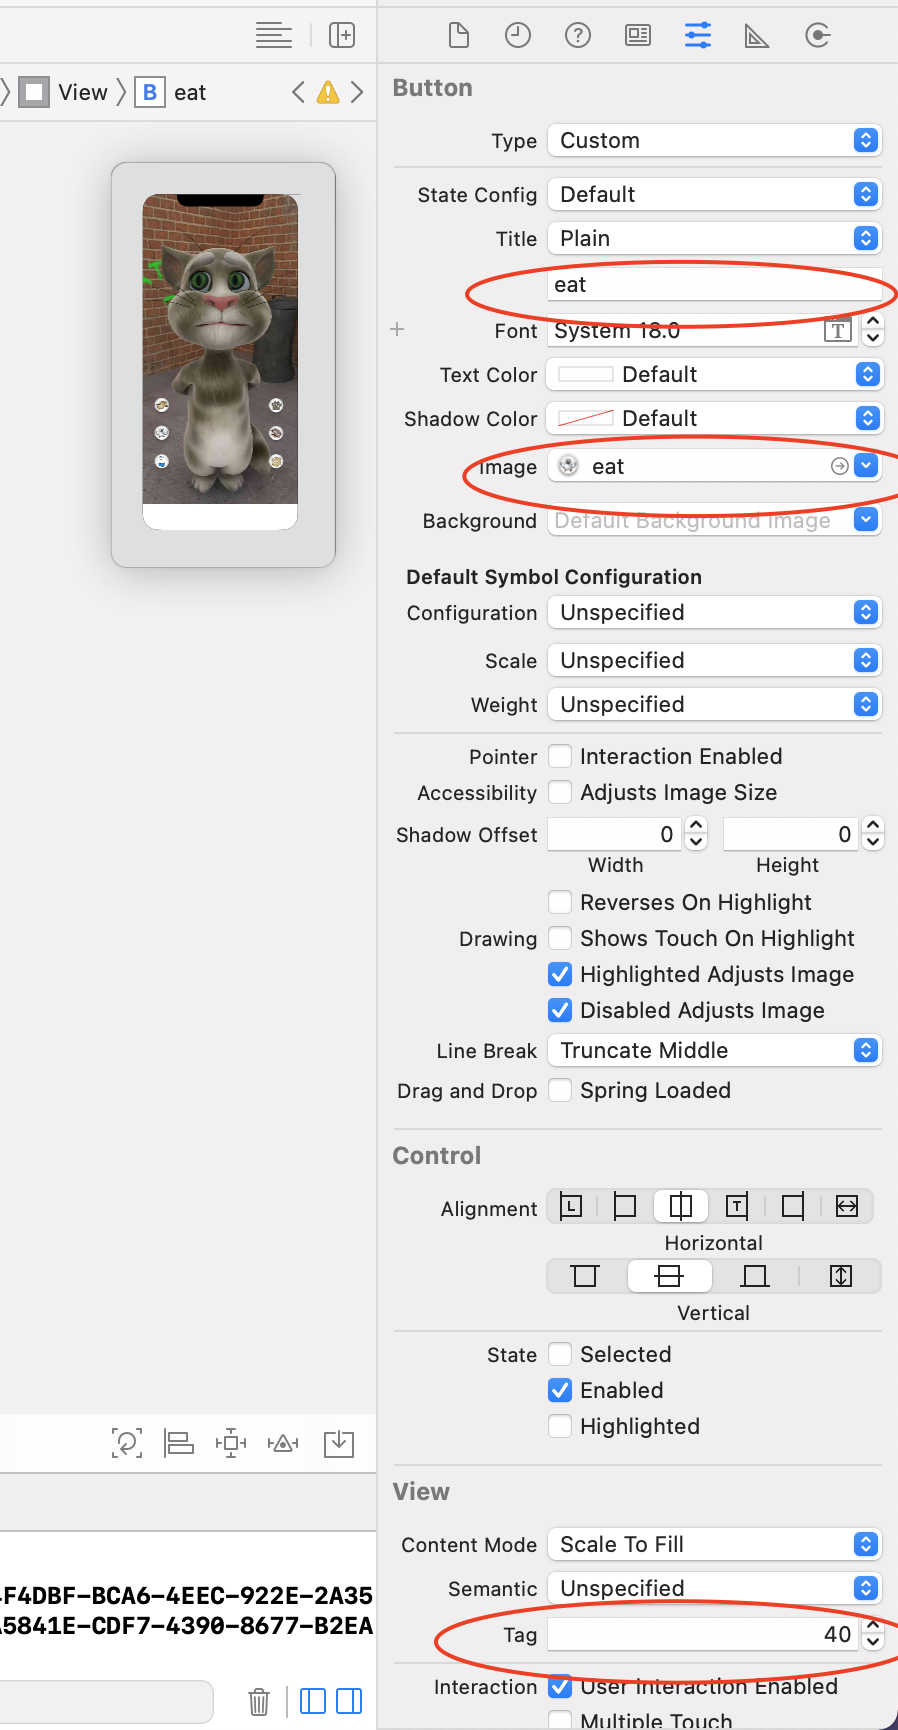
As above, I specifically checked three places that need to be changed: - One is the button title, which is used to identify the button
- The second is the Image attribute, which is used to set the background for the button. Here we set the Image named eat
- Third, set a unique number for the button, which is used to distinguish which button we click later
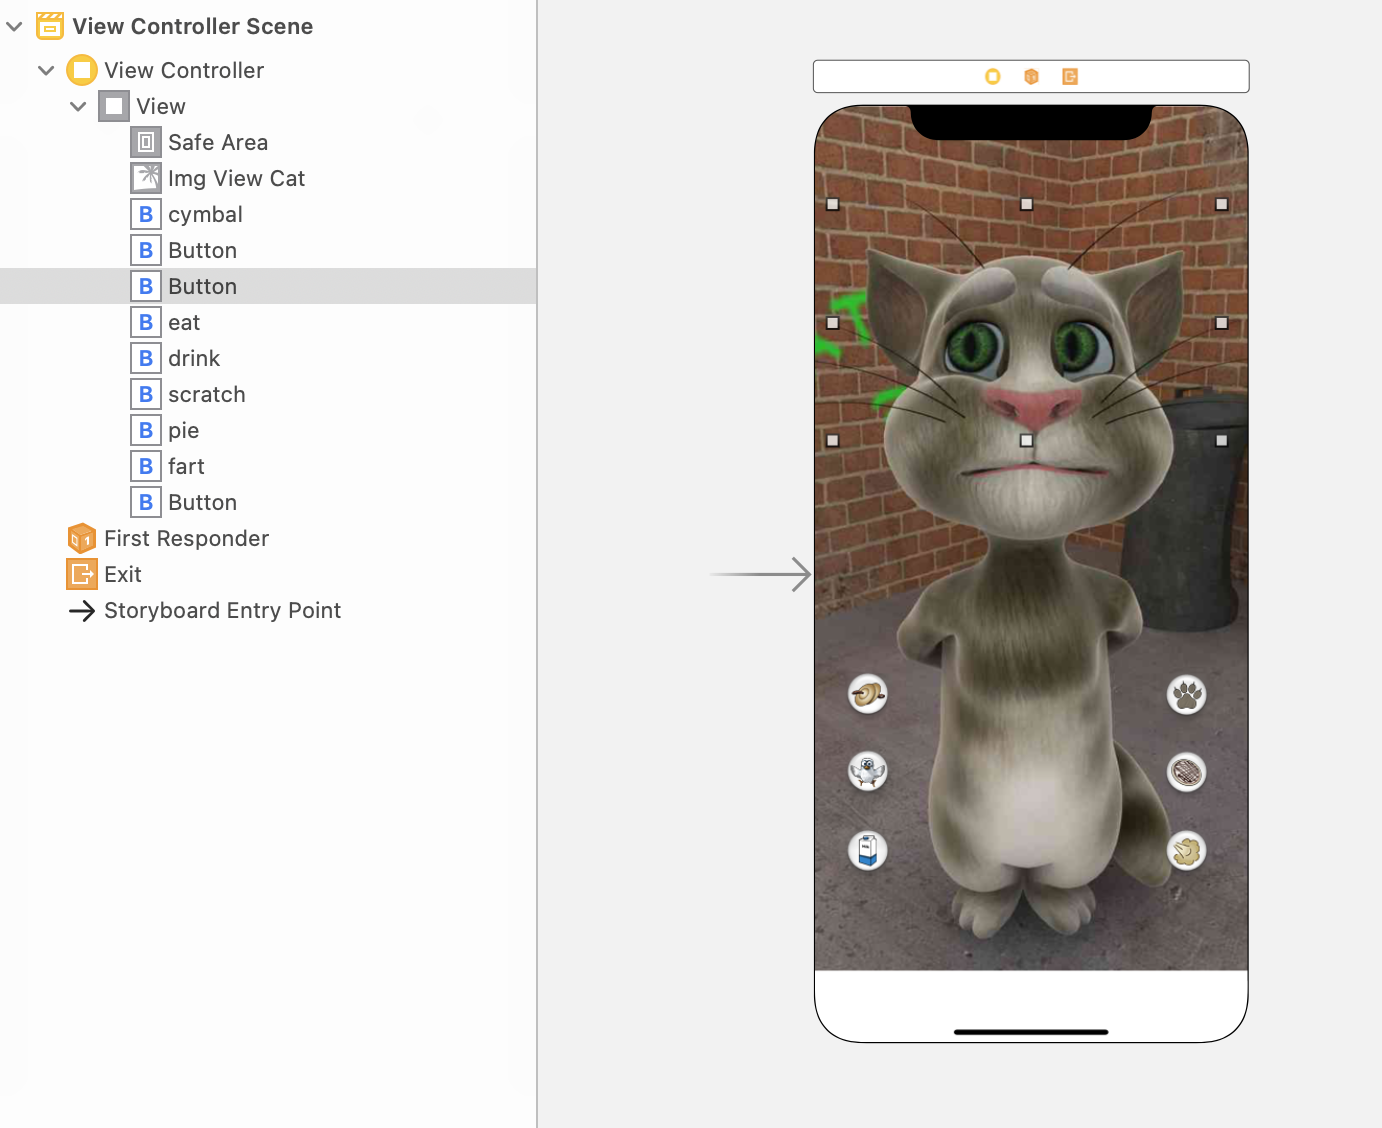
Well, anyway, you keep dragging the mouse, and finally form the following interface
3.3 click event response and interface linkage
For the click event response, that is, what response we make when we click the button. In our little game, we play the specific animation. The details of playing the animation are in our viewcontroller M file, but we can also drag and drop to generate code. The specific operation is to press and hold the control button, and then drag the button to viewcontroller In the m file, a pop-up window for inputting modification information will pop up automatically in the following areas. Just enter the name of doAction as required.
@interface ViewController ()
- (IBAction)doAction:(UIButton *)sender;
@end
In the same way, bind all buttons and Image View components, and name them imgViewCat. The final result is as follows:
@interface ViewController ()

@property (weak, nonatomic) IBOutlet UIImageView *imgViewCat;
- (IBAction)doAction:(UIButton *)sender;
@end
Finally, we need to implement these bindings in @ implementation ViewController. Because the buttons we need to process are similar in form, we use switch to divide them. Here, we use the tag value configured in Section 3.2 layout through sender The form of tag is passed to switch to distinguish, and then different operations are performed.
#import "ViewController.h";
#import <AudioToolbox/AudioToolbox.h>

@interface ViewController ()

@property (weak, nonatomic) IBOutlet UIImageView *imgViewCat;
- (IBAction)doAction:(UIButton *)sender;
@end

@implementation ViewController

- (void)viewDidLoad {
    [super viewDidLoad];
    // Do any additional setup after loading the view.
}

- (IBAction)doAction:(UIButton *)sender {
    NSLog(@"%@", @"6666");
    switch (sender.tag) {
        case 10:
            NSLog(@"%@", @"10");
            break;
        case 20:
            NSLog(@"%@", @"20");
            break;

        case 30:
            NSLog(@"%@", @"30");
            break;

        case 40:
            NSLog(@"%@", @"40");
            break;
        case 50:
            NSLog(@"%@", @"50");
            break;

        case 60:
            NSLog(@"%@", @"60");
            break;

        case 70:
            NSLog(@"%@", @"70");
            break;
        case 80:
            NSLog(@"%@", @"80");
            break;
        case 90:
            NSLog(@"%@", @"90");
            break;
        default:
            break;
    }
}

@end
Here we can start the application initially. When we click each button, we will print the tag value originally configured by the button.
3.4 animation implementation
On the basis of completing the above effects, we will realize animation playback, still in viewcontroller M file, we add definitions and implementations respectively
// Definition method
- (void)startAnimation:(int)count playPicName:(NSString *) playPicName soundName:(NSString *) soundName;


// Implementation method
// Three parameters are used, namely count, playPicName and soundName
- (void)startAnimation:(int)count playPicName:(NSString *) playPicName soundName:(NSString *) soundName  {
    NSLog(@"%@", @"Start animation");
    // Judge whether the current animation is playing through isAnimating attribute. When it is playing, prevent it from playing again
    if(self.imgViewCat.isAnimating){
        return;
    }
    // Defines an array for storing picture resources that need to play animation
    NSMutableArray *arrayM = [NSMutableArray array];
    for (int i = 0; i <= count; i++) {
    // Format the picture name according to the index, [@ "% @%02d.jpg"] format is used to format the name and supplement the number at the same time
        NSString *imgName = [NSString stringWithFormat: @"%@_%02d.jpg", playPicName, i];
        // [NSBundle mainBundle] indicates the address path where the installation package is located
        // Path address of encapsulated resource picture
        NSString *path = [[NSBundle mainBundle] pathForResource:imgName ofType:nil];
        // Read the picture resource file according to the path
        UIImage *imgCat = [UIImage imageWithContentsOfFile: path];
        NSLog(@"%@_%@_%@", imgCat, path, imgName);
        [arrayM addObject:imgCat];

    }

    self.imgViewCat.animationImages = arrayM;
    // Sets the interval between each frame
    self.imgViewCat.animationDuration = count * 0.04;
    // Sets the number of animation repetitions
    self.imgViewCat.animationRepeatCount = 1;
    // Call audio playback synchronously, and implement this method in the next step
    // [self playSoundEffect: soundName];
    // Start playing animation
    [self.imgViewCat startAnimating];

}
- count: represents the number of frames of each animation, which is passed to the playback method in the form of parameters
- playPicName: the name of the animation to be played. It is used to find picture resources in the resource package
- soundName: used to synchronously play audio and audio files when playing animation
After implementing this method, we need to add it to the switch response method we set at the beginning, and realize the corresponding animation effect by calling the startAnimation method to pass different parameters.
- (IBAction)doAction:(UIButton *)sender {
    switch (sender.tag) {
        case 10:
            NSLog(@"%@", @"10");
            [self startAnimation: 12 playPicName:@"cymbal" soundName: @"cymbal.m4a"];
            break;
        case 20:
            NSLog(@"%@", @"20");
            [self startAnimation: 27 playPicName:@"fart" soundName: @"fart003_11025.m4a"];
            break;
        case 30:
            NSLog(@"%@", @"30");
            [self startAnimation: 80 playPicName:@"drink" soundName: @"drink.m4a"];
            break;
        case 40:
            NSLog(@"%@", @"40");
            [self startAnimation: 39 playPicName:@"eat" soundName: @"eat.m4a"];
            break;
        case 50:
            NSLog(@"%@", @"50");
            [self startAnimation: 55 playPicName:@"scratch" soundName: @"scratch.m4a"];
            break;
        case 60:
            NSLog(@"%@", @"60");
            [self startAnimation: 23 playPicName:@"pie" soundName: @"pie.m4a"];
            break;
        case 70:
            NSLog(@"%@", @"70");
            [self startAnimation: 80 playPicName:@"knockout" soundName: @"knockout.m4a"];
            break;
        case 80:
            NSLog(@"%@", @"80");
            [self startAnimation: 29 playPicName:@"foot_right" soundName: @"foot_right.m4a"];
            break;
        case 90:
            NSLog(@"%@", @"90");
            [self startAnimation: 29 playPicName:@"foot_left" soundName: @"foot_left.m4a"];
            break;
        default:
            break;
    }
}
3.5 sound playback
On the basis of completing the above effects, we will realize the playback of sound and audio, which is still in viewcontroller M file, we add definitions and implementations respectively
// Definition method
- (void)playSoundEffect:(NSString *)name;

// Implementation method
/**
 * Play sound files
 *
 * @param name Audio file name */
-(void)playSoundEffect:(NSString *)name{
    NSString *audioFile=[[NSBundle mainBundle] pathForResource:name ofType:nil];
    NSURL *fileUrl=[NSURL fileURLWithPath:audioFile];
    //1. Get the system sound ID
    SystemSoundID soundID=0;
    /**
     * inFileUrl: Audio file url
     * outSystemSoundID:Sound ID (this function will add the sound effect file to the system audio service and return a long shaping ID) */
    AudioServicesCreateSystemSoundID((__bridge CFURLRef)(fileUrl), &soundID);
    //If you need to perform some operations after playback, you can call the following method to register a playback completion callback function AudioServicesAddSystemSoundCompletion(soundID, NULL, NULL, soundCompleteCallback, NULL);
    //2. Play audio
    AudioServicesPlaySystemSound(soundID);//Play sound
    AudioServicesPlayAlertSound(soundID);//Play sound and shake
}
- Name: used to synchronously play the name of audio and play audio files when playing animation
After completing this method, add it synchronously to the step of animation playback, even if it is completed.
3.6 complete code
Through the specific operations of each step above, we can officially run our project. Take off. When we click the button, we will start the corresponding response respectively to realize the playback of the whole animation and audio. The following is the whole complete code:
#import "ViewController.h";
#import <AudioToolbox/AudioToolbox.h>

@interface ViewController ()

@property (weak, nonatomic) IBOutlet UIImageView *imgViewCat;
- (IBAction)doAction:(UIButton *)sender;
- (void)startAnimation:(int)count playPicName:(NSString *) playPicName soundName:(NSString *) soundName;
- (void)playSoundEffect:(NSString *)name;
@end

@implementation ViewController

- (void)viewDidLoad {
    [super viewDidLoad];
    // Do any additional setup after loading the view.
}

/**
 * Play sound files
 *
 * @param name Audio file name */
-(void)playSoundEffect:(NSString *)name{
    NSString *audioFile=[[NSBundle mainBundle] pathForResource:name ofType:nil];
    NSURL *fileUrl=[NSURL fileURLWithPath:audioFile];
    //1. Get the system sound ID
    SystemSoundID soundID=0;
    /**
     * inFileUrl: Audio file url
     * outSystemSoundID:Sound ID (this function will add the sound effect file to the system audio service and return a long shaping ID) */
    AudioServicesCreateSystemSoundID((__bridge CFURLRef)(fileUrl), &soundID);
    //If you need to perform some operations after playback, you can call the following method to register a playback completion callback function AudioServicesAddSystemSoundCompletion(soundID, NULL, NULL, soundCompleteCallback, NULL);
    //2. Play audio
    AudioServicesPlaySystemSound(soundID);//Play sound
    AudioServicesPlayAlertSound(soundID);//Play sound and shake
}
// Implementation method
// Three parameters are used, namely count, playPicName and soundName
- (void)startAnimation:(int)count playPicName:(NSString *) playPicName soundName:(NSString *) soundName  {
    NSLog(@"%@", @"Start animation");
    // Judge whether the current animation is playing through isAnimating attribute. When it is playing, prevent it from playing again
    if(self.imgViewCat.isAnimating){
        return;
    }
    // Defines an array for storing picture resources that need to play animation
    NSMutableArray *arrayM = [NSMutableArray array];
    for (int i = 0; i <= count; i++) {
    // Format the picture name according to the index, [@ "% @%02d.jpg"] format is used to format the name and supplement the number at the same time
        NSString *imgName = [NSString stringWithFormat: @"%@_%02d.jpg", playPicName, i];
        // [NSBundle mainBundle] indicates the address path where the installation package is located
        // Path address of encapsulated resource picture
        NSString *path = [[NSBundle mainBundle] pathForResource:imgName ofType:nil];
        // Read the picture resource file according to the path
        UIImage *imgCat = [UIImage imageWithContentsOfFile: path];
        NSLog(@"%@_%@_%@", imgCat, path, imgName);
        [arrayM addObject:imgCat];

    }

    self.imgViewCat.animationImages = arrayM;
    // Sets the interval between each frame
    self.imgViewCat.animationDuration = count * 0.04;
    // Sets the number of animation repetitions
    self.imgViewCat.animationRepeatCount = 1;
    // Call audio playback synchronously, and implement this method in the next step
    [self playSoundEffect: soundName];
    // Start playing animation
    [self.imgViewCat startAnimating];
}

- (IBAction)doAction:(UIButton *)sender {
    switch (sender.tag) {
        case 10:
            NSLog(@"%@", @"10");
            [self startAnimation: 12 playPicName:@"cymbal" soundName: @"cymbal.m4a"];
            break;
        case 20:
            NSLog(@"%@", @"20");
            [self startAnimation: 27 playPicName:@"fart" soundName: @"fart003_11025.m4a"];
            break;
        case 30:
            NSLog(@"%@", @"30");
            [self startAnimation: 80 playPicName:@"drink" soundName: @"drink.m4a"];
            break;
        case 40:
            NSLog(@"%@", @"40");
            [self startAnimation: 39 playPicName:@"eat" soundName: @"eat.m4a"];
            break;
        case 50:
            NSLog(@"%@", @"50");
            [self startAnimation: 55 playPicName:@"scratch" soundName: @"scratch.m4a"];
            break;
        case 60:
            NSLog(@"%@", @"60");
            [self startAnimation: 23 playPicName:@"pie" soundName: @"pie.m4a"];
            break;
        case 70:
            NSLog(@"%@", @"70");
            [self startAnimation: 80 playPicName:@"knockout" soundName: @"knockout.m4a"];
            break;
        case 80:
            NSLog(@"%@", @"80");
            [self startAnimation: 29 playPicName:@"foot_right" soundName: @"foot_right.m4a"];
            break;
        case 90:
            NSLog(@"%@", @"90");
            [self startAnimation: 29 playPicName:@"foot_left" soundName: @"foot_left.m4a"];
            break;
        default:
            break;
    }
}
@end
4, Summary
After the above series of operations, we have completed our little game. You can install it on your mobile phone to taste it. Ha ha.
For this little game, we mainly drag and drop the layout in the form of visual interface, then distinguish the specific click contents through the Switch scheme, and finally complete the whole little game by encapsulating animation playback and sound audio playback.
The resources used above have been distributed to platforms that can be downloaded. If you encounter problems during downloading, you can contact at any time.
The latest project code has been pushed to this address: https://gitee.com/suwu150/tom-cat-play
Here are the picture resources and audio resources involved: https://download.csdn.net/download/suwu150/20464032
Then we dried this bowl of poisonous chicken soup. Goodbye, everyone.