1 mongoDB replica set
Introduction to 1 replica set
We introduced the use of single-machine MongoDB. In practice, we seldom use single-machine MongoDB, because there is a risk of data loss when using single-machine, and single-server can not achieve high availability (that is, when the server goes down, there is no substitute for the top of the server, our business will hang up). In MongoDB, we use single-machine MongoDB. The copy set perfectly solves the two problems above.
MongoDB's replica set is essentially a set of mongod processes. The members of the replication set are:
Primary: The primary node is responsible for all write operations.
2.Secondaries: slave node, synchronize data of master node, save data copy;
3.Arbiter: Arbitrator node, which does not save data, has only one voting function;
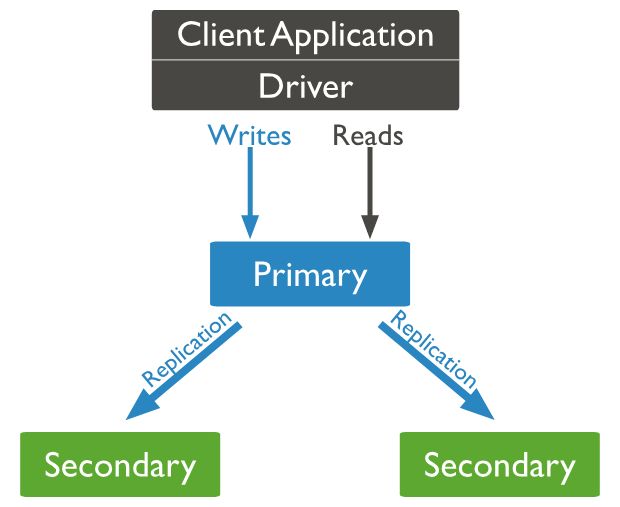
Duplicate Set Running Process: The primary node is the only node responsible for write operations in the cluster, and the write operations of the primary node are recorded in its operation log (oplog, is one). capped collection ) In the log, the slave replicates the oplog log log of the master node and executes the commands in the log to keep the data consistent with the master node. All nodes in the replica set can read, but the application reads data from the primary node by default. When the primary node does not communicate with the slave node for a period of time (currently defaulted to 10s), the cluster will vote to select a new primary node. The following figure is from the official website, describing the structure of a duplicate set of one master and two slaves. By default, the read and write operations of the application are carried out through the master node.
2 replica set construction
The construction of MongoDB's replica set is not complicated. Here's a brief demonstration of the construction process. When building mongoDB replica set, the best number of nodes is odd, which is mainly to ensure that voting goes smoothly. Here we demonstrate how to build a master-slave copy set. When building a copy set, it is better for each node to deploy on different devices, because I don't have so many computers, so I use three centos7 virtual machines to build it.
The first step is to install mongoDB.
In order to facilitate the communication between several devices, we use the vim/etc/hosts command to register the host information on each device (pay attention to changing the IP of our device). The configuration is as follows:
127.0.0.1   localhost localhost.localdomain localhost4 localhost4.localdomain4
::1         localhost localhost.localdomain localhost6 localhost6.localdomain6
192.168.70.129 mongo01
192.168.70.131 mongo02
192.168.70.133 mongo03
mongoDB is installed on all three centos virtual machines for reference Installation methods in the first article Notice that the configuration of the replica set has one more replication node than that of the stand-alone machine. Here, set the name of the replica set to MongoXset. Use the command vim/usr/local/mongodb/bin/mongodb.conf to edit the configuration file as follows:
systemLog:
  destination: file
  logAppend: true
  path: /usr/local/mongodb/logs/mongodb.log
storage:
  dbPath: /usr/local/mongodb/data
  journal:
    enabled: true
processManagement:
  fork: true
net:
  port: 27017
  bindIp: 0.0.0.0
replication:
  replSetName: MongoXset
The second step is to initialize the replica set
After installation, connect any node in Robomongo and initialize the replica set by executing the following commands:
//To configure
config = { _id:"MongoXset", members:[
  {_id:0,host:"192.168.70.129:27017"},
  {_id:1,host:"192.168.70.131:27017"},
  {_id:2,host:"192.168.70.133:27017"}]
}
use admin
//Initialization
rs.initiate(config)
After executing the above command, our replica set is set up and rs.status() is executed to check the status of the replica set. We can see that mongodb of 192.168.70.133:27017 is primary (primary node), and the other two nodes are secondary (slave node):
{
    "set" : "MongoXset",
    "date" : ISODate("2019-06-30T08:13:34.677Z"),
    "myState" : 1,
    "term" : NumberLong(1),
    "syncingTo" : "",
    "syncSourceHost" : "",
    "syncSourceId" : -1,
    "heartbeatIntervalMillis" : NumberLong(2000),
    "optimes" : {
        "lastCommittedOpTime" : {
            "ts" : Timestamp(1561882407, 1),
            "t" : NumberLong(1)
        },
        "readConcernMajorityOpTime" : {
            "ts" : Timestamp(1561882407, 1),
            "t" : NumberLong(1)
        },
        "appliedOpTime" : {
            "ts" : Timestamp(1561882407, 1),
            "t" : NumberLong(1)
        },
        "durableOpTime" : {
            "ts" : Timestamp(1561882407, 1),
            "t" : NumberLong(1)
        }
    },
    "lastStableCheckpointTimestamp" : Timestamp(1561882387, 1),
    "members" : [
        {
            "_id" : 0,
            "name" : "192.168.70.129:27017",
            "health" : 1,
            "state" : 2,
            "stateStr" : "SECONDARY",
            "uptime" : 219,
            "optime" : {
                "ts" : Timestamp(1561882407, 1),
                "t" : NumberLong(1)
            },
            "optimeDurable" : {
                "ts" : Timestamp(1561882407, 1),
                "t" : NumberLong(1)
            },
            "optimeDate" : ISODate("2019-06-30T08:13:27Z"),
            "optimeDurableDate" : ISODate("2019-06-30T08:13:27Z"),
            "lastHeartbeat" : ISODate("2019-06-30T08:13:33.585Z"),
            "lastHeartbeatRecv" : ISODate("2019-06-30T08:13:34.465Z"),
            "pingMs" : NumberLong(0),
            "lastHeartbeatMessage" : "",
            "syncingTo" : "192.168.70.133:27017",
            "syncSourceHost" : "192.168.70.133:27017",
            "syncSourceId" : 2,
            "infoMessage" : "",
            "configVersion" : 1
        },
        {
            "_id" : 1,
            "name" : "192.168.70.131:27017",
            "health" : 1,
            "state" : 2,
            "stateStr" : "SECONDARY",
            "uptime" : 219,
            "optime" : {
                "ts" : Timestamp(1561882407, 1),
                "t" : NumberLong(1)
            },
            "optimeDurable" : {
                "ts" : Timestamp(1561882407, 1),
                "t" : NumberLong(1)
            },
            "optimeDate" : ISODate("2019-06-30T08:13:27Z"),
            "optimeDurableDate" : ISODate("2019-06-30T08:13:27Z"),
            "lastHeartbeat" : ISODate("2019-06-30T08:13:33.604Z"),
            "lastHeartbeatRecv" : ISODate("2019-06-30T08:13:34.458Z"),
            "pingMs" : NumberLong(0),
            "lastHeartbeatMessage" : "",
            "syncingTo" : "192.168.70.133:27017",
            "syncSourceHost" : "192.168.70.133:27017",
            "syncSourceId" : 2,
            "infoMessage" : "",
            "configVersion" : 1
        },
        {
            "_id" : 2,
            "name" : "192.168.70.133:27017",
            "health" : 1,
            "state" : 1,
            "stateStr" : "PRIMARY",
            "uptime" : 1281,
            "optime" : {
                "ts" : Timestamp(1561882407, 1),
                "t" : NumberLong(1)
            },
            "optimeDate" : ISODate("2019-06-30T08:13:27Z"),
            "syncingTo" : "",
            "syncSourceHost" : "",
            "syncSourceId" : -1,
            "infoMessage" : "",
            "electionTime" : Timestamp(1561882205, 1),
            "electionDate" : ISODate("2019-06-30T08:10:05Z"),
            "configVersion" : 1,
            "self" : true,
            "lastHeartbeatMessage" : ""
        }
    ],
    "ok" : 1,
    "operationTime" : Timestamp(1561882407, 1),
    "$clusterTime" : {
        "clusterTime" : Timestamp(1561882407, 1),
        "signature" : {
            "hash" : BinData(0,"AAAAAAAAAAAAAAAAAAAAAAAAAAA="),
            "keyId" : NumberLong(0)
        }
    }
}
3 Test replica set
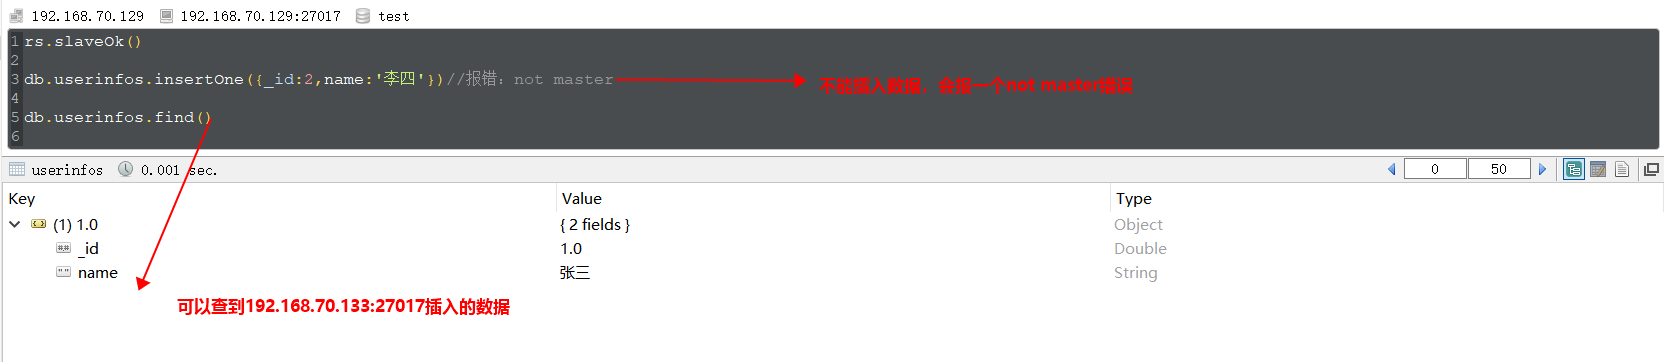
We know that the master node of the replica set is responsible for all write operations, and the slave node can not perform write operations, only synchronize the data of the master node. Here's a simple test: connect the main node 192.168.70.133:27017, insert a command by executing the following command:

Connect slave node 192.168.70.129:27017, execute the command below, we see that slave node can not insert data, but we can find the data inserted by master node from slave node (note: rs.slaveOk() must be executed before read operation):
Testing High Availability: Connect the primary node 192.168.70.133:27017, execute the command use admin db.shutdown Server () to close the primary node, then connect another node to execute rs.status() to check the status of the replica set as follows. We see 192.168.70.133:27017 nodes are unavailable and 192.168.70.129:27017 is elected. For the new primary node:
"members" : [
        {
            "_id" : 0,
            "name" : "192.168.70.129:27017",
            "health" : 1,
            "state" : 1,
            "stateStr" : "PRIMARY",
            "uptime" : 2919,
            "optime" : {
                "ts" : Timestamp(1561885110, 1),
                "t" : NumberLong(2)
            },
            "optimeDurable" : {
                "ts" : Timestamp(1561885110, 1),
                "t" : NumberLong(2)
            },
            "optimeDate" : ISODate("2019-06-30T08:58:30Z"),
            "optimeDurableDate" : ISODate("2019-06-30T08:58:30Z"),
            "lastHeartbeat" : ISODate("2019-06-30T08:58:35.900Z"),
            "lastHeartbeatRecv" : ISODate("2019-06-30T08:58:34.979Z"),
            "pingMs" : NumberLong(0),
            "lastHeartbeatMessage" : "",
            "syncingTo" : "",
            "syncSourceHost" : "",
            "syncSourceId" : -1,
            "infoMessage" : "",
            "electionTime" : Timestamp(1561884658, 1),
            "electionDate" : ISODate("2019-06-30T08:50:58Z"),
            "configVersion" : 1
        },
        {
            "_id" : 1,
            "name" : "192.168.70.131:27017",
            "health" : 1,
            "state" : 2,
            "stateStr" : "SECONDARY",
            "uptime" : 3892,
            "optime" : {
                "ts" : Timestamp(1561885110, 1),
                "t" : NumberLong(2)
            },
            "optimeDate" : ISODate("2019-06-30T08:58:30Z"),
            "syncingTo" : "192.168.70.129:27017",
            "syncSourceHost" : "192.168.70.129:27017",
            "syncSourceId" : 0,
            "infoMessage" : "",
            "configVersion" : 1,
            "self" : true,
            "lastHeartbeatMessage" : ""
        },
        {
            "_id" : 2,
            "name" : "192.168.70.133:27017",
            "health" : 0,
            "state" : 8,
            "stateStr" : "(not reachable/healthy)",
            "uptime" : 0,
            "optime" : {
                "ts" : Timestamp(0, 0),
                "t" : NumberLong(-1)
            },
            "optimeDurable" : {
                "ts" : Timestamp(0, 0),
                "t" : NumberLong(-1)
            },
            "optimeDate" : ISODate("1970-01-01T00:00:00Z"),
            "optimeDurableDate" : ISODate("1970-01-01T00:00:00Z"),
            "lastHeartbeat" : ISODate("2019-06-30T08:58:36.291Z"),
            "lastHeartbeatRecv" : ISODate("2019-06-30T08:50:59.539Z"),
            "pingMs" : NumberLong(0),
            "lastHeartbeatMessage" : "Error connecting to 192.168.70.133:27017 :: caused by :: Connection refused",
            "syncingTo" : "",
            "syncSourceHost" : "",
            "syncSourceId" : -1,
            "infoMessage" : "",
            "configVersion" : -1
        }
    ]
4 Setting the priority of nodes
When deploying, we usually prefer to make stable and good performance devices as the primary node in the election, so that poor performance servers can not be elected as the primary node. This requires priority. The default priority of each node is 1. We can change the priority of each node. The higher the priority, the greater the probability of being elected as the primary node. The node with priority of 0 can not be elected as the primary node. Using the mongo shell to execute the following commands can change the priority of each node, which is no longer demonstrated here.
//Getting Cluster Configuration
  cfg=rs.config()
//set priority
  cfg.members[0].priority=1
  cfg.members[1].priority=100
  cfg.members[1].priority=0
//Reload configuration
  rs.reconfig(cfg)
Common functions for 3 replica set management
Here are some commands for managing replica sets. Interested partners can test them for themselves.
| Method | describe |
| rs.status() | View the status of replica sets |
|
rs.initiate(cfg) |
Initialize the replica set |
| rs.conf() | Configuration of obtaining replica sets |
| rs.reconfig(cfg) | Reload configuration |
| rs.add(ip:port) | Add a node |
| rs.addArb(ip:port) | Add an arbitration node |
| rs.remove(ip:port) | Delete a node |
| rs.isMaster() | Check to see if it is the primary node |
| rs.slaveOk() | Let slave nodes perform read operations |
| rs.printReplicationInfo() | View the size and time of oplog |
| rs.printSlaveReplicationInfo() | View data synchronization from slave nodes |
Realization of Read-Write Separation Driven by 4C#
We have built a duplicate set with one master and two slaves in 192.168.70.129:27017 (master node), 192.168.70.131:27017 (slave node), 192.168.70.133:27017 (slave node). Now let's briefly demonstrate how to use C# to operate the duplicate set and achieve read-write separation.
First, add some test data: connect the master node 192.168.70.129:27017, insert some test data by executing the following commands, and then execute the commands rs.slaveOk() to the two slave nodes to allow the node to read:
use myDb
//empty students Records in
db.students.drop()
//stay students Add test data to the collection
db.students.insertMany([
    {"no":1, "stuName":"jack", "age":23, "classNo":1},
    {"no":2, "stuName":"tom", "age":20, "classNo":2},
    {"no":3, "stuName":"hanmeimei", "age":22, "classNo":1},
    {"no":4, "stuName":"lilei", "age":24, "classNo":2}
])
Then write a console program to add driver packages using Install-Package MongoDB.Driver. The code is as follows:
    class Program
    {
        static void Main(string[] args)
        {
            //Connect to the database
            var client = new MongoClient("mongodb://192.168.70.133:27017, 192.168.70.131:27017, 192.168.70.129:27017");
            //Obtain database
            var mydb = client.GetDatabase("myDb");
            //Setting Priority to Read Data from a Node
            mydb.WithReadPreference(ReadPreference.Secondary);
            //mydb.WithReadConcern(ReadConcern.Majority);
            //mydb.WithWriteConcern(WriteConcern.WMajority);//Here you can set the write confirmation level
            //Obtain collection
            var stuCollection = mydb.GetCollection<Student>("students");
            //Insert a piece of data
            stuCollection.InsertOne(new Student()
            {
                no = 5,
                stuName = "jim",
                age = 25
            });

            //Read Student List
            List<Student> stuList = stuCollection.AsQueryable().ToList();
            stuList.ForEach(s => Console.WriteLine($"Student ID:{s.no}  ,Full name:{s.stuName}  ,Age:{s.age}"));
            Console.ReadKey();
        }
    }
    /// <summary>
    /// Student category
    /// </summary
    public class Student
    {
        public int no { get; set; }//Student ID
        public string stuName { get; set; }//Full name
        public int age { get; set; }//Age
        [BsonExtraElements]
        public BsonDocument others { get; set; }
    }
Note: Use var client = new MongoClient("mongodb://192.168.70.133:27017, 192.168.70.131:27017, 192.168.70.129:27017"); when getting client, the driver can automatically determine which node is the primary node. The results are as follows:

2 Sharing Fragmentation Brief Introduction
In addition to the replica set, there is another cluster in Monodb: fragmented cluster. The so-called fragmentation simply means that a complete data is divided and stored on different nodes. When MongoDB stores huge amounts of data, a machine is not enough to store data, or data is too large to meet our needs, we can consider using fragmented cluster.
Consider a chestnut: For example, we have 100 million user information, choose the user name column as shard key, store user information in two Shard Server s, mongoDB will automatically segment user data according to the shard key, if the first slice (shard1) after the slice stores user letters whose initials are a~m. The second slice (shard2) stores user information whose initials are n~z. When we want to query the user of name=jack, because the initials of Jack j are between a and m, the fragmented cluster will be directly searched in shard1, so the query efficiency will be greatly improved; if we want to insert a user of name=tom, because t is between N and z, the information of Tom will be inserted in shard2. The fragmentation key of this chestnut is name. When we want to query the user whose birthday is a certain day (the date of birth is not a fragmentation key), mongoDB will still query the data of all the fragmentation servers.
The basic structure of fragmented cluster is as follows:
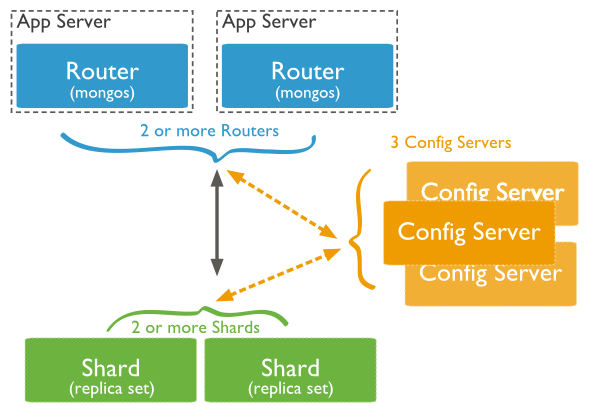
The fragmented cluster consists of three components (all mongod processes):
1 Shard Server
Store roles in which real business data is stored. Every shard server in a production environment should use replica sets to prevent data loss and achieve high availability.
2 Config Server
Configure roles to store metadata and configuration information of sharing clusters. The fragmentation cluster determines which shard we query or which shard we want to insert data into is determined by the configuration in Config Server. Config Server also needs to use replica set as well, otherwise Config Server will be down and configuration information will not be available.
3 mongos
Routing roles, which is the entry point for applications to access fragmented clusters, we access fragmented clusters by connecting mongos, which makes the whole cluster look like a separate database. Mongos also recommends configuring a replica set, otherwise the routing roles will fail and the application will not be able to access the cluster.
Each role in a fragmented cluster is usually configured as a replica set, so more mongod processes are needed. For example, nine mongod processes are needed for all three roles in a sharing cluster to use a master-slave replica set. Here, we will not show how to build a fragmented cluster. Interested partners can follow the example Official Documents Build, or refer to Garden Friends'Efforts to Brother's Articles.
For small and medium-sized applications, the use of replica sets can meet business needs, there is no need to use fragmented cluster. When the amount of data is very large, we can consider using fragmentation technology. When using fragmented cluster in development, we only need to connect mongos as a simple mongoDB instance, and how to store and query fragmentation will be automatically completed by the cluster. This section is also the last article on mongoDB. Further application will be further studied when business needs arise. If there are any mistakes in this article, I hope you can point out that I will revise it in time. Thank you.