iOS Animation Series, a total of 10. Now I'm going to write the ninth article. Interest can be entered into several other articles through the transmission gate below.
Chapter 4: CABasic Animation. iOS Animation Series IV: Translations of Basic Animation
Chapter 5: CABasic Animation. iOS Animation Series V: Scale-up and Rotation of Basic Animation
Chapter 7: iOS Animation Series Seven: Implementing Twitter-like Startup Animation
Chapter 8: iOS Animation Series VIII: Using CAShape Layer to Draw Dynamic Flow Charts
Chapter 9: iOS Animation Series 9: Realizing Spotted Animation and Playing Fluctuation Indicators
Chapter 10: Practical combat series. It will be a super-large integration, using all the things in front of it.
Look at the last update more than a month has passed, basically the simplified books have been changed, the heart of the self-blame ah. I haven't touched a computer in this month, and I suddenly knocked on the code. That's why it makes sense for a Yardman to be a skilled worker.
Today, we can see it mainly by realizing a display bar of music playing status and a little praised animation effect.
Careplicator Layer, CAEmitter Layer and CAGradient Layer are three dedicated layers.
It's still the old practice. Let's see what the effect will be.


1. CAReplicatorLayer
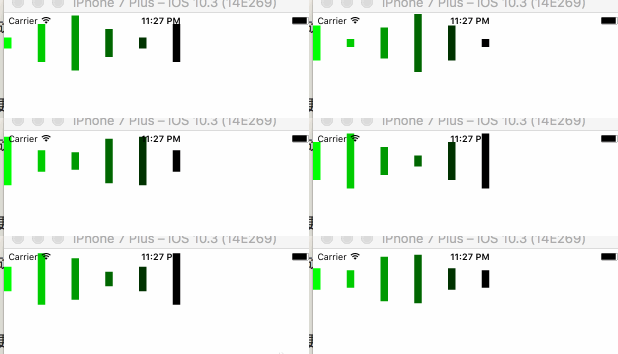
The purpose of CAReplicator Layer is to efficiently generate many similar layers. It draws sublayers of one or more layers and applies different transformations on each replica. What do you mean? See how many lines in the middle of the example fluctuate up and down? In fact, I did not write so many articles, only one. Add this to the CAReplicator Layer replication layer and automatically generate the remaining bars according to the parameters set.

Step 1.1: Write a layer first, and copy the rest.
let layer = CALayer.init()
layer.frame = CGRect.init(x: 0, y: 0, width: 10, height: 80)
layer.backgroundColor = UIColor.white.cgColor
layer.anchorPoint = CGPoint.init(x: 0.5, y: 0.5)

layer.add(self.scaleYAnimation(), forKey: "scaleAnimation")

    fileprivate func scaleYAnimation() -> CABasicAnimation{
        let anim = CABasicAnimation.init(keyPath: "transform.scale.y")
        anim.toValue = 0.1
        anim.duration = 0.4
        anim.autoreverses = true
        anim.repeatCount = MAXFLOAT
        return anim

    }
Is that all right? It's the most basic way to build a CALayer, set the frame, set the anchor, set the background color, and add the animation of moving up and down.
Wait a minute. Why is the background white here? Isn't white invisible? Don't worry, the answer will be revealed in the second step.
Step 2: Use CAReplicator Layer for replication
//        Set the number of sub-layers in the replication layer
        replicatorLayer.instanceCount = 6

//        Set the offset of the sublayer relative to the previous layer
        replicatorLayer.instanceTransform = CATransform3DMakeTranslation(45, 0, 0)

//        Set the delay time of the sublayer relative to the previous layer
        replicatorLayer.instanceDelay = 0.2

//        Set the color of the layer. (The premise is to set the background color of the layer. If no background color is set, the default is transparent. Setting this property again will not work.
        replicatorLayer.instanceColor = UIColor.green.cgColor

//        The gradient of color, relative to the gradient of the previous layer (value - 1 ~+1). RGB has three colors, so here are three green, red and blue.
        replicatorLayer.instanceGreenOffset = -0.2
        replicatorLayer.instanceRedOffset = -0.2
        replicatorLayer.instanceBlueOffset = -0.2

//        Sublayers need to be added to the replication layer, which replicates automatically according to the parameters set above.
        replicatorLayer.addSublayer(layer)

//        Add the replication layer to the view layer for display

        view.layer.addSublayer(replicatorLayer)
See Muyou? Why is the background color of the front baseline white? The final effect is replicatorLayer.instanceColor = UIColor.green.cgColor.
That's it. It's it. It's it.
1.3 Introduction to the Careplicator Layer attribute
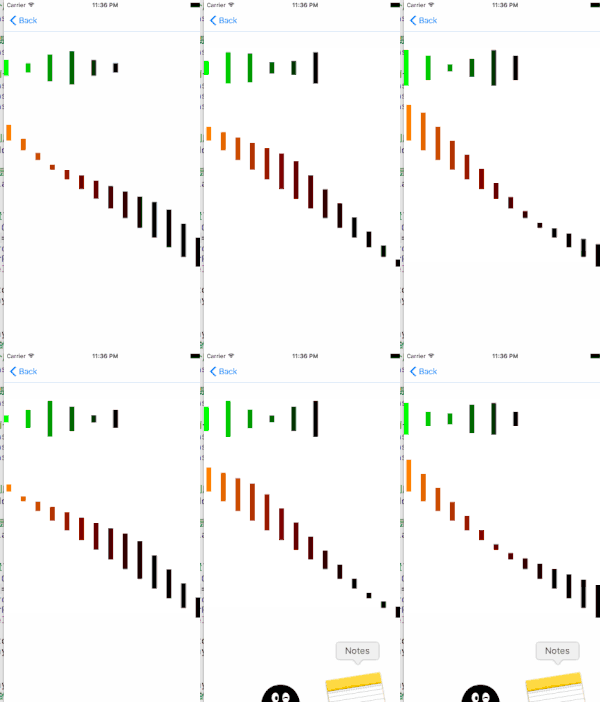
In order to see the meaning between the attributes, a second replication layer has come. The second replication layer modifies the anchor of replication, the number of replicates, and the offset of replication.
Let's look at the difference between the two replication layers.

Let's see what attributes the government has for this layer:
    open var instanceCount: Int
    open var preservesDepth: Bool
    open var instanceDelay: CFTimeInterval
    open var instanceTransform: CATransform3D
    open var instanceColor: CGColor?
    open var instanceRedOffset: Float
    open var instanceGreenOffset: Float
    open var instanceBlueOffset: Float
    open var instanceAlphaOffset: Float
There are nine attributes, right? Let's see what it means.
-
instanceCount: The number of times a layer is copied, including all its sublayers. The default value is 1, that is, no sublayers are copied.
-
PreservatesDepth: If set to YES, the layer will remain CATransformLayer with similar properties and constraints
- Instance Delay: Sets the delay time of the sublayer relative to the previous layer
- Instance Transform: Sets the offset of the sublayer relative to the previous layer
- instanceColor: Set the color of the layer. (The premise is to set the background color of the layer. If the background color is not set, the default is transparent. Setting this property again will not work.
- Instance Red Offset, instance Green Offset, instance Blue Offset: The gradient of color, relative to the gradient of the previous layer (value - 1 ~+1). RGB has three colors, so here are three green, red and blue.
- Instance AlphaOffset: Gradient relative to the previous layer transparency graph.
2. CAEmitterLayer
CAEmitter Layer is a high-performance particle engine used to create real-time example animations such as smoke, fire, rain and so on. CAEmitter Layer looks like a container for many CAEmitterCell s, which define an example effect.
Popularly speaking, for example, rain is composed of many small raindrops. Every little raindrop is
CAEmitter Cell, CAEmitter Layer, is used to control these small raindrops. We don't need to care too much about cell creation and destruction. As long as we set parameters, the system will help us to complete these tasks.
So let's use a little praise animation to see how it works. The results are as follows:

Step 1: Create a thumb button
Create a button to set the picture of the selected state and the normal state. Write trigger events. There's nothing to explain about this. Just click and change the status.
//Click on the button event
 @IBAction func priaseBtnClick(_ sender: UIButton) {
     sender.isSelected = !sender.isSelected
 }
Step 2.2: Customize button
In order to make the button animated, you need to customize the button. So we need to rewrite the initialization method of button and the method of button state change.
The format of rewriting method in swift is different from OC, so we need to pay attention to it.
//Method of rewriting state changes
    override var isSelected: Bool{
        didSet{
//            Execute animation
           explosionAni()
        }
    }

//Rewrite button initialization method
    override init(frame: CGRect) {
      explosionLayer = CAEmitterLayer.init()
        super.init(frame: frame)
        setupExplosion()
    }


    required init?(coder aDecoder: NSCoder) {
        explosionLayer = CAEmitterLayer.init()
        super.init(coder: aDecoder)
        setupExplosion()
//        fatalError("init(coder:) has not been implemented")

    }
2.3 Create a single element of the dots around the dots and implement it through CAEmitterCell
Basically all the attributes CAEmitterCell should use are used, and the rest we will continue to add below.
    let explosionCell = CAEmitterCell.init()
        explosionCell.name = "explosion"
//        Set the range of particle color alpha to change
        explosionCell.alphaRange = 0.10
//        Variation of particle alpha
        explosionCell.alphaSpeed = -1.0
//        Life Cycle of Particles
        explosionCell.lifetime = 0.7
//        Scope of Particle Life Cycle
        explosionCell.lifetimeRange = 0.3

//        Initial velocity of particle emission
        explosionCell.birthRate = 2500
//        Velocity of particles
        explosionCell.velocity = 40.00
//        Particle velocity range
        explosionCell.velocityRange = 10.00

//        Scaling Ratio of Particles
        explosionCell.scale = 0.03
//        Scaling scale range
        explosionCell.scaleRange = 0.02

//        Pictures to be displayed by particles

        explosionCell.contents = UIImage(named: "sparkle")?.cgImage
2.4 Set CAEmitter Layer to control cell
        explosionLayer.name = "explosionLayer"

//        Shape of Emission Source
        explosionLayer.emitterShape = kCAEmitterLayerCircle
//        Launch mode
        explosionLayer.emitterMode = kCAEmitterLayerOutline
//        Emitter size
        explosionLayer.emitterSize = CGSize.init(width: 10, height: 0)
//        Particles contained in the emitter
        explosionLayer.emitterCells = [explosionCell]
//        Render Mode
        explosionLayer.renderMode = kCAEmitterLayerOldestFirst
        explosionLayer.masksToBounds = false
        explosionLayer.birthRate = 0
//        Launch position
        explosionLayer.position = CGPoint.init(x: frame.size.width/2, y: frame.size.height/2)
        explosionLayer.zPosition = -1

        layer.addSublayer(explosionLayer)
2.5 Setting Animation Parameters
The animation here is basically just CAKeyframe Animation. It's very simple. If it's not clear, look at the one ahead. Chapter 7: CAKeyFrame Animation and CAA Nimation Group..
2.6 Attributes of CAEmitter Layer
Basically, the properties that should be used are all used in this particle. The only thing that needs to be looked up in the manual is the following enumerations.
/** `emitterShape' values. **/ //Launcher Shape
@available(iOS 5.0, *)
public let kCAEmitterLayerPoint: String //spot

@available(iOS 5.0, *)
public let kCAEmitterLayerLine: String //Line

@available(iOS 5.0, *)
public let kCAEmitterLayerRectangle: String //rectangle

@available(iOS 5.0, *)
public let kCAEmitterLayerCuboid: String //Rectangle

@available(iOS 5.0, *)
public let kCAEmitterLayerCircle: String //circular

@available(iOS 5.0, *)
public let kCAEmitterLayerSphere: String //spherical

/** `emitterMode' values. **/ //Launch mode
@available(iOS 5.0, *)
public let kCAEmitterLayerPoints: String //Punctate

@available(iOS 5.0, *)
public let kCAEmitterLayerOutline: String //outline

@available(iOS 5.0, *)
public let kCAEmitterLayerSurface: String //surface

@available(iOS 5.0, *)
public let kCAEmitterLayerVolume: String //Of large number

/** `renderMode' values. **///Render Mode
@available(iOS 5.0, *)
public let kCAEmitterLayerUnordered: String //Disorder

@available(iOS 5.0, *)
public let kCAEmitterLayerOldestFirst: String //The oldest comes out first

@available(iOS 5.0, *)
public let kCAEmitterLayerOldestLast: String //The oldest comes out last

@available(iOS 5.0, *)
public let kCAEmitterLayerBackToFront: String //Back and forth reversal

@available(iOS 5.0, *)

public let kCAEmitterLayerAdditive: String //additional
Don't remember these, don't recite them. Check it when you use it.
3. CAGradientLayer
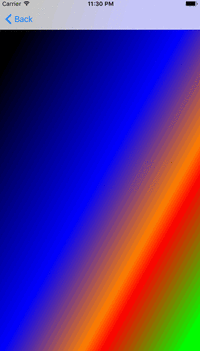
CAGradient Layer is used to generate two or more color smooth gradients. It is also possible to copy a CAGradient Layer with Core Graphics and draw the content into a boarding map of a common layer, but the real advantage of CAGradient Layer is that it uses hardware acceleration for drawing.
The results are as follows:

    func createGradientLayer(){
        gradientlayer = CAGradientLayer.init()
        gradientlayer.frame = view.bounds

//        Set the color group. There are five colors: black, blue, orange, red and green.
        gradientlayer.colors = [UIColor.black.cgColor,UIColor.blue.cgColor,UIColor.orange.cgColor,UIColor.red.cgColor,UIColor.green.cgColor]
//        Gradient the color according to the direction from the starting point to the end point, ranging from 0 to 1
        gradientlayer.startPoint = CGPoint(x: 0.0, y: 0.0)
        gradientlayer.endPoint = CGPoint(x: 1.0, y: 1.0)

//        Set the color segmentation line, the range is 0-1
        gradientlayer.locations = [0.1,0.5,0.7,0.75,0.95]
        view.layer.addSublayer(gradientlayer)

    }
The swift version of the source code can be downloaded here. https://git.oschina.net/atypical/multAnimation.git
If the voice of OC version is high, I will add it.
--------------------------------------------------------------------------------------------------------------------------------------------------------------------
Chapter 4: CABasic Animation. iOS Animation Series IV: Translations of Basic Animation
Chapter 5: CABasic Animation. iOS Animation Series V: Scale-up and Rotation of Basic Animation
Chapter 7: iOS Animation Series Seven: Implementing Twitter-like Startup Animation
Chapter 8: iOS Animation Series VIII: Using CAShape Layer to Draw Dynamic Flow Charts
Chapter 9: iOS Animation Series 9: Realizing Spotted Animation and Playing Fluctuation Indicators
Chapter 10: Practical combat series. It will be a super-large integration, using all the things in front of it.