1, Introduction to RocketMQ architecture
1.1 logical deployment diagram

(pictures from the Internet)
1.2 description of core components
As can be seen from the above figure, RocketMQ's core components mainly include four, namely NameServer, Broker, Producer and Consumer. Let's briefly explain these four core components in turn:
NameServer: NameServer acts as a provider of routing information. Producers or consumers can find the corresponding Broker IP list of each Topic through NameServer. Multiple Namesrver instances form a cluster, but they are independent of each other and have no information exchange.
Broker: message relay role, responsible for storing and forwarding messages. The broker is responsible for sending and receiving messages from the broker server at the same time. The broker server also stores metadata related to messages, including consumer groups, consumption progress offsets, and subject and queue messages.
Friends who need the framework source code can see my personal profile and contact me. Recommended distributed architecture source code
Producer: responsible for producing messages. Generally, the business system is responsible for producing messages. A message producer will send the messages generated in the business application system to the Broker server. RocketMQ provides a variety of sending methods, including synchronous sending, asynchronous sending, sequential sending and one-way sending. Both synchronous and asynchronous methods require the Broker to return confirmation information, and one-way transmission is not required.
Consumer: it is responsible for consuming messages. Generally, the background system is responsible for asynchronous consumption. A message consumer pulls messages from the Broker server and provides them to the application. From the perspective of user application, it provides two consumption forms: pull consumption and push consumption.
In addition to the three core components mentioned above, there is also the concept of Topic, which will be mentioned many times below:
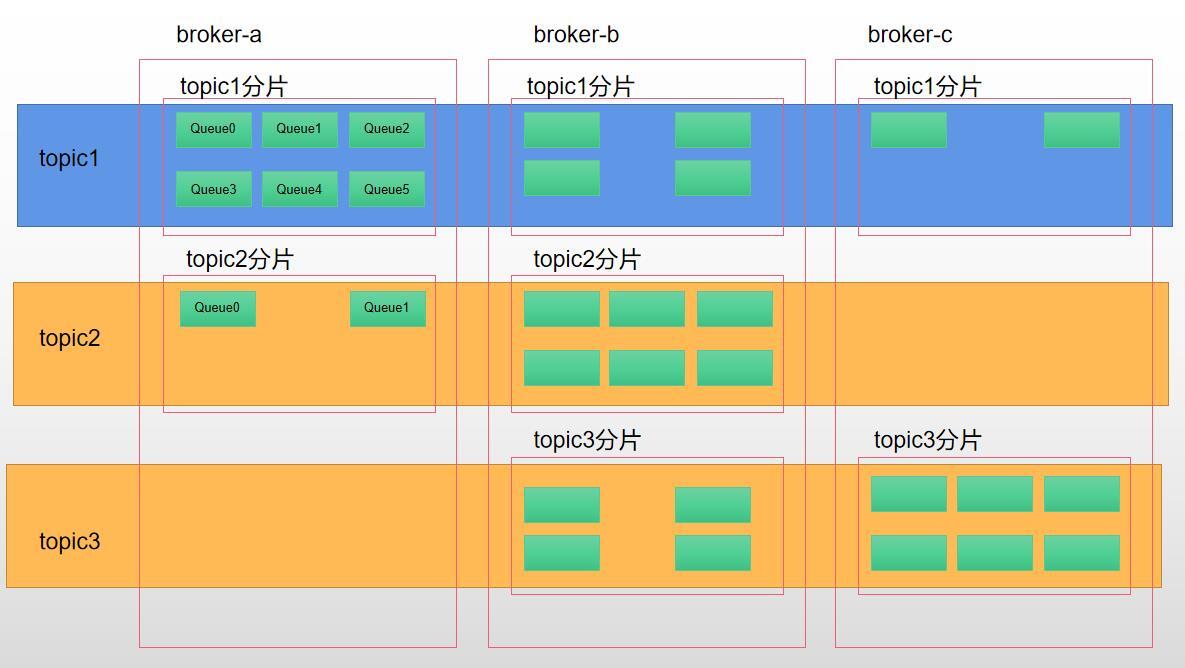
Topic: represents a collection of messages. Each topic contains several messages. Each message can only belong to one topic. It is the basic unit of RocketMQ for message subscription. A topic can be partitioned on multiple Broker clusters. Each topic partition contains multiple queue s. Refer to the following figure for the specific structure:
1.3 design concept
RocketMQ is a topic based publish and subscribe mode. Its core functions include message sending, message storage and message consumption. The overall design pursues simplicity and performance first. To sum up, it mainly includes the following three types:
-
NameServer replaces ZK as the registration center. NameServer clusters do not communicate with each other and tolerate minute inconsistency in routing information in the cluster, which is more lightweight;
-
Use memory mapping mechanism to realize efficient IO storage and achieve high throughput;
-
Tolerate design defects and ensure that the message is consumed at least once through ack. However, if the ACK is lost, the message may be consumed repeatedly. This situation is allowed in design and is guaranteed by the user.
This article focuses on NameServer. Let's take a look at how NameServer is started and how to manage routes.
2, NameServer architecture design
In the first chapter, we have briefly introduced that NameServer replaces zk as a more lightweight registry as a provider of routing information. So how to realize routing information management? Let's look at the following figure first:
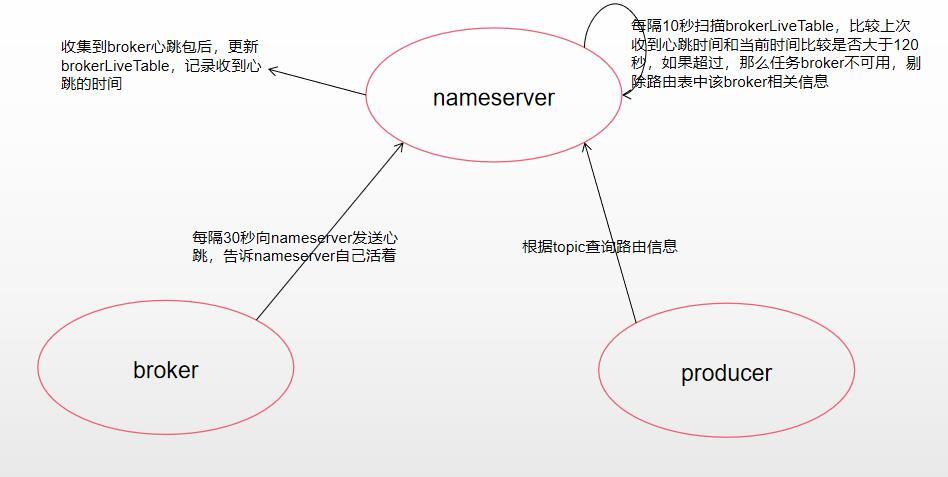
The above figure describes the core principles of NameServer for route registration, route elimination and route discovery.
Route registration: when the broker server starts, it will send a heartbeat signal to all nameservers in the nameserver cluster for registration, and will send a heartbeat to the nameserver every 30 seconds to tell the nameserver that it is alive. After receiving the heartbeat packet sent by the broker, nameserver will record the broker information and save the last time it received the heartbeat packet.
Route rejection: NameServer maintains a long connection with each Broker, receives heartbeat packets sent by the Broker every 30 seconds, and scans the Broker livetable every 10 seconds to compare whether the heartbeat time received last time and the current time are greater than 120 seconds. If more than 120 seconds, it is considered that the Broker is unavailable and the relevant information of the Broker in the routing table is rejected.
Route discovery: route discovery is not real-time. After route changes, NameServer does not actively push to the client and waits for the producer to regularly pull the latest route information. This design method reduces the complexity of NameServer implementation. When the route changes, the fault-tolerant mechanism at the message sending end is used to ensure the high availability of message sending (this content will be introduced in the subsequent introduction of producer message sending, which will not be explained in this paper).
High availability: NameServer ensures its high availability by deploying multiple NameServer servers. At the same time, there is no communication between multiple NameServer servers. In this way, when the routing information changes, the data between NameServer servers may not be exactly the same, but the high availability of message sending is guaranteed through the fault-tolerant mechanism of the sender. This is precisely why NameServer pursues simplicity and efficiency.
3, Start process
After sorting out and understanding the architecture design of NameServer, let's first look at how NameServer is started?
Since it's source code interpretation, let's take a look at the code entry: org apache. rocketmq. namesrv. Namesrvstartup#main (string [] args), which actually calls the main0() method,
The code is as follows:
public static NamesrvController main0(String[] args) {
try {
//Create namesrvController
NamesrvController controller = createNamesrvController(args);
//Initialize and start NamesrvController
start(controller);
String tip = "The Name Server boot success. serializeType=" + RemotingCommand.getSerializeTypeConfigInThisServer();
log.info(tip);
System.out.printf("%s%n", tip);
return controller;
} catch (Throwable e) {
e.printStackTrace();
System.exit(-1);
}
return null;
}
Starting NameServer through the main method is mainly divided into two steps: first create NamesrvController, and then initialize and start NamesrvController. We analyze them separately.
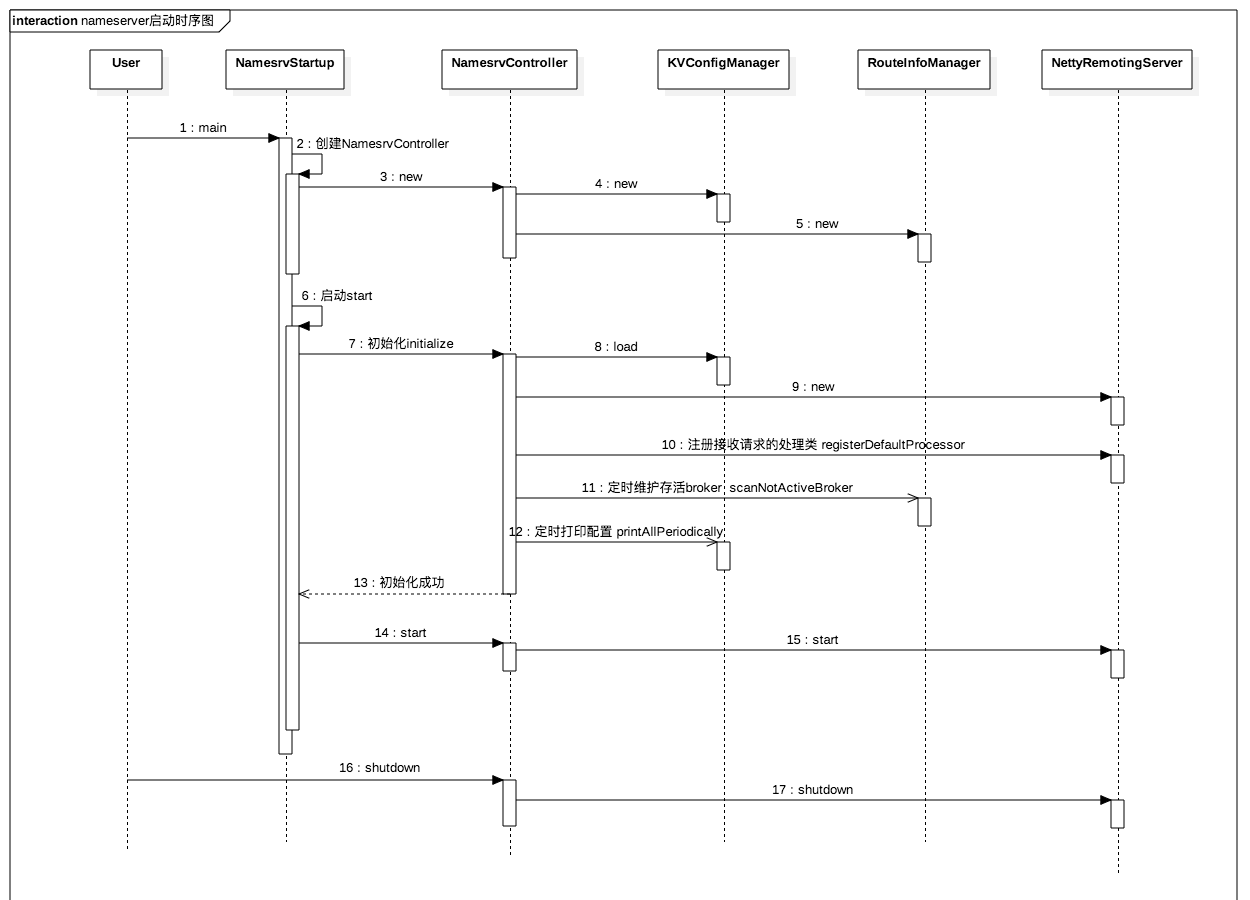
3.1 sequence diagram
Before reading the code, let's have an understanding of the overall process through a sequence diagram, as shown in the following figure:
3.2 creating NamesrvController
Let's look at the core code first, as follows:
public static NamesrvController createNamesrvController(String[] args) throws IOException, JoranException {
// Set the version number to the current version number
System.setProperty(RemotingCommand.REMOTING_VERSION_KEY, Integer.toString(MQVersion.CURRENT_VERSION));
//PackageConflictDetect.detectFastjson();
//Construct org apache. commons. cli. Options, and add the - h -n parameter, - h parameter is the print help information, and - n parameter is the specified namesrvAddr
Options options = ServerUtil.buildCommandlineOptions(new Options());
//Initialize commandLine, and add the - c -p parameter in options, - c specifies the configuration file path of nameserver, and - p identifies the print configuration information
commandLine = ServerUtil.parseCmdLine("mqnamesrv", args, buildCommandlineOptions(options), new PosixParser());
if (null == commandLine) {
System.exit(-1);
return null;
}
//nameserver configuration class, business parameters
final NamesrvConfig namesrvConfig = new NamesrvConfig();
//netty server configuration class, network parameters
final NettyServerConfig nettyServerConfig = new NettyServerConfig();
//Set the port number of the nameserver
nettyServerConfig.setListenPort(9876);
//The command has the - c parameter to specify the configuration file. You need to read the content of the configuration file according to the configuration file path and assign the configuration information in the file to NamesrvConfig and NettyServerConfig
if (commandLine.hasOption('c')) {
String file = commandLine.getOptionValue('c');
if (file != null) {
InputStream in = new BufferedInputStream(new FileInputStream(file));
properties = new Properties();
properties.load(in);
//Reflection mode
MixAll.properties2Object(properties, namesrvConfig);
MixAll.properties2Object(properties, nettyServerConfig);
//Set profile path
namesrvConfig.setConfigStorePath(file);
System.out.printf("load config properties file OK, %s%n", file);
in.close();
}
}
//The command line is marked with - p, which indicates that it is a command to print parameters. Then the properties of NamesrvConfig and NettyServerConfig will be printed. When starting NameServer, you can use it first/ mqnameserver -c configFile -p prints the currently loaded configuration properties
if (commandLine.hasOption('p')) {
InternalLogger console = InternalLoggerFactory.getLogger(LoggerName.NAMESRV_CONSOLE_NAME);
MixAll.printObjectProperties(console, namesrvConfig);
MixAll.printObjectProperties(console, nettyServerConfig);
//The print parameter command does not need to start the nameserver service, but only needs to print parameters
System.exit(0);
}
//Parse the command line parameters and load them into namesrvConfig
MixAll.properties2Object(ServerUtil.commandLine2Properties(commandLine), namesrvConfig);
//Check ROCKETMQ_HOME, cannot be empty
if (null == namesrvConfig.getRocketmqHome()) {
System.out.printf("Please set the %s variable in your environment to match the location of the RocketMQ installation%n", MixAll.ROCKETMQ_HOME_ENV);
System.exit(-2);
}
//Initialize the logback log factory. rocketmq uses logback as log output by default
LoggerContext lc = (LoggerContext) LoggerFactory.getILoggerFactory();
JoranConfigurator configurator = new JoranConfigurator();
configurator.setContext(lc);
lc.reset();
configurator.doConfigure(namesrvConfig.getRocketmqHome() + "/conf/logback_namesrv.xml");
log = InternalLoggerFactory.getLogger(LoggerName.NAMESRV_LOGGER_NAME);
MixAll.printObjectProperties(log, namesrvConfig);
MixAll.printObjectProperties(log, nettyServerConfig);
//Create NamesrvController
final NamesrvController controller = new NamesrvController(namesrvConfig, nettyServerConfig);
//Copy the contents of global Properties to namesrvcontroller Configuration. In allconfigs
// remember all configs to prevent discard
controller.getConfiguration().registerConfig(properties);
return controller;
}
From the above comments on each line of code, we can see that the process of creating NamesrvController is mainly divided into two steps:
Step 1: get the configuration from the command line. Assigned to NamesrvConfig and NettyServerConfig classes.
Step 2: construct a NamesrvController instance according to the configuration classes NamesrvConfig and NettyServerConfig.
It can be seen that NamesrvConfig and NettyServerConfig want to be important. These two classes are the business parameters and network parameters of NameServer. Let's see the attributes in these two classes:
NamesrvConfig
NettyServerConfig
Note: Apache Commons CLI is an open source command line parsing tool. It can help developers quickly build startup commands and help you organize command parameters and output lists.
3.3 initialization and startup
After creating the NamesrvController instance, initialize and start the NameServer.
First, initialize. The code entry is NamesrvController#initialize.
public boolean initialize() {
//Load kvconfig. Under kvConfigPath The KV configuration in the JSON configuration file, and then put these configurations into the KVConfigManager#configTable attribute
this.kvConfigManager.load();
//Initialize a netty server according to nettyServerConfig.
//brokerHousekeepingService is instantiated in the constructor when NamesrvController is instantiated. This class is responsible for handling Broker connection events and implements ChannelEventListener, which is mainly used to manage the brokerLiveTable of RouteInfoManager
this.remotingServer = new NettyRemotingServer(this.nettyServerConfig, this.brokerHousekeepingService);
//Initialize the thread pool responsible for processing Netty network interaction data. The default number of threads is 8
this.remotingExecutor =
Executors.newFixedThreadPool(nettyServerConfig.getServerWorkerThreads(), new ThreadFactoryImpl("RemotingExecutorThread_"));
//If the requesterprocessor class is registered to handle the request, then the netrequesterprocessor class is registered to handle the request
this.registerProcessor();
//Register the heartbeat mechanism thread pool, delay the startup for 5 seconds, and traverse the RouteInfoManager#brokerLiveTable attribute every 10 seconds to scan for non viable brokers
this.scheduledExecutorService.scheduleAtFixedRate(new Runnable() {
@Override
public void run() {
NamesrvController.this.routeInfoManager.scanNotActiveBroker();
}
}, 5, 10, TimeUnit.SECONDS);
//Register and print KV configuration thread pool, delay 1 minute to start, and print kvConfig configuration every 10 minutes
this.scheduledExecutorService.scheduleAtFixedRate(new Runnable() {
@Override
public void run() {
NamesrvController.this.kvConfigManager.printAllPeriodically();
}
}, 1, 10, TimeUnit.MINUTES);
//rocketmq can improve the security of data transmission by turning on TLS. If it is turned on, you need to register a listener to reload SslContext
if (TlsSystemConfig.tlsMode != TlsMode.DISABLED) {
// Register a listener to reload SslContext
try {
fileWatchService = new FileWatchService(
new String[] {
TlsSystemConfig.tlsServerCertPath,
TlsSystemConfig.tlsServerKeyPath,
TlsSystemConfig.tlsServerTrustCertPath
},
new FileWatchService.Listener() {
boolean certChanged, keyChanged = false;
@Override
public void onChanged(String path) {
if (path.equals(TlsSystemConfig.tlsServerTrustCertPath)) {
log.info("The trust certificate changed, reload the ssl context");
reloadServerSslContext();
}
if (path.equals(TlsSystemConfig.tlsServerCertPath)) {
certChanged = true;
}
if (path.equals(TlsSystemConfig.tlsServerKeyPath)) {
keyChanged = true;
}
if (certChanged && keyChanged) {
log.info("The certificate and private key changed, reload the ssl context");
certChanged = keyChanged = false;
reloadServerSslContext();
}
}
private void reloadServerSslContext() {
((NettyRemotingServer) remotingServer).loadSslContext();
}
});
} catch (Exception e) {
log.warn("FileWatchService created error, can't load the certificate dynamically");
}
}
return true;
}
The above code is the NameServer initialization process. It can be seen from the comments of each line of code that there are mainly five steps:
-
Step 1: load the KV configuration and write it into the configTable attribute of KVConfigManager;
-
Step 2: initialize the netty server;
-
Step 3: initialize the thread pool for processing netty network interaction data;
-
Step4: register the heartbeat mechanism thread pool, and check the Broker's survival every 10 seconds after starting for 5 seconds;
-
Step5: register and print the thread pool of KV configuration. After starting for 1 minute, print the KV configuration every 10 minutes.
RocketMQ's development team also used a common programming technique, which is to use JVM hook function to gracefully shut down NameServer. In this way, the shutdown operation will be performed before the JVM process is shut down.
Runtime.getRuntime().addShutdownHook(new ShutdownHookThread(log, new Callable<Void>() {
    @Override
    public Void call() throws Exception {
        controller.shutdown();
        return null;
    }
}));
Execute the start function to start the NameServer. The code is relatively simple, that is, start the netty server created in the first step. Remotingserver The start () method is not described in detail. You need to be familiar with netty, which is not the focus of this article. Interested students can download the source code by themselves.
public void start() throws Exception {
    //Start netty service
    this.remotingServer.start();
  //If TLS is turned on
    if (this.fileWatchService != null) {
        this.fileWatchService.start();
    }
}
4, Routing management
At the beginning of Chapter 2, we learned that NameServer, as a lightweight registry, mainly provides Topic routing information for message producers and consumers, and manages these routing information and Broker nodes, mainly including route registration, route elimination and route discovery.
This chapter will analyze how NameServer manages routing information from the perspective of source code. The core code is mainly at org apache. rocketmq. namesrv. routeinfo. Routeinfomanager.
4.1 routing meta information
Before understanding routing information management, we first need to know which routing meta information is stored in NameServer and what the data structure is.
Looking at the code, we can see that the routing meta information is maintained mainly through five attributes, as follows:
private final HashMap<String/* topic */, List<QueueData>> topicQueueTable;
private final HashMap<String/* brokerName */, BrokerData> brokerAddrTable;
private final HashMap<String/* clusterName */, Set<String/* brokerName */>> clusterAddrTable;
private final HashMap<String/* brokerAddr */, BrokerLiveInfo> brokerLiveTable;
private final HashMap<String/* brokerAddr */, List<String>/* Filter Server */> filterServerTable;
We will explain these five attributes in turn.
4.1.1 TopicQueueTable
Note: Topic message queue routing information. Load balancing is performed according to the routing table when sending messages.
Data structure: HashMap structure. key is the name of Topic, and value is a queue collection of type QueueData. As mentioned in the first chapter, there are multiple queues in a Topic. The data structure of QueueData is as follows:
Data structure example:
topicQueueTable:{
    "topic1": [
        {
            "brokerName": "broker-a",
            "readQueueNums":4,
            "writeQueueNums":4,
            "perm":6,
            "topicSynFlag":0,
        },
        {
            "brokerName": "broker-b",
            "readQueueNums":4,
            "writeQueueNums":4,
            "perm":6,
            "topicSynFlag":0,
        }
    ]
}
4.1.2 BrokerAddrTable
Description: the basic information of the Broker, including the Broker name, the name of the cluster to which it belongs, and the address of the active and standby brokers.
Data structure: HashMap structure. key is BrokerName and value is an object of BrokerData type. The data structure of BrokerData is as follows (it can be understood in combination with the following logic diagram of Broker master-slave structure):

Broker master-slave structure logic diagram:
Data structure example:
brokerAddrTable:{
    "broker-a": {
        "cluster": "c1",
        "brokerName": "broker-a",
        "brokerAddrs": {
            0: "192.168.1.1:10000",
            1: "192.168.1.2:10000"
        }
    },
    "broker-b": {
        "cluster": "c1",
        "brokerName": "broker-b",
        "brokerAddrs": {
            0: "192.168.1.3:10000",
            1: "192.168.1.4:10000"
        }
    }
}
4.1.3 ClusterAddrTable
Note: the Broker cluster information stores the names of all brokers in the cluster.
Data structure: HashMap structure. key is ClusterName and value is the Set structure that stores BrokerName.
Data structure example:
clusterAddrTable:{
    "c1": ["broker-a","broker-b"]
}
4.1.4 BrokerLiveTable
Description: Broker status information. NameServer replaces this information every time it receives a heartbeat packet
Data structure: HashMap structure. key is the address of the Broker and value is the Broker information object of the BrokerLiveInfo structure. The data structure of BrokerLiveInfo is as follows:
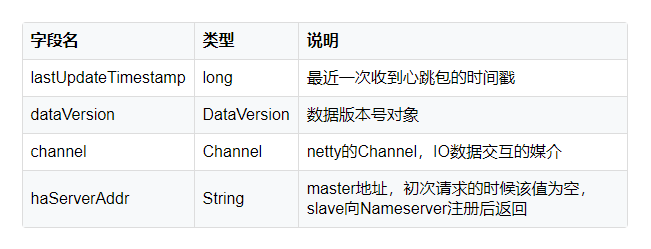
Data structure example:
brokerLiveTable:{
    "192.168.1.1:10000": {
            "lastUpdateTimestamp": 1518270318980,
            "dataVersion":versionObj1,
            "channel":channelObj,
            "haServerAddr":""
    },
    "192.168.1.2:10000": {
            "lastUpdateTimestamp": 1518270318980,
            "dataVersion":versionObj1,
            "channel":channelObj,
            "haServerAddr":"192.168.1.1:10000"
     },
    "192.168.1.3:10000": {
            "lastUpdateTimestamp": 1518270318980,
            "dataVersion":versionObj1,
            "channel":channelObj,
            "haServerAddr":""
     },
    "192.168.1.4:10000": {
            "lastUpdateTimestamp": 1518270318980,
            "dataVersion":versionObj1,
            "channel":channelObj,
            "haServerAddr":"192.168.1.3:10000"
     }
}
4.1.5 filterServerTable
Note: the list of filterservers and message filtering servers on the Broker will be introduced later when the consumer is introduced. The data pulled by the consumer is pulled through the filterserver, and the consumer registers with the Broker.
Data structure: HashMap structure, where key is the Broker address and value is the List set recording the address of filterServer.
4.2 route registration
Route registration is realized through the heartbeat function between Broker and NameServer. It is mainly divided into two steps:
Step1:
When the Broker starts, it sends heartbeat statements to all nameservers in the cluster and sends them again every 30 seconds (the default is 30s, and the time interval is between 10 seconds and 60 seconds).
Step2:
NameServer received heartbeat package updates topicqueueuetable, brokeraddrtable, brokerlivetable, clusterAddrTable and filterServerTable.
We analyze these two steps separately.
4.2.1 Broker sends heartbeat packets
The core logic of sending heartbeat packets is in the Broker startup logic, and the code entry is org apache. rocketmq. Broker. The core of this article is the heartbeat sending logic of the Broker controller, which is only listed in the following article:
1) A thread pool registration Broker is created. The program is executed 10 seconds after startup and every 30 seconds (the default is 30 seconds, the time interval is between 10 seconds and 60 seconds, and the default value of BrokerConfig.getRegisterNameServerPeriod() is 30 seconds).
this.scheduledExecutorService.scheduleAtFixedRate(new Runnable() {
@Override
public void run() {
try {
BrokerController.this.registerBrokerAll(true, false, brokerConfig.isForceRegister());
} catch (Throwable e) {
log.error("registerBrokerAll Exception", e);
}
}
}, 1000 * 10, Math.max(10000, Math.min(brokerConfig.getRegisterNameServerPeriod(), 60000)), TimeUnit.MILLISECONDS);
2) After encapsulating the Topic configuration and version number, carry out the actual route registration (Note: encapsulating the Topic configuration is not the focus of this article, which will be explained when introducing the Broker source code). The actual route registration is at org apache. rocketmq. Broker. out. Implemented in brokerouter API #registerbrokerall, the core code is as follows:
public List<RegisterBrokerResult> registerBrokerAll(
final String clusterName,
final String brokerAddr,
final String brokerName,
final long brokerId,
final String haServerAddr,
final TopicConfigSerializeWrapper topicConfigWrapper,
final List<String> filterServerList,
final boolean oneway,
final int timeoutMills,
final boolean compressed) {
final List<RegisterBrokerResult> registerBrokerResultList = new CopyOnWriteArrayList<>();
//Get nameserver address list
List<String> nameServerAddressList = this.remotingClient.getNameServerAddressList();
if (nameServerAddressList != null && nameServerAddressList.size() > 0) {
/**
*Encapsulation request header start
*Encapsulate the request header, which mainly encapsulates the relevant information of the broker
**/
final RegisterBrokerRequestHeader requestHeader = new RegisterBrokerRequestHeader();
requestHeader.setBrokerAddr(brokerAddr);
requestHeader.setBrokerId(brokerId);
requestHeader.setBrokerName(brokerName);
requestHeader.setClusterName(clusterName);
requestHeader.setHaServerAddr(haServerAddr);
requestHeader.setCompressed(compressed);
//Encapsulate the requestBody, including topic and filterServerList related information
RegisterBrokerBody requestBody = new RegisterBrokerBody();
requestBody.setTopicConfigSerializeWrapper(topicConfigWrapper);
requestBody.setFilterServerList(filterServerList);
final byte[] body = requestBody.encode(compressed);
final int bodyCrc32 = UtilAll.crc32(body);
requestHeader.setBodyCrc32(bodyCrc32);
/**
*Encapsulate request header end
**/
//Enable multithreading to register with each nameserver
final CountDownLatch countDownLatch = new CountDownLatch(nameServerAddressList.size());
for (final String namesrvAddr : nameServerAddressList) {
brokerOuterExecutor.execute(new Runnable() {
@Override
public void run() {
try {
//Actual registration method
RegisterBrokerResult result = registerBroker(namesrvAddr,oneway, timeoutMills,requestHeader,body);
if (result != null) {
//Encapsulate the information returned by nameserver
registerBrokerResultList.add(result);
}
log.info("register broker[{}]to name server {} OK", brokerId, namesrvAddr);
} catch (Exception e) {
log.warn("registerBroker Exception, {}", namesrvAddr, e);
} finally {
countDownLatch.countDown();
}
}
});
}
try {
countDownLatch.await(timeoutMills, TimeUnit.MILLISECONDS);
} catch (InterruptedException e) {
}
}
return registerBrokerResultList;
}
From the above code, it is also relatively simple. First, you need to encapsulate the request header and requestBody, and then turn on multithreading to register with each NameServer server.
The request header type is RegisterBrokerRequestHeader, which mainly includes the following fields:

The requestBody type is RegisterBrokerBody, which mainly includes the following fields:

1) The actual route registration is realized through the registerBroker method. The core code is as follows:
private RegisterBrokerResult registerBroker(
final String namesrvAddr,
final boolean oneway,
final int timeoutMills,
final RegisterBrokerRequestHeader requestHeader,
final byte[] body
) throws RemotingCommandException, MQBrokerException, RemotingConnectException, RemotingSendRequestException, RemotingTimeoutException,
InterruptedException {
//When creating a request instruction, you need to pay attention to the requestCode REGISTER_ Broker, the network processor at the nameserver side will conduct corresponding business processing according to the requestCode
RemotingCommand request = RemotingCommand.createRequestCommand(RequestCode.REGISTER_BROKER, requestHeader);
request.setBody(body);
//Network transmission based on netty
if (oneway) {
//If it is a one-way call, there is no return value and no nameserver return result
try {
this.remotingClient.invokeOneway(namesrvAddr, request, timeoutMills);
} catch (RemotingTooMuchRequestException e) {
// Ignore
}
return null;
}
//The asynchronous call initiates registration with the nameserver to obtain the return information of the nameserver
RemotingCommand response = this.remotingClient.invokeSync(namesrvAddr, request, timeoutMills);
assert response != null;
switch (response.getCode()) {
case ResponseCode.SUCCESS: {
//Get the returned reponseHeader
RegisterBrokerResponseHeader responseHeader =
(RegisterBrokerResponseHeader) response.decodeCommandCustomHeader(RegisterBrokerResponseHeader.class);
//Reseal the returned results and update masterAddr and haServerAddr
RegisterBrokerResult result = new RegisterBrokerResult();
result.setMasterAddr(responseHeader.getMasterAddr());
result.setHaServerAddr(responseHeader.getHaServerAddr());
if (response.getBody() != null) {
result.setKvTable(KVTable.decode(response.getBody(), KVTable.class));
}
return result;
}
default:
break;
}
throw new MQBrokerException(response.getCode(), response.getRemark(), requestHeader == null ? null : requestHeader.getBrokerAddr());
}
Network transmission is conducted between the Broker and NameServer through netty. When the Broker initiates registration with the NameServer, it will add the registration code requestCode to the request REGISTER_ Broker. This is a network tracking method. Each request of RocketMQ will define a requestCode, and the network processor of the server will process the affected business according to different requestcodes.
4.2.2 NameServer processing heartbeat packets
After the Broker sends out the heartbeat packet of route registration, NameServer will process it according to the requestCode in the heartbeat packet. The default network processor of NameServer is DefaultRequestProcessor. The specific code is as follows:
public RemotingCommand processRequest(ChannelHandlerContext ctx,
        RemotingCommand request) throws RemotingCommandException {
    if (ctx != null) {
        log.debug("receive request, {} {} {}",
                  request.getCode(),
                  RemotingHelper.parseChannelRemoteAddr(ctx.channel()),
                  request);
    }
    switch (request.getCode()) {
        ......
        //, if it is requestcode REGISTER_ Broker, register as a broker
        case RequestCode.REGISTER_BROKER:
            Version brokerVersion = MQVersion.value2Version(request.getVersion());
            if (brokerVersion.ordinal() >= MQVersion.Version.V3_0_11.ordinal()) {
                return this.registerBrokerWithFilterServer(ctx, request);
            } else {
                return this.registerBroker(ctx, request);
            }
        ......
        default:
            break;
    }
    return null;
}
Judge requestCode, if it is requestCode REGISTER_ Broker, then confirm that the business processing logic is a registered broker. Select different methods according to the broker version number, and we have V3_0_11 taking the above as an example, calling the registerBrokerWithFilterServer method to register is divided into three steps:
Step1:
Check whether the header is correct based on the Cr32;
Step2:
Analyze Topic information;
Step3:
Call RouteInfoManager#registerBroker to register the Broker;
The core registration logic is implemented by RouteInfoManager#registerBroker. The core code is as follows:
public RegisterBrokerResult registerBroker(
final String clusterName,
final String brokerAddr,
final String brokerName,
final long brokerId,
final String haServerAddr,
final TopicConfigSerializeWrapper topicConfigWrapper,
final List<String> filterServerList,
final Channel channel) {
RegisterBrokerResult result = new RegisterBrokerResult();
try {
try {
//Add write lock to prevent concurrent writing of routing table information in RoutInfoManager.
this.lock.writeLock().lockInterruptibly();
//Get all broker name collections from clusterAddrTable according to clusterName
Set<String> brokerNames = this.clusterAddrTable.get(clusterName);
//If it is not obtained, it means that the cluster to which the broker belongs has not been recorded. You need to create and add the broker name to the broker collection of the cluster
if (null == brokerNames) {
brokerNames = new HashSet<String>();
this.clusterAddrTable.put(clusterName, brokerNames);
}
brokerNames.add(brokerName);
boolean registerFirst = false;
//Try to get brokerData from brokerAddrTable according to brokerName
BrokerData brokerData = this.brokerAddrTable.get(brokerName);
if (null == brokerData) {
//If no brokerdata is obtained, create a new brokerdata and put it into brokerAddrTable, and set registerFirst to true;
registerFirst = true;
brokerData = new BrokerData(clusterName, brokerName, new HashMap<Long, String>());
this.brokerAddrTable.put(brokerName, brokerData);
}
//Update brokerAddrs in brokerData
Map<Long, String> brokerAddrsMap = brokerData.getBrokerAddrs();
//Considering that the master may hang up and the slave becomes the master, the brokerId will become 0. At this time, the old brokerAddr needs to be deleted
//Switch slave to master: first remove <1, IP:PORT> in namesrv, then add <0, IP:PORT>
//The same IP:PORT must only have one record in brokerAddrTable
Iterator<Entry<Long, String>> it = brokerAddrsMap.entrySet().iterator();
while (it.hasNext()) {
Entry<Long, String> item = it.next();
if (null != brokerAddr && brokerAddr.equals(item.getValue()) && brokerId != item.getKey()) {
it.remove();
}
}
//Update the broker addrs and judge whether it is the first registered broker according to the returned oldAddr
String oldAddr = brokerData.getBrokerAddrs().put(brokerId, brokerAddr);
registerFirst = registerFirst || (null == oldAddr);
//If the Broker is a Master, and the Broker's Topic configuration information changes or is registered for the first time, you need to create or update the Topic routing metadata and fill in the topicqueueuetable
if (null != topicConfigWrapper
&& MixAll.MASTER_ID == brokerId) {
if (this.isBrokerTopicConfigChanged(brokerAddr, topicConfigWrapper.getDataVersion())
|| registerFirst) {
ConcurrentMap<String, TopicConfig> tcTable =
topicConfigWrapper.getTopicConfigTable();
if (tcTable != null) {
for (Map.Entry<String, TopicConfig> entry : tcTable.entrySet()) {
//Create or update Topic routing metadata
this.createAndUpdateQueueData(brokerName, entry.getValue());
}
}
}
}
//Update brokelivelnfo, which is an important basis for route deletion
BrokerLiveInfo prevBrokerLiveInfo = this.brokerLiveTable.put(brokerAddr,
new BrokerLiveInfo(
System.currentTimeMillis(),
topicConfigWrapper.getDataVersion(),
channel,
haServerAddr));
if (null == prevBrokerLiveInfo) {
log.info("new broker registered, {} HAServer: {}", brokerAddr, haServerAddr);
}
//Register the address list of the Broker's filterServer
if (filterServerList != null) {
if (filterServerList.isEmpty()) {
this.filterServerTable.remove(brokerAddr);
} else {
this.filterServerTable.put(brokerAddr, filterServerList);
}
}
//If this Broker is a slave node, you need to find the node information of the Broker Master and update the corresponding masterAddr attribute
if (MixAll.MASTER_ID != brokerId) {
String masterAddr = brokerData.getBrokerAddrs().get(MixAll.MASTER_ID);
if (masterAddr != null) {
BrokerLiveInfo brokerLiveInfo = this.brokerLiveTable.get(masterAddr);
if (brokerLiveInfo != null) {
result.setHaServerAddr(brokerLiveInfo.getHaServerAddr());
result.setMasterAddr(masterAddr);
}
}
}
} finally {
this.lock.writeLock().unlock();
}
} catch (Exception e) {
log.error("registerBroker Exception", e);
}
return result;
}
Through the above source code analysis, we can decompose the registration of a Broker into seven steps:
-
Step 1: add write lock to prevent concurrent writing of routing table information in RoutInfoManager;
-
Step 2: judge whether the cluster to which the Broker belongs exists. If it does not exist, it needs to be created, and add the Broker name to the cluster Broker set;
-
Step 3: maintain BrokerData;
-
Step 4: if the Broker is a Master and the Broker's Topic configuration information changes or is registered for the first time, it is necessary to create or update the Topic routing metadata and fill in the topicqueueuetable;
-
Step 5: update BrokerLivelnfo;
-
Step 6: register the address list of the Broker's filterServer;
-
Step 7: if this Broker is a slave node, you need to find the node information of the Broker Master, update the corresponding masterAddr attribute, and return it to the Broker side.
4.3 route rejection
4.3.1 trigger conditions
There are two main trigger conditions for route rejection:
NameServer scans the BrokerLiveTable every 10s. If no heartbeat packet is received for 120s, remove the Broker and close the socket connection;
Route deletion is triggered when the Broker closes normally.
4.3.2 source code analysis
The logic of the trigger point and the final route deletion described above is the same, which is unified in RouteInfoManager#onChannelDestroy
The core code is as follows:
public void onChannelDestroy(String remoteAddr, Channel channel) {
String brokerAddrFound = null;
if (channel != null) {
try {
try {
//Read lock
this.lock.readLock().lockInterruptibly();
//Find the corresponding Broker address from the brokerLiveTable through the channel
Iterator<Entry<String, BrokerLiveInfo>> itBrokerLiveTable =
this.brokerLiveTable.entrySet().iterator();
while (itBrokerLiveTable.hasNext()) {
Entry<String, BrokerLiveInfo> entry = itBrokerLiveTable.next();
if (entry.getValue().getChannel() == channel) {
brokerAddrFound = entry.getKey();
break;
}
}
} finally {
//Release read lock
this.lock.readLock().unlock();
}
} catch (Exception e) {
log.error("onChannelDestroy Exception", e);
}
}
//If the Broker has been cleared from the surviving Broker address list, use remoteAddr directly
if (null == brokerAddrFound) {
brokerAddrFound = remoteAddr;
} else {
log.info("the broker's channel destroyed, {}, clean it's data structure at once", brokerAddrFound);
}
if (brokerAddrFound != null && brokerAddrFound.length() > 0) {
try {
try {
//Apply for write lock
this.lock.writeLock().lockInterruptibly();
//Remove the brokerAddress from the brokerLiveTable and filterServerTable according to the brokerAddress
this.brokerLiveTable.remove(brokerAddrFound);
this.filterServerTable.remove(brokerAddrFound);
String brokerNameFound = null;
boolean removeBrokerName = false;
Iterator<Entry<String, BrokerData>> itBrokerAddrTable =
this.brokerAddrTable.entrySet().iterator();
//Traverse the brokerAddrTable
while (itBrokerAddrTable.hasNext() && (null == brokerNameFound)) {
BrokerData brokerData = itBrokerAddrTable.next().getValue();
Iterator<Entry<Long, String>> it = brokerData.getBrokerAddrs().entrySet().iterator();
while (it.hasNext()) {
Entry<Long, String> entry = it.next();
Long brokerId = entry.getKey();
String brokerAddr = entry.getValue();
//Find the corresponding brokerData according to the brokerAddress and remove the corresponding brokerAddress from the brokerData
if (brokerAddr.equals(brokerAddrFound)) {
brokerNameFound = brokerData.getBrokerName();
it.remove();
log.info("remove brokerAddr[{}, {}] from brokerAddrTable, because channel destroyed",
brokerId, brokerAddr);
break;
}
}
//If the brokerAddress of the entire brokerData is empty after removal, the entire brokerData will be removed
if (brokerData.getBrokerAddrs().isEmpty()) {
removeBrokerName = true;
itBrokerAddrTable.remove();
log.info("remove brokerName[{}] from brokerAddrTable, because channel destroyed",
brokerData.getBrokerName());
}
}
if (brokerNameFound != null && removeBrokerName) {
//Traverse clusterAddrTable
Iterator<Entry<String, Set<String>>> it = this.clusterAddrTable.entrySet().iterator();
while (it.hasNext()) {
Entry<String, Set<String>> entry = it.next();
String clusterName = entry.getKey();
Set<String> brokerNames = entry.getValue();
//Remove the corresponding brokerName according to the brokerName to be removed obtained in step 3
boolean removed = brokerNames.remove(brokerNameFound);
if (removed) {
log.info("remove brokerName[{}], clusterName[{}] from clusterAddrTable, because channel destroyed",
brokerNameFound, clusterName);
//If the collection is empty after removal, the entire cluster will be removed from the clusterAddrTable
if (brokerNames.isEmpty()) {
log.info("remove the clusterName[{}] from clusterAddrTable, because channel destroyed and no broker in this cluster",
clusterName);
it.remove();
}
break;
}
}
}
if (removeBrokerName) {
Iterator<Entry<String, List<QueueData>>> itTopicQueueTable =
this.topicQueueTable.entrySet().iterator();
//Traverse queuetopic table
while (itTopicQueueTable.hasNext()) {
Entry<String, List<QueueData>> entry = itTopicQueueTable.next();
String topic = entry.getKey();
List<QueueData> queueDataList = entry.getValue();
Iterator<QueueData> itQueueData = queueDataList.iterator();
while (itQueueData.hasNext()) {
QueueData queueData = itQueueData.next();
//Remove the corresponding broker under topic according to the broker name
if (queueData.getBrokerName().equals(brokerNameFound)) {
itQueueData.remove();
log.info("remove topic[{} {}], from topicQueueTable, because channel destroyed",
topic, queueData);
}
}
//If there is only one broker to be removed under the topic, the topic will also be removed from the table
if (queueDataList.isEmpty()) {
itTopicQueueTable.remove();
log.info("remove topic[{}] all queue, from topicQueueTable, because channel destroyed",
topic);
}
}
}
} finally {
//Release write lock
this.lock.writeLock().unlock();
}
} catch (Exception e) {
log.error("onChannelDestroy Exception", e);
}
}
}
The overall logic of route deletion is mainly divided into six steps:
-
Step 1: add readlock, find the corresponding Broker address from the BrokerLiveTable through the channel, and release readlock. If the Broker has been cleared from the list of surviving Broker addresses, use remoteAddr directly.
-
Step 2: apply for a write lock and remove it from the BrokerLiveTable and filterServerTable according to the BrokerAddress.
-
Step 3: traverse the BrokerAddrTable, find the corresponding brokerData according to the brokeraddress, and remove the corresponding brokeraddress in the brokerData. If the brokeraddress of the whole brokerData is empty after removal, remove the whole brokerData.
-
Step 4: traverse the clusterAddrTable and remove the corresponding brokername according to the brokername to be removed obtained in step 3. If the collection is empty after removal, the entire cluster will be removed from the clusterAddrTable.
-
Step 5: traverse the topicqueueuetable and remove the corresponding Broker under the Topic according to the Broker name. If there is only one Broker to be removed under the Topic, the Topic will also be removed from the table.
-
Step 6: release the write lock.
As can be seen from the above, the overall logic of route elimination is relatively simple, that is, it simply operates on the data structure of route meta information. In order to better understand this code, it is recommended that you read the code by referring to the data structure of routing meta information introduced in 4.1.
4.4 route discovery
When the routing information changes, the nameserver will not actively push it to the client, but wait for the client to regularly go to the nameserver to actively pull the latest routing information. This design reduces the complexity of nameserver implementation.
4.4.1 active pull of producer
After the producer is started, it will start a series of scheduled tasks, one of which is to regularly obtain Topic routing information from the NameServer. The code entry is mqclientinstance#start scheduledtask (), and the core code is as follows:
private void startScheduledTask() {
......
this.scheduledExecutorService.scheduleAtFixedRate(new Runnable() {
@Override
public void run() {
try {
//Update the latest topic routing information from nameserver
MQClientInstance.this.updateTopicRouteInfoFromNameServer();
} catch (Exception e) {
log.error("ScheduledTask updateTopicRouteInfoFromNameServer exception", e);
}
}
}, 10, this.clientConfig.getPollNameServerInterval(), TimeUnit.MILLISECONDS);
......
}
/**
* Get topic routing information from nameserver
*/
public TopicRouteData getTopicRouteInfoFromNameServer(final String topic, final long timeoutMillis,
boolean allowTopicNotExist) throws MQClientException, InterruptedException, RemotingTimeoutException, RemotingSendRequestException, RemotingConnectException {
......
//Send a request package to the nameserver. The requestCode is requestCode GET_ ROUTEINFO_ BY_ TOPIC
RemotingCommand request = RemotingCommand.createRequestCommand(RequestCode.GET_ROUTEINFO_BY_TOPIC, requestHeader);
......
}
The network transmission between producer and NameServer is through netty, and producer adds the registration code to the request initiated by NameServer
RequestCode.GET_ROUTEINFO_BY_TOPIC.
4.4.2 routing information returned by nameserver
After receiving the request sent by producer, NameServer will process it according to the requestCode in the request. The processing of requestCode is also carried out in the default network processor DefaultRequestProcessor, which is finally realized through RouteInfoManager#pickupTopicRouteData.
TopicRouteData structure
Before formally parsing the source code, let's take a look at the data structure returned by NameServer to producer. From the code, we can see that the returned object is a TopicRouteData object. The specific structure is as follows:
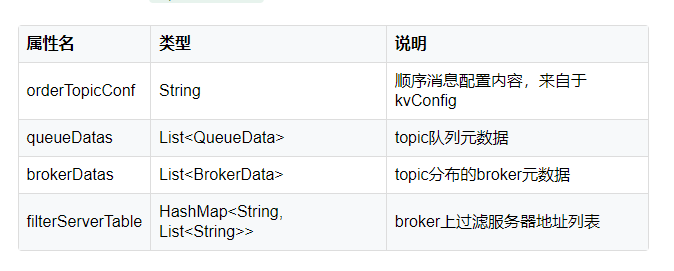
Among them, QueueData, BrokerData and filterServerTable are introduced when introducing the routing meta information in Chapter 4.1.
Source code analysis
After understanding the TopicRouteData structure returned to the producer, let's enter the RouteInfoManager#pickupTopicRouteData method to see how to implement it.
public TopicRouteData pickupTopicRouteData(final String topic) {
TopicRouteData topicRouteData = new TopicRouteData();
boolean foundQueueData = false;
boolean foundBrokerData = false;
Set<String> brokerNameSet = new HashSet<String>();
List<BrokerData> brokerDataList = new LinkedList<BrokerData>();
topicRouteData.setBrokerDatas(brokerDataList);
HashMap<String, List<String>> filterServerMap = new HashMap<String, List<String>>();
topicRouteData.setFilterServerTable(filterServerMap);
try {
try {
//Read lock
this.lock.readLock().lockInterruptibly();
//Get the queue collection according to the topic name from the metadata topicqueueuetable
List<QueueData> queueDataList = this.topicQueueTable.get(topic);
if (queueDataList != null) {
//Write the obtained queue collection to the queuedata of topicRouteData
topicRouteData.setQueueDatas(queueDataList);
foundQueueData = true;
Iterator<QueueData> it = queueDataList.iterator();
while (it.hasNext()) {
QueueData qd = it.next();
brokerNameSet.add(qd.getBrokerName());
}
//Traverse the brokerName extracted from the QueueData collection
for (String brokerName : brokerNameSet) {
//Get brokerData from brokerAddrTable according to brokerName
BrokerData brokerData = this.brokerAddrTable.get(brokerName);
if (null != brokerData) {
//Clone the brokerData object and write it to the brokerData of topicRouteData
BrokerData brokerDataClone = new BrokerData(brokerData.getCluster(), brokerData.getBrokerName(), (HashMap<Long, String>) brokerData.getBrokerAddrs().clone());
brokerDataList.add(brokerDataClone);
foundBrokerData = true;
//Traversal of brokerAddrs
for (final String brokerAddr : brokerDataClone.getBrokerAddrs().values()) {
//Get the filterServerList according to brokerAddr, and write it into the filterServerTable of topicRouteData after encapsulation
List<String> filterServerList = this.filterServerTable.get(brokerAddr);
filterServerMap.put(brokerAddr, filterServerList);
}
}
}
}
} finally {
//Release read lock
this.lock.readLock().unlock();
}
} catch (Exception e) {
log.error("pickupTopicRouteData Exception", e);
}
log.debug("pickupTopicRouteData {} {}", topic, topicRouteData);
if (foundBrokerData && foundQueueData) {
return topicRouteData;
}
return null;
}
The above code encapsulates the queuedata, brokerdata and filterServerTable of topicrotedata, and the orderTopicConf field is not encapsulated. Let's see when this field is encapsulated. Let's look up at the calling method DefaultRequestProcessor#getRouteInfoByTopic of routeinfomanager#pickuptopicrotedata as follows:
public RemotingCommand getRouteInfoByTopic(ChannelHandlerContext ctx,
RemotingCommand request) throws RemotingCommandException {
......
//This code is the code parsed above to obtain the topicRouteData object
TopicRouteData topicRouteData = this.namesrvController.getRouteInfoManager().pickupTopicRouteData(requestHeader.getTopic());
if (topicRouteData != null) {
//Judge whether the orderMessageEnable configuration of nameserver is enabled
if (this.namesrvController.getNamesrvConfig().isOrderMessageEnable()) {
//If the configuration is turned on, get the configuration content of sequential messages in kvConfig configuration file according to the name of namespace and topic
String orderTopicConf =
this.namesrvController.getKvConfigManager().getKVConfig(NamesrvUtil.NAMESPACE_ORDER_TOPIC_CONFIG,
requestHeader.getTopic());
//Encapsulate orderTopicConf
topicRouteData.setOrderTopicConf(orderTopicConf);
}
byte[] content = topicRouteData.encode();
response.setBody(content);
response.setCode(ResponseCode.SUCCESS);
response.setRemark(null);
return response;
}
//If the topic route is not obtained, the reponseCode is TOPIC_NOT_EXIST
response.setCode(ResponseCode.TOPIC_NOT_EXIST);
response.setRemark("No topic route info in name server for the topic: " + requestHeader.getTopic()
+ FAQUrl.suggestTodo(FAQUrl.APPLY_TOPIC_URL));
return response;
}
Combining these two methods, we can conclude that finding Topic routing is mainly divided into three steps:
Call RouteInfoManager#pickupTopicRouteData, get information from topicqueueuetable, brokeraddrtab and filterServerTable, and fill in queue data, brokerdata and filterServerTable respectively.
If the topic is a sequential message, get the configuration about the first closing of the sequential message from KVconfig and fill it into orderTopicConf.
If no routing information is found, the returned code is responsecode TOPIC_ NOT_ EXIST.
5, Summary
This article mainly introduces the NameServer of RocketMQ from the perspective of source code, including the startup process of NameServer, route registration, route elimination and route discovery. After understanding the design principle of NameServer, we can also go back and think about some tips worth learning in the design process. Here, I put forward two points:
-
Start the process and register the JVM hook for graceful shutdown. This is a programming skill. In the actual development process, if we use thread pool or some resident thread tasks, we can consider registering JVM hooks to release resources or complete some things before the JVM is closed to ensure elegant downtime.
-
When updating the routing table, you need to prevent concurrent operations by locking. Here, the read-write lock with less lock granularity is used to allow multiple message senders to read concurrently to ensure high concurrency when sending messages. However, at the same time, NameServer only processes one Broker heartbeat packet, and multiple heartbeat packets request serial execution. This is also a classic use scenario of read-write lock.