background
When it comes to building tools, I often add the word "automation" before it, because building tools are used to make us stop doing mechanical things and liberate our hands.
What is front-end automation? The code that front-end engineers need to maintain is extremely huge and complex, and the processes of code maintenance, packaging and publishing have become extremely cumbersome. At the same time, more and more time and energy are wasted. Of course, human errors also increase the error rate with the increase of processes.
As a result, every team hopes to have a tool that can help the whole team streamline the process, improve efficiency and reduce the error rate. There are more and more discussions on Automated Deployment, and many large domestic teams also have their own mature automated deployment tools.
Common construction tools gulp, webpack, parcel, rollup, vite, fis, grunt, etc
After years of development, Webpack has become the first choice in building tools because:
- When developing new projects, most teams will adopt technologies that keep up with the times. Almost all of these technologies will adopt "modularization + new language + new framework". Webpack can provide one-stop solutions for these new projects;
- Webpack has a good ecology and maintenance team, which can provide good development experience and ensure quality;
- Webpack is used and verified by a large number of Web developers all over the world, and can find tutorials and experience sharing needed at all levels.
Composition of webpack
It is not accurate to say that webpack is a construction tool. Rather, it should be a static module packer. In webpack, the concept of bundle is very important. Another important concept is dependency graph, which constitutes an important core of this packer.
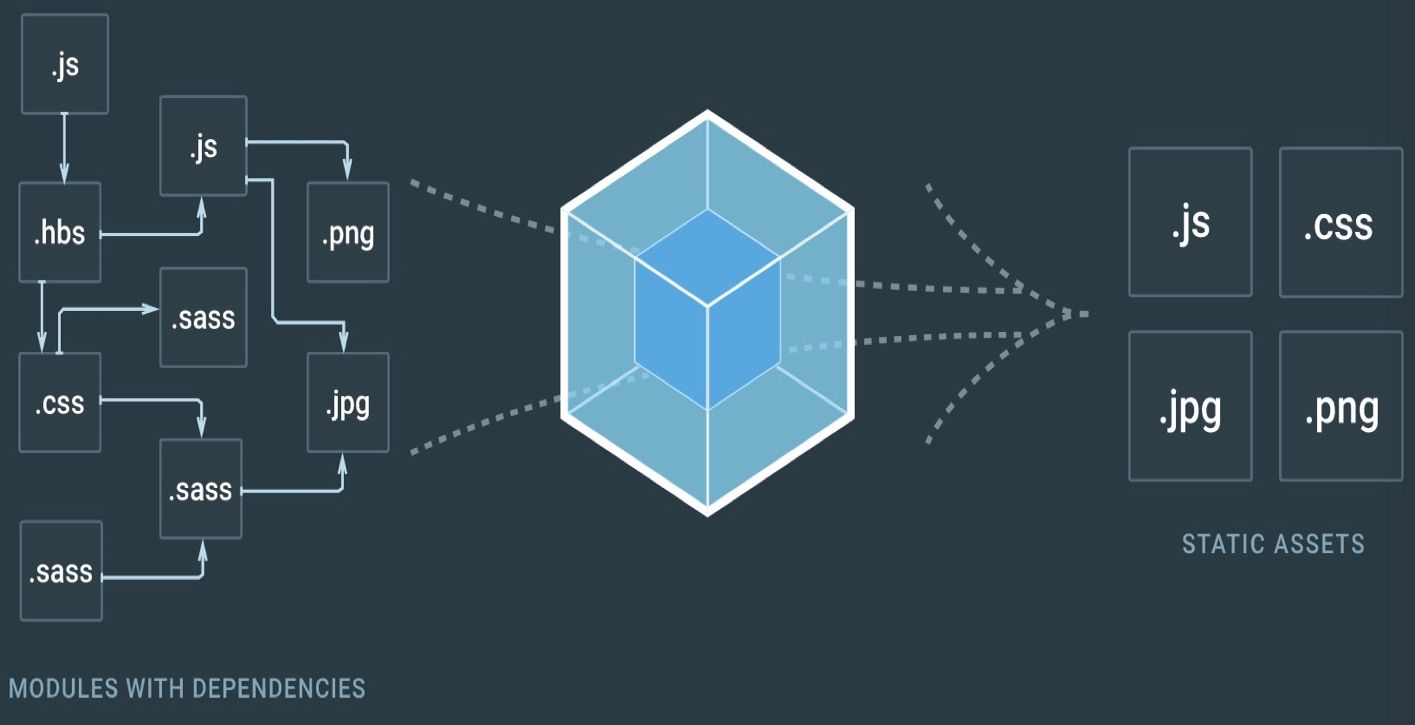
There are four core elements of webpack, which are also closely related to the use and configuration of webpack:
- Entry: configure the entry file, that is, the entry that generates the dependency graph
- Output: output location configuration of the file
- loader: the compilation process of matching files
- plugins: plug-in processing for the whole build packaging process (file compression, hot loading of dev environment)
The entrance and exit determine where we need to package those files, and the loader undertakes the compilation of the matching files here. plugins is aimed at the operation of the whole construction process, what functions are needed and what plug-ins are introduced.
How does webpack packaging work
It can also be called how webpack realizes modularization
CommonJS is a synchronous loading module, which is generally used for node. Because the node application runs on the server, the program can directly read the files of each module through the file system, which is characterized by fast response and will not block the operation of the program due to synchronization;
AMD is an asynchronous loading module, so it is widely used in the front end. The front-end project runs in the browser, and each module needs to load js module files through http request. Affected by factors such as the network, if synchronized, the browser will appear "fake dead" (stuck), affecting the user experience.
ESModule aims to realize the unification of front and rear end modularization. webpack is to transcode the modular code of ES6 into the form of CommonJS, so as to be compatible with the browser.
Why can the files packaged by webpack be used in the browser: at this time, webpack will package all js modules into bundle js (except for modules loaded asynchronously, which will be described later), if it is read into memory, it will not be loaded in modules.

Modular processing of CommonJS by webpack
give an example:
index.js file, import test JS file
const test = require('./test');

console.log(test);
console.log('hello world');
test.js file
module.exports = {
  name: 'startdt',
  age: '5',
};
After we execute the webpack, the package is completed, and we can see the bundle Code in JS
//Modules is an array that holds all modules. Each element in the array is a function
(function(modules) {
	// All installed modules are stored here
    // The function is to cache the loaded modules in memory to improve performance
	var installedModules = {};
	// Load a module in the array. moduleId is the index of the module to be loaded in the array
    // __ webpack_require__ Role and node JS is similar to the require statement
	function __webpack_require__(moduleId) {
		// When requiring a module, first judge whether it has been cached, and the cached module returns directly
		if(installedModules[moduleId]) {
			return installedModules[moduleId].exports;
		}
		// If there is no module to be loaded in the cache, create a new module and store it in the cache
		var module = installedModules[moduleId] = {
            // index of module in array
            i: moduleId,
            // Has the module been loaded
            l: false,
            // The exported value of the module, also known as the main content of the module, will be rewritten
			exports: {}
		};
		// Get the function corresponding to the module whose index is moduleId from modules
        // Then call this function and pass in the parameters required by the function. This points to the main content of the module
		modules[moduleId].call(module.exports, module, module.exports, __webpack_require__);
		// Mark module as loaded
		module.l = true;
		// Returns the exported value of the module, that is, the main content of the module
		return module.exports;
	}
    // Expose all modules to the outside
	__webpack_require__.m = modules;
	// Expose cached modules outward
    __webpack_require__.c = installedModules;

	...
	...

    // The publicPath in the Webpack configuration is used to load the separated asynchronous code, which is not used yet
	__webpack_require__.p = "";
    // Load entry module and return exports
    // After the preparatory work is finished, you need to check the entry module to make the project run
    // Use__ webpack_require__  Load the module with index 0 and return the exported content of the module
    // The module with index 0 is index JS file, that is, the execution entry module
    // __ webpack_require__.s means the index corresponding to the startup module
	return __webpack_require__(__webpack_require__.s = 0);
})
/***** On the top of the gorgeous split line is the webpack initialization code, and below is the module code we wrote*******/
// All modules are stored in an array. Modules are distinguished and located according to the index of each module in the array
([
	/* Module 0 corresponds to index js */
	(function(module, exports, __webpack_require__) {
		// Pass__ webpack_require__  Import foo function according to the specification, foo The module index corresponding to JS is 1
		const test = __webpack_require__(1);

		console.log(test);
		console.log('hello world');
	}),
	/* Module 1 corresponds to foo js */
	(function(module, exports) {
		// Export objects through CommonJS specification
		module.exports = {
		  name: 'startdt',
		  age: '5',
		};
	})
]);
The above is an immediate execution function. Simply click:
(function(modules) {

  // Simulate the require statement
  function __webpack_require__(index) {
	  return [/*Stored in the array of all modules, the exposed things of the first module*/]
  }

  // Execute the 0th module stored in all module arrays, and return the exported content of the module
  return __webpack_require__(0);

})([/*An array that holds all modules*/])
bundle.js can run directly in the browser because:
Webpack pass_ webpack_require_ Function (this function defines a loading function that can be executed in the browser) simulates the loading of the module (similar to the require statement in Node.js), and mounts the defined module content to module Exports;
At the same time__ webpack_require__ The module cache is also optimized in the function. The loaded module will not be executed for the second time, and the execution results will be cached in memory. When a module is accessed for the second time, it will directly read the cached return value in memory.
The original independent module files were merged into a separate bundle The reason for JS is that browsers cannot be like node JS can load module files locally as quickly as possible, but the files that have not been obtained must be loaded through network request. If the number of modules is large, the loading time will be very long. Therefore, all modules are stored in the array to perform a network load.
In this part, I wrote a demo
webpack's handling of es6 Module modularization
give an example
index.js file, import test JS file
import test from './test';

console.log(test);
console.log('hello world');
test.js file
export default {
  name: 'startdt',
  age: '5',
};
After packaging, the bundle JS code is as follows
(function(modules) {
	var installedModules = {};
	function __webpack_require__(moduleId) {
		if(installedModules[moduleId]) {
			return installedModules[moduleId].exports;
		}
		var module = installedModules[moduleId] = {
			i: moduleId,
			l: false,
			exports: {}
		};
		modules[moduleId].call(module.exports, module, module.exports, __webpack_require__);
		module.l = true;
		return module.exports;
	}
	__webpack_require__.m = modules;
	__webpack_require__.c = installedModules;
	__webpack_require__.d = function(exports, name, getter) {
		if(!__webpack_require__.o(exports, name)) {
			Object.defineProperty(exports, name, {
				configurable: false,
				enumerable: true,
				get: getter
			});
		}
	};
	__webpack_require__.n = function(module) {
		var getter = module && module.__esModule ?
			function getDefault() { return module['default']; } :
			function getModuleExports() { return module; };
		__webpack_require__.d(getter, 'a', getter);
		return getter;
	};
	__webpack_require__.o = function(object, property) { return Object.prototype.hasOwnProperty.call(object, property); };
	__webpack_require__.p = "";
	return __webpack_require__(__webpack_require__.s = 0);
})([Related modules]);
The packaged content is similar to the common JS modular method
function(module, __webpack_exports__, __webpack_require__) {
	"use strict";
	// In__ webpack_exports__ Upper definition__ Indicates that the esModule object is a module
	Object.defineProperty(__webpack_exports__, "__esModule", { value: true });
	var __WEBPACK_IMPORTED_MODULE_0__foo__ = __webpack_require__(1);
	console.log(__WEBPACK_IMPORTED_MODULE_0__foo__["a"]);
	console.log('hello world');
},
function(module, __webpack_exports__, __webpack_require__) {
	"use strict";
	__webpack_exports__["a"] = ({
       name: 'startdt',
       age: '5',
	});
}
Different from commonjs
First, wrap the module before the function's parameters Exports became_ webpack_exports_
Secondly, where the es6 module import syntax is used, give__ webpack_exports__ Added attribute__ esModule
The rest is similar to commonjs
On demand loading of webpack files
The above webpack packages all modules into the master file, so the module loading mode is synchronous. However, in the process of developing applications, on-demand loading (also known as lazy loading) is also one of the optimization techniques often used.
Loading on demand, in popular terms, is to execute the code to the asynchronous module (the module content is in another js file), load the corresponding asynchronous module code immediately through the network request, and then continue the next process.
main.js file
window.document.getElementById('btn').addEventListener('click', function () {
 // Only after the button is clicked can show be loaded JS file, which executes the function of file export after the file is loaded successfully
 import(/* webpackChunkName: "show" */ './show').then((show) => {
   show('Webpack');
 })
});
show.js file
module.exports = function (content) {
  window.alert('Hello ' + content);
};
The key sentence in the code is import(/* webpackChunkName: "show" / '. / show "). Webpack has built-in support for import() statements. When webpack encounters similar statements, it will handle them as follows:
With/ show.js generates a new Chunk for the entry;
When the code executes the statement where import is located, the file generated by Chunk will be loaded.
import returns a Promise. When the file is loaded successfully, you can get show. Com in the then method of Promise JS exported content.
webpack has a require The ensure API syntax is used to mark the module as an asynchronous loading module. webpack4 recommends using the new import () API (with the @ Babel / plugin syntax dynamic import plug-in).
Because require Ensure executes the next process through the callback function, while import() returns promise, which means that async/await syntax can be used to execute asynchronous processes like writing synchronous code.
After the above contents are packaged, two chunk files will be generated, which are the main file and the execution entry file bundle JS and asynchronous loading file 0 bundle.js .
// 0.bundle.js
// Asynchronous module
// window["webpackJsonp"] is a bridge connecting multiple chunk files
// window["webpackJsonp"].push = main chunk file webpackJsonpCallback
(window["webpackJsonp"] = window["webpackJsonp"] || []).push([
  [0], // The asynchronous module ID chunkId can judge whether the asynchronous code is loaded successfully
  // Like the synchronization module, it stores {module path: module content}
  {
  "./src/async.js": (function(module, __webpack_exports__, __webpack_require__) {
      __webpack_require__.r(__webpack_exports__);
      __webpack_exports__["default"] = (function () {
        return 'hello, aysnc module';
      });
    })
  }
]);
The asynchronous module source code is saved in the packaged file of the asynchronous module. At the same time, in order to distinguish different asynchronous modules, the corresponding ID of the asynchronous module: chunkId is also saved. The above code actively calls window ["webpackJsonp"] Push function, which is the key function connecting the asynchronous module and the main module. This function is defined in the main file. In fact, window ["webpackJsonp"] push = webpackJsonpCallback
The implementation process of webpack asynchronous loading module is basically the same as that of jsonp.
Now that we know the result of packaging, how does webpack work
The core object of webpack
Tapable: controls the publication and subscription of hooks. Compiler and Compilation objects are inherited from tapable
Compiler
Compiler inherits the Tapable object and can broadcast and listen to webpack events.
Compiler object is the compiler of webpack. There is only one compiler object in the webpack cycle.
The compiler object creates an instance when the webpack starts. The compiler instance contains the complete configuration of the webpack, including the information of loaders and plugins.
Compilation
Compilation inherits the Tapable object and can broadcast and listen to webpack events.
The Compilation instance only represents the process of webpack building and generating Compilation resources once.
In the webpack development mode, the watch option is enabled. Each time a change in the entry file module is detected, a new compilation will be created: a new compilation resource and a new compilation object will be generated. This compilation object contains the currently compiled module resource, module, resources generated by compilation, changed files and dependent states
The running process of webpack is a serial process. The following processes will be executed from start to end:
- Initialization parameters: read and merge parameters from configuration files and Shell statements to get the final parameters;
- Start Compilation: initialize the Compiler object (instantiate the Compiler object) with the parameters obtained in the previous step, load all configured plug-ins, execute the run method of the object to start Compilation, and generate the Compilation object (instantiate the Compilation object);
- Determine the entry: according to the entry in the configuration, call the AST engine (acorn) to process the entry file, generate the abstract syntax tree AST, and build all the dependencies of the module according to the AST;
- Compiling module: starting from the entry file, call all configured loaders to translate the module, find out the module that the module depends on, and then recurse this step until all the entry dependent files have been processed in this step;
- Complete module compilation: after translating all modules with Loader in step 4, the final translated content of each module and the dependencies between them are obtained;
- Output resources: according to the dependency between the entry and the module, assemble the "chunks" containing multiple modules, and then convert each "Chunk" into a separate file to be added to the output list. This step is the last chance to modify the output content;
- Output completion: after determining the output content, determine the output path and file name according to the configuration, and output the file content to the directory.
Preparation before Compilation
Overview of this stage: register plugins of project configuration and default plug-in of webpack on various hook s of compiler ➡️ Register resolverfactory Hooks is factory The createresolver method provides a parameter object.
The event mechanism of webpack is based on the event flow control of the tapable library. Various hooks are exposed during the whole compilation process, and the plugin registers and listens to some / some hooks. When this hook is triggered, the methods bound in the plugin will be executed.
new NodeEnvironmentPlugin({
  infrastructureLogging: options.infrastructureLogging
}).apply(compiler);
loader phase
Generate module instance by recursive compilation
- In the resolve phase, an object containing all the information of the current module is parsed and returned
Overview of this stage: use the enhanced resolve library to get the resolve resolution method ➡️ Resolve the inline loader and its corresponding resource, as well as the loader of the project config, and then merge and sort all loaders ➡️ Get the parser and generator corresponding to the module for subsequent ast parsing and template generation ➡️ Output a composite object containing all the information of the current module context, loaders, absolute path, dependency and other modules, and provide it to the callback triggered by the afterResolve hook. This object will be used to initialize the module instance of the current file in the next step.
such as
import Styles from style-loader!css-loader?modules!./styles.css
Will be resolved to:
{
  "resource": "./styles.css",
  "elements": [
    {
      "loader": "style-loader"
    },
    {
      "loader": "css-loader",
      "options": "modules"
    }
  ]
}
Then, each task of the parameter array is processed in parallel. After completion, a results list will be returned. The list order is the order of the parameter array, which is independent of the execution order.
results obtained:
{
  "results": [
    [
      {
        "loader": "loader Absolute path 1",
        "options": "loader Parameter 1"
      },
      {
        "loader": "loader Absolute path 2",
        "options": "loader Parameter 2"
      }
    ],
    {
      "resource": "Module absolute path",
      "resourceResolveData": "Module basic information (i.e enhanced-resolve Execution results)"
    }
  ]
}
Parse the loader in config module rules and recursively filter and match the corresponding loader:
{
  "result": [
    { "type": "type", "value": "javascript/auto" },
    { "type": "resolve", "value": {} },
    { "type": "use", "value": { "loader": "babel-loader" } }
  ]
}
Merge and sort loader s:
Then process the inline loader with prefix!,!!!, -! And result items with the enforce parameter are used to determine the disabling and sorting of the loader.
Parallel processing the useLoadersPost, useLoadersPre and useLoaders obtained in the previous step, get the corresponding resolve result, that is, path information, and then sort and merge them in the callback,
That is, the configuration order of loaders is postLoader, inline loader, loader (normal), and preLoader, and the execution order is the opposite.
- Execute the loader stage, initialize the module and translate it in reverse order with the loader
Start the process of building module. new NormalModule(result) gets the initialized module ➡️ In the build process, execute runLoaders to process the source code. First read each loader in positive order and execute its pitch, then execute the normal of each loader in reverse order, and finally get a compiled string or Buffer.
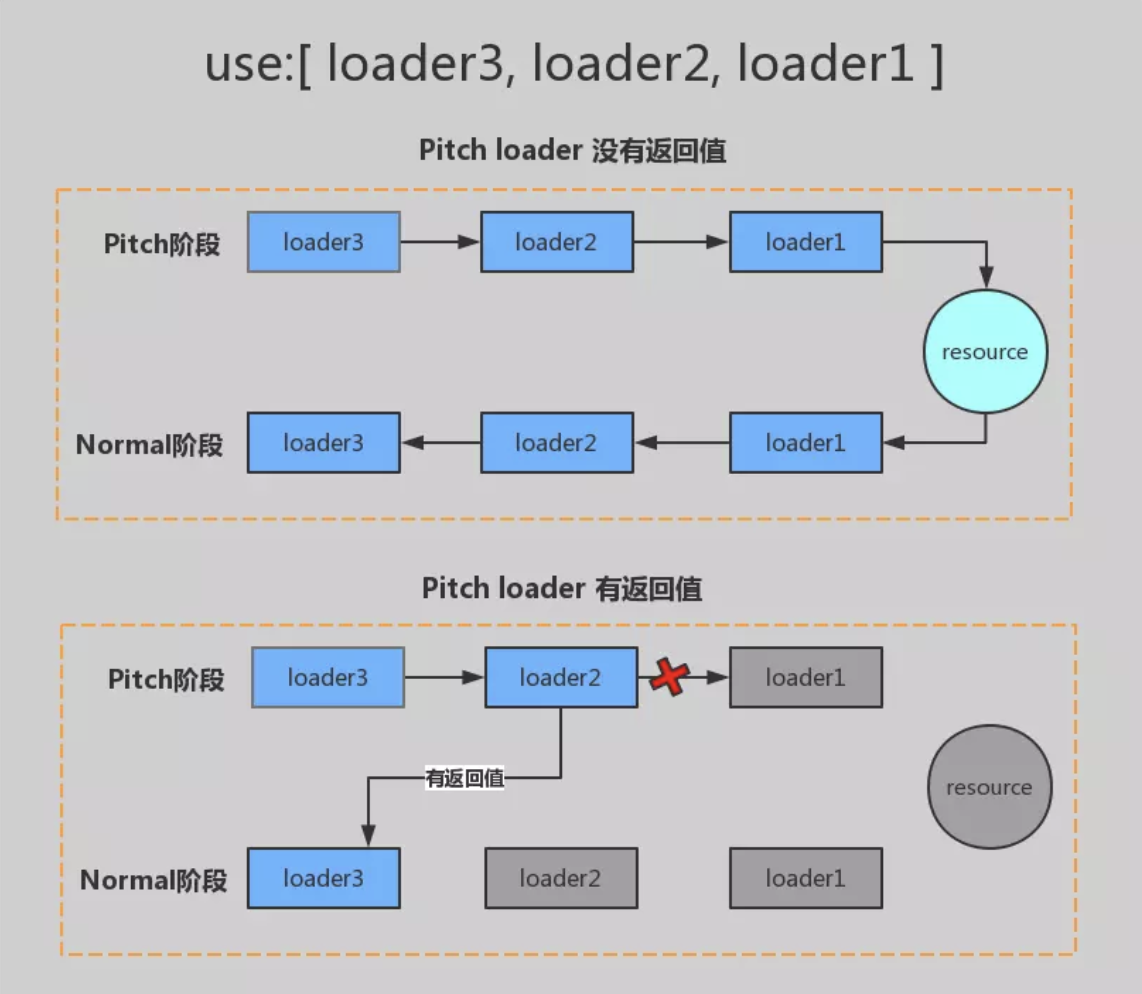
The runLoaders method comes from loader runner. It is used to execute various loaders according to the specified process and post process the module source code into a JavaScript in String or Buffer format (possibly a SourceMap).
- parse phase, collecting dependencies
Call parser to convert the compilation result of runLoaders in the previous step into ast using acorn library. The generated AST is divided into three parts: ImportDeclaration, FunctionDeclaration and VariablesDeclaration. ➡️ Traverse the ast, trigger relevant hook plug-ins to collect dependencies according to the import, export and asynchronous conditions, and these dependencies are used to resolve recursive dependencies and template operations ➡️ Generate their own unique buildHash according to the relevant information of each module.
- Recursive processing dependency phase (repeat the above steps)
According to the interdependence between modules, recursively resolve all dependent modules. Resolve ➡️ Execute loader ➡️ parse ➡️ Collect and process the modules that the module depends on until all the files that the entry depends on (directly or indirectly) have been processed in these steps. Finally, an entry module is returned.

loader process induction
In this way, starting from the entry module, all modules are converted and compiled recursively according to the dependencies between modules.
Until all layers of dependencies are converted, execute return process nextTick(callback);, The callback will be called before the next event loop tick.
An entry module is returned:
{
  "module": {
    //...
    //Synchronization module
    "dependencies": ["HarmonyImportSideEffectDependency", "HarmonyImportSpecifierDependency"],
    //Asynchronous module
    "blocks": ["ImportDependenciesBlock"]
  }
}
If no error is thrown, then compilation. Is triggered Hooks: succeedentry. This is the end of module generation.
plugins
A webpack plug-in consists of the following aspects:
- A non anonymous js function
- Define the apply method on its prototype object
- Indicates the webpack hook event that mounts itself
- Operate the specific data of the internal situation of webpack
- The callback provided by the webpack is invoked when the method completes
Basic plug-in structure
A plug-in is an instantiated object with an apply method in the prototype. When the plug-in is installed, the apply method will be called once by webpack. The apply method provides a reference to the currently active webpack compiler that allows access to the compiler's callback
Simple Plugin case
function HelloWorldPlugin() {
   //
};
HelloWorldPlugin.prototype.apply = function(compiler) {
  compiler.plugin('webpacksEventHook', function(compilation, callback) {
    console.log('Hello World!')
    callback();
  });
};

module.exports = HelloWorldPlugin;
function HelloCompilationPlugin(options) {}

HelloCompilationPlugin.prototype.apply = function(compiler) {

  // Setup callback for accessing a compilation:
  compiler.plugin("compilation", function(compilation) {

    // Now setup callbacks for accessing compilation steps:
    compilation.plugin("optimize", function() {
      console.log("Assets are being optimized.");
    });
  });
};

module.exports = HelloCompilationPlugin;
Use of plug-ins
const HelloWorldPlugin = require('hello-world');

const webpackConfig = {
  // ... config settings here ...
  plugins: [
    new HelloWorldPlugin({options: true})
  ]
};
