0
preface
Obviously, Gradle is a powerful build tool, and many articles only treat it as a tool. However, Gradle is not only a powerful build tool, it looks more like a programming framework. The composition of Gradle can be divided into the following three aspects:
-
1) , groovy core syntax: including groovy basic syntax, closure, data structure, object-oriented and so on.
-
2) Android DSL (build scrpit block): Android plug-ins are unique to Gradle. We can do different things in different build scrpit blocks.
-
3) Gradle API: including Project, Task, Setting, etc. (the focus of this article).
As you can see, the grammar of Gradle is based on groovy, and it has its own API, so we can think of Gradle as a programming framework. With Gradle, we can realize all the requirements in the project construction process.
It should be noted that if we want to use Gradle at will, we must master Groovy well in advance. If we are not familiar with Groovy, please refer to the article "in depth exploration of automatic construction technology of Gradle (II. Foundation of Groovy)".
https://juejin.im/post/5e97ac34f265da47aa3f6dca
It should be noted that Groovy is a language, while DSL is a domain specific configuration file, gradle is a framework tool based on Groovy, and gradlew is a compatible packaging tool for gradle.
1
Gradle advantage
1. Better flexibility
In terms of flexibility, relative to Maven, Ant and other construction tools, Gradle provides a series of API s that enable us to modify or customize the project construction process. For example, we can use Gradle to dynamically modify the generated APK package name, but if we use Maven, Ant and other tools, we must wait until the APK is generated, and then manually modify the APK name.
2. Finer granularity
In terms of granularity, when using Maven, Ant and other build tools, our source code and build script are independent, and we don't know what the internal processing is. However, our Gradle is different. It is executed one by one from the compilation of source code, the compilation of resources to the generation of APK.
In addition, the granularity of the Gradle build is refined into each task. And all its task source code is open source. After we master the whole packaging process, we can change its execution process dynamically by modifying its task. For example, in the implementation of Tinker framework, it dynamically modifies the packaging process of Gradle to generate APK, and at the same time generates various patch files.
3. Better scalability
In terms of extensibility, Gradle supports plug-in mechanism, so we can reuse these plug-ins as simple and convenient as reusing libraries.
4. Greater compatibility
Gradle is not only powerful, but also compatible with all Maven and Ant functions. In other words, gradle absorbs the advantages of all construction tools.
As you can see, compared with other construction tools, the benefits of Gradle are self-evident, and the core reason is that Gradle is a programming framework.
2
Gradle build lifecycle
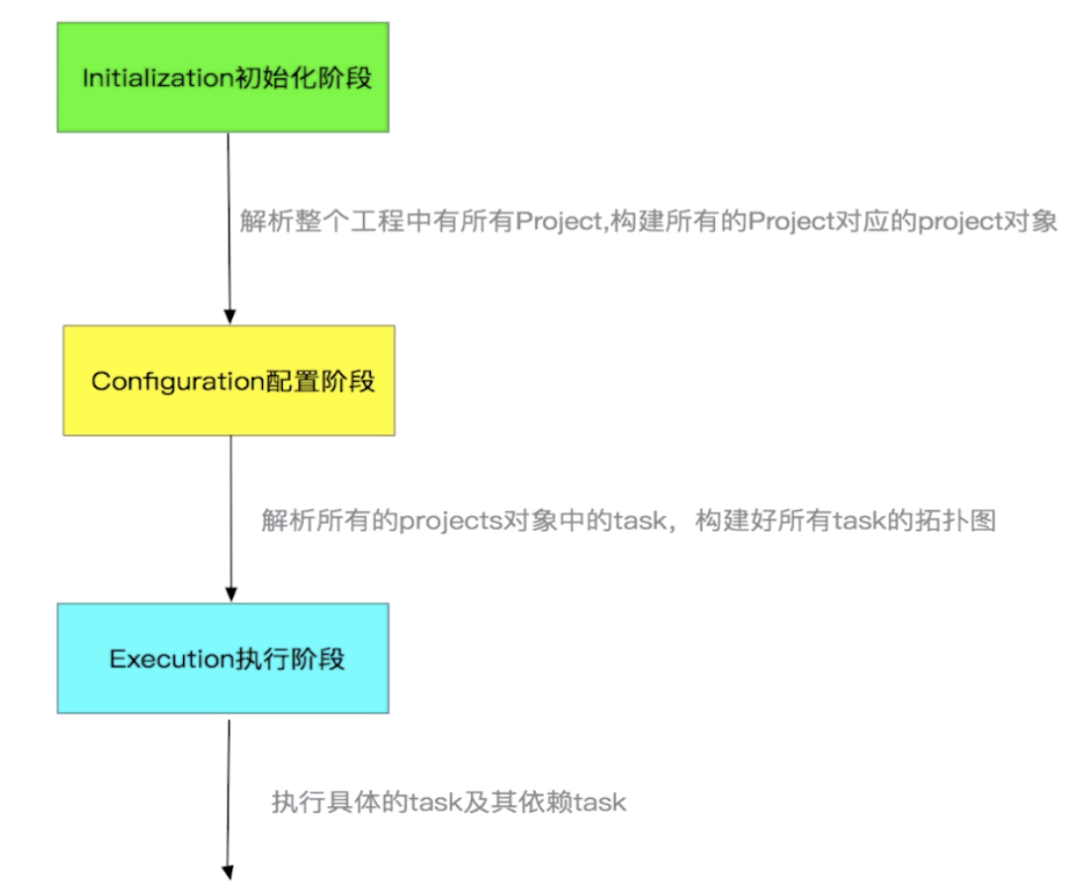
The construction process of Gradle is divided into three parts: initialization phase, configuration phase and execution phase. The construction process is as follows:
Let's learn more about them.
1. Initialization phase
First, in this phase, the setting.gradle include information in to determine how many projects are added to the build, and then, for each Project( build.gradle Script file) to create a corresponding Project instance, and finally form a Project hierarchy.
The script files associated with the initialization phase are settings.gradle , and a settings.gradle The script corresponds to a Settings object. The most commonly used method to declare the inclusion of the Project hierarchy is a method under the Settings object. When the Gradle is initialized, a Settings instance object will be constructed to perform the initialization configuration of each Project.
settings.gradle
At settings.gradle In the file, we can add each life cycle node listening during the construction of the Gradle. The code is as follows:
include ':app'
gradle.addBuildListener(new BuildListener() {
    void buildStarted(Gradle var1) {
        println 'Start building'
    }
    void settingsEvaluated(Settings var1) {
        // var1.gradle.rootProject An error will be reported when accessing the Project object,
        //Because Project initialization has not been completed.
        println 'settings Assessment complete( settings.gradle Code execution completed)'
    }
    void projectsLoaded(Gradle var1) {
        println 'Project structure loading complete (end of initialization phase)'
        println 'After initialization, you can access the root project:' + var1.gradle.rootProject
    }
    void projectsEvaluated(Gradle var1) {
        println 'All project evaluations complete (end of configuration phase)'
    }
    void buildFinished(BuildResult var1) {
        println 'End of build '
    }
})
After writing the corresponding gladle life cycle monitoring code, we can see the following information in the Build output interface:
Executing tasks: [clean, :app:assembleSpeedDebug] in project
/Users/quchao/Documents/main-open-project/Awesome-WanAndroid
settings Assessment complete( settins.gradle Code execution completed)
//Project structure loading complete (end of initialization phase)
//After initialization, you can access the root project: root project 'Awesome-WanAndroid'
Configuration on demand is an incubating feature.
> Configure project :app
gradlew version > 4.0
WARNING: API 'variant.getJavaCompiler()' is obsolete and has been
replaced with 'variant.getJavaCompileProvider()'.
It will be removed at the end of 2019.
For more information, see
https://d.android.com/r/tools/task-configuration-avoidance.
To determine what is calling variant.getJavaCompiler(), use
-Pandroid.debug.obsoleteApi=true on the command line to display more
information.
skip tinyPicPlugin Task!!!!!!
skip tinyPicPlugin Task!!!!!!
//All project evaluations complete (end of configuration phase)
> Task :clean UP-TO-DATE
:clean spend 1ms
...
> Task :app:clean
:app:clean spend 2ms
> Task :app:packageSpeedDebug
:app:packageSpeedDebug spend 825ms
> Task :app:assembleSpeedDebug
:app:assembleSpeedDebug spend 1ms
//End of build
Tasks spend time > 50ms:
    ...
In addition, in settings.gradle In the file, we can specify the location of other projects, so that we can import the moudle from other external projects into the current project. The sample code is as follows:
if (useSpeechMoudle) {
    //Import speech module of other apps
    include "speech"
    project(":speech").projectDir = new     File("../OtherApp/speech")
}
2. Configuration phase
The Task of the configuration phase is to execute the build.gradle Script to complete the configuration of Project. At the same time, Task dependency graph will be constructed to execute Task according to dependency in the execution phase. The code executed in the configuration phase generally includes the following three parts, as follows:
-
1), build.gralde Various statements in.
-
2) , closure.
-
3) , Task.
It should be noted that the code in initialization phase and configuration phase will be executed when executing any Gradle command.
3. Implementation phase
At the end of the configuration phase, Gradle will create a directed acyclic graph according to the dependency of each Task. We can get the directed acyclic graph through the getTaskGraph method of the Gradle object = > taskexecutiongraph, and after the directed acyclic graph is built, before all tasks are executed, we can use whenready( groovy.lang.Closure )Or addTaskExecutionGraphListener(TaskExecutionGraphListener) to receive the corresponding notification. The code is as follows:
gradle.getTaskGraph().addTaskExecutionGraphListener(new
TaskExecutionGraphListener() {
    @Override
    void graphPopulated(TaskExecutionGraph graph) {
    }
})
Then, the Gradle build system will execute the corresponding tasks by calling Gradle < task name >.
4. Each lifecycle node of Hook Gradle
Here's Goe_H's Gradle life cycle sequence diagram explains the whole process of the Gradle life cycle, as shown in the following figure:
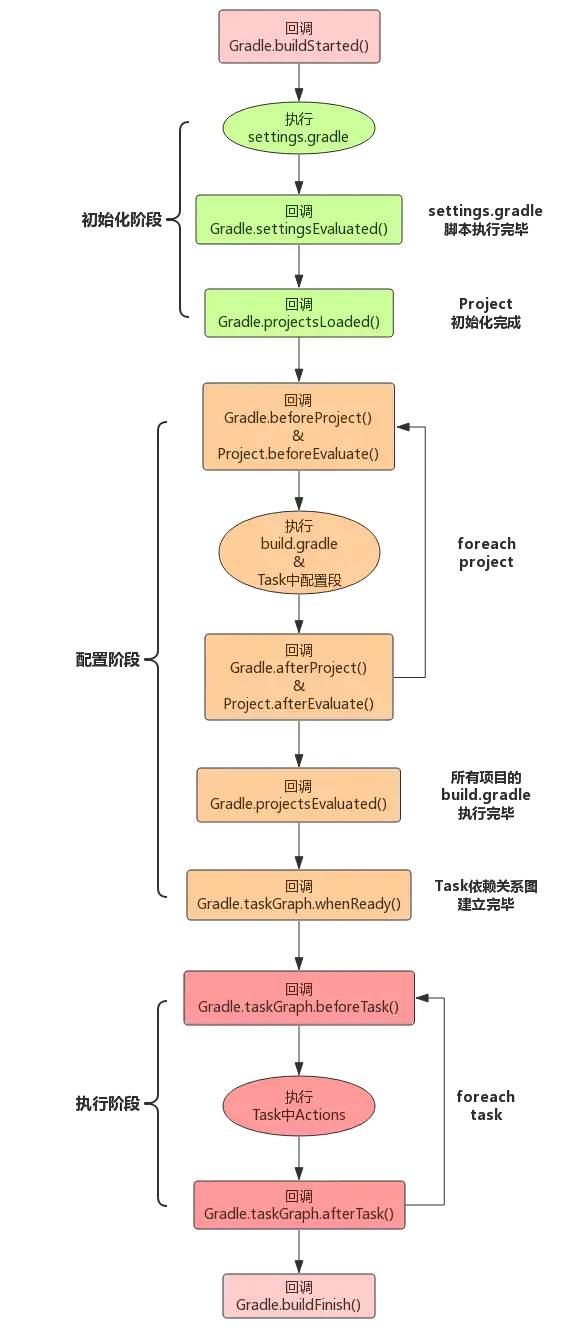
As you can see, the process of the whole Gradle life cycle includes the following four parts:
-
1) , first, analyze settings.gradle To get module information, this is the initialization phase.
-
2) , and then, configure each module, and the task will not be executed during configuration.
-
3) , then, after configuration, there is an important callback project.afterEvaluate , which means that all modules have been configured and are ready to perform a task.
-
4) , finally, execute the specified task and its dependent tasks.
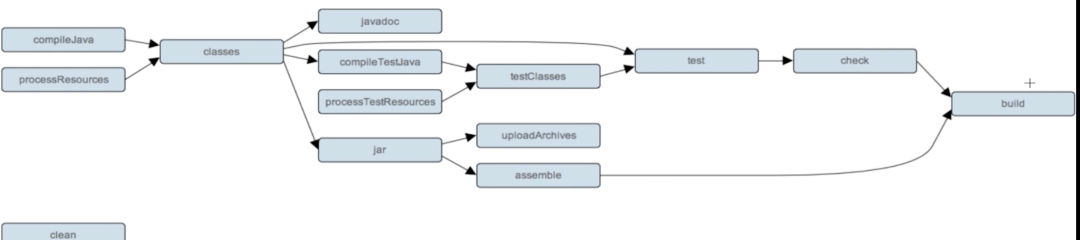
In the gradle build command, the most complex command can be said to be the gradle build command, because many other tasks are needed in the project construction process. Here, let's take a look at the tasks it depends on and the directed acyclic graph it consists of, as shown below:
matters needing attention
-
1) The listener corresponding to each Hook point must be added before the callback's life cycle.
-
2) , if more than one is registered project.afterEvaluate Callback, the execution order will be the same as the registration order.
5. Get the time consumption of each stage and task of construction
After understanding the Hook methods in the Gradle life cycle, we can use them to get the time-consuming situation of various stages and tasks of project construction settings.gradle Add the following code to it:
long beginOfSetting = System.currentTimeMillis()
def beginOfConfig
def configHasBegin = false
def beginOfProjectConfig = new HashMap()
def beginOfProjectExcute
gradle.projectsLoaded {
    println 'Initialization phase, time consuming:' + (System.currentTimeMillis() -
beginOfSetting) + 'ms'
}
gradle.beforeProject { project ->
    if (!configHasBegin) {
        configHasBegin = true
        beginOfConfig = System.currentTimeMillis()
    }
    beginOfProjectConfig.put(project, System.currentTimeMillis())
}
gradle.afterProject { project ->
    def begin = beginOfProjectConfig.get(project)
    println 'Configuration phase,' + project + 'Time consuming:' +
(System.currentTimeMillis() - begin) + 'ms'
}
gradle.taskGraph.whenReady {
    println 'Configuration phase, total time:' + (System.currentTimeMillis() -
beginOfConfig) + 'ms'
    beginOfProjectExcute = System.currentTimeMillis()
}
gradle.taskGraph.beforeTask { task ->
    task.doFirst {
        task.ext.beginOfTask = System.currentTimeMillis()
    }
    task.doLast {
        println 'Implementation phase,' + task + 'Time consuming:' +
(System.currentTimeMillis() - task.beginOfTask) + 'ms'
    }
}
gradle.buildFinished {
    println 'Execution phase, time consuming:' + (System.currentTimeMillis() -
beginOfProjectExcute) + 'ms'
}
In Gradle, executing each type of configuration script will create corresponding instances. In Gradle, there are three types of configuration scripts, as follows:
-
1) , build scrit: corresponding to a Project instance, that is, each build.gradle Will be converted to a Project instance.
-
2) Init scrit: it corresponds to a Gradle instance, which is created during construction initialization and exists in the form of a single instance in the whole construction execution process.
-
3) , Settings scrit: corresponding to a Settings instance, that is, each settings.gradle Will be converted to a Settings instance.
As you can see, a Gradle construction process is composed of one or more Project instances, and each Project instance is composed of one or more task s. Next, let's get to know Project.
3
Project
Project is the entry point for Gradle to build the entire application, so it's very important that we have a deep understanding of it. Unfortunately, there are few good articles about project explanation on the Internet, but it doesn't matter. Next, we will learn more about the project api.
As we can see from the above, each build.gradle There is a corresponding Project instance in the build.gradle In, we usually configure a series of Project dependencies, such as:
implementation 'com.github.bumptech.glide:glide:4.8.0'
Similar to the implementation and api dependent keywords, in essence it is a method call. Above, we use the implementation() method to pass in a map parameter, which contains three pairs of key values. The complete writing is as follows:
implementation group: 'com.github.bumptech.glide' name:'glide' version:'4.8.0'
When we use the implementation and api dependency aar files, Gradle will find the corresponding dependency files in the repository. Your repository may contain jcenter, maven and a series of warehouses. Each warehouse is actually a collection server that depends on many files, And they are classified and stored through the above group s, name s, and version s.
1. Project core API decomposition
There are many API s in Project, but we can divide them into six parts according to their properties and purposes, as shown in the following figure:
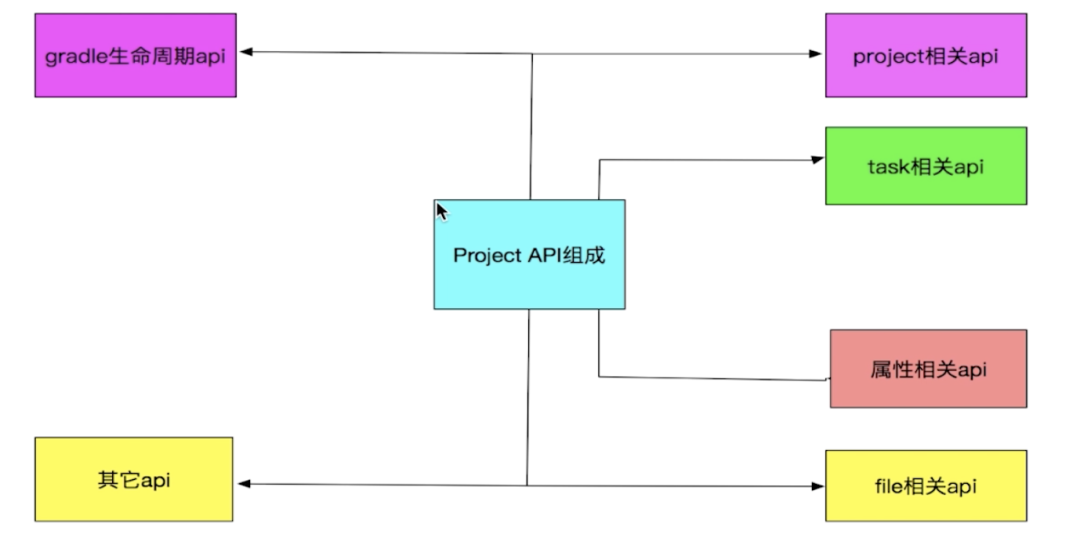
For the role of each part of the Project, we can have a general understanding first, so as to build an overall perception for the API system of the Project, as shown below:
-
1) Project API: enables the current project to operate its parent project and manage its child projects.
-
2) Task related API: provides the ability to add new tasks and manage existing tasks for the current Project. Because task is very important, we will go to chapter four.
-
3) . api related to Project attributes: Gradle will provide us with some Project attributes in advance, and the api related to attributes enables us to add additional attributes to Project.
-
4) . File related API: Project File related APIs are mainly used to operate some File processing under our current Project.
-
5) Gradle lifecycle API: the lifecycle API we explained in Chapter 2.
-
6) , other API s: add dependency, add configuration, import external files, etc.
2,Project API
Every Groovy Script is compiled into Script bytecode by the compiler, and every build.gradle All scripts will be compiled into Project bytecode by the compiler, so we build.gradle All the logic written in is written in the Project class.
Next, we will introduce a series of important API s of Project according to the easy to difficult formula.
It should be noted in advance that by default, we select the build.gradle In this script file, learn a series of usage of Project. The usage of getAllProject is as follows:
1,getAllprojects
getAllprojects indicates to get all project instances. The example code is as follows:
/**
 * getAllProjects Use example
 */
this.getProjects()

def getProjects() {
    println "<================>"
    println " Root Project Start "
    println "<================>"
    //1. The getAllprojects method returns a Set containing the root project and its subprojects
    //The eachWithIndex method is used to iterate over sets, arrays and other containers,
    //And return subscript at the same time. Unlike each method, only return project
    this.getAllprojects().eachWithIndex { Project project, int index ->
        //2. The subscript is 0, indicating that the current traversal is rootProject
        if (index == 0) {
            println "Root Project is $project"
        } else {
            println "child Project is $project"
        }
    }
}
First, we define a getProjects method using the def keyword. Then, in note 1, we call the getAllprojects method to return a Set containing the root project and its subprojects, and chain call eachWithIndex to traverse the Set set.
Next, in Note 2, we will judge whether the current subscript index is 0. If it is, it indicates that the current traversal is rootProject, and the name of rootProject will be output; otherwise, the name of child project will be output.
Next, we execute. / gradlew clean on the command line, and the result is as follows:
quchao@quchaodeMacBook-Pro Awesome-WanAndroid % ./gradlew clean
Settings assessment complete( settings.gradle Code execution completed)

Project structure loading complete (end of initialization phase)
After initialization, you can access the root project: root project 'awesome wanandroid'
Initialization phase, time: 5ms
Configuration on demand is an incubating feature.
> Configure project :
<================>
 Root Project Start
<================>
Root Project is root project 'Awesome-WanAndroid'
child Project is project ':app'
In the configuration phase, root project 'awesome wanandroid' takes 284ms
> Configure project :app
...
Configuration phase, total time: 428ms
> Task :app:clean
Execution phase, task ': app:clean 'time: 1ms
:app:clean spend 2ms
End of build
Tasks spend time > 50ms:
Execution phase, time: 9ms
As you can see, after initialization, we will first configure our rootProject and output the corresponding project information. Next, the configuration of the sub project app will be executed. Finally, clean task is executed.
It should be noted that the root project and its sub projects form a tree structure, but the height of this tree is only limited to two layers.
2,getSubprojects
Getprojects indicates to get the instances of all sub projects under the current project. The example code is as follows:
/**
 * getAllsubproject Use example
 */
this.getSubProjects()

def getSubProjects() {
    println "<================>"
    println " Sub Project Start "
    println "<================>"
    //The getSubprojects method returns a Set containing subprojects
    this.getSubprojects().each { Project project ->
        println "child Project is $project"
    }
}
Just like the usage of getAllprojects, the getSubprojects method returns a Set containing subprojects. Here we use the each method to print out the names of subprojects. The operation results are as follows:
quchao@quchaodeMacBook-Pro Awesome-WanAndroid % ./gradlew clean
Settings assessment complete( settings.gradle Code execution completed)
...
> Configure project :
<================>
 Sub Project Start
<================>
child Project is project ':app'
In the configuration phase, root project 'awesome wanandroid' takes 289ms
> Configure project :app
...
All project evaluations complete (end of configuration phase)
Configuration phase, total time: 425ms
> Task :app:clean
Execution phase, task ': app:clean 'time: 1ms
:app:clean spend 2ms
End of build
Tasks spend time > 50ms:
Execution phase, time: 9ms
As you can see, the name of the subproject is also output in the configuration phase of Gradle.
3,getParent
getParent means to get the parent class of the current project. It should be noted that if we use it in the root project, the parent class will be null. Because the root project has no parent class, so here we are directly in app build.gradle Write the following example code:
...
> Configure project :
In the configuration phase, root project 'awesome wanandroid' takes 104ms
> Configure project :app
gradlew version > 4.0
my parent project is Awesome-WanAndroid
Configuration phase, project ': app' time: 282ms
...
All project evaluations complete (end of configuration phase)
Configuration phase, total time: 443ms
...
As you can see, the current parent class of app project, namely awesome Wan Android project, is output here.
4,getRootProject
What if we want to get only the current project instance in the root project? Using getRootProject directly, you can build.gradle The file gets the project instance of the current root project. The example code is as follows:
/**
 * 4,getRootProject Use example
 */
this.getRootPro()

def getRootPro() {
    def rootProjectName = this.getRootProject().name
    println "root project is $rootProjectName"
}
5,project
Project represents an instance of a specified project, which is then manipulated in a closure. Before using, we need to look at the source code of the project method, as follows:
    /**
     * <p>Locates a project by path and configures it using the given closure. If the path is relative, it is
     * interpreted relative to this project. The target project is passed to the closure as the closure's delegate.</p>
     *
     * @param path The path.
     * @param configureClosure The closure to use to configure the project.
     * @return The project with the given path. Never returns null.
     * @throws UnknownProjectException If no project with the given path exists.
     */
    Project project(String path, Closure configureClosure);
As you can see, there are two parameters in the project method, one is to specify the path of the project, the other is to configure the closure of the project. Let's see how to use project flexibly. The sample code is as follows:
/**
 * 5,project Use example
 */

//1. Closure parameters can be placed outside the brackets
project("app") { Project project ->
    apply plugin: 'com.android.application'
}

// 2. A simpler way to write it is to omit parameters
project("app") {
    apply plugin: 'com.android.application'
}
After using it skillfully, we usually use the method in Note 2.
6,allprojects
allprojects means to configure the current project and each of its subprojects, as follows:
/**
 * 6,allprojects Use example
 */

//A simpler way to write like project
allprojects {
    repositories {
        google()
        jcenter()
        mavenCentral()
        maven {
            url "https://jitpack.io"
        }
        maven { url "https://plugins.gradle.org/m2/" }
    }
}
In all projects, we usually use it to configure some general configurations, such as the most common global warehouse configuration above.
7,subprojects
Subjects can uniformly configure all subprojects under the current project. The example code is as follows:
/**
 * 7,subprojects Use example:
 *    Introduce configuration script of uploading aar file to Maven server to all subprojects
 */
subprojects {
    if (project.plugins.hasPlugin("com.android.library")) {
        apply from: '../publishToMaven.gradle'
    }
}
In the above example code, we will first determine whether the subproject under the current project is a library. If it is a library, it is necessary to introduce the publishToMaven script.
3. project property
At present, in the project interface, only seven attributes are defined in advance, and the source code is as follows:
public interface Project extends Comparable<Project>, ExtensionAware, PluginAware {
    /**
     * Default project build file name
     */
    String DEFAULT_BUILD_FILE = "build.gradle";

    /**
     * The symbol to distinguish project name from task name
     */
    String PATH_SEPARATOR = ":";

    /**
     * Default build directory name
     */
    String DEFAULT_BUILD_DIR_NAME = "build";

    String GRADLE_PROPERTIES = "gradle.properties";

    String SYSTEM_PROP_PREFIX = "systemProp";

    String DEFAULT_VERSION = "unspecified";

    String DEFAULT_STATUS = "release";

    ...
}
Fortunately, gradle provides the ext keyword that gives us the ability to define the extended properties we need. With it, we can globally configure the dependencies in our project. Next, let's start from the ancient time of configuration, so that we can have a deeper understanding of the global dependency configuration of gradle.
ext extended attribute
1. Ancient times
At the beginning of AS, our dependency configuration code is AS follows:
android {
    compileSdkVersion 27
    buildToolsVersion "28.0.3"
    ...
}
2. Slash and burn
However, this way of writing values directly is not standardized, so we use this way later:
def mCompileSdkVersion = 27
def mBuildToolsVersion = "28.0.3"

android {
    compileSdkVersion mCompileSdkVersion
    buildToolsVersion mBuildToolsVersion
    ...
}
3. Iron plow and cattle plough
If each sub project needs to be configured with the same Version, we need to write a lot of duplicate code. Therefore, we can use the subject and ext we learned above to simplify:
//In the root directory build.gradle Medium
subprojects {
    ext {
        compileSdkVersion = 27
        buildToolsVersion = "28.0.3"
    }
}

//Under app mouse build.gradle Medium
android {
    compileSdkVersion this.compileSdkVersion
    buildToolsVersion this.buildToolsVersion
    ...
}
4. Industrial age
There is still a serious problem in using the subjects method to define the general extended attributes. It is the same as the previous method. It will still define these extended attributes in each subproject. At this time, we can remove the subjects and directly use ext to define the whole project
//In the root directory build.gradle Medium
ext {
    compileSdkVersion = 27
    buildToolsVersion = "28.0.3"
}
5. Electrical age
As the project grows larger and larger, there are more and more ext extension properties defined under the root project. Therefore, we can configure this set of global properties to be defined in another gradle script. Here we usually name it as config.gradle , the general template is as follows:
ext {

    android = [
            compileSdkVersion       : 27,
            buildToolsVersion       : "28.0.3",
            ...
            ]

    version = [
            supportLibraryVersion   : "28.0.0",
            ...
            ]

    dependencies = [
            // base
            "appcompat-v7"                      : "com.android.support:appcompat-v7:${version["supportLibraryVersion"]}",
            ...
            ]

    annotationProcessor = [
            "glide_compiler"                    : "com.github.bumptech.glide:compiler:${version["glideVersion"]}",
            ...
            ]

    apiFileDependencies = [
            "launchstarter"                                   : "libs/launchstarter-release-1.0.0.aar",
            ...
            ]

    debugImplementationDependencies = [
            "MethodTraceMan"                                  : "com.github.zhengcx:MethodTraceMan:1.0.7"
    ]

    releaseImplementationDependencies = [
            "MethodTraceMan"                                  : "com.github.zhengcx:MethodTraceMan:1.0.5-noop"
    ]

    ...
}
6. More intelligent now
Although we have a comprehensive global dependency profile, we still have to write a long string of dependency codes in our modules. Therefore, we can use traversal to dependency. The template codes are as follows:
//Under each mouse build.gradle Script
def implementationDependencies = rootProject.ext.dependencies
def processors = rootProject.ext.annotationProcessor
def apiFileDependencies = rootProject.ext.apiFileDependencies

//Under each mouse build.gradle In the dependencies closure of a script
//Handle all aar dependencies
apiFileDependencies.each { k, v -> api files(v)}

//Handle all xxximplementation dependencies
implementationDependencies.each { k, v -> implementation v }
debugImplementationDependencies.each { k, v -> debugImplementation v }
...

//Handle annotationProcessor dependencies
processors.each { k, v -> annotationProcessor v }

//Handle all dependencies that contain exclude
debugImplementationExcludes.each { entry ->
    debugImplementation(entry.key) {
        entry.value.each { childEntry ->
            exclude(group: childEntry.key, module: childEntry.value)
        }
    }
}
Maybe in the future, there will be a more concise way with the continuous optimization of Gradle. If you have a better place, we can discuss it.
At gradle.properties Define extended properties under
In addition to defining additional properties using ext extended properties, we can also define additional properties in the gradle.properties The extension properties are defined as follows:
//At gradle.properties Medium
mCompileVersion = 27

//Under app mouse build.gradle Medium
compileSdkVersion mCompileVersion.toInteger()
4. Document related API
In gradle, file related API s can be summarized into the following two categories:
1) , path get API
getRootDir()
getProjectDir()
getBuildDir()
2) . API related to file operation
File location
File copy
File tree traversal
1) , path get API
There are three kinds of API s commonly used for path acquisition, and their example codes are as follows:
/**
 * 1,Path get API
 */
println "the root file path is:" + getRootDir().absolutePath
println "this build file path is:" + getBuildDir().absolutePath
println "this Project file path is:" + getProjectDir().absolutePath
Then, we execute. / gradlew clean, and the output is as follows:
> Configure project :
the root file path is:/Users/quchao/Documents/main-open-project/Awesome-WanAndroid
this build file path is:/Users/quchao/Documents/main-open-project/Awesome-WanAndroid/build
this Project file path is:/Users/quchao/Documents/main-open-project/Awesome-WanAndroid
//Configuration phase, root project'Awesome-WanAndroid'Time consuming:538ms
2) . API related to file operation
1. File location
The common file location API is file/files, and its example code is as follows:
//Under rootProject build.gradle Medium

/**
 * 1,File of file location
 */
this.getContent("config.gradle")

def getContent(String path) {
    try {
        //Different from the way that new file needs to pass in absolute path,
        //file starts from the current project project
        def mFile = file(path)
        println mFile.text
    } catch (GradleException e) {
        println e.toString()
        return null
    }
}

/**
 * 1,files for file location
 */
this.getContent("config.gradle", "build.gradle")

def getContent(String path1, String path2) {
    try {
        //Different from the way that new file needs to pass in absolute path,
        //file starts from the current project project
        def mFiles = files(path1, path2)
        println mFiles[0].text + mFiles[1].text
    } catch (GradleException e) {
        println e.toString()
        return null
    }
}
2. File copy
The common file copy API is copy, and its example code is as follows:
/**
 * 2,File copy
 */
copy {
    //You can copy files or folders
    //Here is to copy the apk directory generated under app moudle to
    //build directory under root project
    from file("build/outputs/apk")
    into getRootProject().getBuildDir().path + "/apk/"
    exclude {
        //Exclude files that do not need to be copied
    }
    rename {
        //Rename the copied file
    }
}
3. File tree traversal
We can use fileTree to convert the current directory into the form of number of files, and then we can get each tree element (node) for corresponding operations. The example code is as follows:
/**
 * 3,File tree traversal
 */
fileTree("build/outputs/apk") { FileTree fileTree ->
    fileTree.visit { FileTreeElement fileTreeElement ->
        println "The file is $fileTreeElement.file.name"
        copy {
            from fileTreeElement.file
            into getRootProject().getBuildDir().path + "/apkTree/"
        }
    }
}
5. Other API
1. Dependent on relevant API
buildscript under root project
The dependency used to configure the project core in buildscript. The original and simplified use examples are as follows:
Original use example
buildscript { ScriptHandler scriptHandler ->
//Configure the warehouse address of our project
scriptHandler.repositories { RepositoryHandler repositoryHandler ->
    repositoryHandler.google()
    repositoryHandler.jcenter()
    repositoryHandler.mavenCentral()
    repositoryHandler.maven { url 'https://maven.google.com' }
    repositoryHandler.maven { url "https://plugins.gradle.org/m2/" }
    repositoryHandler.maven {
        url uri('../PAGradlePlugin/repo')
    }
    //Access local private Maven server
    repositoryHandler.maven {
        name "personal"
        url "http://localhost:8081:/JsonChao/repositories"
        credentials {
            username = "JsonChao"
            password = "123456"
        }
    }
}

  //Configure plug-in dependency of our project
dependencies { DependencyHandler dependencyHandler ->
    dependencyHandler.classpath 'com.android.tools.build:gradle:3.1.4'

    ...
}
Simplified use example
buildscript {
//Configure the warehouse address of our project
repositories {
    google()
    jcenter()
    mavenCentral()
    maven { url 'https://maven.google.com' }
    maven { url "https://plugins.gradle.org/m2/" }
    maven {
        url uri('../PAGradlePlugin/repo')
    }
}

//Configure plug-in dependency of our project
dependencies {
    classpath 'com.android.tools.build:gradle:3.1.4'

    ...
}
dependencies under app moudle
Different from the dependencies in the root project buildscript, which is used to configure the plug-in dependency of our Gradle project, the dependencies under app moudle is used to add the third-party dependency for the application. We need to pay attention to the use of exclude and transitive under app moudle. The example code is as follows:
implementation(rootProject.ext.dependencies.glide) {
        //Exclude dependency: generally used to solve problems related to resource and code conflicts
        exclude module: 'support-v4'
        //Passing dependency: a = > b = > C, dependency in C is used in B,
        //And A depends on B. if transfer dependency is turned on, A can use B
        //The dependencies in C used in are not opened by default, that is, false
        transitive false
}
2. External command execution
We usually use exec provided by Gradle to execute external commands. Next, we use exec command to copy APK files newly produced under the current project to the Downloads directory of the computer. The example code is as follows:
}
/**
 * Use exec to execute external commands
 */
task apkMove() {
    doLast {
        //To execute in the execution phase of gradle
        def sourcePath = this.buildDir.path + "/outputs/apk/speed/release/"
        def destinationPath = "/Users/quchao/Downloads/"
        def command = "mv -f $sourcePath $destinationPath"
        exec {
            try {
                executable "bash"
                args "-c", command
                println "The command execute is success"
            } catch (GradleException e) {
                println "The command execute is failed"
            }
        }
    }
4
Task
Only tasks can be executed in the execution phase of Gradle (its essence is a series of actions in the executed tasks), so the importance of tasks is self-evident.
1. From an example 🌰 set out
First of all, we can be in any one build.gradle You can define a Task in the file. Here is a complete example code:
//1. Declare a gradle task named JsonChao
task JsonChao
JsonChao {
    //2. Output hello ~, in the JsonChao task closure,
    //Execution is in the second phase of the gradle life cycle, the configuration phase.
    println("hello~")
    //3. Attach some actions to the task, and execute them in the
    // The third phase of the gradle life cycle is the execution phase.
    doFirst {
        println("start")
    }
    doLast {
        println("end")
    }
}
//4. In addition to the above, define the declaration, configuration and Action separately
//Besides, they can also be combined directly.
//Here we define another Android task, which depends on JsonChao
//Task, that is to say, the JsonChao task must be executed before
//To execute Android task s, they form a
//Directed acyclic graph: jsonchao task = > Android task
task Andorid(dependsOn:"JsonChao") {
    doLast {
        println("end?")
    }
}
First, in annotation 1, we declare a gradle task named JsonChao.
Next, in Note 2, hello ~, which is output in the JsonChao task closure, will be executed in the second phase of the gradle life cycle, that is, the configuration phase.
Then, in note 3, some execution actions are attached to the task, namely doFirst and doLast. The code in their closures will be executed in the third stage of the gradle life cycle, namely the execution stage.
For doFirst and doLast, their functions are as follows:
-
doFirst: indicates the Action called at the beginning of task execution.
-
doLast: indicates the Action to be called when the task will be completed.
It should be noted that doFirst and doLast can be executed multiple times.
Finally, in note 4, we can see that in addition to notes 1, 2 and 3, which define declaration, configuration and Action separately, they can also be combined directly. Here we define another Android task, which depends on JsonChao task, that is,
You must finish executing JsonChao task before you can execute Android task. Thus, they form a directed acyclic graph: JsonChao task = > Android task.
You can see the following output results when executing Android gradle task:
> Task :JsonChao
start
end
Execution phase, task ': JsonChao' time: 1ms
:JsonChao spend 4ms
> Task :Andorid
end?
Execution phase, task ': Andorid' time: 1ms
:Andorid spend 2ms
End of build
Tasks spend time > 50ms:
Execution phase, time: 15ms
2. Task definition and configuration
There are two common ways to define a Task. The sample code is as follows:
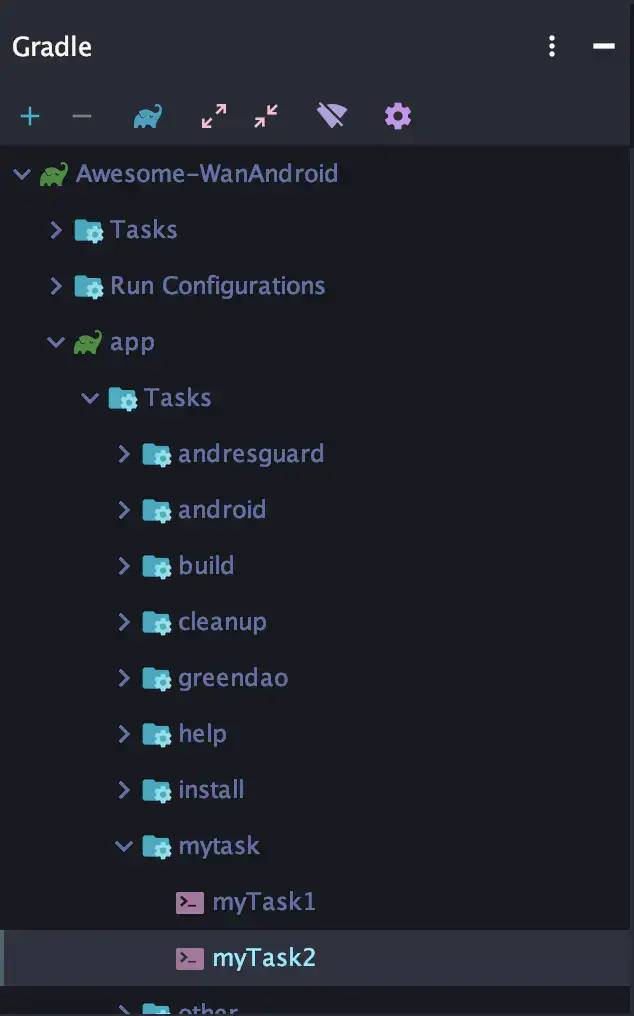
// Task definition method 1: directly create by task function (in "()", group and description attributes can not be specified)
task myTask1(group: "MyTask", description: "task1") {
    println "This is myTask1"
}

// Task definition method 2: create task through TaskContainer
this.tasks.create(name: "myTask2") {
    setGroup("MyTask")
    setDescription("task2")
    println "This is myTask2"
}
After the above Tasks are defined, synchronize the project to see the corresponding Task Group and its Tasks, as shown in the following figure:
Properties of Task
It should be noted that no matter which task is defined in "()", we can configure a series of its properties as follows:
project.task('JsonChao3', group: "JsonChao", description: "my tasks",
dependsOn: ["JsonChao1", "JsonChao2"] ).doLast {
    println "execute JsonChao3 Task"
}
The attributes currently supported by the government can be summarized in the following table:
| model selection | describe | Default |
|---|---|---|
| "name" | task name | None, must specify |
| "type" | task Class to be created | DefaultTask |
| "action" | closure or Action to be executed when task is executed | null |
| "overwrite" | Replace an existing task | false |
| "dependsOn" | The task collection that the task depends on | [] |
| "group" | Group to which the task belongs | null |
| "description" | task description | null |
| "constructorArgs" | Parameters passed to the task Class constructor | null |
Use "$" to refer to another task's properties
Here, we can use "$" in the current task to reference the properties of another task. The example code is as follows:
task Gradle_First() {

}

task Gradle_Last() {
    doLast {
        println "I am not $Gradle_First.name"
    }
}
Use ext to customize the required attributes for task s
Of course, in addition to using the existing attributes, we can also use ext to customize the required attributes for the task. The code is as follows:
task Gradle_First() {
    ext.good = true
}

task Gradle_Last() {
    doFirst {
        println Gradle_First.good
    }
    doLast {
        println "I am not $Gradle_First.name"
    }
}
Use the defaultTasks keyword to identify the default execution tasks
In addition, we can also use the defaultTasks keyword to identify some tasks as default execution tasks. The code is as follows:
defaultTasks "Gradle_First", "Gradle_Last"

task Gradle_First() {
    ext.good = true
}

task Gradle_Last() {
    doFirst {
        println Gradle_First.goodg
    }
    doLast {
        println "I am not $Gradle_First.name"
    }
}
matters needing attention
Each task will go through a complete life cycle process of initialization, configuration and execution.
3. Task execution details
Task usually uses doFirst and doLast to operate during execution. The example code is as follows:
//Use Task to operate in the execution phase
task myTask3(group: "MyTask", description: "task3") {
    println "This is myTask3"
    doFirst {
        //Sophomore
        println "This group is 2"
    }

    doLast {
        //Senior three
        println "This description is 3"
    }
}

//It can also be used taskName.doxxx How to add execution tasks
myTask3.doFirst {
    //The first execution of this way = > boss
    println "This group is 1"
}
Task execution practice
Next, we will use doFirst and doLast to carry out the following actual combat to calculate the time consumption during the execution of build. The complete code is as follows:
//Task execution: calculate the time consumption during the execution of build
def startBuildTime, endBuildTime
//1. Operate after the completion of the Gradle configuration phase,
//So as to ensure that the task to be executed is configured
this.afterEvaluate { Project project ->
    //2. Find the first task executed under the current project, namely preBuild task
    def preBuildTask = project.tasks.getByName("preBuild")
    preBuildTask.doFirst {
        //3. Get the time stamp of the first task execution time
        startBuildTime = System.currentTimeMillis()
    }
    //4. Find the last task executed under the current project, i.e. build task
    def buildTask = project.tasks.getByName("build")
    buildTask.doLast {
        //5. Get the time stamp of the moment before the last task is completed
        endBuildTime = System.currentTimeMillis()
        //6. Time consumption during output build execution
        println "Current project execute time is ${endBuildTime - startBuildTime}"
    }
}
4. Task dependency and execution order
There are three ways to specify the execution order of tasks, as shown in the following figure:
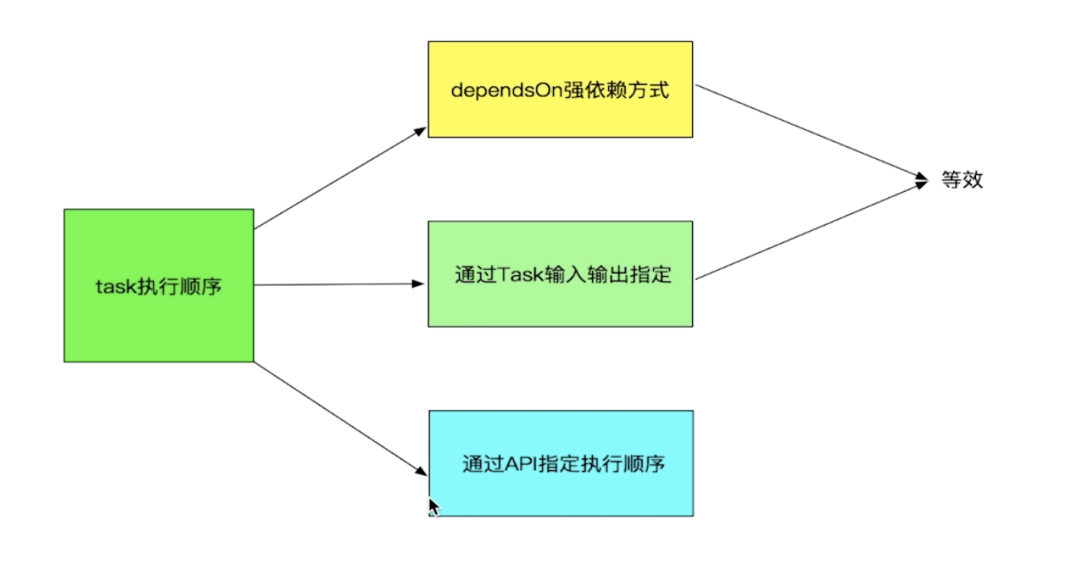
1) . dependsOn strong dependency mode
dependsOn strong dependency can be subdivided into static dependency and dynamic dependency. The example code is as follows:
Static dependency
task task1 {
    doLast {
        println "This is task1"
    }
}

task task2 {
    doLast {
        println "This is task2"
    }
}

//Task static dependency mode1 (Common)
task task3(dependsOn: [task1, task2]) {
    doLast {
        println "This is task3"
    }
}

//Task static dependency mode2
task3.dependsOn(task1, task2)
Dynamic dependence
//Task dynamic dependency mode
task dytask4 {
    dependsOn this.tasks.findAll { task ->
        return task.name.startsWith("task")
    }
    doLast {
        println "This is task4"
    }
}
2) , specify input and output through Task
We can also specify the input and output through Task. In this way, we can efficiently implement a gradle script to automatically maintain version release documents. The code related to the input and output is as follows:
task writeTask {
  inputs.property('versionCode', this.versionCode)
  inputs.property('versionName', this.versionName)
  inputs.property('versionInfo', this.versionInfo)
  //1. Specify the output file as destFile
  outputs.file this.destFile
  doLast {
    //Write the input content to the output file
    def data = inputs.getProperties()
    File file = outputs.getFiles().getSingleFile()

    //Write version information to XML file
    ...

}

task readTask {
  //2. Specify that the input file is the output file destFile of the previous task (writeTask)
  inputs.file this.destFile
  doLast {
    //Read the contents of the input file and display
    def file = inputs.files.singleFile
    println file.text
  }
}

task outputwithinputTask {
  //3. Write before read
  dependsOn writeTask, readTask
  doLast {
    println 'End of I / O task'
  }
}
First, we define a WirteTask. Then, in note 1, we specify the output file as destFile and write the version information to the XML file.
Next, a readTask is defined, and in Note 2, the input file is specified as the output file of the previous task (i.e. writeTask).
Finally, in note 3, use dependsOn to associate the two task s. At this time, the order of input and output is write first, then read. In this way, a real case of input and output is realized. If you want to see the complete implementation code, please check the releaseinfo.gradle script.
In addition, in McImage, it uses the method of dependsOn to insert its own task into the construction process of Gradle. The key code is as follows:
// inject task
(project.tasks.findByName(chmodTask.name) as Task).dependsOn(mergeResourcesTask.taskDependencies.getDependencies(mergeResourcesTask))
(project.tasks.findByName(mcPicTask.name) as Task).dependsOn(project.tasks.findByName(chmodTask.name) as Task)
mergeResourcesTask.dependsOn(project.tasks.findByName(mcPicTask.name))
Specify dependency order through API
In addition to the method of dependsOn, we can also specify the dependency order of tasks through mustRunAfter method in the task closure. Note that in the latest gradle api, mustRunAfter must be used in combination with dependsOn's strong dependency. The example code is as follows:
//Specify dependency order through API
task taskX {
    mustRunAfter "taskY"

    doFirst {
        println "this is taskX"
    }
}

task taskY {
    //Use mustRunAfter to specify the dependent (one or more) pre task
    //You can also use the method of "shouldRunAfter", but it is a non mandatory dependency
//    shouldRunAfter taskA
    doFirst {
        println "this is taskY"
    }
}

task taskZ(dependsOn: [taskX, taskY]) {
    mustRunAfter "taskY"
    doFirst {
        println "this is taskZ"
    }
}
5. Task type
In addition to defining a new task, we can also use the type attribute to directly use an existing task type (many articles say that it is not very accurate to inherit an existing class), such as the Copy, Delete, Sync task and so on provided by Gradle. The sample code is as follows:
//1. Delete the build file in the root directory
task clean(type: Delete) {
    delete rootProject.buildDir
}
//2. Copy doc to build/target directory
task copyDocs(type: Copy) {
    from 'src/main/doc'
    into 'build/target/doc'
}
//3. During execution, the source files will be copied to the target directory, and then all non copied files will be deleted from the target directory
task syncFile(type:Sync) {
    from 'src/main/doc'
    into 'build/target/doc'
}
6. Hook to build lifecycle
We can use a series of life cycle API s provided by gradle to hook our own tasks into the construction life cycle. For example, we can use the afterEvaluate method to hook the writeTask defined in the third section to the time after gradle configures all tasks. The example code is as follows:
//Execute writeTask after configuration phase
this.project.afterEvaluate { project ->
  def buildTask = project.tasks.findByName("build")
  doLast {
    buildTask.doLast {
      writeTask.execute()
    }
  }
}
It should be noted that after the configuration is completed, we need to import the releaseinfo script defined by us under app moudle, as follows:
apply from: this.project.file("releaseinfo.gradle")
5
SourceSet
SourceSet is mainly used to set the location of source code or resources in our project. At present, its two most common use cases are as follows:
-
1) . modify the so inventory location.
-
2) . subcontracting storage of resource documents.
1. Modify so inventory location
We only need to configure the following code under the android closure under app moudle to modify the so inventory location:
android {
    ...
    sourceSets {
        main {
            //Modify the storage location of so Library
            jniLibs.srcDirs = ["libs"]
        }
    }
}
2. Subcontracting storage of resource documents
Similarly, configure the following code under the android closure under app moudle to subcontract the resource file:
android {
    sourceSets {
        main {
            res.srcDirs = ["src/main/res",
                           "src/main/res-play",
                           "src/main/res-shop"
                            ...
                           ]
        }
    }
}
In addition, we can use the following code to define sourceSets outside the android closure:
this.android.sourceSets {
    ...
}
6
Gradle command
There are many Gradle commands, but we usually only use the following two types of commands:
-
1) , command to get the build information.
-
2) , execute the task command.
1. Command to get build information
//1. List the names of subprojects by top-down structure
./gradlew projects
//2. List all tasks in the project by category
./gradlew tasks
//3. List project dependencies
./gradlew dependencies
2. Command to execute task
There are four general commands for executing task s, as follows:
//1. Used to execute multiple task tasks
./gradlew JsonChao Gradle_Last
//2. Use - x to exclude a single task task
./gradlew -x JsonChao
//3. Use - continue to continue to execute the following build command after the build fails
./gradlew -continue JsonChao
//4. It is recommended to use the simplified task name to execute the task. The following command is used to execute the task
// Gradle_Last task
./gradlew G_Last
For task s defined in subdirectories, we usually use the following commands to execute them:
//1. Use - b to execute the task defined in the app directory
./gradlew -b app/build.gradle MyTask
//2. In large projects, we usually use the more intelligent - p to replace - b
./gradlew -p app MyTask
7
summary
At this point, we have finished explaining the core API of Gradle. Here we will review the main points of this article, as follows:
1, Gradle advantage
1. Better flexibility
2. Finer granularity
3. Better scalability
4. Greater compatibility
2, Gradle build lifecycle
1. Initialization phase
2. Configuration phase
3. Implementation phase
4. Each lifecycle node of Hook Gradle
5. Get the time consumption of each stage and task of construction
3, Project
1. Project core API decomposition
2,Project API
3. project property
4. Document related API
5. Other API
4, Task
1. From an example 🌰 set out
2. Task definition and configuration
3. Task execution details
4. Task dependency and execution order
5. Task type
6. Hook to build lifecycle
5, SourceSet
1. Modify so inventory location
2. Subcontracting storage of resource documents
6, Gradle command
1. Command to get build information
2. Command to execute task
The core API of Gradle is very important, which is absolutely necessary for us to effectively implement a Gradle plug-in. Because only a solid foundation can go further, I hope we can move forward together.
Reference link:
1. Chapter 6-8 of "detailed lecture on construction technology + actual combat of gradle 3.0 automation project of muke.com"
2. Gradle DSL API documentation
3. Android Plugin DSL API documentation
4. Gradle DSL = > project official API document
5. Gradle DSL = > official API document of task
6. Introduction to the basics of Gradle script
7. Comprehensive understanding of Gradle execution timing
8. Comprehensive understanding of Gradle - defining tasks
9. Take control of Android Gradle
10. Gradle foundation - build lifecycle and Hook technology