Spring
1, Initial Spring
1.0 front installation
1.framework
-
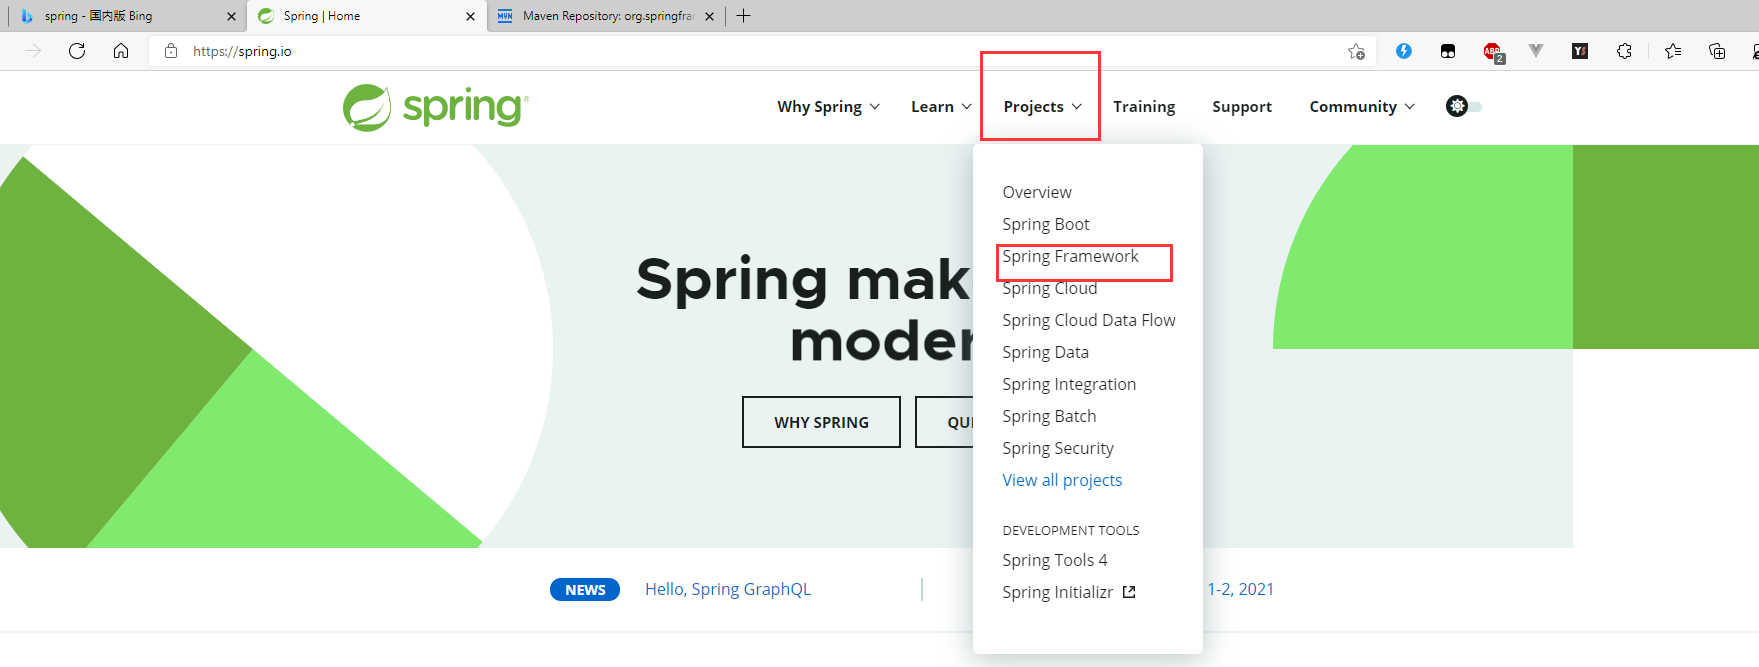
Search spring through the browser and enter the official website
-
Select spring framework from the project drop-down box on the home page
-
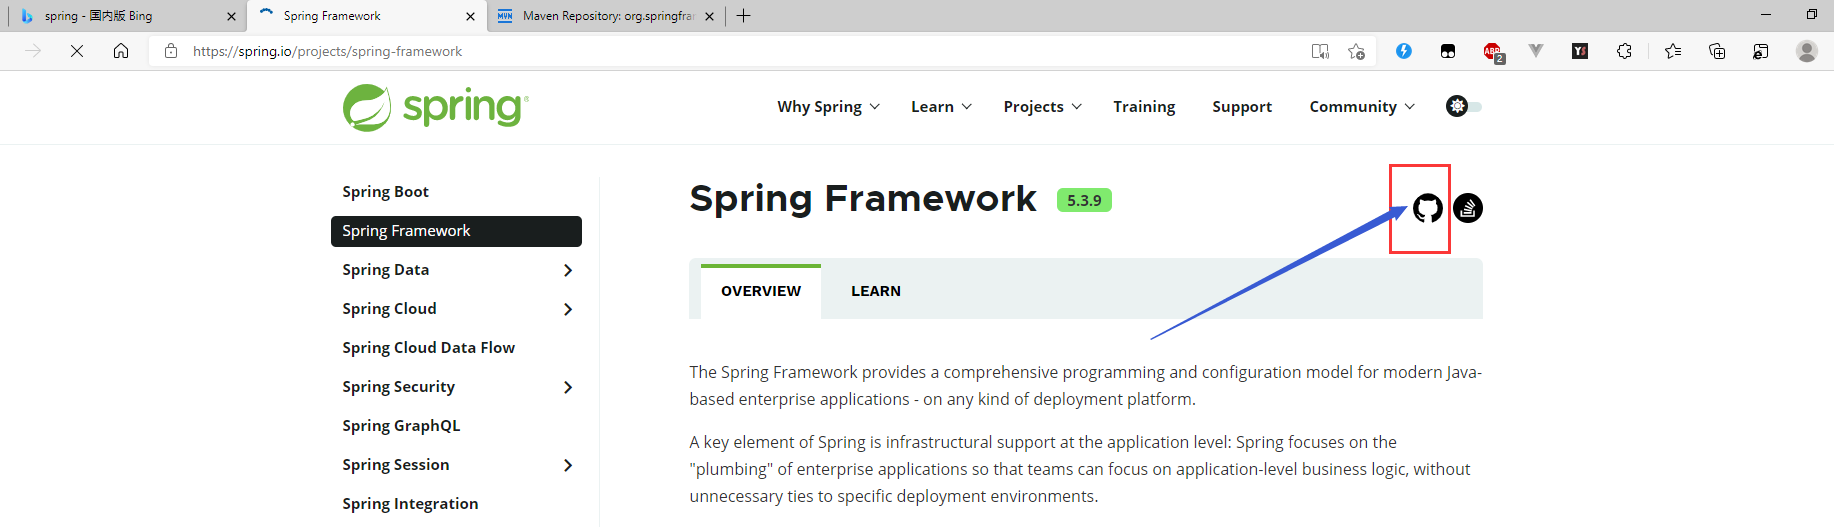
Click the GitHub icon in the framework interface to enter GitHub to download the framework
-
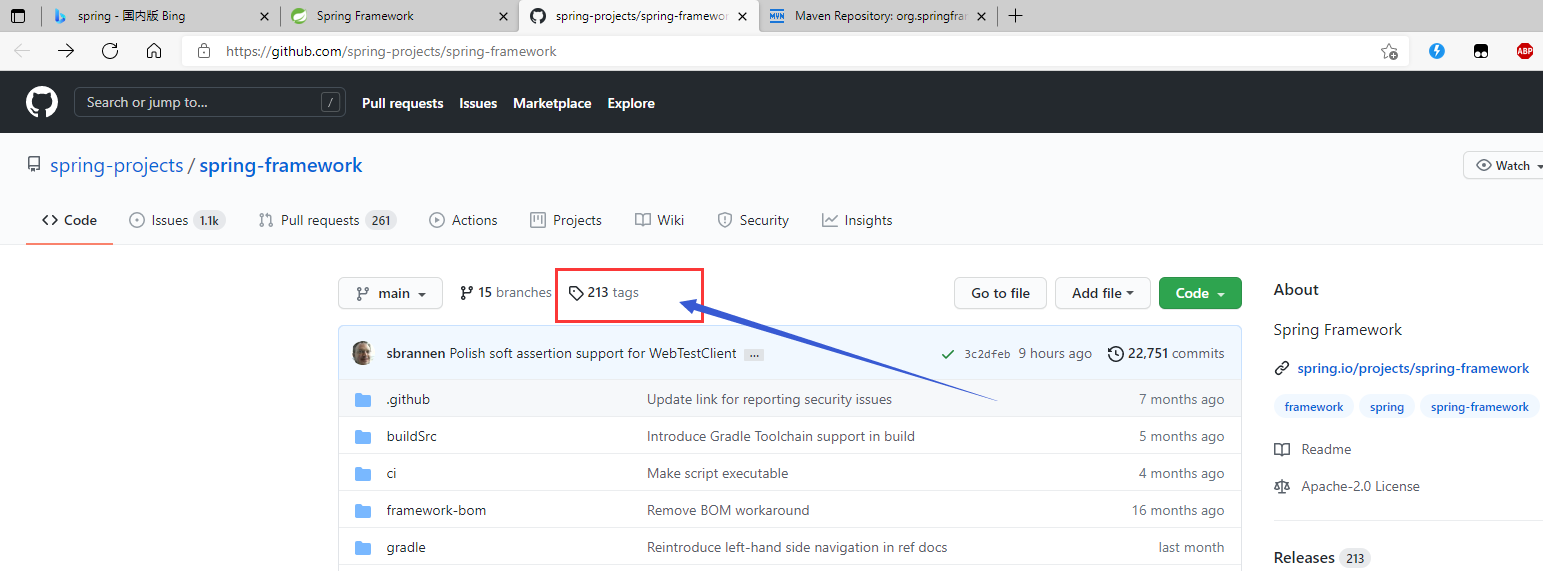
Click tags on the GitHub interface of Spring to enter the download details page
-
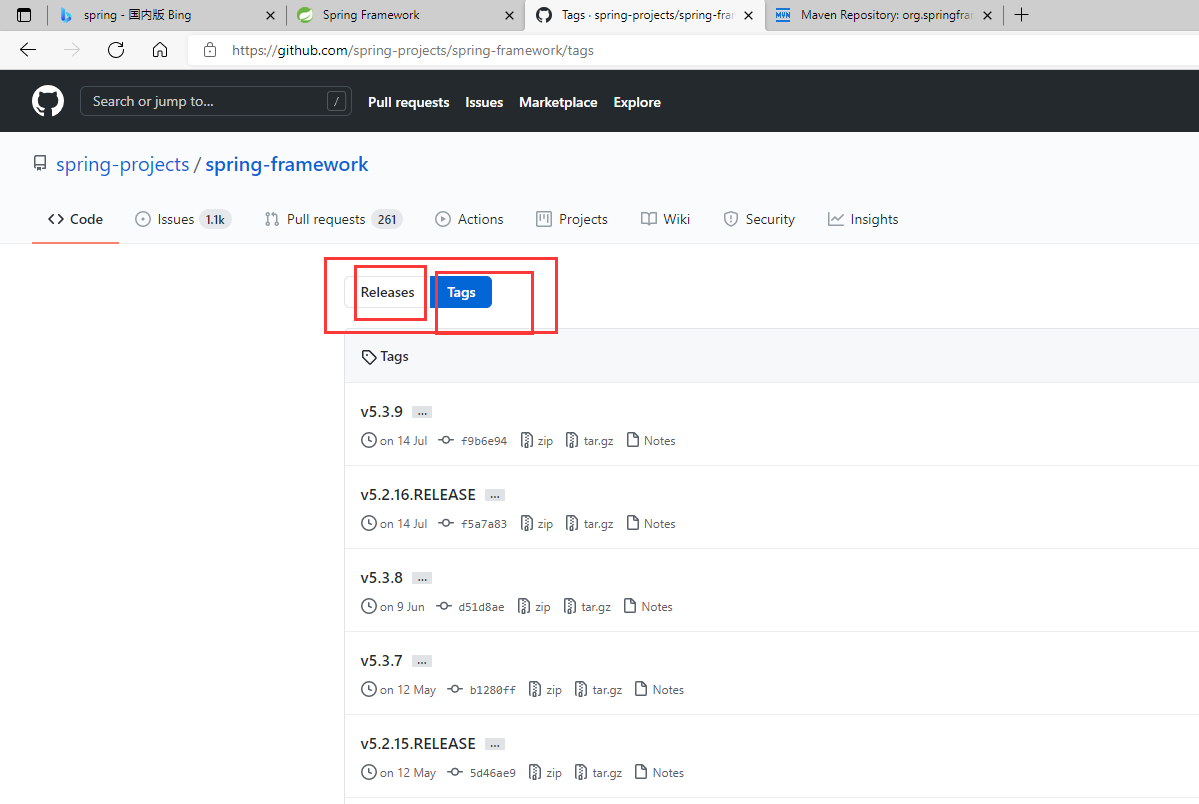
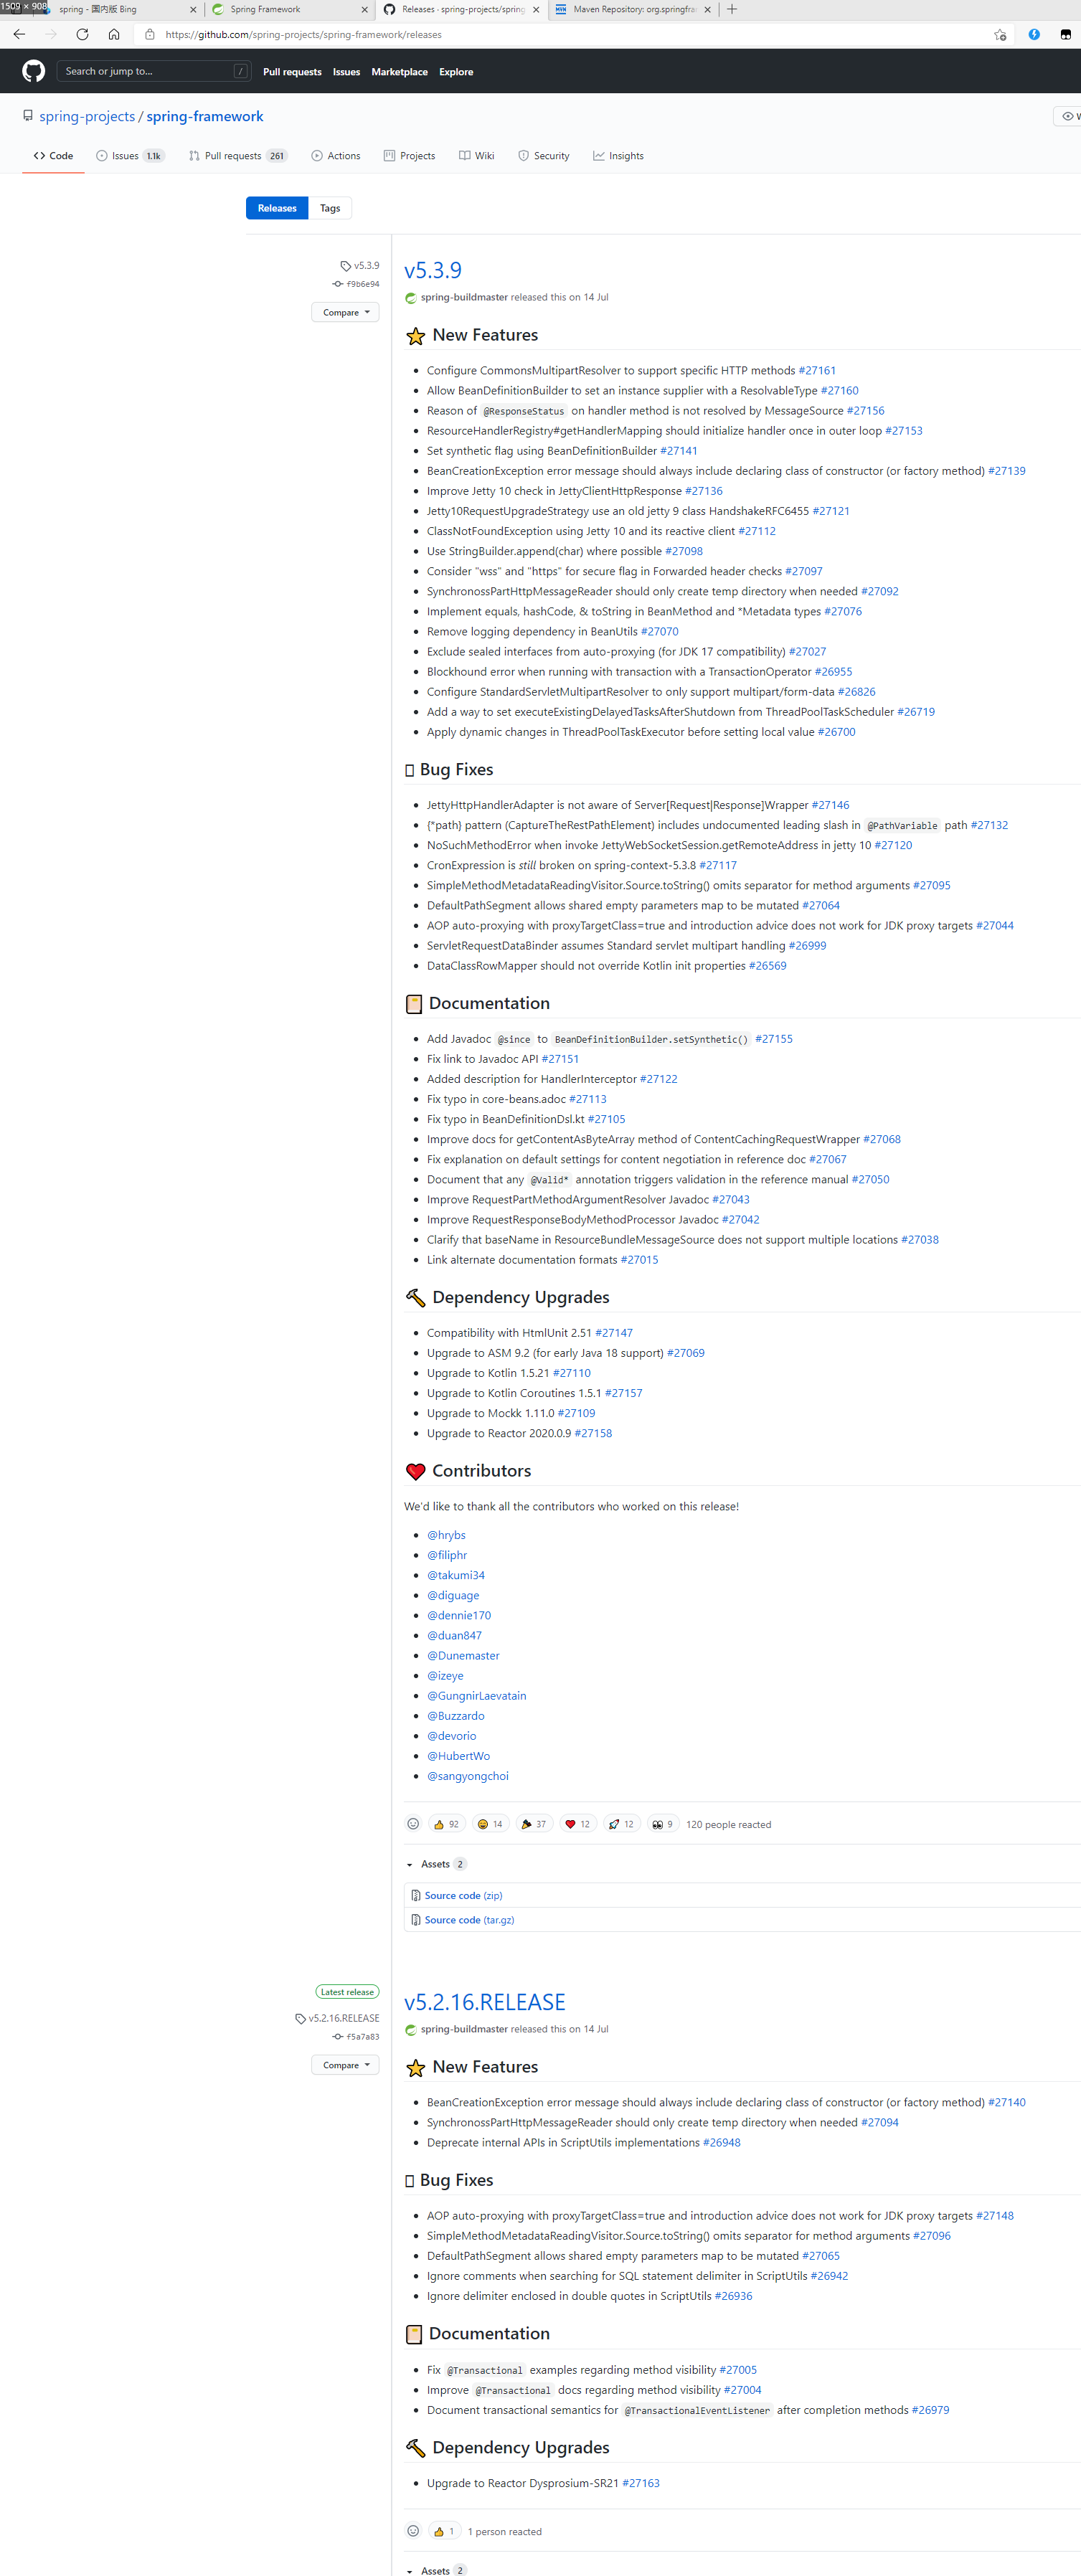
After clicking tags, we can select tags (abbreviated page) or releases (detailed page), and click the latest v5.3.9 zip on this page to download
After downloading, just unzip it directly
2. Add maven precondition
maven of search response
Select the version appropriate to the frame
<!-- https://mvnrepository.com/artifact/org.springframework/spring-webmvc -->
<dependency>
    <groupId>org.springframework</groupId>
    <artifactId>spring-webmvc</artifactId>
    <version>5.3.9</version>
</dependency>
<!-- https://mvnrepository.com/artifact/org.springframework/spring-jdbc -->
<dependency>
    <groupId>org.springframework</groupId>
    <artifactId>spring-jdbc</artifactId>
    <version>5.3.9</version>
</dependency>
1.1 INTRODUCTION
- Spring: Spring - > brings spring to the software industry
- In 2002, Rod Jahnson first launched the Spring framework prototype interface21 framework.
- On March 24, 2004, the Spring framework was redesigned based on the interface 21 framework and released the official version of 1.0.
- It's hard to imagine Rod Johnson's degree. He is a doctor at the University of Sydney. However, his major is not computer, but musicology.
- Spring concept: make the existing technology more practical Itself is a hodgepodge, integrating existing framework technologies
Official website: http://spring.io/
Official download address: https://repo.spring.io/libs-release-local/org/springframework/spring/
GitHub : https://github.com/spring-projects
1.2 advantages
- Spring is an open source free framework, container
- Container: Spring is a container because it contains and manages the life cycle of application objects
- Spring is a lightweight framework
- Non intrusive: objects in Spring based applications can be independent of Spring API s
- Inversion of control (IOC), aspect oriented programming (AOP)
- Inversion of Control: IOC - Inversion of Control refers to giving Spring the right to create objects. Before using Spring, objects were created by new in our code. After using Spring. Objects are created by the Spring framework.
- Aspect Oriented Programming: AOP
- Support transaction processing and framework integration
- Dependency Injection: DI -- Dependency Injection means that the dependent objects do not need to be set manually by calling setXX method, but are assigned by configuration.
- Componentization: Spring implements the combination of simple component configurations into a complex application. In spring, you can combine these objects using XML and Java annotations.
- One stop: Based on IOC and AOP, it can integrate open source frameworks and excellent third-party class libraries of various enterprise applications (in fact, Spring itself also provides Spring MVC in the presentation layer and Spring JDBC in the persistence layer)
Summary: Spring is a lightweight framework for inversion of control (IOC) and aspect oriented programming (AOP)
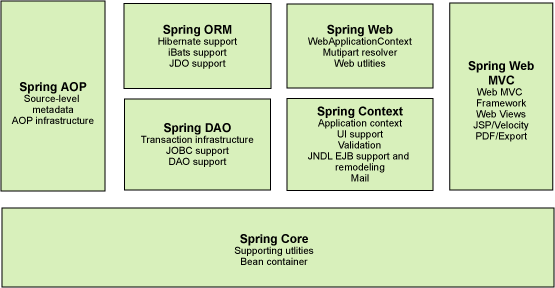
1.3 composition
1.4. Expansion
- Sprong Boot
- A rapid development of scaffolding
- Based on SpringBoot, you can quickly develop a single microservice
- Contract greater than configuration
- SpringCloud
- Spring Cloud is implemented based on springBoot
- Disadvantages: after development for too long, it violates the original concept! Configuration is very cumbersome, known as "configuration hell"
2, IOC
2.0 IOC theoretical derivation
-
UserDao interface
-
UserDaoImpl implementation class
-
UserService business interface
-
UserServicempl business implementation class
- **Set the method of setDao (UserDao), * * so that the user decides which dao layer to call
2.1 essence of IOC
Inversion of control (IOC) is a design idea. DI (dependency injection) is a method to realize IOC. Some people think that DI is just
Another way of saying IOC. In programs without I0C, we use object-oriented programming. The creation of objects and the dependencies between objects are completely hard coded in the program
In, the creation of objects is controlled by the program itself. After control inversion, the creation of objects is transferred to a third party. Personally, I think the so-called control inversion is to obtain dependency
Object is reversed.
When configuring a Bean in XML, the definition information of the Bean is separated from the implementation, and the annotation method can integrate the two,
The definition information of Bean is directly defined in the implementation class in the form of annotation, so as to achieve the purpose of zero configuration.
Inversion of control is a way to produce or obtain specific objects through description (XML or annotation) and through a third party. Implementing inversion of control in Spring
The IOC container is implemented by dependency injection (DI).
2.2 helloSpring
ApplicationContext.xml configuration
<?xml version="1.0" encoding="UTF-8"?>
<beans xmlns="http://www.springframework.org/schema/beans"
       xmlns:xsi="http://www.w3.org/2001/XMLSchema-instance"
       xsi:schemaLocation="http://www.springframework.org/schema/beans http://www.springframework.org/schema/beans/spring-beans.xsd">
     <bean id="dao" class="com.ziop.dao.UserDaoImpl"/>
    <bean id="mysqlDao" class="com.ziop.dao.UserMysqlDao"/>
    <bean id="oricalDao" class="com.ziop.dao.UserOricalDao"/>
    <bean id="service" class="com.ziop.service.UserServiceImpl">
        <property name="userdao" ref="oricalDao"/>
    </bean>
</beans>
When using, get the Spring container
ApplicationContext applicationContext = new ClassPathXmlApplicationContext("ApplicationContext.xml");
Get object
UserServiceImpl applicationContext = (UserServiceImpl) context.getBean("service");
- Note: the Property name element refers to the name of a JavaBean property, and the ref element refers to the name of another bean definition. This link between the Id and ref elements expresses the dependencies between the partners.
2.3 method of creating object by Ioc
-
By default, objects are created by parameterless construction
-
<bean id="user" class="com.ziop.pojo.User">
<property name="name" value="ziop"/>  <!-- set up set Parameter method-->
</bean>
-
-
Call parameterized construction
-
<!--By subscript assignment,,,,,--> <bean id="user" class="com.ziop.pojo.User"> <constructor-arg index="0" value="ziop"/> </bean> -
<!--Passed the parameter construction of type call,,, which is not recommended--> <bean id="user" class="com.ziop.pojo.User"> <constructor-arg type="java.lang.String" value="ziop"/> </bean> -
<!--Get by parameter name-->
   <bean id="user" class="com.ziop.pojo.User">
       <constructor-arg name="name" value="ziop"/>
   </bean>
-
initialization
When you generate a container, all bean s have been created by default. We can get them directly when we use them. Moreover, the objects we get in different periods are the same, and there is only one instance in memory
Object user = context.getBean("user");
Object user1 = context.getBean("user");
System.out.println(user == user1);
Object lazy loading
Of course, we can set lazy loading and lazy init for bean s
<bean id="userF" class="com.ziop.pojo.UserF" lazy-init="true"/>
- Three cases of lazy init
- Default: false by default
- false: no lazy loading is performed. Once the container is generated, the bean object is created immediately
- true: execute lazy loading and create instance objects when they are in use
2.4. Spring configuration
In ApplicationContext In XML, we can configure the following parameters
<beans>
 <bean  id="userF" class="com.ziop.pojo.UserF" lazy-init="true"> </bean>
    <alias name="user" alias="user2"/>
    <description>hello</description>
    <import resource="beans.xml"/>
</beans>
alias
<alias name="user" alias="user2"/>
bean
- ID: the unique identifier of the bean, which is also equivalent to the object name we learned
- class: the fully qualified name corresponding to the bean object: package name + type
- name: equivalent to alias. Multiple aliases can be taken at the same time. Multiple separators can be used. They can be spaces, commas, semicolons, etc
- Lazy init: lazy loading
<bean id="userF" class="com.ziop.pojo.UserF" lazy-init="true" name="userFirst u1,u2;u3"> </bean>
import
It is generally used in team collaborative development. It can merge multiple configuration files into one file.
Suppose that the current project is jointly developed by multiple people. Each person copies different development classes and registers different classes in different beans. Finally, we only need to import different beans into an xml file to merge them into a general ApplicationContext xml is all you need to do. In the end, you only need to import applicationCont.xml Just xml
In ApplicationContext Add the following configuration to XML:
<import resource="beans1.xml"/>
<import resource="beans2.xml"/>
<import resource="beans3.xml"/>
When using, just use the general configuration directly
2.5. Dependency injection
Constructor Injection
2.3 method of creating object by Ioc
set mode injection [ key ]
-
Dependency injection: set injection!
- Dependency: the creation of bean objects depends on the container
- Injection: all attributes in the bean object are injected by the container!
[environment construction]
- Complex type
     public class Address {
         private  String address;

         public String getAddress() {
             return address;
         }

         public void setAddress(String address) {
             this.address = address;
         }
     }
-
What a test object
public class Student { private String name; private Address address; private String[] books; private List<String> hobbies; private Map<String, String> card; private Set<String> games; private String wife; private Properties info; public String getName() { return name; } public void setName(String name) { this.name = name; } public Address getAddress() { return address; } public void setAddress(Address address) { this.address = address; } public String[] getBooks() { return books; } public void setBooks(String[] books) { this.books = books; } public List<String> getHobbies() { return hobbies; } public void setHobbies(List<String> hobbies) { this.hobbies = hobbies; } public Map<String, String> getCard() { return card; } public void setCard(Map<String, String> card) { this.card = card; } public Set<String> getGames() { return games; } public void setGames(Set<String> games) { this.games = games; } public String getWife() { return wife; } public void setWife(String wife) { this.wife = wife; } public Properties getInfo() { return info; } public void setInfo(Properties info) { this.info = info; } @Override public String toString() { return "Student{" + "name='" + name + '\'' + ", address=" + address + ", books=" + Arrays.toString(books) + ", hobbies=" + hobbies + ", card=" + card + ", games=" + games + ", wife='" + wife + '\'' + ", info=" + info + '}'; } } -
ApplicationContext.xml
<?xml version="1.0" encoding="UTF-8"?> <beans xmlns="http://www.springframework.org/schema/beans" xmlns:xsi="http://www.w3.org/2001/XMLSchema-instance" xsi:schemaLocation="http://www.springframework.org/schema/beans http://www.springframework.org/schema/beans/spring-beans.xsd"> <bean id="student" class="com.ziop.pojo.Student"> <property name="name" value="ziop"/> </bean> </beans> -
Test class
import org.junit.Test; import org.springframework.context.ApplicationContext; import org.springframework.context.support.ClassPathXmlApplicationContext; public class StudentTest { ApplicationContext applicationContext = new ClassPathXmlApplicationContext("ApplicationContext.xml"); @Test public void getName() { Student student = (Student) applicationContext.getBean("student"); System.out.println(student.getName()); System.out.println(student.getAddress()); } } -
Perfect injection information
<?xml version="1.0" encoding="UTF-8"?>
<beans xmlns="http://www.springframework.org/schema/beans"
       xmlns:xsi="http://www.w3.org/2001/XMLSchema-instance"
       xsi:schemaLocation="http://www.springframework.org/schema/beans http://www.springframework.org/schema/beans/spring-beans.xsd">
    <bean id="address" class="com.ziop.pojo.Address">
        <property name="address" value="Henan"/>
    </bean>
    <bean id="student" class="com.ziop.pojo.Student">
        <!--character string-->
        <property name="name" value="ziop"/>
        <!--reference type        -->
        <property name="address" ref="address"/>
        <!--        array-->
        <property name="books">
            <array>
                <value>The Dream of Red Mansion</value>
                <value>Romance of the Three Kingdoms</value>
                <value>Water Margin</value>
                <value>Journey to the West</value>
            </array>
        </property>
        <!--        list-->
        <property name="hobbies">
            <list>
                <value>listen to the music</value>
                <value>Read novels</value>
                <value>watch movie</value>
            </list>
        </property>
        <!--map-->
        <property name="card">
            <map>
                <entry key="ID" value="12334214"/>
                <entry key="bank card" value="12334214"/>
            </map>
        </property>
        <!--set-->
        <property name="games">
            <set>
                <value>LOL</value>
                <value>CF</value>
                <value>BOB</value>
            </set>
        </property>
        <!--null-->
        <property name="wife">
            <null/>
        </property>
        <!--parameter-->
        <property name="info">
            <props>
                <prop key="drive">20210</prop>
                <prop key="url">20210</prop>
                <prop key="user">20210</prop>
                <prop key="password">20210</prop>
            </props>
        </property>
    </bean>

</beans>
Extension mode injection - namespace
p-namespace
Function: used to describe attributes, similar to vue: you can quickly describe attributes
Usage: introduce xmlns: P into xml=“ http://www.springframework.org/schema/p "
Official interpretation:
-
XML shortcut with p namespace
-
P-namespace allows you to use the attributes of bean elements (instead of nested < property / > elements) to describe the attribute values of cooperative beans, or both.
-
Spring supports an extensible configuration format based on namespaces defined by XML Schema. The bean configuration format is defined in the XML Schema document. However, there is no p namespace defined in the XSD file, it only exists in the core of spring.
example:
- Example 1: the following example shows two XML code segments parsed into the same result (the first uses standard XML format and the second uses p-namespace):
<beans xmlns="http://www.springframework.org/schema/beans"
    xmlns:xsi="http://www.w3.org/2001/XMLSchema-instance"
    xmlns:p="http://www.springframework.org/schema/p"
    xsi:schemaLocation="http://www.springframework.org/schema/beans
        https://www.springframework.org/schema/beans/spring-beans.xsd">

    <bean name="classic" class="com.example.ExampleBean">
        <property name="email" value="someone@somewhere.com"/>
    </bean>

    <bean name="p-namespace" class="com.example.ExampleBean"
        p:email="someone@somewhere.com"/>
</beans>
This example shows an attribute in the p namespace named email in the bean definition. This tells Spring to include a property declaration. As mentioned earlier, the p namespace has no schema definition, so you can set the attribute name to the attribute name.
-
Example 2: using ref to reference other bean s
<beans xmlns="http://www.springframework.org/schema/beans"
    xmlns:xsi="http://www.w3.org/2001/XMLSchema-instance"
    xmlns:p="http://www.springframework.org/schema/p"
    xsi:schemaLocation="http://www.springframework.org/schema/beans
        https://www.springframework.org/schema/beans/spring-beans.xsd">

    <bean name="john-classic" class="com.example.Person">
        <property name="name" value="John Doe"/>
        <property name="spouse" ref="jane"/>
    </bean>

    <bean name="john-modern"
        class="com.example.Person"
        p:name="John Doe"
        p:spouse-ref="jane"/>

    <bean name="jane" class="com.example.Person">
        <property name="name" value="Jane Doe"/>
    </bean>
</beans>
This example includes not only attribute values that use the p namespace, but also attribute references declared in a special format. However, the first bean definition uses < property name = "spare" ref = "jane" / > to create a reference from bean john to bean jane, and the second bean definition uses p: spare ref = "jane" as a property to do the same thing. In this case, sparse is the property name, and the - ref section indicates that this is not a direct value, but a reference to another bean.
c-namespace
Function: to improve the writing method of parametric structure
Usage: introduce xmlns: C into xml=“ http://www.springframework.org/schema/c "
Official explanation: similar to the XML Shortcut of the p namespace, the c namespace introduced in Spring 3.1 allows inline attributes to configure constructor parameters instead of nested constructor arg elements.
-
Example 1: use c: namespace to do the same thing as constructor based dependency injection:
-
<beans xmlns="http://www.springframework.org/schema/beans" xmlns:xsi="http://www.w3.org/2001/XMLSchema-instance" xmlns:c="http://www.springframework.org/schema/c" xsi:schemaLocation="http://www.springframework.org/schema/beans https://www.springframework.org/schema/beans/spring-beans.xsd"> <bean id="beanTwo" class="x.y.ThingTwo"/> <bean id="beanThree" class="x.y.ThingThree"/> <!-- traditional declaration with optional argument names --> <bean id="beanOne" class="x.y.ThingOne"> <constructor-arg name="thingTwo" ref="beanTwo"/> <constructor-arg name="thingThree" ref="beanThree"/> <constructor-arg name="email" value="something@somewhere.com"/> </bean> <!-- c-namespace declaration with argument names --> <bean id="beanOne" class="x.y.ThingOne" c:thingTwo-ref="beanTwo" c:thingThree-ref="beanThree" c:email="something@somewhere.com"/> </beans> -
C: namespace uses the same Convention as P: one (trailing parameter of bean reference) to set constructor parameters according to their names. Similarly, it needs to be declared in an XML file, even if it is not defined in the XSD schema (it exists in the Spring core).
-
-
Example 2: for the rare case where the constructor parameter name is unavailable (usually if the bytecode is compiled without debugging information), you can use fallback to the parameter index, as shown below:
-
<!-- c-namespace index declaration --> <bean id="beanOne" class="x.y.ThingOne" c:_0-ref="beanTwo" c:_1-ref="beanThree" c:_2="something@somewhere.com"/> -
_ 0 _ 1 _ 2 is the subscript of the index. Because the xml attribute cannot start with a number, the index needs to be prefixed with an underscore
-
2.6 Bean scope
Official interpretation:
You can not only control the various dependencies and configuration values that will be inserted into objects created from specific bean definitions, but also control the scope of objects created from specific bean definitions.
This approach is powerful and flexible because you can choose the scope of objects created by configuration without having to operate within the scope of objects at the Java class level.
A bean can be defined as one deployed in many scopes. The Spring framework supports six scopes, four of which are only available when using web aware ApplicationContext.
You can also create custom ranges.
| Scope | Range | Description Description |
|---|---|---|
| singleton | Single case | (default) apply a bean definition to an object instance for each Spring IoC container. |
| prototype | prototype | Apply a single bean definition to any number of object instances. |
| request | request | Apply a single bean definition to the lifecycle of a single HTTP request. In other words, each HTTP request has its own bean instance, which is created after a single bean definition. Valid only in web aware Spring ApplicationContext. |
| session | conversation | Apply a single bean definition to the life cycle of an HTTP session. Valid only in web aware Spring ApplicationContext. |
| application | application | Apply a single bean definition to the lifecycle of the ServletContext. Valid only in web aware Spring ApplicationContext. |
| websocket | Define a bean as the scope of the WebSocket life cycle. Valid only in web aware Spring ApplicationContext. |
-
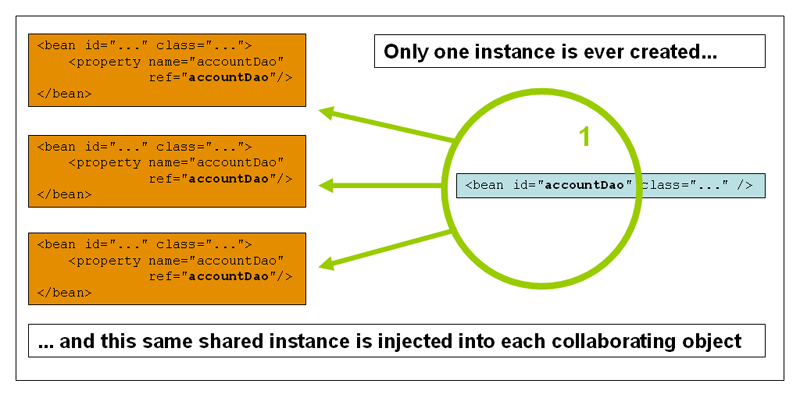
Singleton mode: each time getBean gets the same object
-
-
<bean id="accountService" class="com.something.DefaultAccountService"/>

<!-- The following is the display set to singleton mode (although the default is also singleton mode)-->
<bean id="accountService" class="com.something.DefaultAccountService" scope="singleton"/>
-
-
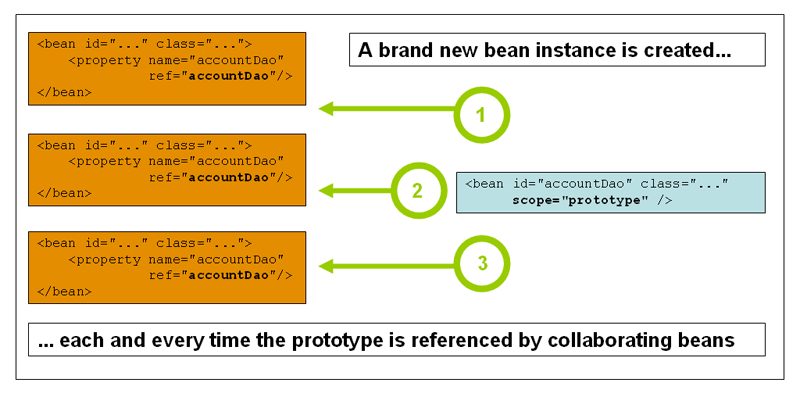
Prototype pattern: every time getBean gets a new object
-
The rest of the request session application and websocket can only be used in web development
2.7. Bean automatic assembly
- Automatic assembly is a way for spring to meet bean dependencies
- spring will automatically find in the context and automatically assemble properties for the bean
Three assembly methods in spring
- Configuration displayed in xml
- Configuration displayed in java
- Implicit automatic assembly bean [important]
The official explanation on whether to use xml configuration or annotation configuration is as follows:
-
The introduction of annotation based configuration raises the question whether this method is "better" than XML. In short, the answer is "as the case may be". The long answer is that each method has its advantages and disadvantages, and it is usually up to developers to decide which strategy is more suitable for them. Because of the way they are defined, annotations provide a lot of context in their declarations, making the configuration more concise. However, XML is good at connecting components without touching their source code or recompiling them. Some developers tend to make connections close to the source code, while others believe that annotated classes are no longer POJOs and that the configuration becomes decentralized and difficult to control
2.7. 1 test
- Environment construction
- One person, two pets
- dog
- cat
2.7. 2. ByName auto assembly
- ByName: the beanId corresponding to the value after the set method of its own object will be found in the container context
- ByName: as long as the property name and beanID are the same
-
<?xml version="1.0" encoding="UTF-8"?>
<beans xmlns="http://www.springframework.org/schema/beans"
       xmlns:p="http://www.springframework.org/schema/p"
       xmlns:xsi="http://www.w3.org/2001/XMLSchema-instance"
       xsi:schemaLocation="http://www.springframework.org/schema/beans http://www.springframework.org/schema/beans/spring-beans.xsd">
    <bean id="dog" class="com.ziop.pojo.Dog"/>
    <bean id="cat" class="com.ziop.pojo.Cat"/>
    <bean id="people" class="com.ziop.pojo.People"
          p:name="ziop"
         autowire="byName"/>
</beans>
2.7. 3. ByType auto assembly
- byType: beanId with the same property type as its own object will be found in the container context
- byType: the type must be globally unique in the configuration
<!--byType: It will find the object with the same property type as its own object in the container context beanId-->
<bean id="people" class="com.ziop.pojo.People"
      p:name="ziop"
      autowire="byType"/>
Summary:
- When byname, you need to ensure that the IDs of all beans are unique, and the bean needs to be consistent with the value of the set method of the automatically injected attribute!
- When bytype, you need to ensure that the class of all beans is unique, and the bean needs to be consistent with the type of self injected attributes!
2.7. 4. Automatic assembly using annotations
jdk1.5 support annotations, spring 2 5 supporting notes
Notes on importing notes:
- Import constraints
- Configuration annotation support: < context: annotation config / >
<?xml version="1.0" encoding="UTF-8"?>
<beans xmlns="http://www.springframework.org/schema/beans"
       xmlns:xsi="http://www.w3.org/2001/XMLSchema-instance"
       xmlns:context="http://www.springframework.org/schema/context"
       xsi:schemaLocation="http://www.springframework.org/schema/beans
                           http://www.springframework.org/schema/beans/spring-beans.xsd
                           http://www.springframework.org/schema/context
                           https://www.springframework.org/schema/context/spring-context.xsd">
    <context:annotation-config/>
</beans>
@Autowired
It can be used directly on attributes or set
You can use Autowired without writing the Set method, provided that the auto assembly attribute exists in the IOC and conforms to the name byName
Parameter: can the required attribute value be null
Auxiliary note: @ Qualifier(value = "Xxx") specifies a unique bean object injection!
 	   @Autowired
    @Qualifier("cat")
    private Cat cat;
    @Autowired(required = false)
    private Dog dog;
If the environment of @ Autowired automatic assembly is complex and the automatic assembly cannot be completed through an annotation [@ Autowired], we can
Use @ Qualifier(value = "Xxx") to configure the use of @ Autowired and specify a unique bean object injection!
	@Autowired
    @Qualifier("cat")
    private Cat cat;
    @Resource
    private Dog dog;
Summary:
- @Difference between Resource and @ Autowired
- They are used for automatic assembly and can be placed in the attribute field
- @Autowired is implemented by byType
- @Resource is implemented by byname by default. If the name cannot be found, it is implemented by bytype! If both cannot be found, an error will be reported! [common]
- The execution order is different: @ Autowired is implemented by byType, and @ Resource is implemented by byname by default.
2.8 development using annotations
After spring 4, using annotations to develop dependencies that must be imported into the aop package
context constraints are required to use annotations, and annotation support is added
-
bean
-
First, you need to have the following configuration in xml
<?xml version="1.0" encoding="UTF-8"?>
<beans xmlns="http://www.springframework.org/schema/beans"
       xmlns:xsi="http://www.w3.org/2001/XMLSchema-instance"
       xmlns:context="http://www.springframework.org/schema/context"
       xsi:schemaLocation="http://www.springframework.org/schema/beans
                           http://www.springframework.org/schema/beans/spring-beans.xsd
                           http://www.springframework.org/schema/context
                           http://www.springframework.org/schema/context/spring-context.xsd">
    <context:component-scan base-package="com.ziop.pojo"/>
    <context:annotation-config/>
</beans>
b. Second, you can use the @ Component attribute in pojo
@Component public class User { public String name = "ziop"; public String getName() { return name; } public void setName(String name) { this.name = name; } } -
-
How are attributes injected
-
@Value("ziop")
public String name;@value("ziop")
-
-
Derived annotation
@Component has four derived annotations
- dao [@Repository]
- service [@Service]
- controller [@Controller]
Summary: the four sing annotation functions are the same. They all represent registering a class in spring and assembling beans
-
Automatic assembly [annotation related information]
- @Autowired auto assembly type. name
- If Autowired cannot uniquely auto assemble attributes, you need to pass @ Qualifier("xxx")
- @The Nullable field cannot be marked with this annotation, indicating that the field can be null
- @Resource is implemented by byname by default. If the name cannot be found, it is implemented by bytype!
- @Component: the component is placed on the class, indicating that the class is managed by spring
- @Autowired auto assembly type. name
-
Scope
-
@Scope
- Parameter: Singleton singleton mode
- prototype non singleton mode
- Parameter: Singleton singleton mode
-
@Component
@Scope("singleton")
public class User {
    @Value("ziop")
    public String name;
}
-
-
Summary
- xml and annotation
- xml is more versatile and suitable for any occasion! Simple and convenient maintenance
- Annotations are not their own classes and cannot be used. Maintenance is relatively complex!
- xml and annotation best practices:
- Xml is used to manage bean s;
- Annotations are only responsible for completing attribute injection
- In the process of using, we only need to pay attention to one problem: to make the annotation effective, we need to turn on the annotation support
  <context:component-scan base-package="com.ziop.pojo"/>
  <context:annotation-config/>
- xml and annotation
2.9. Configure Spring in Java
We don't need to use any Spring xml to configure, we can use Java to do it all!
JavaConfig is a sub project of spring. After spring 4, it has become a core function
Configuration class
// This class will also be managed by the Spring container and registered in the container, because it is originally a @ Comoponent
// *@ Configuration with table this is a Configuration class, just like the bean we saw earlier XML is the same
@Configuration
@ComponentScan("com.ziop")
//@Import() can import other configuration classes
public class ZiopConfig {
    /**
     * Registering a bean is equivalent to a bean tag we wrote earlier
     * The name of this method is equivalent to the Id attribute in the bean tag
     * The return value of this method is equivalent to the class attribute in the bean tag
     */
    @Bean
    public User getUser() {
        /* Is to return the bean object to be injected*/
        return new User();
    }

}
Entity class
@Component
public class User {
    @Value("ziop")
    private String name;

    public String getName() {
        return name;
    }

    public void setName(String name) {
        this.name = name;
    }

    @Override
    public String toString() {
        return "User{" +
                "name='" + name + '\'' +
                '}';
    }
}
Test class
public class UserTest {
    @Test
    public void getName() {
        ApplicationContext config = new AnnotationConfigApplicationContext(ZiopConfig.class);
        User user = (User) config.getBean("getUser");
        String name = user.getName();
        System.out.println(name);
    }
}
It is hereby explained that this article combines the spring video of crazy God BiliBili and the documents on the official website with personal understanding notes