1, Environment configuration
There are two existing servers 10.168 103.110 (old server) and 10.168.103.111 (new server). Among them, 110 server has swarm cluster, a tracker and a storage. Now it needs to be a fastdfs cluster to meet the downtime of fastdfs on 110. Fastdfs on 111 server can be used normally.
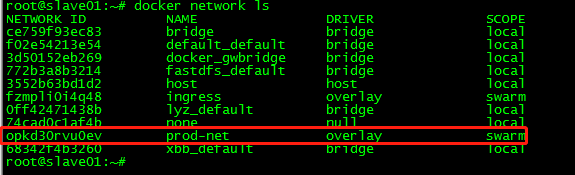
- First, check the network condition of the 110 server:
docker network ls
The network name is prod net
docker node ls

2, Build docker network cluster (swarm)
Here, we need to create a swarm management node on the new server 111, organize the docker nodes of the two servers and manage them in the same cluster:
Reference blog: https://segmentfault.com/a/1190000020378231
- Before managing the node, first initialize the management node on the 110 server (already initialized here)
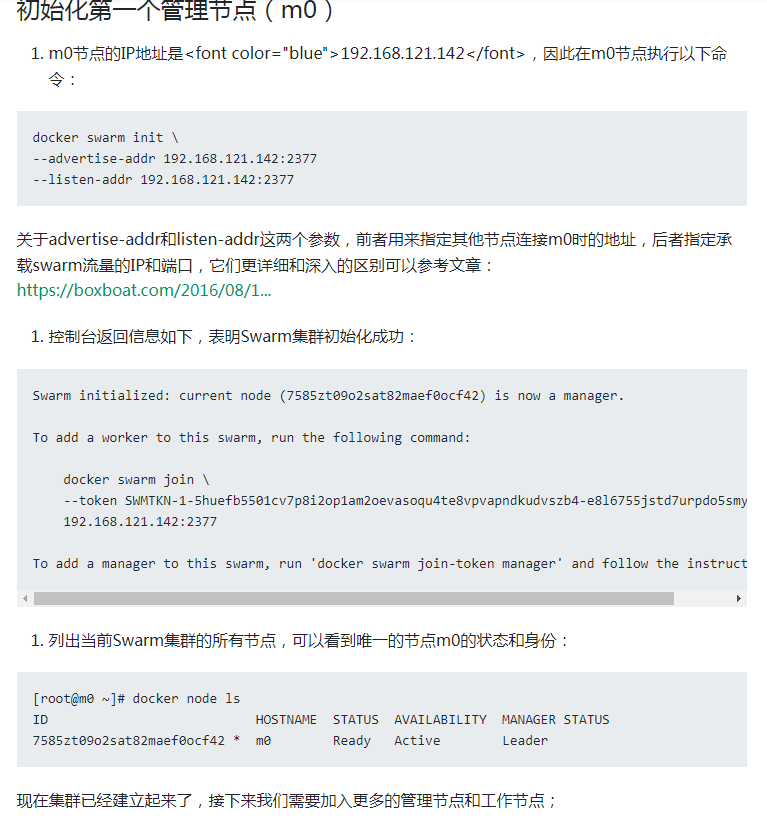
- Add 111 server to the management node of 110, where 111 needs to add a management node instead of a work node (the work node of docker swarm cannot be started normally with docker compose)
Enter docker swarm join token manager on the 110 server to obtain the join token of the management node
docker swarm join-token manager

Then execute the previously obtained management node join token on the 111 server:
docker swarm join --token SWMTKN-1-36skn1672aqlxnx7bsqh5hhudvbdjxak48c1qsy3loy9ny7hh0-8zpzistuo0ycolr50ihlhodbd 10.168.103.110:2377
This node joined a swarm as a manager.
Enter docker node ls on the 111 server to view the same newly added nodes as on the 110 server

Here, the two docker nodes are organized, and users can manage in a cluster. The same network can be used when docker compose starts the service. (Fastdfs has not been built successfully before, because of the problem of docker network)
3, Build Fastdfs cluster
Because Fastdfs already exists on 110, you can build it directly on 111, get the Fastdfs image on 110, and write the docker compose file (here I specified the ip of the container as 10.0.1.59, because the ip will change every time you start the container, so it is fixed here and will be used later). You can see that the network and 110 are prod net, which should be unified.
Because it is a cluster built later, we need to synchronize the historical data on 110 first. The synchronization here is also very simple. When we first wrote the docker compose file, FASTDFS_IPADDR specifies to use the ip of the old server or the container name of Fastdfs of the old server. When I start Fastdfs on 111, it will automatically desynchronize (Binlong synchronize) the data of 110 server.
version: "3"

services:
  fdfs-service:
    image: fastdfs:v2
    container_name: fdfs-prod
    restart: always
    ports:
      - 8888:8888
      - 22122:22122
      - 23000:23000
      - 8011:80
    volumes:
      - /home/xbb/fdfs/storage:/home/dfs
    environment:
      - FASTDFS_IPADDR=10.168.103.110
    networks:
      prod-net:
        ipv4_address: 10.0.1.59

networks:
  prod-net:
    external: true
Switch to the docker compose file directory and execute the startup container (here, both tracker and storage are started):
docker-compose -f docker-compose.yml up -d
The directory mapped to the host machine here is / home/xbb/fdfs/storage. After startup, the data directory and logs folder will be generated under it. I won't talk about Fastdfs here. Please refer to: https://blog.csdn.net/zrs19800702/article/details/53911526
Enter the container to view the synchronization status:
docker exec -it fdfs-prod bash
View status:
fdfs_monitor /etc/fdfs/client.conf
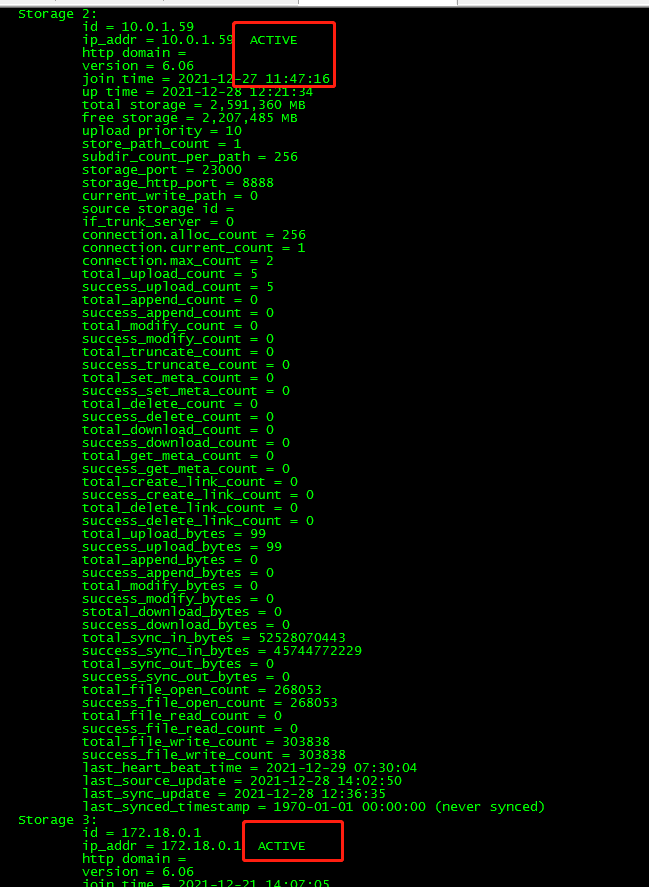
# FDFS_STORAGE_STATUS: INIT: initialization, source server that has not been synchronized with existing data

# FDFS_STORAGE_STATUS: WAIT_SYNC: wait for synchronization. The source server that has synchronized the existing data

# FDFS_STORAGE_STATUS: synchronizing

# FDFS_STORAGE_STATUS: DELETED: DELETED. The server is removed from this group

# FDFS_STORAGE_STATUS: OFFLINE: OFFLINE

# FDFS_STORAGE_STATUS: ONLINE: ONLINE, unable to provide service

# FDFS_STORAGE_STATUS: ACTIVE: online, can provide services
This indicates that our data has been synchronized and services can be provided. At this time, visit the image and find that both servers can be accessed.
Now that the historical data synchronization is completed, you need to complete the incremental synchronization:
As mentioned above, we have fixed the ip. Here, we also need to fix the container ip on the old server 110. Here, we modify the 110 to 10.0 one point five six
version: "3"

services:
  fdfs-service:
    image: fastdfs:v2
    container_name: fdfs-test
    restart: always
    ports:
      - 8888:8888
      - 22122:22122
      - 23000:23000
      - 8011:80
    volumes:
      - /home/xbb/fastdfs/storage:/home/dfs
    environment:
      - FASTDFS_IPADDR=10.168.103.110
    networks:
      prod-net:
        ipv4_address: 10.0.1.56

networks:
  prod-net:
    external: true
Because Fastdfs is deployed with docker, its ip is also the ip of the container. The ip of the host cannot be used in the configuration of tracker and storage, otherwise the corresponding ip will not be found and an error will be reported. After changing the fixed ip, call down the container of the old server and restart it with docker compose. After that, the starting ip will always be fixed.
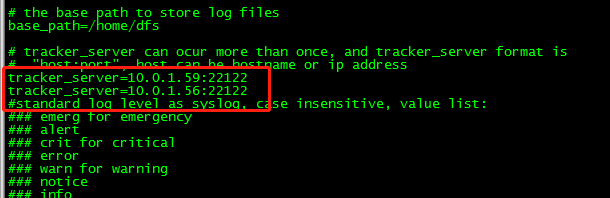
After both are started, you can modify the configuration of tracker and storage in the container. There are only three files that need to be modified:
vi /etc/fdfs/client.conf
vi /etc/fdfs/storage.conf
vi /etc/fdfs/mod_fastdfs.conf
The tracker of these three configuration files in two containers_ The server is changed to: container name: 22122
tracker_server=10.0.1.59:22122
tracker_server=10.0.1.56:22122
After all three files are changed, exit the container and restart.
docker stop fdfs-prod
docker start fdfs-prod
After restart, the cluster is successfully built.
Test:
Upload a file on the old server (110) to see if the synchronization on the new server (111) is successful:
docker exec -it fdfs-test bash
cd /var
echo qawsedrftg > a.txt
/usr/bin/fdfs_upload_file /etc/fdfs/client.conf a.txt

After execution, a path will be returned to the browser for access. Both 110 and 111 can be accessed. At this time, the cluster is successfully built.


4, nginx load balancing( https://www.cnblogs.com/1214804270hacker/p/9325150.html)
We also need to build an nginx on the 110 server to poll and access two Fastdfs.
Download an nginx image.
Write the docker compose file, nginx The conf file is mapped to the internal log file of the container. Note that the same network segment should be used.
version: '3'
services:
  nginx:
    image: nginx:1.20.1
    container_name: nginx-test
    restart: always
    networks:
      - prod-net
    ports:
      - 81:80
    volumes:
      - /home/xbb/nginx/conf/nginx.conf:/etc/nginx/nginx.conf
      - /home/xbb/nginx/log:/var/log/nginx

networks:
  prod-net:
    external:
      name: prod-net
Create nginx in the host / home/xbb/nginx/conf directory Conf file:
worker_processes auto;
#error_log  logs/error.log;
#error_log  logs/error.log  notice;
#error_log  logs/error.log  info;

#pid        logs/nginx.pid;

events {
    worker_connections  1024;
}

http {
    include       mime.types;
    default_type  application/octet-stream;

    #log_format  main  '$remote_addr - $remote_user [$time_local] "$request" '
    #                  '$status $body_bytes_sent "$http_referer" '
    #                  '"$http_user_agent" "$http_x_forwarded_for"';

    #access_log  logs/access.log  main;

    sendfile        on;
    #tcp_nopush     on;

    #keepalive_timeout  0;
    keepalive_timeout  65;

    #gzip  on;
        upstream fdfsServer{
                server 10.168.103.111:8888;
                server 10.168.103.110:8888;
        }

    client_max_body_size   20m;
    server {
        listen       80;
        server_name  localhost;

        #charset koi8-r;

        #access_log  logs/host.access.log  main;
     location ~/group([0-9])/M[0-9] {
                proxy_pass http://fdfsServer;
        }
        #error_page  404              /404.html;

        # redirect server error pages to the static page /50x.html
        #
        error_page   500 502 503 504  /50x.html;
   #     location = /50x.html {
    #        root   html;
     #   }

        # proxy the PHP scripts to Apache listening on 127.0.0.1:80
        #
        #location ~ \.php$ {
        #    proxy_pass   http://127.0.0.1;
        #}

        # pass the PHP scripts to FastCGI server listening on 127.0.0.1:9000
        #
        #location ~ \.php$ {
        #    root           html;
        #    fastcgi_pass   127.0.0.1:9000;
        #    fastcgi_index  index.php;
        #    fastcgi_param  SCRIPT_FILENAME  /scripts$fastcgi_script_name;
        #    include        fastcgi_params;
        #}

        # deny access to .htaccess files, if Apache's document root
        # concurs with nginx's one
        #
        #location ~ /\.ht {
        #    deny  all;
        #}
    }

    # another virtual host using mix of IP-, name-, and port-based configuration
    #
    #server {
    #    listen       8000;
    #    listen       somename:8080;
    #    server_name  somename  alias  another.alias;

    #    location / {
    #        root   html;
    #        index  index.html index.htm;
    #    }
    #}
}
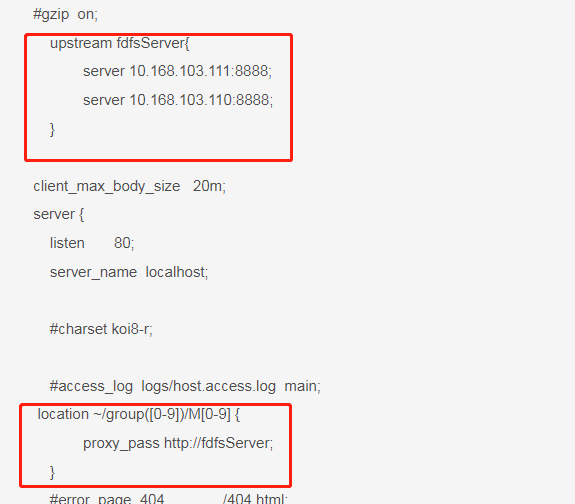
Modify the two parts, and then start the docker compose file. At this time, the load balancing of nginx is completed. If 110 Fastdfs goes down, it will automatically find 111 when accessing. It is also possible for nginx to access the above test files.
