Ubuntu 16.04 install Hadoop and configure pseudo distributed environment
(class assignments)
1, hadoop
Hadoop is a distributed system infrastructure developed by the Apache foundation. Users can develop distributed programs without knowing the details of the distributed bottom layer. Make full use of the power of cluster for high-speed computing and storage. Hadoop implements a Distributed File System, one of which is HDFS (Hadoop Distributed File System). HDFS has the characteristics of high fault tolerance and is designed to be deployed on low-cost hardware; Moreover, it provides high throughput to access application data, which is suitable for applications with large data set s. HDFS relax es the requirements of POSIX and can access the data in the file system in the form of stream. The core design of Hadoop framework is HDFS and MapReduce. HDFS provides storage for massive data, while MapReduce provides computing for massive data.
2, Preparation before installation
1.JDK installation package (download the installation package of. tar.gz for Linux system)
(1) Website download: https://www.oracle.com/java/technologies/javase/javase-jdk8-downloads.html
(2) Network disk self access: https://pan.baidu.com/s/1OfLQ8VtFJN648k-P7z3FpQ
Extraction code: yqwm
(I prepared jdk-8u301-linux-x64 here)
2.hadoop installation package
(1) Website download: https://archive.apache.org/dist/hadoop/common/hadoop-3.3.1/hadoop-3.3.1.tar.gz
(2) Network disk self access: https://pan.baidu.com/s/1vHuDktIdtBYDvZu37J575Q
Extraction code: a2yb
3.Xshell7,xftp7
4. Connect using xshell
tips:
ifconfig #Display or configure network devices
SSH connection is not possible because SSH server is not installed
sudo apt-get install openssh-server #Install SSH server
3, Install JDK
1. Update Ubuntu source
sudo apt-get update
2. Upload JDK installation package
Upload the jdk installation package just downloaded with xftp of Xshell

Generally upload to: / home/ubuntu (here ubuntu is my account name)
3. Unzip the JDK installation package to the / usr/local / directory
sudo tar -zxvf jdk-8u301-linux-x64.tar.gz -C /usr/local/
4. Rename the extracted folder to jdk8
cd /usr/local/
sudo mv jdk1.8.0_301/ jdk8
5. Add to environment variable
cd /home/Account name/
sudo gedit .bashrc
Add the following at the end of the file:
export JAVA_HOME=/usr/local/jdk8
export JRE_HOME=$JAVA_HOME/jre
export CLASSPATH=.:$JAVA_HOME/lib:$JRE_HOME/lib
export PATH=.:$JAVA_HOME/bin:$PATH
heed: add content must not be wrong, remember to save Oh
take effect
source .bashrc
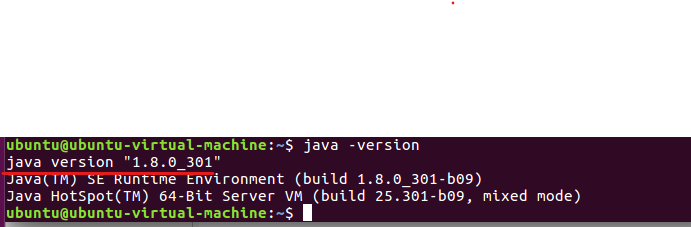
6. Verify that the installation is successful
java -version
The java version is installed and added to the environment variable successfully
4, Create hadoop user
sudo useradd -m hadoop -s /bin/bash  #Create a hadoop user and use / bin/bash as the shell
sudo passwd hadoop                   #Set the password for hadoop users and enter the password twice in a row
sudo adduser hadoop sudo             #Add administrator privileges for hadoop users
su hadoop                            #Switch the current user to hadoop
5, Install Hadoop
1. Install SSH
sudo apt-get install ssh
2. Configure login free authentication to avoid permission problems when using Hadoop
ssh-keygen -t rsa        #Enter all the way after entering this command
cd ~/.ssh
cat id_rsa.pub >> authorized_keys
ssh localhost            #It was found that the password was not entered to connect
exit                     #Exit remote connection status
3. Upload hadoop installation package
Upload the just downloaded hadoop installation package with xftp of Xshell

Generally upload to: / home / account name
4. Unzip the hadoop installation package to the / usr/local directory, rename the folder to hadoop, and finally set the permissions
cd /home/ubuntu                 #Here ubuntu is my account name
sudo tar -zxvf hadoop-3.3.1.tar.gz -C /usr/local/
cd /usr/local
sudo mv hadoop-3.3.1/ hadoop
sudo chown -R ubuntu hadoop/   #Here ubuntu is my account name
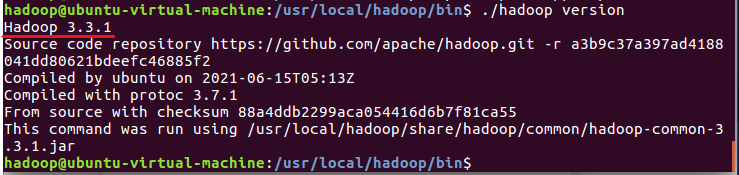
5. Verify that the installation is successful
cd /usr/local/hadoop/bin
./hadoop version
The version of hadoop appears
6. Set JAVE_HOME environment variable
sudo gedit /usr/local/hadoop/etc/hadoop/hadoop-env.sh
Put the original (tips: the line number is displayed in the lower right corner, which is easier to find in line 54)
export JAVA_HOME=${JAVA_HOME}
Change to
export JAVA_HOME=/usr/local/jdk8
And remove the comments, remember to save Oh

7. Set Hadoop environment variables
sudo gedit /home/ubuntu/.bashrc #Here ubuntu is my account name
Append at the end
export HADOOP_HOME=/usr/local/hadoop
export CLASSPATH=.:{JAVA_HOME}/lib:${HADOOP_HOME}/sbin:$PATH
export PATH=.:${HADOOP_HOME}/bin:${HADOOP_HOME}/sbin:$PATH
take effect
source /home/ubuntu/.bashrc #Here ubuntu is my account
6, Configure pseudo distributed environment
Modify two configuration files (core-site.xml and hdfs-site.xml)
1. Modify core-site.xml
sudo gedit /usr/local/hadoop/etc/hadoop/core-site.xml
Add the following
<configuration>

<property>
<name>hadoop.tmp.dir</name>
<value>file:/usr/local/hadoop/tmp</value>
</property>

<property>
<name>fs.defaultFS</name>
<value>hdfs://localhost:9000</value>
</property>

<configuration>
Remember to save
2. Modify hdfs-site.xml
sudo gedit /usr/local/hadoop/etc/hadoop/hdfs-site.xml
Add the following
<configuration>

<property>
<name>dfs.replication</name>
<value>1</value>
</property>

<property>
<name>dfs.namenode.name.dir</name>
<value>file:/usr/local/hadoop/tmp/dfs/name</value>
</property>

<property>
<name>dfs.datanode.data.dir</name>
<value>file:/usr/local/hadoop/tmp/dfs/data</value>
</property>

<configuration>
Remember to save
YARN is not configured here for the time being. You need to configure it yourself
3. Perform NameNode formatting
cd /usr/local/hadoop/bin
./hdfs namenode -format
The storage directory / usr / local / Hadoop / TMP / DFs / name has been successfully formatted indicates that the format is successful
4. Start all Hadoop components
cd /usr/local/hadoop/sbin
./start-all.sh
Warnings may appear during startup, which can be ignored directly without affecting normal use
5. After successful startup, you can access the Web page to view the NameNode and Datanode information, and you can also view the files in HDFS online
http: / / (own ip): 9870/
Or your own Firefox browser
localhost: 9870
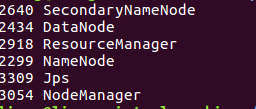
6. View Hadoop related component processes
jps
You will find the following processes
7. Close all Hadoop components
cd /usr/local/hadoop/sbin
./stop-all.sh