Install MySQL using yum or up2date for Linux
There are many ways to deploy MySQL database, including yum installation, RPM installation and compilation installation. Each installation method has its own advantages, so enterprises usually use rpm and binary installation.
Download address of database official website: https://downloads.mysql.com/archives/community/
Main features of Mysql 5.7
-
Better performance: better optimization for multi-core CPU, solid-state disk and lock. 100W QPS per second is no longer the pursuit of MySQL. Our users are more concerned about whether the next version can be loaded with 200W QPS
-
Better InnoDB storage engine
-
More robust replication function: replication brings a scheme without data loss. Traditional financial customers can also choose to use MySQL database. In addition, GTID online smooth upgrade is also possible
-
Better optimizer: the significance of optimizer code refactoring will bring great improvements in this version and later versions. Oracle is officially solving the biggest problem before MySQL
-
Support for native JSON types
-
Better geographic information service support: InnoDB native supports geographic location types, GeoJSON and GeoHash features
-
Add sys Library
yum deployment mode
Since the release of CentOS 7.0, mariadb has been used in the yum source instead of MySQL (you can check the differences between mariadb and MySQL here). Even if you enter yum install -y mysql, the installation content of mariadb is displayed. If you want to install mysql, you must use the official Yum source of mysql.
1. Write yum source configuration file
#Configure the yum source, including the epel source
	1. curl -o /etc/yum.repos.d/CentOS-Base.repo https://mirrors.aliyun.com/repo/Centos-7.repo
	2. wget -O /etc/yum.repos.d/epel.repo http://mirrors.aliyun.com/repo/epel-7.repo
	3. yum -y install vim wget
- Use the official yum warehouse
Official website download connection: https://dev.mysql.com/downloads/repo/yum/

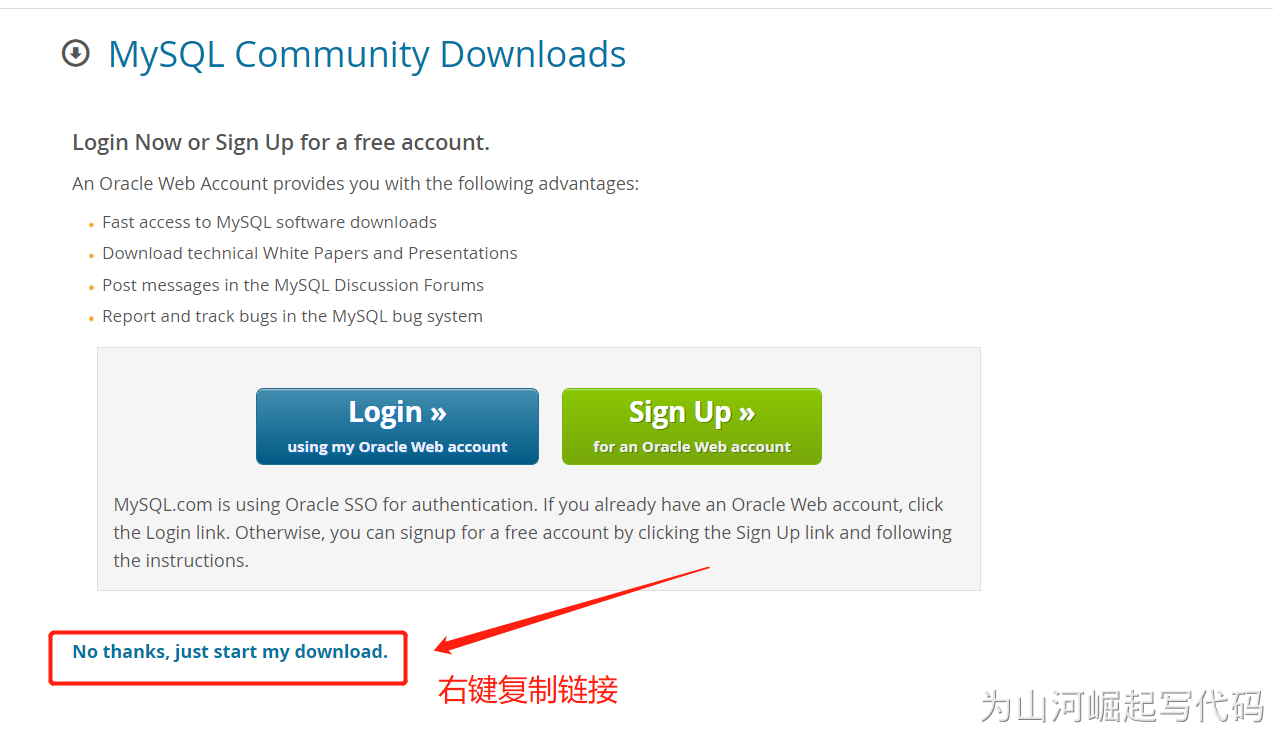
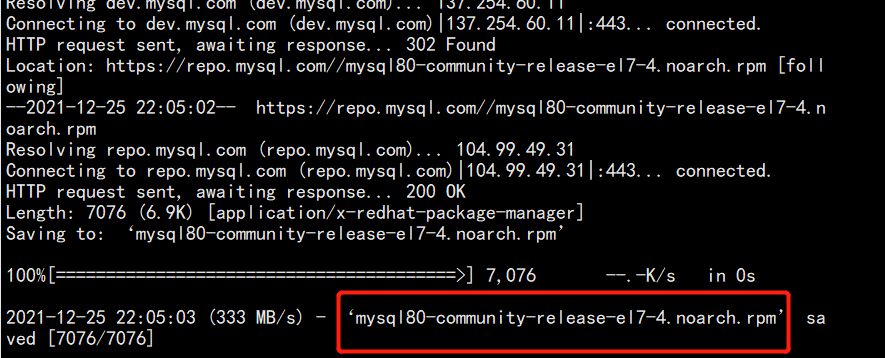
wget https://dev.mysql. com/get/mysql80-community-release-el7-4. noarch. RPM (copied link)
yum install mysql80-community-release-el7-4.noarch.rpm
2. Generate yum source cache
Every time we write, we need to generate yum cache to avoid installation errors.
1. yum makecache
3. Check if the installed yum source exists
	1. yum repolist enabled | grep mysql

Select the version installed by default. The default is 8.0 edition
 install YUM Management kit, which provides yum-config-manager Command tool
	1. yum -y install yum-utils
	2. yum-config-manager --disable mysql80-community
	3. yum-config-manager --enable mysql57-community
	4. yum repolist enabled | grep mysql

4. Install MySQL service
yum install -y mysql-community-server Then wait for installation
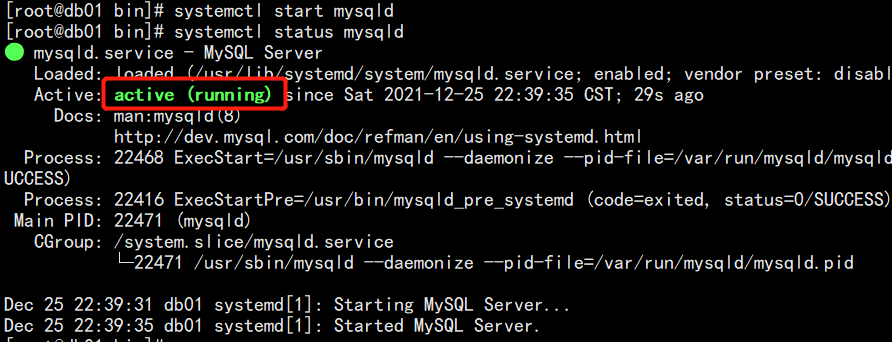
5. Start MySQL service
start-up mysqld Server
1. systemctl start mysqld
 Check to see if it starts
2. systemctl status mysqld
6. Initialization
MySQL server initialization (starting with MySQL 5.7)
When the MySQL server is initially started, if the data directory of the server is empty, the following occurs:
-
MySQL server initialized.
-
Generate SSL certificate and key files in the data directory.
-
Install and enable the validate_password plug-in.
-
A super user account 'root' @ 'localhost' will be created. The password of the super user will be set and stored in the error log file / var / log / mysqld Log.
1. grep 'temporary password' /var/log/mysqld.log

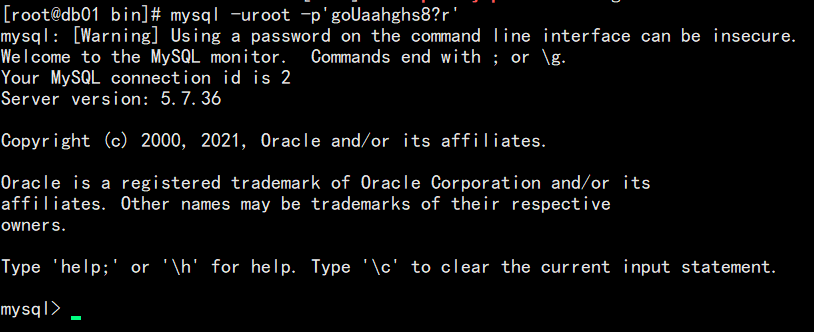
7. Try connecting and changing the default password
mysql -uroot -p'goUaahghs8?r'
# The following error occurs because the initialization password needs to be modified
1. show databases;
ERROR 1820 (HY000): You must reset your password using ALTER USER statement before executing this statement.

2. alter user   root@localhost   identified  by  '123456';
ERROR 1819 (HY000): Your password does not satisfy the current policy requirements

#Too simple passwords will fail because they do not meet the requirements of password complexity

# Change Password
1. alter user   root@localhost   identified  by  'MySQL@666';
Query OK, 0 rows affected (0.00 sec)
# Refresh permissions
2.  FLUSH PRIVILEGES;
Query OK, 0 rows affected (0.00 sec)

# To set a simpler password, you need to cancel the password complexity and edit / etc / my CNF configuration file, add the following contents in the [mysqld] configuration block (this configuration is not recommended for enterprise generation environment)
plugin-load=validate_password.so
validate-password=OFF
8. Remote connection
Remote login also requires authorization for remote login
Mysql does not allow remote login by default. We need to turn off selinux or firewall, and open port 3306 without turning off the firewall;
# Allow local user links
1. grant all privileges on *.* to root@localhost identified by 'Test123!';
 Query OK, 0 rows affected, 1 warning (0.00 sec)

# Allow any IP connection
2. grant all privileges on *.* to root@'%' identified by 'Test123!';
 Query OK, 0 rows affected, 1 warning (0.00 sec)
Add iptables rules for opening 3306 ports
iptables -t filter -I INPUT -p tcp --dport 3306 -j DROP
Uninstall installed MySQL
//rpm package installation mode uninstall
 Package name: rpm -qa|grep -i mysql
 Delete command: rpm -e –nodeps Package name

//Download as yum or up2date
1.View installed mysql
 Command: rpm -qa | grep -i mysql
2.uninstall mysql
 Command: yum remove mysql-community-server-5.6.36-2.el7.x86_64
 see mysql Other dependencies: rpm -qa | grep -i mysql

//Unload dependency
yum remove mysql-libs
yum remove mysql-server
yum remove perl-DBD-MySQL
yum remove mysql